Carrier RG10L3 Manualul proprietarului
- Tip
- Manualul proprietarului

REMOTE CONTROLLER
OWNER’S MANUAL

Table of Contents
Remote Controller Specifications
......................................................02
Handling the Remote Controller ....................................................03
Buttons and Functions ...................................................................04
Remote Screen Indicators ..............................................................06
How to Use Basic Functions ..........................................................06
How to Use Advanced Functions ..................................................09
01

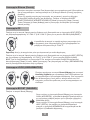
NOT SURE WHAT A FUNCTION DOES?
Refer to the How to Use Basic Functions and How to Use Advanced Functions sections
of this manual for a detailed description of how to use your air conditioner.
SPECIAL NOTE
• Button designs on your unit may differ slightly from the example shown.
If the indoor unit does not have a particular function, pressing that function’s button on
the remote control will have no effect.
When there are wide differentces between “Remote controller Manual” and “USER’S
MANUAL” on function description, the description of “USER’S MANUAL” shall prevail.
•
•
02
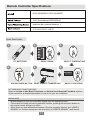
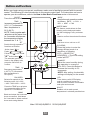
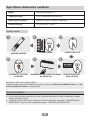
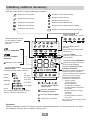
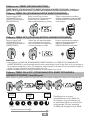
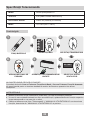
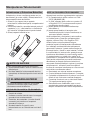
Remote Controller Specifications
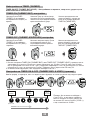
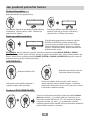
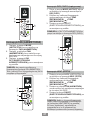
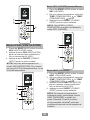
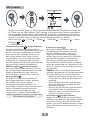
Quick Start Guide
RG10L3(2HS)/BGEFU1,RG10L3(2HS)/BGEF
maximun 8m (vertical distance )
3.0V( Dry batteries R03/LR03×2)
-5°C~60°C(23°F~140°F)
FIT BATTERIES
POINT REMOTE TOWARD UNIT
PRESS POWER BUTTON
SELECT MODE SELECT TEMPERATURE
SELECT FAN SPEED
1
6
2
5 4
My ModeFollow Me LED Turbo
Ioniser
Swing
Timer
Self Clean
Mode On/Off Fan
Sleep
AUTO
COOL
DRY
HEAT
FAN
HIGH
MED
LOW
SET TEMPERATURE
3
AUTO
COOL
DRY
HEAT
FAN
AU-100%

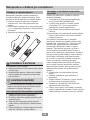
TIPS FOR USING REMOTE CONTROL
NOTES FOR USING REMOTE CONTROL
• The remote control must be used within 8
meters of the unit.
The unit will beep when remote signal is
received.
Curtains, other materials and direct sunlight
can interfere with the infrared signal receiver.
Remove batteries if the remote will not be
used more than 2 months.
•
•
•
•
•
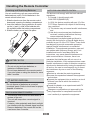
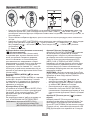
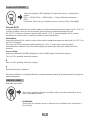
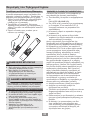
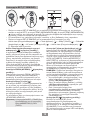
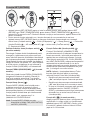
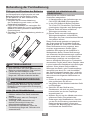
Inserting and Replacing Batteries
Your air conditioning unit may come with two
batteries(some units). Put the batteries in the
remote control before use.
1.
Slide the back cover from the remote control
downward, exposing the battery compartment.
Insert the batteries, paying attention to match
up the (+) and (-) ends of the batteries with
the symbols inside the battery compartment.
Slide the battery cover back into place.
2.
3.
BATTERY NOTES
For optimum product performance:
•
Do not mix old and new batteries, or
batteries of different types.
•
Do not leave batteries in the remote control
if you don’t plan on using the device for more
than 2 months.
BATTERY DISPOSAL
Do not dispose of batteries as unsorted
municipal waste. Refer to local laws for proper
disposal of batteries.
The device could comply with the local national
regulations.
In Canada, it should comply with
CAN ICES-3(B)/NMB-3(B).
In USA, this device complies with part 15 of the
FCC Rules. Operation is subject to the following
two conditions:
(1) This device may not cause harmful interference,
and
(2) this device must accept any interference
received, including interference that may
cause undesired operation.
This equipment has been tested and found to
comply with the limits for a Class B digital device,
pursuant to part 15 of the FCC Rules. These limits
are designed to provide reasonable protection
against harmful interference in a residential
installation. This equipment generates, uses and
can radiate radio frequency energy and, if not
installed and used in accordance with the
instructions, may cause harmful interference to
radio communications. However, there is no
guarantee that interference will not occur in a
particular installation. If this equipment does cause
harmful interference to radio or television reception,
which can be determined by turning the equipment
off and on, the user is encouraged to try to correct
the interference by one or more of the following
measures:
Reorient or relocate the receiving antenna.
Increase the separation between the equipment
and receiver.
Connect the equipment into an outlet on a circuit
different from that to which the receiver is
connected.
Consult the dealer or an experienced radio/TV
technician for help.
Changes or modifications not approved by the
party responsible for compliance could void
user’s authority to operate the equipment.
03
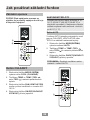
Handling the Remote Controller

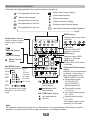
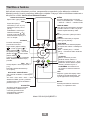
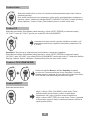
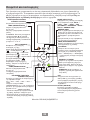
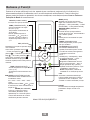
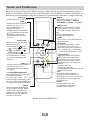
Buttons and Functions
Before you begin using your new air conditioner, make sure to familiarize yourself with its remote
control. The following is a brief introduction to the remote control itself. For instructions on how to
operate your air conditioner, refer to the How to Use Basic Functions section of this manual.
ON/OFF
Turns the unit on or off. MODE
OK
TIMER
HUMIDITY
LED
BOOST
ECO/GEAR
Scrolls through operation modes
as follows: AUTO
COOL
DRY HEAT FAN
FAN SPEED
SWING
Model:
Increases temperate in
0.5°C (1°F) increments.
Max. temperature is
30°C (86°F).
NOTE: Press together &
buttons at the same time
for 3 seconds will alternate
the temperature display
between the °C & °F.
TEMP
TEMP
04
RG10L3(2HS)/BGEFU1RG10L3(2HS)/BGEF
Used to confirm the selected functions.
Decreases temperature
in 0.5 C(1 F) increments.
OO
Min. temperature is
O O
16 C(60 F).
Turns indoor unit’s LED display
and air conditioner buzzer on
and off, which create a comfortable
and quiet environment.
Adjust the room humidity during
Dry operation in a range of
35%~85%. Press this button to
increase the humidity in 5%
increments.
NOTE: After setting, the humidity
settings will display on the screen.
Set timer to turn unit on or off
Humidity
Press this button to enter the
energy efficient mode in a
sequence of following:
ECO GEAR(75%)
GEAR(50%)
mode ECO
Selects fan speeds in the
following order:
AU
20%
60% 40% 80% 100%.
Press the TEMP or button
to increase/decrease the fan
speed in 1% increments. Enables unit to reach preset
temperature in shortest possible time.
Boost
Previous setting
SET
Scrolls through operation
functions as follows:
The selected symbol will
flash on the display area,
press the OK button to
confirm.
Starts and stops the horizontal
louver movement. Hold down
for 2 seconds to initiate vertical
louver auto swing feature.
BREEZE AWAY
This feature avoids direct air flow
blowing on the body and makes
you feel indulging in silky coolness.
Sleep( )
Follow Me( ) AP mode
.......
Fresh( )
( ) clean( )
Active
Active
clean( )

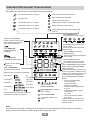
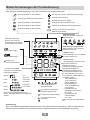
Information are displayed when the remote controller is power up.
Transmission Indicator
MODE display
TIMER ON display
FAN SPEED display
TIMER OFF display
Silence feature
display
ECO display
GEAR display
LOCK display
Horizontal louver
swing display
Vertical louver auto
swing display
TURBO mode display
Not applicalbe for
this unit
Temperature/Timer/Fan speed
display
Active clean feature display
Fresh feature display
Sleep mode display
Follow me feature display
Wireless control feature display
Low battery detection display(If flashes)
Note:
All indicators shown in the figure are for the purpose of clear presentation. But during the actaul
operation, only the relative function signs are shown on the display window.
05
Remote Screen Indicators
Displays when LOCK feature
is activated.
Silence
LOW
MED
HIGH
AUTO
Lights up when remote
sends signal to indoor
unit
Displays selected fan speed:
Displays the current
including:
mode,
2%-20%
21%-40%
41%-60%
61%-80%
81%-100%
1%
This fan speed can not be
adjusted in AUTO or DRY
mode.
Displays when ECO
feature is activated
Displays when GEAR
feature is activated
Displays the set temperature
by default, or fan speed or
timer setting when using
TIMER ON/OFF functions.
Temperature range:
oo
oo
16-30 C /60-86 F
Timer setting range:
0-24 hours
Fan speed setting range:
Humidity setting range:
AU -100%
35% -85%
This display is blank when
operating in FAN mode.
(20-28 C/68-82 F)
(Model dependent)
Breeze Away display
Not applicable for this unit
Not applicable for this unit
Not applicable for this unit
Not applicable for this unit

06
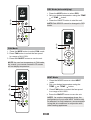
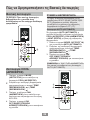
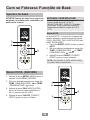
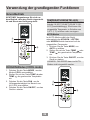
How to Use Basic Functions
ATTENTION! Before operation, please
ensure the unit is plugged in and power
is available.
AUTO Mode
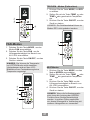
SETTING TEMPERATURE
The operating temperature range for units is
16-30°C (60-86°F)/20-28 C(68-82 F)(Model
dependent). You can increase or decrease
the set temperature in 0.5°C (1°F) increments.
In AUTO mode, the unit will automatically select
the COOL, FAN, or HEAT operation based on
the set temperature.
1. Press the MODE button to select AUTO.
2. Set your desired temperature using the TEMP
or TEMP button.
Set your desired temperature using the
TEMP or TEMP button.
3. Press the ON/OFF button to start the unit.
Press the ON/OFF button to start the unit.
NOTE: FAN SPEED can’t be set in AUTO mode.
COOL Mode
Basic operation
1. Press the MODE button to select COOL
mode.
2.
3.
Press FAN button to select the fan speed
in a range of AU-100%.
4.
1
3
2
1
3
2
4
Humidity
Boost
Humidity
Boost

07
1
3
2
1. Press the MODE button to select DRY.
Press the MODE button to select FAN mode.
2. Set your desired temperature using the TEMP
or TEMP button.
3. Press the ON/OFF button to start the unit.
Press the ON/OFF button to start the unit.
Press FAN button to select the fan speed
in a range of AU-100%.
Set your desired temperature using the
TEMP or TEMP button.
Press the ON/OFF button to start the unit.
1. Press the MODE button to select HEAT
mode.
2.
3.
Press FAN button to select the fan speed
in a range of AU-100%.
4.
4
1
3
2
1
3
2
DRY Mode (dehumidifying)
NOTE: FAN SPEED cannot be changed in DRY
mode.
HEAT Mode
NOTE: As outdoor temperature drops, the
performance of your unit’s HEAT function may
be affected. In such instances, we recommend
using this air conditioner in conjunction with
other heating appliances.
FAN Mode
1.
2.
3.
NOTE: You can’t set temperature in FAN mode.
As a result, your remote control’s LCD screen
will not display temperature.
Humidity
Boost
Humidity
Boost
Humidity
Boost

08
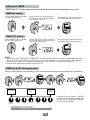
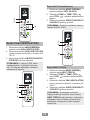
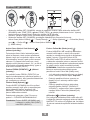
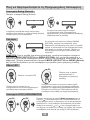
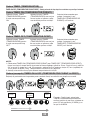
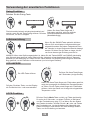
Setting the TIMER
TIMER ON setting
TIMER OFF setting
TIMER ON & OFF setting(example)
TIMER ON/OFF - Set the amount of time after which the unit will automatically turn on/off.
Press TIMER button to initiate
the ON time sequence. Press Temp. up or down button for
for multiple times to set the desired
time to turn on the unit.
Press Temp. up or down button for
for multiple times to set the desired
time to turn off the unit.
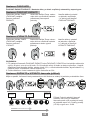
NOTE:
1. When setting the TIMER ON or TIMER OFF, the time will increase by 30 minutes increments with each
press, up to 10 hours. After 10 hours and up to 24, it will increase in 1 hour increments. (For example,
press 5 times to get 2.5h, and press 10 times to get 5h,) The timer will revert to 0.0 after 24.
2. Cancel either function by setting its timer to 0.0h.
Point remote to unit and wait 1sec,
the TIMER ON will be activated.
Press TIMER button to initiate
the OFF time sequence. Point remote to unit and wait 1sec,
the TIMER OFF will be activated.
Current
time 1PM
2:00PM 3:00PM 4PM 5PM 6PM
Timer starts Unit turns
ON
Unit turns
OFF
2.5 hours later
5 hours later
3:30PM
Example: If current timer is 1:00PM,
to set the timer as above steps, the
unit will turn on 2.5h later (3:30PM)
and turn off at 6:00PM.
ON/OFF
MODE
FAN
SHORT
CUT
TIMER ON
TIMER OF
F
TEMP
SLEEP
1sec
ON/OFF
MODE
FAN
SHORT
CUT
TIMER ON
TIMER OF
F
TEMP
SLEEP
ON/OFF
MODE
FAN
SHORT
CUT
TIMER ON
TIMER OF
F
TEMP
SLEEP
ON/OFF
MODE
FAN
SHORT
CUT
TIMER ON
TIMER OF
F
TEMP
SLEEP
1sec
x5
xn xn
x10
xn
Keep in mind that the time periods you set for both functions refer to hours after the current time.
TIMER
TIMER
TIMER
TIMER

09
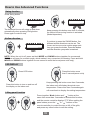
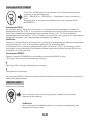
How to Use Advanced Functions
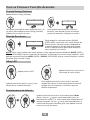
Swing function
Airflow direction
LED DISPLAY
Press Swing button
The horizontal louver will swing up and down
automatically when pressing Swing button.
Press again to make it stop.
If continue to press the SWING button, five
different airflow directions can be set. The
louver can be move at a certain range each
time you press the button. Press the button
until the direction you prefer is reached.
NOTE: When the unit is off, press and hold MODE and SWING buttons together for one second,
the louver will open for a certain angle, which makes it very convenient for cleaning. Press and hold
MODE and SWING buttons together for one second to reset the louver(some units only).
Keep pressing this button more than 2 seconds,
the vertical louver swing function is activated.
(Model dependent)
2s
Keep pressing this button more than 5 seconds,
the indoor unit will display the actual room
temperature. Press more than 5 seconds again
will revert back to display the setting temperature.
Press this button to turn on and turn off
the display on the indoor unit.
5s
Press LED button Press this button more
than 5 seconds(some units)
Swing
LED LED
Swing
Swing
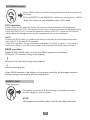
Lifting panel function
3s
3s
+
Press together Mode button and “ ” button at the
same time more than 3 seconds to activate this function,
and the remote controller displays "F2".When setting the
panel status, press the “ ” or “ ” buttons of the
remote controller to control the rise or fall of the grille,
and press any other button to exit the setting.

10
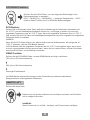
ECO/GEAR function
BREEZE AWAY
Press this button
Under cooling mode, press this button, the remote controller will adjust the temperature
automatically to 24 C/75 F, fan speed of Auto to save energy (only when the set temperature
is less than 24 C/75 F). If the set temperature is above 24 C/75 F, press the ECO button,
the fan speed will change to Auto, the set temperature will remain unchanged.
NOTE:
Pressing the ECO button, or modifying the mode or adjusting the set temperature to less
than 24 C/75 F will stop ECO operation.
Under ECO operation, the set tmeperature should be 24 C/75 F or above, it may result in
insufficient cooling. If you feel uncomfortable, just press the ECO button again to stop it.
O
O
O
O
O
O
O
O
O
O
Press X-ECO button to enter the energy efficient mode in a sequence of
following:
ECO GEAR(75%) GEAR(50%) Previous setting mode ECO......
Note:This function is only available under COOL mode
ECO operation:
GEAR operation:
Press the ECO/GEAR button to enter the GEAR operation as following:
75%(up to 75% electrial energy consumption)
50%(up to 50% electrial energy consumption)
Previous setting mode.
Under GEAR operation, the display on the remote controller will alternage between
electical energy consumption and set temperature.
This feature avoids direct air flow blowing on the body and makes
you feel indulging in silky coolness.
NTOE:
This feature is available under cool,Fan and Dry mode only.

11
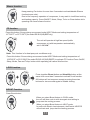
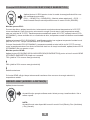
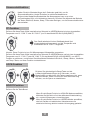
FP function
LOCK function
2s
Keep pressing Fan button for more than 2 seconds to activate/disable Silence
function(some units).
Due to low frequency operation of compressor, it may result in insufficient cooling
and heating capacity. Press ON/OFF, Mode, Sleep, Turbo or Clean button while
operating will cancel silence function.
Silence function
Fan
5s
5s
Boost
The unit will operate at high fan speed (while
compressor on) with temperature automatically
set to 8 C/46 F.
Note: This function is for heat pump air conditioner only.
2
+Press together Boost button and Humidity button at the
same time more than 5 seconds to activate Lock function.
All buttons will not response except pressing these two
buttons for two seconds again to disable locking.
BOOST Function
Press Boost button
Boost
When you select Boost feature in COOL mode,
the unit will blow cool air with strongest wind setting to
jump-start the cooling process.
When you select Boost feature in HEAT mode,
for units with Electric heat elements, the Electric HEATER
will activate and jump-start the heating process.
O O O O
Press this button 2 times during one second under HEAT Mode and setting temperature of
16 C/60 F or 20 C/68 F(for model
RG10L10(2HS)/BGEF only
).
Press this button 2 times during one second under HEAT Mode and setting temperature of
16 C/60 F or 20 C/68 F(for model RG10L10(2HS)/BGEF) to activate FP function.Press On/Off,
Sleep, Mode, Fan and Temp. button while operating will cancel this function.
Humidity

12
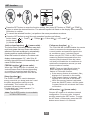
SET function
SET OK
FRESH function( ) (some units) :
Active clean function( ) (some units) :
Sleep function( ) :
AP function( )(some units) :
Follow me function( ) :
Press the SET button to enter the function setting, then press SET button or TEMP or TEMP
button to select the desired function. The selected symbol will flash on the display area, press the
OK button to confirm.
To cancel the selected function, just perform the same procedures as above.
Press the SET button to scroll through operation functions as follows:
The FOLLOW ME function enables the remote
control to measure the temperature at its
current location and send this signal to the
air conditioner every 3 minutes interval.
When using AUTO, COOL or HEAT modes,
measuring ambient temperature from the
remote control(instead of from the indoor
unit itself) will enable the air conditioner to
optimize the temperature around you and
ensure maximum comfort.
The SLEEP function is used to decrease
energy use while you sleep (and don t need
the same temperature settings to stay
comfortable). This function can only be
activated via remote control.
Note: The SLEEP function is not available
in FAN or DRY mode.
,
For the detail, see sleep operation in
USER S MANUAL.
,
,, ,
,
,,
,,
When the FRESH function is initiated, the
Ionizer/Plasma Dust Collector(depending
on models) is energized and will help to
remove pollen and impurities from the air
.
,
,
,
,
,
,
,
,
If the memory feature is stopped, Of
displays for 3 seconds on the screen.
While the memory feature is activated,
press the ON/OFF button, shift the mode
or power failure will not cancel the Follow
me function.
NOTE: Press and hold Boost button for
seven seconds to start/stop memory
feature of Follow Me function.
If the memory feature is activated, On
displays for 3 seconds on the screen.
The Active Clean Technology washes away dust,
mold, and grease that may cause odors when it
adheres to the heat exchanger by automatically
freezing and then rapidly thawing the frost.
When this function is turned on, the indoor unit
display window appears “CL”, after 20 to 45
minutes, the unit will turn off automatically and
cancel CLEAN function.
Choose AP mode to do wireless network
configuration. For some units, it doesn’t
work by pressing the SET button. To enter
the AP mode, continuously press the LED
button seven times in 10 seconds.
Active clean ( ) Fresh ( ) Sleep( ) Follow Me( ) AP mode ( )
Active clean ( )....
[ ]: Model dependent
**
*


01
Съдържание
Спецификации на дистанционното .........................................02
Работа с Дистанционното Управление ...................................03
Бутони и функции .......................................................................04
Индикатори на екрана на дистанционното ............................ 05
Как да използвате основните функции ..................................06
Как да използвате разширените функции ..............................09

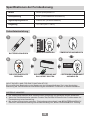
02
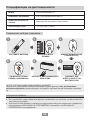
Спецификации на дистанционното
Модел RG10L3(2HS)/BGEFU1
Номинално Напрежение 3.0V (Сухи батерии R03/LR03×2)
Обхват на приемане на
сигнала Максимум 8 м (вертикално разстояние)
Заобикаляща среда -5°C~60°C(23°F~140°F)
Ръководство за бързо стартиране
1
6
2
5 4
My ModeFo
Swing
ModeOn/Off Fan
Sleep
AUTO
COOL
DRY
HEAT
FAN
HIGH
MED
LOW
SET TEMPERATURE
3
AUTO
COOL
DRY
HEAT
FAN
AU-100%
ПОСТАВЕТЕ БАТЕРИИ
НАТИСНЕТЕ БУТОНА
POWER (ЗАХРАНВАНЕ)
ИЗБЕРЕТЕ MODE
(РЕЖИМ)
НАСОЧЕТЕ ДИСТАНЦИОННОТО
КЪМ УРЕДА
ИЗБЕРЕТЕ FAN
SPEED (СКОРОСТ НА
ВЕНТИЛАТОРА)
ИЗБЕРЕТЕ EMPERATURE
(ТЕМПЕРАТУРА)
НЕ СТЕ СИГУРНИ КАКВО ПРАВИ ДАДЕНА ФУНКЦИЯ?
Обърнете се към разделите Как да използваме основни функции и Как да използваме
разширени функциив това ръководство за подробно описание как да използвате климатика
си.
СПЕЦИАЛНА БЕЛЕЖКА
● Дизайнът на бутоните на устройството ви може да се различава леко от показания пример.
● Ако устройството няма определена функция, натискането на този бутон ,на дистанционното,
това няма да има ефект.
● Когато има големи разлики в описанието на функцията между дистанционното управление,
илюстрацията и НАРЪЧНИКА НА ПОТРЕБИТЕЛЯ, описанието в „НЪРЪЧНИК НА
ПОТРЕБИТЕЛЯ“ има предимство.

03
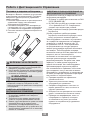
Работа с Дистанционното Управление
Поставяне и подмяна на батериите
Възможно е Вашият климатик да се доставя
с две батерии (за някои модели). Поставете
батериите в дистанционното управление
преди употреба.
1. Плъзнете задния капак от дистанционното
управление надолу, като изложите
отделението за батериите.
2. Поставете батериите, като внимавате да
съответстват на (+) и (-) края на батериите
със символите в отделението за батерии.
3. Плъзнете капака на батерията обратно на
мястото си.
БЕЛЕЖКИ ЗА БАТЕРИИТЕ
За оптимална производителност на продукта:
● Не смесвайте стари и нови батерии или
батерии от различни видове.
● Не оставяйте батериите в дистанционното,
когато не планирате да използвате уреда
за повече от 2 месеца.
ИЗХВЪРЛЯНЕ НА
БАТЕРИИТЕ
Не изхвърляйте батериите като несортирани
общински отпадъци. Обърнете се към
местните закони за правилното изхвърляне
на батериите.
СЪВЕТИ ЗА ИЗПОЛЗВАНЕ НА
ДИСТАНЦИОННО УПРАВЛЕНИЕ
● Дистанционното управление трябва да
се използва в рамките на 8 метра от
устройството.
● Устройството ще издава звуков сигнал,
когато е получен дистанционен сигнал.
● Завеси, други материали и пряка слънчева
светлина могат да възпрепятстват
приемника на инфрачервения сигнал.
● Извадете батериите, ако устройството за
дистанционно управление не се използва
повече от 2 месеца.
ЗАБЕЛЕЖКИ ОТНОСНО ИЗПОЛЗВАНЕ НА
ДИСТАНЦИОННОТО УПРАВЛЕНИЕ
Устройството може да отговаря на местните
национални разпоредби.
● В Канада тя трябва да съответства на CAN
ICES-3(B)/NMB-3(B).
● В САЩ това устройство отговаря на част
15 от правилата на FCC. Операцията е
предмет на следните две условия:
(1) това устройство няма да причинява вредни
смущения и
(2) това устройство трябва да приема
смущения, включително смущения, които
могат да причинят нежелана работа.
Това оборудване е тествано и е установено,
че отговаря на ограниченията за цифрово
устройство от клас B, съгласно част 15
от Правилата на FCC. Тези ограничения
са предназначени да осигурят разумна
защита срещу вредни смущения в жилищна
инсталация. Това оборудване генерира,
използва и може да излъчва радиочестотна
енергия и, ако не е инсталирано и
използвано в съответствие с инструкциите,
може да причини вредни смущения в
радиокомуникациите. Въпреки това, няма
гаранция, че няма да има смущения в
дадена инсталация. Ако това оборудване
причинява вредни смущения в радиото
или телевизионното приемане, което може
да се определи, като се изключи и включи
оборудването, потребителят се насърчава да
се опита да коригира смущенията чрез една
или няколко от следните мерки:
● Преориентирайте или преместете
приемната антена.
● Увеличете разстоянието между
оборудването и приемника.
● Свържете оборудването в контакт на
верига, различна от тази, към която е
свързан приемникът.
● Обърнете се към дилъра или към опитен
радио / телевизионен техник за помощ.
● Промени или модификации, които не
са одобрени от страната, отговорна
за спазването им, могат да отнемат
правото на потребителя да управлява
оборудването.

04
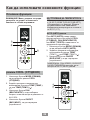
Бутони и функции
Преди да започнете да използвате новия климатик, не забравяйте да се запознаете с
дистанционното управление. Следва кратко въведение към самия дистанционно управление.
За инструкции как да работите с климатика си, вижте раздела Как да използваме основни
функции в това ръководство.
ON/OFF (ВКЛ./ИЗКЛ.)
Включва или изключва устройството.
TEMP (ТЕМП.)
Увеличава температурата на
стъпки от по 0,5°C (1°F).
Максималната температурата е
30°C (86°F).
ЗАБЕЛЕЖКА: Едновременното
натискане на бутоните &
в продължение на 3 секунди
превключва температурното
показание на дисплея между °C и
°F.
SET (НАСТРОЙКА)
Превърта през работните
функции, както следва:
Active clean (Активно почистване)
() Fresh (Свежест)( ) → Sleep
(Сън)( ) → Follow Me (Следвай
ме)( ) → AP mode (Режим „Точка
на достъп“)( )→ Active clean
(Активно почистване)( ) .
Избраният символ мига на
дисплея. Натиснете бутона OK,
за да потвърдите.
TEMP (ТЕМП.)
Намалява температурата на
стъпки от по 0,5°C (1°F).
Минималната температурата е
16°C (60°F).
FAN SPEED (СКОРОСТ НА
ВЕНТИЛАТОРА)
Избира скоростите на вентилатора в
следния ред:
AU→20%→40%→60%→ 80% → 100%.
Натиснете бутона TEMP (ТЕМП.) или
, за да увеличите/намалите скоростта
на вентилатора на стъпки от по 1%.
SWING (ЛЮЛКА)
Стартира и спира хоризонталното
движение на жалузите. Задръжте
натиснат за 2 секунди, за
да стартирате функцията
за автоматично люлеене на
вертикалните жалузи.
ECO/GEAR (ЕКО/ПРЕДАВКА)
Натиснете бутон за да активирате
енерго- спестяващ режим в
следната последователност:
ECO (EKO) → GEAR (ПРЕДАВКА)
(75%) → GEAR (ПРЕДАВКА)(50%)
→ Предишен режим на настройка
→ ECO (EKO)......
HUMIDITY (ВЛАЖНОСТ)
Регулирайте влажността на
помещението по време на режим
Dry (Изсушаване) в диапазона от
35%~85%. Натиснете този бутон,
за да увеличите влажността на
стъпки от по 5%.
БЕЛЕЖКА: След настройване,
избраната влажност ще се покаже
на екрана.
LED (ЛЕД)
Включва и изключва LED (ЛЕД)
дисплея на вътрешното тяло
и зумера на климатика, което
създава комфортна и тиха среда.
BOOST (ПОДСИЛВАНЕ)
Позволява на уреда да достигне
предварително зададена
температура за възможно най-
кратко време.
TIMER (ТАЙМЕР)
Задайте таймер за включване или
изключване на уреда
OK
Използва се за потвърждаване на
избраните функции.
BREEZE AWAY (БРИЗ)
Тази функция предотвратява
директна струя към тялото и ви кара
да се чувствате нежно охладени.
MODE (РЕЖИМ)
Превърта през режимите на работа,
както следва: AUTO (АВТО) → COOL
(СТУДЕНО) → DRY (СУХО) → HEAT
(ТОПЛО) → FAN (ВЕНТИЛАТОР)
Humidity
Boost
Модел: RG10L3(2HS)/BGEFU1

05
Индикатори на екрана на дистанционното
Информацията се показва, когато дистанционното е включено.
Не е приложимо за този уред Дисплей режим Active Clean (Актив клийн)
Дисплей бриз Дисплей режим фреш
Не е приложимо за този уред
Показва режима Sleep (Сън)
Не е приложимо за този уред
Показва функцията Follow me
(Следвайте ме)
Не е приложимо за този уред
Показание за функцията Wireless control
(WiFi контрол)
Показва засечена слаба батерия
(ако мига)
Индикаторът за
предаване светва, когато
дистанционното изпраща
сигнал към вътрешното
тяло
Дисплей TIMER ON
(ТАЙМЕР ВКЛ.)
TIMER OFF (ТАЙМЕР
ИЗКЛ.) дисплей
Показва функцията
Silence (Тишина)
FAN SPEED (СКОРОСТ НА
ВЕНТИЛАТОРА) дисплей
Показание за люлеенето на
хоризонталните жалузи
Auto (Авто) суинг дисплей
вертикален въздушен отвор
Дисплей TURBO (ТУРБО)
режим
Не е приложимо за този
уред
Показва избраната скорост на вентилатора:
Silence (Тишина)
2%-20%
1%
LOW (НИСКО)
21%-40%
MED (МЕД)
41%-60%
HIGH (ВИСОКО)
61%-80%
81%-100%
AUTO (АВТО)
Тази скорост на вентилатора не може да се
регулира в режим AUTO (АВТО) или DRY
(СУХО).
Дисплей MODE (РЕЖИМ)
Показва текущия режим,
включително:
Показание за ECO (ЕКО)
функцията (при някои модели)
Показва се, когато е активирана
функцията ECO (ЕКО).
Дисплей GEAR (ПРЕДАВКА)
Показва се, когато е
активирана функцията GEAR
(ПРЕДАВКА).
Дисплей LOCK (ЗАКЛЮЧВАНЕ)
Показва се, когато функцията
LOCK (ЗАКЛЮЧВАНЕ) е
активирана.
Дисплей Temperature/Timer/Fan speed
(Температура/Таймер/Скорост на
вентилатора)
Показва скоростта на вентилатора
по подразбиране или скоростта на
вентилатора или настройката на
таймера при използване на функции
TIMER ON/OFF (ТАЙМЕР ВКЛ./ИЗКЛ.).
• Температурен диапазон:
16-30°C/60-86°F
(20-28°C/68-82°F)
(В зависимост от модела)
• Обхват на настройката на таймера:
0-24 часа
• Диапазон за настройване
FAN SPEED (СКОРОСТ НА
ВЕНТИЛАТОРА):
AU -100%
• Обхват на настройка за влажността:
35% -85%
Този дисплей е празен, когато работите
в режим FAN (ВЕНТИЛАТОР).
Забележка:
Всички показатели, показани на фигурата, са с цел яснота на представянето. Обаче по време на
действителната операция единствено знаците за съответните функции се показват на екрана на
дисплея.

06
Как да използвате основните функции
Основни функции
ВНИМАНИЕ! Моля, уверете се преди
употреба, че уредът е включен в
контакта и че има захранване.
1
3
2
Humidity
Boost
режим COOL (СТУДЕНО)
1. Натиснете бутона MODE (РЕЖИМ),
за да изберете режим COOL
(СТУДЕНО).
2. Задайте желаната температура,
използвайки бутоните TEMP (TEMП.)
или TEMP (TEMП.) .
3. Натиснете бутона FAN
(ВЕНТИЛАТОР), за да изберете
скорост на вентилатора в диапазон от
AU-100%.
4. Натиснете бутона ON/OFF
(ВКЛ./ИЗКЛ.), за да стартирате
устройството.
НАСТРОЙВАНЕ НА ТЕМПЕРАТУРАТА
Обхватът на работната температура
е 16-30°C (60-86°F)/20-28°C(68-82°F)
( В зависимост от модела). Можете
да увеличавате или намалявате
зададената температура на стъпки от
по 0,5°C (1°F).
AUTO (АВТО) режим
При AUTO (АВТО) режим уредът
сам автоматично ще избере COOL
(СТУДЕНО), FAN (ВЕНТИЛАТОР)
или HEAT (ТОПЛО) в зависимост от
зададената температура.
1. Натиснете бутона MODE (РЕЖИМ),
за да изберете AUTO (АВТО).
2. Задайте желаната температура,
използвайки бутоните TEMP
(TEMП.) или TEMP (TEMП.) .
3. Натиснете бутона ON/OFF
(ВКЛ./ИЗКЛ.), за да стартирате
устройството.
ЗАБЕЛЕЖКА: FAN SPEED (СКОРОСТ
НА ВЕНТИЛАТОРА) не може да се
настрои в AUTO (АВТО) режим.
1
3
2
4
Humidity
Boost
Pagina se încarcă ...
Pagina se încarcă ...
Pagina se încarcă ...
Pagina se încarcă ...
Pagina se încarcă ...
Pagina se încarcă ...
Pagina se încarcă ...
Pagina se încarcă ...
Pagina se încarcă ...
Pagina se încarcă ...
Pagina se încarcă ...
Pagina se încarcă ...
Pagina se încarcă ...
Pagina se încarcă ...
Pagina se încarcă ...
Pagina se încarcă ...
Pagina se încarcă ...
Pagina se încarcă ...
Pagina se încarcă ...
Pagina se încarcă ...
Pagina se încarcă ...
Pagina se încarcă ...
Pagina se încarcă ...
Pagina se încarcă ...
Pagina se încarcă ...
Pagina se încarcă ...
Pagina se încarcă ...
Pagina se încarcă ...
Pagina se încarcă ...
Pagina se încarcă ...
Pagina se încarcă ...
Pagina se încarcă ...
Pagina se încarcă ...
Pagina se încarcă ...
Pagina se încarcă ...
Pagina se încarcă ...
Pagina se încarcă ...
Pagina se încarcă ...
Pagina se încarcă ...
Pagina se încarcă ...
Pagina se încarcă ...
Pagina se încarcă ...
Pagina se încarcă ...
Pagina se încarcă ...
Pagina se încarcă ...
Pagina se încarcă ...
Pagina se încarcă ...
Pagina se încarcă ...
Pagina se încarcă ...
Pagina se încarcă ...
Pagina se încarcă ...
Pagina se încarcă ...
Pagina se încarcă ...
Pagina se încarcă ...
Pagina se încarcă ...
Pagina se încarcă ...
-
 1
1
-
 2
2
-
 3
3
-
 4
4
-
 5
5
-
 6
6
-
 7
7
-
 8
8
-
 9
9
-
 10
10
-
 11
11
-
 12
12
-
 13
13
-
 14
14
-
 15
15
-
 16
16
-
 17
17
-
 18
18
-
 19
19
-
 20
20
-
 21
21
-
 22
22
-
 23
23
-
 24
24
-
 25
25
-
 26
26
-
 27
27
-
 28
28
-
 29
29
-
 30
30
-
 31
31
-
 32
32
-
 33
33
-
 34
34
-
 35
35
-
 36
36
-
 37
37
-
 38
38
-
 39
39
-
 40
40
-
 41
41
-
 42
42
-
 43
43
-
 44
44
-
 45
45
-
 46
46
-
 47
47
-
 48
48
-
 49
49
-
 50
50
-
 51
51
-
 52
52
-
 53
53
-
 54
54
-
 55
55
-
 56
56
-
 57
57
-
 58
58
-
 59
59
-
 60
60
-
 61
61
-
 62
62
-
 63
63
-
 64
64
-
 65
65
-
 66
66
-
 67
67
-
 68
68
-
 69
69
-
 70
70
-
 71
71
-
 72
72
-
 73
73
-
 74
74
-
 75
75
-
 76
76


Carrier RG10L3 Manualul proprietarului
- Tip
- Manualul proprietarului
Lucrări conexe
Alte documente
-
 Inventor V4MFI-24 Air Conditioning Systems Manual de utilizare
-
Tesla TM52AF21-1832IAW Manual de utilizare
-
Tesla TM36AF21-1232IA Split-type Air Conditioning Manual de utilizare
-
Gorenje KAS35NFT Manualul proprietarului
-
inVENTer RG66A/BGEF Remote Controller Manual de utilizare
-
Electrolux EXI12HD1W Manual de utilizare
-
 Nobu RG57B/BGE Manual de utilizare
-
-
LG AMNQ24GTTA0 Manual de utilizare
-
Tesla TT34TP21-1232IAWUV Manual de utilizare

