ULTIMATE SPEED ULG 3.8 A1 BATTERY CHARGER Operation and Safety Notes
- Tip
- Operation and Safety Notes

IAN 74798
CAR BATTERY CHARGER ULG 3.8 A1
KFZ-BATTERIELADEGERÄT
Bedienungs- und Sicherheitshinweise
PUNJAČ AKUMULATORA ZA AUTO
Upute za posluživanje i za Vašu sigurnost
ÎNCĂRCĂTOR BATERIE AUTO
Instrucţiuni de utilizare şi de siguranţă
ΦΟΡΤΙΣΤΗΣ ΜΠΑΤΑΡΙΑΣ ΑΥΤΟΚΙΝΗΤΟΥ
Υποδείξεις χειρισμού και ασφαλείας
CAR BATTERY CHARGER
Operation and Safety Notes

GB Operation and Safety Notes Page 5
HR Upute za posluživanje i za Vašu sigurnost Stranica 15
RO Instrucţiuni de utilizare şi de siguranţă Pagina 25
GR Υποδείξεις χειρισμού και ασφαλείας Σελίδα 35
DE / AT / CH Bedienungs- und Sicherheitshinweise Seite 45
Before reading, unfold the page containing the illustrations and familiarise yourself with all functions of the
device.
Prije nego što pročitate tekst, otvorite stranicu sa slikama i upoznajte se na osnovu toga sa svim funkcijama
uređaja.
Înainte de a citi instrucţiunile, priviţi imaginile şi familiarizaţi-vă cu toate funcţiile aparatului.
Πριν ξεκινήσετε την ανάγνωση, ανοίξτε τη σελίδα με τις εικόνες και εξοικειωθείτε με όλες τις λειτουργίες της
συσκευής.
Klappen Sie vor dem Lesen die Seite mit den Abbildungen aus und machen Sie sich anschließend mit allen
Funktionen des Gerätes vertraut.

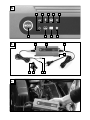
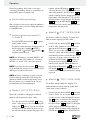
A
1 3 4 52
10
678
12
B
C
16
9
1112
15 14 13


5 GB
Table of contents
Introduction
Proper Use .....................................................................................................................Page 6
Delivery Contents ..........................................................................................................Page 6
Component description ................................................................................................Page 6
Technical Data ..............................................................................................................Page 7
Safety
Safety information .........................................................................................................Page 7
Product features.............................................................................................................Page 9
Operation
Connection ....................................................................................................................Page 9
Disconnecting ................................................................................................................Page 9
Select charging mode ................................................................................................... Page 9
Reset / deleting settings ................................................................................................. Page 10
Switching between modes 1, 2, 3 and 4 ....................................................................Page 10
Mode 1 „6 V“ (7. 3 V / 0. 8 A) ....................................................................................Page 10
Mode 2
„12 V“ (14. 4 V / 0. 8 A) ........................................................................... Page 10
Mode 3
„12 V“ (14. 4 V / 3. 8 A) .........................................................................Page 10
Mode 4
„12 V” (14. 7 V / 3. 8 A) ..........................................................................Page 11
Regenerating / charging empty (used, overcharged) 12 V batteries ........................Page 11
Protective function of the device ...................................................................................Page 11
Overheating protection ................................................................................................Page 11
Maintenance and care ...................................................................................Page 11
Service .........................................................................................................................Page 11
Warranty ................................................................................................................... Page 12
Disposal ......................................................................................................................Page 12
Declaration of conformity / Manufacturer ....................................Page 13

6 GB
Introduction / Safety
Introduction
Car battery charger ULG 3.8 A1
Q
Introduction
Please carefully read these operating
instructions and fold out the page with
the illustrations. Keep these operating
instructions in a safe place and hand them over to
anyone to whom you pass on the appliance.
Q
Proper Use
The ULTIMATE SPEED ULG 3.8 A1 is a battery
charger with a pulse trickle charge mode and is
suitable for charging and maintenance charging of
the following 6 V or 12 V lead rechargeable batter-
ies with wet cell or gel electrolyte:
• 6V:withacapacityof1.2Ahto14Ah
• 12V:withacapacityof1.2Ahto14Ah
• 12V:withacapacityof14Ahto120Ah
You can also used it to regenerate completely dis-
charged batteries. The battery charger has protective
circuits to prevent sparking and overheating. Any in-
correct or improper use leads to loss of the warranty.
The manufacturer takes no responsibility for damage
(s)
arising out of usage that is contrary to the instructions
laid down. The appliance is not meant for commer-
cial use.
Q
Delivery Contents
Check the appliance and all accessories for damage
immediately after unpacking. Do not put a defective
appliance or parts into operation.
1 Charger ULTIMATE SPEED ULG 3.8 A1
2 Quick / contact clamps (1 red, 1 black)
1 Operating manual
Q
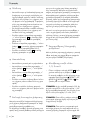
Component description
see Fig. A:
1
LED display (standby)
2
„6 V“ LED display „Mode 1“
3
LED display „Mode 2“
4
LED display „Mode 3“
5
LED display „Mode 4“
6
LED display „incorrect polarity / fault“
7
LED display „fully charged“
8
LED display „Charging process active“
9
Q
Selection button „MODE“
The following pictograms are used in these operating instructions / on the device:
Read instruction manual!
V
~
Volt (AC)
Observe caution and safety notes! Safety class II
Caution – electric shock!
Danger to life!
For indoor use only!
Risk of explosion!
Keep children away from
electrical devices!
Risk of fire!
Check that the device, mains lead
and plug are in good condition!
W
Watts (Effective power)

7 GB
Introduction / Safety
Introduction
see Fig. B:
10
Charging station
11
Mains lead
12
Mounting holes
13
„+“-Pole connection cable (red), incl. ring shoe
14
„–“-Pole connection cable (black), incl. ring shoe
15
„+“-Pole quick-contact terminal (red), incl. red
fixing screw
16
„–“-Pole quick-contact terminal (black), incl.
black fixing screw
Q
Technical Data
Input voltage: 220–230–240 V
~
50 / 60 Hz
Power consumption: 60 W
Reverse current*: < 5 mA (no AC input)
Nominal output voltage: 6 V
/ 12 V
Nominal output current: 0.8 A / 3.8 A
Charging voltage: 7.3 V or 14.4 V or 14.7 V
Charging current: 0.8 A ± 10 %
3.8 A ± 10 %
Battery type: 6 V lead-acid battery
1.2 Ah–14 Ah
12 V lead-acid battery
1.2 Ah–120 Ah
Temperature (min.): 0°C
Temperature (max.): 40°C
Housing protection type: IP 65 (dust-tight, protected
against water jets)
Safety class: II /
* = Return current is the current used by the
charging station battery, when no mains
current is connected.
Q
Safety
Safety information
DANGER! Avoid danger to life and limbs
caused by improper use!
CAUTION! Do not operate the appliance
with a damaged cable, power cord or
plug. A damaged power cord causes danger
to life by electric shock.
If damaged, have the power cord repaired by
authorised and trained technicians only! Please
contact the service department for your country!
PROTECT YOURSELF FROM
AN ELECTRIC SHOCK! When
connecting the charging station, use
a screwdriver and a spanner with an insulated
handle!
DANGER OF ELECTRIC SHOCK! Do not
operate the vehicle if you are charging a battery
while it is still in the vehicle! Switch off the igni-
tion and park the vehicle. Apply the parking
brake (e.g. in cars) or secure with a mooring
rope (e.g. electric boat)!
DANGER OF ELECTRIC SHOCK! Disconnect
the battery charger from the mains before you
make or break the connections to the battery.
- First connect the clamp that is not connected
to vehicle bodywork, then connect the other
clamp to the vehicle bodywork at a point
away from the battery and the fuel line. After
this is done, you can connect the battery
charger to the mains.
- After charging, disconnect the battery charg-
er from the mains. Then disconnect the clamp
attached to the vehicle bodywork before you
disconnect the clamp from the battery.
DANGER OF ELECTRIC SHOCK! Handle
the connecting cables („–“ and „+“) by their
insulated areas only!
DANGER OF ELECTRIC SHOCK! Ensure
that there is complete protection from moisture
at the connections to the battery and at the
mains outlet socket!
DANGER OF ELECTRIC SHOCK! Carry out
the mounting, maintenance and cleaning of the
battery charger only when it is disconnected
from mains!
DANGER OF ELECTRIC SHOCK! After
completion of the charging and maintenance
charging process on a battery mounted in a
vehicle, first disconnect the negative connection
cable (black) of the battery charger from the
negative terminal of the battery.

8 GB
Do not leave small children
unattended with the battery
charger! Children are too young
to assess the possible dangers associated with
electrical devices. Children should be supervised
in order to ensure that they do not play with
the device.
Children or persons who lack the knowledge or
experience to use the device or whose physical,
sensory or intellectual capacities are limited
must never be allowed to use the device without
supervision or instruction by a person responsi-
ble for their safety.
EXPLOSION HAZARD!
Protect yourself from a high-
ly explosive oxyhydrogen gas
reaction! Gaseous hydrogen can leak from
the battery during the charging and discharging
process. Oxyhydrogen gas is an explosive mixture
of gaseous hydrogen and oxygen. The result is
the so-called oxyhydrogen reaction upon con-
tact with open fire (flames, embers or sparks)!
Carry out the charging or discharging proce-
dure in a wellventilated room protected from
the weather. Make sure that there are no sourc-
es of open fire (flames, embers or sparks) in the
vicinity when charging or discharging batteries!
RISK OF EXPLOSION OR FIRE!
Ensure that the use of the battery
charger cannot ignite any explosive
or combustible substances, e.g. petrol or solvents!
EXPLOSIVE GASES!
AVOID FLAMES AND SPARKS! Ensure
that there is adequate ventilation during the
charging process.
Stand the battery on a well ventilated surface
while charging. Otherwise the device could be
damaged.
DANGER OF EXPLOSION! Ensure that the
positive terminal connection cable does not come
into contact with a fuel line (e.g. petrol line)!
DANGER OF CHEMICAL BURNS! Protect
your eyes and skin against chemical
burns caused by acid (sulphuric acid)
upon contact with the battery! Wear:
Acid-resistant glasses, clothing and gloves! If
your eyes or skin come into contact with sulphuric
acid, rinse the affected part of the body with
plenty of clear running water and seek immedi-
ate medical assistance!
Avoid causing an electrical short-circuit when
connecting the battery charger to the battery.
Connect the minus pole connecting cable only
to the minus pole of the battery or to the car
body. Connect the plus pole connecting cable
only to the plus pole of the battery!
Before connecting to the mains, make sure that
the mains current is equipped with standard
230 V
~
50 Hz, PEN conductor, a 16 A fuse and
a residual-current circuit-breaker! Otherwise the
device could be damaged.
Do not place the battery charger near fire, heat,
or subject it to prolonged temperatures of over
50 °C! The output from the battery charger
drops automatically in high temperatures.
Avoid damaging any lines carrying fuel, electricity
,
brake fluid, hydraulic oil or water. Be particularly
careful not to cause damage when mounting the
charger in place with screws! Failure to observe
this advice risks loss of life or injury!
Use only the supplied original manufacturer’s
parts with the battery charger!
Do not allow any objects to cover the battery
charger! Otherwise the device could be dam-
aged.
Protect the electrical contacts of the battery
against short-circuiting!
Use the battery charger only for charging and
maintenance charging of undamaged 6 V / 12 V
lead batteries (wet cell or gel electrolyte)!
Otherwise damage to property could occur.
Do not use the battery charger for charging or
maintenance charging of disposable batteries.
Otherwise damage to property could occur.
Do not use the battery charger for charging or
maintenance charging of damaged or frozen
batteries! Otherwise damage to property
could occur.
Before connecting the charging station, read
the information on battery maintenance in the
operating instructions of the battery! Otherwise
personal injury and / or damage to the device
could occur.
Before connecting the charging station to a
battery permanently installed in a vehicle, read
the information on electrical safety and mainte-
Safety / Operation
Safety

9 GB
nance in the operating instuctions of the vehicle!
Otherwise personal injury and / or damage to
the device could occur.
Unplug the charger from the mains supply when
not being used! This also benefits the environment.
Consider how much electricity is consumed,
even in standby mode.
Remain alert at all times and always watch what
you are doing. Always proceed with caution
and do not use the battery charger if you can-
not concentrate or feel unwell.
Q
Product features
This appliance has been designed for charging a
variety of SLA batteries (sealed lead acid batteries),
as mainly used in cars, motorbikes and several other
vehicles. They may be of types e.g. WET (with liquid
electrolyte), GEL (with mit gel-type electolyte) or AGM
(absorbed glass mat) batteries. A special design of
the appliance (also named „three-phase-charging
strategy“) enables the recharging of the batttery to
almost 100 % of its original capacity. Connecting
the battery for a long period to the battery charger
is also a good way of ensuring that your battery is
kept in optimum condition.
Q
Operation
Before you carry out any work
on the battery charger always pull the mains
plug out of the mains socket.
DANGER OF ELECTRIC
SHOCK! DANGER OF DAMAGE TO
PROPERTY! DANGER OF INJURY! Ensure
that you do not strike electrical cables, gas or
water pipes when you are drilling into the wall.
If necessary, check the wall using a suitable
detector before you drill.
You may find it convenient to attach the battery
charger on to a board or a wall. Screw the two
screws through the mounting holes
12
into the
board or wall.
Q
Connection
Before starting the charging or discharging
procedure on a permanently installed battery
in a vehicle, first disconnect the minus pole con-
necting cable (black) of the vehicle from the
minus pole of the battery. The minus pole of the
battery is usually connected to the car body.
Then disconect the plus pole connecting cable
(red) of the vehicle from the plus pole of the
battery.
First attach the „+“ quick-release clamp (red)
15
of the battery charger to the „+“ terminal of the
battery (see Fig. C).
Attach the „–“ quick-release clamp (black)
16
of the battery charger to the „–“ terminal of
the battery (see Fig. C).
Connect the mains lead
11
of the battery
charger to an electrical power outlet socket.
Q
Disconnecting
Disconnect the appliance from the power supply.
Detach the „–“ quick-release clamp (black)
16
from the „–“ terminal of the battery.
Detach the „+“ quick-release clamp (red)
15
from the „+“ terminal of the battery.
Reconnect the plus pole connecting cable of
the vehicle to the plus pole of the battery.
Reconnect the minus pole connecting cable of
the vehicle to the minus pole of the battery.
Q
Select charging mode
You can select different charging modes for charging
different batteries at different ambient temperatures.
In comparison with conventional battery charging
stations, this appliance has a special function for
reusing an empty battery or rechargeable battery.
You can recharge an empty battery / rechargeable
battery. Safe charging is ensured by means of a
protection function against incorrect connection and
short circuiting. Due to the installed electronics, the
charging station does not begin operation directly
after connecting the battery, but only starts after a
charging mode has been selected.
Safety / Operation
Safety

10 GB
This avoids sparking, which often occurs when
connecting. The battery charger is controlled by an
internal MCU (Micro-Computer Unit).
Q
Reset / deleting settings
After connection to the power supply, the appliance
automatically returns to its basic setting and remains
in STANDBY mode
Q
Switching between modes 1,
2, 3 and 4
Press the MODE selection button
9
the appro-
priate number of times.
The device switches between charging modes in
the following order: Standby
, MODE 1
„6 V“, MODE 2
, MODE 3 , MODE 4
and then repeats the cycle
NOTE: If a 12 V battery is connected, MODE 1 “6 V”
cannot be selected. If a 6 V battery is connected,
MODES 2, 3 and 4 “12 V” cannot be selected.
NOTE: If you press the selector button
9
, charging
mode automatically switches over to the next mode
and begins operation in that mode.
NOTE: However, if a battery is not disconnected
from the charging station after a full charge, the
appliance remains in trickle-charge mode, even if
the user switches over to another mode. This pro-
tects the battery from being damaged.
Q
Mode 1 „6 V“ (7.3 V / 0.8 A)
This mode is suitable for charging 6 V lead-acid
batteries with a capacity less than 14 Ah.
Press the selection button MODE
9
, to select
mode 1. After doing so, the corresponding LED
display „6 V“
2
lights up. If you do not activate
an-other process afterwards, the electronic sys-
tem will automatically start the charging process
together with the LED display
8
at (with a
current of) 0.8 A ± 10 %. If the procedure runs
without any problems, the LED display
8
remains on during the entire charging proc
ess,
un-
til the battery is fully charged at 7.3 V / ±
0.25 V.
When the battery is fully charged, LED display
7
lights up and LED display
8
goes
out. The device now switches automatically into
maintenance charging mode.
Q
Mode 2 „12 V“ (14.4 V / 0.8 A)
This mode is suitable for charging 12 V lead-acid
batteries with a capacity less than 14 Ah.
Press the selection button MODE
9
, to activate
mode 2. After completion of this process, the
appropriate LED indicator
3
lights up.
Then if you do not take any further action, the
electronic control and the LED indicator
8
automatically switches on and starts the charg-
ing process. If the procedure runs without any
problems, the LED display
8
remains on
during the entire charging process, until the
battery is fully charged. When the battery is
fully charged, LED display
7
lights up and
LED display
8
goes out. The device now
switches automatically into maintenance charg-
ing mode.
Q
Mode 3 „12 V“ (14.4 V / 3.8 A)
This mode is mainly suitable for charging 12 V
lead-acid batteries with a capacity greater than
14 Ah under normal conditions.
Press the selection button MODE
9
, to activate
mode 3. Then if you do not take any further ac-
tion, the electronic control and the LED indicator
4
switches on and starts the charging pro-
cess. If the process runs without any problems,
the LED indicator
8
remains on during the
whole charging process until the battery is
charged. When the battery is fully charged, the
LED indicator
7
and the die LED indicator
Operation
Operation / Maintenance and care / Service

11 GB
8
go out. The device now switches auto-
matically into maintenance charging mode.
Q
Mode 4 „12 V” (14.7 V / 3.8 A)
This mode is used for charging 12 V lead-acid bat-
teries with a capacity greater than 14 Ah under
cold conditions or for charging some AGM (Absor-
bent Glass Mat) batteries with a capacity greater
than 14 Ah.
Press the MODE selection button
9
to select
mode 4. As you select the desired mode, the
appropriate LED indicator
5
lights up im-
mediately. If you take no further action, the elec-
tronic control switches on after a preset delay
to begin the charging process. In this mode the
charging current is the same as in “mode 3”. If
the process runs without any problems, the LED
indicator
8
lights up, the electronic control
switches on and remains in this state until the
battery is charged. As soon as this point is
reached, the battery charger switches to main-
tenance charging mode. Now the LED indicator
8
goes out and the LED indicator
7
lights up to indicate the present status.
Q
Regenerating / charging
empty (used, overcharged)
12 V batteries
The battery charger detects the battery voltage au-
tomatically once the battery charger is connected
to a battery and the charging process has started.
It changes to pulse charging mode if the voltage is
in the range of 7.5 V ± 0.5 to 10.5 V ± 0.5 V.
This pulse charging process is continued until the
battery voltage has increased to 10.5 V ± 0.5 V.
As soon as this state is reached, the battery charger
switches into the normal charging mode that you
selected earlier.
Now the battery can be charged quickly and safely.
Most empty batteries can be charged and used
again using this procedure.
NOTE: The LED indicator
8
flashes during
the pulse-charging process.
Q
Protective function of the device
As soon as a deviating situation, such as short-circuit,
critical voltage drop during the charging process,
open circuit or reversed connection of the output
clamps, occurs, the battery charger switches the
electronics off and resets the system directly into the
default settings to avoid causing any damage. If you
do not activate any settings, the system will remain
in STANDBY mode. With the inverse connection of
the output clamps the LED display „incorrect polari-
ty / fault“
6
lights up additionally.
Q
Overheating protection
If the appliance becomes too hot during charging,
the power output is automatically reduced. This
protects the appliance from damage.
Q
Maintenance and care
Before you carry out any work
on the battery charger always pull the mains
plug out of the mains socket.
Do not under any circum-stances use solvents
or other aggressive cleaning agents.
The appliance is maintenance-free.
Switch off the appliance.
Clean the plastic surfaces of the device with
a dry cloth.
Q
Service
Have your device
repaired at the service centre or by
qualified specialist personnel using
original manufacturer parts only. This
will ensure that your device remains safe to use.
Operation
Operation / Maintenance and care / Service

12 GB
If the plug or lead
needs to be replaced, always have
the replacement carried out by the
manufacturer or its service centre. This
will ensure that your device remains safe to use.
Q
Warranty
The warranty for this appliance is for 3
years from the date of purchase. The ap-
pliance has been manufactured with care
and meticulously examined before deliv-
ery. Please retain your receipt as proof of
purchase. In the event of a warranty claim
,
please make contact by telephone with
our
Service Department. Only in this way can
a post-free despatch for your goods be
assured.
The warranty covers only claims for material and
maufacturing defects, but not for transport damage,
for wearing parts or for damage to fragile compo-
nents, e.g. buttons or batteries. This product is for pri-
vate use only and is not intended for commercial use.
The warranty is void in the case of abusive and im
proper
handling, use of force and internal tampering not carr
ied
out by our authorized service branch. Your statutory
rights are not restricted in any way by this warranty.
The warranty period will not be extended by repairs
made unter warranty. This applies also to replaced
and repaired parts. Any damage and defects extant
on purchase must be reported immediately after
unpacking the appliance, at the latest, two days after
the purchase date. Repairs made after the expiration
of the warranty period are subject to payment.
GB
Service Great Britain
Tel.: 0871 5000 720
(0,10 GBP/Min.)
e-mail: k[email protected]
IAN 74798
Q
Disposal
The packaging is wholly composed of envi-
ronmentally-friendly materials that can be
disposed of at a local recycling centre.
Do not dispose of electrical
appliances in household waste.
In accordance with European Directive 2002 / 96 / EC
on used electrical and electronic appliances and its
implementation in national law, used power tools
must be collected separately and
recycled in an eco-
logically compatible manner.
Please return the tool
via the available collection facilities.
Information on options for disposing of electrical
appliances after their useful life can be obtained
from your local or city council.
Disposal of batteries
As the end user you have a duty to
recycle or properly dispose of all your
used batteries. Batteries containing
environmentally polluting substances are labelled
with the adjacent symbols to indicate that they must
not be disposed of with household refuse. The ab-
breviations for the critical heavy metals are: Cd =
cadmium, Hg = mercury, Pb = lead
Take exhausted batteries to a local authority appro-
ved disposal facility or back to the retailer. By doing
this you will be complying with the legal requirements
and making an important contribution to protecting
the environment.
Declaration of conformity / Manufacturer
Service / Warranty / Disposal

13 GB
Q
Declaration of conformity /
Manufacturer
We, Kompernaß GmbH, the person responsible for
documents: Mr Semi Uguzlu, Burgstr. 21, D-44867
Bochum, Germany, hereby declare that this product
complies with the following standards, normative
documents and EU directives:
EC Low-Voltage Directive
(2006 / 95 / EC)
Electromagnetic Compatibility
(2004 / 108 / EC)
Product designation:
Car battery charger ULG 3.8 A1
Date of manufacture (DOM): 10–2012
Serial number: IAN 74798
Bochum, 31.10.2012
Semi Uguzlu
- Quality Manager -
We reserve the right to make technical modifications
in the course of product development.
Declaration of conformity / Manufacturer
Service / Warranty / Disposal

14
Popis sadržaja

15 HR
Popis sadržaja
Uvod
Uporaba u skladu sa namjenom ................................................................................ Stranica 16
Obim isporuke ............................................................................................................. Stranica 16
Opis dijelova ............................................................................................................... Stranica 16
Tehnički podaci ........................................................................................................... Stranica 17
Sigurnost
Sigurnosne upute ........................................................................................................ Stranica 17
Osobine proizvoda ..................................................................................................... Stranica 19
Rukovanje
Priključivanje ................................................................................................................ Stranica 19
Odvajanje.................................................................................................................... Stranica 19
Odabir modusa punjenja ........................................................................................... Stranica 19
Reset / brisanje postavki ............................................................................................. Stranica 20
Prespajanje između modusa 1,2, 3 i 4 ..................................................................... Stranica 20
Modus 1 „6 V“ (7,3 V / 0,8 A) ................................................................................... Stranica 20
Modus 2
„12 V“ (14,4 V / 0,8 A) ......................................................................... Stranica 20
Modus 3
„12 V“ (14,4 V / 3,8 A) ........................................................................ Stranica 20
Modus 4
„12 V“ (14,7 V / 3,8 A) ......................................................................... Stranica 21
Prazne (istrošene, prepunjene) baterije od 12 V obnoviti / napuniti ....................... Stranica 21
Zaštitna funkcija uređaja ............................................................................................ Stranica 21
Zaštita od pregrijavanja ............................................................................................. Stranica 21
Održavanje i servisiranje .......................................................................... Stranica 21
Servis .......................................................................................................................... Stranica 22
Jamstveni list........................................................................................................ Stranica 22
Zbrinjavanje ......................................................................................................... Stranica 22
Izjava o konformitetu / Proizvođač .................................................. Stranica 23

16 HR
Uvod / Sigurnost
Uvod
Punjač akumulatora za auto
ULG 3.8 A1
Q
Uvod
Molimo pažljivo pročitajte upute za ru-
kovanje, te u tu svrhu otvorite stranu sa
ilustracijama. Brižljivo sačuvajte upute
za uporabu, te je priložite kada uređaj dajete trećim
osobama.
Q
Uporaba u skladu sa namjenom
ULTIMATE SPEED ULG 3.8 A1 je uređaj za punje-
nje baterija s punjenjem zbog održavanja impulsa,
koji je prikladan za punjenje i punjenje zbog odr-
žavanja slijedećih olovnih akumulatora (baterije)
od 6 V ili 12 V, sa elektrolitskom otopinom ili gelom:
• 6V:kapacitetod1,2Ahdo14Ah
• 12V:kapacitetod1,2Ahdo14Ah
• 12V:kapacitetod14Ahdo120Ah
Nadalje možete potpuno ispražnjene baterije ob-
noviti. Uređaj za punjenje baterija opremljen je sa
zaštitnim spojem protiv stvaranja iskri ili pregrijava-
nja. Svaki nenamjenski ili nestručan način uporabe
dovodi do gubitka prava iz jamstva. Proizvođačne
preuzima odgovornost od štete nastale uslijed
korištenja uređaja protivnog njegovoj namjeni. Ure-
đaj nije namijenjen za uporabu u komercijalne svrhe.
Q
Obim isporuke
Neposredno nakon raspakiranja kontrolirajte cjelo-
kupan obim isporuke i uređaj sa svim dijelovima na
oštećenost. Defektan uređaj ili defektne dijelove ne
puštajte u pogon.
1
Uređaj za punjenje ULTIMATE SPEED ULG 3.8 A1
2 Priključni steznici za brzi kontakt
(1 crveni, 1 crni)
1 Upute za rukovanje
Q
Opis dijelova
Vidite prikaz A:
1
LED-prikaz (Pripravnost)
2
„6 V“ LED-prikaz „Modus 1“
3
LED-prikaz „Modus 2“
4
LED-prikaz „Modus 3“
5
LED-prikaz „Modus 4“
6
LED-prikaz „polni priključak / pogreška“
7
LED-prikaz „potpuno napunjen“
8
LED-prikaz „postupak punjenja aktivan“
9
Q
Gumb za odabir „MODE“
U ovim uputama za uporabu / na uređaju rabi se slijedeće prikaze:
Čitati upute za rukovanje!
V
~
Volt (Imjenični napon)
Obratiti pažnju na upozoravajuće
i sigurnosne upute!
Zaštitna klasa II
Čuvajte se strujnog udara!
Opasnost po život!
Isključivo namijenjeno za uporabu
u unutarnjim prostorijama!
Opasnost od eksplozije!
Držite djecu podalje od
električnog uređaja!
Opasnost od požara!
Materijal ambalaže i uređaj zbrinite
na način neškodljiv za okoliš!
W
W (Efektivna snaga)

17 HR
Uvod / Sigurnost
Uvod
Vidite prikaz B:
10
Uređaj za punjenje
11
Mrežni kabel
12
Bušenje za pričvršćenje
13
„–“-Polni priključni kabel (crveni),
uklj. prstenasti držač
14
„–“-Polni priključni kabel (crni),
uklj. prstenasti držač
15
„+“-Polni brzokontaktni priključni steznik
(crveni), uklj. crveni vijak za učvršćavanje
16
„–“-Polni brzokontaktni priključni steznik (crni),
uklj. crni vijak za učvršćavanje
Q
Tehnički podaci
Ulazni napon: 220–240 V
~
50 / 60 Hz
Primanje snage: 60 W
Povratna struja*: < 5 mA (bez AC-ulaza)
Nazivni izlazni
napon: 6 V
/ 12 V
Nazivna izlazna
struja: 0,8 A / 3,8 A
Napon punjenja: 7,3 V ili 14,4 V ili 14,7 V
Struja punjenja: 0,8 A ± 10 %
3,8 A ± 10 %
Tip baterije: 6 V-olovna–kiselinska–baterija
1,2 Ah–14 Ah
12 V-olovna–kiselinska–baterija
1,2 Ah–120 Ah
Temperatura (min.): 0°C
Temperatura (maks.): 40°C
Vrsta zaštite kućišta: IP 65 (nepropustno na prašinu,
zaštićeno od mlaza vode)
Zaštitna klasa: II /
* = Povratna struja označava struju, koju uređaj
za punjenje potroši iz akumulatora, kada nije
priključeno napajanje iz strujne mreže.
Q
Sigurnost
Sigurnosne upute
OPASNOST! Izbjegnite opasnost od oz-ljeđi-
vanja i opasnost po život uslijed nestručno
rukovanje uređajem!
OPREZ! Ne rukujte uređajem kada je
oštećen kabel, mrežni kabel ili mrežni
utikač. Oštećeni mrežni kabel uzrokuje opa-
snost po život uslijed strujnog udara.
J Dajte mrežni kabel j u slučaju oštećenja na
popravak isključivo ovlaštenom i obučenom
stručnom osoblju! U slučaju popravke kvara se
povežite sa servisnom ispostavom Vaše države!
J
ZAŠTITITE SE OD STRUJNOG
UDARA! Prilikom priključivanja ure-
đaja za punjenje koristite odvijače i
ključeve sa izoliranim zaštitnim rukohvatom!
J OPASNOST OD STRUJNOG UDARA!
Ako je baterija čvrsto montirana u vozilu, osi-
gurajte da vozilo nije u pogonu! Isključite elek-
trično paljenje i namjestite vozilo na poziciju
parkiranja, s nategnutom ručnom kočnicom
(npr. osobno vozilo) ili vezano konopom (npr.
električni čamac)!
J OPASNOST OD STRUJNOG UDARA!
Prije zatvaranja ili otvaranja spojeva prema bate-
riji,
odvojite uređaj za punjenje baterije od mreže.
- Priključite prvo priključnu stezaljku, koja nije
priključena na karoseriji. Priključite drugu pri-
ključnu stezaljku podalje od baterije i benzin
skog
voda na karoseriji. Tek nakon toga priključite
uređaj za punjenje baterije na opskrbnu mrežu.
- Nakon punjenja, odvojite uređaj za punjenje
baterije od opskrbne mreže. Tek nakon toga
odvojite priključnu stezaljku od karoserije.
Nakon toga odvojite priključnu stezaljku od
baterije.
J OPASNOST OD STRUJNOG UDARA!
Zahvaćajte priljučne kabele polova („–“ i „+“)
isključivo na izoliranom dijelu!
J OPASNOST OD STRUJNOG UDARA!
Obvezno spriječite bilo kakav dodir s vlagom
tijekom priključenja na bateriju i utičnicu strujne
mreže!

18 HR
Sigurnost / Rukovanje
Sigurnost
J OPASNOST OD STRUJNOG UDARA!
Instalirajte, redovito održavajte i njegujte uređaj
za punjenje baterija samo kad nije priključen na
strujnu mrežu!
J OPASNOST OD STRUJNOG UDARA!
Ako je u vozilu stalno priključena baterija, odvo-
jite nakon punjenja i punjenja zbog održavanja,
prvo priključni kabel minus pola (crno) uređaja
za punjenje baterija od minus pola baterije.
J
Ne ostavljajte djecu nikad
bez nadzora u blizini uređaja
za punjenje baterija! Djeca
nemogu ocijeniti moguću opasnost pri rukovanju
s električnim uređajima. Potrebno je nadzirati
djecu, kako se nebi igrala s uređajem.
J Djeci ili osobama, koje nemaju znanje o stroju
ili iskustvo u ophođenju s istim, ili čije su tjelesne,
senzorične ili umne sposobnosti ograničene, nije
dozvoljeno koristiti stroj, bez nadzora ili upute
od osobe koja je zadužena za njihovu sigurnost.
J
OPASNOST OD EKSPLOZIJE!
Zaštitite se od reakcije pra-
skavog plina! Plinoviti vodik može
prilikom procesa punjenja strujati iz baterije.
Praskavi plin je eksplozivna mješavina vodika i
kisika u plinovitom stanju. Prilikom kontakta sa
otvorenim izvorima plamena (plamen, žar ili
iskre) dolazi do takozvane reakcije praskavog
plina! Postupak punjenja baterije treba biti
izveden u zaštićenoj prostoriji, koja je dostatno
prozračena. Osigurajte, da prilikom postupka
punjenja baterije u blizini ne bude prisutan
izvor plamena (plamen, iskra ili žar)!
J
OPASNOST OD EKSPLOZIJE I
POŽARA! Osigurajte, da se eksplo-
zivne ili zapaljive tvari npr. benzin ili
otapala tijekom uporabe uređaja za punjenje
baterija nemogu zapaliti!
EKSPLOZIVNI
PLINOVI! IZBJEGAVAJTE STVARANJE
PLAMENA I ISKRI! Osigurajte pri punjenju
dostatno prozračivanje.
J Postavite bateriju tijekom postupka punjenja na
dostatno prozračenu površinu. Uređaj bi se
inače mogao oštetiti.
J OPASNOST OD EKSPLOZIJE! Osigurajte
da priključni kabel plus pola ne dolazi u dodir
sa vodom goriva (npr. benzinski vod)!
OPASNOST OD NAGRIZANJA! Zaštitite
oči i kožu od nagrizanja uslijed kiseline
(sum-porne) prilikom kontakta sa ba-
terijom! Rabite: zaštitne očale, odjeću i ruka-
vice otporne na kiselinu! Ukoliko oči ili koža dođu
u dodir sa sumpornom kiselinom, zahvaćeni
dio tijela isperite velikom količinom bistre vode i
neizostavno se obratite liječniku za pomoć!
J Izbjegavajte električni kratki spoj pri priključenju
uređaja za punjenje baterija na bateriju. Priključi-
te kabel za minus-pol isključivo na odgovarajući
pol (minus) akumulatora, odnosno na karoseri-
ju. Priključite kabel za plus-pol isključivo na
odgovarajući pol (plus) akumulatora!
J Prije priključivanja na mrežni napon osigurajte,
da mrežna struja bude propisno opremljena sa
230 V
~
50 Hz, uzemljenim nultim provodnikom,
osiguračem od 16 A i Fi-osiguračem (zaštitnim
osiguračem)! Uređaj bi se inače mogao oštetiti.
J Ne izlažite uređaj za punjenje baterija vatri,
vrućini ili dugotrajnom utjecaju temperature
iznad 50 °C! Izlazna snaga uređaja za punje-
nje baterija automatski opadne na većim tem-
peraturama.
J Ne oštetite vodove za gorivo, struju, sustav
kočnica, hidraulike, vode, ili pri montaži uređa-
ja za punjenje baterija vijcima! Inače prijeti
opasnost po život i od ozljeda!
J Rabite uređaj za punjenje baterija isključivo sa
dostavljenim originalnim dijelovima!
J Ne prekrivajte uređaj za punjenje baterija s
predmetima! Uređaj bi se inače mogao oštetiti
J Zaštitite površine električnih kontakata od
kratkog spoja!
J Rabite uređaj za punjenje baterija isključivo za
punjenje i punjenje zbog održavanja neošteće-
nih olovnih baterija od 6 V / 12 V (s elektrolitskom
otopinom ili gelom)! U suprotnom slučaju moglo
bi prouzročiti materijalnu štetu.
J Ne rabite uređaj za punjenje baterija za punje-
nje i punjenje zbog održavanja baterija koje
se puni ponovo. U suprotnom slučaju moglo bi
prouzročiti materijalnu štetu.
J Ne rabite uređaj za punjenje baterija za punje-
nje i punjenje zbog održavanja oštećene ili
zamrznute baterije! U suprotnom slučaju moglo
bi prouzročiti materijalnu štetu.

19 HR
Sigurnost / Rukovanje
Sigurnost
J Prije priključivanja uređaja za punjenje se
informirajte o servisiranju akumulatora, i to na
temelju njegovih uputa za rukovanje! Inače pri-
jeti opasnost od ozljede i / ili opasnost, da se
ošteti uređaj.
J Prije priključivanja uređaja za punjenje na ba-
teriju stalno priključenu u vozilu se informirajte
o pridržavanju načela električne sigurnosti i
održavanja, i to na temelju uputa za rukovanje
vozilom! Inače prijeti opasnost od ozljede i / ili
opasnost, da se ošteti uređaj.
J Također iz razloga zaštite okoliša, odvojite
punjač od struje u slučaju nekorištenja! Vodite
računa o tome, da se i tijekom standby-pogona
troši struja.
J Budite uvijek pozorni i vodite računa o tome
što radite. Uvijek razumno postupajte i ne stavl-
jajte uređaj za punjenje baterija u pogon, ako
niste koncentrirani ili ako se ne osjećate dobro.
Q
Osobine proizvoda
Ovaj uređaj je koncipiran za punjenje mnoštva
SLA-akumulatora (zapečaćenih akumulatora sa
olovom i kiselinom), koji se uglavnom koriste u
osobnim automobilima, motociklima i nekim drugim
vozilima. Ovi akumulatori mogu na primjer biti
WET-akumulatori (sa tekućim elektrolitom), GEL-ba-
terije (sa elektrolitom u obliku gela) ili AGM-baterije
(sa matama, koje absorbiraju elektrolit). Posebna
koncepcija uređaja (poznata i pod nazivom “Tro-
stupanjska strategija punjenja”) omogućava ponovno
punjenje baterije gotovo do 100 % njenog kapaciteta.
Nadalje moguće je dugotrajno priključenje baterije
s uređajem za punjenje baterija, kako bi istu po
mogućnosti uvijek održavali u optimalnome stanju.
Q
Rukovanje
Prije izvođenja bilo radova
na uređaju, uvijek prethodno izvucite utikač iz
utičnice.
OPASNOST OD
STRUJNOG UDARA! OPASNOST OD
MATERIJALNE ŠTETE! OPASNOST OD
OZLJEDA! Osigurajte da ne zahvatite vod
struje, plina ili vode tijekom bušenja i uvijanja
vijaka u zid. Prije bušenja ispitajte zid pomoću
tragača vodova.
j Montirajte uređaj za punjenje baterija eventu-
alno na dasku ili zid. Za to zavijte dva vijka
kroz pričvrsne bušotine
12
na dasku ili u zid.
Q
Priključivanje
j Prije postupka punjenja i održavanja punjenja
akumulatora stalno priključenog u vozilu prvo
odvojite minus-priključni kabel (crni) vozila od
minus-pola baterije. Minus-pol baterije po pra-
vilu je povezan sa karoserijom vozila.
j Nakon toga odvojite plus-priključni kabel (crve-
ni) vozila od plus-pola baterije (akumulatora).
j Tek nakon toga prikopčajte brzokontaktnu
priključnu stezaljku „+“-pola (crveno)
15
uređaja
za punjenje baterija na „+“-pol baterije (vidite
prikaz C).
j Prikopčajte brzokontaktnu priključnu stezaljku
„-“-pola (crno)
16
uređaja za punjenje baterija
na „-“-pol baterije (vidite prikaz C).
j Priključite mrežni kabel
11
uređaja za punjenje
baterija na utičnicu.
Q
Odvajanje
j Odvojite uređaj od mrežnog napajanja.
j Skinite brzokontaktnu priključnu stezaljku „-“-
pola (crno)
16
sa „-“-pola baterije.
j Skinite brzokontaktnu priključnu stezaljku „+“-
pola (crveno)
15
sa „+“-pola baterije.
j Plus-polni priključni kabel vozila ponovo
priključite na plus-pol baterije.
j Minus-polni priključni kabel vozila ponovo
priključite na minus-pol baterije.
Q
Odabir modusa punjenja
Za punjenje različitih baterija na različitim okolnim tem-
peraturama možete birati različite moduse punjenja.
U usporedbi sa konvencionalnim uređajima za
punjenje baterija ovaj uređaj raspolaže specijalnom
funkcijom za ponovnu uporabu prazne baterije /

20 HR
Rukovanje / Održavanje i servisiranje
Rukovanje
praznog akumulatora. Potpuno ispražnjenu bateri-
ju / potpuno ispražnjen akumulator ponovo možete
napuniti. Zaštita od
pogrešnog priključivanja i krat-
kog spoja omogućava
siguran postupak punjenja.
Pomoću ugrađene elektronike uređaj za punjenje
ne stupa u pogon neposredno nakon priključivanja
baterije, nego tek nakon što je odabran modus za
punjenje.
Na taj način sprječava se nastanak iskri, koje se
često pojavljuju za vrijeme postupka priključivanja.
Nadalje uređaj za punjenje baterija upravljan je
unutarnjim MCU-om (mikro-računalska jedinica).
Q
Reset / brisanje postavki
Nakon priključivanja na mrežno napajanje uređaj
automatski prima osnovne postavke i ostaje u
STANDBY-modusu (modusu pripravnosti).
Q
Prespajanje između modusa
1,2, 3 i 4
j Pritisnite odabirnu tipku MODE
9
odgovara-
jući uzastopce.
Uređaj uključuje moduse punjenja u slijedećem
redoslijedu: spremnost
, MODE 1 „6 V“,
MODE 2
, MODE 3 , MODE 4 i po-
kreće onda slijedeći ciklus.
UPUTA: Ako se priključi bateriju od 12 V, nije
moguće odabrati MODE 1 „6 V“. Ako se priključi
bateriju od 6 V, nije moguće odabrati MODE 2, 3
i 4 „12 V“.
U
PUTA: Kada pritisnete tipku za odabir
9
, uređaj
se prebacuje na slijedeći modus punjenja i njega
izvršava.
UPUTA: Ako međutim bateriju nakon potpunog
punjenja ne odvojite od uređaja, zadržava se u
modusu za održavanje punjenja, čak i kada korisnik
odabere jedan drugi modus. To je korisno, kako
bi potpuno napunjena baterija bila zaštićena od
oštećenja.
Q
Modus 1 „6 V“ (7,3 V / 0,8 A)
Taj modus je prikladan za punjenje olovno-kiselin-
skih-baterija od 6 V s kapacitetom manjim od 14 Ah.
j Pritisnite tipku za odabir MODE
9
, da biste
pozvali modus 1. Nakon izvedbe ovog postupka
zasvijetliti će odgovarajuća LED-lampica „6 V“
2
.
Ukoliko nakon toga ne izvršite daljnje podeša-
vanje, elektronika će se zajedno sa LED-prikazom
8
uključiti i započeti postupak punjenja
sa (strujom od) 0,8 A ± 10 %. Ukoliko ovaj po-
stupak prođe bez problema, LED-prikaz
8
ostaje aktivan za vrijeme cijelog postupka pu-
njenja, sve dok baterija ne bude napunjena na
7,3 V / ± 0,25 V. Kada je baterija potpuno na-
punjena, zasvijetliti će LED-prikaz
7
, a
LED-lampica
8
se gasi. Uređaj sad automat-
ski prebacuje u modus punjenja zbog održava
nja.
Q
Modus 2 „12 V“ (14,4 V / 0,8 A)
Taj modus je prikladan za punjenje olovno-kiselin-
skih-baterija od 12 V s kapacitetom manjim od 14 Ah.
j Pritisnite tipku za odabir MODE
9
, kako biste
izabrali modus 2. Nakon izvođenja tog postupka
zasvjetljeti će odgovarajuće LED-pokazivanje
3
. Ako nakon toga ne poduzmete nikakav
drugi postupak, elektronika se zajedno sa
LED-pokazivanjem
8
automatski uključi i
pokreće postupak punjenja. Ukoliko ovaj po-
stupak prođe bez problema, LED-prikaz
8
ostaje aktivan za vrijeme cijelog postupka pu-
njenja, sve dok baterija ne bude napunjena.
Kada je baterija potpuno napunjena, zasvijetli-
ti će LED-prikaz
7
, a LED-lampica
8
se gasi. Uređaj sad automatski prebacuje u
modus punjenja zbog održavanja.
Q
M
odus 3 „12 V“ (14,4 V / 3,8 A)
Taj modus se većinom rabi za punjenje olovno-kise-
linskih-baterija od 12 V s velikim kapacitetom više od
14 Ah u normalnim uvjetima.
Pagina se încarcă...
Pagina se încarcă...
Pagina se încarcă...
Pagina se încarcă...
Pagina se încarcă...
Pagina se încarcă...
Pagina se încarcă...
Pagina se încarcă...
Pagina se încarcă...
Pagina se încarcă...
Pagina se încarcă...
Pagina se încarcă...
Pagina se încarcă...
Pagina se încarcă...
Pagina se încarcă...
Pagina se încarcă...
Pagina se încarcă...
Pagina se încarcă...
Pagina se încarcă...
Pagina se încarcă...
Pagina se încarcă...
Pagina se încarcă...
Pagina se încarcă...
Pagina se încarcă...
Pagina se încarcă...
Pagina se încarcă...
Pagina se încarcă...
Pagina se încarcă...
Pagina se încarcă...
Pagina se încarcă...
Pagina se încarcă...
Pagina se încarcă...
Pagina se încarcă...
Pagina se încarcă...
-
 1
1
-
 2
2
-
 3
3
-
 4
4
-
 5
5
-
 6
6
-
 7
7
-
 8
8
-
 9
9
-
 10
10
-
 11
11
-
 12
12
-
 13
13
-
 14
14
-
 15
15
-
 16
16
-
 17
17
-
 18
18
-
 19
19
-
 20
20
-
 21
21
-
 22
22
-
 23
23
-
 24
24
-
 25
25
-
 26
26
-
 27
27
-
 28
28
-
 29
29
-
 30
30
-
 31
31
-
 32
32
-
 33
33
-
 34
34
-
 35
35
-
 36
36
-
 37
37
-
 38
38
-
 39
39
-
 40
40
-
 41
41
-
 42
42
-
 43
43
-
 44
44
-
 45
45
-
 46
46
-
 47
47
-
 48
48
-
 49
49
-
 50
50
-
 51
51
-
 52
52
-
 53
53
-
 54
54


ULTIMATE SPEED ULG 3.8 A1 BATTERY CHARGER Operation and Safety Notes
- Tip
- Operation and Safety Notes
în alte limbi
Lucrări înrudite
-
ULTIMATE SPEED ULG 3.8 A1 Operation and Safety Notes
-
ULTIMATE SPEED ULG 3.8 B1 Operating Instructions Manual
-
-
ULTIMATE SPEED ULG 12 A2 Operation and Safety Notes
-
ULTIMATE SPEED ULGD 3.8 A1 Translation Of Original Operation Manual
-
ULTIMATE SPEED ULG 17 A1 Operation and Safety Notes
-
-
Alte documente
-
Kärcher BRC 30/15 C Carpet Extractor Instrucțiuni de utilizare
-
Windsor Saber Blade 16 Manualul proprietarului
-
-
Stanley SXAE00026 Manual de utilizare
-
Bosch C3 Operating Instructions Manual
-
Parkside IAN 75636 Instrucțiuni de utilizare
-
Eaton CEAG ZB-S Mounting And Operating Instructions
-
Vonroc BC501AC Manual de utilizare
-
-