
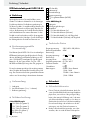
IAN 92517
CAR BATTERY CHARGER ULGD 3.8 A1
KFZ-BATTERIELADEGERÄT
Bedienungs- und Sicherheitshinweise
PUNJAČ AKUMULATORA ZA AUTO
Upute za posluživanje i za Vašu sigurnost
ÎNCĂRCĂTOR BATERIE AUTO
Instrucţiuni de utilizare şi de siguranţă
ЗАРЯДНО УСТРОЙСТВО ЗА
АВТОМОБИЛЕН АКУМУЛАТОР
Инструкции за обслужване и безопасност
CAR BATTERY CHARGER
Operation and Safety Notes
ΦΟΡΤΙΣΤΗΣ ΜΠΑΤΑΡΙΑΣ ΑΥΤΟΚΙΝΗΤΟΥ
Υποδείξει χειρισού και ασφαλεία

ЗАРЯДНО УСТРОЙСТВО ЗА
АВТОМОБИЛЕН АКУМУЛАТОР
Инструкции за обслужване и безопасност
GB Operation and Safety Notes Page 5
HR Upute za posluživanje i za Vašu sigurnost Stranica 11
RO Instrucţiuni de utilizare şi de siguranţă Pagina 17
BG Инструкции за обслужване и безопасност Страница 23
GR Υποδείξει χειρισού και ασφαλεία Σελίδα 31
DE / AT / CH Bedienungs- und Sicherheitshinweise Seite 39
Before reading, unfold the page containing the illustrations and familiarise yourself with all functions of the
device.
Prije nego što pročitate tekst, otvorite stranicu sa slikama i upoznajte se na osnovu toga sa svim funkcijama
uređaja.
Înainte de a citi instrucţiunile, priviţi imaginile şi familiarizaţi-vă cu toate funcţiile aparatului.
Преди да прочетете отворете страницата с фигурите и след това се запознайте с всички функции
на уреда.
Πριν ξεκινήσετε την ανάγνωση, ανοίξτε τη σελίδα ε τι εικόνε και εξοικειωθείτε ε όλε τι λειτουργίε τη
συσκευή.
Klappen Sie vor dem Lesen die Seite mit den Abbildungen aus und machen Sie sich anschließend mit allen
Funktionen des Gerätes vertraut.

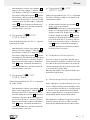
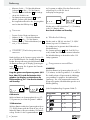
A
B
C
10
1 2 3 4
5
9 8
6
7
1415
11 12 1312
12 12
17 16


5 GB
Table of contents
Introduction
Intended use ........................................................................................................................................ Page 6
Scope of delivery ................................................................................................................................Page 6
Parts description ..................................................................................................................................Page 6
Technical Data ....................................................................................................................................Page 6
Safety
Safety instructions ................................................................................................................................Page 6
Operation
Before use ............................................................................................................................................Page 7
Connecting ..........................................................................................................................................Page 7
Disconnect ...........................................................................................................................................Page 7
Measuring Standby / Battery voltage ................................................................................................Page 8
Revitalising ...........................................................................................................................................Page 8
Programme selection ...........................................................................................................................Page 8
Programme 1 „6 V“ (7.3 V / 0.8 A) ....................................................................................................Page 8
Programme 2 „12 V“ (14.4 V / 0.8 A) ............................................................................................... Page 9
Programme 3 „12 V“ (14.4 V / 3.8 A) ...............................................................................................Page 9
Programme 4 „12 V“ (14.7 V / 3.8 A) ..............................................................................................Page 9
Retention charge .................................................................................................................................Page 9
Appliance protection function ............................................................................................................Page 9
Maintenance and care .........................................................................................................Page 9
Service ...............................................................................................................................................Page 10
Warranty .........................................................................................................................................Page 10
Disposal ............................................................................................................................................Page 10

6 GB
Safety / Operation
Introduction / Safety
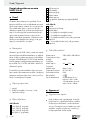
Car battery charger ULGD 3.8 A1
Introduction
We congratulate you on the purchase of your new
device. You have chosen a high quality product. The
instructions for use are part of the product. They
contain important information concerning safety,
use and disposal. Before using the product, please
familiarise yourself with all of the safety information
and instructions for use. Only use the unit as de
scribed
and for the specified applications. If you pass the
product on to anyone else, please ensure that you
also pass on all the documentation with it.
Intended use
The Ultimate Speed ULGD 3.8 A1 is a multistep car
battery charger (also called appliance in the follow-
ing) for charging and charge retention of 6 V or 12 V
lead batteries (in the following called battery in the
following). These may be the types AGM-Ca / Ca-
GEL-MF-VRLA with electrolyte solution or gel.
The manufacturer is not liable for damage caused
by improper use. The device is not intended for
commercial use. Only use indoors.
Scope of delivery
1 Charger
2 Clamps (1 red, 1 black)
1 Instructions for use
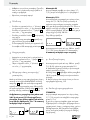
Parts description
See Figure A:
1
12 V 0.8 A-(Programme 2)
2
12 V 3.8 A-(Programme 3)
3
12 V 3.8 A-(Programme 4)
4
6 V 0.8 A-(Programme 1)
5
LED reverse connection
6
LED stand-by
7
Charge display
8
Condition display
9
Voltage display
10
Programme selection button (MODE)
See Figure B:
11
Charger
12
Fastening eyelets
13
Mains lead
14
„+“ pole clamp (red)
15
„-“ pole clamp (black)
16
„+“ pole connector cable (red) inc. lug
17
„-“ pole connector cable (black) inc. lug
Technical Data
Input voltage: 220–240 V∼ 50 / 60Hz
Rated power: 60 W
Rated voltage outgoing: 6 V
/ 12 V
Rated output current: 0.8 A / 3.8 A
Ambient temperature: 0 °C to 40 °C
Housing protection type: IP 65
Protection class: II /
Battery types: 6 V lead acid battery
1.2 Ah–14 Ah
12 V Lead acid battery
1.2 Ah–120 Ah
Safety
Safety instructions
Children or persons who lack the knowledge or
experience to use the device or whose physical,
sensory or intellectual capacities are limited m
ust
never be allowed to use the device without su-
pervision or instruction by a person responsible
for their safety.
Children should be supervised in order to en-
sure that they do not play with the appliance.
Never use the charger for
charging of non-rechargeable batteries.
During charging, place the removed battery on
a well-aired surface.
The automatic operating mode and the restric-
tions in use are explained further below in these
instructions.

7 GB
Safety / Operation
Introduction / Safety
DANGER OF ELECTRIC SHOCK!
- Do not operate the appliance if the cables,
the mains cable or mains plug are damaged.
A damaged mains cable indicates a life-threat-
ening danger due to electric shock.
Before connecting to the power, ensure that the
power connection is earthed, is 230 V∼ 50 Hz,
and is 16 A fused and equipped with an RCCB
switch (residual current circuit breaker) in accord-
ance with the current regulations!
- Disconnect the charger from the grid, before
you make or break connections to the battery.
- First, connect the clamp that is not connected
to the bodywork. Then connect the other clamp
to the bodywork, away from battery and fuel
pipe. Only after this, connect the charger to
the grid.
- After charging, disconnect the charger from
the grid. Only after this remove the clamp
from the bodywork. Following this, remove
the clamp from the battery.
DANGER OF EXPLOSION AND FIRE
HAZARD! Protect yourself from a highly ex-
plosive hydrogen-oxygen reaction!
- Ensure that during charge and charge retention
procedures, there are no naked lights (flames,
cinders or sparks)!
- Ensure that the plus cable does not come into
contact with fuel lines (e.g. petrol pipe)!
- Ensure that there is no possibility of ignition of
explosive or flammable substances, such as
petrol or solvents, while using charger!
DANGER OF CHEMICAL BURNS!
Wear protective glasses! Wear protective gloves!
If eyes or skin has come into contact with battery
acid, rinse the affected body region off with a
large amount of clean water and consult a doc-
tor straight away!
Avoid causing a short circuit when connecting
the charger to the battery. Connect the negative
pole connector cable only to the negative bat-
tery or to the body work. Connect the positive
pole connector cable only to the plus pole of
the battery!
Do not place the charger close to fire, heat or
to places with long-term exposure to tempera-
tures over 50 °C!
E
nsure that no fuel lines,electric cables, hydraulic
or water pipes are damaged by the screws dur-
ing assembly of the charger!
Do not cover the charger with any objects!
Protect the electrical contact surfaces of the
battery from short circuiting!
Only use the charger for charging and for
charge retention of 6 V / 12 V lead batteries.
Do not charge frozen batteries.
Operation
Before use
Before connecting the charger, the operating
instructions must be observed.
Furthermore, the instructions of the vehicle man-
ufacturer regarding a permanently connected
vehicle battery must be observed. Secure the
vehicle, switch off the ignition.
Clean the battery poles. Take care that while
doing so, your eyes do not come into contact
with the dirt.
Ensure sufficient ventilation.
Connecting
Connect the „+“pole clamp (red)
14
of the
charger to the „+“ pole of the battery.
Connect the „-“pole clamp (black)
15
to the
„-“ pole of the battery.
Connect the mains cable
13
of the charger to
the mains socket.
The battery voltage display
9
shows the cur-
rent battery voltage.
Should the connection of the clamps be swapped,
the LED „reverse connection“ lights up
5
.
Disconnect
Disconnect the appliance from the mains supply.
Remove the „-“ pole clamp (black)
15
from the
„-“ pole of the battery.

8 GB
Operation / Maintenance and care
Operation
Remove the „+“ pole clamp (red)
14
from the
„+“ pole of the battery.
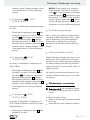
Measuring STANDBY / Battery
voltage
After connection to the grid, the appliance is on
STANDBY. The standby display
6
lights up. When
the clamps are connected, the battery voltage is
shown in the LCD (voltage display
9
). The segments
of the condition display
8
are empty.
If the voltage is below 3.8 V or above
15 V, the battery will not be charged. The
display briefly shows the error message
„Err“. The appliance goes on standby.
e®®
88.8
V
6 V battery
If the voltage range of the battery is measured as
between 3.7–7.3 V, only programme 1 can be se-
lected.
12 V batteries:
If a battery is recognised in the critical voltage
range of between 7.3–10.5 V, the appliance checks
whether a fully charged 6 V battery, or a discharged
12 V battery is present. After pressing the programme
selection button
10
to select a programme, the ap-
pliance carries out a control measurement for about
90 sec.
The display shows:
---
88.8
V
If after about 90 sec. between 7.3–7.5 V are detected
,
the 12 V battery is defective.
The appliance goes on standby.
Revitalising
If after about 90 sec. between 7.5–10.5 V are de-
tected, a 12 V battery is present.
Charging starts with a pulse charge for revitalising.
The voltage display
9
flashes. Once 10.5 V are
reached, the appliance switches to the other charge
steps.
Revitalising is the same for all the 12 V charge pro-
grammes.
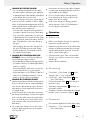
Programme selection
NOTES:
If a battery is detected in the voltage range of be-
tween 3.7–7.3 V, the programmes 2–3–4 can be
selected.
The charging process takes place automatically.
Depending on the selected programme, the char-
acteristic charge curve is monitored for voltage,
time and temperature. Included are the diagnostics
programme, revitalising mode and retention charge.
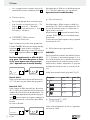
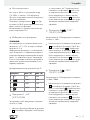
(See principle representation programme 3 Fig. C)
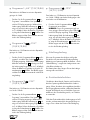
Programme max. (V) max. (A)
1
6 V 7.3 V 0.8 A
2
*
14.4 V 0.8 A
3
*
14.4 V 3.8 A
4
*
14.7 V 3.8 A
Programme 1 „6 V“
(7.3 V / 0.8 A)
For charging 6 V batteries with a capacity of less
than 14 Ah.
Press the programme selection button
10
, to se-
lect programme 1. The symbol „6 V“ is displayed
on the LCD. During charging, the charge dis-
play
7
flashes and shows the progress of the
charge procedure (1–4 bars). When the battery

9 GB
Operation / Maintenance and care
Operation
is fully charged, the condition display
8
shows
4 bars. The flashing stops and the appliance
automatically switches to retention charge.
Programme 2 „12 V“
(14.4 V / 0.8 A)
For charging 12 V batteries with a capacity of less
than 14 Ah.
Press the programme selection button
10
, to
select programme 2. The symbol
is dis-
played on the LCD. During charging, the charge
display
7
flashes and shows the progress of
the charge procedure (1–4 bars). When the
battery is fully charged, the condition display
8
shows 4 bars. The flashing stops and the appli-
ance automatically switches to retention charge.
Programme 3 „12 V“
(14.4 V / 3.8 A)
For charging 12 V batteries with a capacity of be-
tween 14 Ah–120 Ah.
Press the programme selection button
10
, to se-
lect programme 3. The symbol
is displayed
on the LCD. During charging, the charge dis-
play
7
flashes and shows the progress of the
charge procedure (1–4 bars). When the battery
is fully charged, the condition display
8
shows
4 bars. The flashing stops and the appliance
automatically switches to retention charge.
Programme 4 „12 V“
(14.7 V / 3.8 A)
For charging 12 V batteries with a capacity of be-
tween 14 Ah–120 Ah under cold conditions or for
charging AGM batteries.
Press the programme selection button
10
, to
select programme 4.
NOTE: This programme may start with a minute
delay. The symbol
is displayed on the LCD.
During charging, the charge display
7
flashes
and shows the progress of the charge proced
ure
(1–4 bars). When the battery is fully charged,
the condition display
8
shows 4 bars. The
flashing stops and the appliance automatically
switches to retention charge.
Retention charge
As described under programmes, this appliance
features the automatic retention charge. Depending
on the voltage drop of the battery, caused by self-
discharge, the appliance reacts with different charge
currents.
The battery can remain connected to the charger
for longer periods of time.
Appliance protection function
The charger switches the electronics off and switches
the system instantly to the basic setting, as soon as
there is an abnormal situation, such as short circuit,
critical voltage drop during charging, broken circuit
or swapped connection of the connector clamps is
detected.
Should the appliance become too hot during charg-
ing, the output current is automatically reduced.
This protects the appliance from damage.
Maintenance and care
Before you carry out any work
on the battery charger always pull the mains
plug out of the mains socket.
The appliance is maintenance-free.
Do not under any circum-stances use solvents
or other aggressive cleaning agents.
Clean the plastic surfaces of the device with
a dry cloth.

10 GB
Service / Warranty / Disposal
Service
Have your device
repaired at the service centre or by
qualified specialist personnel using
original manufacturer parts only. This
will ensure that your device remains safe to use.
Always have the ma-
nufacturer or his customer service ex-
change the mains cable or plug. This will
maintain the safety of the device.
Warranty
The warranty for this appliance is for 3
years from the date of purchase. The ap-
pliance has been manufactured with care
and meticulously examined before deliv-
ery. Please retain your receipt as proof
of purchase. In the event of a warranty
claim, please make contact by telephone
with our Service Department. Only in this
way can a post-free despatch for your
goods be assured.
The warranty covers only claims for material and
maufacturing defects, but not for transport damage,
for wearing parts or for damage to fragile compo-
nents, e.g. buttons or batteries. This product is for pri-
vate use only and is not intended for commercial use.
The warranty is void in the case of abusive and im-
proper handling, use of force and internal tampering
not carried out by our authorized service branch. Your
statutory rights are not restricted in any way by this
warranty.
The warranty period will not be extended by repairs
made unter warranty. This applies also to replaced
and repaired parts. Any damage and defects extant
on purchase must be reported immediately after
unpacking the appliance, at the latest, two days after
the purchase date. Repairs made after the expiration
of the warranty period are subject to payment.
GB
Service Great Britain
Tel.: 0871 5000 720
(0,10 GBP/Min.)
e-mail: kom[email protected]
IAN 92517
Disposal
The packaging is wholly composed of envi-
ronmentally-friendly materials that can be
disposed of at a local recycling centre.
Do not dispose of electrical
appliances in household waste!
In accordance with European Directive 2002 / 96 / EC
on used electrical and electronic appliances and its
implementation in national law, used power tools
must be collected separately and recycled in an
ecologically compatible manner. Please return the
tool via the available collection facilities.
Information on options for disposing of electrical
appliances after their useful life can be obtained
from your local or city council.
Popis sadržaja

11 HR
Service / Warranty / Disposal
Popis sadržaja
Uvod
Namjena ........................................................................................................................................ Stranica 12
Opseg isporuke ............................................................................................................................. Stranica 12
Opis dijelova ................................................................................................................................. Stranica 12
Tehnički podaci ............................................................................................................................. Stranica 12
Sigurnost
Sigurnosne upute .......................................................................................................................... Stranica 12
Rukovanje
Prije stavljanja u pogon ................................................................................................................ Stranica 13
Priključivanje .................................................................................................................................. Stranica 13
Odvajanje...................................................................................................................................... Stranica 14
Standby / mjerenje napona akumulatora .................................................................................... Stranica 14
Ponovno oživljavanje .................................................................................................................... Stranica 14
Izabiranje programa ..................................................................................................................... Stranica 14
1. programm 1 „6 V“ (7,3 V / 0,8 A) ........................................................................................... Stranica 14
2. program „12 V“ (14,4 V / 0,8 A) ............................................................................................. Stranica 15
3. program „12 V“ (14,4 V / 3,8 A) ............................................................................................. Stranica 15
4. program „12 V“ (14,7 V / 3,8 A) ............................................................................................. Stranica 15
Podržavanje punjenja ................................................................................................................... Stranica 15
Funkcija zaštite uređaja ................................................................................................................ Stranica 15
Održavanje i servisiranje ............................................................................................ Stranica 15
Servis ............................................................................................................................................ Stranica 16
Jamstveni list.......................................................................................................................... Stranica 16
Zbrinjavanje ........................................................................................................................... Stranica 16

12 HR
Sigurnost / Rukovanje
Uvod / Sigurnost
Punjač akumulatora za auto
ULGD 3.8 A1
Uvod
Čestitamo Vam na kupnji novog uređaja. Ovom
kupnjom odlučili ste se za visokokvalitetan proizvod.
Uputa za uporabu je sastavni dio ovog proizvoda.
Ona sadrži važne upute o sigurnosti, uporabi i
uklanjanju otpada. Prije upotrebe proizvoda upoz-
najte se sa svim njegovim uputama za korištenje i
sigurnosnim uputama. Koristite ovaj proizvod u
skladu s navedenim uputama te u navedene svrhe.
Ukoliko proizvod dajete nekoj drugoj osobi, pre-
dajte toj osobi također i sve upute.
Namjena
Ultimativni „speed“ ULGD 3.8 A1 je jedan više stu
panj-
ski punjač za automobilske akumulatore (u daljnjem
tekstu uređaj) pogodan za punjenje i podržavanje
punjenja automobilskih 6V ili 12V olovnih akumula-
tora za startanje (u daljnjem tekstu akumulator), npr.
tipovi AGM–Ca / Ca–GEL–MF-VRLA s tekućinom
elektrolita ili gelom.
Proizvođač ne preuzima nikakvu odgovornost za
štete nastale od nenamjenske upotrebe. Uređaj nije
namijenjen za komercijalne svrhe i samo je za kori-
štenje u unutrašnijm prostorijama.
Opseg isporuke
1 punjač
2 priključne stezaljke (1 crvena, 1 crna)
1 upute za korištenje
Opis dijelova
vidi sliku A:
1
12 V 0,8 A-(2. program)
2
12 V 3,8 A-(3. program)
3
12 V 3,8 A-(4. program)
4
6 V 0,8 A-(1. programm)
5
LED-obrnuti pol
6
LED-stand-by
7
prikaz punjenja
8
prikaz statusa
9
prikaz napona
10
tipka za odabiranje programa (MODE)
vidi sliku B:
11
punjač
12
rupe za pričvršćivanje
13
mrežni kabel
14
„+“-pol-priključna stezaljka (crvena)
15
„–“-pol-priključna stezaljka (crna)
16
„+“-pol-priključni kabel (crveni), uklj. prstenastu
papučicu
17
„–“-pol- priključni kabel (crni), uklj. prstenastu
papučicu
Tehnički podaci
Ulazni napon: 220–240 V∼ 50 / 60 Hz
Ocjenjena potrošnja
energije: 60 W
Ocjenjena
Izlazni napon: 6 V
/ 12 V
Ocjenjena
Izlazna struja: 0,8 A / 3,8 A
Temperatura okoline: 0 °C do 40 °C
Vrsta zaštite kućišta: IP 65
Klasa zaštite: II /
Tipovi akumulatora: 6 V akumulator-olovo–
kiselina 1,2 Ah–14 Ah
12 V akumulator-olovo-ki-
selina 1,2 Ah–120 Ah
Sigurnost
Sigurnosne upute
Ovaj uređaj ne smiju upotrebljavati osobe (uk-
ljučujući djecu) s ograničenim fzičkim, osjetilnim
ili umnim sposobnostima ili s nedovoljnim isku-
stvom i / ili znanjem osim pod nadzorom osobe
zadužene za njihovu sigurnost ili osobe koja
im daje upute kako koristiti uređaj.

13 HR
Sigurnost / Rukovanje
Uvod / Sigurnost
Djeca se moraju nadzirati, kako bi se osiguralo,
da se ne igraju uređajem.
Ne koristite punjač za
punjenje jednokratnih baterija.
Stavite izvađeni akumulator za vrijeme procesa
punjenja na dobro prozračnu površinu.
Automatski način djelovanja, kao i ograničenja
u primjeni bit će objašnjeni u nastavku ovoih
uputa za korištenje.
OPASNOST OD STRUJNOG UDARA!
- Ne koristite uređaj s oštećenim kablom, mrež-
nim kablom ili mrežnim dijelom. Oštećeni mrež-
ni kabeli mogu uzrokovati strujni udar i kao
takvi predstavljaju opasnost po život.
Uvjerite se prije priključka mrežnog kabla, da je
struja mreže opremljena s propisanim 230 V∼
50 Hz, nula uzemljenim vodom, jednim osigu-
račem od 16 A i jednom FI-sklopkom (prekidač
za zaštitu od pogrešne struje)!
- Isključite punjč iz električne mreže, prije nego
zatvorite ili otvorite priključke prema akumula-
toru.
- Najprije priključite priključnu stezaljku, koja nije
priključena na karoseriju. Priključite drugu pri-
ključnu stezaljku udaljeno od akumulatora i
voda benzina, na karoseriju. Priključite punjač
tek nakon toga na struju.
- Odvojite punjač nakon punjenja od struje.
Tek poslije toga odstranite priključne stezaljke
od karoserije. Odstranite nakon toga priključn
e
stezaljke od akumulatora.
OPASNOST OD EKSPLOZIJE I POŽARA!
Zaštitite se od vrlo eksplozivne oxyhydrogen
reakcije!
- Uvjerite se, da se kod procesa punjenja i po-
državanja punjenja ne nalazi otvoreno svjetlo
(plamen, žar ili iskre)!
- Uvjerite se, da plus pol priključnog kabla nema
kontakt prema vodu goriva (npr. vodu benzina)!
- Uvjerite se, da se zapaljive ili eksplozivne tvari,
npr. benzin ili otapala, ne mogu zapaliti za
vrijeme korištenja punjača!
OPASNOST OD OZLJEDA!
Nosite zaštitne naočale! Nosite zaštitne rukavi-
ce! Ako oči ili koža dođu u dodir s baterijskom
kiselinom, isperite dotično mjesto s mnogo čiste
tekuće vode i obratite se odmah liječniku!
Sprječite električni kratki spoj kod priključka pu-
njača na akumulator. Priključite minus pol priključ-
nog kabla isključivo na minus pol akumulatora
odnosno na karoseriju. Priključite plus-pol-priključ-
nog kabla isključivo na plus pol akumulatora!
Ne izlažite punjač blizini vatre, vrućine i dugo-
trajnog utjecaja temperature iznad 50 °C!
Ne oštetite s vijcima kod montaže punjača nika-
kve vodove za gorivo, struju, kočnice, hidrauliku
ili vodu!
Nemojte prekrivati punjač drugim predmetima!
Zaštitite električne kontakte na akumulatoru od
kratkog spoja!
Koristite punjač isključivo za proces punjenja i
održavanja punjenja na neoštećenim 6 V / 12 V
olovnim akumulatorima. Zamrznuti akumulatori
se ne smiju puniti.
Rukovanje
Prije stavljanja u pogon
Prije spajanja punjača moraju se poštivati upute
za korištenje akumulatora.
Nadalje poštivajte, propise proizvođača vozila,
kada je akumulator stalno priključen u vozilu.
Osigurajte vozilo, isključite paljenje.
Očistite polove akumulatora. Pri tome pazite
da oči ne dođu u kontakt s prljavštinom.
Vodite računa da prostorija u kojoj radite bude
dovoljno prozračena.
Priključivanje
Prikvačite „+“-pol-priključnu stezaljku (crvena)
14
punjača na „+“-pol akumulatora.
Prikvačite „–“-pol-priključne stezaljke (crna)
15
na „–“-pol akumulatora.
Priključite mrežni kabel
13
punjača na utičnicu.
Prikaz napona akumulatora
9
pokazuje tre-
nutačni napon akumulatora.
Kod obratnog priključka izlaznih stezaljki svjetli
LED-krivi pol
5
.

14 HR
Rukovanje / Održavanje i servisiranje
Rukovanje
Odvajanje
Odvojite uređaj od struje.
Skinite „–“-pol-priključne stezaljke (crna)
15
od
„–“-pola akumulatora.
Skinite „+“-pol-priključne stezaljke (crvena)
14
od „+“-pola akumulatora.
STANDBY / mjerenje napona
akumulatora
Nakon priključka na opskrbu struje uređaj je u
STANDBY-pogonu. Standby-prikaz
6
svjetli. Nap
on
akumulatora će se kod priključene priključne stezaljke
prikazati na LC-zaslonu (pokazivanje napona
9
).
Segmenti prikaza stanja
8
su prazni.
Ako izmjereni napon leži ispod 3,8 V odno-
sno iznad 15 V akumulator se neće puniti.
U zaslonu se kratko pojavi greška „Err“.
Uređaj se preklapa na Standby.
e®®
88.8
V
6 V-akumulator
Ako se na akumulatoru izmjeri napon u granicama
od 3,7–7,3 V, onda se može odabrati samo 1. pro-
gram.
12 V-akumulator:
Ako se prepozna kritično područje napona akumu-
latora od 7,3–10,5 V, uređaj provjerava dali se radi
o potpuno napunjenom 6 V akumulatoru ili jednom
praznom 12 V akumulatoru. Pritisnite tipku za izabi-
ranje programa
10
, kako bi izabrali program, uređaj
vrši cca. 90 sek jedno kontrolno mjerenje.
U zaslonu je pokazano:
---
88.8
V
Ako se nakon cca. 90 sek prepozna 7,3–7,5 V,
onda je 12 V akumulator defektan.
Uređaj se preklapa na Standby.
Ponovno oživljavanje
Ako se nakon cca. 90 sek prepozna 7,5–10,5 V,
onda predstoji 12 V akumulator.
Proces punjenja počinje pulsirajući za ponovno
oživljavanje.
Prikaz napona
9
žmiga. Dok se postigne 10,5 V,
uređaj se prebaci u daljnje stupnjeve punjenja.
Ponovno oživljavanje je identično kod svih 12 V
programa punjenja.
Izabiranje programa
NAPOMENE:
Ako se kod akumulatora prepozna područje napo-
n
a od 3,7–7,3 V, mogu se izabrati programi 2–3–4.
Napredovanje punjenja se vrši automatski. Ovisno
o odabranom programu prati se karakteristika pu-
njenja napon, vrijeme i temperatura. S programom
dijagnoze, modusom za ponovno oživljavanje i po-
državanje punjenja.
(vidi prikaz principa 3. programa slika C).
Program maks. (V) maks.
(A)
1
6 V 7,3 V 0,8 A
2
*
14,4 V 0,8 A
3
*
14,4 V 3,8 A
4
*
14,7 V 3,8 A
1. programm 1 „6 V“
(7,3 V / 0,8 A)
Za punjenje 6 V-akumulatora s jednim kapacitetom
manjim od 14 Ah.
Pritisnite tipku za izabiranje programa
10
, kako
bi izabrali 1. program. U LC -zaslonu se prika-
zuje simbol „6 V“. Za vrijeme procesa punjenja
žmiga pokazivanje punjenja
7
i pokazuje,
kako napreduje punjenje (1–4 stupca). Dok je
akumulator potpuno napunjen, prikaz stanja
8

15 HR
Rukovanje / Održavanje i servisiranje
Rukovanje
pokazuje 4 stupca. Žmiganje zaustavlja i uređaj
se automatski prebaci u modus podržavanja
punjenja.
2. program „12 V“
(14,4 V / 0,8 A)
Za punjenje 12 V-akumulatora s kapacitetom manjim
od 14 Ah.
Pritisnite tipku za izabiranje programa
10
, kako
bi izabrali 2. program. U LC-zaslonu se prikazu-
je simbol
. Za vrijeme procesa punjenja
žmiga pokazivanje punjenja
7
i pokazuje,
kako napreduje punjenje (1–4 stupca). Dok je
akumulator potpuno napunjen, prikaz stanja
8
pokazuje 4 stupca. Žmiganje zaustavlja i uređaj
se automatski prebaci u modus podržavanja
punjenja.
3. program „12 V“
(14,4 V / 3,8 A)
Za punjenje 12 V-akumulatora s kapacitetom od
14 Ah–120 Ah.
Pritisnite tipku za izabiranje programa
10
, kako
bi izabrali 3. program. U LC-zaslonu se prika-
zuje simbol
. Za vrijeme procesa punjenja
žmiga pokazivanje punjenja
7
i pokazuje,
kako napreduje punjenje (1–4 stupca). Dok je
akumulator potpuno napunjen, prikaz stanja
8
pokazuje 4 stupca. Žmiganje zaustavlja i uređaj
se automatski prebaci u modus podržavanja
punjenja.
4. program „12 V“
(14,7 V / 3,8 A)
Za punjenje 12 V-akumulatora s kapacitetom od
14 Ah–120 Ah pod hladnim uvjetim ili za punjenje
AGM-akumulatora.
Pritisnite tipku za izabiranje programa
10
, kako
bi izabrali 4. program.
UPUTA: Ovaj program počinje eventualno s
malim kašnjenjem. U LC-zaslonu se prikazuje
simbol
. Za vrijeme procesa punjenja žmiga
pokazivanje punjenja
7
i pokazuje, kako napre-
duje punjenje (1–4 stupca). Dok je akumulator
potpuno napunjen, prikaz stanja
8
pokazuje
4 stupca. Žmiganje zaustavlja i uređaj se auto-
matski prebaci u modus podržavanja punjenja.
Podržavanje punjenja
Kako je opisano u programima, uređaj posjedunje
automatsko podržavanje punjenja. Ovisno o padu
napona akumulatora –zbog samoispražnjenja –
uređaj reagira sa različitom strujom punjenja.
Akumulator može biti duže vremena priključen na
punjaču.
Funkcija zaštite uređaja
Odmah dok nastupi nenormalno stanje kao što su ko
d
kratkog spoja, kritičnog pada napona za vrijeme
punjenja, otvoreni strujni krug ili obrnuto priključiva-
nje izlaznih stezaljki, punjač isključuje elektroniku i
stavlja sustav izravno u početni položaj, kako bi se
izbjegla oštećenja.
Ako uređaj za vrijeme punjenja bude prevrući, au-
tomatski se smanjuje izlazna snaga. To štiti uređaj
od oštećenja.
Održavanje i servisiranje
Prije izvođenja bilo radova
na uređaju, uvijek prethodno izvucite utikač iz
utičnice.
Uređaj ne mora biti servisiran.
Nikako ne koristite otapala ili agresivna sredstva
za čišćenje.
Čistite plastične površine uređaja suhom krpom.

16 HR
Servis / Jamstveni list / Zbrinjavanje
Servis
Električne naprave
smiju popravljati samo ovlašteni ser-
viseri ili električari. Time ćete zadržati
sigurnost vaših uređaja.
Prepustite zamjenu
mrežne utičnice ili mrežnog kabla uvi-
jek proizvođaču ili ovlaštenom servisu.
Time ćete zadržati sigurnost Vašeg uređaja.
Jamstveni list
Na ovaj uređaj vrijedi jamstvo u trajanju
od 3 godine od datuma kupovine. Uređaj
je pažljivo proizveden i prije isporuke
brižljivo kontroliran. Molimo sačuvajte
blagajnički račun kao dokaz o kupnji.
Molimo da se u slučaju ostvarivanja prava
na jamstvo telefonski povežete sa Vašom
servisnom ispostavom. Samo na taj način
vaša roba može biti besplatno uručena.
Jamstvo vrijedi samo za greške materijala i izrade, a
ne za transportne štete, potrošne dijelove ili oštećenja
lomljivih dijelova, na primjer prekidača ili baterija.
Proizvod je namijenjen isključivo za privatnu, a ne
za gospodarstvenu uporabu.
U slučaju nestručnog rukovanja, rukovanja protivnog
namjeni uređaja, primjene sile i zahvata, koji nisu
izvršeni od strane našeg ovlaštenog servisnog pred-
stavništva, važenje jamstva prestaje. Vaša zakonska
prava ovim jamstvom ostaju netaknuta.
Jamstveni rok se ne produžava uslijed ostvarivanja
prava na jamstvo. To vrijedi i za zamijenjene i po-
pravljene dijelove. Eventualno već prilikom kupovine
prisutna oštećenja i nedostaci moraju biti javljena
neposredno nakon raspakiranja, ali najkasnije dva
dana nakon datuma kupovine. Popravke vršene nakon
isteka jamstvenog roka podliježu obavezi plaćanja.
Proizvođač:
KOMPERNASS GMBH
BURGSTRASSE 21
44867 BOCHUM
GERMANY
HR
Servis Hrvatska
Tel.: 0800 777 999
e-mail: kom[email protected]
IAN 92517
Zbrinjavanje
Pakiranje se sasvoji od materijala neš-
kodljivih za okoliš, koje možete zbrinuti
preko mjesne ustanove za recikliranje.
Električne uređaje ne
bacajte u kućno smeće!
Prema europskoj smjernici 2002 / 96 / EC o starim
električnim i elektronskim uređajima i shodno realizaci-
ji u okviru nacionalnog prava istrošeni električni uređa-
ji moraju biti odvojeno sakupljeni i vraćeni u tokove
reciklaže neškodljive za okoliš.
U pogledu mogućnosti zbrinjavanja istrošenih
električnih uređaja molimo se informirajte kod Vaše
gradske ili mjesne uprave.
Izjava o sukladnosti za ovaj proizvod dos-
tupna je na internet stranici www.lidl.hr.
Cuprins

17 RO
Servis / Jamstveni list / Zbrinjavanje
Cuprins
Introducere
Utilizare conform destinaţiei ........................................................................................................... Pagina 18
Pachet de livrare ............................................................................................................................. Pagina 18
Descrierea componentelor ............................................................................................................. Pagina 18
Date tehnice .................................................................................................................................... Pagina 18
Siguranţă
Indicaţii de siguranţă ...................................................................................................................... Pagina 18
Utilizare
Înainte de punerea în funcţiune ...................................................................................................... Pagina 19
Conectarea ...................................................................................................................................... Pagina 19
Deconectare .................................................................................................................................... Pagina 20
Standby / Măsurarea tensiunii bateriei ......................................................................................... Pagina 20
Conservarea .................................................................................................................................... Pagina 20
Selectarea programelor ................................................................................................................. Pagina 20
Programul 1 „6 V“ (7,3 V / 0,8 A) .................................................................................................. Pagina 20
Programul 2 „12 V“ (14,4 V / 0,8 A) ............................................................................................. Pagina 21
Programul 3 „12 V“ (14,4 V / 3,8 A).............................................................................................. Pagina 21
Programul 4 „12 V“ (14,7 V / 3,8 A) ............................................................................................. Pagina 21
Încărcarea de întreţinere ................................................................................................................ Pagina 21
Funcţia de protecţie a aparatului ................................................................................................... Pagina 21
Revizie şi întreţinere .......................................................................................................... Pagina 22
Service ........................................................................................................................................... Pagina 22
Garanţie ....................................................................................................................................... Pagina 22
Înlăturare .................................................................................................................................... Pagina 22

18 RO
Siguranţă / Utilizare
Introducere / Siguranţă
Î
ncărcător baterie auto ULGD 3.8 A1
Introducere
V
ă felicităm pentru achiziţia aparatului dumneavoastră.
Aţi ales un produs de înaltă calitate. Manualul de
utilizare reprezintă o parte integrantă a acestui pro-
dus. Acesta conţine informaţii importante referitoare
la siguranţă, la utilizare şi la eliminarea ca deşeu.
Înainte de utilizarea acestui produs, familiarizaţi-vă
mai întâi cu instrucţiunile de utilizare şi de siguranţă.
Folosiţi produsul numai în modul descris şi numai în
domeniile de utilizare indicate. Predaţi toate docu-
mentele aferente în cazul în care înstrăinaţi produsul.
Utilizare conform destinaţiei
Ultimate Speed ULGD 3.8 A1 este un încărcător de
baterii pentru autoturisme pe mai multe niveluri (de-
numit în continuare aparat), care este recomandat
pentru încărcarea și menţinerea încărcării bateriilor
de pornire de 6 V- sau 12 V-cu plumb (denumită în
continuarea baterie) ca de exemplu de tipul AGM –
Ca / Ca – GEL – MF-VRLA cu soluţie cu electrolit sau
cu gel.
Pentru daunele cauzate prin utilizarea neconformă
cu destinaţia, producătorul nu preia nicio răspun
dere.
Aparatul nu este recomandat uzului comercial și
este recomandat doar pentru utilizarea în spaţii in-
terioare.
Pachet de livrare
1 încărcător
2 clema de conectare(1 roșu, 1 negru)
1 manual de instrucţiuni
Descrierea componentelor
vedeţi figura A:
1
12 V 0,8 A-(program 2)
2
12 V 3,8 A-(program 3)
3
12 V 3,8 A-(program 4)
4
6 V 0,8 A-(program 1)
5
Iluminare cu LED la poli
6
LED-Stand-By
7
Afișarea nivelului de încărcare
8
Afișarea nivelului
9
Afișarea tensiunii
10
Tasta de selectare a programelor(MODE)
vedeţi figura B:
11
Încărcător
12
Alezaje de fixare
13
Cablu de reţea
14
Clema de conectare la polul „+“ (roșu)
15
Clema de conectare la polul „–“ (negru)
16
Clema de conectare la polul „+“ (roșu), incl.
papuc inelar
17
Cablu de conectare la polul „–“ (negru), incl.
papuc inelar
Date tehnice
Tensiunea de intrare: 220–240 V∼ 50 / 60 Hz
Consum de putere: 60 W
Măsurare
Tensiunea de ieșire: 6 V
/ 12 V
Măsurare
Tensiunea de ieșire: 0,8 A / 3,8 A
Temperatura ambiantă: 0 °C până la 40 °C
Tip protecţie carcasă: IP 65
Clasa de protecţie: II /
Tipuri de baterii: 6 V-baterie plub-acid
1,2 Ah–14 Ah
12 V-baterie plumb acid
1,2 Ah–120 Ah
Siguranţă
Indicaţii de siguranţă
Acest aparat poate fi utilizat de către persoane
(inclusiv copii) cu capacităţi fizice, senzoriale
sau psihice limitate sau cu lipsă de experienţă
sau de cunoştinţe doar dacă sunt supraveghea-
te de către o persoană responsabilă de siguranţa
acestora sau dacă au fost informate cu privire
la modul de utilizare a aparatului.

19 RO
Siguranţă / Utilizare
Introducere / Siguranţă
Copiii trebuie supravegheaţi pentru a nu se
juca cu dispozitivul.
Nu utilizaţi încărcătorul
pentru încărcarea bateriilor care nu sunt reîn-
cărcabile.
Așezaţi bateria scoasă pe o suprafaţă bine
aerisită în timpul procesului de încărcare.
Modul automat de acţiune precum și limitările
de utilizare vor fi explicate în acest manual de
instrucţiuni.
PERICOL DE ELECTROCUTARE!
- Nu utilizaţi apatul cu cablul, cablul de reţea
sau ștecherul deteriorate. Cablurile de curent
defecte reprezintă un pericol de moarte prin
electrocutare.
Înainte de conectarea la reţea, asiguraţi-vă că
curentul de reţea deţine 230 V∼ 50 Hz, un con-
ductor neutru legat la împământare, o siguranţă
de 16 A și un întrerupător de protecţie (întreru-
pător de protecţie contra curentului eronat)!
- Deconectaţ aparatul de la reţea înaint de a
închide sau deschide conexiunile cu bateria.
- Conectaţi clema de conectare care nu este
legată de caroserie. Conectaţi cealaltă clemă
de conectare în afara bateriei și a conductei
de benzină de pe caroserie. Conectaţi apa-
ratul după aceea la reţeaua de alimentare.
- Deconectaţi aparatul după încărcare de la
reţeaua de alimentare. Deconectaţi imediat
clema de conectare de pe caroserie. Îndepăr-
taţi apoi clema de conectare de pe baterie.
PERICOL DE EXPLOZIE ȘI INCENDIU!
Protejaţi-vă de o reacţie explozivă a gazelor!
- Asiguraţi-vă că nu există foc (flacără, cărbuni
sau scântei) la încărcare sau la menţinerea
încărcări!
- Asiguraţi-vă că cablul de conectare la polul
plus nu are contact cu conducta de alimentare
cu combustibil (conducta de benzină)!
- Asiguraţi-vă că materialele explozive sau in-
flamabile ca de ex. benzina sau soluţii infla-
mabile să nu se poată aprindă la utilizarea
încărcătorului!
PERICOL DE ARSURĂ!
Purtaţi ochelari de protecţie! Purtaţi mânuși de
protecţie! Atunci când ochii sau pielea intră în
contact cu acidul sulfuric, clătiţi zona afectată cu
multă apă curată și contactaţi imediat un medic!
Evitaţi un scurtcircuit în timpul conectării la ba-
terie a aparatului de încărcat. Conectaţi cablul
de conectare la polul minus numai la polul minus
al bateriei respectiv la caroserie. Conectaţi ca-
blul de conectare la polul plus numai la polul
plus al bateriei respectiv la caroserie.
Nu expuneţi aparatul de încărcat focului, căldu-
rii și influenţelor termice cu o temperatură ridi-
cată de peste 50 °C!
La montarea aparatului de încărcat nu deterio-
raţi nicio conductă de combustibil, electricitate,
de la instalaţia de frânare, niciun furtun hidraulic
s deau apă cu șuruburi!
Nu acoperiţi aparatul de încărcat cu obiecte!
Protejaţi suprafeţele de contact electric ale ba-
teriei contra unui scurt circuit!
Folosiţi aparatul pentru încărcat baterii doar
pentru încărcarea și conservarea sarcinii bate-
riilor de plumb de 6 V / 12 V. Bateriile îngheţate
nu au voie să fie încărcate.
Utilizare
Înainte de punerea în funcţiune
Înainte de conectarea aparatului de încărcat
baterii trebuie respectat manualul de utilizare
al bateriei.
Mai mult trebuie respectate prevederile produ-
cătorului de autovehicule în cazul unei baterii
montate anterior. Asiguraţi autoturismul, opriţi-l.
Curăţaţi polii bateriei. Aveţi grijă ca ochii să nu
intre în contact cu murdăria.
Asiguraţi o aerisire suficientă.
Conectarea
Conectaţi clema de conectare la polul „+“
(roșu)
14
al aparatului de încărcat la polul
„+“-al bateriei.
Conectaţi clema de conectare la polul „–“-Pol
(negru)
15
la polul „–“-al bateriei.
Conectaţi cablul de reţea
13
al aparatului de
încărcat la priză.
Afișarea tensiunii bateriei
9
indică tensiunea
actuală din baterie.

20 RO
Utilizare
Utilizare
La o conectare inversă a clemelor de ieșire ilu-
minează LED-ul pentru schimbarea polilor
5
.
Deconectare
Deconectaţi aparatul de la curentul de reţea.
Luaţi clema de conectare de pe polul „–“-Pol
(negru)
15
de pe polul „–“-al bateriei.
Luaţi clema de conectare la polul „+“ (roșu)
14
de la polul„+“ al bateriei.
STANDBY / Măsurarea
tensiunii bateriei
După conectarea la sursa de curent aparatul este
în modul STANDBY de funcţionare. Afișajul stand-by
se aprinde
6
. În cazul clemelor conectate se
afișează tensiunea bateriei pe ecranul LCD (afișarea
tensiunii
9
). Segmentele afilării stării
8
sunt goale.
Dacă tensiunea bateriei se află sub 3,8 V
resp. peste 15 V atunci bateria nu se încar-
că. Pe ecran apare scurt afișarea erorii
„Err“. Aparatul trece în modul Standby.
e®®
88.8
V
Baterie de 6 V
Dacă se măsoară bateria în intervalul de tensiune
3,7–7,3 V, atunci se poate selecta doar programul 1.
Baterii de 12 V:
Dacă o baterie se află în intervalul critic de tensiune
de 7,3–10,5 V atunci aparatul verifică dacă există
o baterie de 6 V încărcată sau dacă bateria de 12 V
este descărcată. Apăsaţi tasta de selectare a progra-
mului
10
pentru a selecta un program, și aparatul va
efectua o măsurare de control pentru aprox.90 de
secunde.
Pe ecran se afișează:
---
88.8
V
Dacă după aprox. 90 de sec se identifică tensiunea
7,3–7,5 V, atunci bateria de 12 V este defectă.
Aparatul trece în modul Standby.
Conservarea
Dacă după aprox. 90 de secunde se identifică o
tensiune între 7,5–10,5 V, se află o baterie de 12 V.
Procesul de încărcare începe cu o funcţionare cu
impuls pentru conservare.
Afișarea tensiunii
9
ilumnează intermitent. Dacă
s-au atins 10,5 V aparatul trece la celelalte etape
de încărcare.
Conservarea este identică pentru toate programele
de încărcare de 12 V.
Selectarea programelor
INDICAŢII:
Dacă se identifică o baterie în intervalul de tensiune
3,7–7,3 V atunci se selectează programele 2–3–4.
Procesul de încărcare are loc automat. În funcţie de
program apare linia de încărcare pentru monitori-
zarea tensiunii, duratei și temperaturii. Cu program
de diagnoză, mod de revenire și conservare a sar-
cinii.
(vedeţi descrierea principiului programul 3 fig C).
Program max. (V) max. (A)
1
6 V 7,3 V 0,8 A
2
*
14,4 V 0,8 A
3
*
14,4 V 3,8 A
4
*
14,7 V 3,8 A
Programul 1 „6 V“
(7,3 V / 0,8 A)
Pentru încărcarea bateriilor de 6 V cu o capacitate
mai mică de 14 Ah.
Pagina se încarcă...
Pagina se încarcă...
Pagina se încarcă...
Pagina se încarcă...
Pagina se încarcă...
Pagina se încarcă...
Pagina se încarcă...
Pagina se încarcă...
Pagina se încarcă...
Pagina se încarcă...
Pagina se încarcă...
Pagina se încarcă...
Pagina se încarcă...
Pagina se încarcă...
Pagina se încarcă...
Pagina se încarcă...
Pagina se încarcă...
Pagina se încarcă...
Pagina se încarcă...
Pagina se încarcă...
Pagina se încarcă...
Pagina se încarcă...
Pagina se încarcă...
Pagina se încarcă...
Pagina se încarcă...
Pagina se încarcă...
-
 1
1
-
 2
2
-
 3
3
-
 4
4
-
 5
5
-
 6
6
-
 7
7
-
 8
8
-
 9
9
-
 10
10
-
 11
11
-
 12
12
-
 13
13
-
 14
14
-
 15
15
-
 16
16
-
 17
17
-
 18
18
-
 19
19
-
 20
20
-
 21
21
-
 22
22
-
 23
23
-
 24
24
-
 25
25
-
 26
26
-
 27
27
-
 28
28
-
 29
29
-
 30
30
-
 31
31
-
 32
32
-
 33
33
-
 34
34
-
 35
35
-
 36
36
-
 37
37
-
 38
38
-
 39
39
-
 40
40
-
 41
41
-
 42
42
-
 43
43
-
 44
44
-
 45
45
-
 46
46


Ultimate ULG 3.8 A1 BATTERY CHARGER Operation and Safety Notes
- Tip
- Operation and Safety Notes
- Acest manual este potrivit și pentru
Alte documente
-
ULTIMATE SPEED ULG 3.8 A1 Operation and Safety Notes
-
ULTIMATE SPEED ULGD 3.8 A1 Translation Of Original Operation Manual
-
Stanley SXAE00026 Manual de utilizare
-
-
Hama 00136686 Manual de utilizare
-
ULTIMATE SPEED ULG 17 A1 Operation and Safety Notes
-
TMby 954501 Manual de utilizare
-
BLACK+DECKER BXAE00021 Manual de utilizare
-
ULTIMATE SPEED ULG 12 A2 Operation and Safety Notes
-
ULTIMATE SPEED ULG 3.8 A1 BATTERY CHARGER Operation and Safety Notes