Crivit 1-LD3945 Usage And Safety Instructions
- Categorie
- Monitoare de ritm cardiac
- Tip
- Usage And Safety Instructions

IAN
107990
HEART RATE MONITOR
·
1
/201
5
· Art.
-
Nr.:
1
-
LD
3
945
HEART RATE MONITOR
Usage and safety instructions
CEAS CU MĂSURARE PULS
Manual de utilizare
ЧАСОВНИК ЗА
ИЗМЕРВАНЕ НА ПУЛС
Инструкция за работа
HERZFREQUENZ-MESSUHR
Bedienungs- und Sicherheitshinweise
Usage and safety instructions................................................................... - 1 -
IndicaŃii referitoare la utilizare şi siguranŃă ......................................... - 23 -
Указания за работа и безопасност .................................................. - 46 -
Bedienungs- und Sicherheitshinweise ............................ - 71 -

- 1 -
Usage and safety instructions
Table of contents
Table of contents......................................................................................................... - 1 -
Preliminary note .......................................................................................................... - 3 -
Intended use ................................................................................................................ - 3 -
Scope of delivery ....................................................................................................... - 3 -
Technical specifications ............................................................................................. - 3 -
Features ....................................................................................................................... - 4 -
Important safety information...................................................................... - 5 -
Batteries ................................................................................................................ - 5 -
User ....................................................................................................................... - 5 -
Chest belt ..................................................................................................................... - 6 -
Wearing the chest belt ........................................................................................ - 6 -
Coded transmission ............................................................................................. - 6 -
Bicycle holder ............................................................................................................. - 7 -
Setup of the heart rate monitor.................................................................................. - 8 -
Light .............................................................................................................................. - 9 -
Important notes on the operation of the heart rate monitor ................................... - 9 -
Speed setting ........................................................................................................ - 9 -
Time and basic settings .............................................................................................. - 9 -
Second time zone ............................................................................................. - 10 -
Alarm .................................................................................................................. - 10 -
Snooze feature .................................................................................................. - 11 -
Timer (max. 23:59:00) .................................................................................... - 11 -
Stop watch ............................................................................................................... - 12 -
Memory feature ................................................................................................ - 12 -
Heart rate measurement ......................................................................................... - 12 -
Warning light .................................................................................................... - 13 -
Timer ................................................................................................................... - 14 -
- 2 -
Memory feature ................................................................................................ - 14 -
Target heart rate ............................................................................................... - 15 -
Calories, fat burn and BMI .............................................................................. - 16 -
Notes on the BMI .............................................................................................. - 16 -
Fitness ................................................................................................................. - 17 -
Troubleshooting ....................................................................................................... - 17 -
The heart rate is not shown or is shown incorrectly ....................................... - 17 -
The display is unreadable / the light does not work .................................... - 17 -
Replacing the batteries ........................................................................................... - 18 -
Replacing the watch battery ............................................................................ - 18 -
Battery low indicator ........................................................................................ - 18 -
Replacing the chest belt battery ...................................................................... - 19 -
Reset .......................................................................................................................... - 19 -
Water resistance of the heart rate monitor ........................................................... - 19 -
Water resistance of the chest belt .......................................................................... - 19 -
Cleaning instructions ............................................................................................... - 19 -
Disposal of the electronic appliance ..................................................................... - 20 -
Disposal of the batteries.......................................................................................... - 20 -
digi-tech gmbh warranty ........................................................................................ - 20 -
Warranty conditions ............................................................................................... - 20 -
Warranty period and defects liability ................................................................... - 20 -
Scope of the warranty............................................................................................. - 21 -
Warranty claim procedure ..................................................................................... - 21 -
Service ...................................................................................................................... - 22 -
Supplier .................................................................................................................... - 22 -

- 3 -
HEART RATE MONITOR
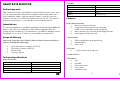
Preliminary note
Please read the instruction manual before using the product for the first time- even
if you are experienced at using electronic equipment. Please take special care
when reading the chapter "Important safety information". Keep this instruction
manual so you may use it a reference material in the future. If you sell or give this
product to someone else it is very important to also include this manual.
Intended use
This electronic appliance is intended for time display and the described additional
features. Any other use or modification of the electronic appliance does not
comply with the intended uses. The manufacturer is not liable for damages caused
by improper use or misuse. The device is not intended for commercial use.
Scope of delivery
Please note: Check the scope of delivery after purchase. Please ensure that all
parts are included and undamaged.
• Heart rate monitor incl. battery (CR2032)
• Chest belt incl. battery (CR2032)
• Bicycle holder
• Instruction manual
Technical specifications
Heart rate monitor
Operating temperature
0
-
50°C
Dimensions
4,3 x 4,6 cm
Display
2,5 x 2,6 cm
Weight
46 g
Battery
CR 2032/3V
- 4 -
Chest belt
Operating temperature
0
-
50°C
Dimensions
7 x 3,3 x 1,2 cm
Frequency
5
,3
kHz
Weight
51g
Battery
CR 2032/3V
Features
Heart rate measurement
• Alarm for maximum heart rate
• Target heart rate training with timer and alarm
(Health, Fitness, Peformance and user defined)
• Max. heart rate, min. heart rate and average heart rate
• Warning light for high heart rate
Calorie features
• Calories and fat burned during training
• BMI-calculation
• Fitness Level
Stop watch
• 1/100 seconds with 99 lap times
Countdown timer
Time features
• Time
• Calendar
• Alarm with snooze
• Hourly chime
• Second time zone

- 5 -
Other
• Back light
Important safety information
ATTENTION:
Consult your doctor before you begin any
training program. Your doctor can help you choose the
proper training intensity and heart rate guidelines for your
exercises.
This heart rate heart rate monitor is not a medical device and
should only be used as a guide for your training.
Batteries
Keep batteries out of reach of small children. If a battery is swallowed, you must
seek medical attention immediately. Batteries/rechargeable batteries must always
be inserted in the correct polarity. If necessary, clean the battery and device
contacts. Never attempt to recharge non-rechargeable batteries. Never short-
circuit or attempt to open batteries. Never throw batteries into fire as they may
explode. If the device will not be used for an extended time period, remove the
battery and store the device in a dry and dust-free area. Improper use of the
battery can lead to explosion or leakage. If the battery leaks, avoid contact with
skin, eyes and mucous membranes. Use gloves. If you are exposed to battery
acid, rinse the affected areas with plenty of clean water and immediately seek
medical attention. Remove discharged batteries from the device as they present an
increased risk of leakage.
User
This device may be used by persons (including children over 8 years of age) with
reduced physical, sensory or mental abilities or lack of experience and
knowledge, if they are supervised or instructed regarding the safe use of the
device and understand the dangers that may arise. Children may not play with the
device. Cleaning and user maintenance of the device may not be performed by
- 6 -
children without supervision. Keep packaging films out of the hands of children.
There is a danger of suffocation.
Chest belt
ATTENTION: Pacemaker patients should consult their physicians before
using the chest belt.
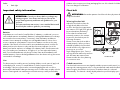
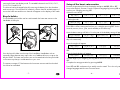
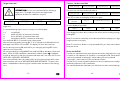
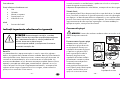
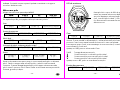
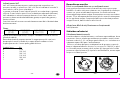
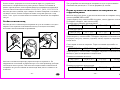
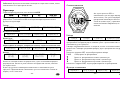
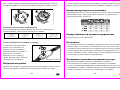
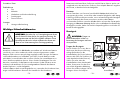
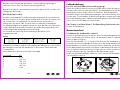
Wearing the chest belt
Adjust the chest belt so that it fits
snugly directly below the chest
muscles. Moisten the contact areas
with water or ECG gel (ECG gel can
be purchased at a pharmacy).
Ensure that the contact areas
constantly remain in skin contact.
Position the chest belt as per the
following illustration.
Please ensure that the chest belt is
seated properly. When you have
exhaled completely the chest belt
should still have very slight tension
pressing it to your chest.
High voltage power lines, Trains or
moving vehicular traffic may interfere
with the heart rate measurement.
Please consider this when planning
your exercise route.
Coded transmission
The chest belt's transmissions are digitally coded to prevent interference if you are
training with a training partner who is using an identical watch and chest belt.
When using the chest belt for the first time, a random channel is selected
automatically. The channel is briefly displayed at the top of the display upon
contact area

- 7 -
entering the heart rate display mode. The available channels are CH10, CH11,
CH12, CH13 and CH14.
The channel can be changed by briefly removing the battery from the chest best
and reinserting it. The chest belt will randomly select a channel and after approx. 1
minute the heart rate and the new channel will appear on the display of the watch.
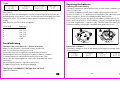
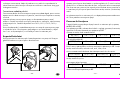
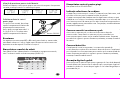
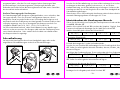
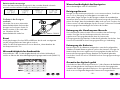
Bicycle holder
The included bicycle holder can be used to attach the heart rate monitor to the
handlebar of a bicycle.
Press the bicycle holder onto the top of the handlebar. Handlebars with an
especially large diameter may require the use of additional force to snap on the
bicycle holder. The heart rate monitor can now be attached to the bicycle holder
in the same way that you would attach it to your wrist.
The maximum range of 70cm between the heart rate monitor and the chest belt
should not be exceeded.
- 8 -
Setup of the heart rate monitor
Remove the protective film from the display and press MODE, SEL or SET.
Now select English, German, French or Spanish language by pressing SEL and
confirm your setting by pressing SET.
Select the unit KM-KG
METRIC KM - KG KM - KG KM - KG
or Miles/pounds
IMPERIAL M - LB M - LB M - LB
in the same way. The 12 or 24 hour selection will blink on the display.
Press SEL to select a setting and confirm your setting by pressing SET. Set the
seconds, minutes, hours, year, month and day in the same way.
Now the basic settings will follow. First the year of the birthday setting will appear
BIRTHDAY GEB-TAG DATNAISS CUMPL-AN
Press SEL to set the year and press SET to confirm your setting. Set the month and
day in the same way.
Now the weight will appear
WEIGHT GEWICHT POIDS PESO
Set the digits of your weight by pressing SEL and confirm each digit by pressing
SET.
Now the height display will appear
HEIGHT GROESSE TAILLE TAMANO
Set each digit of your height by pressing SEL and confirm each digit by pressing
SET.
Complete the setting procedure by pressing MODE.
Press SET and SEL simultaneously to totally reset the watch. This is the only way to
change language and the units of measurement.

- 9 -
Light
Briefly press LIGHT to temporarily activate the light.
Important notes on the operation of the heart rate
monitor
The watch has
3 different Modes of Operation.
Press MODE to select the mode of operation of the watch.
The order of the modes is as follows:
Stop watch
CHRONO ST-UHR CHRONO CRONO
Heart rate
HRM PULS FC PULSO
Time
TIME ZEIT TEMPS HORA
Each mode of operation may have several subfeatures.
The subfeatures can always be accessed by pressing SEL.
Speed setting
When setting numerical values, press and hold SEL to use the speed setting
feature.
Time and basic settings
Press MODE to select the feature before proceeding.
TIME
TIMETIME
TIME
ZEIT
ZEITZEIT
ZEIT
TEMPS
TEMPSTEMPS
TEMPS
HORA
HORAHORA
HORA
- 10 -
The subfeatures of the time mode can be accessed by pressing SEL.
Alarm
ALARM ALARM ALARM ALARMA
Timer
TIMER TIMER COMPTE TIMER
Time
TIME ZEIT TEMPS HORA
Press and hold SET for 3 seconds to access setting mode.
The display will show
HOLD
TO SET
HALTEN=
EINST.
MAINT=
REGLER
MANT=
AJUST
and the 12 or 24 hour selection will blink on the display.
Press SEL to select a setting and confirm your setting by pressing SET. Set the
seconds, minutes, hours, year, month and day in the same way.
Exit setting mode by pressing MODE.
Second time zone
Press and hold SEL for 3 seconds. The watch will switch to the second time zone
display and T2 will appear on the display. Setting the second time zone can be
accomplished in the same way as described in the previous paragraph.
Press and hold SEL for 3 seconds to return to normal time mode.
Alarm
ALARM ALARM ALARM ALARMA
Press and hold SET for 3 seconds to enter setting mode.
"AL" will appear on the display and the minutes of the alarm time will blink.
Press SEL to set the minutes and press SET to confirm your setting. Set the hours in
the same way.
You may optionally set the month and day as well.

- 11 -
If neither month nor day are set the alarm will sound daily. If the day is set, the
alarm will sound monthly. If both the month and the day are set the alarm will
sound only at the set date.
The hourly chime setting will now appear on the display
CHIME STDALARM SIGN HOR HORA AL
Press SEL to select a setting and confirm your setting by pressing SET
(ON/EIN/ACTIF/ENCENDID=on,
OFF/AUS/INACTIF/APAGADO=off).
If the chime is activated, the bell symbol will appear and the watch will chime at
the beginning of every hour.
Exit setting mode by pressing MODE. The alarm can be activated or deactivated
by pressing SET. If the alarm is activated the alarm symbol will appear.
When the alarm sounds, press SET, SEL or MODE to stop the alarm.
Snooze feature
If no button is pressed when the alarm sounds, the alarm will shut off after 30
seconds and the symbol will blink on the display. The alarm will stop and will
resume after sounding after 2 minutes. The process will repeat itself 5 times.
Timer (max. 23:59:00)
TIMER TIMER COMPTE TIMER
Press and hold SET for 3 seconds to enter setting mode.
The minutes of the timer time will blink on the display.
Press SEL to set minutes of the timer time and confirm your setting by pressing SET.
Set the hours in the same way.
Now the additional settings for the timer will follow. Press SEL to select the desired
mode:
Cd r After reaching 0:00 the timer will count the set time again
Cd U After reaching 0:00 the timer will count forward
Cd S After reaching 0:00 the timer will stop
Exit setting mode by pressing MODE.
- 12 -
The timer can be started or stopped by pressing SET.
Press and hold SET to reset the timer.
After the timer time is up an alarm will sound.
Stop watch
Press MODE to select the feature before proceeding.
CHRONO
CHRONOCHRONO
CHRONO
ST
STST
ST-
--
-UHR
UHRUHR
UHR
CHRONO
CHRONOCHRONO
CHRONO
CRONO
CRONOCRONO
CRONO
Press SET to start or stop the stop watch. Press SEL while the stop watch is running
to record a lap time. Up to 99 laps can be recorded.
Press and hold SET to reset the stop watch.
Memory feature
DATA
RECALL
ANSICHT
DATEN
APPEL
DONNEES
RECUP
DATOS
Press SEL while the stop watch is stopped to display the fastest lap on the display.
Press SET to display the other lap times.
Please note: The memory feature can only be used if at least one lap time was
recorded.
Heart rate measurement
Press MODE to select the feature before proceeding.
HRM
HRMHRM
HRM
PULS
PULSPULS
PULS
FC
FCFC
FC
PULSO
PULSOPULSO
PULSO
The subfeatures of the heart rate measurement can only be used when the chest
belt is connected.
Press SEL to access the subfeatures of the heart rate watch.
Timer
TIMER TIMER COMPTE TEMPORIZADOR

- 13 -
Memory feature
MEMORY SPEICHER MEMOIRE MEMORIA
Target heart rate
ZONE BEREICH ZONE ZONA
Calories, fat burn and BMI
CALORIE KALORIEN CALORIES CALORIAS
Fitness
FITNESS
LEVEL
FITNESS
LEVEL
NIV FORM
PHYSIQ
NIVEL
FIT
In the middle row of the display the heart rate is shown while wearing the chest
belt. If the signal is received from the chest belt the heart symbol will flash. To the
right of the heart rate the heart rate in percent of the maximum heart rate is shown.
The maximum heart rate is calculated by evaluating your age, weight and height.
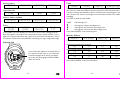
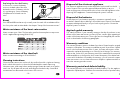
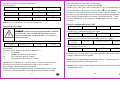
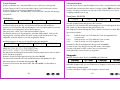
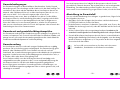
Warning light
If your heart rate reaches or exceeds 99% of
your maximum heart rate, or your heart rate
exceeds the target zone values (see target
zone) the red warning light will blink and an
alarm will sound.
- 14 -
Timer
TIMER TIMER COMPTE TEMPORIZADOR
The bottom row of the display will show the elapsed training time. The middle row
will show your heart rate and the heart rate in percent of the maximum heart rate.
The timer will start automatically when the chest belt starts measuring the heart
rate. The timer will continue counting the time if the feature mode of the watch is
changed.
Press SET to select the timer mode:
TIMER total training time
training time in heart rate target zone
▲ training time with heart rate over target zone
▼ training time with heart rate below target zone
Press and hold SET to reset the training time.
Memory feature
MEMORY SPEICHER MEMOIRE MEMORIA
The stored values are shown in the bottom row of the display.
maximum heart rate during training
HI H FO AL
minimum heart rate during training
LO N FA BA
average heart rate during training
AV D MO PR
Press and hold SET to reset the stored values.

- 15 -
Target heart rate
ATTENTION: Consult your physician before selecting a
target zone. The target zone presets are approximate
guidelines and are not suitable for everyone.
ZONE BEREICH ZONE ZONA
The bottom row of the display will show the lower and upper limit value of the
target zone.
The selected training type is shown on the top row of the display.
L- U user defined
L-1 Health (50-65% of maximum heart rate)
L-2 Fitness (65-80% of maximum heart rate)
L-3 Performance (80-95% of maximum heart rate)
Press and hold SET for 3 seconds to enter setting mode.
Select the training type by pressing SEL. If "U" is selected (user defined) the lower
and upper limits can be set. Press SET. The display will show the lower limit.
Set the value by pressing SEL and confirm your setting by pressing SET. Set the
upper limit in the same way.
Exit setting mode by pressing MODE. Press and hold SEL to activate the heart rate
alarm. When the heart rate alarm is activated, the alarm symbol will appear
on and an alarm will sound when the measured heart rate is not within the set zone
"BEEP-BEEP...BEEP-BEEP...BEEP-BEEP".
If the measured heart rate is at or above 99% of the maximum heart rate the max.
heart rate alarm will sound. "BEEP-BEEP-BEEP-BEEP-BEEP-BEEP". The max. heart
alarm is independant of the training zone and the heart rate alarm of the training
zone.
- 16 -
Calories, fat burn and BMI
CALORIE KALORIEN CALORIES CALORIAS
The lower row will show the burned calories
CALORIE KALORIEN CALORIES CALORIAS
Press SET to switch to the display of fat burn in gram
FAT
BURN
FETT CONSGRAISSES
GRASA
or to the display of your BMI
BMI BMI IMC IMC
In the display for calorie burn or fat burn the values can be reset by pressing and
holding SET.
Note: To increase the accuracy of the calorie and fat burn displays your age and
weight must be set correctly.
Note: The counter for fat burn is only activated while your heart rate is above 120
beats per minute.
Notes on the BMI
The BMI is a statistical measurement that can be used to judge a persons weight.
For adults, a value between 18.5 and 25 is considered normal. Values below
18.5 are considered "underweight". Values above 25 are considered
"overweight". Values above 30 are considered "Obese".
The BMI is only a coarse guideline because it does not take a persons body type
and body composition into consideration.
The watch automatically calculates your BMI from the values entered during setup.

- 17 -
Fitness
FITNESS
LEVEL
FITNESS
LEVEL
NIV FORM
PHYSIQ
NIVEL
FIT
After your training, immediately press SET. A 5 minute countdown will start (cool
down phase).
The bar will show the remaining time. On the left side of the display the heart rate
at the beginning of cool down is shown. On the right side of the display the current
heart rate is shown. The countdown time is shown on the bottom row of the
display.
After 5 minutes your fitness level will appear.
Fitness level Heart rate
6 >130
5 130-120
4 120-110
3 110-105
2 105-100
1 <100
Troubleshooting
The heart rate is not shown or is shown incorrectly
Make sure the chest belt is positioned correctly and fits well.
Your skin should not be too dry or too cold.
The contact areas can be slightly moistened to improve function.
Electromagnetic interference may have an adverse effect on reception.
The distance between watch and chest belt must be under 70cm.
Other heart rate measuring devices within a 2m range may also cause
interference.
Wireless bicycle computers may cause interference.
The batteries may be low and require replacing.
The display is unreadable / the light does not work
Replace the batteries.
- 18 -
Replacing the batteries
Replacing the watch battery
The battery replacement can be performed by a watch maker in addition to a
water resistance test.
To replace the battery yourself, please read the following instructions first:
Remove the screws (1, 2, 3 and 4) from the back side of the watch with a small
Phillips screwdriver. Remove the caseback and the battery sticker.
Use a small, flat tool to open the latch (5) of the battery holder. Remove the
battery and insert a fresh 3V CR2032 battery with the (+) terminal facing upwards.
Ensure that the gasket (6) is seated correctly. Close the latch of the battery holder.
Replace the battery sticker and the caseback and replace the screws.
Battery low indicator
If the battery voltage on the chest belt battery drops below the voltage required for
normal operation,
TXBELT
LO BAT
TXGURT
BATT
SNGLTX
PILE
TXBCIN
BAT BA
will appear on the display. Replace the battery of the chest belt.

- 19 -
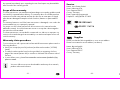
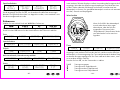
Replacing the chest belt battery
Use a coin to unscrew the battery
cover on the back side of the chest
belt and insert the 3V battery with the
(+) sign facing up. Screw the battery
compartment cover back into the
case.
Reset
Press SET and SEL simultaneously to totally reset the watch. All stored data will be
lost. Set up the watch as described in the chapter “Setup of the heart rate monitor”.
Water resistance of the heart rate monitor
Water resistant up to 3 bar. The bar value specifies the atmospheric overpressure
which is applied during testing (DIN 8310).
Water resistance of the chest belt
Water resistance according to IEC 60529 IPx7.
Cleaning instructions
Clean the heart rate monitor with a soft, dry and lint-free cloth. A glasses cleaning
cloth is ideal. After each use, clean the chest belt and the watch strap using
lukewarm water, mild soap solution and a sponge. Please take care not to get the
watch wet. Dry all parts with a towel and hang the chest belt to dry. Sweat and
contaminants are detrimental to the function of the sensor.
battery CR2032
- 20 -
Disposal of the electronic appliance
This electronic appliance may not be disposed of with normal household
waste. Dispose of the unit at an approved disposal facility or at your
local recycling centre. Please observe the current rules and regulations when
disposing of the appliance. Contact the disposal system if in doubt.
Disposal of the batteries
Please dispose of your batteries properly in containers especially set up
at retailers. Batteries do not belong in household waste. Dispose of the batteries at
an approved disposal facility or at your local recycling centre. Contact the
disposal system if in doubt.
digi-tech gmbh warranty
This watch includes a 3 year warranty starting on the day of purchase. In case of
defects of this heart rate monitor you have, by law, certain rights regarding the
vendor of the heart rate monitor. These rights are not changed by the warranty
which is described in the following paragraphs.
Warranty conditions
The warranty duration starts on the date of purchase. Please keep the original
receipt in a safe place. The receipt is needed as a proof of purchase. If a defect
occurs in the heart rate monitor within 3 years, the heart rate monitor will be
repaired or replaced (according to our choice) free of charge. This warranty
requires that, within the 3 year warranty period, the watch and the receipt can be
made available to us along with a short written description of the defect and when
it occured. If the defect is covered by the warranty, you will receive the repaired
heart rate monitor or a new heart rate monitor. Repair or replacement does not
cause the warranty period to restart.
Warranty period and defects liability
The warranty period is not increased by the defect liability. This also applies to
repaired or replaced parts. If defects are noticed at the time of purchase they must

- 21 -
be reported immediately upon unpacking the item. Paid repair may be available
after the end of the warranty period.
Scope of the warranty
The heart rate monitor was manufactured according to strict quality guidelines and
was carefully inspected before delivery. The warranty does not include parts that
experience normal wear and tear and can thus be seen as wear parts or fragile
parts that are damaged. Examples include Switches, Batteries or parts made of
glass.
This warranty becomes void if the heart rate monitor is damaged, is not used in the
recommended way or is improperly repaired.
For proper use of the heart rate monitor all instructions in this manual must be
adhered to exactly. Use of the heart rate monitor in a way that is discouraged in
the manual must be avoided.
The heart rate monitor not intended for commercial use. Abusive or improper use,
excessive force and changes that are made by non-authorized repair centers will
void the warranty.
Warranty claim procedure
To ensure that your call is processed in a fast and efficient manner please note the
following directions:
• Have your receipt (as proof of purchase) and the article number (107990)
handy.
• The article number can be found on the type label, an engraving, the front
page of the manual (bottom left) or a sticker on the back side or bottom side of
the case.
• In case defects occur, please first contact the service center (see below) by
phone or email.
Visit www.lidl-service.com to download this and many other manuals,
product videos and software.
- 22 -
Service
Name: Inter-Quartz GmbH
Street: Valterweg 27A
Town: Eppstein 65817
Country: Germany
Email: support@inter-quartz.de
Telephone: +49 (0)6198 571825
0800896640
008001114916
IAN
107990
Supplier
Please note that the following address is not a service address.
Please first contact the service address (see above).
Name: digi-tech gmbh
Street: Valterweg 27A
Town: Eppstein 65817
Country: Germany

-
23
-
Indicaţii referitoare la utilizare şi
siguranţă
Cuprins
Cuprins ..................................................................................................................... - 23 -
Introducere ............................................................................................................... - 25 -
Utilizarea corespunzătoare .................................................................................... - 25 -
Setul livrat ................................................................................................................. - 25 -
Date tehnice ............................................................................................................. - 26 -
FuncŃii ........................................................................................................................ - 26 -
Indicaţii importante referitoare la siguranţă.................................. - 27 -
Bateriile .............................................................................................................. - 27 -
Stimati clienti, .................................................................................................... - 28 -
Cureaua de piept .................................................................................................... - 28 -
Purtarea centurii pentru piept .......................................................................... - 28 -
Transmiterea codată a pulsului ....................................................................... - 29 -
Suportul bicicletei .................................................................................................... - 29 -
Punerea în funcŃiune ................................................................................................ - 30 -
Lumină ....................................................................................................................... - 31 -
InformaŃii importante pentru utilizarea ceasului cu măsurare puls ..................... - 31 -
Reglarea rapida ................................................................................................ - 32 -
Ora şi setările de bază ........................................................................................... - 32 -
Al doilea fus orar .............................................................................................. - 32 -
Alarmă ............................................................................................................... - 33 -
FuncŃia de amânare .......................................................................................... - 33 -
Ceas (max. 23:59:00) ..................................................................................... - 34 -
Cronometru .............................................................................................................. - 34 -
FuncŃia de memorare........................................................................................ - 34 -
Măsurare puls .......................................................................................................... - 35 -
LED de avertizare.............................................................................................. - 36 -
-
24
-
Ceas ................................................................................................................... - 36 -
FuncŃia de memorare........................................................................................ - 36 -
Intervalul pulsului ideal ..................................................................................... - 37 -
Caloriile, arderea grăsimilor şi IMC ............................................................... - 38 -
IndicaŃii pentru IMC .......................................................................................... - 39 -
Fitness ................................................................................................................. - 39 -
Remedierea erorilor ................................................................................................ - 40 -
Pulsul nu se afişează deloc sau nu se afişează corect .................................. - 40 -
Afişajul este dificil de citit/Iluminarea nu funcŃionează ................................ - 40 -
Schimbarea bateriei ................................................................................................ - 40 -
Schimbarea bateriei ceasului .......................................................................... - 40 -
Afişajul de avertizare pentru nivelul bateriei ................................................. - 41 -
Schimbarea bateriei centurii pentru piept ...................................................... - 41 -
Resetarea.................................................................................................................. - 41 -
Etanşeitatea ceasului de mână .............................................................................. - 41 -
Etanşeitatea centurii pentru piept ........................................................................... - 42 -
IndicaŃie referitoare la curăŃare ............................................................................. - 42 -
Casarea ceasului cu măsurare puls ....................................................................... - 42 -
Casarea bateriilor ................................................................................................... - 42 -
GaranŃia digi-tech gmbh ........................................................................................ - 42 -
CondiŃiile garanŃiei .................................................................................................. - 43 -
Termenul de garanŃie şi drepturile legale la garanŃie ......................................... - 43 -
Amploarea garanŃiei ............................................................................................... - 43 -
Procedura în cazul acordării garanŃiei ................................................................. - 44 -
Service ...................................................................................................................... - 45 -
Furnizor ..................................................................................................................... - 45 -

-
25
-
CEAS CU MĂSURARE PULS
Introducere
Felicitări pentru achiziŃionarea noului dvs. ceas cu măsurare puls. AŃi ales un
aparat de înaltă calitate. Manualul de utilizare este anexat acestui ceas cu
măsurare puls. Acesta conŃine indicaŃii importante referitoare la siguranŃă, utilizare
şi casare. Înaintea utilizării ceasului cu măsurare puls, familiarizaŃi-vă cu toate
indicaŃiile referitoare la utilizare şi siguranŃă. UtilizaŃi ceasul cu măsurare puls
numai conform descrierii şi pentru domeniile de utilizare indicate.
În cazul transmiterii ceasului cu măsurare puls către terŃi, înmânaŃi-le toate
documentele aferente.
Utilizarea corespunzătoare
Ceasul cu măsurare puls este adecvat pentru afişarea orei şi pentru utilizarea
funcŃiilor suplimentare descrise. Orice altă utilizare sau modificare a ceasului cu
măsurare puls este considerată a fi necorespunzătoare. Producătorul nu îşi asumă
responsabilitatea pentru daunele cauzate de folosirea necorespunzătoare sau
utilizarea greşită. Ceasul cu măsurare puls nu este prevăzut pentru uz comercial.
Setul livrat
IndicaŃie: VerificaŃi setul livrat după achiziŃionare. AsiguraŃi-vă că toate
componentele sunt incluse şi nu sunt defecte.
• Ceas cu măsurare puls incl. baterie (CR2032)
• Centură pentru piept incl. baterie (CR2032)
• Suport pentru bicicletă
• Manual de utilizare
-
26
-
Date tehnice
Ceas cu măsurare puls
Intervalul temperaturii de funcŃionare
0
-
50°C
Dimensiuni (fără curea)
4,3 x 4,6
cm
Dimensiuni afişaj
2,5 x 2,6
cm
Greutate
4
6
g
B
aterie
CR2032
Centură pentru piept
Intervalul temperaturii de
funcŃionare
0
-
50°C
Dimensiuni (fără curea)
7 x 3,3 x 1,2 cm
FrecvenŃa de transmisie
5,3
kHz
Greutate
51 g
B
aterie
CR2032
Funcţii
Măsurarea pulsului
• Alarmă pentru puls maxim
• ExerciŃii pentru pulsul ideal cu cronometru şi alarmă
(sănătate, fitness, performanŃă şi personalizare)
• Pulsul maxim, pulsul minim, pulsul mediu
• LED de avertizare (la depăşirea valorilor predefinite ale pulsului)
FuncŃii referitoare la calorii
• Consumul de calorii şi arderea grăsimilor în timpul exerciŃiilor
• Calcularea IMC
• Nivelul de fitness
Cronometru
• 1/100 de secunde cu 99 de ture

-
27
-
Ceas electronic
FuncŃii referitoare la indicarea orei
• Oră
• Calendar
• Alarmă cu repetare
• Semnal pentru ore
• Al doilea fus orar
Altele
• Iluminare de fundal
Indicaţii importante referitoare la siguranţă
ATENŢIE
: Înaintea începerii exerciŃiilor, consultaŃi
medicul. Acesta vă poate indica exerciŃiile adecvate pentru
dvs., intensitatea exerciŃiilor şi valorile predefinite ale
pulsului. Acest ceas cu măsurare puls
nu este un aparat medical şi serveşte numai la asistarea
structurării exerciŃiilor dvs.
Bateriile
Nu pastrati bateriile in apropierea copiilor. In cazul in care a fost inghitita o
baterie, de urgenta trebuie cautata asistenta medicala. Bateriile/Acumulatoarele
trebuie polarizate corect. Daca este necesar, curatati inainte polii de contact. Nu
incercati sa reincarcati bateriile, sa le scurtcircuitati sau sa le deschideti. Nu
aruncati niciodata baterii in foc, deoarece acestea pot exploda. Daca nu folositi
aparatul o perioada mai indelungata, scoateti bateriile si pastrati-l intr-un loc
uscat si fara praf. Prin folosinta neregulamentara a bateriilor, exista pericol de
explozie sau de scurgere. Daca are totusi loc o scurgere, evitati contactul cu
pielea, ochii si mucoasele. Folositi manusi.
-
28
-
In cazul contactului cu acid din baterie, spalati intensiv locul cu multa apa si
cautati de urgenta asistenta medicala.
Indepartati din aparat bateriile vizibil defecte, exista pericol acut de scurgere.
Stimati clienti,
acest aparat poate fi folosit de personae (inclusiv copii de la 8 ani ) cu dezabilitati
fizice, senzoriale, mentale sau cu lipsa de experienta, numai sub supraveghere
sau dupa ce s-au dat informatii defolosire a aparatului si s-au explicat eventualele
pericole. Este interzis copiilor de a se juca cu aparatul. Este interzisa curatarea si
ingrijirea acestuia de catre copii fara supraveghere. Nu lasati ambalajul in
apropierea copiilor, exista pericol de sufocare.
Cureaua de piept
ATENTIE: Purtatorii de stimulator cardiac ar trebui sa consulte un doctor,
inainte de a purta cureaua de
piept.
Purtarea centurii pentru piept
AdaptaŃi centura, astfel încât
aceasta să se sprijine direct sub
muşchii pectorali. UmeziŃi uşor
suprafeŃele de contact ale centurii
cu apă sau cu gel pentru EKG
(care se poate procura de la
farmacie). AsiguraŃi-vă că
suprafeŃele de contact se află în
permanenŃă în contact cu pielea.
PoziŃionaŃi centura după ca în
următoarea imagine.
AveŃi grijă la poziŃia corectă a
centurii pentru piept. Când expiraŃi
complet, centura trebuie să se
sprijine cu o tensionare foarte
SuprafaŃa de contact

-
29
-
redusă pe cutia toracică. Stâlpii de înaltă tensiune, cablurile suspendate de la
calea ferată sau traficul auto pot influenŃa sau interfera cu măsurarea. AveŃi grijă
la alegerea traseului.
Transmiterea codată a pulsului
Transmiterea datelor de la centura pentru piept este codată digital, pentru a evita
apariŃia erorilor dacă exersaŃi cu un partener, care foloseşte un aparat cu aceeaşi
structură.
La prima utilizare a centurii pentru piept, se selectează automat un canal
aleatoriu. Canalul este afişat scurt timp în partea de sus a afişajului, când comutaŃi
la afişarea pulsului. Canalele disponibile sunt CH10, CH11, CH12, CH13 şi
CH14.
PuteŃi schimba canalul, scoŃând bateria pentru scurt timp din centura pentru piept
şi montând-o la loc. Centura pentru piept alege un nou canal aleatoriu şi după
cca 1 min. se afişează pulsul şi noul canal pe ceasul cu măsurare puls.
Suportul bicicletei
PuteŃi purta ceasul cu măsurare puls la articulaŃia mâinii sau puteŃi să îl fixaŃi pe
ghidonul bicicletei cu suportul pentru bicicletă livrat.
-
30
-
ApăsaŃi suportul pentru bicicletă de sus pe bara ghidonului. În cazul unei bare a
ghidonului cu un diametru deosebit de mare, este posibil să fie necesară aplicarea
unei forŃe mai mari, pentru a fixa suportul pentru bicicletă. Acum puteŃi fixa ceasul
cu măsurare puls pe suportul pentru bicicletă în acelaşi mod ca şi la articulaŃia
mâinii.
La utilizarea ceasului cu măsurare puls, nu depăşiŃi distanŃa maximă de transmisie
de 70 cm până la centura pentru piept.
Punerea în funcţiune
TrageŃi folia de protecŃie de pe afişajul ceasului cu măsurare puls şi apăsaŃi
MODE, SEL sau SET.
Prin apăsarea pe SEL, selectaŃi dintre limbile: engleză, germană, franceză şi
spaniolă. ConfirmaŃi selectarea prin apăsarea pe SET.
SelectaŃi în acelaşi mod unitatea KM-KG
METRIC KM - KG KM - KG KM - KG
sau mile/pfund (M-LB)
IMPERIAL M - LB M - LB M - LB
Afişajul modului cu 12 sau 24 de ore luminează intermitent.
Pentru setare, apăsaŃi SEL şi confirmaŃi setarea prin apăsarea pe SET. SetaŃi în
acelaşi mod secundele, minutele orele, anul, luna şi ziua.
Acum urmează setările de bază. Mai întâi apare anul dvs. de naştere.
BIRTHDAY GEB-TAG DATNAISS CUMPL-AN
Pentru setare, apăsaŃi SEL şi confirmaŃi setarea prin apăsarea pe SET. SetaŃi în
acelaşi mod luna şi ziua.
Acum apare afişajul greutăŃii.
WEIGHT GEWICHT POIDS PESO
SetaŃi cifrele greutăŃii dvs., de asemenea, prin apăsarea pe SEL şi confirmaŃi
datele introduse prin apăsarea pe SET.

-
31
-
Acum apare afişajul înălŃimii.
HEIGHT GROESSE TAILLE TAMANO
SetaŃi cifrele înălŃimii dvs., de asemenea, prin apăsarea pe SEL şi confirmaŃi datele
introduse prin apăsarea pe SET.
ÎncheiaŃi punerea în funcŃiune prin apăsarea pe MODE.
Prin apăsarea simultană pe SET şi SEL se poate reseta ora. Abea dupa aceea se
poate alege din nou limba dorita si unitatea de masura.
Lumină
ApăsaŃi scurt LIGHT, pentru a activa temporar iluminarea de fundal.
Informaţii importante pentru utilizarea ceasului cu
măsurare puls
Ceasul cu măsurare puls dispune de peste
3 moduri de funcţionare
.
Prin apăsarea pe MODE puteŃi comuta modurile de funcŃionare ale ceasului cu
măsurare puls.
Ordinea funcŃiilor este:
Cronometru
CHRONO ST-UHR CHRONO CRONO
Măsurare puls
HRM PULS FC PULSO
Ora
TIME ZEIT TEMPS HORA
În continuare, în cadrul modurilor de funcŃionare există diferite subfuncŃii.
AjungeŃi întotdeauna la subfuncŃii prin apăsarea SEL.
-
32
-
Reglarea rapida
Pentru reglarea valorilor numerice, prin apasarea pe SEL si mentinerea apasata ,
puteti folosi reglarea rapida.
Ora şi setările de bază
Alegeti mai intai functia apasand pe MODE.
TIME
TIMETIME
TIME
ZEIT
ZEITZEIT
ZEIT
TEMPS
TEMPSTEMPS
TEMPS
HORA
HORAHORA
HORA
Prin apăsarea pe SEL, puteŃi apela subfuncŃiile modului Oră.
Alarmă
ALARM ALARM ALARM ALARMA
Ceas
TIMER TIMER COMPTE TIMER
Ora
TIME ZEIT TEMPS HORA
ApăsaŃi continuu SET timp de 3 secunde, pentru a comuta în modul de setare.
Pe afişaj apare
HOLD
TO SET
HALTEN=
EINST.
MAINT=
REGLER
MANT=
AJUST
şi afişajul modului cu 12 sau 24 de ore luminează intermitent.
Pentru setare, apăsaŃi SEL şi confirmaŃi setarea prin apăsarea pe SET. SetaŃi în
acelaşi mod secundele, minutele orele, anul, luna şi ziua.
ÎncheiaŃi modul de setare prin apăsarea pe MODE.
Al doilea fus orar
ApăsaŃi continuu SEL timp de 3 secunde. Ceasul comută la afişarea celui de-al
doilea fus orar şi apare T2 pe afişaj. Setarea celui de-al doilea fus orar se
realizează după cum se descrie în paragraful următor.

-
33
-
ApăsaŃi continuu SEL timp de 3 secunde, pentru a comuta înapoi la afişarea
normală a orei.
Alarmă
ALARM ALARM ALARM ALARMA
ApăsaŃi continuu SET timp de 3 secunde, pentru a ajunge la modul de setare.
Pe afişaj apare „AL” şi minutele orei de trezire luminează intermitent.
Pentru setare, apăsaŃi SEL şi confirmaŃi setarea prin apăsarea pe SET. SetaŃi orele
în acelaşi mod.
Dacă doriŃi, setaŃi acum luna şi ziua.
Dacă nu se setează nici luna, nici ziua, alarma va suna zilnic. Dacă se setează
numai ziua, alarma va suna lunar. Dacă se setează atât luna, cât şi ziua, alarma
va suna numai la data setată.
Pe afişaj apare acum setarea semnalului pentru ore.
CHIME STDALARM SIGN HOR HORA AL
Pentru setare, apăsaŃi SEL şi confirmaŃi setarea prin apăsarea pe SET
(ON/EIN/ACTIF/ENCENDID=activat,
OFF/AUS/INACTIF/APAGADO=dezactivat).
În cazul semnalului pentru ore activat, apare simbolul clopot şi se aude un semnal
sonor la fiecare oră fixă.
ÎncheiaŃi modul de setare prin apăsarea pe MODE.
PuteŃi activa sau dezactiva alarma prin apăsarea pe SET. Dacă alarma este
activată, apare simbolul alarmă .
Când se aude alarma, apăsaŃi SET, SEL sau MODE pentru a o opri.
FuncŃia de amânare
Dacă nu apăsaŃi nicio tastă când se aude alarma, funcŃia de amânare se
activează automat după 30 de secunde şi simbolul luminează intermitent pe
afişaj. Alarma se opreşte acum şi se aude din nou după 2 minute. Acest proces se
repetă de 5 ori.
-
34
-
Ceas (max. 23:59:00)
TIMER TIMER COMPTE TIMER
ApăsaŃi continuu SET timp de 3 secunde, pentru a seta ceasul.
Pe afişaj luminează intermitent minutele orei ceasului.
Pentru setare, apăsaŃi SEL şi confirmaŃi setarea prin apăsarea pe SET. SetaŃi orele
în acelaşi mod.
Acum urmează setarea de bază a ceasului. Prin apăsarea pe SEL, selectaŃi modul
dorit:
Cd r După 0:00, ceasul contorizează din nou ora
setată.
Cd U După 0:00, ceasul contorizează înainte
Cd S După 0:00, ceasul se opreşte
ÎncheiaŃi modul de setare prin apăsarea pe MODE.
PuteŃi porni sau opri ceasul prin apăsarea pe SET.
ApăsaŃi continuu SET, pentru a reseta ceasul.
După expirarea duratei se aude un semnal sonor.
Cronometru
Alegeti mai intai functia apasand pe MODE.
CHRONO
CHRONOCHRONO
CHRONO
ST
STST
ST-
--
-UHR
UHRUHR
UHR
CHRONO
CHRONOCHRONO
CHRONO
CRONO
CRONOCRONO
CRONO
ApăsaŃi SET pentru pornirea sau oprirea cronometrului. ApăsaŃi SEL în timp ce
cronometrul funcŃionează, pentru a îl opri la durata unei runde. Poate fi oprit până
la 99 de runde.
ApăsaŃi continuu SET, pentru a reseta cronometrul.
FuncŃia de memorare
DATA
RECALL
ANSICHT
DATEN
APPEL
DONNEES
RECUP
DATOS
Când cronometrul este oprit, apăsaŃi SEL şi pe afişaj apare cea mai rapidă rundă.
ApăsaŃi SET, pentru a afişa duratele celorlalte runde.

-
35
-
IndicaŃie: FuncŃia de memorare poate fi apelată numai dacă s-a înregistrat
minimum o durată a rundei.
Măsurare puls
Alegeti mai intai functia apasand pe MODE.
HRM
HRMHRM
HRM
PULS
PULSPULS
PULS
FC
FCFC
FC
PULSO
PULSOPULSO
PULSO
Măsurarea pulsului funcŃionează numai în cazul utilizării centurii pentru piept.
Prin apăsarea pe SEL, puteŃi apela subfuncŃiile măsurării pulsului:
Ceas
TIMER TIMER COMPTE TEMPORIZADOR
FuncŃia de memorare
MEMORY SPEICHER MEMOIRE MEMORIA
Pulsul ideal
ZONE BEREICH ZONE ZONA
Consumul de calorii, arderea grăsimilor şi IMC
CALORIE KALORIEN CALORIES CALORIAS
Fitness
FITNESS
LEVEL
FITNESS
LEVEL
NIV FORM
PHYSIQ
NIVEL
FIT
Dacă se utilizează centura pentru piept, în zona centrală a afişajului se afişează
pulsul. Când se recepŃionează semnalul pulsului, simbolul inimă luminează
intermitent. În partea dreaptă lângă afişajul pulsului apare valoarea atinsă din
pulsul maxim în procente. Pulsul maxim estimat se calculează automat pornind de
la vârstă, greutate şi înălŃime.
-
36
-
LED de avertizare
Dacă pulsul dvs. a ajuns la 99% din pulsul
maxim sau această valoare este depăşită
sau pulsul depăşeşte valoarea limită setată
(vezi „Intervalul pulsului ideal”), LED-ul
roşu de avertizare luminează intermitent şi
alarma va suna.
Ceas
TIMER TIMER COMPTE TEMPORIZADOR
În zona inferioară a afişajului apare durata exerciŃiului parcursă până în acel
moment. În zona centrală se afişează pulsul şi valoarea atinsă din pulsul maxim în
procente. Ceasul contorizează automat din momentul în care este aplicată
centura pentru piept. Ceasul contorizează apoi în continuare chiar şi în cazul în
care comutaŃi într-un alt mod.
ApăsaŃi scurt SET, pentru a selecta modul Ceas:
TIMER Întreaga durată a exerciŃiului
Durata exerciŃiului în intervalului pulsului ideal
▲
Durata exerciŃiului peste intervalul pulsului ideal
▼
Durata exerciŃiului sub intervalul pulsului ideal
ApăsaŃi continuu SET, pentru a reseta durata exerciŃiului.
FuncŃia de memorare
MEMORY SPEICHER MEMOIRE MEMORIA

-
37
-
Valorile memorate sunt afişate pe rândurile de jos.
Pulsul maxim atins
HI H FO AL
Pulsul minim atins
LO N FA BA
Pulsul mediu
AV D MO PR
ApăsaŃi continuu SET, pentru a reseta valorile memorate.
Intervalul pulsului ideal
ATENTIE: Inainte de inceperea antrenamentului, clarificati
cu doctoral dvs. care este intervalul de puls tinta potrivit.
Valorile recomandate sunt aproximative si nu se potrivesc
fiecarei persoane.
ZONE BEREICH ZONE ZONA
Pe rândul de jos se afişează valoarea limită superioară şi inferioară a intervalului
pulsului ideal.
Tipul de exerciŃiu selectat se afişează pe rândul de sus.
L- U Personalizat
L-1 Sănătate (50-65% din pulsul maxim)
L-2 Fitness (65-80% din pulsul maxim)
L-3 PerformanŃă (80-95% din pulsul maxim)
ApăsaŃi continuu SET timp de 3 secunde, pentru a comuta în modul de setare.
SelectaŃi tipul de exerciŃiu prin apăsarea pe SEL. În cazul selectării „U”
(personalizat), valorile limită se pot seta manual.
ApăsaŃi SET. Pe afişaj luminează intermitent valoarea limită inferioară. SetaŃi
valoarea prin apăsarea pe SEL şi confirmaŃi setarea prin apăsarea pe SET.
-
38
-
SetaŃi valoarea limită superioară în acelaşi mod.
ÎncheiaŃi modul de setare prin apăsarea pe MODE.
ApăsaŃi continuu SEL, pentru a activa alarma pentru puls. Dacă alarma pentru
puls este activată, pe afişaj apare simbolul alarmă şi în cazul părăsirii
intervalului pulsului ideal se aude un semnal „BIP-BIP... BIP-BIP...BIP-BIP”. Dacă
pulsul dvs. este de 99% din pulsul maxim sau această valoare este depăşită, se
emite semnalul de alarmă pentru puls maxim „BIP-BIP-BIP-BIP-BIP...”. Acest
semnal nu depinde de zona exerciŃiului şi de alarma pentru puls din zona
exerciŃiului.
Caloriile, arderea grăsimilor şi IMC
CALORIE KALORIEN CALORIES CALORIAS
Pe rândul de jos se afişează caloriile consumate.
CALORIE KALORIEN CALORIES CALORIAS
ApăsaŃi SET, pentru a comuta la afişarea arderii grăsimilor în grame
FAT
BURN
FETT CONSGRAISSES
GRASA
sau la afişarea IMC-ului dvs.
BMI BMI IMC IMC
În afişarea consumului de calorii sau a arderii grăsimilor, valorile memorate se pot
reseta prin apăsarea continuă pe SET.
IndicaŃie: Pentru a îmbunătăŃi precizia afişării caloriilor şi a arderii grăsimilor,
vârsta şi greutatea trebuie să fie setate corect.
IndicaŃie: Contorul pentru arderea grăsimilor este activ numai la un puls de peste
120 de bătăi pe minut.
Pagina se încarcă...
Pagina se încarcă...
Pagina se încarcă...
Pagina se încarcă...
Pagina se încarcă...
Pagina se încarcă...
Pagina se încarcă...
Pagina se încarcă...
Pagina se încarcă...
Pagina se încarcă...
Pagina se încarcă...
Pagina se încarcă...
Pagina se încarcă...
Pagina se încarcă...
Pagina se încarcă...
Pagina se încarcă...
Pagina se încarcă...
Pagina se încarcă...
Pagina se încarcă...
Pagina se încarcă...
Pagina se încarcă...
Pagina se încarcă...
Pagina se încarcă...
Pagina se încarcă...
Pagina se încarcă...
Pagina se încarcă...
Pagina se încarcă...
Pagina se încarcă...
-
 1
1
-
 2
2
-
 3
3
-
 4
4
-
 5
5
-
 6
6
-
 7
7
-
 8
8
-
 9
9
-
 10
10
-
 11
11
-
 12
12
-
 13
13
-
 14
14
-
 15
15
-
 16
16
-
 17
17
-
 18
18
-
 19
19
-
 20
20
-
 21
21
-
 22
22
-
 23
23
-
 24
24
-
 25
25
-
 26
26
-
 27
27
-
 28
28
-
 29
29
-
 30
30
-
 31
31
-
 32
32
-
 33
33
-
 34
34
-
 35
35
-
 36
36
-
 37
37
-
 38
38
-
 39
39
-
 40
40
-
 41
41
-
 42
42
-
 43
43
-
 44
44
-
 45
45
-
 46
46
-
 47
47
-
 48
48


Crivit 1-LD3945 Usage And Safety Instructions
- Categorie
- Monitoare de ritm cardiac
- Tip
- Usage And Safety Instructions
în alte limbi
- English: Crivit 1-LD3945
- Deutsch: Crivit 1-LD3945
Lucrări înrudite
Alte documente
-
Domyos VE 590 Operating Instructions Manual
-
LIVARNO 408045 Manualul proprietarului
-
-
-
-
-
-
-
Elta 4521 Manual de utilizare
-
Kettler VITO M Training And Operating Instructions