Cooke & Lewis CLROIS30 Assembly Instructions
- Tip
- Assembly Instructions

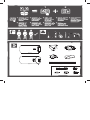
V31217
CLROIS30 3663602842699
This file is the property of Kingfisher Group Plc. No copying, alteration or amendment is permitted without
written authorisation from the Kingfisher Brand Team.
V1.1
ᇹࡒמ֣ăěŗʗɡ2/5ǟϨҨ뼷ɑϨ̆Ǣ͎ࣂĀߩݨԶѤӍ.CDɡӴ̽ҲŀмŗʸߩݨȞƥԶѤ뼶
ǕNJɫĀ̈ܨ࠰ᇹࡒמ֣ǨĈ뼶λǀᇹࡒȞײ֣ӿĀΒǚǜNj뼷ăīŢǕNJɫɘDŽҫ̑뼵ȻƑͱզϐ뼶
PROCESS
BLACK
SEPARATIONS JOB INFO
VERSION #
PID #: 00001
Agency job #: 10383
Product Description: Island Glass
Hood
Brand: Cooke & Lewis
Brand Contact: [email protected]
Barcode: 3663602842699
Vendor: Atlan
No. of new line drawings: xx
Page size A4 / No. of printed pages 68
2 3 4 5 6 7 8
24/11/17
DLS
08/12/17
DLS
00/00/17
INITIALS
00/00/17
INITIALS
00/00/17
INITIALS
00/00/17
INITIALS
00/00/17
INITIALS
00/00/17
INITIALS
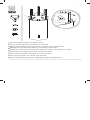
1
NOTE: A4 and has been resized to A5

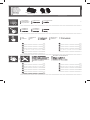
[01] x1
[03] x1
[04] x1
[02] x1
[10] x36 [11] x36 [12] x42
[08] x6 [09] x3
[07] x6
[05] x3 [06] x1
ț
ț
ț
ÖNEMLI -
1 2
x3
8mm

3
'DKLOGH÷LOGLU
No incluido
Não incluída
Nu este inclus
Not included
1LFKWLQEHJULIIHQ
Non inclus
1LHGRáąF]RQR
ɇɟɩɪɢɥɚɝɚɟɬɫɹ
CARBFILT21
3663602843139
VENT PACK (Ø150mm)
3663602843153
Preparation
Vorbereitung
Preparación
Préparation
Preparação
Przygotowanie
+D]ÕUOÕN
2
Installation
Installation
Installation
ɍɫɬɚɧɨɜɤɚ Instalare
4
BenutzungUtilisationUse
Utilizare
Uso .XOODQÕP
38
41
44
47
50
53
56
59
62
Cuidados y Mantenimiento
%DNÕPYH2QDUÕP
(QWUHWLHQHWPDLQWHQDQFH
ș țLQHUH
39
42
45
48
51
54
57
60
63

Installation
Installation
Installation
ɍɫɬɚɧɨɜɤɚ
Instalare
4
Warning: Professional installation is recommended for this appliance and must be installed
correctly following the manufacturer’s instructions. The manufacturer declines all responsibility for
improper installation, which may harm persons and animals and cause damage.
Warning: Danger of electric shock! The power supply must be cut off before the appliance is
installed completely.
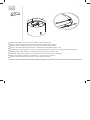
Check the package and make sure you have all of the parts listed.
Decide on the appropriate location for your product.
Please take care when fi tting or handling to prevent personal injury or damage to the product.
The specifi cations plate is available on this appliance. This plate displays all the necessary
identifi cation information for ordering replacement parts.
If you sell the appliance, give it away, or leave it behind when you move house, make sure you
also pass on this manual so that the new owner can become familiar with the appliance and its
safety warnings.
WARNING: This appliance is 20kg net weight. You must ensure the ceiling the appliance
is installed to is capable of bearing this weight. If you are in any doubt regarding the
suitability of location of installation contact a structural engineer for advice.
This appliance is supplied with concrete fi xing bolts ([09]) suitable for fi xing to concrete
ceilings only (see diagram 1). If this product is being fi tted to a ceiling with wooden joists,
this product must be bolted to the joists in question (see diagram 2).
Avertissement : Nous recommandons une installation professionnelle pour cet appareil et ce
dernier doit être installé correctement en suivant les instructions du fabricant. Le fabricant décline
toute responsabilité en cas d’installation incorrecte susceptible de blesser des personnes et des
animaux, et de provoquer des dommages.
Avertissement : Danger de choc électrique ! L’alimentation électrique doit être coupée avant que
l’appareil ne soit complètement installé.
Vérifi er l’emballage et s’assurer qu’il contient toutes les pièces répertoriées.
Déterminer l’emplacement approprié pour le produit.
Rester prudent lors du montage ou de la manipulation pour éviter toute blessure ou dommage
du produit.
La plaque signalétique est disponible sur cet appareil. Cette plaque affi che toutes les informations
d’identifi cation nécessaires pour commander des pièces de rechange.
Si vous vendez l’appareil, si vous le donnez, ou si vous le laissez lors de votre déménagement,
assurez-vous de transmettre ce manuel de façon à ce que le nouveau propriétaire puisse se
familiariser avec l’appareil et les avertissements de sécurité.

5
AVERTISSEMENT : Le poids net de cet appareil est de 20 kg. Vérifi er que le plafond
auquel cet appareil est fi xé est capable de supporter ce poids. En cas de doute quant à
la convenance de l’emplacement d’installation, contacter un ingénieur en structure pour
obtenir des conseils.
Cet appareil est fourni avec des boulons de fi xation pour le béton ([09]) adaptés à une
fi xation à des plafonds en béton uniquement (voir le schéma 1). Si ce produit est fi xé à
un plafond avec des solives en bois, il doit être boulonné aux solives en question (voir le
schéma 2).
Ostrzeżenie: Przy tym urządzeniu zalecany jest montaż wykonany przez fachowca. Urządzenie
musi zostać zainstalowane zgodnie z instrukcjami producenta. Producent nie ponosi żadnej
odpowiedzialności za nieprawidłowy montaż, który może spowodować obrażenia u ludzi i zwierząt
oraz uszkodzenia mienia.
Ostrzeżenie: Ryzyko porażenia prądem! Zasilanie musi być odcięte do momentu zakończenia
montażu urządzenia.
Sprawdzić zawartość opakowania i upewnić się, że zawiera części wymienione w specyfi kacji.
Należy wybrać odpowiednie miejsce montażu produktu.
Zaleca się zachowanie ostrożności podczas montowania i użytkowania urządzenia, aby uniknąć
obrażeń lub uszkodzenia produktu.
Na tym urządzeniu znajduje się tabliczka znamionowa. Tabliczka zawiera wszystkie informacje
dotyczące specyfi kacji potrzebne do zamówienia cz
ęści zamiennych.
W przypadku sprzedaży urządzenia lub przeprowadzki należy oddać tabliczkę lub pozostawić ją na
swoim miejscu. Należy również przekazać niniejszą instrukcję obsługi nowemu właścicielowi, aby
umożliwić mu zaznajomienie się z urządzeniem i ostrzeżeniami dotyczącymi bezpieczeństwa.
OSTRZEŻENIE: Masa urządzenia wynosi 20 kg. Konieczne jest upewnienie się, czy sufi t,
na którym będzie instalowane urządzenie, wytrzyma jego ciężar. W razie wątpliwości
dotyczących wytrzymałości miejsca instalacji należy skonsultować się z inżynierem
budownictwa.
Do urządzenia są dołączone śruby mocujące do betonu ([09]), przeznaczone wyłącznie
do mocowania w betonowych sufi tach (patrz schemat 1). Jeśli produkt jest mocowany do
sufi tu z drewnianymi belkami, konieczne jest przymocowanie go właśnie do tych belek
(patrz schemat 2).
Warnung: Bei diesem Gerät wird die Installation durch einen Fachmann empfohlen; diese hat
korrekt und unter Beachtung der Herstelleranweisungen zu erfolgen. Der Hersteller haftet nicht für
eine unsachgemäße Installation, die zu Verletzungen von Menschen und Tieren führen und Schäden
verursachen kann.
Warnung: Stromschlaggefahr! Vor der vollständigen Installation des Geräts muss die
Stromversorgung ausgeschaltet werden.
Überprüfen Sie die Verpackung und stellen Sie sicher, dass alle aufgeführten Teile in der Packung
vorhanden sind.
Wählen Sie einen geeigneten Einsatzort für Ihr Produkt.
Gehen Sie beim Montieren und Handhaben umsichtig vor, um Verletzungen oder eine Beschädigung
des Produkts zu vermeiden.

9
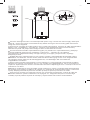
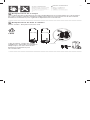
A
B
CARBFILT21
VENT PACK
(Ø150mm)
CARBFILT21
VENT PACK
(Ø150mm)
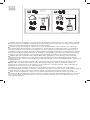
01
Choose a type of installation: Ducted option A (extraction to the outside) or recirculation option B
(no extraction to the outside). If fi tted to a concrete ceiling this product can be used in recirculation
mode only. Both options are suitable for a wooden ceiling.
Choisir un type d’installation : Option avec conduit A (extraction vers l’extérieur) ou option de
recirculation B (pas d’extraction vers l’extérieur). S’il est fi xé à un plafond en béton, ce produit ne
peut être utilisé qu’en mode de recirculation. Les deux options conviennent à un plafond en bois.
Wybierz wariant instalacji: Wariant z odprowadzaniem A(odprowadzanie na zewnątrz) lub wariant
z recyrkulacją B (bez odprowadzania na zewnątrz). W wypadku mocowania do sufi tu betonowego
dostępny jest jedynie wariant z recyrkulacją. Oba warianty są możliwe przy sufi cie drewnianym.
Wählen Sie eine Installationsart: Option Amit Rohr (Absaugung nach außen) oder Option B
Umwälzung (keine Absaugung nach außen). Bei Anbringung an einer Betondecke kann dieses
Produkt nur in der Version mit Umwälzung verwendet werden. Für eine Holzbalkendecke eignen sich
beide Optionen.
Выберите тип установки: вариант A с воздуховодом (с отведением воздуха наружу) или
вариант B с рециркуляцией (без отведения воздуха наружу). При установке вытяжки на
бетонном потолке можно использовать только вариант с рециркуляцией. При установке на
деревянном потолке доступны оба варианта.
Alegeți un tip de instalare: Opțiunea cu conductă A (extragere în exterior) sau Opțiune de
recirculare B (fără extragere în exterior). Dacă este fi xat pe un tavan din beton, acest produs poate fi
utilizat numai în modul recirculare. Ambele opțiuni sunt adecvate pentru un tavan din lemn.
Elija un tipo de instalación: Opción con conducto A (extracción hacia el exterior) u opción con
recirculación B (sin extracción hacia el exterior). Si este producto está instalado sobre un cielo raso
de hormigón, solo podrá utilizarse en modo recirculación. Ambas opciones pueden usarse en un
cielo raso de madera.

11
02
990-1170
B
BPP
Caution! Before drilling it is extremely important to check the ceiling for hidden pipes, electrical
cables etc. using an appropriate detection device. Ensure the ceiling and fi xings used can support the
weight of this appliance! If in doubt, consult a structural engineer for advice.
WARNING: Use only the same size of fi ttings and mounting screws as recommended in this
instruction manual. Failure to follow these instructions may result in electrical hazards.
Attention ! Avant de percer, il est extrêmement important de vérifi er que le plafond ne cache pas
des tuyaux, des câbles électriques, etc. en utilisant un dispositif de détection approprié. S’assurer
que le plafond et les fi xations peuvent supporter le poids de cet appareil ! En cas de doute, consulter
un ingénieur en structure pour obtenir des conseils.
AVERTISSEMENT : n’utiliser que des raccords et des vis de fi xation de même taille tels que
recommandés dans ce manuel d’instructions. Le non-respect de ces instructions peut être à l’origine
de dangers électriques.
Uwaga! Przed rozpoczęciem wiercenia należy bezwzględnie sprawdzić, czy w sufi cie nie znajdują
się ukryte rury, przewody elektryczne itp. przy użyciu odpowiedniego sprzętu. Należy się upewnić, że
sufi t oraz mocowania wytrzymają ciężar urządzenia! W razie wątpliwości należy skonsultować się z
inżynierem budownictwa.
OSTRZEŻENIE: Używać wyłącznie mocowań i śrub mocujących o takim samym rozmiarze, jak te,
które zostały podane w niniejszej instrukcji obsługi. Nieprzestrzeganie tych zaleceń może skutkować
porażeniem prądem elektrycznym.
Achtung! Vor dem Bohren muss die Decke mithilfe geeigneter Vorrichtungen unbedingt auf in der
Decke verlaufende Rohre, Elektrokabel usw. geprüft werden. Vergewissern Sie sich, dass die Decken
und verwendeten Befestigungseinrichtungen das Gewicht dieses Geräts tragen können! Lassen Sie
sich im Zweifelsfall von einem Statiker beraten.

13
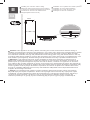
[08] x6
[04] x1
03
30 cm
[04]
[08]
[09]
[04]
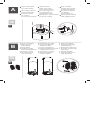
Mark and drill six holes 8mm in diameter using the slotted holes in the top mounting plate
[04] as guidance. Secure the top mounting plate to the ceiling using the 6x rawl bolts, nuts and
washers supplied.
Marquer et percer six trous de 8 mm de diamètre en utilisant les trous fendus dans la plaque de
fi xation supérieure [04] comme guides. Fixer la plaque de fi xation supérieure au plafond en utilisant
les 6 boulons à chevilles, les écrous et les rondelles fournis.
Zaznaczyć i wywiercić sześć otworów o średnicy 8 mm, kierując się otworami podłużnymi w górnej
płycie montażowej [04]. Przymocuj górną płytę montażową do sufi tu sześcioma kompletami kołków
rozporowych, nakrętek i podkładek (w zestawie).
Markieren und bohren Sie mithilfe der Langlöcher in der oberen Montageplatte [04] sechs
Löcher mit einem Durchmesser von 8 mm. Befestigen Sie die obere Montageplatte mittels der 6x
mitgelieferten Dübel, Muttern und Unterlegscheiben.
Отметьте и просверлите шесть отверстий диаметром 8 мм, ориентируясь на расположение
отверстий на монтажной пластине [04]. Зафиксируйте верхнюю монтажную пластину на
потолке с помощью шести расширительных болтов, гаек и шайб, которые поставляются
в комплекте.
I
Installation an einer soliden Decke.
Instalação em teto sólido.
Installation sur un plafond massif.
Instalarea pe tavan solid.
Instalación en un techo macizo.
ɍɫɬɚɧɨɜɤɚɧɚɦɨɧɨɥɢɬɧɨɦɩɨɬɨɥɤɟ
Installing onto a solid ceiling.
Sert tavana montaj.
0RQWDĪGRVXILWXOLWHJR

15
II
Installation an einer Holz-/Hohldecke.
Instalação em teto de madeira/oco.
Installation sur un plafond en bois/faux plafond.
Instalarea pe un tavan din lemn / fals.
Instalación en un techo de madera/hueco.
ɍɫɬɚɧɨɜɤɚɧɚɞɟɪɟɜɹɧɧɨɦɤɚɪɤɚɫɧɨɦɩɨɬɨɥɤɟ
Installing onto a timber / hollow ceiling.
$KúDSERúOXNOXWDYDQDPRQWDM
0RQWDĪGRVXILWXZ\NRQDQHJR]EHWRQXOLWHJR
30 cm
04
[04] x1
Caution! This appliance is heavy. Before mounting the cooker hood ensure that the ceiling is
capable of supporting the weight of the appliance. The ceiling may need to be strengthened to enable
it to support the weight. If in doubt please seek the advice of a structural engineer. Mark and drill
six holes 8mm diameter through the plasterboard and ceiling joists using the slotted holes in the top
mounting plate [04] as guidance. Secure the top plate to the ceiling joist using 6 x suitable bolts, nuts
and washers (not supplied). Suitable fi xings will be available from any reputable hardware store.
Attention ! Cet appareil est lourd. Avant d’installer la hotte de la cuisinière, s’assurer que le
plafond est capable de supporter le poids de l’appareil. Il peut s’avérer nécessaire de renforcer le
plafond pour qu’il puisse supporter le poids. En cas de doute, contacter un ingénieur en structure
pour obtenir des conseils. Marquer et percer six trous de 8 mm de diamètre à travers les plaques de
plâtre et les solives du plafond en utilisant les trous fendus dans la plaque de fi xation supérieure [04]
comme guides. Fixer la plaque de fi xation supérieure à la solive du plafond en utilisant 6 boulons,
écrous et rondelles adéquats (non fournis). Des fi xations adéquates seront disponibles dans tout
magasin de bricolage renommé.
Uwaga! To urządzenie jest ciężkie. Przed montażem okapu kuchennego należy się upewnić,
czy sufi t wytrzyma ciężar urządzenia. Sufi t może wymagać wzmocnienia, aby wytrzymać ciężar
urządzenia. W razie wątpliwości należy skonsultować się z inżynierem budownictwa. Zaznaczyć
i wywiercić sześć otworów o średnicy 8 mm w płycie gipsowej i belkach sufi tu, kierując się
otworami podłużnymi w górnej płycie montażowej [04]. Przymocuj górną płytę montażową do

17
[04] x 1
05
VENT PACK
(Ø150mm)
Once the ceiling plate is secured as above, install the mains supply cable inside the plate. Drill a
hole for installation of the vent hose (ducted option on a timber ceiling only).
Une fois la plaque de plafond fi xée comme susmentionné, installer le câble d’alimentation secteur
à l’intérieur de la plaque. Percer un trou pour l’installation du tuyau d’aération (option avec conduit
sur un plafond en bois uniquement).
Po przymocowaniu płyty tak jak powyżej, zainstalować przewód zasilania wewnątrz
płyty. Wywiercić otwór do montażu węża wentylacyjnego (wariant z recyrkulacją tylko przy
sufi tach drewnianych).
Installieren Sie, sobald die Deckenplatte wie vorstehend angebracht ist, das Netzkabel in
der Platte. Bohren Sie ein Loch für die Installation des Lüftungsschlauchs (Option mit Rohr, nur
bei Holzbalkendecke).
După fi xarea plăcii de tavan ca mai sus, instalați cablul de alimentare de rețea în interiorul plăcii.
Realizați un orifi ciu pentru instalarea furtunului de aerisire (opțiunea cu canal numai pe un tavan
din cherestea).
Закрепив потолочный кронштейн как показано выше, проложите внутри плиты кабель
питания. Просверлите отверстие для установки вентиляционного шланга (вариант с
воздуховодом доступен только для деревянного потолка).
Una vez que fi jó la placa del cielo raso tal como se muestra más arriba, instale el cable del
suministro eléctrico dentro de la placa. Perfore un agujero para la instalación de la manguera de
ventilación (opción con conducto sobre un cielo raso de madera únicamente).
Quando a placa do teto estiver fi xada como acima, instale o cabo de alimentação no interior da
placa. Perfure um orifício para instalação do tubo de ventilação (apenas para opção entubada num
teto de madeira).
Tavan plakası yukarıdaki şekilde sabitlendikten sonra, ana güç kablosunu plakanın içine
monte edin. Havalandırma borusunun montajı için bir delik açın (ahşap tavanlar için sadece
kanallı seçenek).

18
06
[05] x3
[07] x6
[10] x24
[11] x24
[12] x24
[05]
[07]
[12]
[10]
[11]
Measure accurately the length of the support legs required and attach the brackets to each of
the legs.
Attach each assembly to the remaining legs as shown. Ensure both legs overlap by at least 100mm.
Mesurer avec précision la longueur des pieds de soutien et fi xer les supports à chacun des pieds.
Fixer chaque ensemble aux pieds restants comme illustré. S’assurer que les pieds se chevauchent
d’au moins 100 mm.
Zmierzyć dokładnie długość wymaganych listew mocujących i przymocować do każdej z
nich wsporniki.
Przymocować każdy zestaw do pozostałych listew mocujących, tak jak na schemacie. Upewnić się,
że obie listwy mocujące zachodzą na wsporniki przynajmniej o 100 mm.
Messen Sie die erforderliche Länge der Tragfüße genau, und befestigen Sie die
Befestigungswinkel an jedem einzelnen Fuß.
Befestigen Sie jede Baugruppe wie gezeigt an den verbleibenden Füßen. Achten Sie darauf, dass
beide Füße eine Überlappung von mindestens 100 mm aufweisen.
Точно измерьте требуемую длину опорных ножек и прикрепите кронштейны к каждой из них.
Прикрепите все монтажные детали к оставшимся ножкам, как показано на схеме. Убедитесь,
что обе ножки перекрывают друг друга хотя бы на 100 мм.
Măsurați precis lungimea picioarelor de sprijin necesare și atașați consolele de fi ecare
dintre picioare.
Atașați fi ecare ansamblu de picioarele rămase, după cum se indică. Asigurați-vă că ambele picioare
se suprapun prin cel puțin 100 mm.

20
[06]
[06] x1
07
Attach the plastic valve to the air outlet of the hood motor.
Fixer la valve en plastique à la sortie d’air du moteur de la hotte.
Zamontować plastikowy zawór do wylotu powietrza silnika okapu.
Bringen Sie das Kunststoffventil am Luftauslass des Haubenmotors an.
Прикрепите пластиковую заслонку к воздуховодному отверстию двигателя вентилятора.
Atașați supapa din plastic de ieșirea pentru aer de pe motorul hotei.
Sujete la válvula de plástico a la salida de aire del motor de la campana.
Fixe a válvula de plástico na saída de ar do motor do exaustor.
Plastik valfi davlumbaz motorunun hava çıkışına tutturun.

21
08
A
Only for ducted option
(on a timber ceiling).
Uniquement pour
l'option avec conduit
(sur un plafond en bois).
2SFMD]NDQDáHP
ZHQW\ODF\MQ\PPRQWDĪ
do sufitu drewnianego).
Nur bei Option mit Rohr
(an einer Holzdecke).
Ɍɨɥɶɤɨɞɥɹɜɚɪɢɚɧɬɚ
ɫɜɨɡɞɭɯɨɜɨɞɨɦɧɚ
ɞɟɪɟɜɹɧɧɨɦɩɨɬɨɥɤɟ
1XPDLSHQWUXRSĠLXQHD
FXWXEXODWXUă
(pe tavan din lemn).
Solo para la opción
con conducto
(en un techo de madera).
Apenas para a opção entubada
(em teto de madeira).
<DOQÕ]FDNDQDOOÕVHoHQHN
LoLQGLUDKúDSWDYDQGD
A
CARBFILT21
09
B
Only for recirculation
option (solid and
timber ceilings).
Uniquement pour l'option
de recyclage (plafonds
massifs et en bois).
2SFMD]UHF\UNXODFMą
PRQWDĪGRVXILWXOLWHJR
lub drewnianego).
Nur bei Option
Umwälzung (solide
Decken und Holzdecken).
Ɍɨɥɶɤɨɞɥɹɜɚɪɢɚɧɬɚɫ
ɪɟɰɢɪɤɭɥɹɰɢɟɣɦɨɧɨɥɢɬɧɵɣ
ɢɞɟɪɟɜɹɧɧɵɣɩɨɬɨɥɨɤ
1XPDLSHQWUXRSĠLXQHDFX
recirculare (pe tavan solid
úLGLQOHPQ
Solo para la opción
con conducto (en un
techo de madera).
Apenas para a opção de
recirculação (tetos de
madeira e sólidos).
<DOQÕ]FDGHYULGDLP
VHoHQH÷LLoLQGLUVHUWYH
DKúDSWDYDQODUGD
B

22
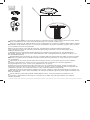
10
[01] x1
[12] x6
[05] x3
B
A
[12]
[01]
Fix the assembled support legs to the motor body using the brackets [05].
Fixer les pieds de soutien assemblés au corps du moteur en utilisant les supports [05].
Przymocować zmontowane listwy mocujące do obudowy silnika przy pomocy wsporników [05].
Befestigen Sie die zusammengebauten Stützfüße mithilfe der Befestigungswinkel [05]
am Motorgehäuse.
Закрепите собранные опорные ножки на корпусе двигателя с помощью кронштейнов [05].
Fixați picioarele de sprijin asamblate de corpul motorului, cu ajutorul consolelor [05].
Fije las patas de soporte ensambladas al motor utilizando las ménsulas [05].
Fixe as colunas de apoio montadas no corpo do motor utilizando os suportes [05].
Monte edilen destek bacaklarını, dirsekleri [05] kullanarak motor gövdesine sabitleyin.

23
11
[03] x1
[11] x6
B
A
[10] x6
[12] x6
[12]
[11]
[10]
[03]
Fix the triangular support to the legs as shown.
Fixer le support triangulaire aux pieds comme illustré.
Zamontować trójkątny element do listew mocujących, tak jak na schemacie.
Befestigen Sie die dreieckige Halterung wie gezeigt an den Füßen.
Прикрепите треугольную опорную конструкцию к ножкам, как показано на схеме.
Fixați suportul triunghiular de picioare, după cum se indică.
Fije el soporte triangular a las patas, tal como se muestra.
Fixe o apoio triangular nas colunas como ilustrado.
Üçgen şeklindeki destek parçasını gösterildiği şekilde bacaklara tutturun.

24
12
B
A
[02] x1
[02]
Slide the chimney extension [02] over the legs as shown.
Faire coulisser la rallonge de cheminée [02] par-dessus les pieds comme illustré.
Nasunąć przedłużenie komina [02] na listwy, tak jak na schemacie.
Schieben Sie die Abzugskanalverlängerung [02] wie gezeigt über die Füße.
Установите удлинитель воздуховода [02] на ножки, как показано на схеме.
Glisați extensia coșului [02] peste picioare, după cum se indică.
Deslice la extensión de la chimenea [02] sobre las patas, tal como se muestra.
Deslize a extensão da chaminé [02] pelas colunas como ilustrado.
Baca uzatma parçasını [02] gösterildiği şekilde bacakların üzerine kaydırın.

25
13
B
A
The cooker hood is now ready for fi nal assembly.
La hotte de la cuisinière est désormais prête pour l’assemblage fi nal.
Okap kuchenny jest teraz gotowy do ostatecznego montażu.
Die Abzugshaube ist nun bereit für die endgültige Montage.
Теперь можно приступить к заключительному этапу сборки вытяжки.
Hota aparatului de gătit este acum pregătită pentru asamblarea fi nală.
La campana de cocina está ahora lista para el ensamblaje fi nal.
O exaustor está agora pronto para a montagem fi nal.
Davlumbaz artık son montaj için hazırdır.

26
14
A
B
[11] x6
[10] x6
[12] x6
[12]
[10]
[11]
Once the ducting has been connected (ducted option only) connect the mains supply cable (see
page 29 - ensure the power is still switched off). Attach the legs to the mounting plate and secure
using the screws supplied.
Une fois les conduits raccordés (option avec conduit uniquement), brancher le câble d’alimentation
secteur (voir « Installation » à la page 30 - s’assurer que l’appareil est toujours hors tension).
Attacher les pieds à la plaque de montage et fi xer à l’aide des vis fournies.
Po zamontowaniu kanału odprowadzania (tylko przy wariancie z odprowadzaniem), podłączyć
przewód zasilania (patrz strona „Instalacja” na stronie 31 – upewnić się, że zasilanie
jest odłączone). Dopasować listwy mocujące do płyty mocującej i przymocować, używając
dołączonych śrub.
Sobald das Rohr angeschlossen ist (nur Option mit Rohr), das Netzkabel anschließen (siehe
„Installation“ auf Seite 32 - darauf achten, dass die Stromversorgung immer noch ausgeschaltet
ist). Bringen Sie die Füße an der Montageplatte an, und befestigen Sie sie mithilfe der
mitgelieferten Schrauben.
После подключения воздуховода (только варианты с воздуховодом) подсоедините кабель
питания (см. раздел «Установка» на стр. 33), сперва удостоверившись в том, что питание не
подается. Присоедините ножки к монтажной пластине и зафиксируйте их с помощью болтов из
комплекта поставки.
După ce conductele au fost conectate (numai opțiunea cu canal), conectați cablul de alimentare
de la rețea (vezi capitolul ”Instalare” din pagina 34 - asigurați-vă că alimentarea este în continuare
oprită). Atașați picioarele de placa de montare și fi xați cu ajutorul șuruburilor furnizate.
Una vez que conectó los conductos (opción con conductos únicamente), conecte el cable de
suministro eléctrico (véase “Instalación” en la página 35 - asegúrese de que la corriente siga
cortada). Fije las patas a la placa de montaje y sujete usando los tornillos suministrados.

28
15
[09] x3
B
A
[09]
With the hood attached to the ceiling, the inner section can be lifted to the ceiling bracket and fi xed
into place using the screws supplied.
La hotte étant fi xée au plafond, la section interne peut être soulevée jusqu’au support du plafond et
fi xée à l’aide des vis fournies.
Po przymocowaniu do sufi tu można unieść wewnętrzną część okapu do wsporników w sufi cie i
zamontować ją, używając dołączonych śrub.
Wenn die Haube an der Decke angebracht ist, kann der innere Teil zum Deckenbefestigungswinkel
angehoben und mithilfe der mitgelieferten Schrauben in der Position befestigt werden.
Установив верхнюю часть вытяжки на потолке, можно поднять ее внутреннюю секцию и
зафиксировать на потолочном кронштейне с помощью входящих в комплект винтов.
Cu hota atașată de tavan, secțiunea internă poate fi ridicată la consola din tavan și fi xată pe poziție
cu ajutorul șuruburilor furnizate.
Con la campana fi jada al cielo raso, la sección interna puede levantarse hacia la ménsula del cielo
raso y se la puede sujetar usando los tornillos suministrados.
Com o exaustor fi xado no teto a secção interior pode ser elevada até ao suporte do teto e fi xada
no local correto utilizando os parafusos fornecidos.
Davlumbaz tavana tutturulmuş haldeyken iç bölüm tavan braketine yükseltilebilir ve ürünle birlikte
verilen vidalarla yerine sabitlenebilir.

30
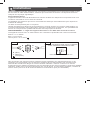
Installation
Toute l'installation doit être effectuée par une personne compétente ou un électricien qualifi é. Avant
de raccorder le câble d'alimentation, s'assurer que la tension de secteur correspond à la tension
indiquée sur la plaque signalétique.
Raccordement direct
L'appareil doit être raccordé directement au secteur à l'aide d'un disjoncteur omnipolaire avec une
ouverture minimale de 3 mm entre les contacts.
L'installateur doit s'assurer que le bon raccordement électrique a été effectué et qu'il respecte le
schéma de câblage.
Le câble ne doit pas être plié ni comprimé.
Vérifi er régulièrement l’absence de dommages sur la fi che secteur et le cordon d'alimentation. Si
le cordon d’alimentation est endommagé, il doit être remplacé par le fabricant, son prestataire de
service ou une personne qualifi ée afi n d’éviter tout risque pour la sécurité.
AVERTISSEMENT : il s’agit d'un appareil de Classe 1 et il DOIT être raccordé à la terre.
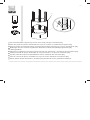
Cet appareil est livré avec un câble secteur à 3 conducteurs présentant les couleurs suivantes :
Marron = L ou Phase
Bleu = N ou neutre
Vert et jaune = E ou Terre
UTILISER UN FUSIBLE DE 3 A
BOÎTIER DE DÉRIVATION AVEC FUSIBLES
AVEC INTERRUPTEUR BIPOLAIRE
EUR UK
(Bleu)
(Marron)
(Vert/jaune)
N
L
N
L
N
L
FUSE ON
Afi n de prévenir les risques toujours présents lors de l'utilisation d'un appareil électrique, il est
important que cet appareil soit correctement installé et de lire attentivement les instructions de
sécurité afi n d’éviter tout danger ou toute mauvaise utilisation. Veiller à conserver ce manuel
d'instructions pour référence ultérieure et à le transmettre à tout futur propriétaire. Après avoir déballé
l'appareil, vérifi er qu'il n'est pas endommagé. En cas de doute, ne pas utiliser l'appareil, contacter le
service client (voir la fi n de la section Entretien et maintenance pour plus de détails).
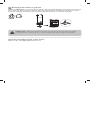
Pagina se încarcă...
Pagina se încarcă...
Pagina se încarcă...
Pagina se încarcă...
Pagina se încarcă...
Pagina se încarcă...
Pagina se încarcă...
Pagina se încarcă...
Pagina se încarcă...
Pagina se încarcă...
Pagina se încarcă...
Pagina se încarcă...
Pagina se încarcă...
Pagina se încarcă...
Pagina se încarcă...
-
 1
1
-
 2
2
-
 3
3
-
 4
4
-
 5
5
-
 6
6
-
 7
7
-
 8
8
-
 9
9
-
 10
10
-
 11
11
-
 12
12
-
 13
13
-
 14
14
-
 15
15
-
 16
16
-
 17
17
-
 18
18
-
 19
19
-
 20
20
-
 21
21
-
 22
22
-
 23
23
-
 24
24
-
 25
25
-
 26
26
-
 27
27
-
 28
28
-
 29
29
-
 30
30
-
 31
31
-
 32
32
-
 33
33
-
 34
34
-
 35
35


Cooke & Lewis CLROIS30 Assembly Instructions
- Tip
- Assembly Instructions
în alte limbi
- français: Cooke & Lewis CLROIS30
Lucrări înrudite
Alte documente
-
GoodHome GHAGRO90 Instrucțiuni de utilizare
-
KingFisher T Shape Manual de utilizare
-
LIVARNO 413948 Manualul proprietarului
-
COOKE LEWIS CLVHW60a Manual de utilizare
-
-
Form Links 9860000 Manualul utilizatorului
-
-
OmniMount DCM250 Manual de utilizare
-
-