
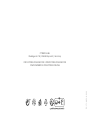
CY _171 _ 9 95 3 _ A 0 3 23
CYBEX GmbH
Riedingerstr. 18 | 95448 Bayreuth | Germany
[email protected] / WWW.CYBEX-ONLINE.COM
WWW.FACEBOOK.COM/CYBEX.ONLINE
FR

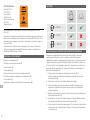
NEWBORN INLAY
Short Instruction
FOR SIRONA Gi I-SIZE
EN
CZ
HU
DK
VI
IT
SK
SL
BG
MS
FR
ES
HR
SR
HY
NL
NO
TR
HI
PT
LT
BS
RU
EL
CMN
PL
FI
AR
TH
SE
LV
CNR
UK
RO
YUE
EE
SQ
JA
MK
KO
DE


EN
CZ
HU
DK
VI
IT
SK
SL
BG
MS
FR
ES
HR
SR
HY
NL
NO
TR
HI
PT
LT
BS
RU
EL
CMN
PL
FI
AR
TH
SE
LV
CNR
UK
RO
YUE
EE
SQ
JA
MK
KO
DE
3
DE.................................................................................................................... 2
EN.................................................................................................................... 4
IT ..................................................................................................................... 6
FR .................................................................................................................... 8
NL .................................................................................................................. 10
PL .................................................................................................................. 12
HU ................................................................................................................. 14
CZ .................................................................................................................. 16
SK .................................................................................................................. 18
ES .................................................................................................................. 20
PT .................................................................................................................. 22
SE .................................................................................................................. 24
NO ................................................................................................................. 26
FI ................................................................................................................... 28
DK.................................................................................................................. 30
SL .................................................................................................................. 32
HR ................................................................................................................. 34
RU ................................................................................................................. 36
UK.................................................................................................................. 38
EE .................................................................................................................. 40
LT ................................................................................................................... 42
LV .................................................................................................................. 44
TR .................................................................................................................. 46
AR.................................................................................................................. 49
BG ................................................................................................................. 50
SR.................................................................................................................. 52
EL .................................................................................................................. 54
RO ................................................................................................................. 56
SQ ................................................................................................................. 58
BS .................................................................................................................. 60
MK ................................................................................................................. 62
CNR ............................................................................................................... 64
HI ................................................................................................................... 66
TH .................................................................................................................. 68
VI ................................................................................................................... 70
MS ................................................................................................................. 72
HY .................................................................................................................. 74
CMN .............................................................................................................. 76
YUE ............................................................................................................... 78
JA................................................................................................................... 80
KO ................................................................................................................. 82

2
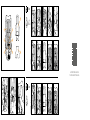
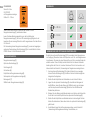
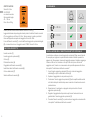
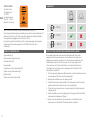
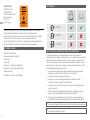
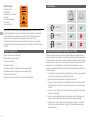
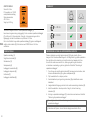
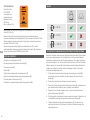
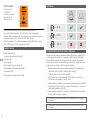
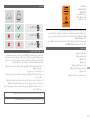
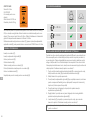
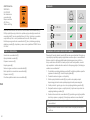
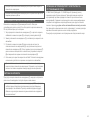
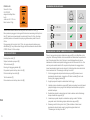
DE ÜBERBLICK
40 – 48 cm
48 – 60 cm
61 – 105 cm
VERWENDUNG DER OPTIONALEN ZUSATZEINLAGE
Es steht eine optionale Zusatzeinlage (2) für besonders kleine Neugeborene
zur Verfügung. Diese dient dazu die Sitzposition von Früh- und Neugeborenen
zu verbessern. Sie muss ab einer Körpergröße von 48 cm aus dem Kindersitz
entfernt werden. Wenn Ihr Baby bei der ersten Fahrt mit diesem Kindersitz
bereits größer als 48 cm ist, brauchen Sie dieses Teil nicht zu benutzen und
können direkt den Abschnitt „Verwendung der Neugeboreneneinlage“ lesen.
1. Um die optionale Zusatzeinlage (2) mit dem Kindersitz zu verwenden,
lockern Sie die Schultergurte (3)(4) des
integrierten Gurtsystems.
2. Stellen Sie die Kopfstütze des Kindersitzes in eine höhere Position.
3. Legen Sie die optionale Zusatzeinlage (2) unterhalb des Bezuges auf
und Sie die optionale Zusatzeinlage (2)
Kindersitzes platzieren.
4. Klappen Sie den Bezug anschließend wieder nach hinten und drücken Sie
ihn mit der Hand in den Spalt hinter der optionalen Zusatzeinlage (2).
5. Stellen Sie die Kopfstütze anschließend wieder in die niedrigste Position.
Achten Sie dabei darauf, dass diese hinter die optionale Zusatzeinlage (2)
geführt wird.
6. Anschließend legen Sie die Neugeboreneneinlage, wie im Abschnitt
„Verwendung der Neugeboreneneinlage“ beschrieben, ein.
ZULASSUNG
Sirona Gi i-Size
UN R129/03
mit Neugeboreneneinlage
Größe: 40 – 105 cm
SIRONA GI I-SIZE
i-Size universal ISOFIX
40–105 cm
max. 20 kg
030093
UN Regulation No. 129/03
Cybex GmbH
Riedingerstr. 18, 95448 Bayreuth
Germany
Vielen Dank, dass Sie sich für den Kauf der Sirona Gi i-Size
Neugeboreneneinlage (1) entschieden haben.
Lesen Sie diese Bedienungsanleitung vor der Installation der
Neugeboreneneinlage (1)
Gi i-Size auf.
Die Verwendung dieser Neugeboreneneinlage (1), sowie der beigelegten
optionalen Zusatzeinlage (Komforteinlage) (2), ist ausschließlich mit dem
CYBEX Sirona Gi i-Size Kindersitz erlaubt.
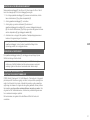
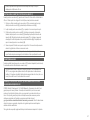
SITZKOMPONENTEN
Neugeboreneneinlage (1)
Optionale Zusatzeinlage (2)
Schultergurte (3)
Gurtschloss (4)
Kopfstütze der Neugeboreneneinlage (5)
Seitenpolster der Neugeboreneneinlage (6)
Beckengurte (7)
(8)

3
DE
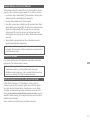
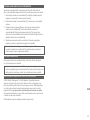
💡Die optionale Zusatzeinlage darf nur in Kombination mit der
Neugeboreneneinlage verwendet werden.
💡Die optionale Zusatzeinlage muss entfernt werden sobald das Kind größer
als 48cm ist.
VERWENDUNG DER NEUGEBORENENEINLAGE
Die Neugeboreneneinlage (1) ermöglicht die Verwendung des Sirona Gi i-Size
ab 40 cm. Erreicht Ihr Kind eine Größe von 60 cm, sollte sie wieder entfernt
werden.
1. Um die Neugeboreneneinlage (1) mit dem Kindersitz zu verwenden,
lockern Sie die Schultergurte (3)(4) des
integrierten Gurtsystems.
2. Nehmen Sie nun die Neugeboreneneinlage (1) und legen Sie diese in den
Kindersitz.
3. Legen Sie nun die Schultergurte (3) rechts und links neben der
Kopfstütze der Neugeboreneinlage (5) über die Seitenpolster der
Neugeboreneneinlage (6). Führen Sie danach die Beckengurte (7)
rechts und links durch die dafür vorgesehenen Ausschnitte zwischen
Seitenpolster (6)(8).
4.
weiterhin wie in der Bedienungsanleitung des Kindersitzes beschrieben.
💡Das Verstellen der Kopfstütze nach oben erleichtert das Einlegen der
Neugeboreneneinlage. Stellen Sie sicher, dass die Kopfstütze vor
Fahrtantritt wieder in die passende Position gebracht wurde.
WASCHEN DES BEZUGS
Bevor Sie die Neugeboreneneinlage (1) waschen, müssen beide
werden.
💡Der Bezug darf nur bei 30 °C im Schonwaschgang gewaschen werden,
in der prallen Sonne trocknen!
HERSTELLERGARANTIE- UND ENTSORGUNGSBESTIMMUNGEN
Ihnen 3 Jahre Garantie auf dieses Produkt. Die Garantie gilt in dem Land, in
dem dieses Produkt erstmalig über den Einzelhandel an einen Verbraucher
verkauft wurde. Den Inhalt der Garantie und alle wesentlichen Angaben, die
Homepage go.cybex-online.com/manufacturer-warranty-car-seats. Wird in
der Artikelbeschreibung eine Garantie ausgewiesen, bleiben Ihre gesetzlichen
Bitte beachten Sie die Entsorgungsbestimmungen Ihres Landes.

4
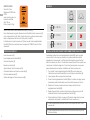
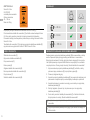
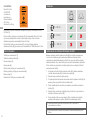
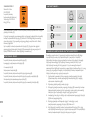
EN
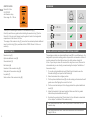
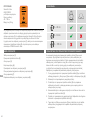
OVERVIEW
40 – 48 cm
48 – 60 cm
61 – 105 cm
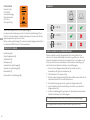
INSTALLATION OF THE OPTIONAL ADDITIONAL INSERT
The package contains an optional additional insert (2) for small Newborns. It is
designed to improve the seating position of premature and newborn children. It
must be removed from the child seat once the child reaches a height of
not needed and you can directly proceed reading the chapter “Installation of
the newborn inlay“.
1. To use the optional additional insert (2) with the child seat loosen the
Shoulder belts (3) and open the Belt buckle (4).
2. Move the headrest into a higher position.
3. Put the optional additional insert (2) onto the seating surface below the soft
4. Put the cover back and push it into the gap behind the optional additional
insert (2).
5. Adjust the headrest to the lowest position. Make sure that it is guided
behind the optional additional insert (2).
6. Now take the newborn inlay (1) and place it in the child seat as described
in the chapter “Installation of the newborn inlay“.
💡The optional additional insert must only be used in combination with the
newborn inlay.
💡The optional additional insert must be removed after the child exceeds a
height of 48 cm.
CERTIFICATION
Sirona Gi i-Size
UN R129/03
with Newborn inlay
Size range: 40 – 105 cm
SIRONA GI I-SIZE
i-Size universal ISOFIX
40–105 cm
max. 20 kg
030093
UN Regulation No. 129/03
Cybex GmbH
Riedingerstr. 18, 95448 Bayreuth
Germany
Thank you for choosing the Sirona Gi i-Size newborn inlay (1).
Carefully read this user guide before installing the newborn inlay (1) on the
Sirona Gi i-Size car seat. Always keep the guide to hand in the designated
compartment of the Sirona Gi i-Size.
The usage of this newborn inlay (1), as well as the enclosed optional additional
insert (comfort inlay) (2), is permitted with the CYBEX Sirona Gi i-Size car
seat only.
PRODUCT PARTS
Newborn inlay (1)
Optional additional insert (2)
Shoulder belts (3)
Belt buckle (4)
Headrest of the newborn inlay (5)
Side pads of the newborn inlay (6)
Lap belts (7)
Seat surface of the newborn inlay (8)

EN
5
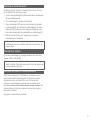
INSTALLATION OF THE NEWBORN INLAY
The Newborn inlay (1) allows the Sirona Gi i-Size to be used from 40 cm.
When your child reaches a height of 60 cm, it should be removed again.
1. To use the Newborn Inlay (1) with the child seat loosen the Shoulder belts
(3) and open the Belt buckle (4) .
2. Now take the Newborn inlay (1) and place it in the child seat.
3. Place the Shoulder belts (3) right and left next to the Headrest of the
newborn inlay (5), above the Side pads of the newborn inlay (6). Then,
guide the Lap belts (7) on the right and left through the cut-outs provided
between the Side pads (6) and the Seat surface of the newborn inlay (8).
4. The seat can now be used for your baby. The restraining process is
described in the user guide of the car seat.
💡Adjusting the headrest in an upward position makes it easier to insert
the newborn inlay. Make sure that the headrest has been returned to the
appropriate position before starting to drive.
CLEANING OF THE COVER
Before you wash the Newborn inlay (1), both foams must be removed. There
are openings in the fabric for this purpose.
💡The cover may only be washed at 30°C with a delicate wash program
otherwise it may result in discolouration of the cover fabric. Please wash
the cover separately from other laundry and do not dry it in the dryer or in
direct sunlight!
MANUFACTURER‘S WARRANTY AND DISPOSAL REGULATION
CYBEX GmbH (Riedingerstr. 18, 95448 Bayreuth, Germany) gives you 3
years warranty on this product. The warranty is valid in the country where
this product was initially sold by a retailer to a customer. The contents of the
warranty and all essential information required for the assertion of the warranty
can be found on our homepage: go.cybex-online.com/manufacturer-
warranty-car-seats. If a warranty is shown in the article description, your legal
Please observe the waste disposal regulations in your country.

6
IT
PANORAMICA
40 – 48 cm
48 – 60 cm
61 – 105 cm
INSTALLAZIONE DELL'INSERTO AGGIUNTIVO OPZIONALE
La confezione contiene un inserto aggiuntivo opzionale (2) per neonati piccoli.
È concepito per migliorare la posizione della seduta di bambini prematuri e
appena nati. Deve essere rimosso dal seggiolino appena il bambino raggiunge
l'altezza di 48 cm. Se il bambino è alto più di 48 cm al primo utilizzo del
seggiolino auto, l'inserto non è necessario ed è possibile passare alla lettura
del capitolo "Installazione dell'inserto neonato".
1. Usare l'inserto aggiuntivo opzionale (2) con le cinture del seggiolino
allentate (3)(4).
2. Spostare il poggiatesta in una posizione più alta.
3. Posizionare l'inserto aggiuntivo opzionale (2)
al di sotto delle parti morbide dopo aver rovesciato il rivestimento verso la
parte anteriore.
4. Riposizionare il rivestimento e spingerlo nello spazio dietro l'inserto
aggiuntivo opzionale (2).
5. Regolare il poggiatesta nella posizione più bassa. Assicurarsi che sia
guidato dietro l'inserto aggiuntivo opzionale (2).
6. Prendere l'inserto neonato (1) e posizionarlo nel seggiolino come descritto
nel capitolo “Installazione dell'inserto neonato”.
CERTIFICAZIONE
Sirona Gi i-Size
UN R129/03
con inserto neonato
Gamma delle taglie:
40 – 105 cm
SIRONA GI I-SIZE
i-Size universal ISOFIX
40–105 cm
max. 20 kg
030093
UN Regulation No. 129/03
Cybex GmbH
Riedingerstr. 18, 95448 Bayreuth
Germany
Grazie per aver scelto l'inserto neonato Sirona Gi i-Size (1).
Leggere attentamente questa guida utente prima di installare l'inserto neonato
(1) sul seggiolino auto Sirona Gi i-Size. Tenere sempre la guida a portata di
mano nell'apposito scomparto del seggiolino Sirona Gi i-Size.
L'uso dell'inserto neonato (1), nonché dell'inserto aggiuntivo opzionale allegato
(2), è consentito solo con il seggiolino auto CYBEX Sirona Gi i-Size.
PARTI DEL PRODOTTO
Inserto neonato (1)
Inserto aggiuntivo opzionale (2)
Cinture (3)
Fibbia della cintura (4)
Poggiatesta dell'inserto neonato (5)
Imbottiture laterali dell'inserto neonato (6)
Cinture addominali (7)
Seduta dell'inserto neonato (8)

IT
7
💡L'inserto aggiuntivo opzionale deve essere usato solo in combinazione con
l'inserto neonato.
💡L'inserto aggiuntivo opzionale deve essere rimosso quando il bambino
raggiunge un'altezza di 48 cm.
INSTALLAZIONE DELL'INSERTO NEONATO
L’inserto neonato (1) permette di utilizzare Sirona Gi i-Size da 40 cm. Quando
il bambino raggiunge un'altezza di 60 cm, deve essere nuovamente rimosso.
1. Usare l'inserto neonato (1) con le cinture del seggiolino allentate (3) e
(4).
2. Prendere l'inserto neonato (1) e posizionarlo nel seggiolino.
3. Posizionare le cinture (3) a destra e a sinistra accanto al poggiatesta
dell'inserto neonato (5), sopra le imbottiture laterali dell'inserto (6). Quindi,
indirizzare le cinture addominali (7) a destra e a sinistra attraverso le
aperture previste tra le imbottiture laterali (6) e la seduta dell'inserto
neonato (8).
4. Il seggiolino adesso può essere usato dal bambino. La procedura di
contenimento è descritta nella guida utente del seggiolino auto.
💡La regolazione del poggiatesta verso l'alto facilita l'inserimento dell'inserto
neonato. Assicurarsi che il poggiatesta sia stato riportato nella posizione
appropriata prima di iniziare a guidare.
PULIZIA DEL RIVESTIMENTO
Prima di lavare l'inserto neonato (1), entrambe le schiume devono essere
rimosse. A questo scopo, il tessuto dispone di aperture.
💡Il rivestimento può essere lavato solo a 30°C con un programma di
lavaggio per capi delicati, altrimenti il tessuto potrebbe scolorirsi. Lavare il
rivestimento separatamente dagli altri capi e non asciugarlo in asciugatrice
né alla luce solare diretta!
GARANZIA DEL FABBRICANTE E REGOLAMENTO SULLO
SMALTIMENTO
garanzia di 3 anni su questo prodotto. La garanzia è valida nel Paese in cui
questo prodotto è stato inizialmente venduto da un rivenditore al dettaglio
al cliente. Il contenuto della garanzia e tutte le informazioni essenziali
richieste per la validità della garanzia sono disponibili sulla nostra homepage:
go.cybex-online.com/manufacturer-warranty-car-seats. Se, nella
descrizione dell’articolo, si fa riferimento a una garanzia, i diritti legali nei nostri
confronti per eventuali difetti rimangono inalterati.

8
FR
APERÇU
40 – 48 cm
48 – 60 cm
61 – 105 cm
INSTALLATION DE L’INSERT SUPPLÉMENTAIRE FACULTATIF
L’emballage contient un insert supplémentaire facultatif (2) pour les petits
nouveau-nés. Il est conçu pour améliorer la position assise des enfants
prématurés et nouveau-nés. Il doit être retiré du siège auto quand l’enfant
atteint une hauteur de 48 cm. Si votre bébé mesure plus de 48 cm quand vous
commencez à utiliser le siège auto, l’insert n’est pas requis et vous pouvez
passer directement au chapitre « Installation de l’insert nouveau-né ».
1. Pour utiliser l’insert supplémentaire facultatif (2) avec le siège auto,
relâchez les ceintures d'épaule (3) et ouvrez la boucle de ceinture (4).
2. Levez l’appuie-tête à une position plus élevée.
3. Posez l’insert supplémentaire facultatif (2) sur la surface du siège, sous la
housse des parties textiles après avoir basculé la housse vers l’avant.
4. Replacez la housse et poussez-la dans l’espace derrière l’insert
supplémentaire facultatif (2).
5. Réglez l’appuie-tête à la position la plus basse. Assurez-vous qu’il est
acheminé derrière l’insert supplémentaire facultatif (2).
6. Placez maintenant l’insert nouveau-né (1) dans le siège enfant, comme
indiqué dans le chapitre « Installation de l’insert nouveau-né ».
💡L’insert supplémentaire facultatif doit être utilisé uniquement avec l’insert
nouveau-né.
💡L’insert supplémentaire facultatif doit être retiré quand l’enfant fait plus de
48 cm de hauteur.
CERTIFICATION
Sirona Gi i-Size
Règlement R129/03 de
l’ONU
avec insert nouveau-né
Intervalle de tailles :
40 à 105 cm
Poids : jusqu’à 20 kg
SIRONA GI I-SIZE
i-Size universal ISOFIX
40–105 cm
max. 20 kg
030093
UN Regulation No. 129/03
Cybex GmbH
Riedingerstr. 18, 95448 Bayreuth
Germany
Merci d’avoir choisi l’insert nouveau-né Sirona Gi i-Size (1).
Lisez attentivement ce guide utilisateur avant d’installer l’insert nouveau-né (1)
sur le siège auto Sirona Gi i-Size. Gardez toujours ce guide à portée de main,
L’utilisation de cet insert nouveau-né (1) ainsi que de l’insert supplémentaire
facultatif (2) fourni est autorisée avec le siège auto CYBEX Sirona Gi i-Size
seulement.
PIÈCES DU PRODUIT
Insert nouveau-né (1)
Insert supplémentaire facultatif (2)
Ceintures d’épaule (3)
Boucle de ceinture (4)
Appuie-tête de l’insert nouveau-né (5)
Coussinets latéraux de l’insert nouveau-né (6)
Ceintures abdominales (7)
Surface de siège de l’insert nouveau-né (8)

FR
9
INSTALLATION DE L’INSERT NOUVEAU-NÉ
L’insert nouveau-né (1) permet l’utilisation du Sirona Gi i-Size à partir de
40 cm. Il faut le retirer quand votre enfant atteint une hauteur de 60 cm.
1. Pour utiliser l’insert nouveau-né (1) avec le siège auto, relâchez les
ceintures d'épaule (3) et ouvrez la boucle de ceinture (4).
2. Placez maintenant l’insert nouveau-né (1) dans le siège enfant.
3. Placez les ceintures d’épaule (3) à droite et à gauche de l’appuie-tête
de l’insert nouveau-né (5), au-dessus des coussinets latéraux de l’insert
nouveau-né (6). Acheminez ensuite les ceintures abdominales (7) à droite
et à gauche, dans les découpes pratiquées entre les coussinets latéraux
(6) et la surface de siège de l’insert nouveau-né (8).
4. Vous pouvez maintenant placer votre bébé dans le siège. Le processus de
retenue est décrit dans le guide utilisateur du siège auto.
💡Le réglage de l’appuie-tête en position relevée facilite la mise en place de
l’insert nouveau-né. Assurez-vous de remettre l’appuie-tête à la bonne
position avant de conduire.
NETTOYAGE DE LA HOUSSE
Avant de laver l’insert nouveau-né (1), les deux mousses doivent être retirées.
💡La housse ne doit être lavée qu’à 30 °C avec un programme de lavage
délicat ; sinon, le tissu de la housse pourrait se décolorer. Veuillez laver la
housse séparément des autres linges et ne la séchez pas dans le sèche-
linge ou à la lumière directe du soleil !
GARANTIE DU FABRICANT ET RÉGLEMENTATION RELATIVE À
LA MISE AU REBUT
CYBEX GmbH (Riedingerstr. 18, 95448 Bayreuth, Allemagne) vous donne
3 ans de garantie sur ce produit. La garantie est valable dans le pays où ce
produit a été initialement vendu par un revendeur à un client. Le contenu de la
garantie se trouvent sur notre page d’accueil :
go.cybex-online.com/manufacturer-warranty-car-seats. Si une garantie est
indiquée dans la description de l’article, vos droits légaux contre nous pour les
défauts restent inchangés.
Veuillez respecter la réglementation de votre pays relative à l’élimination
des déchets.

10
NL
OVERZICHT
40 – 48 cm
48 – 60 cm
61 – 105 cm
HET OPTIONELE EXTRA INLEGKUSSEN INSTALLEREN
De verpakking bevat een optioneel extra inlegkussen (2) voor kleine
pasgeborenen. Het werd ontworpen om de zitpositie van premature en
pasgeboren kinderen te verbeteren. Het moet worden verwijderd van het
kinderstoeltje zodra het kind 48 cm lang is. Als uw baby langer is dan
48 cm wanneer hij of zij het autostoeltje voor het eerst gebruikt, dan is
het inlegkussen niet nodig en kunt u doorgaan naar het hoofdstuk "De
stoelverkleiner installeren".
1. Om het optionele inlegkussen (2) te gebruiken met het kinderzitje, maak de
schouderriemen (3) los en open de riemgesp (4).
2. Beweeg de hoofdsteun naar een hogere positie.
3. Plaats het optionele inlegkussen (2) op het zitoppervlak onder de zachte
goederenhoes nadat u de hoes naar voren heeft geklapt.
4. Plaats de hoes terug en duw ze in de opening achter het optionele extra
inlegkussen (2).
5. Stel de hoofdsteun in op de laagste positie. Zorg ervoor dat die achter het
optionele extra inlegkussen (2) gaat.
6. Neem nu de stoelverkleiner (1) en plaats die in het kinderzitje zoals
beschreven in het hoofdstuk "De stoelverkleiner installeren".
CERTIFICERING
Sirona Gi i-Size
VN-reglement nr.
16 129/03
met stoelverkleiner
Maat: 40 – 105 cm
Gewicht: max. 20 kg
SIRONA GI I-SIZE
i-Size universal ISOFIX
40–105 cm
max. 20 kg
030093
UN Regulation No. 129/03
Cybex GmbH
Riedingerstr. 18, 95448 Bayreuth
Germany
Dank u om voor de Sirona Gi i-Size stoelverkleiner te kiezen (1).
Lees deze gebruiksaanwijzing aandachtig door voordat u de stoelverkleiner (1)
installeert op het Sirona Gi i-Size autostoeltje. Bewaar de handleiding altijd in
het aangewezen bagagevak van de Sirona Gi i-Size.
Het gebruik van deze stoelverkleiner (1), en het bijgevoegde extra optionele
inlegkussen (2), is enkel toegestaan in het CYBEX Sirona Gi i-Size
autostoeltje.
PRODUCTONDERDELEN
Stoelverkleiner (1)
Optioneel extra inlegkussen (2)
Schouderriemen (3)
Riemgesp (4)
Hoofdsteun van de stoelverkleiner (5)
Zijpads van de stoelverkleiner (6)
Buikriemen (7)
Zitvlak van de stoelverkleiner (8)

NL
11
💡Het optionele extra inlegkussen mag alleen worden gebruikt in combinatie
met de stoelverkleiner.
💡Het optionele extra inlegkussen moet worden verwijderd wanneer het kind
langer is dan 48 cm.
DE STOELVERKLEINER INSTALLEREN
Met de stoelverkleiner (1) kan de Sirona Gi i-Size gebruikt worden
vanaf 40 cm. Wanneer uw kind de lengte van 60 cm bereikt, moet u de
stoelverkleiner weer verwijderen.
1. Om de stoelverkleiner (1) te gebruiken met het kinderzitje, maak de
schouderriemen (3) los en open de riemgesp (4).
2. Neem nu de stoelverkleiner (1) en plaats hem in het autostoeltje.
3. Plaats de schouderriemen (3) rechts en links naast de hoofdsteun van
de stoelverkleiner (5) boven de zijpads van de stoelverkleiner (6). Leid
dan de buikriemen (7) aan de linker- en rechterkant door de voorziene
uitsnijdingen tussen de zijpads (6) en het zitvlak van de stoelverkleiner (8).
4. De stoel is nu klaar voor uw baby. Het bevestigingsproces staat in de
gebruiksaanwijzing van het autostoeltje.
💡U kunt de hoofdsteun verticaal aanpassen zodat de stoelverkleiner
eenvoudiger kan worden ingebracht. Zorg ervoor dat u de hoofdsteun
opnieuw in de juiste positie plaatst voordat u begint te rijden.
DE HOES REINIGEN
Voordat u de stoelverkleiner (1) wast, moeten beide schuimstukken
verwijderen worden. Er zijn hiervoor openingen in de stof.
💡De hoes mag alleen gewassen worden op 30°C met een zacht
wasprogramma, anders kan de stof van de hoes verkleuren. Was de hoes
niet met ander wasgoed en niet drogen in de wasdroger of direct zonlicht!
GARANTIE EN AFVALVERWIJDERINGSVOORSCHRIFTEN VAN DE
FABRIKANT
CYBEX GmbH (Riedingerstr. 18, 95448 Bayreuth, Duitsland) geeft u 3 jaar
garantie op dit product. De garantie is alleen geldig in het land waar het
product aanvankelijk werd verkocht door een retailer aan een klant. De inhoud
van de garantie en alle essentiële informatie vereist voor de aanspraak erop
staan op onze startpagina:
go.cybex-online.com/manufacturer-warranty-car-seats. Als een garantie
wordt getoond in de beschrijving van een artikel, blijven uw wettelijke rechten
ten aanzien van ons voor defecten onveranderd.
Leef de voorschriften inzake afvalverwijdering in uw land na.

12
PL
40 – 48 cm
48 – 60 cm
61 – 105 cm
(2) dla noworodków o niskiej
1. (2)
(3)(4).
2.
3. (2)
4.
(2).
5.
(2).
6. (1) w foteliku dla dziecka,
💡
noworodka.
💡
48 cm wzrostu.
CERTYFIKACJA
Sirona Gi i-Size
UN R129/03
Zakres rozmiarów:
40 – 105 cm
Masa: do 20 kg
SIRONA GI I-SIZE
i-Size universal ISOFIX
40–105 cm
max. 20 kg
030093
UN Regulation No. 129/03
Cybex GmbH
Riedingerstr. 18, 95448 Bayreuth
Germany
(1).
(1) w foteliku samochodowym Sirona
Sirona Gi i-Size.
(1)(2)
(1)
(2)
Pasy naramienne (3)
Klamra pasa (4)
(5)
(6)
Pasy biodrowe (7)
(8)

PL
13
(1)
1. (1)
pasy naramienne (3)(4).
(1) w foteliku dla dziecka.
3. (3)
dla noworodka (5)(6)
(7)
(6)
noworodka (8).
4.
💡
CZYSZCZENIE POKROWCA
(1)
💡
ODPADÓW
CYBEX GmbH (Riedingerstr. 18, 95448 Bayreuth, Niemcy) udziela 3-letniej
go.cybex-online.com/manufacturer-warranty-car-seats
nienaruszone.

14
HU
ÁTTEKINTÉS
40 – 48 cm
48 – 60 cm
61 – 105 cm
(2)
újszülöttek számára. Úgy tervezték, hogy javítsa a koraszülöttek és újszülöttek
nagyobb, akkor a betétre nincs szükség, és közvetlenül folytathatja az „Újszü-
1. (2) gyermeküléssel való használatához
lazítsa meg a vállöveket (3), és nyissa ki az övcsatot (4).
2. Helyezze a fejtámaszt magasabb helyzetbe.
3. (2) a párnahuzat alatti
4.
mögötti résbe (2).
5.
(2) mögött található.
6. Most vegye ki az újszülött betétet (1), és helyezze a gyermekülésbe az
💡
💡
magassága meghaladja a 48 cm-t.
TANÚSÍTVÁNY
SIRONA Gi i-Size
ENSZ R129/03
Mérettartomány:
40–105 cm
Súly: 20 kg-ig
SIRONA GI I-SIZE
i-Size universal ISOFIX
40–105 cm
max. 20 kg
030093
UN Regulation No. 129/03
Cybex GmbH
Riedingerstr. 18, 95448 Bayreuth
Germany
(1) választotta.
(1) a Sirona Gi i-Size autóülésbe való
mindig tartsa a Sirona Gi i-Size erre a célra szolgáló rekeszében.
(1)
(2) csak a CYBEX Sirona Gi i-Size autóüléssel együtt használható.
A TERMÉK ELEMEI
(1)
(2)
Vállövek (3)
(4)
(5)
(6)
Medenceövek (7)
(8)

HU
15
Az újszülött betét (1)
1. (1) gyermeküléssel való használatához lazítsa
meg a vállöveket (3), és nyissa ki az övcsatot (4).
(1) az autóülésbe.
3. Helyezze a vállöveket (3)(5) fejtámaszának
(6). Ezután vezesse
át a medenceöveket (7) az oldalpárnák (6)
ülésfelülete (8) közötti jobb és bal oldali nyílásokon.
4. Az ülés most már használható a baba számára. A rögzítési folyamatot az
autóülés használati útmutatója írja le.
💡
A HUZAT TISZTÍTÁSA
(1)
Ehhez nyílások találhatók az anyagban.
💡
mossa, és ne szárítsa szárítógépben vagy közvetlen napsütésen!
A GYÁRTÓ GARANCIÁRA ÉS HULLADÉKKEZELÉSRE
VONATKOZÓ SZABÁLYZATA
A CYBEX GmbH (Riedingerstr. 18, 95448 Bayreuth, Németország) 3 év
szavatosságot biztosít erre a termékre. A szavatosság abban az országban
szavatosság tartalmára vonatkozó és a garancia érvényesítéséhez szükséges
minden lényeges információ megtalálható a honlapunkon:
go.cybex-online.com/manufacturer-warranty-car-seats. A termék
garantált jogait a meghibásodásokra vonatkozóan.
Kérjük, tartsa be az országában érvényes hulladékkezelési szabályozásokat.

1616
CZ
40 – 48 cm
48 – 60 cm
61 – 105 cm
(2) pro malé novorozence. Je
1. (2)
ramenní pásy (3)(4).
2.
3.
(2) na sedací plochu pod tento potah.
4. (2).
5.
(2).
6. (1)
💡
💡
48 cm.
CERTIFIKACE
Sirona Gi i-Size
UN R129/03
s novorozeneckou
Rozsah velikostí:
40–105 cm
Hmotnost: do 20 kg
SIRONA GI I-SIZE
i-Size universal ISOFIX
40–105 cm
max. 20 kg
030093
UN Regulation No. 129/03
Cybex GmbH
Riedingerstr. 18, 95448 Bayreuth
Germany
(1).
(1)
(1)
(2)
(1)
(2)
Ramenní pásy (3)
(4)
(5)
(6)
(7)
(8)

CZ
1717
(1)
1. (1)
ramenní pásy (3)(4).
(1)
3. Ramenní pásy (3)
(5)(6).
(7)
(6)(8).
4.
💡
polohy.
(1)
💡
slunku!
stránkách: go.cybex-online.com/manufacturer-warranty-car-seats. Pokud
Pagina se încarcă...
Pagina se încarcă...
Pagina se încarcă...
Pagina se încarcă...
Pagina se încarcă...
Pagina se încarcă...
Pagina se încarcă...
Pagina se încarcă...
Pagina se încarcă...
Pagina se încarcă...
Pagina se încarcă...
Pagina se încarcă...
Pagina se încarcă...
Pagina se încarcă...
Pagina se încarcă...
Pagina se încarcă...
Pagina se încarcă...
Pagina se încarcă...
Pagina se încarcă...
Pagina se încarcă...
Pagina se încarcă...
Pagina se încarcă...
Pagina se încarcă...
Pagina se încarcă...
Pagina se încarcă...
Pagina se încarcă...
Pagina se încarcă...
Pagina se încarcă...
Pagina se încarcă...
Pagina se încarcă...
Pagina se încarcă...
Pagina se încarcă...
Pagina se încarcă...
Pagina se încarcă...
Pagina se încarcă...
Pagina se încarcă...
Pagina se încarcă...
Pagina se încarcă...
Pagina se încarcă...
Pagina se încarcă...
Pagina se încarcă...
Pagina se încarcă...
Pagina se încarcă...
Pagina se încarcă...
Pagina se încarcă...
Pagina se încarcă...
Pagina se încarcă...
Pagina se încarcă...
Pagina se încarcă...
Pagina se încarcă...
Pagina se încarcă...
Pagina se încarcă...
Pagina se încarcă...
Pagina se încarcă...
Pagina se încarcă...
Pagina se încarcă...
Pagina se încarcă...
Pagina se încarcă...
Pagina se încarcă...
Pagina se încarcă...
Pagina se încarcă...
Pagina se încarcă...
Pagina se încarcă...
Pagina se încarcă...
Pagina se încarcă...
Pagina se încarcă...
-
 1
1
-
 2
2
-
 3
3
-
 4
4
-
 5
5
-
 6
6
-
 7
7
-
 8
8
-
 9
9
-
 10
10
-
 11
11
-
 12
12
-
 13
13
-
 14
14
-
 15
15
-
 16
16
-
 17
17
-
 18
18
-
 19
19
-
 20
20
-
 21
21
-
 22
22
-
 23
23
-
 24
24
-
 25
25
-
 26
26
-
 27
27
-
 28
28
-
 29
29
-
 30
30
-
 31
31
-
 32
32
-
 33
33
-
 34
34
-
 35
35
-
 36
36
-
 37
37
-
 38
38
-
 39
39
-
 40
40
-
 41
41
-
 42
42
-
 43
43
-
 44
44
-
 45
45
-
 46
46
-
 47
47
-
 48
48
-
 49
49
-
 50
50
-
 51
51
-
 52
52
-
 53
53
-
 54
54
-
 55
55
-
 56
56
-
 57
57
-
 58
58
-
 59
59
-
 60
60
-
 61
61
-
 62
62
-
 63
63
-
 64
64
-
 65
65
-
 66
66
-
 67
67
-
 68
68
-
 69
69
-
 70
70
-
 71
71
-
 72
72
-
 73
73
-
 74
74
-
 75
75
-
 76
76
-
 77
77
-
 78
78
-
 79
79
-
 80
80
-
 81
81
-
 82
82
-
 83
83
-
 84
84
-
 85
85
-
 86
86


Lucrări înrudite
-
CYBEX CY 171 Manualul utilizatorului
-
CYBEX S2 i-Size Manualul utilizatorului
-
CYBEX Sirona S2 i-Size 360 Degree Rotating Car Seat Manualul utilizatorului
-
CYBEX BASE T Manual de utilizare
-
CYBEX GAZELLE S Manual de utilizare
-
-
CYBEX EEZY S TWIST 2 Instrucțiuni de utilizare
-
-
-
Alte documente
-
RECARO Avan Manualul proprietarului
-
RECARO Kio Manualul proprietarului
-
mothercare Maxi-Cosi AxissFix Plus 0720038 Manualul utilizatorului
-
 Maxi Cosi MICA Manualul proprietarului
-
Brevi Alain i-Size Manualul proprietarului
-
 Maxi Cosi Beryl Manualul proprietarului
-
RECARO Salia Elite Manualul proprietarului

