
IAN 277031
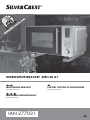
MICROWAVE BRACKET SMH 30 A1
MICROWAVE BRACKET
Assembly instructions
SUPORT CUPTOR CU MICROUNDE
Instrucţiuni de montaj
MIKROWELLENHALTERUNG
Montageanleitung

GB / CY Assembly instructions Page 1
RO Instrucţiuni de montaj Pagina 11
DE / AT / CH Montageanleitung Seite 21

GB
│
CY
│
1 ■
SMH 30 A1
Contents
Introduction ...................................................2
Information about these assembly instructions ................................... 2
Intended use ............................................................ 2
Safety. . . . . . . . . . . . . . . . . . . . . . . . . . . . . . . . . . . . . . . . . . . . . . . . . . . . . . . . 2
Package contents ..............................................3
Assembly material .............................................3
Assembly .....................................................4
Preparing for assembly .................................................... 4
Required tools ........................................................... 4
Assembly steps .......................................................... 5
Maintenance ..................................................7
Cleaning ......................................................7
Disposal ......................................................7
Appendix .....................................................7
Technical details. . . . . . . . . . . . . . . . . . . . . . . . . . . . . . . . . . . . . . . . . . . . . . . . . . . . . . . . . . 7
Kompernass Handels GmbH warranty ........................................ 8
Service ................................................................. 9
Importer ................................................................ 9

■ 2
│
GB
│
CY
SMH 30 A1
Introduction
Information about these assembly instructions
Congratulations! You have purchased a high-quality product. Familiarise yourself
with the product before assembly and first use. Please read the following assembly
instructions and safety notes carefully. Use the product only as described and for
the range of applications specified. Retain these instructions for future reference.
Please also pass all associated documents on to any future owner(s).
Intended use
This microwave wall bracket is intended exclusively for mounting microwaves
and electrical appliances with a similar constructions on walls in private, non-
commercial households. The microwave wall bracket is only intended for use
inside buildings.
No liability will be assumed for damage caused by misuse or improper handling,
the use of force or unauthorised modification. The risk shall be borne solely by
the user.
Safety
DANGER! ELECTRIC SHOCK!
► Ensure that there are no electrical cables, water or gas pipes or other lines
in the wall at the mounting location.
WARNING! RISK OF INJURY!
► Do not install the product in places under which people might stand.
CAUTION – PROPERTY DAMAGE
► Note that the supplied wall plugs are only suitable for concrete and brick
walls. If your wall is made of different types of materials or constructed
differently from what is recommended for the installation, purchase suitable
materials from a specialist shop.
► All of the assembly material supplied must be used.
► Never use violence or excessive force for assembly. This could damage the
product.
► Ensure that you do not exceed the maximum permissible load capacity of
the product of 30 kg.
► After mounting the product, check its stability and operational reliability as
well as that of the mounted load. This check should be repeated at regular
intervals (at least quarterly).

GB
│
CY
│
3 ■
SMH 30 A1
CAUTION – PROPERTY DAMAGE
► Maintain a sufficient safety distance around the mounted load to ensure
sufficient ventilation.
► In the case of damage, remove the mounted load and stop using the product.
► If in doubt, contact a suitable specialist for information on mounting this
product and do not try to mount the product yourself.
Package contents
▯ 1 x wall bracket
▯ 2 x profile rails
▯ 2 x extension rails
▯ 2 x locking screws for the extension rails
▯ 1 x allen key
▯ 6 x wall plugs
▯ 6 x fixing screws for the wall bracket
▯ 2 x locking screws for the wall bracket
▯ 2 x screw covers
▯ These assembly instructions
NOTE
► Check the package for completeness and signs of visible damage.
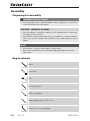
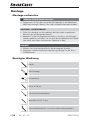
Assembly material
A B C D E
F
Ø 6 x 20 mm 3 x 3 mm S10 x 50 mm Ø 8 x 50 mm Ø 4 x15 mm —
2 x1 x6 x6 x2 x2 x

■ 4
│
GB
│
CY
SMH 30 A1
Assembly
Preparing for assembly
DANGER! ELECTRIC SHOCK!
► Ensure that there are no electrical cables, water or gas pipes or other lines
in the wall at the mounting location.
CAUTION – PROPERTY DAMAGE
► Before installation, check the suitability of the intended wall for supporting
the weight to be mounted.
► Note that the supplied wall plugs are only suitable for concrete and brick
walls. If you are unsure about the suitability of your wall, please consult an
expert.
NOTE
►
Allow plenty of time for the assembly of the product.
► Remove the individual parts from the packaging and place them within
easy reach.
Required tools
Pencil
Spirit level
Drill
Drill bit Ø 10 mm
Phillips screwdriver
Open-ended spanner SW 13 mm
Allen key 3 x 3 mm (supplied)

GB
│
CY
│
5 ■
SMH 30 A1
Assembly steps
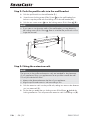
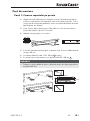
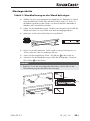
Step 1: Attaching the wall bracket to the wall
♦ Start by selecting a suitable mounting height. Take into account the dimen-
sions of the appliance that you want to mount on the product. Read the
operating instructions for the appliance to ensure the required distances to
walls or cupboards.
♦ Hold the wall bracket up to the to the desired position on the wall to use it
as a template and align it with the help of a spirit level.
♦ Mark the location of the six drill holes with a pencil.
♦ Drill holes with a diameter of 10 mm and a depth of at least 50 mm at the
marked positions.
♦ Insert the supplied wall plugs S10 x 50 mm
C
into the holes.
♦ Screw the wall bracket to the wall using the supplied screws Ø 8 x 50 mm
D
.
NOTE
►
Start with the inner holes as you will need to leave room for the screwing
motion of the open-ended spanner.
50 mm
10 mm
C
D

■ 6
│
GB
│
CY
SMH 30 A1
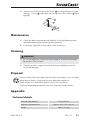
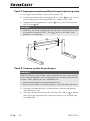
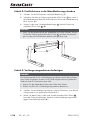
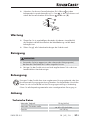
Step 2: Push the profile rails into the wall bracket
♦ Push the profile rails into the wall bracket (1.).
♦ Screw the two locking screws Ø 4 x15 mm
E
into the wall bracket from
below to stop the profile rails from falling out of the wall bracket (2.).
♦ Push the two screw covers
F
over the locking screws Ø 4 x15 mm
E
(3.).
NOTE
► If you want to use the entire width of the wall bracket, you can leave out
the locking screws Ø 4 x15 mm
E
. Bear in mind that the profile rails will no
longer be secured.
Step 3: Fitting the extension rails
NOTE
The grooves in the profile and extension rails are intended for the placement
of your appliance. Align your appliance as far as possible towards the wall.
This will provide the best hold.
► Measure the distance between the feet of your appliance.
► Align the profile and extension rails according to this.
♦ Push the extension rails into the profile rails, taking into account the distance
you just measured (1.).
♦ Ensure that you attach the two locking screws Ø 6 x 20 mm
A
behind the
locking mechanism. This will prevent the extension rails from falling out (2.).
E
F

GB
│
CY
│
7 ■
SMH 30 A1
♦ Screw the two locking screws Ø 6 x 20 mm
A
into the profile rails using the
Allen key 3 x 3 mm
B
, and tighten the locking screws Ø 6 x 20 mm
A
hand
tight (3.).
Maintenance
♦ Check the stability and operational reliability of the wall bracket and the
attached load at regular intervals (at least quarterly).
♦ If necessary, tighten all of the product's screw connections.
Cleaning
WARNING
► Do not use aggressive or abrasive cleaning agents, as these can damage
the product's outer surfaces.
♦ Clean the product using a moistened cloth and a standard commercial
household detergent.
Disposal
Dispose of the product via an approved waste disposal company or your municipal
waste disposal facility. Observe the currently applicable regulations.
Please contact your waste disposal facility if you are in any doubt.
Dispose of all packaging materials in an environmentally friendly manner.
Appendix
Technical details
Maximal load capacity 30 kg (66 lbs)
Maximum total dimensions
approx. 43 x 23.4 x 54 cm
Weight approx. 2.4 kg
A
B

■ 8
│
GB
│
CY
SMH 30 A1
Kompernass Handels GmbH warranty
Dear Customer,
This appliance has a 3-year warranty valid from the date of purchase. If this product
has any faults, you, the buyer, have certain statutory rights. Your statutory rights are
not restricted in any way by the warranty described below.
Warranty conditions
The validity period of the warranty starts from the date of purchase. Please keep your
original receipt in a safe place. This document will be required as proof of purchase.
If any material or production fault occurs within three years of the date of purchase
of the product, we will either repair or replace the product for you at our discretion.
This warranty service is dependent on you presenting the defective appliance and
the proof of purchase (receipt) and a short written description of the fault and its time
of occurrence.
If the defect is covered by the warranty, your product will either be repaired or replaced
by us. The repair or replacement of a product does not signify the beginning of a
new warranty period.
Warranty period and statutory claims for defects
The warranty period is not prolonged by repairs effected under the warranty. This also
applies to replaced and repaired components. Any damage and defects present at
the time of purchase must be reported immediately after unpacking. Repairs carried out
after expiry of the warranty period shall be subject to a fee.
Scope of the warranty
This appliance has been manufactured in accordance with strict quality guidelines
and inspected meticulously prior to delivery.
The warranty covers material faults or production faults. The warranty does not extend
to product parts subject to normal wear and tear or fragile parts such as switches,
batteries, baking moulds or parts made of glass.
The warranty does not apply if the product has been damaged, improperly used or
improperly maintained. The directions in the operating instructions for the product
regarding proper use of the product are to be strictly followed. Uses and actions that
are discouraged in the operating instructions or which are warned against must be
avoided.
This product is intended solely for private use and not for commercial purposes. The
warranty shall be deemed void in cases of misuse or improper handling, use of force
and modifications/repairs which have not been carried out by one of our authorised
Service centres.

GB
│
CY
│
9 ■
SMH 30 A1
Warranty claim procedure
To ensure quick processing of your case, please observe the following instructions:
▯ Please have the till receipt and the item number (e.g. IAN 12345) available as
proof of purchase.
▯ You will find the item number on the type plate, an engraving on the front page of
the instructions (bottom left), or as a sticker on the rear or bottom of the appliance.
▯ If functional or other defects occur, please contact the service department listed
either by telephone or by e-mail.
▯ You can return a defective product to us free of charge to the service address
that will be provided to you. Ensure that you enclose the proof of purchase (till
receipt) and information about what the defect is and when it occurred.
You can download these instructions along with many other manuals, product
videos and software on www.lidl-service.com.
Service
Service Great Britain
Tel.: 0871 5000 720 (£ 0.10/Min.)
E-Mail: [email protected]
CY
Service Cyprus
Tel.: 8009 4409
E-Mail: [email protected]
IAN 277031
Importer
Please note that the following address is not the service address. Please use the
service address provided in the operating instructions.
KOMPERNASS HANDELS GMBH
BURGSTRASSE 21
44867 BOCHUM
GERMANY
www.kompernass.com

SMH 30 A1
■ 10

RO
│
11 ■
SMH 30 A1
Cuprins
Introducere ..................................................12
Informaţii privind aceste instrucţiuni de montaj .................................12
Utilizarea conform destinaţiei ..............................................12
Siguranţa ....................................................12
Furnitura ....................................................13
Material de montaj ............................................13
Montarea ....................................................14
Pregătirea montajului ..................................................... 14
Scule necesare .......................................................... 14
Paşii de montare ........................................................15
Întreţinerea ..................................................17
Curăţarea ...................................................17
Eliminarea ...................................................17
Anexă ......................................................17
Date tehnice ............................................................ 17
Garanţia Kompernass Handels GmbH ....................................... 18
Service-ul .............................................................. 19
Importator ............................................................. 19

■ 12
│
RO
SMH 30 A1
Introducere
Informaţii privind aceste instrucţiuni de montaj
Felicitări! Prin această achiziţionare aţi optat pentru un produs de calitate superi-
oară. Înainte de montaj şi de punerea în funcţiune a produsului familiarizaţi-vă cu
acesta. În acest scop citiţi cu atenţie următoarele instrucţiuni de montaj, precum
şi indicaţiile de siguranţă. Utilizaţi produsul numai în modul descris şi numai în
scopurile menţionate. Păstraţi cu grijă aceste instrucţiuni de montaj. În cazul trans-
miterii produsului unei alte persoane, predaţi-i, de asemenea, toate documentele
aferente acestuia.
Utilizarea conform destinaţiei
Suportul pentru cuptorul cu microunde este destinat exclusiv fixării pe perete a
cuptoarelor cu microunde şi a altor aparate electrice mici, similare ca mod de
construcţie, pentru uz casnic şi nu pentru uz comercial. Suportul pentru cuptorul
cu microunde este destinat numai utilizării în interiorul clădirilor.
Nu se acordă garanţie pentru pagubele rezultate în urma manevrării abuzive
sau necorespunzătoare, al uzului de forţă sau al modificărilor neautorizate.
Riscul este asumat în totalitate de către utilizator.
Siguranţa
PERICOL! ELECTROCUTARE!
► Asiguraţi-vă că în locul de montare nu există în perete cabluri de curent,
conducte de apă, gaz sau alte conducte.
AVERTIZARE! PERICOL DE RĂNIRE!
► Nu montaţi produsul deasupra locurilor în care se pot afla persoane.
ATENŢIE - PAGUBE MATERIALE!
► Se va avea în vedere că diblurile livrate sunt adecvate numai pentru pereţi
din beton şi cărămidă plină. În cazul în care peretele prevăzut pentru insta-
lare este realizat din alte de tipuri de materiale şi de construcţie, procuraţi-
vă materialul de montaj adecvat din magazinele de specialitate.
► Materialul de montaj inclus în furnitură trebuie utilizat în totalitate.
► Nu utilizaţi la montaj niciodată forţa. Acest lucru poate deteriora produsul.
► Atenţie, capacitatea portantă maximă admisă a produsului nu trebuie să
depăşească 30 kg.

RO
│
13 ■
SMH 30 A1
ATENŢIE - PAGUBE MATERIALE!
► După montarea produsului şi a sarcinii fixate pe acesta, verificaţi dacă exis-
tă suficientă stabilitate şi siguranţă la operare. Această verificare trebuie
repetată la intervale regulate (cel puţin trimestrial).
► Păstraţi o distanţă de siguranţă suficientă în jurul sarcinii aplicate, pentru
a asigura destulă aerisire și ventilaţie.
► În caz de deteriorări asupra produsului, îndepărtaţi imediat sarcina aplicată
şi nu mai folosiţi produsul.
► În caz de nelămuriri, adresaţi-vă unui specialist calificat şi nu încercaţi dvs.
să realizaţi montajul!
Furnitura
▯ 1 suport pentru perete
▯ 2 şine profilate
▯ 2 şine de prelungire
▯ 2 şuruburi de fixare a şinei de prelungire
▯ 1 cheie hexagonală interioară
▯ 6 dibluri
▯ 6 şuruburi de prindere a suportului pe perete
▯ 2 şuruburi de asigurare a suportului pe perete
▯ 2 capace pentru şurub
▯ Aceste instrucţiuni de montaj
INDICAŢIE
► Verificaţi dacă furnitura este completă şi dacă prezintă deteriorări vizibile.
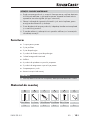
Material de montaj
A B C D E
F
Ø 6 x 20 mm 3 x 3 mm S10 x 50 mm Ø 8 x 50 mm Ø 4 x 15 mm —
2 x 1 x 6 x 6 x 2 x 2 x

■ 14
│
RO
SMH 30 A1
Montarea
Pregătirea montajului
PERICOL! ELECTROCUTARE!
► Asiguraţi-vă că în locul de montare nu există în perete cabluri de curent,
conducte de apă, gaz sau alte conducte.
ATENŢIE - PAGUBE MATERIALE!
► Verificaţi neapărat înainte de instalare dacă peretele este adecvat pentru
greutatea de care urmează a fi aplicată.
► Se va avea în vedere că diblurile livrate sunt adecvate numai pentru pereţi
din beton şi cărămidă plină. Dacă nu sunteţi sigur de structura peretelui
dvs., consultaţi un specialist.
INDICAŢIE
►
Acordaţi-vă suficient timp pentru montarea produsului.
► Scoateţi toate componentele din ambalaj şi aşezaţi-le în aşa fel încât să vă
fie la îndemână.
Scule necesare
Creion
Nivelă
Maşină de găurit
Burghiu Ø 10 mm
Şurubelniţă în cruce
Cheie fixă de 13 mm
Cheie hexagonală interioară 3 x 3 mm (inclusă în furnitură)

RO
│
15 ■
SMH 30 A1
Paşii de montare
Pasul 1: Fixarea suportului pe perete
♦ Alegeţi mai întâi înălţimea potrivită pentru montaj. La această operaţiune
ţineţi cont şi de dimensiunile aparatului care va fi aşezat pe produs. Citiţi in-
strucţiunile de utilizare ale aparatului pentru a respecta distanţele necesare
faţă de pereţi sau dulapuri.
♦ Ţineţi suportul pentru perete pe post de şablon în locul dorit pe perete şi
poziţionaţi-l drept cu ajutorul unei nivele.
♦ Marcaţi cele şase găuri cu un creion.
♦ În locurile marcate executaţi găuri cu diametrul de 10 mm şi adâncimea de
cel puţin 50 mm.
♦ Introduceţi diblurile livrate S10 x 50 mm
C
în găuri.
♦ Înşurubaţi suportul pe perete cu şuruburile livrate Ø 8 x 50 mm
D
.
INDICAŢIE
►
Începeţi cu găurile aflate la interior, deoarece aveţi nevoie de spaţiu pentru
mişcarea cheii fixe.
50 mm
10 mm
C
D

■ 16
│
RO
SMH 30 A1
Pasul 2: Împingerea şinelor profilate în suportul pentru perete
♦ Împingeţi şinele profilate în suportul pentru perete (1.).
♦ Înşurubaţi cele două şuruburi de asigurare Ø 4 x 15 mm
E
de jos în suportul
pentru perete, pentru ca şinele profilate să nu cadă din suport. (2.).
♦ Trageţi cele două capace pentru şuruburi
F
peste şuruburile de asigurare
Ø 4 x 15 mm
E
(3.).
INDICAŢIE
►
Dacă doriţi să utilizaţi toată lăţimea suportului pentru perete, puteţi renunţa
la şuruburile de asigurare Ø 4 x 15 mm
E
. Ţineţi cont că, astfel, şinele
profilate nu sunt asigurate.
Pasul 3: Fixarea şinelor de prelungire
INDICAŢIE
Adânciturile de pe şinele profilate şi de pe şinele de prelungire sunt prevăzute
pentru aşezarea aparatului dvs. Aşezaţi aparatul dvs. pe cât posibil în direcţia
peretelui. Astfel, aparatul dvs. are o stabilitate bună.
► Măsuraţi distanţele dintre picioarele aparatului dvs.
► Ajustaţi şinele profilate şi cele de prelungire în funcţie de aceste măsurători.
♦ Împingeţi şinele de prelungire în şinele profilate, ţinând cont de distanţa
măsurată anterior (1.).
♦ Aveţi grijă să fixaţi cele două şuruburi de fixare Ø 6 x 20 mm
A
în spatele
dispozitivului de siguranţă. Astfel, şinele de prelungire sunt asigurate împo-
triva căderii (2.).
E
F

RO
│
17 ■
SMH 30 A1
♦ Înşurubaţi cele două şuruburi de fixare Ø 6 x 20 mm
A
, cu cheia hexago-
nală interioară livrată 3 x 3 mm
B
, în şinele profilate şi strângeţi şuruburile
de fixare Ø 6 x 20 mm
A
manual (3.).
Întreţinerea
♦ Verificaţi la intervale regulate (cel puţin trimestrial) stabilitatea şi siguranţa la
operare a suportului pentru perete şi a sarcinii aplicate.
♦ Strângeţi la nevoie din nou toate şuruburile produsului.
Curăţarea
AVERTIZARE
► Nu utilizaţi substanţe de curăţare agresive sau abrazive, deoarece acestea
pot deteriora suprafaţa produsului.
♦ Curăţaţi produsul cu o lavetă uşor umezită şi cu un detergent obişnuit, din
comerţ.
Eliminarea
Eliminaţi produsul prin intermediul unei firme autorizate sau prin intermediul
serviciului local de eliminare a deşeurilor. Respectaţi prevederile actuale în
vigoare. Dacă aveţi nelămuriri, contactaţi serviciul local de eliminare a
deşeurilor.
Eliminaţi toate materialele de ambalare în mod ecologic.
Anexă
Date tehnice
Capacitate portantă maximă 30 kg (66 lbs)
Dimensiunea maximă
cca 43 x 23,4 x 54 cm
Greutate cca 2,4 kg
A
B

■ 18
│
RO
SMH 30 A1
Garanţia Kompernass Handels GmbH
Stimate client,
Pentru acest aparat se acordă o garanţie de 3 ani de la data cumpărării. În cazul
în care produsul prezintă defecte, beneficiaţi de drepturi legale faţă de vânzătorul
produsului. Aceste drepturi legale nu sunt limitate prin garanţia noastră prezentată în
cele ce urmează.
Condiţii de garanţie
Perioada de garanţie începe de la data cumpărării. Păstraţi cu grijă bonul fiscal
original. Acesta este necesar pentru a dovedi cumpărarea.
Dacă în decurs de trei ani de la data cumpărării acestui produs apare un defect de
material sau de fabricaţie, produsul va fi reparat sau înlocuit de către noi – la alegerea
noastră – în mod gratuit. Garanţia presupune ca în timpul perioadei de trei ani să se
prezinte aparatul defect şi dovada cumpărării (bonul fiscal), precum şi o scurtă descriere
în scris, în care să se specifice în ce constă defectul şi când a apărut acesta.
Dacă defectul este acoperit de garanţia noastră, veţi primi înapoi produsul reparat sau
unul nou. Odată cu reparaţia sau înlocuirea produsului nu începe o nouă perioadă
de garanţie.
Perioada de garanţie şi pretenţiile legale privind defectele
Perioada de garanţie nu este prelungită după efectuarea reparaţiilor realizate în
perioada de garanţie. Acest lucru este valabil şi pentru piesele înlocuite şi reparate.
Eventualele deteriorări şi deficienţe prezente deja la cumpărare trebuie semnalate
imediat după dezambalarea produsului. Reparaţiile necesare după expirarea perioa-
dei de garanţie se efectuează contra cost.
Domeniul de aplicare a garanţiei
Aparatul a fost produs cu grijă, în conformitate cu orientările stricte privind calitatea
şi verificat cu rigurozitate înaintea livrării.
Garanţia se acordă în caz de defecte de material sau de fabricaţie. Această garanţie
nu se extinde asupra componentelor produsului care sunt expuse uzurii normale şi
care, prin urmare, pot fi considerate piese de uzură sau asupra deteriorărilor apărute
la componentele fragile, de exemplu comutatoare, acumulatori, forme de copt sau
componente realizate din sticlă.
Această garanţie se pierde în cazul în care produsul a fost deteriorat, a fost utilizat
sau întreţinut în mod necorespunzător. Pentru utilizarea corespunzătoare a produsului
trebuie respectate cu stricteţe toate indicaţiile prezentate în instrucţiunile de utilizare.
Trebuie evitate în mod obligatoriu utilizările şi acţiunile nerecomandate sau care fac
obiectul unor avertizări în cadrul instrucţiunilor de utilizare.
Aparatul este destinat numai uzului privat şi nu utilizărilor comerciale. În cazul ma-
nevrării abuzive sau necorespunzătoare, al uzului de forţă şi al intervenţiilor care
nu au fost realizate de către filiala noastră autorizată de service, garanţia îşi pierde
valabilitatea.
Pagina se încarcă...
Pagina se încarcă...
Pagina se încarcă...
Pagina se încarcă...
Pagina se încarcă...
Pagina se încarcă...
Pagina se încarcă...
Pagina se încarcă...
Pagina se încarcă...
Pagina se încarcă...
Pagina se încarcă...
Pagina se încarcă...
Pagina se încarcă...
-
 1
1
-
 2
2
-
 3
3
-
 4
4
-
 5
5
-
 6
6
-
 7
7
-
 8
8
-
 9
9
-
 10
10
-
 11
11
-
 12
12
-
 13
13
-
 14
14
-
 15
15
-
 16
16
-
 17
17
-
 18
18
-
 19
19
-
 20
20
-
 21
21
-
 22
22
-
 23
23
-
 24
24
-
 25
25
-
 26
26
-
 27
27
-
 28
28
-
 29
29
-
 30
30
-
 31
31
-
 32
32
-
 33
33


Silvercrest SMH 30 A1 Assembly Instructions Manual
- Tip
- Assembly Instructions Manual
- Acest manual este potrivit și pentru
în alte limbi
- English: Silvercrest SMH 30 A1
- Deutsch: Silvercrest SMH 30 A1