Parkside PDWE 8 B2 Translation Of The Original Instructions
- Tip
- Translation Of The Original Instructions

AIR FILTER REGULATOR & LUBRICATOR PDWE 8 B2
IAN 327372_1904
AIR FILTER REGULATOR &
LUBRICATOR
Translation of the original instructions
ПНЕВМОПОДГОТВЯЩА ГРУПА
Превод на оригиналното ръководство за експлоатация
UNITATE DE REVIZIE PENTRU
AER COMPRIMAT
Traducerea instrucţiunilor de utilizare original
ΜΟΝΑΔΑ ΣΥΝΤΗΡΗΣΗΣ
ΠΕΠΙΕΣΜΕΝΟΥ ΑΕΡΑ
Μετάφραση των αυθεντικών οδηγιών λειτουργίας
JEDINICA ZA PRIPREMU ZRAKA
Prijevod originalnih uputa za uporabu
DRUCKLUFT-WARTUNGSEINHEIT
Originalbetriebsanleitung
PRIPREMNA GRUPA
Prevod originalnog uputstva za upotrebu

GB / CY Translation of the original instructions Page 1
HR Prijevod originalnih uputa za uporabu Stranica 11
RS Prevod originalnog uputstva za upotrebu Strana 21
RO Traducerea instrucţiunilor de utilizare original Pagina 31
BG Превод на оригиналното ръководство за експлоатация Cтраница 41
GR / CY Μετάφραση των αυθεντικών οδηγιών λειτουργίας Σελίδα 51
DE / AT / CH Originalbetriebsanleitung Seite 61
Before reading, unfold the page containing the illustrations and familiarise yourself with all functions of
the device.
Prije nego što pročitate tekst, otvorite stranicu sa slikama i upoznajte se na osnovu toga sa svim funkcijama
uređaja.
Pre čitanja rasklopite obe strane sa slikama te se upoznajte sa svim funkcijama uređaja.
Înainte de a citi instrucţiunile, priviţi imaginile şi familiarizaţi-vă cu toate funcţiile aparatului.
Преди да прочетете отворете страницата с фигурите и след това се запознайте с всички функции
на уреда.
Πριν ξεκινήσετε την ανάγνωση, ανοίξτε τη σελίδα με τις εικόνες και εξοικειωθείτε με όλες τις λειτουργίες
της συσκευής.
Klappen Sie vor dem Lesen die Seite mit den Abbildungen aus und machen Sie sich anschließend mit allen
Funktionen des Gerätes vertraut.

A
B C

PDWE 8 B2
GB
│
CY
│
1 ■
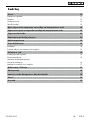
Contents
Introduction .........................................................2
Intended use ..................................................................... 2
Features ......................................................................... 2
Package contents ................................................................. 2
Technical specifications ............................................................. 2
General safety instructions for compressed air tools ........................3
Safety instructions for the use of compressed air appliances .................3
User safety ..........................................................4
Prohibited areas of application .........................................4
Important note .......................................................4
Before use ...........................................................4
Installation ....................................................................... 4
Filling the oil mister unit ............................................................. 5
Use .................................................................5
Setting the working pressure ......................................................... 6
Filter unit ........................................................................ 6
Draining condensate using the drainvalve .............................................. 6
Oil mister unit .................................................................... 7
Maintenance and cleaning .............................................7
Disposal .............................................................8
Kompernass Handels GmbH warranty ...................................8
Service ..............................................................9
Importer ............................................................9

PDWE 8 B2
■ 2
│
GB
│
CY
AIR FILTER REGULATOR &
LUBRICATOR PDWE 8 B2
Introduction
Congratulations on the purchase of your new appli-
ance. You have chosen a high-quality product. The
operating instructions are part of this product. They
contain important information about safety, usage
and disposal. Before using the product, please
familiarise yourself with all of the operating and
safety instructions. Use the product only as
described and for the range of applications speci-
fied. Please also pass these operating instructions
on to any future owner.
Intended use
The compressed air maintenance unit is used to oil
the compressed air for compressed air tools, and
filters out condensate from the compressed air at
the same time. Use the product only as described
and for the range of applications specified. Retain
these instructions for future reference. Pass all rele-
vant documents to any future owner. Any use which
deviates from the intended use is prohibited and
potentially dangerous. Damage caused by failure
to observe the instructions or misuse is not covered
by the warranty and does not fall under the manu-
facturer's liability. The appliance is designed for
domestic use and must not be used for commercial
or industrial purposes.
Symbols on the compressed air tool:
WARNING!
Read the operating instructions
before use.
Wear a dust mask.
Wear protective goggles.
Wear hearing protection.
Wear protective gloves.
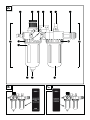
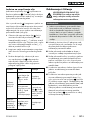
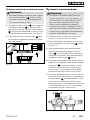
Features
Filter unit
Connector nipple (pre-assembled)
Air pressure regulator
Compressed air manometer
Wall bracket
Oil refill inlet
Oil outlet screw
Quick coupling
Oil mister unit
Locking ring
Container for compressed air oil
Drain valve
Condensate collector
Filter insert
Package contents
1 Air Filter Regulator & Lubricator
including connections
1 set of operating instructions
Technical specifications
Working pressure max. 8bar
Oil suitable compressor oil

PDWE 8 B2
GB
│
CY
│
3 ■
WARNING!
General safety
instructions for
compressed air tools
WARNING!
► PLEASE READ THE OPERATING INSTRUC-
TIONS CAREFULLY BEFORE USE. THEY ARE
A PART OF THIS APPLIANCE AND MUST
BE AVAILABLE AT ALL TIMES!
■ The type plate shows all technical data of this
compressed air maintenance unit, please inform
yourself about the technical conditions of this
appliance.
■ This appliance may be used by people aged
16 years and above and by people with limited
physical, sensory or mental capabilities or lack
of experience and knowledge, provided that
they are under supervision or have been told
how to use the appliance safely and are aware
of the potential risks. Do not allow children to
use the appliance as a plaything. Cleaning and
user maintenance tasks may not be carried out
by children unless they are supervised.
■ The compressed air maintenance unit is used in
conjunction with a compressor for the mainte-
nance and care (e.g. filtering, oiling and regu-
lating) of your compressed air tools. The
compressed air maintenance unit may only be
used with a compressed air compressor. When
using the unit, observe the maximum
compressed air values of the connected tools
and check these several times during use. This
product is intended for private use only. The
compressed air maintenance unit may only be
used for its intended purpose. Any other use
deviating from this is prohibited!
■ Proper use also involves compliance with the
safety instructions as well as the assembly
instructions contained in the operating instruc-
tions. The manufacturer or dealer accepts no
liability for damage caused by improper or
incorrect use.
■ Use only accessories suitable for this product.
People who use the compressed air mainte-
nance unit and carry out any maintenance work
must familiarise themselves with it. They must
also be informed of potential hazards. The
applicable accident prevention regulations must
be observed correctly and conscientiously.
■ Any changes made to the compressed air main-
tenance unit will preclude any liability on the
part of the manufacturer for any associated
damage.
Safety instructions for the use
of compressed air appliances
RISK OF INJURY!
► Disconnect the compressed air supply before
changing tools, adjusting and servicing.
► When undoing a connection, always hold the
compressed air hose firmly in your hands.
Injuries may occur due to the compressed air
hose whipping back.
■ The compressed air maintenance unit must be
installed before it can be put safely into opera-
tion. A stable wall is suitable for mounting (with
screws).
■ We recommend using only lubricants specified
by the manufacturer.
■ Never exceed the specified maximum pressure
values of the compressed air maintenance unit.
■ The compressed air maintenance unit may only
be connected to a compressed air source which
does not exceed the working pressure of 8 bar.
■ Do not place the compressed air lines near
heat, oil or sharp edges.
■ The compressed air maintenance unit may only
be operated in conjunction with a compressed
air compressor. The use of other compressed air
sources, such as a compressed air cylinder, is
prohibited. There is a risk of fire and/or explo-
sion.
■ Make sure that you keep children and people
with limited physical or mental abilities away
from the compressed air maintenance unit and
connected compressed air tools.

PDWE 8 B2
■ 4
│
GB
│
CY
■ Use only original spare parts for repairs.
Non-original spare parts can cause serious
damage.
■ When carrying out maintenance, adjustment
and repair work, always disconnect the
compressed air maintenance unit from the
compressed air supply first.
■ Modifications to the compressed air mainte-
nance unit are prohibited.
■ Do not use the compressed air maintenance unit
unless it is in perfect condition. If in doubt,
consult a specialist before using the appliance.
■ Have all repairs carried out by qualified profes-
sionals.
User safety
■ Before each application, test the compressed
air tool you are using.
Do not use the compressed air maintenance unit
with a higher operating pressure than that indi-
cated in the technical data. Before connecting
your air tools to the compressed air mainte-
nance unit, make sure they are properly and
securely connected.
Prohibited areas of application
■ Do not use this compressed air maintenance
unit in potentially explosive atmospheres. Avoid
working in environments containing substances
such as flammable gases, liquids, and paint or
dust mists. These substances can be ignited by
very hot surfaces on the compressed air unit.
Important note
■ Do not use the compressed air maintenance unit
in conjunction with compressed air appliances
that are suitable for use with processed
compressed air (e.g. grease guns, sandblasting
devices, tyre inflators, etc.).
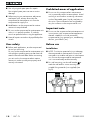
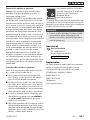
Before use
Installation
■ NOTE: To minimise potential injury or damage,
the compressed air maintenance unit must be
mounted on a suitable wall prior to initial opera-
tion. Ensure the compressed air maintenance
unit is mounted stably and horizontally.
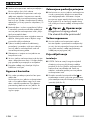
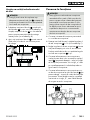
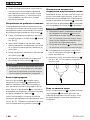
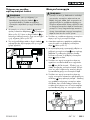
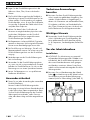
■ For wall mounting, use the wall bracket to
mark the wall and for screw mounting with
suitable fixing materials (not supplied) (see
fig.D).
(fig. D)

PDWE 8 B2
GB
│
CY
│
5 ■
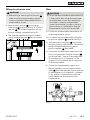
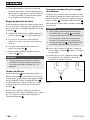
Filling the oil mister unit
CAUTION!
► Before filling or removing the oil reservoir
make sure that the compressed air mainte-
nance unit has been disconnected from the
compressed air source.
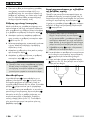
♦ Remove the oil reservoir
by turning the
locking ring clockwise (see fig. E). Fill the oil
reservoir with suitable compressor oil until
the max. marking is reached (see Fig. B).
♦ Then manually rotate the oil reservoir anticlock-
wise to the desired position
(do not use tools).
(fig. E)
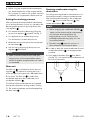
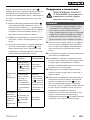
Use
CAUTION!
► Ensure that the connected compressed air line
is clean and oil-free so that the compressed
air maintenance unit can be used properly.
Also make sure that the compressed air
system is pressure-free. In order to minimise
pressure losses, it is preferable to keep the
compressed air lines as short as possible.
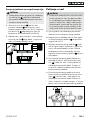
♦ Connect the compressed air maintenance unit
to the compressed air source.
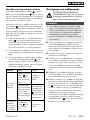
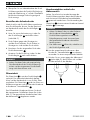
♦ First release the locking device by pulling the
air pressure regulator
upwards (see Fig. F).
♦ Set the air pressure regulator
to the lowest
setting by rotating it anticlockwise. The desired
settings are adopted by pressing the air
pressure regulator downwards.
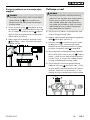
♦ Connect the compressed air supply line of the
tool to be connected to the quick coupling
(on the right side – output) of the compressed
air maintenance unit. A triangle "▸" on the
surface of the unit indicates the flow direction
of the compressed air.
♦ Connect the compressed air supply line of
the compressed air source via the connector
nipple
(on the left side inlet) of the compressed
air maintenance unit. A triangle "▸" is marked
on the surface in close proximity to the inlet,
which indicates the flow direction of the
compressed air.
(fig. F)

PDWE 8 B2
■ 6
│
GB
│
CY
♦ Before using the compressed air maintenance
unit, check the direction of the compressed air
flow using the "▸" mark on the surface. Incorrect
installation will not generate sufficient pressure.
Setting the working pressure
After connecting the compressed air maintenance
unit to a compressed air source, you can adjust the
desired operating pressure by using the air pres-
sure regulator .
♦ First release the locking device by pulling the
air pressure regulator
upwards (see fig. F).
♦ Turn anticlockwise to reduce the pressure.
Turn clockwise to increase the pressure.
♦ Read the pressure setting from the compressed
air manometer
.
♦ Lock the setting by pushing the air pressure
regulator
downward.
NOTE
► Make sure that the maximum possible oper-
ating pressure of the compressed air mainte-
nance unit and the compressed air tool used is
not exceeded.
Filter unit
The filter unit is connected to the air pressure
regulator . The maximum working pressure is
8 bar and the working pressure is adjustable from
0.5 to 8 bar. The filter unit is used to filter
condensate and stores the condensate in the
condensate collector .
The fill level of the condensate can be inspected
through the transparent viewing window (see fig.
C). The stored condensate can be discharged via
the drain valve
.
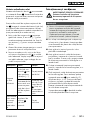
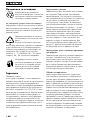
Draining condensate using the
drainvalve
Ensure that the compressed air maintenance unit is
mounted horizontally so that the condensate can
also be collected horizontally in the condensate
collector
. Do not use the filter unit if the
condensate collector is not fitted.
NOTE
► Before emptying the condensate collector
,
make sure the compressed air maintenance
unit has been disconnected from the
compressed air source. Otherwise, the
collected condensate may spray out in an
uncontrolled manner.
► The drain valve
opens as soon as it is
disconnected from the compressed air.
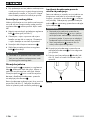
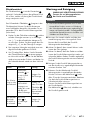
■ In order to drain the stored condensate from the
condensate collector
, use an appropriate
container.
♦ Press against the drain valve from below
(see fig. G), it will open and the condensate will
flow into the container.
(fig. G)

PDWE 8 B2
GB
│
CY
│
7 ■
Oil mister unit
The oil mister unit is connected to the filter unit .
Its function is to lubricate the filtered compressed air
which is being transported in the direction of the
compressed air tool.
The fill level of the oil reservoir
(integrated in the
oil mister unit) can be inspected through the trans-
parent viewing window. Use only oil that is suitable
for this compressed air maintenance unit (see
above).
♦ Turn the oil outlet screw
(mounted on the
sight glass) clockwise ("–") to reduce the
amount of oil required. Turn it anticlockwise
("+") to increase the amount of oil.
♦ The integrated sight glass makes continuous
monitoring of the filtered compressed air
possible.
♦ To top up the oil, unscrew the screw of the oil
refill inlet
with a suitable Allen key. Fill the
container with the help of a suitable funnel and
then replace the screw using the Allen key.
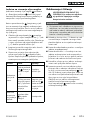
Fault Causes The solution
Insufficient
lubrication.
Oil outlet screw
turned too far
in direction ("–").
Increase the oil
quantity
The compressed
air oil quantity is
too low, i.e.
below the
minimum fill
quantity.
Pour more oil
into the oil
reservoir
.
Pay attention to
the maximum
filling quantity.
The oper-
ating pres-
sure of the
compressed
air is too
weak.
The pressure
regulator
is
closed too
tightly.
Increase the
pressure.
Maintenance and cleaning
WARNING! RISK OF INJURY!
Disconnect the appliance from
the compressed air supply.
NOTE
► The compressed air maintenance unit must be
serviced and overhauled at regular intervals
to ensure proper functioning and compliance
with safety requirements. Improper and incor-
rect operation can lead to failures and
damage to the appliance.
■ Never use harsh and/or abrasive cleaning
agents or solvents. These could damage the
plastic parts of the compressed air mainte-
nance unit.
■ Never allow water to get inside the oiler.
■ Make sure that the housing and the inside of
the compressed air maintenance unit remain
free of dust and dirt. To ensure this is the case,
wipe the compressed air maintenance unit
regularly with a clean cloth.
■ Clean the compressed air maintenance unit and
the connections at regular intervals with a damp
cloth.
■ Empty the tank of the compressed air mainte-
nance unit at regular intervals. To do this, press
the drain valve (see fig. G) on the underside
upwards. Please note that the compressed air
maintenance unit must be pressure-free for
safety reasons.
Disconnect the compressed air maintenance
unit from the compressed air source.
The drain valve opens as soon as it is discon-
nected from the compressed air.

PDWE 8 B2
■ 8
│
GB
│
CY
Disposal
The packaging consists of environ-
mentally friendly material. It can be
disposed of in local recycling
containers.
Do not dispose of the appliance in the
normal domestic waste!
Your local community or municipal authorities can
provide information on how to dispose of the
worn-out appliance.
Dispose of the packaging in an envi-
ronmentally friendly manner.
Note the labelling on the packaging
and separate the packaging material
components for disposal if necessary.
The packaging material is labelled
with abbreviations (a) and numbers (b)
with the following meanings:
1–7: plastics,
20–22: paper and cardboard,
80–98: composites.
Your local community or municipal
authorities can provide information on
how to dispose of the worn-out
product.
Kompernass Handels GmbH
warranty
Dear Customer,
This appliance has a 3-year warranty valid from the
date of purchase. If this product has any faults, you,
the buyer, have certain statutory rights. Your statu-
tory rights are not restricted in any way by the
warranty described below.
Warranty conditions
The warranty period starts on the date of purchase.
Please keep your receipt in a safe place. This will
be required as proof of purchase.
If any material or manufacturing fault occurs within
three years of the date of purchase of the product,
we will either repair or replace the product for you
or refund the purchase price (at our discretion).
This warranty service requires that you present the
defective appliance and the proof of purchase
(receipt) within the three-year warranty period,
along with a brief written description of the fault
and of when it occurred.
If the defect is covered by the warranty, your
product will either be repaired or replaced by us.
The repair or replacement of a product does not
signify the beginning of a new warranty period.
Warranty period and statutory claims for
defects
The warranty period is not prolonged by repairs
effected under the warranty. This also applies to
replaced and repaired components. Any damage
and defects present at the time of purchase must be
reported immediately after unpacking. Repairs
carried out after expiry of the warranty period shall
be subject to a fee.

PDWE 8 B2
GB
│
CY
│
9 ■
Scope of the warranty
This appliance has been manufactured in accord-
ance with strict quality guidelines and inspected
meticulously prior to delivery.
The warranty covers material faults or production
faults. The warranty does not extend to product
parts subject to normal wear and tear or to fragile
parts which could be considered as consumable
parts such as switches, batteries or parts made of
glass.
The warranty does not apply if the product has
been damaged, improperly used or improperly
maintained. The directions in the operating instruc-
tions for the product regarding proper use of the
product are to be strictly followed. Uses and
actions that are discouraged in the operating
instructions or which are warned against must be
avoided.
This product is intended solely for private use and
not for commercial purposes. The warranty shall be
deemed void in cases of misuse or improper
handling, use of force and modifications / repairs
which have not been carried out by one of our
authorised Service centres.
Warranty claim procedure
To ensure quick processing of your case, please
observe the following instructions:
■ Please have the till receipt and the item number
(e.g.IAN12345) available as proof of purchase.
■ You will find the item number on the type plate
on the product, an engraving on the product,
on the front page of the operating instructions
(below left) or on the sticker on the rear or
bottom of the product.
■ If functional or other defects occur, please
contact the service department listed either by
telephone or by e-mail.
■ You can return a defective product to us free of
charge to the service address that will be
provided to you. Ensure that you enclose the
proof of purchase (till receipt) and information
about what the defect is and when it occurred.
You can download these instructions
along with many other manuals,
product videos and installation soft-
ware at www.lidl-service.com.
This QR code will take you directly to
the Lidl service page (www.lidl-service.com) where
you can open your operating instructions by
entering the item number (IAN) 123456.
NOTE
► For Parkside and Florabest tools, please send
us only the defective item without the acces-
sories (e.g. battery, storage case, assembly
tools, etc.).
Service
Service Great Britain
Tel.: 0800 404 7657
E-Mail: [email protected]
CY
Service Cyprus
Tel.: 8009 4409
E-Mail: [email protected]
IAN 327372_1904
Importer
Please note that the following address is not the
service address. Please use the service address
provided in the operating instructions.
KOMPERNASS HANDELS GMBH
BURGSTRASSE 21
44867 BOCHUM
GERMANY
www.kompernass.com

PDWE 8 B2
■ 10
│
GB
│
CY

PDWE 8 B2
HR
│
11 ■
Sadržaj
Uvod ..............................................................12
Namjenska uporaba ..............................................................12
Oprema .......................................................................12
Opseg isporuke ..................................................................12
Tehnički podaci ..................................................................12
Opće sigurnosne napomene za uređaje na komprimirani zrak ..............13
Sigurnosne upute za uporabu uređaja na komprimirani zrak ...............13
Sigurnost korisnika ..................................................14
Zabranjena područja primjene .........................................14
Važna napomena ....................................................14
Prije uključivanja ....................................................14
Instalacija ......................................................................14
Punjenje jedinice za stvaranje uljne maglice ............................................15
Puštanje u rad. . . . . . . . . . . . . . . . . . . . . . . . . . . . . . . . . . . . . . . . . . . . . . . . . . . . . . . 15
Postavljanje radnog tlaka ..........................................................16
Filtracijska jedinica ...............................................................16
Ispuštanje kondenzata pomoću
ventila za pražnjenje ..............................................................16
Jedinica za stvaranje uljne maglice ...................................................17
Održavanje i čišćenje .................................................17
Zbrinjavanje ........................................................18
Jamstvo tvrtke Kompernass Handels GmbH ..............................18
Servis .............................................................19
Uvoznik ............................................................19

PDWE 8 B2
■ 12
│
HR
JEDINICA ZA PRIPREMU
ZRAKA PDWE 8 B2
Uvod
Čestitamo na kupnji Vašeg novog uređaja. Time
ste se odlučili za vrlo kvalitetan proizvod. Upute
za uporabu dio su opreme ovog proizvoda. One
sadrže važne napomene za sigurnost, rukovanje i
zbrinjavanje. Prije uporabe proizvoda upoznajte se
sa svim napomenama za rukovanje i svim sigurnos-
nim napomenama. Proizvod koristite isključivo na
opisani način i u navedenim područjima uporabe.
U slučaju predaje proizvoda trećim osobama
predajte i svu dokumentaciju.
Namjenska uporaba
Servisna jedinica za komprimirani zrak služi za
podmazivanje komprimiranog zraka za pneumat-
ske alate i istodobno filtrira kondenzat iz komprimi-
ranog zraka. Proizvod koristite isključivo na opisani
način i u navedenim područjima uporabe. Ove
upute dobro sačuvajte. U slučaju predaje proizvo-
da trećim osobama priložite i također predajte i
svu dokumentaciju. Zabranjena je i potencijalno
opasna svaka uporaba koja odstupa od namjenske
uporabe. Oštećenja nastala zbog zanemarivanja
ili zlouporabe nisu pokrivena jamstvom i proiz-
vođač za njih ne snosi odgovornost. Uređaj je
dizajniran za kućnu uporabu i ne smije se koristiti
u komercijalnim ili industrijskim okruženjima.
Simboli na alatu na komprimirani zrak:
WARNING!
Prije uključivanja uređaja pročitajte
upute za uporabu.
Nosite masku za zaštitu od prašine.
Nosite zaštitu za oči.
Nosite zaštitu od buke.
Nosite zaštitne rukavice
Oprema
Filtracijska jedinica
Utična spojnica (montirana)
Regulator tlaka
Manometar za komprimirani zrak
Zidni držač
Otvor za punjenje ulja
Vijak za prolazak ulja
Brza spojka
Jedinica za stvaranje uljne maglice
Prsten za zatvaranje
Spremnik ulja za komprimirani zrak
Ventil za pražnjenje
Spremnik za sakupljanje kondenzata
Uložak filtra
Opseg isporuke
1 jedinica za pripremu zraka,
uključujući priključke
1 upute za uporabu
Tehnički podaci
Radni tlak maks. 8 bara
Ulje prikladno ulje za kompresore

PDWE 8 B2
HR
│
13 ■
WARNING!
Opće sigurnosne
napomene za uređaje
na komprimirani zrak
UPOZORENJE!
► PRIJE UPORABE PAŽLJIVO PROČITAJTE
UPUTE ZA UPORABU. UPUTE SU SASTAV-
NI DIO UREĐAJA I MORAJU BITI DOSTU-
PNE U BILO KOJEM TRENUTKU!
■ Na tipskoj pločici nalaze se svi tehnički podaci
ove servisne jedinice za komprimirani zrak.
Molimo vas da se informirate o tehničkim
uvjetima ovog uređaja.
■ Ovaj uređaj smiju koristiti osobe stare 16 godina
ili više, kao i osobe smanjenih fizičkih, osjetilnih
ili mentalnih sposobnosti ili s nedovoljno iskustva
i/ili znanja, ako su pod nadzorom ili su primile
poduku o sigurnom rukovanju uređajem te su
razumjele opasnosti koje proizlaze iz uporabe
uređaja. Djeca se ne smiju igrati uređajem.
Čišćenje i korisničko održavanje ne smiju
obavljati djeca bez odgovarajućeg nadzora.
■ Zajedno s kompresorom, servisna jedinica za
komprimirani zrak koristi se za održavanje i
njegu (npr. filtriranje, podmazivanje i reguli-
ranje) pneumatskih alata. Servisna jedinica
za komprimirani zrak smije se koristiti samo s
kompresorom. Tijekom korištenja uređaja, pridr-
žavajte se maksimalnih vrijednosti tlaka zraka
na priključenim alatima i provjerite ih više puta
tijekom rada. Ovaj je proizvod predviđen samo
za privatnu uporabu. Servisna jedinica za kom-
primirani zrak smije se koristiti isključivo u skladu
s namjenom. Svaka druga i drugačija uporaba
je zabranjena!
■ Dio namjenske uporabe je pridržavanje sigur-
nosnih uputa sadržanih u uputama za uporabu,
kao i uputa za montažu. Za štete nastale uslijed
nenamjenske ili pogrešne uporabe, proizvođač
i prodavač ne preuzimaju nikakvu odgovornost.
■ Smije se koristiti samo pribor prikladan za ovaj
proizvod. Osobe koje koriste servisnu jedinicu
za komprimirani zrak i po potrebi obavljaju
radove održavanja, obvezne su upoznati se
s istim. Nadalje, moraju biti informirane o po-
tencijalnim opasnostima. Potrebno je valjano i
savjesno pridržavati se važećih propisa o sprje-
čavanju nezgoda.
■ Svaka izmjena servisne jedinice za komprimira-
ni zrak isključuje odgovornost proizvođača za
pritom nastale štete.
Sigurnosne upute za uporabu
uređaja na komprimirani zrak
OPASNOST OD OZLJEDA!
► Prije promjene alata, podešavanja i servisira-
nja prekinite dovod komprimiranog zraka.
► Prilikom otpuštanja priključka obavezno
pneumatsko crijevo držite čvrsto u rukama.
Zbog povratnog udara pneumatskog crijeva
može doći do ozljeda.
■ Servisna jedinica za komprimirani zrak mora se
instalirati prije puštanja u pogon. Za montažu
pogodan stabilan zid (pričvršćivanje vijcima).
■ Preporuča se koristiti samo maziva koja je
naveo proizvođač.
■ Nikada ne prekoračujte navedene maksimalne
vrijednosti tlaka servisne jedinice za komprimi-
rani zrak.
■ Servisna jedinica za komprimirani zrak smije se
priključiti samo na izvor komprimiranog zraka
koji ne prelazi radni tlak od 8 bara.

PDWE 8 B2
■ 14
│
HR
■ Vodove za komprimirani zrak ne postavljajte u
blizinu topline, ulja i oštrih rubova.
■ Servisna jedinica za komprimirani zrak smije
raditi samo zajedno s kompresorom za zrak.
Korištenje drugih izvora komprimiranog zraka,
kao što je npr. cilindar s komprimiranim zrakom,
zabranjeno je. Postoji opasnost od požara i / ili
eksplozije.
■ Pazite da djecu i osobe s ograničenim fizičkim
ili mentalnim sposobnostima držite podalje od
servisne jedinice za komprimirani zrak i priklju-
čenih pneumatskih alata.
■ Za popravke koristite samo originalne rezervne
dijelove. Neoriginalni rezervni dijelovi mogu
prouzročiti ozbiljna oštećenja.
■ Tijekom izvođenja radova na održavanju,
postavljanju i poravaka, uvijek prvo odvojite
servisnu jedinicu za komprimirani zrak od
izvora komprimiranog zraka.
■ Zabranjene su izmjene servisne jedinice za
komprimirani zrak.
■ Servisnu jedinicu za komprimirani zrak koristite
samo u besprijekornom stanju. U slučaju dvojbe,
prije uporabe se posavjetujte sa stručnjakom.
■ Popravke uređaja smiju obavljati isključivo
kvalificirani stručnjaci.
Sigurnost korisnika
■ Prije svake uporabe provjerite korišteni pneu-
matski alat.
Ne koristite servisnu jedinicu za komprimirani
zrak s višim radnim tlakom nego što je nave-
deno u tehničkim podacima. Prije spajanja
pneumatskog alata na servisnu jedinicu za
komprimirani zrak provjerite je li ispravno i
sigurno spojen.
Zabranjena područja primjene
■ Ne koristite ovu servisnu jedinicu za komprimira-
ni zrak u potencijalno eksplozivnim atmosfera-
ma. Izbjegavajte rad u okolinama u kojima
postoje tvari poput zapaljivih plinova, tekućina,
boja i prašine. Te se tvari mogu zapaliti zbog
vrlo vrućih površina na uređaju za komprimirani
zrak.
■
Oprez Upozorenje:
Mogućnost strujnog udara!
Ne otvarati kućište proizvoda!
Važna napomena
■ Servisnu jedinicu za komprimirani zrak ne
koristite zajedno s pneumatskim uređajima koji
ne smiju koristiti pripremljeni komprimirani zrak
(npr. preše za mast, uređaji za pjeskarenje,
uređaji za punjenje guma, itd.).
Prije uključivanja
Instalacija
■ POZOR: Da biste umanjili moguće ozljede ili
oštećenja, prije prvog uključivanja uređaja
potrebno je servisnu jedinicu za komprimirani
zrak montirati na prikladan zid. Pazite na
stabilan i vodoravan položaj servisne jedinice
za komprimirani zrak.
■ Za zidnu montažu koristite zidni držač
za
označavanje na zidu i pričvrstite ga odgovara-
jućim materijaom za pričvršćivanje (nije u opsegu
isporuke) (vidi sliku D).
(Slika D)

PDWE 8 B2
HR
│
15 ■
Punjenje jedinice za stvaranje uljne
maglice
POZOR!
► Pazite da prije punjenja, odnosno otpuštanja
spremnika za ulje
servisnu jedinicu za
komprimirani zrak odvojite od izvora kompri-
miranog zraka.
♦ Skinite spremnik za ulje
okretanjem prstena
za zatvaranje u smjeru kazaljke na satu (vidi
sliku E). Napunite spremnik za ulje odgova-
rajućim uljem za kompresore do oznake maksi-
malne razine (vidi sliku B).
♦ Nakon toga ručno zategnite spremnik za ulje
(bez alata) u smjeru suprotnom od smjera
kazaljke na satu.
(Slika E)
Puštanje u rad
POZOR!
► Pazite da je priključeni vod komprimiranog
zraka čist i bez ulja kako biste mogli pravilno
koristiti servisnu jedinicu za komprimirani
zrak. Također pazite da sustav komprimira-
nog zraka nije pod tlakom. Da bi se umanjili
gubici tlaka, korisno je vodove komprimira-
nog zraka držati što kraćima.
♦ Spojite servisnu jedinicu za komprimirani zrak
na izvor komprimiranog zraka.
♦ Najprije otpustite kopču povlačenjem regulatora
tlaka
prema gore (vidi sliku F).
♦ Regulator tlaka
postavite na najniži stupanj
okretanjem u smjeru suprotnom od smjera
kazaljke na satu. Željene postavke se usvajaju
pritiskom na regulator tlaka prema dolje.
♦ Spojite opskrbni vod komprimiranog zraka ala-
ta koji želite spojiti na brzu spojnicu
(s desne
strane – izlaz) servisne jedinice za komprimira-
ni zrak. Trokut „▸“ na površini uređaja ukazuje
za smjer protoka komprimiranog zraka.
♦ Spojite opskrbni vod izvora komprimiranog
zraka na utični spoj
(na lijevoj strani – ulaz)
servisne jedinice za komprimirani zrak. Izravno
na ulazu, na površini se nalazi trokut „▸“ koji
ukazuje za smjer protoka komprimiranog zraka.
(Slika F)

PDWE 8 B2
■ 16
│
HR
♦ Prije pokretanja servisne jedinice za komprimira-
ni zrak provjerite smjer strujanja komprimiranog
zraka pomoću oznake „▸“ na površini. Nepra-
vilna instalacija neće stvoriti dovoljan pritisak.
Postavljanje radnog tlaka
Nakon priključivanja servisne jedinice za komprimi-
rani zrak na izvor komprimiranog zraka, pomoću
regulatora tlaka možete postaviti željeni radni
tlak.
♦ Najprije otpustite kopču povlačenjem regulatora
tlaka
prema gore (vidi sliku F).
♦ Okretanjem u smjeru suprotnom od smjera
kazaljke na satu tlak se smanjuje. Okretanjem
u smjeru kazaljke na satu tlak se povećava.
♦ Postavljeni tlak očitajte na manometru
.
♦ Zaključajte postavke pritiskom na regulator
tlaka
prema dolje.
NAPOMENA
► Pazite da se ne prekorači maksimalni radni
tlak servisne jedinice za komprimirani zrak i
korištenog pneumatskog alata.
Filtracijska jedinica
Filtracijska jedinica povezana je s regulatorom
tlaka . Maksimalni radni tlak iznosi 8 bara, a
radni tlak se može regulirati od 0,5 do 8 bara.
Filtracijska jedinica koristi se za filtriranje kon-
denzata i skladištenje kondenzata u spremniku
za sakupljanje kondenzata .
Razinu kondenzata možete provjeriti kroz prozirne
prozorčiće (vidi sliku C). Sakupljeni kondenzat
može se isprazniti preko ventila za pražnjenje
.
Ispuštanje kondenzata pomoću
ventila za pražnjenje
Pazite na vodoravnu montažu servisne jedinice za
komprimirani zrak kako bi se kondenzat mogao
skupljati u spremniku za kondenzat i u vodorav-
nom položaju. Zabranjena je uporaba filtracijske
jedinice
bez montiranog spremnika za sakuplja-
nje kondenzata .
NAPOMENA
► Pazite da prije pražnjenja spremnika za
sakupljanje kondenzata
servisnu jedinicu
za komprimirani zrak odvojite od izvora kom-
primiranog zraka. U protivnom se sakupljeni
kondenzat može se nekontrolirano raspršiti.
► Ventil za pražnjenje
otvara se čim se
odvoji od komprimiranog zraka.
■ Za pražnjenje kondenzata iz spremnika za
sakupljanje kondenzata
koristite odgovara-
jući spremnik.
♦ Pritisnite ventil za pražnjenje
odozdo (vidi
sliku G). Ventil se otvara i kondenzat istječe u
spremnik.
(Slika G)

PDWE 8 B2
HR
│
17 ■
Jedinica za stvaranje uljne maglice
Jedinica za stvaranje uljne maglice povezana
je s filtracijskom jedinicom . Ima funkciju pod-
mazivanja filtriranog komprimiranog zraka koji se
transportira u smjeru pneumatskog alata.
Razinu spremnika za ulje
(integriranog u jedi-
nicu za stvaranje uljne maglice) možete provjeriti
kroz prozirne prozorčiće. Za ovu servisnu jedinicu
za komprimirani zrak koristite samo odgovarajuće
ulje (vidi gore).
♦ Okrećite vijak za prolazak ulja
postavljen
na prozorčić u smjeru kazaljke na satu („–“) da
biste smanjili potrebnu količinu ulja. Okrećite ga
u smjeru suprotnom od smjera kazaljke na satu
(„+“) da biste povećali količinu ulja.
♦ Integrirani prozorčić omogućuje stalnu kontrolu
filtriranog komprimiranog zraka.
♦ Za ponovno punjenje uljem odvrnite vijak
otvora za punjenje ulja
prikladnim imbus
ključem. Napunite spremnik prikladnim lijevkom,
a zatim ponovno zategnite vijak ključem.
Greška Uzrok Rješenje
Podmaziva-
nje nije do-
statno.
Vijak za prolazak
ulja okrenut je
previše u smjeru
(„–“).
Povećajte
količinu ulja
Količina pneumat-
skog ulja je preni-
ska, tj. ispod mini-
malne količine
punjenja.
Napunite spre-
mnik za ulje
.
Pazite na mak-
simalnu količinu
punjenja.
Radni tlak
komprimira-
nog zraka je
preslab.
Regulator tlaka
je prejako
zategnut.
Povećajte tlak.
Održavanje i čišćenje
UPOZORENJE! OPASNOST OD
OZLJEDA! Prije radova na održava-
nju prekinite napajanje uređaja
komprimiranim zrakom.
NAPOMENA
► Za ispravan rad i usklađenost sa sigurnosnim
zahtjevima, servisna jedinica za komprimirani
zrak treba se redovno održavati i popravljati.
Neispravan i nepravilan rad može uzrokovati
kvarove i oštećenja uređaja.
■ Nikada ne koristite oštra i / ili abrazivna sred-
stva za čišćenje ili otapala. Ista mogu oštetiti
plastične dijelove servisne jedinice za kompri-
mirani zrak.
■ Pazite da voda nikada ne prodre u unutrašnjost
jedinice za podmazivanje.
■ Pazite da na kućištu i u unutrašnjosti servisne
jedinice za komprimirani zrak nema prašine i
prljavštine. U tu svrhu servisnu jedinicu za kom-
primirani zrak redovito obrišite čistom krpom.
■ Periodično očistite servisnu jedinicu za kompri-
mirani zrak i priključke vlažnom krpom.
■ Ispraznite spremnik servisne jedinice za kom-
primirani zrak u redovitim intervalima. Da biste
to učinili, pritisnite ventil za pražnjenje (vidi
sliku G) na donjoj strani prema gore. Imajte na
umu da servisna jedinica za komprimirani zrak
zbog sigurnosti ne smije biti pod tlakom.
Odvojite servisnu jedinicu za komprimirani
zrak od izvora komprimiranog zraka.
Ventil za pražnjenje otvara se čim se odvoji
od komprimiranog zraka.
Pagina se încarcă...
Pagina se încarcă...
Pagina se încarcă...
Pagina se încarcă...
Pagina se încarcă...
Pagina se încarcă...
Pagina se încarcă...
Pagina se încarcă...
Pagina se încarcă...
Pagina se încarcă...
Pagina se încarcă...
Pagina se încarcă...
Pagina se încarcă...
Pagina se încarcă...
Pagina se încarcă...
Pagina se încarcă...
Pagina se încarcă...
Pagina se încarcă...
Pagina se încarcă...
Pagina se încarcă...
Pagina se încarcă...
Pagina se încarcă...
Pagina se încarcă...
Pagina se încarcă...
Pagina se încarcă...
Pagina se încarcă...
Pagina se încarcă...
Pagina se încarcă...
Pagina se încarcă...
Pagina se încarcă...
Pagina se încarcă...
Pagina se încarcă...
Pagina se încarcă...
Pagina se încarcă...
Pagina se încarcă...
Pagina se încarcă...
Pagina se încarcă...
Pagina se încarcă...
Pagina se încarcă...
Pagina se încarcă...
Pagina se încarcă...
Pagina se încarcă...
Pagina se încarcă...
Pagina se încarcă...
Pagina se încarcă...
Pagina se încarcă...
Pagina se încarcă...
Pagina se încarcă...
Pagina se încarcă...
Pagina se încarcă...
Pagina se încarcă...
Pagina se încarcă...
Pagina se încarcă...
Pagina se încarcă...
-
 1
1
-
 2
2
-
 3
3
-
 4
4
-
 5
5
-
 6
6
-
 7
7
-
 8
8
-
 9
9
-
 10
10
-
 11
11
-
 12
12
-
 13
13
-
 14
14
-
 15
15
-
 16
16
-
 17
17
-
 18
18
-
 19
19
-
 20
20
-
 21
21
-
 22
22
-
 23
23
-
 24
24
-
 25
25
-
 26
26
-
 27
27
-
 28
28
-
 29
29
-
 30
30
-
 31
31
-
 32
32
-
 33
33
-
 34
34
-
 35
35
-
 36
36
-
 37
37
-
 38
38
-
 39
39
-
 40
40
-
 41
41
-
 42
42
-
 43
43
-
 44
44
-
 45
45
-
 46
46
-
 47
47
-
 48
48
-
 49
49
-
 50
50
-
 51
51
-
 52
52
-
 53
53
-
 54
54
-
 55
55
-
 56
56
-
 57
57
-
 58
58
-
 59
59
-
 60
60
-
 61
61
-
 62
62
-
 63
63
-
 64
64
-
 65
65
-
 66
66
-
 67
67
-
 68
68
-
 69
69
-
 70
70
-
 71
71
-
 72
72
-
 73
73
-
 74
74


Parkside PDWE 8 B2 Translation Of The Original Instructions
- Tip
- Translation Of The Original Instructions
în alte limbi
- Deutsch: Parkside PDWE 8 B2
Lucrări înrudite
-
Parkside PDWE 8 A2 Instructions Manual
-
Parkside PDEXS 150 B2 Instructions Manual
-
-
-
-
-
-
-
-