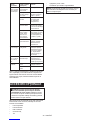
Makita DUP361 Manual de utilizare
- Categorie
- Unelte electrice
- Tip
- Manual de utilizare

DUP361
EN Battery Powered Pruning
Shears INSTRUCTION MANUAL 8
PL Akumulatorowy sekator
ogrodniczy INSTRUKCJA OBSŁUGI 16
HU Akkumulátoros metszőolló HASZNÁLATI KÉZIKÖNYV 25
SK Akumulátorové prerezávacie
nožnice NÁVOD NA OBSLUHU 34
CS Akumulátorové zahradnické
nůžky NÁVOD K OBSLUZE 43
UK Секатор із живленням від
акумулятора
ІНСТРУКЦІЯ З
ЕКСПЛУАТАЦІЇ 51
RO Foarfecă de grădină cu
acumulator MANUAL DE INSTRUCŢIUNI 61
DE Akku-Astschere BETRIEBSANLEITUNG 70


8ENGLISH
ENGLISH (Original instructions)
SPECIFICATIONS
Model: DUP361
Max. cutting capacity 33 mm
Overall length (shears part) 305 mm
Rated voltage D.C.36 V
Battery cartridge BL1815N, BL1820, BL1820B BL1830, BL1830B, BL1840,
BL1840B, BL1850, BL1850B,
BL1860B
Net weight (with shears, switch box, connection cord, two battery
cartridges and back pack)
3.3 kg 3.8 kg
• Duetoourcontinuingprogramofresearchanddevelopment,thespecicationshereinaresubjecttochange
without notice.
• Specicationsandbatterycartridgemaydifferfromcountrytocountry.
• Weight,withbatterycartridge,accordingtoEPTA-Procedure01/2003
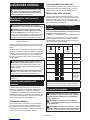
Symbols
Thefollowingshowthesymbolsusedfortheequip-
ment.Besurethatyouunderstandtheirmeaningbefore
use.
Read instruction manual.
Do not expose to moisture.
Danger;beawareofthrownobjects.
Keep bystanders away.
Cd
Ni-MH
Li-ion
OnlyforEUcountries
Donotdisposeofelectricequipmentor
battery pack together with household waste
material!
InobservanceoftheEuropeanDirectives,
onWasteElectricandElectronic
EquipmentandBatteriesandAccumulators
andWasteBatteriesandAccumulators
and their implementation in accordance
withnationallaws,electricequipmentand
batteries and battery pack(s) that have
reachedtheendoftheirlifemustbecol-
lected separately and returned to an envi-
ronmentallycompatiblerecyclingfacility.
Intended use
Thetoolisintendedforpruningtwigsorbranches.
Noise
ThetypicalA-weightednoiseleveldeterminedaccord-
ingtoEN50636:
Soundpressurelevel(LpA):70dB(A)orless
Uncertainty(K):3.2dB(A)
Thenoiselevelunderworkingmayexceed80dB(A).
WARNING: Wear ear protection.
Vibration
Thevibrationtotalvalue(tri-axialvectorsum)deter-
minedaccordingtoEN50636:
Vibration emission (ah):2.5m/s2 or less
Uncertainty(K):1.5m/s2
NOTE:Thedeclaredvibrationemissionvaluehas
been measured in accordance with the standard test
methodandmaybeusedforcomparingonetoolwith
another.
NOTE:Thedeclaredvibrationemissionvalue
mayalsobeusedinapreliminaryassessmentof
exposure.
WARNING:Thevibrationemissionduringactual
useofthepowertoolcandifferfromthedeclared
emission value depending on the ways in which the
tool is used.
WARNING:Besuretoidentifysafetymeasures
to protect the operator that are based on an estima-
tionofexposureintheactualconditionsofuse(taking
accountofallpartsoftheoperatingcyclesuchas
thetimeswhenthetoolisswitchedoffandwhenitis
running idle in addition to the trigger time).
EC Declaration of Conformity
For European countries only
MakitadeclaresthatthefollowingMachine(s):
DesignationofMachine:BatteryPoweredPruning
Shears
ModelNo./Type:DUP361
ConformstothefollowingEuropeanDirectives:
2006/42/EC
Theyaremanufacturedinaccordancewiththefollowing
standardorstandardizeddocuments:ENISO12100
Thetechnicalleinaccordancewith2006/42/ECis
availablefrom:
Makita,Jan-BaptistVinkstraat2,3070,Belgium
29.1.2015

9ENGLISH
Yasushi Fukaya
Director
Makita,Jan-BaptistVinkstraat2,3070,Belgium
Pruning shears safety warnings
WARNING: Read all safety warnings and
all instructions. Failuretofollowthewarningsand
instructionsmayresultinelectricshock,reand/or
seriousinjury.
Save all warnings and instruc-
tions for future reference.
Theterm"powertool"inthewarningsreferstoyour
mains-operated(corded)powertoolorbattery-operated
(cordless) power tool.
1. Use personal protective equipment. Always
wear eye protection.Protectiveequipmentsuch
asdustmask,non-skidsafetyshoes,hardhat,or
hearingprotectionusedforappropriateconditions
willreducepersonalinjuries.
2. Prevent unintentional starting. Ensure the
switch is in the off-position before connecting
to power source and/or battery pack, picking
up or carrying the tool. Carrying power tools with
yourngerontheswitchorenergisingpowertools
that have the switch on invites accidents.
3. Dress properly. Do not wear loose clothing or
jewellery. Keep your hair, clothing, and gloves
away from moving parts.Looseclothes,jewel-
lery or long hair can be caught in moving parts.
4. This tool is for pruning branches. Do not use it
foranyjobexceptthatforwhichitisintended.
5. Never allow children, persons with reduced
physical, sensory or mental capabilities or
lack of experience and knowledge or people
unfamiliar with these instructions to use the
tool. Local regulations may restrict the age of
the operator.
6. Never operate the tool while people, especially
children, or pets are nearby.
7. Do not overreach and keep balance at all
times.Alwaysbesureoffootingonslopesandto
walk, never run.
8. Do not touch moving hazardous parts before
the tool is disconnected from the mains and/or
the battery pack is removed from the tool.
9. Always wear substantial footwear and long
trousers while operating the tool.
10. Disconnect the supply and/or remove the
battery pack from the tool:
• wheneverthetoolisleftbytheuser,
• beforeclearingablockage,
• beforechecking,cleaningorworkingonthe
tool,
• afterstrikingaforeignobjecttoinspectthe
toolfordamage,
• ifthetoolstartstovibrateabnormally,for
immediately check.
11. Never operate the tool with defective guards
or shields, or without safety devices, or if the
cord is damaged or worn.
12. Avoid using the tool in bad weather conditions
especially when there is a risk of lightning.
13. Don’t use the tool or perform battery charging
operations in the rain.
14. Don’t leave the tool in rain or wet locations.
15. Be careful not to catch foreign matter between
the blades.Ifthebladesarejammedwithforeign
matter,immediatelyswitchoffthetoolanddiscon-
nectthebatteryfromthetool.Thenremovethe
foreignmatterfromtheblades.
16. Never hold the branch you are pruning with
your free hand.Keepyourfreehandawayfrom
the cutting area. Never touch the blades, they are
verysharpandyoumaycutyourself.
17. Don’t force the tool to make it cut. You could
slipandinjureyourselforcutsomethingelse
unintentionally.
18. Avoid cutting electrical wires that may be
hidden.
19. Always check the blades carefully before
operation.
20. Handle the blades with extreme care to prevent
cuts or injury from the blades.
21. Disconnect the battery from the tool after each
use and before attempting to perform inspec-
tion or maintenance.
22. When not in use, always keep the tool in its
holster.
Battery tool use and care
1. Recharge only with the charger specied by
the manufacturer.Achargerthatissuitablefor
onetypeofbatterypackmaycreateariskofre
when used with another battery pack.
2. Use power tools only with specically desig-
nated battery packs.Useofanyotherbattery
packsmaycreateariskofinjuryandre.
3. When battery pack is not in use, keep it away
from other metal objects, like paper clips,
coins, keys, nails, screws or other small metal
objects, that can make a connection from one
terminal to another.Shortingthebatterytermi-
nalstogethermaycauseburnsorare.
4. Under abusive conditions, liquid may be
ejected from the battery; avoid contact. If con-
tact accidentally occurs, ush with water. If
liquid contacts eyes, additionally seek medical
help.Liquidejectedfromthebatterymaycause
irritation or burns.
Service
1. Have your power tool serviced by a qualied
repair person using only identical replacement
parts.Thiswillensurethatthesafetyofthepower
tool is maintained.
2. Follow instruction for lubricating and chang-
ing accessories.
3. Keep handles dry, clean and free from oil and
grease.

10 ENGLISH
WARNING: DO NOT let comfort or familiarity
with product (gained from repeated use) replace
strict adherence to safety rules for the subject
product. MISUSE or failure to follow the safety
rules stated in this instruction manual may cause
serious personal injury.
Important safety instructions for
battery cartridge
1. Before using battery cartridge, read all instruc-
tions and cautionary markings on (1) battery
charger, (2) battery, and (3) product using
battery.
2. Do not disassemble battery cartridge.
3. If operating time has become excessively
shorter, stop operating immediately. It may
result in a risk of overheating, possible burns
and even an explosion.
4. If electrolyte gets into your eyes, rinse them
out with clear water and seek medical atten-
tion right away. It may result in loss of your
eyesight.
5. Do not short the battery cartridge:
(1) Do not touch the terminals with any con-
ductive material.
(2) Avoid storing battery cartridge in a con-
tainer with other metal objects such as
nails, coins, etc.
(3) Do not expose battery cartridge to water
or rain.
A battery short can cause a large current
ow, overheating, possible burns and even a
breakdown.
6. Do not store the tool and battery cartridge in
locations where the temperature may reach or
exceed 50 °C (122 °F).
7. Do not incinerate the battery cartridge even if
it is severely damaged or is completely worn
out. The battery cartridge can explode in a re.
8. Be careful not to drop or strike battery.
9. Do not use a damaged battery.
10. The contained lithium-ion batteries are subject
to the Dangerous Goods Legislation require-
ments.
For commercial transports e.g. by third parties,
forwardingagents,specialrequirementonpack-
aging and labeling must be observed.
Forpreparationoftheitembeingshipped,consult-
inganexpertforhazardousmaterialisrequired.
Pleasealsoobservepossiblymoredetailed
national regulations.
Tapeormaskoffopencontactsandpackupthe
battery in such a manner that it cannot move
around in the packaging.
11. Follow your local regulations relating to dis-
posal of battery.
SAVE THESE INSTRUCTIONS.
CAUTION: Only use genuine Makita batteries.
Useofnon-genuineMakitabatteries,orbatteriesthat
have been altered, may result in the battery bursting
causingres,personalinjuryanddamage.Itwill
alsovoidtheMakitawarrantyfortheMakitatooland
charger.
Tips for maintaining maximum
battery life
1. Charge the battery cartridge before completely
discharged. Always stop tool operation and
charge the battery cartridge when you notice
less tool power.
2. Never recharge a fully charged battery car-
tridge. Overcharging shortens the battery
service life.
3. Charge the battery cartridge with room tem-
perature at 10 °C - 40 °C (50 °F - 104 °F). Let
a hot battery cartridge cool down before
charging it.
4. Charge the battery cartridge if you do not use
it for a long period (more than six months).
N Mark
TheNMarkisatrademarkorregisteredtrademarkof
NFCFormula,Inc.inUSAandothercountriesinthe
world.
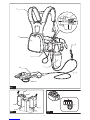
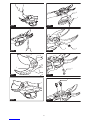
PARTS DESCRIPTION
►Fig.1
1Harness 2Back pack 3Switchbox 4Pilotlamp(red)
5Pilotlamp(green) 6I/Oswitch 7Holster 8Cord holder
9Connection cord 10 Shears 11 Switchtrigger - -

11 ENGLISH
FUNCTIONAL
DESCRIPTION
CAUTION: Always be sure that the tool is
switched off and the battery cartridge is removed
before adjusting or checking function on the tool.
Removing or installing battery
cartridge
CAUTION: Always switch off the tool before
installing or removing of the battery cartridge.
CAUTION: Hold the tool and the battery car-
tridge rmly when installing or removing battery
cartridge. Failure to hold the tool and the battery
cartridgermlymaycausethemtoslipoffyourhands
and result in damage to the tool and battery cartridge
andapersonalinjury.
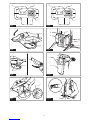
►Fig.2: 1. Red indicator 2. Button 3. Battery cartridge
4. Battery holder
Toremovethebatterycartridge,slideitfromthetool
whileslidingthebuttononthefrontofthecartridge.
Toinstallthebatterycartridge,alignthetongueonthe
battery cartridge with the groove in the housing and slip
it into place. Insert it all the way until it locks in place
withalittleclick.Ifyoucanseetheredindicatoronthe
uppersideofthebutton,itisnotlockedcompletely.
CAUTION: Always install the battery cartridge
fully until the red indicator cannot be seen.Ifnot,
itmayaccidentallyfalloutofthetool,causinginjuryto
you or someone around you.
CAUTION: Do not install the battery cartridge
forcibly.Ifthecartridgedoesnotslideineasily,itis
not being inserted correctly.
NOTE:Thetooldoesnotworkwithonlyonebattery
cartridge.
Tool / battery protection system
Thetoolisequippedwithatool/batteryprotection
system.Thissystemautomaticallycutsoffpowerto
themotortoextendtoolandbatterylife.Thetoolwill
automaticallystopduringoperationifthetoolorbattery
isplacedunderoneofthefollowingconditions.Insome
conditions, the lamps on the switch box lights up.
Overload protection
Whenthetoolisoperatedinamannerthatcausesitto
draw an abnormally high current, the tool automatically
stops without any indication. In this situation, turn the
tooloffandstoptheapplicationthatcausedthetoolto
becomeoverloaded.Thenturnthetoolontorestart.
Overheat protection
Whenthetoolisoverheated,thetoolstopsautomati-
cally, and the green lamp on the switch box blinks. In
thissituation,letthetoolcooldownbeforeturningthe
tool on again.
Overdischarge protection
Whenthebatterycapacitybecomeslow,thetoolstops
automatically.Andtheredlampontheswitchboxlights
uporblinks.Iftheproductdoesnotoperateevenwhen
theswitchesareoperated,removethebatteriesfrom
the battery holder and charge the batteries.
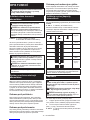
Indicating the remaining battery
capacity
Only for battery cartridges with "B" at the end of the
model number
►Fig.3: 1. Indicator lamps 2. Check button
Pressthecheckbuttononthebatterycartridgetoindi-
catetheremainingbatterycapacity.Theindicatorlamps
lightupforfewseconds.
Indicator lamps Remaining
capacity
Lighted Off Blinking
75%to100%
50%to75%
25%to50%
0%to25%
Charge the
battery.
Thebattery
may have
malfunctioned.
NOTE:Dependingontheconditionsofuseandthe
ambienttemperature,theindicationmaydifferslightly
fromtheactualcapacity.
Switch action
CAUTION: Before connecting the battery to
the shears, always check to see that the switch
trigger actuates properly and returns to the “OFF”
position when released.
CAUTION: When not operating the tool,
always make sure that the I/O switch is on the "O"
side.
CAUTION: Do not press the I/O switch to the
“I" (on) position while pulling the switch trigger.
Thebladeclosesslightlyanditmaycausepersonal
injury.
Toturnonthetool,performasfollows:
1. Connect the switch box, connection cord, and
shears.(Referto“Installingtheconnectioncord”.)
2. Holdtheshearsrmly,andpresstheI/Oswitchto
the“I"(on)position.Thegreenpilotlamplightsup.
►Fig.4: 1.I/Oswitch2.Pilotlamp(green)3.Pilot
lamp (red)

12 ENGLISH
3. Theshearbladesarelocked-modewhentheI/O
switchison.Toreleasethelock,pulltheswitchtrigger
twotimes.Theuppershearbladeopensautomatically.
4. Toclosetheshearblade,pulltheswitchtrigger.
►Fig.5: 1.Switchtrigger
Auto locked-mode and shut-off
mode shift
Forsafetyreasons,thetoolshiftsintolocked-modeor
shut-offmodeautomaticallyifthetoolisleftuntouched
foracertainperiodoftime.
After5minutes:Thetoolshiftsintolocked-mode.Pull
the switch trigger two times to release the lock.
After15minutes:Thetoolisshiftintoshut-offmode,andthe
greenpilotlampturnsoff.PresstheI/Oswitchtothe“O"(off)
positiononce,andpresstheI/Oswitchtothe“I"(on)position
again, then pull the switch trigger two times to release the lock.
Opening angle selector lever
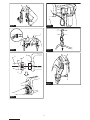
►Fig.6: 1. Opening angle selector lever
Bytiltingtheopeningangleselectorlevertotheleft
side, you can open the upper shear blade wider.
Tolimittheuppershearbladeopeningangle,rstpull
theswitchtriggerfully,andthenreturntheopening
angle selector lever to straight position.
Cutting depth adjustment
CAUTION: Do not let your hands or part of
body close to the shear blades. Otherwise per-
sonal injury may result.
Aftersharpeningorreplacingtheshearblade,adjust
cuttingdepthifnecessary.
Turnonthetool,andpulltheswitchtriggertwotimesto
opentheshearblades,andthenpresstheI/Oswitchto
the“O"(off)position.
Todeepenthecuttingdepth,turnthecuttingdepth
adjustingscrewclockwisewiththehexwrench.Andto
make the cutting depth shallower, turn the cutting depth
adjustingscrewcounterclockwise.
►Fig.7: 1.Cuttingdepthadjustingscrew
NOTE:
Checkthecuttingdepthafteradjustment.Ifthe
cuttingdepthistooshallow,thebranchmaynotcutfully.
Pilot lamps on the switch box
►Fig.8: 1.I/Oswitch2.Pilotlamp(green)3.Pilot
lamp (red)
Thegreenandredlampsindicateasfollows:
(On: Off: Blinking: )
• Greenlamplightsup:thetoolisturnedon.
Green Red
•
Greenlampandredlamplightup:ifyouinsertthe
batterytothebattryholderwhenI/Oswitchis“I”(on)
position,bothofthelampslightupandthebladedoes
not move though you pull the switch trigger. In this situ-
ation,presstheI/Oswitchtothe“O”(off)positiononce,
andpresstheI/Oswitchtothe“I”(on)positionagain.
Green Red
• Greenlampblinks:thetoolisoverheated.Letthe
toolcooldownbeforeturningthetoolonagain.
Green Red
• Greenlamplightsupandredlampblinksorlights
up:batteryisloworalmostat.Chargethebatter-
ies.Wheneitherofthebatterybecomeslow,the
redlampblinksevenoneofthebatteriesisfull.
Green Red
• Greenlampandredlampblinkalternately:thetool
detectsbreakingofwire.Checktheconnection
cordforlooseconnectionwiththeswitchboxand
theshears.Ifthelampsstillblinkalternately,stop
using the tool immediately, disconnect the connec-
tion cord, remove the battery, and ask your local
authorizedservicecenterforrepair.
Lamps blink alternately
ASSEMBLY
CAUTION: Always be sure that the tool is
switched off and the battery cartridge is removed
before carrying out any work on the tool.
Installing the battery holder into the
backpack
►Fig.9: 1. Clamp 2. Battery holder 3.Strap
1. Passtheswitchboxthroughtheopening(either
rightorleft)ofthebackpack.
2. Passtheclampthroughthesquareholeofthebat-
tery holder, and secure the battery holder with the strap.
Make sure that the battery holder sits in the backpack
rmly.
Installing the holster
►Fig.10: 1. Holster 2.Strap
Passthebeltofthelowerbucklethroughtheopeningof
the holster.
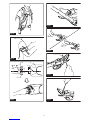
Adjusting the harness
Adjusttheharnessasfollows:
1. Closeandlockthelowerbuckle,andadjustitsbelt
length.
►Fig.11: 1. Lower buckle
2. Adjusttheshoulderstraplength.
►Fig.12

13 ENGLISH
3. Adjustthepositionoftheupperbuckle.Closeand
locktheupperbuckleandadjustitsbeltlength.
►Fig.13: 1.Upperbuckle
CAUTION: In case of emergency, quickly
open the lower buckle and upper buckle, loosen
shoulder straps, and set down the backpack.
Installing the connection cord
CAUTION: Always make sure that the switch
box's I/O switch is on the "O" side before attach-
ing the connection cord.
CAUTION: Do not operate the tool if the con-
nection cord is damaged.
NOTICE: Do not abuse the connection cord. Do not
carry the tool by pulling the connection cord. Keep the
connectioncordawayfromheat,oil,orsharpedges.
Otherwise the connection cord may be damaged.
Attachtheconnectioncordwiththeswitchboxandthe
shearsasfollows:
1. First,alignthetriangularmarksofthemaleplug
oftheconnectioncordwiththetriangularmarkofthe
femaleconnectoroftheswitchbox.Pushintheplugof
theconnectioncordtotheconnectoroftheswitchbox.
Then,alignthemarkingonthecouplingwiththetrian-
glar marks, and push in and turn the coupling to tighten.
►Fig.14: 1.Triangularmark2. Connection cord
3.Switchbox4. Marking on coupling
5. Coupling
NOTICE:Turnthecouplingandalignthemarking
onthecouplingwiththetriangularmarksrstwhen
disconnecting the connection cable.
2. Hang the switch box on the waist belt or upper
belt.
►Fig.15
3. Pushtheconnectioncordintotheloopofthecord
holder.
►Fig.16
Hang the cord holder on either the upper belt or the
waist belt on which the switch box is not hung.
Thecordholderpreventstheconnectioncordfromdan-
gling around your body, and also the cord holder can
preventtheconnectioncordfrombeingcutbymistake.
►Fig.17
►Fig.18
NOTICE: Do not hang anything other than the
connection code on the cord holder. Otherwise the
code holder may be broken.
NOTICE: Do not force the cord holder opening.
Otherwiseitmayresultindeformationorbreakageof
the code holder.
4. Putthearmbandonyourarm.Andslipthecon-
nection cord through the arm band.
►Fig.19: 1.Armband
5. First,alignthetriangularmarksofthefemale
socketoftheconnectioncordwiththetriangularmark
ofthemaleconnectoroftheshears.Pushinthesocket
oftheconnectioncordtotheconnectoroftheshears.
Then,alignthemarkingonthecouplingwiththetrian-
glar marks, and push in and turn the coupling to tighten.
►Fig.20: 1.Triangularmark2. Connection cord
3.Shears4. Marking on coupling
5. Coupling
NOTICE:Turnthecouplingandalignthemarking
onthecouplingwiththetriangularmarksrstwhen
disconnecting the connection cable.
Putting shears in the holster
Keep pulling the switch trigger to close the shear
blades,andpresstheI/Oswitchto"O"sidetoturnoff
thetool.Thenputtheshearsintotheholsterandhold
theshearswiththestrapoftheholster.
OPERATION
CAUTION: Always hold the tool rmly. And
keep rm footing.
CAUTION: Do not put any of your body parts
near to the blades during operation.
CAUTION: Before use, inspect if the blades,
blade bolts or other parts are not worn or dam-
aged.Replacewornordamagedpartsforsafe
operation.
NOTICE:
Ifthebladeisstuckinabranchduring
operation, do not twitst the blade. In that situation, turn
offthetoolandpullthebladesstraightoutslowlyfrom
the branch. Otherwise the blade may be damaged.
NOTICE: In case you cut too thick branch or some-
thing too hard, the overload protection works and the
toolstops.Inthatsituation,iftheuppershearbladeis
openedtoowideandtheswitchtriggerispulledfully,
the upper blade closes slightly when you press the
I/Oswitchto“I"(on)positionforrestartingthetool.
Pruning operation
►Fig.21
Cutbranchesonebyone.Themaximumthicknessof
branches which can be cut with these shears is about
33mm.Maintainyourproperfootingandbalanceatalltimes.
After use
Closetheshearblades,presstheI/Oswitchtothe“O"
(off)position,anddisconnecttheconnectioncordfrom
the shears and the switch box, and remove the batteries
frombatteryholder.
Storetheshearsindry,highorlocked-upplace–outof
reachofchildren.
NOTICE: Remove the battery when not using the
shears. Otherwise the battery capacity is reduced
duringcourseoftime.

14 ENGLISH
MAINTENANCE
CAUTION: Always be sure that the tool is
switched off and the battery cartridge is removed
before attempting to perform inspection or
maintenance.
CAUTION: Wear safety gloves when handling
the blade.Otherwiseitmayresultinpersonalinjury.
NOTICE: Never use gasoline, benzine, thinner,
alcohol or the like. Discoloration, deformation or
cracks may result.
Blade maintenance
NOTICE:Failuretoperformblademaintenancemay
causeexcessivebladefrictionandshortentheoper-
ating time per battery charge.
Beforeandafteroperation,checktheshearblades
carefully.
Afteroperation,cleanoffthebladeswithastiffbrush.
Thenwipethebladeswithacloth.AndapplyMakita
genuine machine oil onto the blade edge and movable
part.
►Fig.22
Sharpening blades
Upper shear blade
1. Applytheatsurfaceofthediamondletothe
blade edge.
Pushthediamondletowardsthetipofthebladeto
sharpen along the entire blade edge.
Maintainthesameatcontactwiththeleconsistently
along the entire blade edge.
►Fig.23: 1.Diamondle
2. Applytheatsurfaceofthediamondlelightlyto
theoppositesideoftheblade.
Movethediamondletowardsthetipoftheblade
lightly to remove burrs.
►Fig.24
NOTICE: Do not sharpen this side too much. File
lightlyonlyforremovingburrs.Otherwisetheblade
clearancemaybecometoomuchorthebladelife
may be shortened.
Lower shear blade
1. Applytheroundsurfaceofthediamondletothe
blade edge.
Pushthediamondletowardsthetipofthebladeto
sharpen along the entire blade edge.
►Fig.25
2. Applytheatsurfaceofthediamondlelightlyto
theoppositesideoftheblade.
Movethediamondletowardsthetipoftheblade
lightly to remove burrs.
►Fig.26
NOTICE: Do not sharpen this side too much. File
lightlyonlyforremovingburrs.Otherwisetheblade
clearancemaybecometoomuchorthebladelife
may be shortened.
Adjustment for blade clearance
►Fig.27: 1.Platexingbolt2. Lock plate 3. Blades
tightening nut
Fromtimetotime,adjusttheclearanceoftheshear
bladesasfollows:
1. Switchonthetool,andpulltheswitchtriggerto
open the shear blades.
2. Withshearbladesopen,switchoffthetool.And
disconnecttheconnectioncordfromthetool.
3. Loosentheplatexingbolt.Andthenremovethe
lock plate.
4. Adjustthetightnessofthebladestighteningnut
byhand(fasteningtorqueforthebladetighteningnut:
approximately0.5N•m).
5. Installthelockplateandplatexingboltagain.
6. Checkthetightnessofthebladewhetherthe
blades never rattle but upper blade can be opened or
closedabout3mmbyhand.Ifthebladesaretootightor
loose,adjusttheclearanceagain.
NOTICE:Payattentiontotheclearanceofthe
blades.Toolooseclearancemayresultindullcut,
and too tight blade clearance may result in overload
forthemotorandshortrunningtimeofthetool.
Removing or installing shear blades
Toremovetheshearblades,performfollowingsteps:
1. Tilttheopeningangleselectorlevertotheleftside
rsttoopenthebladesfully.
2. Switchonthetool,andpulltheswitchtriggerto
open the shear blades.
3. Withshearbladesopen,switchoffthetool.And
disconnecttheconnectioncordfromthetool.
►Fig.28
4. Remove two bolts near the switch trigger with the
hex wrench.
Remove the trigger guard by separating the tongue on
thetriggerguardfromthegrooveofthehousing.
►Fig.29: 1. Bolts 2.Triggerguard
5. RemovetheE-ringonthelinkarmwithaslotted
screwdriver or alike.
►Fig.30: 1.E-ring2. Link arm
NOTICE:TheE-ringisexpendablepart.Donot
re-usetheE-ringwhenreassembling.
6. Carefullyremovethepin.
►Fig.31: 1.Pin
7. Removetwoboltsfromthesideofthehousing.
►Fig.32: 1. Bolts
8. Carefullyremovetheupperandlowershearsfrom
the housing.
►Fig.33

15 ENGLISH
9. Toseparatetheupperbladeandthelowerblade,
rstloosentheplatexingbolt.
Thenremovethelockplate.
►Fig.34: 1.Platexingbolt2. Lock plate
10. Loosen and remove the blades tightening nut.
►Fig.35: 1. Blade tightening nut 2. Blade tightening
bolt
Toinstalltheshearblades,performtheprocedures
above in reverse. Make sure all the bolts are securely
tightened.
Afterinstallingtheblade,alwaysadjustthebladeclear-
ance.(Referto“Adjustmentforbladeclearance”.)
Toinstalltheshearblades,performtheprocedures
aboveinreverse.Wheninstallingtheshearblades,pay
attentiontothefollowingpoints:
• Applymachineoilorgreaseontothebladetight-
ening bolt and between the blades.
• Ifyoucannotplacetheplatexingboltproperly,
rst,removetheO-ringandtheplatexingbolt
fromthelockplate.Andthenoverturnthelock
plate,andreturntheO-ringandtheplatexing
bolt.
• Wheninstallingthetriggerguard,alignthetongue
ofthetriggerguardwiththegrooveofthehousing.
►Fig.36
• Makesurealltheboltsaresecurelytightened.
• Afterinstallingtheblade,alwaysadjustblade
clearance.(Referto“Adjustmentforblade
clearance”.)
• Afterinstallingtheblade,alwaysadjustcutting
depth.(Referto“Cuttingdepthadjustment”.)
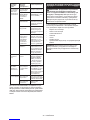
Trouble shooting
Beforemakingarequestforrepairs,checkfortrouble
byyourself.Ifanyabnormalityisfound,controlyour
toolaccordingtothedescriptionofthismanual.Ifthe
remedy mentioned below cannot solve the problem, ask
yourlocalauthorizedservicecenterforrepair.Never
tamper or dismount any part contrary to the description.
State of
abnormality
Probable cause
(malfunction)
Remedy
Theshearblade
does not move
evenafterpull-
ing the switch
trigger.
Thebatteryis
low.
Charge the battery.
I/Oswitchis"Off"
position.
PresstheI/Oswitchto
"I"position.
Theshearsare
locked.
Unlocktheshearsby
performingthestepsin
"Switchaction".
Connection cord
is loose.
Check the connecting
pointsoftheswitchbox
andshearsofconnec-
tion cord.
I/Oswitchis“on”
position when
inserting the bat-
tery cartridge.
PresstheI/Oswitch
tothe“O”(off)position
once,andpresstheI/O
switchtothe“I”(on)
position again.
Switchtrigger
defect.
Stopusingthetool
immediately, and ask
your local authorized
servicecenterfor
repair.
State of
abnormality
Probable cause
(malfunction)
Remedy
Theshear
blades are stuck
on the branch.
Thebranchistoo
thick.
Release the switch
trigger.PresstheI/O
switchto"O"position.
Thenpulltheblades
straightoutslowlyfrom
the branch.
Theswitch
trigger is locked
and can not be
pulled.
Shearbladesare
openedforcibly.
Switchoffandonwith
theI/Oswitch.(The
upper shear blade
closes slightly when
switching on.)
Thecutisnot
smooth.
Theshearblades
are dull.
Sharpentheshear
blades,oradjustblade
clearance.
Theshearblades
are worn out.
Replace the shear
blades.
TomaintainproductSAFETYandRELIABILITY,
repairs,anyothermaintenanceoradjustmentshould
beperformedbyMakitaAuthorizedorFactoryService
Centers, always using Makita replacement parts.
OPTIONAL
ACCESSORIES
CAUTION: These accessories or attachments
are recommended for use with your Makita tool
specied in this manual.Theuseofanyother
accessoriesorattachmentsmightpresentariskof
injurytopersons.Onlyuseaccessoryorattachment
foritsstatedpurpose.
Ifyouneedanyassistanceformoredetailsregard-
ingtheseaccessories,askyourlocalMakitaService
Center.
• Uppershearblade
• Lowershearblade
• Diamondle
• Armband
• Holster
• Cordholder
• Makitagenuinebatteryandcharger
NOTE:Someitemsinthelistmaybeincludedinthe
toolpackageasstandardaccessories.Theymay
differfromcountrytocountry.

16 POLSKI
POLSKI (Instrukcja oryginalna)
DANE TECHNICZNE
Model: DUP361
Maks.zakrescięcia 33 mm
Długośćcałkowita(częśćtnąca) 305 mm
Napięcieznamionowe Napięciestałe36V
Akumulator BL1815N, BL1820, BL1820B BL1830, BL1830B, BL1840,
BL1840B, BL1850, BL1850B,
BL1860B
Masanetto(zostrzami,modułemwyłącznika,przewodempołą-
czeniowym, dwoma akumulatorami i plecakiem)
3,3 kg 3,8 kg
• Wzwiązkuzestaleprowadzonymprzeznasząrmęprogramembadawczo-rozwojowymniniejszedanemogą
uleczmianombezwcześniejszegopowiadomienia.
• Winnychkrajachurządzeniemożemiećodmienneparametrytechniczneimożebyćwyposażonewinny
akumulator.
• MasaurządzeniawrazzakumulatoremobliczonazgodniezprocedurąEPTA01/2003
Symbole
Poniżejpokazanosymbolezastosowanenaurządze-
niu.Przedrozpoczęciemużytkowanianależyzapoznać
sięzichznaczeniem.
Przeczytaćinstrukcjęobsługi.
Chronićprzedwilgocią.
Niebezpieczeństwo;uważaćnawyrzucane
przedmioty.
Osobypostronnepowinnyprzebywaćw
bezpiecznejodległości.
Cd
Ni-MH
Li-ion
DotyczytylkopaństwUE
Niewyrzucaćurządzeńelektrycznychani
akumulatorów wraz z odpadami z gospo-
darstwa domowego!
Zgodniezdyrektywamieuropejskimiw
sprawiezużytegosprzętuelektrycznegoi
elektronicznego oraz baterii i akumulato-
róworazzużytychbateriiiakumulatorów,
atakżedostosowaniemichdoprawa
krajowego,zużyteurządzeniaelektryczne,
baterieiakumulatory,należyskładować
osobnoiprzekazywaćdozakładurecy-
klingudziałającegozgodniezprzepisami
dotyczącymiochronyśrodowiska.
Przeznaczenie
Narzędziejestprzeznaczonedoprzycinaniagałęzi.
Hałas
TypowyrównoważnypoziomdźwiękuAokreślonyw
oparciuonormęEN50636:
Poziomciśnieniaakustycznego(LpA):70dB(A)lub
mniej
Niepewność(K):3,2dB(A)
Poziomhałasupodczaspracymożeprzekraczać80dB(A).
OSTRZEŻENIE: Nosić ochronniki słuchu.
Drgania
Całkowitawartośćpoziomudrgań(sumawektoróww3
osiach)określonazgodnieznormąEN50636:
Emisjadrgań(ah):2,5m/s2lubmniej
Niepewność(K):1,5m/s2
WSKAZÓWKA:Deklarowanawartośćwytwarzanych
drgańzostałazmierzonazgodniezestandardową
metodątestowąimożnająwykorzystaćdoporówny-
wanianarzędzi.
WSKAZÓWKA:Deklarowanąwartośćwytwarzanych
drgańmożnatakżewykorzystaćwewstępnejocenie
narażenia.
OSTRZEŻENIE: Drgania wytwarzane podczas
rzeczywistegoużytkowaniaelektronarzędziamogą
sięróżnićodwartoścideklarowanej,wzależnościod
sposobujegoużytkowania.
OSTRZEŻENIE:Woparciuoszacowane
narażeniewrzeczywistychwarunkachużytkowania
należyokreślićśrodkibezpieczeństwawceluochrony
operatora(uwzględniającwszystkieelementycyklu
działania,tj.czas,kiedynarzędziejestwyłączonei
kiedypracujenabiegujałowym,atakżeczas,kiedy
jestwłączone).
Deklaracja zgodności WE
Dotyczy tylko krajów europejskich
FirmaMakitaoświadcza,żeponiższeurządzenie(-a):
Oznaczeniemaszyny:Akumulatorowysekator
ogrodniczy
Modelnr/typ:DUP361
Jestzgodnezwymogamiokreślonymiwnastępujących
dyrektywacheuropejskich:2006/42/WE
Jest/sąprodukowanezgodnieznastępującyminor-
mamilubdokumentaminormalizacyjnymi:ENISO
12100

17 POLSKI
Dokumentacjatechnicznazgodnawwymaganiami
dyrektywy2006/42/ECjestdostępnaw:
Makita,Jan-BaptistVinkstraat2,3070,Belgia
29.1.2015
Yasushi Fukaya
Dyrektor
Makita,Jan-BaptistVinkstraat2,3070,Belgia
Ostrzeżenia dotyczące
bezpieczeństwa dla sekatora
ogrodniczego
OSTRZEŻENIE: Przeczytać wszystkie ostrze-
żenia bezpieczeństwa i wszystkie instrukcje.
Niezastosowaniesiędowspomnianychostrzeżeńi
instrukcjimożedoprowadzićdoporażeniaprądem
elektrycznym,pożarui/lubpoważnychobrażeńciała.
Wszystkie ostrzeżenia i instruk-
cje należy zachować do wykorzy-
stania w przyszłości.
Pojęcie„elektronarzędzie",występującewwymienio-
nychtuostrzeżeniach,odnosisiędoelektronarzędzia
zasilanegozsiecielektrycznej(zprzewodemzasilają-
cym)lubdoelektronarzędziaakumulatorowego(bez
przewoduzasilającego).
1. Używać środków ochrony osobistej. Zawsze
nosić okulary ochronne.Odpowiednieśrodki
ochrony,takiejakmaskaprzeciwpyłowa,
ochronneobuwieantypoślizgowe,kaskczy
ochronnikisłuchu,dostosowanedopanujących
warunków,zmniejszająryzykoobrażeń.
2. Nie dopuszczać do przypadkowego urucho-
mienia. Przed podłączeniem do źródła zasila-
nia i/lub akumulatora, podniesieniem lub prze-
niesieniem narzędzia należy sprawdzić, czy
przełącznik znajduje się w pozycji wyłączenia.
Przenoszenieelektronarzędzizpalcemnaprze-
łącznikulubpodłączanieprzewoduzasilającego
przywłączonymprzełącznikugroziwypadkiem.
3. Nosić odpowiednią odzież. Nie nosić luźnych
ubrań ani biżuterii. Trzymać włosy, odzież i
rękawice z daleka od części ruchomych.Luźna
odzież,biżuteriaidługiewłosymogązostać
pochwyconeprzezruchomeczęści.
4. Narzędzie służy do przycinania gałęzi. Nie
używaćnarzędziadozadańniezgodnychzjego
przeznaczeniem.
5. Narzędzie nie może być użytkowane przez
dzieci, osoby, które nie przeczytały niniejszej
instrukcji, osoby niebędące w pełni władz
zycznych, poznawczych lub umysłowych ani
niemające odpowiedniej wiedzy i doświadcze-
nia. Lokalne przepisy mogą ograniczać wiek
operatora.
6. Nie wolno użytkować narzędzia, gdy w pobliżu
znajdują się inne osoby, zwłaszcza dzieci, oraz
zwierzęta.
7.
Nie należy się nadmiernie wychylać i zawsze pamię-
tać o utrzymywaniu równowagi.Podczasużywania
narzędzianależychodzić,aniebiegać,atakżezadbać
oodpowiednieoparciedlanógnapochyłościach.
8. Nie dotykać ruchomych niebezpiecznych czę-
ści narzędzia przed odłączeniem go od zasila-
nia sieciowego i/lub wyjęciem akumulatora.
9. Podczas używania narzędzia używać odpo-
wiedniego obuwia oraz spodni z długimi
nogawkami.
10. Odłączyć zasilanie i/lub wyjąć akumulator z
narzędzia w następujących przypadkach:
• poodłożeniunarzędziaprzezużytkownika;
• przedusunięciemblokady;
• przedsprawdzaniem,czyszczeniemlub
konserwacjąnarzędzia;
• pouderzeniuwprzedmiotwcelusprawdze-
nianarzędziapodkątemuszkodzeń;
• gdynarzędziezaczynadrgaćwnietypowy
sposób—należynatychmiastsprawdzić
przyczynę.
11. Nigdy nie użytkować narzędzia z uszkodzo-
nymi osłonami i pokrywami, bez zabezpieczeń
ani z uszkodzonym lub zużytym przewodem.
12. Unikać korzystania z narzędzia przy złej pogo-
dzie, w szczególności podczas burzy.
13. Nie używać narzędzia ani nie ładować akumu-
latora podczas deszczu.
14. Nie pozostawiać narzędzia na deszczu ani w
wilgotnym miejscu.
15. Uważać, aby pomiędzy ostrza nie dostały się
niepożądane przedmioty.Wprzypadkuzacięcia
ostrzyprzezniepożądanyprzedmiotnatychmiast
wyłączyćnarzędzieiodłączyćodniegoakumu-
lator.Następnieusunąćprzedmiotznajdującysię
międzyostrzami.
16. Nie trzymać obcinanej gałęzi wolną ręką. Nie
wolnozbliżaćwolnejrękidostrefycięcia.Nie
dotykaćostrzy,ponieważsąonebardzoostrei
możetodoprowadzićdoskaleczenia.
17. Nie używać siły w celu wykonania cięcia.
Grozitopoślizgnięciem,odniesieniemobrażeń
lubprzypadkowymprzecięciemniepożądanych
przedmiotów.
18. Uważać, aby nie przeciąć przewodów elek-
trycznych, które mogą być niewidoczne.
19. Zawsze dokładnie sprawdzać stan ostrzy przed
uruchomieniem narzędzia.
20. Posługiwać się ostrzami z najwyższą ostrożno-
ścią, aby uniknąć skaleczeń lub obrażeń.
21. Po każdym użyciu oraz przed przystąpieniem
do kontroli lub konserwacji narzędzia należy
odłączyć od niego akumulator.
22. Nieużywane narzędzie przechowywać w
kaburze.
Użytkowanie narzędzi akumulatorowych i dbałość
o nie
1. Akumulator należy ładować wyłącznie przy
użyciu określonej przez producenta łado-
warki.Ładowarkaprzeznaczonadojednegotypu
akumulatoramożestwarzaćzagrożeniepoża-
rem,gdybędzieużywanadoładowaniainnego
akumulatora.

18 POLSKI
2. Do zasilania elektronarzędzi używać tylko
specjalnie do tego celu przeznaczonych aku-
mulatorów.Używanieinnychakumulatorówmoże
stwarzaćryzykowystąpieniaobrażeńciałalub
pożaru.
3. Gdy akumulator nie jest używany, należy
zabezpieczyć go przed kontaktem z metalo-
wymi przedmiotami, typu spinacze, monety,
klucze, gwoździe, wkręty lub innymi metalo-
wymi drobiazgami, które mogą powodować
zwarcie styków akumulatora. Zwarcie styków
akumulatoragrozipoparzeniamilubpożarem.
4. W niewłaściwych warunkach eksploatacji
może dojść do wycieku elektrolitu z akumu-
latora. Nie należy go dotykać. W razie przy-
padkowego kontaktu należy przemyć skażoną
skórę wodą. W przypadku dostania się elek-
trolitu do oczu należy dodatkowo skorzystać
z porady lekarza.Elektrolitzakumulatoramoże
powodowaćpodrażnienialubpoparzenia.
Serwis
1. Elektronarzędzie powinno być serwisowane
przez wykwalikowany personel, z użyciem
wyłącznie oryginalnych części zamiennych.
Zapewnitozachowaniebezpieczeństwapracyz
elektronarzędziem.
2. Przestrzegać instrukcji smarowania i wymiany
akcesoriów.
3. Utrzymywać rękojeści suche, czyste i nieza-
brudzone olejem ani smarem.
OSTRZEŻENIE: NIE WOLNO pozwolić,
aby wygoda lub rutyna (nabyta w wyniku wielo-
krotnego używania urządzenia) zastąpiły ścisłe
przestrzeganie zasad bezpieczeństwa obsługi.
NIEWŁAŚCIWE UŻYTKOWANIE narzędzia lub
niestosowanie się do zasad bezpieczeństwa
podanych w niniejszej instrukcji obsługi może
prowadzić do poważnych obrażeń ciała.
Ważne zasady bezpieczeństwa
dotyczące akumulatora
1.
Przed użyciem akumulatora zapoznać się ze
wszystkimi instrukcjami i znakami ostrzegaw-
czymi na (1) ładowarce, (2) akumulatorze i (3)
produkcie, w którym będzie używany akumulator.
2. Akumulatora nie wolno rozbierać.
3. Jeśli czas działania uległ znacznemu skróce-
niu, należy natychmiast przerwać pracę. Może
bowiem dojść do przegrzania, ewentualnych
poparzeń, a nawet eksplozji.
4. W przypadku przedostania się elektrolitu do
oczu, przemyć je czystą wodą i niezwłocznie
uzyskać pomoc lekarską. Może on bowiem
spowodować utratę wzroku.
5. Nie doprowadzać do zwarcia akumulatora:
(1) Nie dotykać styków materiałami przewo-
dzącymi prąd.
(2) Unikać przechowywania akumulatora w
pojemniku z metalowymi przedmiotami,
takimi jak gwoździe, monety itp.
(3) Chronić akumulator przed deszczem lub
wodą.
Zwarcie prowadzi do przepływu prądu elek-
trycznego o dużym natężeniu i przegrzania
akumulatora, co w konsekwencji może grozić
poparzeniami a nawet awarią urządzenia.
6. Narzędzia i akumulatora nie wolno przecho-
wywać w miejscach, w których temperatura
osiąga bądź przekracza 50°C (122°F).
7. Akumulatorów nie wolno spalać, również tych
poważnie uszkodzonych lub całkowicie zuży-
tych. Akumulator może eksplodować w ogniu.
8. Chronić akumulator przed upadkiem i
uderzeniami.
9. Nie wolno używać uszkodzonego akumulatora.
10. Stanowiące wyposażenie akumulatory lito-
wo-jonowe podlegają przepisom dotyczącym
produktów niebezpiecznych.
Napotrzebytransportukomercyjnego,np.świad-
czonegoprzezrmytrzecieczyspedycyjne,
należyprzestrzegaćspecjalnychwymagańw
zakresie pakowania i oznaczania etykietami.
Przygotowanieproduktudowysyłkiwymaga
skonsultowaniasięzespecjalistąds.materiałów
niebezpiecznych.Należytakżeprzestrzegać
przepisówkrajowych,któremogąbyćbardziej
szczegółowe.
Zakleićtaśmąlubzaślepićotwartestykiakumula-
toraorazzabezpieczyćgo,abyniemógłsięprze-
suwaćwopakowaniu.
11. Postępować zgodnie z przepisami lokalnymi
dotyczącymi usuwania akumulatorów.
ZACHOWAĆ NINIEJSZE
INSTRUKCJE.
PRZESTROGA: Używać wyłącznie oryginal-
nych akumulatorów rmy Makita.Używanienie-
oryginalnychakumulatorówrminnychniżMakitalub
akumulatorów,którezostałyzmodykowane,może
spowodowaćwybuchakumulatoraipożar,obrażenia
ciałaorazzniszczeniemienia.Stanowitorównież
naruszeniewarunkówgwarancjirmyMakitadoty-
czącychnarzędziaiładowarki.
Wskazówki dotyczące zacho-
wania maksymalnej trwałości
akumulatora
1. Akumulator należy naładować zanim zostanie
do końca rozładowany. Po zauważeniu spadek
mocy narzędzia należy przerwać pracę i nała-
dować akumulator.
2. Nie wolno ładować powtórnie w pełni nałado-
wanego akumulatora. Przeładowanie akumula-
tora skraca jego trwałość.
3. Akumulator należy ładować w temperaturze
pokojowej w przedziale 10–40°C (50–104°F). W
przypadku gorącego akumulatora przed przy-
stąpieniem do ładowania należy poczekać, aż
ostygnie.
4. Akumulatory niklowo-wodorkowe należy nała-
dować po okresie długiego nieużytkowania
(dłuższego niż sześć miesięcy).

19 POLSKI
Oznaczenie N
OznaczenieNjestznakiemhandlowymlubzarejestro-
wanymznakiemhandlowymrmyNFCFormula,Inc.w
USAorazinnychkrajach.
OPIS CZĘŚCI
►Rys.1
1Uprząż 2Plecak 3Modułwyłącznika 4Lampka kontrolna
(czerwona)
5Lampka kontrolna
(zielona)
6Wyłącznik 7Kabura 8Uchwytprzewodu
9Przewódpołączeniowy 10 Nożyce 11 Spustprzełącznika - -
OPIS DZIAŁANIA
PRZESTROGA: Przed przystąpieniem do regu-
lacji lub przeglądu narzędzia upewnić się, że jest
ono wyłączone, a akumulator został wyjęty.
Wkładanie i wyjmowanie
akumulatora
PRZESTROGA: Przed włożeniem lub wyjęciem
akumulatora należy zawsze wyłączyć narzędzie.
PRZESTROGA: Podczas wkładania lub wyjmo-
wania akumulatora należy mocno trzymać narzę-
dzie i akumulator.Wprzeciwnymraziemogąsięone
wyślizgnąćzrąk,powodującuszkodzenienarzędzia
lubakumulatoraiobrażeniaciała.
►Rys.2: 1.Czerwonywskaźnik2.Przycisk
3.Akumulator4.Uchwytakumulatora
Abywyjąćakumulator,przesuńprzyciskznajdującysię
wprzedniejjegoczęściiwysuńakumulator.
Abywłożyćakumulator,wyrównajwystępnaakumu-
latorzezrowkiemwobudowieiwsuńgonaswoje
miejsce.Akumulatornależywsunąćdooporu,ażsię
zatrzaśnienamiejscu,cojestsygnalizowanedelikat-
nymkliknięciem.Jeśliwgórnejczęściprzyciskujest
widocznyczerwonywskaźnik,akumulatorniezostał
całkowiciezatrzaśnięty.
PRZESTROGA: Akumulator należy włożyć
do końca, tak aby czerwony wskaźnik nie był
widoczny.Wprzeciwnymraziemożeprzypadkowo
wypaśćznarzędzia,powodującobrażeniaoperatora
lub osób postronnych.
PRZESTROGA: Nie wkładać akumulatora na
siłę.Jeśliakumulatorniedajesięswobodniewsunąć,
oznaczato,żezostałwłożonynieprawidłowo.
WSKAZÓWKA:Narzędzieniedziaławprzypadku
włożeniatylkojednegoakumulatora.
Układ zabezpieczenia narzędzia/
akumulatora
Narzędziejestwyposażonewukładzabezpieczenia
narzędzia/akumulatora.Układautomatycznieodcina
zasilaniesilnikawceluwydłużeniatrwałościnarzędziai
akumulatora.Narzędziezostanieautomatyczniezatrzy-
manepodczaspracywnastępującychsytuacjachzwią-
zanychznarzędziemlubakumulatorem.Wpewnych
warunkachwłączająsięlampkikontrolnewmodule
wyłącznika.
Zabezpieczenie przed przeciążeniem
Wprzypadkuobsługinarzędziawsposóbpowodujący
pobórnadmierniewysokiegoprądunarzędziezostanie
automatyczniezatrzymanebezżadnejsygnalizacji.W
takiejsytuacjinależywyłączyćnarzędzieizaprzestać
wykonywaniaczynnościpowodującejprzeciążenie
narzędzia.Następnienależywłączyćnarzędziewcelu
jegoponownegouruchomienia.
Zabezpieczenie przed przegrzaniem
Wprzypadkugdynarzędziejestprzegrzanezostanieono
automatyczniewyłączoneizaczniemigaćzielonalampka
wmodulewyłącznika.Wtakiejsytuacjiprzedponownym
włączeniemnależypoczekać,ażnarzędziaostygnie.
Zabezpieczenie przed nadmiernym
rozładowaniem
Gdystannaładowaniaakumulatoraspadnie,narzędzie
zostanie automatycznie zatrzymane. Czerwona lampka
wmodulewyłącznikaświecilubmiga.Jeśliproduktnie
działapomimowłączeniaprzełączników,należywyjąć
akumulatoryzuchwytuinaładowaćje.
Wskazanie stanu naładowania
akumulatora
Tylko akumulatory oznaczone literą „B” na końcu
model
►Rys.3: 1.Lampkiwskaźnika2.Przyciskkontrolny
Nacisnąćprzyciskkontrolnynaakumulatorzewcelu
wyświetleniastanunaładowaniaakumulatora.Lampki
wskaźnikazaświecąsięprzezkilkasekund.

20 POLSKI
Lampki wskaźnika Pozostała
energia
akumulatora
Świeci się Wyłączony Miga
75–100%
50–75%
25–50%
0–25%
Naładować
akumulator.
Akumulator
możenie
działać
poprawnie.
WSKAZÓWKA:Zależnieodwarunkówużytkowania
itemperaturyotoczenia,wskazywanypoziommoże
nieznaczniesięróżnićodrzeczywistegostanunała-
dowania akumulatora.
Działanie przełącznika
PRZESTROGA: Przed podłączeniem akumu-
latora do sekatora należy zawsze sprawdzić,
czy spust przełącznika działa prawidłowo i
czy powraca do położenia wyłączenia po jego
zwolnieniu.
PRZESTROGA: Gdy narzędzie nie jest uży-
wane, należy zawsze ustawić wyłącznik w położe-
niu wyłączonym („O”)
PRZESTROGA: Nie przestawiać wyłącznika do
położenia włączonego („I”) podczas naciskania
spustu przełącznika.Możetospowodowaćprzy-
mknięcieostrzyorazobrażeniaciała.
Abywłączyćnarzędzie,należywykonaćnastępujące
czynności:
1. Podłączmodułwyłącznika,przewódpołącze-
niowyisekator.(Patrzsekcja„Podłączanieprzewodu
połączeniowego”).
2. Chwyćpewniesekatoriprzestawwyłącznikdo
położeniawłączonego(„I”).Zacznieświecićzielona
lampka kontrolna.
►Rys.4: 1.Wyłącznik2. Lampka kontrolna (zielona)
3. Lampka kontrolna (czerwona)
3. Powłączeniuwyłącznikaostrzasekatorasą
zablokowane.Abyzwolnićblokadę,dwukrotnienaciśnij
spustprzełącznika.Górneostrzesekatoraotworzysię
automatycznie.
4. Abyzamknąćostrzesekatora,pociągnijspust
przełącznika.
►Rys.5: 1.Spustprzełącznika
Automatyczne przełączanie w tryb
blokady lub tryb wyłączenia
Zewzględówbezpieczeństwa,gdynarzędzieniejest
używaneprzezokreślonyczas,przełączasięwówczas
automatyczniewtrybblokadylubwtrybwyłączenia.
Poupływie5min:Urządzenieprzełączasięwtrybblo-
kady.Abyzwolnićblokadę,należydwukrotnienacisnąć
spustprzełącznika.
Poupływie15min:Narzędzieprzełączasięwtrybwyłącze-
niaigaśniezielonalampkakontrolna.Przestawićwyłącznik
dopołożeniawyłączonego(„O”),następnieprzestawićgo
ponowniedopołożeniawłączonego(„I”)idwukrotnienaci-
snąćspustprzełącznika,abyzwolnićblokadę.
Dźwignia regulacji kąta otwarcia
►Rys.6: 1.Dźwigniaregulacjikątaotwarcia
Przechylającdźwignięregulacjikątaotwarciawlewo,
możnaustawićwiększykątotwarciaostrzysekatora.
Abyograniczyćkątotwarciagórnegoostrzasekatora,
należynajpierwcałkowiciewcisnąćspustprzełącznika,
anastępnieustawićdźwignięregulacjikątaotwarciaz
powrotemwpołożeniupionowym.
Regulacja głębokości cięcia
PRZESTROGA: Nie zbliżać rąk ani innych czę-
ści ciała do ostrzy sekatora. W przeciwnym razie
może to przyczynić się do powstania obrażeń.
Ponaostrzeniulubwymianieostrzasekatoranależyw
raziekoniecznościwyregulowaćgłębokośćcięcia.
Włączyćnarzędzieidwukrotnienacisnąćspustprze-
łącznika,abyotworzyćostrzasekatora,anastępnie
przestawićwyłącznikdopołożeniawyłączonego(„O”).
Abyzwiększyćgłębokośćcięcia,obrócićśrubęregulacji
głębokościcięciawprawoprzyużyciukluczaimbuso-
wego.Abyzmniejszyćgłębokośćcięcia,obrócićśrubę
regulacjigłębokościcięciawlewo.
►Rys.7: 1.Śrubaregulacjigłębokościcięcia
WSKAZÓWKA:
Powykonaniuregulacjinależyspraw-
dzićgłębokośćcięcia.Jeśligłębokośćcięciajestzbyt
płytka,gałąźmożeniezostaćprzeciętadokońca.
Lampki kontrolne w module
wyłącznika
►Rys.8: 1.Wyłącznik2. Lampka kontrolna (zielona)
3. Lampka kontrolna (czerwona)
Sygnalizacjazielonejiczerwonejlampkikontrolnej:
(Włączona: Wyłączona: Miga: )
• Zielonalampkaświeci:narzędziejestwłączone.
Zielona Czerwona
•
Świecizielonaiczerwonalampka:powłożeniuakumula-
toradouchwytuprzywyłącznikuwpołożeniuwłączonym
(„I”)świecąobielampkiaostrzenieporuszasięmimo
naciskaniaspustuprzełącznika.Wtakiejsytuacjiprzesta-
wićwyłącznikdopołożeniawyłączonego(„O”),następnie
przestawićgoponowniedopołożeniawłączonego(„I”).
Pagina se încarcă ...
Pagina se încarcă ...
Pagina se încarcă ...
Pagina se încarcă ...
Pagina se încarcă ...
Pagina se încarcă ...
Pagina se încarcă ...
Pagina se încarcă ...
Pagina se încarcă ...
Pagina se încarcă ...
Pagina se încarcă ...
Pagina se încarcă ...
Pagina se încarcă ...
Pagina se încarcă ...
Pagina se încarcă ...
Pagina se încarcă ...
Pagina se încarcă ...
Pagina se încarcă ...
Pagina se încarcă ...
Pagina se încarcă ...
Pagina se încarcă ...
Pagina se încarcă ...
Pagina se încarcă ...
Pagina se încarcă ...
Pagina se încarcă ...
Pagina se încarcă ...
Pagina se încarcă ...
Pagina se încarcă ...
Pagina se încarcă ...
Pagina se încarcă ...
Pagina se încarcă ...
Pagina se încarcă ...
Pagina se încarcă ...
Pagina se încarcă ...
Pagina se încarcă ...
Pagina se încarcă ...
Pagina se încarcă ...
Pagina se încarcă ...
Pagina se încarcă ...
Pagina se încarcă ...
Pagina se încarcă ...
Pagina se încarcă ...
Pagina se încarcă ...
Pagina se încarcă ...
Pagina se încarcă ...
Pagina se încarcă ...
Pagina se încarcă ...
Pagina se încarcă ...
Pagina se încarcă ...
Pagina se încarcă ...
Pagina se încarcă ...
Pagina se încarcă ...
Pagina se încarcă ...
Pagina se încarcă ...
Pagina se încarcă ...
Pagina se încarcă ...
Pagina se încarcă ...
Pagina se încarcă ...
Pagina se încarcă ...
Pagina se încarcă ...
-
 1
1
-
 2
2
-
 3
3
-
 4
4
-
 5
5
-
 6
6
-
 7
7
-
 8
8
-
 9
9
-
 10
10
-
 11
11
-
 12
12
-
 13
13
-
 14
14
-
 15
15
-
 16
16
-
 17
17
-
 18
18
-
 19
19
-
 20
20
-
 21
21
-
 22
22
-
 23
23
-
 24
24
-
 25
25
-
 26
26
-
 27
27
-
 28
28
-
 29
29
-
 30
30
-
 31
31
-
 32
32
-
 33
33
-
 34
34
-
 35
35
-
 36
36
-
 37
37
-
 38
38
-
 39
39
-
 40
40
-
 41
41
-
 42
42
-
 43
43
-
 44
44
-
 45
45
-
 46
46
-
 47
47
-
 48
48
-
 49
49
-
 50
50
-
 51
51
-
 52
52
-
 53
53
-
 54
54
-
 55
55
-
 56
56
-
 57
57
-
 58
58
-
 59
59
-
 60
60
-
 61
61
-
 62
62
-
 63
63
-
 64
64
-
 65
65
-
 66
66
-
 67
67
-
 68
68
-
 69
69
-
 70
70
-
 71
71
-
 72
72
-
 73
73
-
 74
74
-
 75
75
-
 76
76
-
 77
77
-
 78
78
-
 79
79
-
 80
80


Makita DUP361 Manual de utilizare
- Categorie
- Unelte electrice
- Tip
- Manual de utilizare
în alte limbi
- slovenčina: Makita DUP361 Používateľská príručka
- polski: Makita DUP361 Instrukcja obsługi
Lucrări conexe
-
Makita UP100D Manual de utilizare
-
-
Makita PDC01 Portable Power Pack Manual de utilizare
-
Makita UH004G Manual de utilizare
-
-
Makita UH013G Manual de utilizare
-
Makita DUN461W Manual de utilizare
-
Makita UH014 Manual de utilizare
-
Makita DUH604S Manual de utilizare
-
Makita CB100DB Manual de utilizare
Alte documente
-
Dolmar AR3733 Manualul proprietarului
-
-
Stiga GM Li 7.2 Manual de utilizare
-
Gardena 8885 Manual de utilizare
-
-
-
-
STIHL HSA 26 Manualul proprietarului
-
 Nakayama EC1400 Manual de utilizare
