Tesla Air fryer- AF501BX Manual de utilizare
- Tip
- Manual de utilizare

AIR FRYER
AF501BX
User Manual
ENG BGALB GRBIH/CG
HU RO SLO SRBMK

2
IMPORTANT SAFEGUARDS
The following basic precautions should always be
followed:
1. This appliance shall not be used by children from 0
to 8 years. This appliance can be used by children
aged from 8 years and above if they are continuously
supervised. This appliance can be used by people
with reduced physical, sensory, or mental capabilities
or lack of experience and knowledge if they have
been given supervision or instruction concerning the
use of the appliance in a safe way and understand the
hazards involved.
2. Keep the appliance and its cord out of reach of
children aged less than 8 years
3. Cleaning and user maintenance shall not be made
by children.
4. Cooking appliances should be positioned in a stable
situation with the handles (if any) positioned to avoid
spillage of the hot liquid.
5. Check if the voltage indicated on the appliance
corresponds to the local main voltage before you
connect the appliance.
6. Do not use the appliance if the plug, the main cord or
the appliance itself is damaged.
Always make sure that the plug is inserted properly
into a wall outlet.
7. Do not operate any appliance with a damaged cord
or plug, after the appliance malfunctions, or has been
damaged in any manner.
If the supply cord is damaged, it must be replaced
by the similarly qualified persons in order to avoid a
hazard.
8. Close supervision is necessary. When any appliance is
used near children. Children should be supervised to
ensure that they do not play with the appliance.
9. Do not let the cord hang over the edge of the table or
counter or touch hot surfaces.
10. To protect against electric shock, do not immerse
cord, plugs, or appliance in water or other liquid. Do
not plug in the appliance or operate the control panel
with wet hands.
11. Never connect this appliance to an external timer
switch or separate remote-control system in order to
avoid a hazardous situation. To disconnect, turn off the
appliance, then remove the plug from wall outlet.
12. Do not place the appliance on or manufacturer, its
service agent or near combustible materials such as
a tablecloth or curtain. The accessible surfaces may
become hot during use. Do not place on or near a hot
gas or electric burner, or in a heated oven.
13. Do not place the appliance against a wall or against
other appliances.
Leave at least 10 cm / 3.9 in of free space on the back
and sides and 10 cm / 3.9 in of free space above
the appliance. Do not place anything on top of the
appliance.
14. Do not use the appliance for any other purpose
than described in this manual. The use of accessory
attachments not recommended by the appliance
manufacturer may cause injuries.
15. Do not let the appliance operate unattended.
Extreme caution must be used when moving an
appliance containing hot oil or other hot liquids.
16. Do not use it outdoors.
17. Do not touch the hot surfaces, use the handle. During
air frying, hot steam is released through the air.
The steam and from the air outlet openings. Also be
careful of hot steam and air when you remove the
basket from the appliance.
18. After using the appliance, avoid contact with the hot
metal inside. Unplugged from outlet when not in
use and before cleaning. Allow the appliance to cool
before cleaning.
19. Immediately unplug the appliance if you see dark
smoke coming.
Out of the appliance. Wait for the smoke emission
to stop before you remove the basket from the
appliance.
20. For household use only.
INSTRUCTION MANUAL
Please read the instructions carefully before use.
Take good care of this manual for later use.
ENG

3
WARRANTY
CORD AND PLUG SAFETY
In the following cases, the guarantee according to current regulations will not be effective:
a. Any damage resulting from repairs or manipulation unauthorized by the company.
b. Any damage resulting from misuse, negligence or accident.
c. Any damage caused by natural disasters or voltage that is not declared.
d. Any damage resulting from cases of use of the machine in contexts other than those described in this manual.
• A short power-supply cord is provided to reduce the risk of becoming entangled in or tripping over a longer cord.
• Extension cords may be used if care is exercised in their use.
• If an extension cord is used:
a. The marked electrical rating of the extension cord should be at least equal to the electrical rating of the appliance; and
b. The longer cord should be arranged so that it will not be draped over the countertop or tabletop where it can be
pulled on by children or tripped over.
Save these instructions
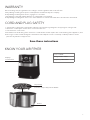
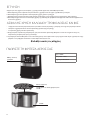
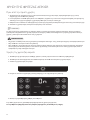
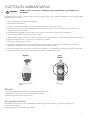
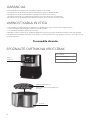
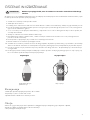
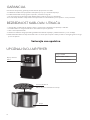
KNOW YOUR AIR FRYER
Display /
Control Panel
Crisper Tray
Basket
Place the Crisper Tray into the Basket.
Power: 1300W
Voltage: 220V – 240V~
Frequency: 50Hz/60Hz

4
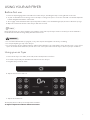
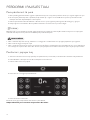
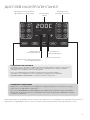
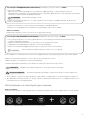
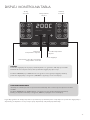
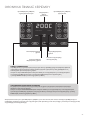
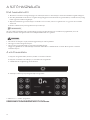
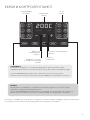
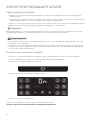
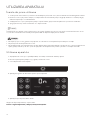
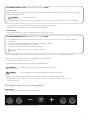
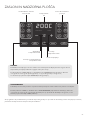
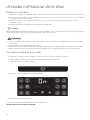
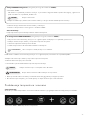
DISPLAY AND CONTROL PANEL
Air Fry
Presets
Decrease
Temperature / Time
Toggle between adjusting
Temperature / Time
Power Icon
Increase Temperature
/ Time
Cooking
Presets
Temperature
/ Time
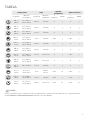
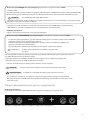
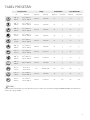
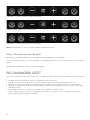
See the chart for Presets that have Preheat and Turn Reminder on by default and those that have the option to toggle the
settings on and off.
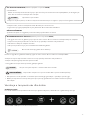
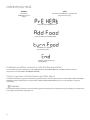
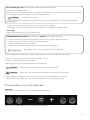
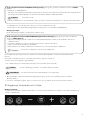
PREHEAT
Preheating the air fryer before adding food will generally deliver the best results. When
cooking multiple batches in a row, only preheat before the first batch.
Tap PREHEAT before START to enable or disable preheating. When preheating is enabled,
PREHEAT appears in red on the Display.
TURN REMINDER
Turning or tossing food halfway through cook time will deliver evenly browned and crispy results.
Tap TURN REMINDER before START to enable or disable Turn Reminder.
When Turn Reminder is enabled, TURN appears in red on the Display.

5
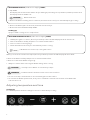
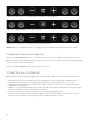
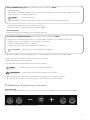
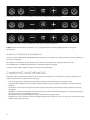
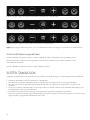
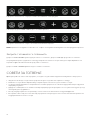
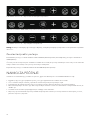
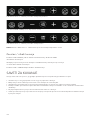
DISPLAY & SOUND
Swich temperature read-out
To toggle between displaying temperature in Fahrenheit and Celsius, press and hold TEMP / TIME.
Mute air fryer
To silence the air fryer’s beeping sound, press and hold STOP / CANCEL. Press and hold STOP / CANCEL again to turn
the sound on.
NOTE
When muted, there will be quicker and fewer beeps for guided cooking prompts and when the cook time has elapsed.
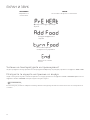
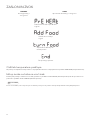
PREHEAT
Preheat is enabled.
The air fryer is preheating.
The air fryer is heated.
Reminder to turn or toss food.
The cook time haselapsed.
TURN
Turn Reminder is enabled.

6
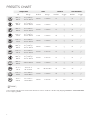
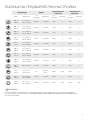
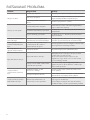
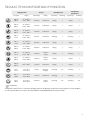
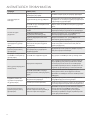
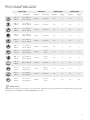
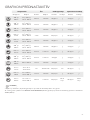
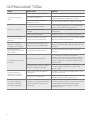
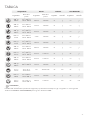
PRESETS CHART
Temperature Time Preheat Turn Reminder
Off Range Default Range Default Toggle Default Toggle
200 0C/
400 0F
76
0
C-200
0
C/
170
0
F - 400
0
F
20 min 1-60 min on √on √
200 0C/
400 0F
76
0
C-200
0
C/
170
0
F - 400
0
F
15 min 1-60 min on √on √
200 0C/
400 0F
76
0
C-200
0
C/
170
0
F - 400
0
F
25 min 1-60 min on √on √
190 °C /
3750F
76
0
C-200
0
C/
170
0
F - 400
0
F
6 min 1-60 min off √off √
190 °C /
3750F
76
0
C-200
0
C/
170
0
F - 400
0
F
10 min 1-60 min on √on √
200 0C/
400 0F
76
0
C-200
0
C/
170
0
F - 400
0
F
20 min 1-60 min on √on √
160 °C /
325 °F
76
0
C-200
0
C/
170
0
F - 400
0
F
25 min 1 min-2 h on √off √
200 0C/
400 0F
76
0
C-200
0
C/
170
0
F - 400
0
F
25 min 1 min-2 h on √on √
200 0C/
400 0F
200
0
C/ 400
0
F
12 min 1-60 min on √on √
56 °C /
135 °F
34 °C-76 °C
90 °F-170 °F
8 h 30 min-24 h off n/a off √
150 °C /
300°F
76 °C-200 °C’
170 °F-400 °F
15 min 1-60 min off √off √
94 °C /
200 °F
66 °C-94 °C /
150 °F-200 °F
30 min 1 min-8 h off n/a off n/a
NOTE
A check mark indicates Preheat and Turn Reminder can be enabled or disabled by tapping PREHEAT / TURN REMINDER
before tapping START.

7
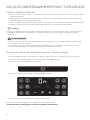
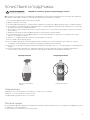
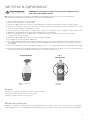
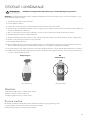
USING YOUR AIR FRYER
Using your air fryer
Before first use
1. Remove all packaging stickers and labels from the air fryer, including the tape securing the Pan to the unit.
2. To pull out the Basket for cleaning, remove the tape securing it into place. Secure the unit with one hand and pull the
handle straight back with the other hand.
3. Thoroughly clean the Basket and Crisper Tray with hot water, some dishwashing liquid, and a non-abrasive sponge.
4. Wipe the inside and outside of the air fryer with a moist cloth.
During the first few uses, there might be a “hot plastic” smell. This is perfectly normal in new air fryers as the material is
heated for the first time. It will go away after the first few uses.
• Do not fill the Basket with oil, frying fat, or any other liquid - this appliance works by circulating
• Do not put anything on top of the air fryer.
• Do not place the air fryer against a wall or against other appliances. It is important to leave at least 10 cm / 3.9 in of free
space around the back and sides, and 10 cm / 3.9 in of free space above the air fryer to allow for proper ventilation.
1. Place the air fryer on a stable, horizontal, heat-resistant, and level surface.
2. Insert the Crisper Tray into the Basket and slide it into the air fryer.
3. Plug the air fryer into an outlet.
4. Tap the Power Icon to turn on.
5. Tap the desired Preset
The Display will show the preset temperature and time.
To adjust temperature and time follow instructions.
NOTE
WARNING!

8
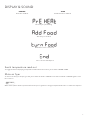
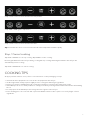
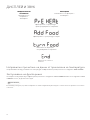
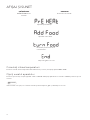
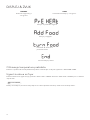
With PREHEAT Enabled (enable before tapping START.)
6. Tap START.
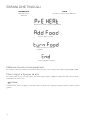
The Display will show “Preheat” and the air fryer will begin preheating. Once preheated, it will beep 5 times and
the Display will show “Add Food”.
7. Remove the Basket carefully, place food inside, and return it to the air fryer to automatically begin cooking.
• Do not use sharp or metal utensils to avoid scratching the nonstick surface.
• Do not turn the Basket upside down, as any excess oil that has collected on the bottom of the Basket will
leak onto the food.
6. Remove the Basket, place food inside, and return it to the air fryer.
7. Ensure Preheat is disabled and Tap START.
8. Remove the Basket carefully and place it on a heat-resistant surface.
9. Remove food from the Basket using tongs.
Cooking tip
Spray food with cooking oil for a crispier finish.
Cooking tip
For ideal temperature and time settings for various foods the Air Fry Cooking.
Carefully remove Basket - hot steam may escape!
The Basket and food will be hot! Do not touch hot surfaces.
• Always use caution when removing the Basket during / after cooking.
When your selected cook time has elapsed, the air fryer will beep 5 times and the Display will show “End” .
WARNING!
Basket will be hot!
1. Tap TEMP / TIME to adjust temperature.
CAUTION!
CAUTION!
Adjusting temperature and time
If the Basket is not removed, cooking will resume.
With TURN REMINDER Enabled (enable before tapping START)
• Halfway through the cook time, the air fryer will beep 5 times and the Display will show “Turn Food”.
• Remove the Basket carefully and place it on a heat-resistant surface.
• Turn or toss the food using tongs.
• Return the Basket to the air fryer to automatically resume cooking.
NOTE

9
Tip: Press and hold + and - icons to increase and decrease temperature and time rapidly.
3. Tap TEMP / TIME again to adjust time.
4. Tap + and - icons to increase and decrease time.
2. Tap + and - icons to increase and decrease temperature.
Tap STOP / CANCEL once to stop cooking. Tap START to resume cooking.
Removing the Basket from the air fryer during cooking will stop cooking. Returning the Basket to the air fryer will
automatically resume cooking.
Tap STOP / CANCEL twice to cancel cooking.
Stop / Cancel cooking
COOKING TIPS
Air fryers perform similar to ovens, refer to oven instructions on item packaging or recipe.
• Snacks that can be prepared in an oven can also be prepared in the air fryer.
• Smaller ingredients usually require a slightly shorter cooking time than larger ingredients.
• Turning or tossing food halfway through cooking time will deliver evenly browned and crispy results.
• Add 1 tablespoon of oil to fresh potatoes for a crispy result. Air fryer the ingredients within a few minutes after adding
the oil.
• Do not prepare foods that will produce a large amount of grease in the air fryer.
• Place a baking pan or an oven-safe dish or pan in the Basket to bake a cake or quiche or to air fry fragile or filled
ingredients.

10
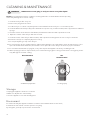
CLEANING & MAINTENANCE
Do not use metal kitchen utensils or abrasive cleaning material to clean the Basket and Crisper Tray,
as this may damage the non-stick coating.
1. Clean the air fryer after every use.
2. Remove the plug from the outlet.
3. Let the air fryer cool down completely. Remove the Basket from the air fryer to cool it down quicker.
4. Clean the Basket and Crisper Tray in the dishwasher’s top rack only or with hot water, dish soap, and a non-abrasive
sponge.
5. If residue is stuck to the bottom of the Basket, fill it with hot water and dish soap and let it soak.
6. Wipe the outside of the air fryer with a moist cloth.
7. Clean the inside of the air fryer with hot water, dish soap and a cleaning brush to remove any food residue.
8. Ensure the air fryer is completely dry before using.
9. Do not put anything on top of the air fryer.
10. Do not place the air fryer against a wall or against other appliances. It is important to leave at least 4 inches of free
space around the back and sides, and 4 inches of free space above the air fryer to allow for proper ventilation.
11. Do not fill the basket with oil, frying fat, or any other liquid - this appliance works by circulating hot air.
12. When spraying food for a crispier finish, we recommend using regular cookinģ oil instead of cooking spray, as this
may damage the nonstick coating
WARNING!
Storage
• Unplug the appliance and let it cool down.
• Make sure all parts are clean and dry.
• Store the appliance in a clean and dry place.
Enviroment
Do not throw away the appliance with the normal household waste at the end of its life,
but hand it in at an official collection point for recycling.
By doing this, you help to preserve the environment.
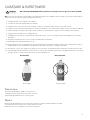
Recommended
Oil Mister/Spray Bottle Cooking Spray
Not
Recommended
NEVER immerse cord, plug, or air fryer in water or any other liquid.

11
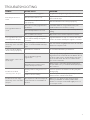
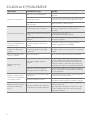
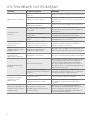
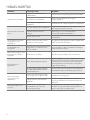
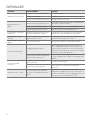
Problem Possible Causes SOLUTION
The air fryer does not
work.
The air fryer is not plugged in. Plug the main plug into a grounded wall socket.
The timer has not been set. Tap the timer icon to set the required cook time to
turn on the air fryer.
The Basket is not put into the air
fryer properly.- Slide the Basket in to the air fryer properly.
The ingredients did not
cook.
There are too many ingredients in
the Basket
Put smaller batches of ingredients in the pan.
Smaller batches are fried more evenly.
The set temperatures is too low Tap +and -Icons to set the required temperature
setting.
The cook time is too short. Tap +and -Icons to set the required cook time.
The ingredients are fried
unevenly in the air fryer.
Certain types of ingredients need
to be shaken halfway through the
cook time.
Ingredients that lie on top of or across each other
need to be shaken halfway through the cook time.
Fried snacks are not crispy
when they come out of the
air fryer.
You used a type of snack meant
to be cooked in a traditional deep
fryer.
Use oven snacks or lightly brush some oil onto the
snacks for a crispier result.
I cannot slide the Basket
into the air fryer properly. The Basket is overfilled. Do not fill the Basket beyond max line.
White smoke comes out of
the air fryer.
You are preparing greasy
ingredients.
When you fry dreasy ingfedients in the air fryer, a
large amount of oil will leak into the Basket. The oil
produces white smoke, and the Basket may heat
up more than usual. This does not affect the air
fryer or the end result.
The Basket still contains grease
residue from previous use.
White smoke is caused by grease heating up in
the pan. Make sure you clean the Basket properly
after each use.
Fresh fries are fried
unevenly in the air fryer.
Quality potatoes will give an even
cook.
Use fresh potatoes and make sure they stay firm
during frying.
Potatoes are too starchy. Rinse the potato sticks properly and dry to remove
starch from the outside of the sticks
Fresh fries are not crispy
when they come out of the
air fryer.
The crispiness of the fries depends
on the amount of oil and water in
the fries
Make sure you dry the potato sticks properly
before you add the oil. Cut the potato sticks
smaller for a crispier result. Add slightly more oil
for a crispier result.
TROUBLESHOOTING


13
MASAT E RËNDËSISHME MBROJTJE
Duhet të ndiqen gjithmonë masat paraprake themelore të
mëposhtme:
1. Kjo pajisje nuk duhet të përdoret nga fëmijët e
moshës 0 deri në 8 vjeç. Kjo pajisje mund të përdoret
nga fëmijët e moshës 8 vjeç e lart nëse janë nën
mbikëqyrje të vazhdueshme. Kjo pajisje mund të
përdoret nga persona me aftësi të kufizuara fizike,
shqisore ose mendore, ose me mungesë përvoje
dhe njohurie, nëse atyre u është dhënë mbikëqyrje
ose udhëzime në lidhje me përdorimin e pajisjes në
mënyrë të sigurt DHE kuptojnë rreziqet e përfshira.
2. Mbajeni pajisjen dhe kabllon e saj* jashtë mundësive
të fëmijëve nën 8 vjeç
Pastrimi dhe mirëmbajtja e përdoruesit nuk duhet të
kryhen nga fëmijët.
3. Pajisjet e gatimit duhet të vendosen në një pozicion të
qëndrueshëm me doreza (nëse ka) për të shmangur
derdhjen e lëngjeve të nxehta.
4. Kontrolloni që voltazhi i shënuar në pajisje të
korrespondojë me tensionin lokal përpara se të lidhni
pajisjen.
5. Mos e përdorni pajisjen nëse spina elektrike është
e dëmtuarkabllon ose vetë pajisjen. Gjithmonë
kontrolloni që spina të jetë futur siç duhet në prizën
e murit.
6. Mos e përdorni pajisjen me kabllo të dëmtuar
osespinën, pasi pajisja keqfunksionon ose dëmtohet
në ndonjë mënyrë.
7. Nëse kordoni i rrymës është i dëmtuar, ai duhet të
zëvendësohet nga prodhuesi, agjenti i tij i shërbimit
ose persona të ngjashëm të kualifikuar për të
shmangur një rrezik.
8. Mbikëqyrja e ngushtë është e nevojshme kur ndonjë
pajisje përdoret pranë fëmijëve. Fëmijët duhet të
mbikëqyren për t’u siguruar që ata të mos luajnë me
pajisjen.
9. Mos lejoni që kordoni të varet mbi buzën e një
tavoline ose banak ose të mos prekë sipërfaqe të
nxehta.
10. Për t’u mbrojtur nga goditja elektrike, mos e zhytni
kordonin, prizat ose pajisjen në ujë ose lëng tjetër.
Mos e futni pajisjen në prizë dhe mos e përdorni
panelin e kontrollit me duar të lagura.
11. Asnjëherë mos e lidhni këtë pajisje me një kohëmatës
të jashtëm ose një sistem të posaçëm telekomandimi
për të shmangur një situatë të rrezikshme. Për të fikur
pajisjen, fikeni pajisjen dhe më pas tërhiqeni spinën
nga priza në mur.
12. Mos e vendosni pajisjen mbi ose afër materialeve të
ndezshme si mbulesa tavoline ose perde. Sipërfaqet
e aksesit mund të nxehen gjatë përdorimit. Mos e
vendosni mbi ose afër një djegës me gaz ose elektrik
ose në një furrë të nxehtë.
13. Mos e vendosni pajisjen pranë murit ose pajisjeve të
tjera. Lini të paktën 10 cm / 3,9 inç hapësirë të lirë në
anën e pasme dhe anët dhe 10 cm / 3.9 inç hapësirë
mbi pajisjen. Mos vendosni asgjë në pajisje.
14. Mos e përdorni pajisjen për qëllime të ndryshme
nga ato të përshkruara në këtë manual. Përdorimi i
aksesorëve që nuk rekomandohen nga prodhuesi i
pajisjes mund të shkaktojë lëndime.
15. Mos e lini pajisjen pa mbikëqyrje. Duhet të jeni
jashtëzakonisht të kujdesshëm kur lëvizni një pajisje
që përmban vaj të nxehtë ose lëngje të tjera të
nxehta.
16. Mos e përdorni jashtë.
17. Mos prekni sipërfaqet e nxehta; përdorni levën.
Gjatë skuqjes me ajër, avulli i nxehtë lëshohet
përmes hapjeve të ajrit. Mbani duart dhe fytyrën në
një distancë të sigurt nga kanalet e avullit dhe ajri.
Gjithashtu, kini kujdes nga avulli dhe ajri i nxehtë kur e
hiqni koshin nga pajisja.
18. Pas përdorimit të pajisjes, shmangni kontaktin me
metalin e nxehtë brenda. Fikeni kur nuk e përdorni
dhe para pastrimit. Lëreni pajisjen të ftohet përpara
se ta pastroni.
19. Hiqeni menjëherë pajisjen nga priza nëse shihni që
del tym i errët jashtë pajisjes. Prisni që tymi të ndalojë
përpara se të hiqni shportën nga pajisja.
20. Vetëm për përdorim shtëpiak.
MANUAL I UDHËZIMIT
Ju lutemi lexoni me kujdes udhëzimet përpara përdorimit.
Kujdesuni mirë për këtë manual për përdorim të mëvonshëm.
AL

14
GARANCI
SIGURIA E KABLLOVE DHE KONEKTORËVE
Unë rastet e mëposhtme, garancia sipas rregulloreve në fuqi nuk do të zbatohet:
a. Çdo dëmtim i shkaktuar nga riparime ose manipulime të paautorizuara nga kompania.
b. Çdo dëmtim i shkaktuar nga keqpërdorimi, neglizhenca ose aksidenti.
c. Të gjitha dëmet e shkaktuara nga fatkeqësitë natyrore ose tensionet e paraportuara.
d. Çdo dëmtim i shkaktuar nga përdorimi i makinës në një kontekst që nuk përshkruhet në këtë manual.
• Një kordon i shkurtër rryme sigurohet për të reduktuar rrezikun e ngatërrimit ose përplasjes mbi një kabllo më të gjatë.
• Kordonët zgjatues mund të përdoren nëse tregohet kujdes në përdorimin e tyre.
• Nëse përdorni një kordon zgjatues:
a. Fuqia elektrike nominale e kabllit zgjatues duhet të jetë së paku e barabartë me fuqinë elektrike të pajisjes;
b. Një kabllo më e gjatë duhet të kalohet në mënyrë që të mos tërhiqet mbi një sipërfaqe pune ose tavolinë ku fëmijët
mund ta arrijnë atëmund të tërhiqet ose të pengohet.
Ruajeni këtë manual
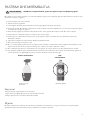
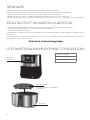
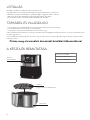
NJOHUNI PAJISJEN TUAJ
Ekrani / Paneli i
Kontrollit
Raftpër freskinë
Shporta
Hapësirë krokante rafti në shportë
Fuqia: 1300 W
Tensioni: 220V – 240V~
Frekuenca: 50Hz/60Hz

15
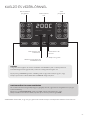
EKRANI DHE PANELI I KONTROLLIT
Fry në ajër
Konfiguro
Ulni temperaturën /
kohën
Kalo midis
cilësimevetemperatura dhe koha
ikonat e fuqisë
Rritni temperaturën
/ kohën
Set gatimi
Temperatura
/ Moti
Shikoni grafikun për paracaktimet që kanë ngrohjen dhe rikujtuesit të aktivizuar si parazgjedhje dhe ato që kanë opsionin
për të aktivizuar dhe çaktivizuar cilësimet.
MBYNGROHJE
Ngrohja paraprake e tiganisjes së ajrit përpara se të shtoni ushqim, në përgjithësi do të japë
rezultatet më të mira. Kur gatuani shumë tufa me radhë, ngroheni vetëm para grupit të parë.
Prekni PARAHEAT përpara FILLIMIT për të aktivizuar ose çaktivizuar ngrohjen paraprake.
Kur aktivizohet ngrohja paraprake, PREHEAT shfaqet me të kuqe në ekran.
KTHIM
Rrotullimi ose hedhja e ushqimit në gjysmë të kohës së gatimit do të japë rezultate të skuqura dhe
krokante në mënyrë të barabartë.
Prekni MBI NGROHJE përpara FILLIMIT për të aktivizuar ose çaktivizuar kujtesën e kthesës.
Kur aktivizohet rikujtesa e kthesës, TURN shfaqet me të kuqe në ekran.

16
EKRANI DHE TINGULLI
Ndërroni leximin e temperaturës
Për të kaluar ndërmjet ekranit të temperaturës Fahrenheit dhe Celsius, shtypni dhe mbani shtypur TEMP / TIME.
Fikni tingujt e fryerjes së ajrit
Për të fikur bipin e fryerjes së ajrit, shtypni dhe mbani shtypur STOP / CANCEL. Shtypni dhe mbani përsëri STOP /
CANCELpër të ndezur zërin.
SHËNIM
Kurështë i fikur, do të ketë gjithnjë e më pak sinjale për udhëzimet e drejtuara të gatimit dhe kur të mbarojë koha e
gatimit.
MBYNGROHJE
Ngrohja është e
aktivizuar.
Kondicioneri është i ngrohur paraprakisht.
Fituesi i ajrit po nxehet.
Kthejeni kujtesën oselëvizni
ushqimin.
Koha e gatimit ka skaduar
KTHIM
Përkujtuesi i kthesës është aktivizuar.

17
TABELA
Temperaturat Koha Ngrohni
paraprakisht Kujtesa e kthesës
I programuar
Mund te
jeterregulloj
I programuar
Mund të
rregullohet
I
programuar
FIKUR
I
programuar
FIKUR
200 0C/
400 0F
76
0
C-200
0
C/
170
0
F - 400
0
F
20 min 1-60 min ai √ai √
200 0C/
400 0F
76
0
C-200
0
C/
170
0
F - 400
0
F
15 min 1-60 min ai √ai √
200 0C/
400 0F
76
0
C-200
0
C/
170
0
F - 400
0
F
25 min 1-60 min ai √ai √
190 °C /
3750F
76
0
C-200
0
C/
170
0
F - 400
0
F
6 min 1-60 min i fikur √i fikur √
190 °C /
3750F
76
0
C-200
0
C/
170
0
F - 400
0
F
10 min 1-60 min ai √ai √
200 0C/
400 0F
76
0
C-200
0
C/
170
0
F - 400
0
F
20 min 1-60 min ai √ai √
160 °C /
325 °F
76
0
C-200
0
C/
170
0
F - 400
0
F
25 min 1 min-2 orë ai √i fikur √
200 0C/
400 0F
76
0
C-200
0
C/
170
0
F - 400
0
F
25 min 1 min-2orë ai √ai √
200 0C/
400 0F
200
0
C/ 400
0
F
12 min 1-60 min ai √ai √
56 °C /
135 °F
34 °C-76 °C
90 °F-170 °F
8 orë 30 min-
24 orë i fikur në i fikur √
150 °C /
300°F
76 °C-200 °C’
170 °F-400 °F
15 min 1-60 min i fikur √i fikur √
94 °C /
200 °F
66 °C-94 °C /
150 °F-200 °F
30 min 1 min-8 orë i fikur në i fikur në
SHËNIM
Shenja e zgjedhjes tregon se rikujtuesi i nxehjes paraprake dhe i rrotullimit mund të aktivizohet ose çaktivizohet duke
prekur PARAHEAT / PREZANTIM PARAHEAT përpara se të prekni FILLIM.

18
PERDORIMI I PAJISJES TUAJ
Perdorimi i pajisjes tuaj
Para përdorimit të parë
1. Nxirre jashttë gjitha etiketat dhe ngjitësit e paketimit të Fryerës së ajrit, duke përfshirë shiritin që e siguron tiganin në njësi.
2. Për të nxjerrë jashtë shportën e pastrimit, hiqni shiritin që e siguron në vend. Montoni njësinë një herëdorën dhe
tërhiqeni dorezën drejt mbrapa me dorën tjetër.
3. Pastroni plotësisht koshin dhe tabakën e thërrimeve me ujë të ngrohtë, pak lëng larës dhesfungjer jo gërryes.
4. Fshijeni pjesën e brendshme dhe të jashtme të tharëses së flokëve me një leckë të lagur.
Mund të ketë një erë “plastike të nxehtë” gjatë përdorimeve të para. Kjo është mjaft normale në Fryerin e ri të ajrit, pasi
materiali nxehet për herë të parë. Do të zhduket pas përdorimit të parë.
• Mos e mbushni shportën me vaj, shkurtues ose lëng tjetër - kështu funksionon kjo pajisjeqarkullon ajri i ngrohtë.
• Mos vendosni asgjë në Fryerin e ajrit
• Mos e vendosni kondicionerin në mur ose pajisje të tjera. Është e rëndësishme të lini të paktën 10 cm / 3,9 inç hapësirë të
lirë rreth pjesës së pasme dhe anëve dhe 10 cm / 3,9 inç hapësirë të lirë mbi kondicionerin për të lejuar ajrosjen e duhur.
1. Vendoseni kondicionerin në një sipërfaqe të qëndrueshme, horizontale, të sheshtë dhe rezistente ndaj nxehtësisë.
2. Fusni tabakanë e kërcitjes në kosh dhe rrëshqiteni në kondicioner.
3. Fusni kondicionerin në një prizë.
4. Prekni ikonën e energjisë për ta aktivizuar.
5. Prekni shënimin e dëshiruar.
Ekrani do të tregojë temperaturën dhe kohën e paracaktuar.
Ndiqni udhëzimet për të vendosur temperaturën dhe kohën.
PARALAJMËRIM!
SHËNIM

19
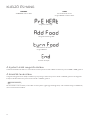
Kur aktivizohet PARAHEAT(aktivizoni përpara se të prekni FILLO.)
6. Prekni FILLO
Ekrani do të shfaqë “Preheat” dhe fryerja e ajrit do të fillojë të nxehet. Kur nxehet paraprakisht, do të tingëllojë5
herë dhe në ekran do të shfaqet “Shto ushqim”.
7.
Hiqeni me kujdes shportën, vendoseni ushqimin brenda dhe kthejeni në tigan me ajër për të filluar gatimin automatikisht.
• Mos përdorni enë të mprehta ose metalike për të shmangur gërvishtjen e sipërfaqes që nuk ngjit.
• Nrkthejeni shportën me kokë poshtë, pasi vaji i tepërt që grumbullohet në fund të koshit do të pikojë
mbi ushqim.
6. Hiqeni koshin, vendosni ushqimin brenda dhe kthejeni në kondicioner.
7. Sigurohuni që ngrohja paraprake të jetë çaktivizuar dhe trokitni lehtë mbi FILLO.
8. Hiqeni me kujdes shportën dhe vendoseni në një sipërfaqe rezistente ndaj nxehtësisë.
9. Hiqeni ushqimin nga shporta duke përdorur darë
KËSHILLA PËR GATIM
Spërkatni ushqimin me vaj gatimi për ta marrë atënjë përfundim më i freskët.
Këshilla për gatim
Për cilësimet ideale të temperaturës dhe kohës për pjata të ndryshme, shihni tabelën e gatimitskuqje me ajër.
Hiqeni me kujdes shportën - mund të dalë avulli i nxehtë!
Shporta dhe ushqimi do të jenë të nxehtë! Mos e prekni nxehtësipërfaqe.
• Kini gjithmonë kujdes kur hiqni koshin gjatë/pas gatimit.
Kur koha e zgjedhur e gatimit të mbarojë, tigani do të bie 5 herë dhe në ekran do të shfaqet “END”.
PARALAJMËRIM!
Shportado të jetë nxehtë!
1. Prek TEMP / TIME për të vendosur temperaturën.
KUJDES!
Vendosja e temperaturës dhe kohës
KUJDES!
Nëse koshi nuk hiqet, gatimi do të vazhdojë.
Me PRERESENTATIVE të aktivizuar (Aktivizo para se të prekësh FILLO.)
• Në gjysmë të kohës së gatimit, fryerja e ajrit do të bie 5 herë dhe në ekran do të shfaqet “Kthejeni ushqimin”.
• Hiqeni me kujdes shportën dhe vendoseni në një sipërfaqe rezistente ndaj nxehtësisë.
• Kthehuniose kthejeni ushqimin me darë.
• Kthejeni shportën në fryer për të vazhduar automatikisht gatimin.
SHËNIM

20
Këshilla: Shtypni dhe mbani ikonat + dhe - për të rritur dhe ulur shpejt temperaturën dhe kohën.
3. Prekni sërish TEMP / KOHA për të vendosur orën.
4. Prekni ikonat + dhe - për të rritur ose ulur kohën.
2. Prekni ikonat + dhe - për të rritur ose ulur temperaturën.
Prekni një herë STOP/ANULO për të ndaluar gatimin. Prekni FILLOpër të vazhduar gatimin.
LargimiShportat e fryerjes me ajër gjatë gatimit do të ndalojnë gatimin. Kthimi i shportës në fryer do të rifillojë
automatikisht gatimin.
Prekni dy herë STOP / ANULO për të anuluar gatimin.
Ndaloni / anuloni gatimin
KËSHILLA PËR GATIM
Furrat e bukës funksionojnë njësoj si furrat, referojuni udhëzimeve të furrës në paketim ose recetë.
• Snacks që mund të përgatiten në furrë mund të përgatiten edhe në një fryerje me ajër.
• Përbërësit më të vegjël zakonisht kërkojnë një kohë pak më të shkurtër gatimi sesa përbërësit më të mëdhenj.
• Duke u kthyer osekthimi i ushqimit në gjysmë të kohës së gatimit do të japë rezultate të skuqura dhe krokante në
mënyrë të barabartë.
• Shtoni 1 lugë gjelle vaj tek patatet e freskëta për një rezultat krokant. Skuqini përbërësit në ajër brenda pakminuta pas
shtimit
• Mos përgatisni ushqim që do të prodhojë një sasi të madhe yndyre në fryerjen e ajrit.
• Vendosni një enë pjekjeje ose një enë furre ose një tavë në shportë për të pjekur një kek ose quiche ose skuqje në
ajërpërbërës të brishtë ose të mbushur.
Pagina se încarcă...
Pagina se încarcă...
Pagina se încarcă...
Pagina se încarcă...
Pagina se încarcă...
Pagina se încarcă...
Pagina se încarcă...
Pagina se încarcă...
Pagina se încarcă...
Pagina se încarcă...
Pagina se încarcă...
Pagina se încarcă...
Pagina se încarcă...
Pagina se încarcă...
Pagina se încarcă...
Pagina se încarcă...
Pagina se încarcă...
Pagina se încarcă...
Pagina se încarcă...
Pagina se încarcă...
Pagina se încarcă...
Pagina se încarcă...
Pagina se încarcă...
Pagina se încarcă...
Pagina se încarcă...
Pagina se încarcă...
Pagina se încarcă...
Pagina se încarcă...
Pagina se încarcă...
Pagina se încarcă...
Pagina se încarcă...
Pagina se încarcă...
Pagina se încarcă...
Pagina se încarcă...
Pagina se încarcă...
Pagina se încarcă...
Pagina se încarcă...
Pagina se încarcă...
Pagina se încarcă...
Pagina se încarcă...
Pagina se încarcă...
Pagina se încarcă...
Pagina se încarcă...
Pagina se încarcă...
Pagina se încarcă...
Pagina se încarcă...
Pagina se încarcă...
Pagina se încarcă...
Pagina se încarcă...
Pagina se încarcă...
Pagina se încarcă...
Pagina se încarcă...
Pagina se încarcă...
Pagina se încarcă...
Pagina se încarcă...
Pagina se încarcă...
Pagina se încarcă...
Pagina se încarcă...
Pagina se încarcă...
Pagina se încarcă...
Pagina se încarcă...
Pagina se încarcă...
Pagina se încarcă...
Pagina se încarcă...
Pagina se încarcă...
Pagina se încarcă...
Pagina se încarcă...
Pagina se încarcă...
Pagina se încarcă...
Pagina se încarcă...
Pagina se încarcă...
Pagina se încarcă...
Pagina se încarcă...
Pagina se încarcă...
Pagina se încarcă...
Pagina se încarcă...
Pagina se încarcă...
Pagina se încarcă...
Pagina se încarcă...
Pagina se încarcă...
Pagina se încarcă...
Pagina se încarcă...
Pagina se încarcă...
Pagina se încarcă...
-
 1
1
-
 2
2
-
 3
3
-
 4
4
-
 5
5
-
 6
6
-
 7
7
-
 8
8
-
 9
9
-
 10
10
-
 11
11
-
 12
12
-
 13
13
-
 14
14
-
 15
15
-
 16
16
-
 17
17
-
 18
18
-
 19
19
-
 20
20
-
 21
21
-
 22
22
-
 23
23
-
 24
24
-
 25
25
-
 26
26
-
 27
27
-
 28
28
-
 29
29
-
 30
30
-
 31
31
-
 32
32
-
 33
33
-
 34
34
-
 35
35
-
 36
36
-
 37
37
-
 38
38
-
 39
39
-
 40
40
-
 41
41
-
 42
42
-
 43
43
-
 44
44
-
 45
45
-
 46
46
-
 47
47
-
 48
48
-
 49
49
-
 50
50
-
 51
51
-
 52
52
-
 53
53
-
 54
54
-
 55
55
-
 56
56
-
 57
57
-
 58
58
-
 59
59
-
 60
60
-
 61
61
-
 62
62
-
 63
63
-
 64
64
-
 65
65
-
 66
66
-
 67
67
-
 68
68
-
 69
69
-
 70
70
-
 71
71
-
 72
72
-
 73
73
-
 74
74
-
 75
75
-
 76
76
-
 77
77
-
 78
78
-
 79
79
-
 80
80
-
 81
81
-
 82
82
-
 83
83
-
 84
84
-
 85
85
-
 86
86
-
 87
87
-
 88
88
-
 89
89
-
 90
90
-
 91
91
-
 92
92
-
 93
93
-
 94
94
-
 95
95
-
 96
96
-
 97
97
-
 98
98
-
 99
99
-
 100
100
-
 101
101
-
 102
102
-
 103
103
-
 104
104


Tesla Air fryer- AF501BX Manual de utilizare
- Tip
- Manual de utilizare
Alte documente
-
Delimano Air Fryer Pro Manual de utilizare
-
-
-
Heinner HAF-B8BK2000 Manualul proprietarului
-
Samsung MC28M6075CS Manual de utilizare
-
Samsung NV66M3531BS Manual de utilizare
-
-
-
Samsung NV75R5641RB Manual de utilizare
-