
DFJ212A /
DFJ213A /
DFJ214A /
DFJ216A /
DFJ312A /
DFJ416A
DFV210A /
DFV214A
EN Cordless Fan Jacket
Cordless Fan Vest INSTRUCTION MANUAL 8
PL
Kurtka Wentylowana z Zasilaniem
Akumulatorowym
Kamizelka Z Wentylatorem
Akumulatorowym
INSTRUKCJA OBSŁUGI 17
HU Akkumulátoros hűthető kabát
Akkumulátoros hűthető mellény
HASZNÁLATI
KÉZIKÖNYV 27
SK
Bunda s ventilátorom na akumulátor
Vesta s ventilátorom na akumulátor
NÁVOD NA OBSLUHU 36
CS Aku pracovní bunda s ventilátorem
Aku pracovní vesta s ventilátorem NÁVOD K OBSLUZE 45
UK Бездротова вентиляційна куртка
Бездротовий вентиляційний жилет
ІНСТРУКЦІЯ З
ЕКСПЛУАТАЦІЇ 54
RO Geacă cu ventilator fără cablu
Vestă cu ventilator fără cablu
MANUAL DE
INSTRUCŢIUNI 64
DE Akku-Klima-Jacke
Akku-Klimaweste BETRIEBSANLEITUNG 73

2
1
2
345
7
6
Fig.1
3
2
4
5
7
8
9
1
6
1
10
Fig.2

3
1
34
2
Fig.3
1
2
3
4
Fig.4
1
Fig.5
1
Fig.6
1
Fig.7
1
2
Fig.8
2
1
Fig.9
1
2
Fig.10

4
1
2
3
4
5
Fig.11
2 1
Fig.12
1
2
3
Fig.13
1
2
Fig.14
1
2
Fig.15
1
2
Fig.16

5
12
3
45
6
7
Fig.17
1
Fig.18
1
Fig.19
1
2
1
2
Fig.20
2 1
Fig.21
Fig.22
Fig.23
Fig.24

6
1
Fig.25
1
2
Fig.26
1
2
Fig.27
12
Fig.28
21
Fig.29
2
1
Fig.30
2
6
3
5
1
4
Fig.31

7
1
2
Fig.32

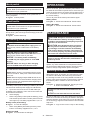
8ENGLISH
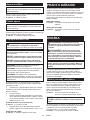
ENGLISH (Original instructions)
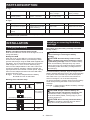
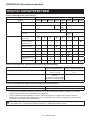
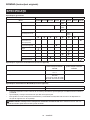
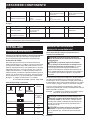
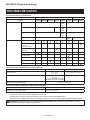
SPECIFICATIONS
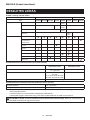
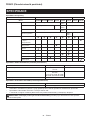
Specications of the jacket / vest
Type Jacket Vest
Model
DFJ212A DFJ213A DFJ214A DFJ216A DFJ312A DFJ416A
DFV210A DFV214A
Material Outer Polyester 100% Cotton
100%
Polyester 100%
Lining Polyester 100% -Cotton
100%
Polyester 100%
Pocket Polyester 100% Cotton
100%
Polyester 100%
Shoulder pad -Nylon
100%
-
Feature Battery pocket -
Hole for direct access
to the pocket
(under the lining)
-------
Mesh pocket for ice
pack
--- ----
Hood -------
Shoulder pad ----- - -
Detachable sleeve ---- - -
Light reector - - -----
Front buckle -------
Specications of the battery holder (optional accessory)
Model Battery holder for LXT battery
cartridge Battery holder for CXT battery
cartridge
Rated voltage D.C. 14.4 V
D.C. 18 V
D.C. 10.8 V - 12 V max
Battery cartridge
BL1415N / BL1430B / BL1440 /
BL1460B
BL1815N / BL1820B / BL1830B /
BL1840B / BL1850B / BL1860B
BL1016 / BL1021B / BL1041B
USB power supply port D.C. 5 V, 2.4 A, Type A
Specications of the Battery BL1055B (optional accessory)
Rated voltage D.C. 10.8 V
USB power supply port D.C. 5 V, 1.5 A, Type C
• Due to our continuing program of research and development, the specications herein are subject to change
without notice.
• Specications and battery cartridge may dier from country to country.
• Some of the battery cartridges listed above may not be available depending on your region of residence.
WARNING: Only use the battery cartridges listed above. Use of any other battery cartridges may cause
injury and/or re.

9ENGLISH
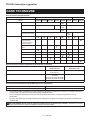
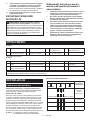
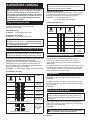
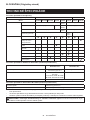
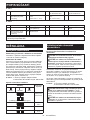
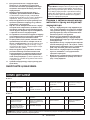
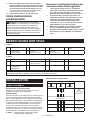
Operating time
Unit: Hour
Air speed Battery
BL1055B BL1041B BL1430B BL1860B
46.0 4.0 4.5 10.0
39.5 6.5 7.0 16.0
218.0 12.0 13.5 29.5
140.0 27.5 31.0 68.0
• The operating times in the above table are a rough guideline. They may dier from actual operating times.
• Operating times may dier depending on battery type, charging status, and usage condition.
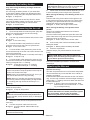
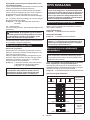
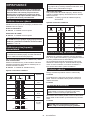
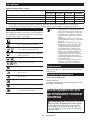
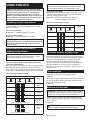
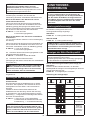
Symbols
Some of the following symbols which may be used for
the equipment. Be sure that you understand their mean-
ing before use.
Read the instruction manual.
Machine wash at below 30°C on the gentle
cycle.
Machine wash at below 40°C on the gentle
cycle.
Machine wash in domestic or commercial
machines on the gentle cycle.
Do not bleach.
Line dry in the shade.
Do not wring.
Iron at low temperatures (not exceeding
110°C).
Iron at medium temperatures (not exceed-
ing 150°C).
Do not iron.
Do not dry clean.
Do not tumble dry.
Ni-MH
Li-ion
Only for EU countries
Due to the presence of hazardous com-
ponents in the equipment, waste electrical
and electronic equipment, accumulators
and batteries may have a negative impact
on the environment and human health.
Do not dispose of electrical and electronic
appliances or batteries with household
waste!
In accordance with the European Directive
on waste electrical and electronic equip-
ment and on accumulators and batteries
and waste accumulators and batteries,
as well as their adaptation to national law,
waste electrical equipment, batteries and
accumulators should be stored separately
and delivered to a separate collection point
for municipal waste, operating in accor-
dance with the regulations on environmen-
tal protection.
This is indicated by the symbol of the
crossed-out wheeled bin placed on the
equipment.
Intended use
The fan jacket/vest is intended for cooling your body
temperature.
Declarations of Conformity
For European countries only
Model DFJ214A
The Declarations of conformity are included in Annex A
to this instruction manual.
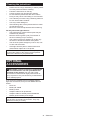
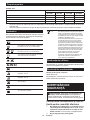
SAFETY WARNINGS
WARNING: Read all safety warnings and
all instructions. Failure to follow the warnings and
instructions may result in electric shock, re and/or
serious injury.
Save all warnings and instruc-
tions for future reference.
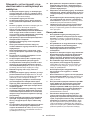
1. Never use the fan jacket when temperature
reach more than 50°C (122°F). Also avoid use
in high humidity. Doing so may cause burns.
2. Do not wear the jacket over bare skin.

10 ENGLISH
3. Do not use the jacket while you are under the
inuence of drugs, alcohol or medication.
4. Do not sleep while wearing the fan jacket. A
steep decline of body temperature may harm your
health.
5. Children, handicapped persons, or anyone
who is insensitive to temperature, for example,
someone with poor blood circulation, should
refrain from using the jacket.
6. This appliance is not intended for medical use
in hospitals.
7. Do not use the jacket other than for its
intended purpose.
8. If you sense anything unusual, switch o
the jacket and remove the battery holder
immediately.
9. If any abnormality is found, contact your local
service center for repair.
10. Do not stamp on, throw or otherwise abuse the
fan jacket.
11. Do not put your nger or a foreign object into
the fan unit.
12. Do not blow compressed air toward the fan. Do
not put small sticks into the fan unit. Doing so
may damage the fan and motor.
13. Do not turn on the fan jacket unless you are
wearing it.
14. Do not use the fan jacket in places where a re
or spark could be generated. The fan unit may
catch re or spark and cause a re or burns.
15. Choose the appropriate fan speed in accor-
dance with the usage environment for continu-
ous use.
16. Do not wear any clothing over the fan jacket.
17. Keep the nameplate on the fan unit. If it
becomes unreadable or goes missing, contact
your local service center for repair.
18. Before washing, detach the fan unit and bat-
tery holder, remove the battery cartridge. Wash
the jacket part only.
19. Do not leave the fan jacket in a place subject
to high heat, such as a car sitting in the sun.
Doing so may cause plastic parts to melt and
become damaged.
20. For long time storage, remove the battery
holder and battery cartridge from the jacket,
and remove the battery cartridge from the
battery holder.
21. When storing, keep the fan jacket, fan units,
battery holder, and battery cartridge out of
reach of children.
22. Do not use the fan jacket when performing
welding operation or operations using a
grinder. Spark entering the fan unit may cause
re.
23. Keep your hair and clothing away from the fan
unit. They can be caught in moving parts of the
fan unit.
Electrical safety
1. Do not expose the jacket to rain or wet condi-
tions. Keep water away from electrical parts.
Water entering the jacket may increase the risk of
an electric shock.
2. Do not handle the cord and battery with wet or
greasy hands.
3. Do not use the fan jacket when the cord or
plug is damaged.
4.
Do not abuse the cord. Do not use the cord for
carrying, pulling or unplugging the jacket. Keep
the cord away from heat, oil, and sharp edges.
5. Do not leave any cord disconnected while the
battery power is supplied. Small children may
put the live plug in their mouth and cause injury.
6. Do not use the supplied cord with appliances
other than the fan unit.
7. Do not insert nails, wires, or other items into
the USB power supply port. Doing so may cause
short circuit, which can cause smoke or a re.
8.
Do not connect the power source to the USB
port. The USB port is only intended for charging
lower voltage devices. Always place the cover
over the USB port when not charging a lower
voltage device. Otherwise there is risk of re.
9. Prevent unintentional starting. Ensure the
switch is in the o-position before connecting
to battery cartridge, picking up or carrying the
appliance. Carrying the appliance with your nger
on the switch or energizing appliance that have
the switch on invites accidents.
10. Disconnect battery cartridge from the appli-
ance or place the switch in the locked or o
position before making any adjustments,
changing accessories, or storing the appli-
ance. Such preventive safety measures reduce
the risk of starting the appliance accidentally.
11. Recharge only with the charger specied by
the manufacturer. A charger that is suitable for
one type of battery pack may create a risk of
re when used with another battery pack.
12. Only use with specically designated batter-
ies. Use of any other battery may create a risk
of injury and re.
13. When battery pack is not in use, keep it away
from other metal objects, like paper clips,
coins, keys, nails, screws or other small metal
objects, that can make a connection from one
terminal to another. Shorting the battery termi-
nals together may cause burns or a re.
14. Under abusive conditions, liquid may be
ejected from the battery; avoid contact. If con-
tact accidentally occurs, ush with water. If
liquid contacts eyes, additionally seek medical
help. Liquid ejected from the battery may cause
irritation or burns.
15. Do not use a battery pack or the fan unit that
is damaged or modied. Damaged or modied
batteries may exhibit unpredictable behaviour
resulting in re, explosion or risk of injury.
16. Do not expose a battery pack or the fan unit
to re or excessive temperature. Exposure
to re or temperature above 130 °C may cause
explosion.

11 ENGLISH
17. Follow all charging instructions and do not
charge the battery pack or the fan unit outside
the temperature range specied in the instruc-
tions. Charging improperly or at temperatures
outside the specied range may damage the
battery and increase the risk of re.
18. Have servicing performed by a qualied repair
person using only identical replacement parts.
This will ensure that the safety of the product is
maintained.
19. Do not modify or attempt to repair the appli-
ance or the battery pack except as indicated in
the instructions for use and care.
Important safety instructions for
battery cartridge
1.
Before using battery cartridge, read all instruc-
tions and cautionary markings on (1) battery
charger, (2) battery, and (3) product using battery.
2. Do not disassemble or tamper with the battery
cartridge. It may result in a re, excessive heat,
or explosion.
3. If operating time has become excessively
shorter, stop operating immediately. It may
result in a risk of overheating, possible burns
and even an explosion.
4.
If electrolyte gets into your eyes, rinse them out
with clear water and seek medical attention right
away. It may result in loss of your eyesight.
5. Do not short the battery cartridge:
(1) Do not touch the terminals with any con-
ductive material.
(2) Avoid storing battery cartridge in a con-
tainer with other metal objects such as
nails, coins, etc.
(3) Do not expose battery cartridge to water
or rain.
A battery short can cause a large current
ow, overheating, possible burns and even a
breakdown.
6. Do not store and use the tool and battery car-
tridge in locations where the temperature may
reach or exceed 50 °C (122 °F).
7. Do not incinerate the battery cartridge even if
it is severely damaged or is completely worn
out. The battery cartridge can explode in a re.
8. Do not nail, cut, crush, throw, drop the battery
cartridge, or hit against a hard object to the
battery cartridge. Such conduct may result in a
re, excessive heat, or explosion.
9. Do not use a damaged battery.
10. The contained lithium-ion batteries are subject
to the Dangerous Goods Legislation require-
ments.
For commercial transports e.g. by third parties,
forwarding agents, special requirement on pack-
aging and labeling must be observed.
For preparation of the item being shipped, consult-
ing an expert for hazardous material is required.
Please also observe possibly more detailed
national regulations.
Tape or mask o open contacts and pack up the
battery in such a manner that it cannot move
around in the packaging.
11. When disposing the battery cartridge, remove
it from the tool and dispose of it in a safe
place. Follow your local regulations relating to
disposal of battery.
12. Use the batteries only with the products
specied by Makita. Installing the batteries to
non-compliant products may result in a re, exces-
sive heat, explosion, or leak of electrolyte.
13. If the tool is not used for a long period of time,
the battery must be removed from the tool.
14. During and after use, the battery cartridge may
take on heat which can cause burns or low
temperature burns. Pay attention to the han-
dling of hot battery cartridges.
15. Do not touch the terminal of the tool imme-
diately after use as it may get hot enough to
cause burns.
16. Do not allow chips, dust, or soil stuck into the
terminals, holes, and grooves of the battery
cartridge. It may cause heating, catching re,
burst and malfunction of the tool or battery car-
tridge, resulting in burns or personal injury.
17. Unless the tool supports the use near
high-voltage electrical power lines, do not use
the battery cartridge near high-voltage electri-
cal power lines. It may result in a malfunction or
breakdown of the tool or battery cartridge.
18. Keep the battery away from children.
SAVE THESE INSTRUCTIONS.
CAUTION: Only use genuine Makita batteries.
Use of non-genuine Makita batteries, or batteries that
have been altered, may result in the battery bursting
causing res, personal injury and damage. It will
also void the Makita warranty for the Makita tool and
charger.
Tips for maintaining maximum
battery life
1. Charge the battery cartridge before completely
discharged. Always stop tool operation and
charge the battery cartridge when you notice
less tool power.
2. Never recharge a fully charged battery car-
tridge. Overcharging shortens the battery
service life.
3. Charge the battery cartridge with room tem-
perature at 10 °C - 40 °C (50 °F - 104 °F). Let
a hot battery cartridge cool down before
charging it.
4. When not using the battery cartridge, remove
it from the tool or the charger.
5. Charge the battery cartridge if you do not use
it for a long period (more than six months).

12 ENGLISH
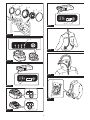
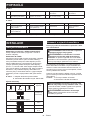
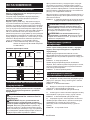
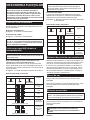
PARTS DESCRIPTION
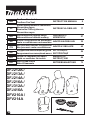
► Fig.1
1Fan unit 2Power cable 3Battery holder for CXT
battery cartridge *
4Battery holder for LXT
battery cartridge *
5Battery BL1055B *
(Country specic)
6CXT battery cartridge *
(10.8 V - 12 V max)
7LXT battery cartridge *
(14.4 V / 18 V max)
- -
* Optional accessory
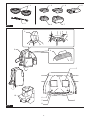
► Fig.2
1Battery pocket 2Light reector 3Hood 4Shoulder pad
5Mesh pocket for ice pack 6Cable hole in the pocket
(under the lining)
7Cable holder 8Cable hole in the lining
9Zip fastener (for fan unit
access)
10 Front buckle - - - -
NOTE: The features of the jacket/vest vary depending on the model. Refer to the section for the specications for
the features of your jacket/vest.
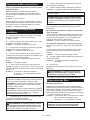
INSTALLATION
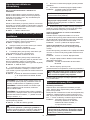
Charging the battery
Battery cartridges used with battery holder
Refer to the instruction manual of the charger for how to
charge the battery.
Battery BL1055B
Open the cover on the USB port. Connect the battery
and AC Power Adapter ADP07 (not included) or other
general USB charger using the USB cable supplied with
the battery. The recommended output spec for general
USB charger is 5 V / 2.4 A or lower. After that, plug
the AC Power Adapter ADP07 to the mains. When the
charging is nished, all battery capacity indicator will
light up and then turns o after a certain period. Unplug
the AC Power Adapter and disconnect the USB cable,
and then close the cover.
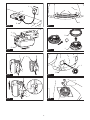
► Fig.3: 1. AC Power Adapter ADP07 2. Battery
BL1055B 3. Cover 4. USB cable
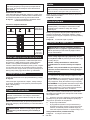
Meaning of the indicator lamp
Indicator lamps Remaining
capacity
Lighted O Blinking
(The lamps go o after a certain period.)
100%
(The charging
is nished)
50% to 100%
25% to 50%
Less than
25%
Installing or removing the battery
cartridge
Only when using the battery cartridge used with
battery holder
CAUTION: Always switch o the device
before installing or removing the battery
cartridge.
CAUTION: Hold the battery holder and the
battery cartridge rmly when installing or remov-
ing the battery cartridge. Failure to hold the battery
holder and the battery cartridge rmly may cause
them to slip out of your hands and result in damage
to the battery holder and battery cartridge and/or a
personal injury.
To install the battery cartridge, align the tongue on the
battery cartridge with the groove in the housing and slip
it into place. Insert it all the way until it locks in place
with a little click. If you can see the red indicator as
shown in the gure, it is not locked completely.
To remove the battery cartridge, slide it from the battery
holder while pressing the button on the front of the
cartridge.
► Fig.4: 1. Red indicator 2. Button 3. Battery cartridge
4. Battery holder
CAUTION: Always install the battery car-
tridge fully until the red indicator cannot be seen.
Otherwise the battery cartridge may accidentally
fall out of the battery holder, causing injury to you or
someone around you.
CAUTION: Do not forcibly install the battery
cartridge. If the battery cartridge does not slide in
easily, it is not being inserted correctly.

13 ENGLISH
Attaching the battery holder
Only when using the battery cartridge used with
battery holder
You can hang the battery holder on your waist belt.
To prevent the battery holder from dropping acciden-
tally, attach a strap using the strap hole and secure it.
► Fig.5: 1. Strap hole
The battery holder has an anti-drop function. When
removing the battery holder from the belt, pull up the
battery holder while pressing the unlock button.
► Fig.6: 1. Unlock button
Installing or removing the fan unit
1. Open the zip fastener inside the jacket. (Skip this
step if your jacket/vest does not have the lining)
► Fig.7: 1. Zip fastener
2. Turn the ring counterclockwise and remove it from
the fan unit.
► Fig.8: 1. Fan unit 2. Ring
3. From the outside of the jacket/vest, insert the
head of the fan unit into the hole in the jacket/vest.
► Fig.9: 1. Fan unit 2. Hole
4. From the inside of the jacket/vest, place the fan
unit so that the loop on the fan unit comes closest to the
strip on the jacket/vest.
(Do not fasten the snap button on the strip at this step.)
► Fig.10: 1. Strip 2. Loop
5. From the inside of the jacket/vest, place the ring
onto the fan unit and turn it clockwise until the triangle
marking is aligned with " II " marking.
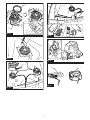
► Fig.11: 1. Ring 2. Fan unit 3. " II " marking
4. Triangle marking 5. " I " marking
NOTE: When turning the ring, be careful not to move
the fan unit position. Keep the position of the loop on
the fan unit closest to the strip.
NOTE: Put the ring parallel to the fan unit. If not, you
may not be able to turn the ring smoothly.
NOTE: When you use lter set (optional accessory),
turn the ring until the triangle marking is aligned with
" I " marking. (the ring cannot be turned up to " II "
marking)
6. Pass the strip through the loop on the fan unit and
fasten the snap button.
► Fig.12: 1. Strip 2. Snap button
CAUTION: Always use the strip and snap
button to secure the fan unit to the jacket/vest. If
the fan unit falls, it may cause an injury, or damage to
the fan unit.
7. Attach the other fan unit to the jacket/vest in the
same way.
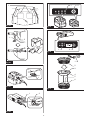
8. Connect the power cable to the fan units.
► Fig.13: 1. Power cable 2. Cable holder 3. Zip
fastener
NOTE: The zip fastener is not provided with the
jacket/vest without lining.
NOTICE: Always connect the power cable to
both of the fan units. The fan does not operate if the
power cable is connected to one fan unit only.
9. Follow either instructions below depending on how
to store the battery when using the fan jacket/vest:
When storing the battery in the battery pocket or on
your belt
Pass the end of the power cable out through the hole
in the jacket's/vest's lining as shown in the gure (skip
this step if your jacket/vest does not have the lining).
Support the cable using the cable holder.
► Fig.14: 1. Hole in the lining 2. Power cable
When storing the battery in the jacket's/vest's
pocket
(Only for the jackets/vests with the hole for direct
access to the pocket)
From the inside of the jacket/vest, pass the end of the
power cable out through the hole in the jacket's/vest's
pocket as shown in the gure.
► Fig.15: 1. Hole in the pocket 2. Power cable
10. Connect the power cable to the battery holder /
Battery BL1055B.
► Fig.16: 1. Battery holder 2. Battery BL1055B
11. Close the zip fastener.
(Skip this step if your jacket/vest does not have the
lining)
CAUTION: When using the fan jacket/vest,
securely store the battery in the pocket or hook it
on your belt to prevent it from falling.
Follow the installation procedure in reverse when
removing it.
Attaching the lter set
Optional accessory
The lter set protects the fan unit from dust and powder.
We recommend that you use the lter set in a dusty or
powdery work place.
Install the lter attachment between the fan unit and the
ring. Turn the ring clockwise until the triangle marking is
aligned with " I " marking. After that, attach the lter onto
the lter attachment.
► Fig.17: 1. Ring 2. Hole in the jacket/vest 3. Filter
attachment 4. Fan unit 5. Filter 6. " I " mark-
ing 7. Triangle marking
NOTICE: Make sure that the lter fully covers
the lter attachment. For better protection against
dust and powder, tuck the skirt of the lter
between the jacket/vest and lter attachment.

14 ENGLISH
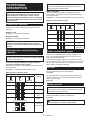
FUNCTIONAL
DESCRIPTION
NOTICE: The fan jacket/vest is eective when
the humidity and temperature of intake air are
lower than those of the body surface. The fan
jacket/vest may not be eective if the air tempera-
ture and/or humidity are higher than those inside
the jacket/vest.
Power level indicator
Current power level is displayed in the power level
indicator.
Battery holder
► Fig.18: 1. Power level indicator
Battery BL1055B
► Fig.19: 1. Power level indicator
NOTICE: For Battery BL1055B, the lamp No.1
and No.4 will blink alternately if there is abnor-
mality in the connection between the battery and
fan unit.
Indicating the remaining battery
capacity
NOTE: Depending on the conditions of use and the
ambient temperature, the indication may dier slightly
from the actual capacity.
Only when using the battery cartridge (with the
indicator) used with battery holder
Press the check button. The indicator lamps light up for
a few seconds.
► Fig.20: 1. Indicator lamp 2. Check button
Meaning of the indicator lamp
Indicator lamps Remaining
capacity
Lighted O Blinking
75% to 100%
50% to 75%
25% to 50%
Less than
25%
(For LXT batteries only)
Charge the
battery.
(For LXT batteries only)
The battery
may have
malfunctioned.
NOTE: For LXT batteries only:
The rst (far left) indicator lamp will blink when the
battery protection system works.
Battery BL1055B
While the battery BL1055B is unplugged, press the
power button. The battery capacity indicator lights up
for a few seconds.
► Fig.21: 1. Power button 2. Battery capacity indicator
Meaning of the indicator lamp
Indicator lamps Remaining
capacity
Lighted O Blinking
50% to 100%
25% to 50%
10% to 25%
Less than
10%
Battery
abnormality
Battery protection system
The device is equipped with a battery protection sys-
tem. This system automatically cuts o power to the
motor to extend battery life.
If the remaining battery capacity is too low, the device
will not operate. When you turn the device on, the motor
will run again, but stops soon. In this situation, remove
and recharge the battery cartridge.
Air ow
Air ow inside the jacket is shown below.
► Fig.22
For the jacket with the hood, wear the hood over your
helmet. The air from the fan goes through the helmet
and cools your head.
► Fig.23
Battery pocket
NOTE: Some jacket/vest does not have the battery
pocket. Refer to the section for the specications for
the features of your jacket/vest.
Use the battery pocket for storing the battery or the
holder (with battery) inside the jacket/vest.
► Fig.24
CAUTION: Always fasten the snap buttons
when the battery is stored in the pocket.

15 ENGLISH
Mesh pocket
NOTE: Some jacket/vest does not have the mesh
pocket. Refer to the section for the specications for
the features of your jacket/vest.
Use mesh pockets on the back of the jacket/vest for
storing ice packs.
► Fig.25: 1. Mesh pocket
Front buckle
NOTE: Some jacket/vest does not have the front
buckle. Refer to the section for the specications for
the features of your jacket/vest.
Adjust the belt length according to your size. If the belt
droops down, pass it through the belt loop(s) as shown
in the gure.
► Fig.26: 1. Belt 2. Belt loop
Connecting USB devices
CAUTION: Connect only devices that are
compatible with the USB power supply port. Not
doing so may cause a malfunction of the battery
holder.
NOTICE: Before connecting a USB device,
always back up the data on the USB device. Not
doing so may cause a loss of your data.
NOTICE: The battery holder and Battery
BL1055B may not supply power to some USB
devices.
NOTICE: When not using or after charging,
remove the USB cable and close the cover.
NOTE: The actual output current varies depending on
the USB device to be connected.
NOTE: Battery power is consumed while the power
button is turned on. Always turn o the switch when
not in use.
NOTE: When charging multiple USB devices in suc-
cession, wait about 10 seconds after charging of the
previous device has completed before beginning to
charge the next device.
The battery holder (with the battery) and Battery BL1055B
can work as an external power supply for USB devices.
1. Open the cover and connect a USB cable (not
included) to the USB port. Then connect the other end
of the cable to the device.
2. Start charging:
—
When using battery holder (with the battery), press
and hold the power button until the power level indi-
cator lights up. The battery supplies DC 5 V, 2.4 A.
Battery holder (with battery)
► Fig.27: 1. Cover 2. USB port
— When using Battery BL1055B, press the power
button. The battery supplies DC 5 V, 1.5 A.
Battery BL1055B
► Fig.28: 1. Power button 2. USB port
OPERATION
To turn on the fan, press and hold the power button. The
fan starts at the maximum power level 4. Each time you
press the power button, the power level changes from 4
to 1, and returns to 4. The power level indicator shows
the current setting.
To turn o, press and hold the power button again.
Battery holder
► Fig.29: 1. Power level indicator 2. Power button
Battery BL1055B
► Fig.30: 1. Power level indicator 2. Power button
MAINTENANCE
CAUTION: Always be sure that the jacket is
switched o and the battery cartridge or battery
BL1055B is removed before attempting to perform
inspections or maintenance.
CAUTION: If the jacket/vest does not switch
on or any fault is found with a fully charged bat-
tery cartridge, clean the terminals of the battery
holder and the battery cartridge. If the jacket still
does not work properly, stop using the jacket/vest
and contact our authorized service center.
NOTICE: Never use gasoline, benzine, thinner,
alcohol or the like. Discoloration, deformation or
cracks may result.
To maintain product SAFETY and RELIABILITY,
repairs, any other maintenance or adjustment should
be performed by Makita Authorized or Factory Service
Centers, always using Makita replacement parts.
Cleaning the fan unit
Wipe o dirt, dust, oil, grease .etc, with clean dry cloth.
To clean the fan blade, remove the ring and unhook
the housing from the cover using slotted screwdriver or
similar. There are three hooks on the housing. Unhook
them little by little in rotation so as not to break the
hooks.
► Fig.31: 1. Slotted screwdriver 2. Housing 3. Cover
4. Hole 5. Fan blade 6. Hook
NOTICE: Do not remove the fan blade from the
housing.
NOTICE: Do not wash the fan unit with water.
Be sure to attach the cover after cleaning the fan blade.
Place the cover onto the housing as shown in the gure
(note the direction of the logo on the cover and the loop
on the housing). Align the hooks with the holes and then
snap it on.
► Fig.32: 1. Logo on the cover 2. Loop on the housing

16 ENGLISH
Cleaning the jacket/vest
• Detach the fan unit(s) and battery or battery holder
from the jacket/vest before washing.
• Follow the instructions on the tag.
• Cotton products may shrink when washed.
• Do not wash the jacket/vest with other clothes.
Doing so may cause color fading or color transfer.
• Use a laundry net when using a washing machine.
• Do not use the fabric softener.
• Use only neutral detergent.
• After washing, take out the jacket/vest from wash-
ing machine at once.
• Be sure to close the zip fastener before washing.
For the jacket with light reector
• The performance of light reector parts may be
weakened by washing.
• Machine wash in gentle cycle (The number of
times for washing is up to 5 times.)
• The number of times for washing is not the only
the factor to decide the lifetime of the jacket.
• The life of the jacket changes by how to use, how
to care and store state.
• If the light reector parts or clothes have been
deteriorated, replace to a new jacket.
NOTE: The features of the jacket/vest vary depending
on the model. Refer to the section for the specica-
tions for the features of your jacket/vest.
OPTIONAL
ACCESSORIES
CAUTION: These accessories or attachments
are recommended for use with your Makita tool
specied in this manual. The use of any other
accessories or attachments might present a risk of
injury to persons. Only use accessory or attachment
for its stated purpose.
If you need any assistance for more details regard-
ing these accessories, ask your local Makita Service
Center.
• Filter set
• Battery BL1055B
• Battery holder
• Adapter cable for fan jacket/vest
• Adapter cable for heated jacket/vest/blanket
• Makita genuine battery and charger
NOTE: Some items in the list may be included in the
tool package as standard accessories. They may
dier from country to country.

17 POLSKI
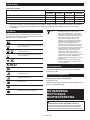
POLSKI (Instrukcja oryginalna)
DANE TECHNICZNE
Dane techniczne kurtki/kamizelki
Typ Kurtka Kamizelka
Model
DFJ212A DFJ213A DFJ214A DFJ216A DFJ312A DFJ416A
DFV210A DFV214A
Materiał Zewnętrzny Poliester 100% Bawełna
100%
Poliester 100%
Podszewka Poliester 100% -Bawełna
100%
Poliester 100%
Kieszeń Poliester 100% Bawełna
100%
Poliester 100%
Poduszka naramienna -Nylon
100%
-
Element Kieszeń na akumulator -
Otwór na potrzeby
bezpośredniego
dostępu do kieszeni
(pod podszewką)
-------
Siatka na saszetkę z
lodem
--- ----
Kaptur -------
Poduszka naramienna ----- - -
Odczepiany rękaw ---- - -
Element odblaskowy - - -----
Przednia klamra -------
Dane techniczne uchwytu akumulatora (akcesorium opcjonalne)
Model Uchwyt akumulatora dla
akumulatora LXT
Uchwyt akumulatora dla
akumulatora CXT
Napięcie znamionowe Prąd stały 14,4 V
Prąd stały 18 V
Prąd stały 10,8 V–12 V maks.
Akumulator
BL1415N / BL1430B / BL1440 /
BL1460B
BL1815N / BL1820B / BL1830B /
BL1840B / BL1850B / BL1860B
BL1016 / BL1021B / BL1041B
Gniazdo zasilania USB Prąd stały 5 V, 2,4 A, typ A
Dane techniczne akumulatora BL1055B (akcesorium opcjonalne)
Napięcie znamionowe Prąd stały 10,8 V
Gniazdo zasilania USB Prąd stały 5 V, 1,5 A, typ C
• W związku ze stale prowadzonym przez naszą rmę programem badawczo-rozwojowym niniejsze dane tech-
niczne mogą ulec zmianom bez wcześniejszego powiadomienia.
• W innych krajach urządzenie może mieć odmienne dane techniczne i może być wyposażone w inny
akumulator.
• Pewne z wymienionych powyżej akumulatorów i ładowarek mogą być niedostępne w regionie zamieszkania
użytkownika.
OSTRZEŻENIE: Należy używać wyłącznie akumulatorów wymienionych powyżej. Używanie innych aku-
mulatorów może stwarzać ryzyko wystąpienia obrażeń ciała lub pożaru.

18 POLSKI
Czas pracy
Jednostka: godziny
Prędkość powietrza Akumulator
BL1055B BL1041B BL1430B BL1860B
46,0 4,0 4,5 10,0
39,5 6,5 7,0 16,0
218,0 12,0 13,5 29,5
140,0 27,5 31,0 68,0
• Czasy pracy podane w powyższej tabeli są przybliżone. Mogą one różnić się od rzeczywistych czasów pracy.
• Czasy pracy mogą różnić się w zależności od rodzaju akumulatora, stanu naładowania oraz warunków
korzystania.
Symbole
Na sprzęcie mogą być zastosowane niektóre z poniż-
szych symboli. Przed rozpoczęciem użytkowania należy
zapoznać się z ich znaczeniem.
Przeczytać instrukcję obsługi.
Prać w pralce w temperaturze poniżej 30°C
w trybie delikatnym.
Prać w pralce w temperaturze poniżej 40°C
w trybie delikatnym.
Prać w pralce domowej lub przemysłowej
w trybie delikatnym.
Nie wybielać.
W celu wysuszenia rozwiesić w cieniu.
Nie wyżymać.
Prasować w niskiej temperaturze (nieprze-
kraczającej 110°C).
Prasować w średniej temperaturze (nie-
przekraczającej 150°C).
Nie prasować.
Nie prać chemicznie.
Nie suszyć w suszarce bębnowej.
Ni-MH
Li-ion
Dotyczy tylko państw UE
Z uwagi na obecność w sprzęcie nie-
bezpiecznych składników, zużyty sprzęt
elektryczny, elektroniczny, akumulatory
oraz baterie mogą powodować negatywny
wpływ na środowisko i zdrowie ludzi.
Nie wyrzucaj urządzeń elektrycznych,
elektronicznych lub akumulatorów wraz z
odpadami z gospodarstwa domowego!
Zgodnie z Europejską Dyrektywą w
sprawie zużytego sprzętu elektrycznego i
elektronicznego oraz dotyczącą akumula-
torów i baterii oraz zużytych akumulatorów
i baterii, a także dostosowaniem ich do
prawa krajowego, zużyte urządzenia
elektryczne, elektroniczne, baterie i
akumulatory, należy składować osobno i
przekazywać do punktu selektywnej zbiórki
odpadów komunalnych, działającego
zgodnie z przepisami dotyczącymi ochrony
środowiska.
Informuje o tym symbol przekreślonego
kołowego kontenera na odpady umiesz-
czony na sprzęcie.
Przeznaczenie
Kurtka/kamizelka wentylowana służy do obniżania
temperatury ciała.
Deklaracje zgodności
Dotyczy tylko krajów europejskich
Model DFJ214A
Deklaracje zgodności są dołączone jako załącznik A do
niniejszej instrukcji obsługi.
OSTRZEŻENIA
DOTYCZĄCE
BEZPIECZEŃSTWA
OSTRZEŻENIE: Przeczytać wszystkie ostrze-
żenia bezpieczeństwa i wszystkie instrukcje.
Niezastosowanie się do wspomnianych ostrzeżeń i
instrukcji może doprowadzić do porażenia prądem
elektrycznym, pożaru i/lub poważnych obrażeń ciała.

19 POLSKI
Wszystkie ostrzeżenia i instruk-
cje należy zachować do wykorzy-
stania w przyszłości.
1. Nie korzystać z kurtki wentylowanej w tempe-
raturze wyższej niż 50°C (122°F). Unikać wyso-
kiej wilgotności. Niezastosowanie się do tych
zaleceń może spowodować oparzenia.
2. Nie nosić kurtki na gołej skórze.
3. Nie korzystać z kurtki pod wpływem substancji
odurzających, alkoholu ani lekarstw.
4. Nie spać w kurtce wentylowanej. Gwałtowny
spadek temperatury może negatywnie wpłynąć na
zdrowie.
5. Dzieci, osoby niepełnosprawne oraz osoby
wrażliwe na temperaturę, na przykład ze
względu na słabe krążenie krwi, nie powinny
korzystać z kurtki.
6. Urządzenie nie służy do użytku medycznego w
szpitalach.
7. Używać kurtki wyłącznie do celów, do których
jest przeznaczona.
8. W przypadku wyczucia czegoś nieoczekiwa-
nego natychmiast wyłączyć kurtkę i wyjąć
akumulator z uchwytu.
9. W przypadku wykrycia nieprawidłowości skon-
taktować się z lokalnym centrum serwisowym
w celu umówienia naprawy.
10. Nie należy rzucać kurtki ani na niej stawać,
ani w żaden inny sposób nieprawidłowo jej
wykorzystywać.
11. Nie wkładać palców ani przedmiotów obcych w
wentylator.
12. Nie kierować sprężonego powietrza na wen-
tylator. Nie umieszczać małych patyków w
wentylatorze. Może to spowodować uszkodzenie
wentylatora i silnika.
13. Nie włączać kurtki, jeśli nie jest ona ubrana.
14. Nie korzystać z kurtki wentylowanej w miej-
scach, w których istnieje ryzyko wystąpienia
pożaru i wytworzenia iskry. Wentylator może się
zapalić, a iskra może spowodować wybuch pożaru
lub doprowadzić do poparzenia.
15. Wybrać odpowiednią prędkość wentylatora
zgodnie ze środowiskiem korzystania do dłu-
gotrwałego używania.
16. Nie zakładać ubrań na kurtkę wentylowaną.
17. Umieścić plakietkę z imieniem na wentylato-
rze. Jeśli stanie się ona nieczytelna lub zgubi
się, skontaktować się z lokalnym centrum
serwisowym w celu umówienia naprawy.
18. Przed praniem wymontować wentylator i
uchwyt akumulatora oraz akumulator. Prać
samą kurtkę.
19. Nie pozostawiać kurtki wentylowanej w miej-
scach narażonych na działanie wysokich tem-
peratur, na przykład w samochodzie zaparko-
wanym w słońcu. Może to spowodować stopienie
i uszkodzenie plastikowych części.
20. Na czas długiego przechowywania należy
wymontować uchwyt akumulatora wraz z
akumulatorem z kurtki i wyjąć akumulator z
uchwytu.
21. Kurtkę wentylowaną, wentylatory, uchwyt aku-
mulatora i akumulator należy przechowywać
poza zasięgiem dzieci.
22. Nie należy używać kurtki wentylowanej pod-
czas spawania lub prac z użyciem szlierki.
Iskry spadające na wentylator mogą spowodować
pożar.
23. Trzymać włosy i odzież z daleka od wentyla-
tora. Mogą one zostać wciągnięte przez ruchome
części wentylatora.
Bezpieczeństwo elektryczne
1. Nie narażać kurtki na działanie deszczu ani wil-
goci. Nie narażać części elektrycznych na dzia-
łanie wody. Woda, która dostanie się do kurtki,
zwiększa ryzyko porażenia prądem elektrycznym.
2. Nie dotykać przewodu ani akumulatora
mokrymi lub tłustymi rękami.
3. Nie używać kurtki wentylowanej z uszkodzo-
nym przewodem lub wtyczką.
4. Obchodzić się z przewodem zasilającym w
prawidłowy sposób. Nie używać przewodu
do noszenia, ciągnięcia ani odłączania kurtki.
Trzymać przewód z dala od źródeł ciepła, oleju
i ostrych krawędzi.
5. Nie zostawiać przewodu odłączonego, kiedy
dostarczane jest zasilanie z akumulatora. Małe
dzieci mogą włożyć wtyczkę do ust i odnieść
obrażenia.
6. Nie używać dostarczonego przewodu z urzą-
dzeniami innymi niż wentylator.
7. Nie wkładać gwoździ, drutów ani innych przed-
miotów do gniazda zasilania USB. Może to
spowodować zwarcie i doprowadzić do powstania
dymu lub pożaru.
8. Nie podłączać źródła zasilania do gniazda
USB. Gniazdo USB służy wyłącznie do łado-
wania urządzeń o niskim napięciu. Zawsze
należy zakładać osłonę na gniazdo USB, gdy
żadne urządzenie o niskim napięciu nie jest
ładowane. W przeciwnym razie istnieje ryzyko
wystąpienia pożaru.
9. Nie dopuszczać do przypadkowego urucho-
mienia. Przed podłączeniem akumulatora albo
podniesieniem lub przeniesieniem urządzenia
należy sprawdzić, czy przełącznik znajduje się
w pozycji wyłączenia. Przenoszenie urządzenia
z palcem na przełączniku lub podłączanie urzą-
dzenia do zasilania przy włączonym przełączniku
grozi wypadkiem.
10. Przed przystąpieniem do przeprowadzenia
regulacji, wymianą akcesoriów lub przed roz-
poczęciem przechowywania urządzenia należy
odłączyć akumulator od urządzenia lub usta-
wić przełącznik w położeniu zablokowania lub
wyłączenia. Tego rodzaju zapobiegawcze środki
bezpieczeństwa zmniejszają ryzyko przypadko-
wego uruchomienia urządzenia.
11. Akumulator należy ładować wyłącznie przy
użyciu określonej przez producenta ładowarki.
Ładowarka przeznaczona do jednego typu
akumulatora może stwarzać zagrożenie poża-
rem, gdy będzie używana do ładowania innego
akumulatora.

20 POLSKI
12. Należy stosować wyłącznie specjalnie prze-
znaczone do tego celu akumulatory. Używanie
innych akumulatorów może stwarzać ryzyko
wystąpienia obrażeń ciała lub pożaru.
13. Gdy akumulator nie jest używany, należy
zabezpieczyć go przed kontaktem z metalo-
wymi przedmiotami, typu spinacze, monety,
klucze, gwoździe, wkręty lub innymi metalo-
wymi drobiazgami, które mogą powodować
zwarcie styków akumulatora. Zwarcie styków
akumulatora grozi poparzeniami lub pożarem.
14. W niewłaściwych warunkach eksploatacji
może dojść do wycieku elektrolitu z akumu-
latora. Nie należy go dotykać. W razie przy-
padkowego kontaktu należy przemyć skażoną
skórę wodą. W przypadku dostania się elek-
trolitu do oczu należy dodatkowo skorzystać
z porady lekarza. Elektrolit z akumulatora może
powodować podrażnienia lub poparzenia.
15. Nie używać uszkodzonego lub przerobionego
akumulatora ani wentylatora. Uszkodzone lub
przerobione akumulatory mogą działać w nieprze-
widywalny sposób i spowodować pożar, wybuch
lub obrażenia ciała.
16. Nie wystawiać akumulatora ani wentylatora na
działanie ognia ani nadmiernej temperatury.
Narażenie na ogień lub temperaturę wyższą niż
130°C może spowodować wybuch.
17. Przestrzegać wszystkich instrukcji ładowania
i nie ładować akumulatora ani wentylatora w
temperaturze wykraczającej poza zakres okre-
ślony w instrukcji. Nieprawidłowe ładowanie lub
temperatury wykraczające poza określony zakres
mogą spowodować uszkodzenie akumulatora
oraz wzrost zagrożenia pożarem.
18. Serwisowanie powinno być wykonywane
przez wykwalikowany personel, z użyciem
wyłącznie identycznych części zamiennych.
Zapewni to zachowanie bezpieczeństwa pracy z
produktem.
19. Nie należy modykować ani podejmować
prób naprawienia urządzenia lub akumulatora
w jakikolwiek inny sposób, niż wskazano
w instrukcji użytkowania i utrzymywania w
dobrym stanie.
Ważne zasady bezpieczeństwa
dotyczące akumulatora
1. Przed użyciem akumulatora zapoznać się ze
wszystkimi instrukcjami i znakami ostrze-
gawczymi na (1) ładowarce, (2) akumulatorze
i (3) produkcie, w którym będzie używany
akumulator.
2. Nie rozmontowywać ani modykować akumu-
latora. Może to spowodować pożar, przegrzanie
lub wybuch.
3. Jeśli czas działania uległ znacznemu skróce-
niu, należy natychmiast przerwać pracę. Może
bowiem dojść do przegrzania, ewentualnych
poparzeń, a nawet eksplozji.
4. W przypadku przedostania się elektrolitu do
oczu, przemyć je czystą wodą i niezwłocznie
uzyskać pomoc lekarską. Może on bowiem
spowodować utratę wzroku.
5. Nie doprowadzać do zwarcia akumulatora:
(1) Nie dotykać styków materiałami przewo-
dzącymi prąd.
(2) Unikać przechowywania akumulatora w
pojemniku z metalowymi przedmiotami,
takimi jak gwoździe, monety itp.
(3) Chronić akumulator przed deszczem lub
wodą.
Zwarcie prowadzi do przepływu prądu elek-
trycznego o dużym natężeniu i przegrzania
akumulatora, co w konsekwencji może grozić
poparzeniami a nawet awarią urządzenia.
6. Narzędzia i akumulatora nie wolno przechowy-
wać ani używać w miejscach, w których tempe-
ratura osiąga bądź przekracza 50°C (122°F).
7. Akumulatorów nie wolno spalać, również tych
poważnie uszkodzonych lub całkowicie zuży-
tych. Akumulator może eksplodować w ogniu.
8. Nie należy przecinać ani zgniatać akumulatora,
wbijać w niego gwoździ, rzucać nim, upusz-
czać, ani uderzać akumulatorem o twarde
obiekty. Takie działanie może spowodować pożar,
przegrzanie lub wybuch.
9. Nie wolno używać uszkodzonego akumulatora.
10. Stanowiące wyposażenie akumulatory lito-
wo-jonowe podlegają przepisom dotyczącym
produktów niebezpiecznych.
Na potrzeby transportu komercyjnego, np. świad-
czonego przez rmy trzecie czy spedycyjne,
należy przestrzegać specjalnych wymagań w
zakresie pakowania i oznaczania etykietami.
Przygotowanie produktu do wysyłki wymaga
skonsultowania się ze specjalistą ds. materiałów
niebezpiecznych. Należy także przestrzegać
przepisów krajowych, które mogą być bardziej
szczegółowe.
Zakleić taśmą lub zaślepić otwarte styki akumula-
tora oraz zabezpieczyć go, aby nie mógł się prze-
suwać w opakowaniu.
11. Jeśli zajdzie konieczność utylizacji akumula-
tora, należy wyjąć go z narzędzia i przekazać
w bezpieczne miejsce. Postępować zgodnie z
przepisami lokalnymi dotyczącymi utylizacji
akumulatorów.
12. Używać akumulatorów tylko z produktami
określonymi przez rmę Makita. Zastosowanie
akumulatorów w niezgodnych produktach może
spowodować pożar, przegrzanie, wybuch lub
wyciek elektrolitu.
13. Jeśli narzędzie nie będzie używane przez dłuż-
szy czas, należy wyjąć z niego akumulator.
14. Przed użyciem akumulatora i po jego użyciu
akumulator może pozostawać nagrzany, co
może spowodować poparzenia lub poparzenia
w niskiej temperaturze. Z gorącym akumulato-
rem należy obchodzić się ostrożnie.
15. Nie należy dotykać styku narzędzia bezpośred-
nio po jego użyciu, ponieważ może on być na
tyle gorący, że spowoduje oparzenia.
16. Nie należy dopuszczać, aby wióry, kurz lub
brud gromadziły się na stykach, w otworach i
rowkach akumulatora. Może to doprowadzić do
przegrzania, pożaru, wybuchu lub uszkodzenia
narzędzia lub akumulatora, co może spowodować
oparzenia lub obrażenia ciała.
Pagina se încarcă...
Pagina se încarcă...
Pagina se încarcă...
Pagina se încarcă...
Pagina se încarcă...
Pagina se încarcă...
Pagina se încarcă...
Pagina se încarcă...
Pagina se încarcă...
Pagina se încarcă...
Pagina se încarcă...
Pagina se încarcă...
Pagina se încarcă...
Pagina se încarcă...
Pagina se încarcă...
Pagina se încarcă...
Pagina se încarcă...
Pagina se încarcă...
Pagina se încarcă...
Pagina se încarcă...
Pagina se încarcă...
Pagina se încarcă...
Pagina se încarcă...
Pagina se încarcă...
Pagina se încarcă...
Pagina se încarcă...
Pagina se încarcă...
Pagina se încarcă...
Pagina se încarcă...
Pagina se încarcă...
Pagina se încarcă...
Pagina se încarcă...
Pagina se încarcă...
Pagina se încarcă...
Pagina se încarcă...
Pagina se încarcă...
Pagina se încarcă...
Pagina se încarcă...
Pagina se încarcă...
Pagina se încarcă...
Pagina se încarcă...
Pagina se încarcă...
Pagina se încarcă...
Pagina se încarcă...
Pagina se încarcă...
Pagina se încarcă...
Pagina se încarcă...
Pagina se încarcă...
Pagina se încarcă...
Pagina se încarcă...
Pagina se încarcă...
Pagina se încarcă...
Pagina se încarcă...
Pagina se încarcă...
Pagina se încarcă...
Pagina se încarcă...
Pagina se încarcă...
Pagina se încarcă...
Pagina se încarcă...
Pagina se încarcă...
Pagina se încarcă...
Pagina se încarcă...
Pagina se încarcă...
Pagina se încarcă...
-
 1
1
-
 2
2
-
 3
3
-
 4
4
-
 5
5
-
 6
6
-
 7
7
-
 8
8
-
 9
9
-
 10
10
-
 11
11
-
 12
12
-
 13
13
-
 14
14
-
 15
15
-
 16
16
-
 17
17
-
 18
18
-
 19
19
-
 20
20
-
 21
21
-
 22
22
-
 23
23
-
 24
24
-
 25
25
-
 26
26
-
 27
27
-
 28
28
-
 29
29
-
 30
30
-
 31
31
-
 32
32
-
 33
33
-
 34
34
-
 35
35
-
 36
36
-
 37
37
-
 38
38
-
 39
39
-
 40
40
-
 41
41
-
 42
42
-
 43
43
-
 44
44
-
 45
45
-
 46
46
-
 47
47
-
 48
48
-
 49
49
-
 50
50
-
 51
51
-
 52
52
-
 53
53
-
 54
54
-
 55
55
-
 56
56
-
 57
57
-
 58
58
-
 59
59
-
 60
60
-
 61
61
-
 62
62
-
 63
63
-
 64
64
-
 65
65
-
 66
66
-
 67
67
-
 68
68
-
 69
69
-
 70
70
-
 71
71
-
 72
72
-
 73
73
-
 74
74
-
 75
75
-
 76
76
-
 77
77
-
 78
78
-
 79
79
-
 80
80
-
 81
81
-
 82
82
-
 83
83
-
 84
84


în alte limbi
- slovenčina: Makita DFJ212A Používateľská príručka
- polski: Makita DFJ212A Instrukcja obsługi
Lucrări înrudite
-
Makita CB100DB Manual de utilizare
-
Makita CF003G Manual de utilizare
-
Makita CW001G Manual de utilizare
-
Makita CW002G Manual de utilizare
-
Makita CJ105D Manual de utilizare
-
-
Makita DC18RC Instrucțiuni de utilizare
-
-
-
Makita DUB363 Manual de utilizare