LG MU5R40 Manual de utilizare
- Tip
- Manual de utilizare

INSTALLATION MANUAL
AIR
CONDITIONER
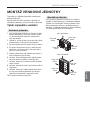
Please read this installation manual completely before installing the product.
Installation work must be performed in accordance with the national wiring
standards by authorized personnel only.
Please retain this installation manual for future reference after reading it thoroughly.
[
Representative
]
LG Electronics Inc. EU Representative : LG Electronics European Shared Service Center B.V.
Krijgsman 1, 1186 DM Amstelveen, The Netherlands
[
Manufacturer
]
MULTI
Original instruction
Copyright © 2017 - 2022 LG Electronics Inc. All Rights Reserved.
No.09,Jinwei Road,Beichen District,Tianjin,China.
LG Electronics Tianjin Appliances co.,Ltd.
РУССКИЙ ЯЗЫК
УКРАÏНСЬКА
ҚАЗАҚ ТІЛІ
БЕЛАРУСКАЯ МОВА
O‘ZBEK TILI
ENGLISH ITALIANO ESPAÑOL FRANÇAIS DEUTSCH
ΕΛΛΗΝΙΚΆ
ČEŠTINA
NEDERLANDS
POLSKI
LIMBA ROMÂNĂ

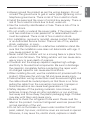
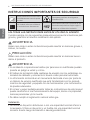
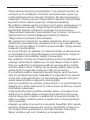
2IMPORTANT SAFETY INSTRUCTIONS
ENGLISH
READ ALL INSTRUCTIONS BEFORE USING THE APPLIANCE.
Always comply with the following precautions to avoid danger-
ous situations and ensure peak performance of your product
WARNING
It can result in serious injury or death when the directions are ignored
CAUTION
It can result in minor injury or product damage when the direc-
tions are ignored
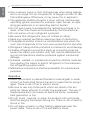
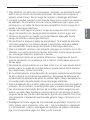
WARNING
• Installation or repairs made by unqualified persons can result in
hazards to you and others.
•
Installation work must be performed in accordance with the Na-
tional Electric Code by qualified and authorized personnel only.
• The information contained in the manual is intended for use by
a qualified service technician familiar with safety procedures
and equipped with the proper tools and test instruments.
• Failure to carefully read and follow all instructions in this man-
ual can result in equipment malfunction, property damage, per-
sonal injury and/or death.
• Compliance with national gas regulations shall be observed.
Installation
•
Do not use a defective or underrated circuit breaker. Use the cor-
rectly rated breaker and fuse. There is risk of fire or electric shock.
•
For electrical work, contact the dealer, seller, a qualified electri-
cian, or an Authorized Service Center. Do not disassemble or re-
pair the product by yourself. There is risk of fire or electric shock.
!
!
!
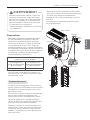
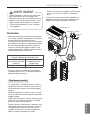
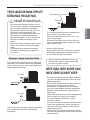
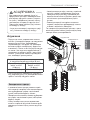
Read the precautions in this
manual carefully before operat-
ing the unit.
This appliance is filled with flammable
refrigerant (R32)
This symbol indicates that the
Operation Manual should be
read carefully.
This symbol indicates that a service
personnel should be handling this
equipment with reference to the
Installation Manual.
IMPORTANT SAFETY INSTRUCTIONS

IMPORTANT SAFETY INSTRUCTIONS 3
ENGLISH
• Always ground the product as per the wiring diagram. Do not
connect the ground wire to gas or water pipes lightening rod or
telephone ground wire. There is risk of fire or electric shock.
• Install the panel and the cover of control box securely. There is
risk of fire or electric shock due to dust, water etc.
• Use the correctly rated breaker or fuse. There is risk of fire or
electric shock.
• Do not modify or extend the power cable. If the power cable or
cord has scratches or skin peeled off or deteriorated then it
must be replaced. There is risk of fire or electric shock.
• For installation, removal or reinstall, always contact the dealer
or an Authorized Service Center. There is risk of fire, electric
shock, explosion, or injury.
• Do not install the product on a defective installation stand. Be
sure that the installation area does not deteriorate with age. It
may cause product to fall.
• Never install the outdoor unit on a moving base or a place from
where it can fall down. The falling outdoor unit can cause dam-
age or injury or even death of a person.
• In outdoor unit the step-up capacitor supplies high voltage
electricity to the electrical components. Be sure to discharge
the capacitor completely before conducting the repair work.
An charged capacitor can cause electrical shock.
•
When installing the unit, use the installation kit provided with the
product. Otherwise the unit may fall and cause severe injury.
• Indoor/outdoor wiring connections must be secured tightly and
the cable should be routed properly so that there is no force
pulling the cable from the connection terminals. Improper or
loose connections can cause heat generation or fire.
• Safely dispose off the packing materials. Like screws, nails,
batteries, broken things etc after installation or svc and then
tear away and throw away the plastic packaging bags. Children
may play with them and cause injury.
• Be sure to check the refrigerant to be used. Please read the
label on the product. Incorrect refrigerant used can prevent the
normal operation of the unit.
•
Do not turn on the breaker or power under condition that front
panel, cabinet, top cover, control box cover are removed or opened.
Otherwise, it may cause fire, electric shock, explosion or death.

4IMPORTANT SAFETY INSTRUCTIONS
ENGLISH
•
Use a vacuum pump or Inert (nitrogen) gas when doing leakage
test or air purge. Do not compress air or Oxygen and do not use
Flammable gases. Otherwise, it may cause fire or explosion.
• The appliance shall be stored in a room without continuously
operating ignition sources (for example: open flames, an oper-
ating gas appliance or an operating electric heater)
• Do not use means to accelerate the defrosting process or to
clean, other than those recommended by the manufacturer.
• Do not pierce or burn refrigerant cycle part.
• Be aware that refrigerants may not contain an odour.
• Keep any required ventilation openings clear of obstruction.
•
The appliance shall be stored in a well-ventilated area where the
room size corresponds to the room area as specified for operation.
•
Refrigerant tubing shall be protected or enclosed to avoid damage.
• Flexible refrigerant connectors (such as connecting lines be-
tween the indoor and outdoor unit) that may be displaced dur-
ing normal operations shall be protected against mechanical
damage.
• A brazed, welded, or mechanical connection shall be made be-
fore opening the valves to permit refrigerant to flow between
the refrigerating system parts.
• Mechanical connections shall be accessible for maintenance
purposes.
Operation
• When the product is soaked (flooded or submerged) in water ,
contact an Authorized Service Center for repair before using it
again. There is risk of fire or electric shock.
• Be sure to use only those parts which are listed in the svc
parts list. Never attempt to modify the equipment. The use of
inappropriate parts can cause an electrical shock, excessive
heat generation or fire.
• Do not touch , operate, or repair the product with wet hands.
Hold the plug by hand when taking out. There is risk of electric
shock or fire.
• Do not place a heater or other heating appliances near the
power cable. There is risk of fire and electric shock.

IMPORTANT SAFETY INSTRUCTIONS 5
ENGLISH
• Do not allow water to run into electric parts. Install the unit
away from water sources. There is risk of fire, failure of the
product, or electric shock.
• Do not store or use or even allow flammable gas or com-
bustibles near the product. There is risk of fire.
• Do not use the product in a tightly closed space for a long
time. Perform ventilation regularly. Oxygen deficiency could
occur and hence harm your health.
•
Do not open the front grille of the product during operation. (Do
not touch the electrostatic filter, if the unit is so equipped.)
There is risk of physical injury, electric shock, or product failure.
• If strange sound, smell or smoke comes from product.Immedi-
ately turn the breaker off or disconnect the power supply
cable. There is risk of electric shock or fire.
• Ventilate the product room from time to time when operating it
together with a stove, or heating element etc. Oxygen defi-
ciency can occur and hence harm your health.
• When the product is not to be used for a long time, disconnect
the power supply plug or turn off the breaker. There is risk of
product damage or failure, or unintended operation.
• Take care to ensure that nobody especially kids could step on
or fall onto the outdoor unit. This could result in personal injury
and product damage.
• Take care to ensure that power cable could not be pulled out
or damaged during operation. There is risk of fire or electric
shock.
• Do not place anything on the power cable. There is risk of fire
or electric shock.
• When flammable gas leaks, turn off the gas and open a win-
dow for ventilation before turning on the product. Do not use
the telephone or turn switches on or off. There is risk of explo-
sion or fire.
• Make sure to ventilate sufficiently when this air conditioner
and a heating appliance such as a heater are used simultane-
ously. Failure to do so may result in fire, serious injury, or prod-
uct failure.
• Periodic ( more than once/year ) cleaning of the dust or salt
particles stuck on the heat exchanger by using water.

6IMPORTANT SAFETY INSTRUCTIONS
ENGLISH
• Dismantling the unit, treatment of the refrigerant oil and even-
tual parts should be done in accordance with local and national
standards.
CAUTION
Installation
• Two or more people must lift and transport the product. Avoid
personal injury.
• Do not install the product where it will be exposed to sea wind
(salt spray) directly. It may cause corrosion on the product.
• Install the drain hose to ensure that the condensed water is
drained away properly. A bad connection may cause water
leakage.
• Keep level even when installing the product. To avoid vibration
or noise.
• Do not install the product where the noise or hot air from the
outdoor unit could damage or disturb the neighborhoods. It
may cause a problem for your neighbors and hence dispute.
• Always check for gas (refrigerant) leakage after installation or
repair of product. Low refrigerant levels may cause failure of
product.
• Any person who is involved with working on or breaking into a
refrigerant circuit should hold a current valid certificate from an
industry-accredited assessment authority, which authorizes
their competence to handle refrigerants safely in accordance
with an industry recognized assessment specification.
• Wear adequate personal protection equipment (PPE) when in-
stalling, maintaining or servicing the product.
Operation
• Do not use the product for special purposes, such as preserv-
ing foods, works of art, etc. It is a consumer air conditioner,
not a precision refrigeration system. There is risk of damage or
loss of property.
• Do not block the inlet or outlet of air flow. It may cause prod-
uct failure.
!

IMPORTANT SAFETY INSTRUCTIONS 7
ENGLISH
• Use a soft cloth to clean. Do not use harsh detergents, sol-
vents or splashing water etc. There is risk of fire, electric
shock, or damage to the plastic parts of the product.
• Do not touch the metal parts of the product when removing
the air filter. There is risk of personal injury.
• Do not step on or put anything on the product. (outdoor units)
There is risk of personal injury and failure of product.
• Always insert the filter securely after cleaning. Clean the filter
every two weeks or more often if necessary. A dirty filter re-
duces the efficiency.
• Do not insert hands or other objects through the air inlet or
outlet while the product is operating. There are sharp and mov-
ing parts that could cause personal injury.
• Be cautious when unpacking and installing the product. Sharp
edges could cause injury.
• If the refrigerant gas leaks during the repair, do not touch the
leaking refrigerant gas. The refrigerant gas can cause frostbite
(cold burn).
• Do not tilt the unit when removing or uninstalling it. The con-
densed water inside can spill.
•
Do not mix air or gas other than the specified refrigerant used in
the system. If air enters the refrigerant system, an excessively
high pressure results, causing equipment damage or injury.
• If the refrigerant gas leaks during the installation, ventilate the
area immediately. Otherwise it can be harmful for your health.
• Dismantling the unit, treatment of the refrigerant oil and even-
tual parts should be done in accordance with local and national
standards.
• Replace the all batteries in the remote control with new ones
of the same type. Do not mix old and new batteries or differ-
ent types of batteries. There is risk of fire or product failure.
• Do not recharge or disassemble the batteries. Do not dispose
off batteries in a fire. They may burn or explode.
• If the liquid from the batteries gets onto your skin or clothes,
wash it well with clean water. Do not use the remote if the
batteries have leaked. The chemicals in batteries could cause
burns or other health hazards.

8IMPORTANT SAFETY INSTRUCTIONS
ENGLISH
• If you swallow the battery fluid from a leak, wash out the in-
side of your mouth thoroughly and then consult a doctor. Fail-
ure to do so may result in serious health complications.
• Do not let the air conditioner run for a long time when the hu-
midity is very high and a door or a window is left open. Mois-
ture may condense and wet or damage furniture.
• Do not expose your skin or kids or plants to the cool or hot air
draft. This could harm to your health.
• Do not drink the water drained from the product. It is not sani-
tary and could cause serious health issues.
•
Use a firm stool or ladder when cleaning, maintaining or repairing
the product at an height. Be careful and avoid personal injury.
• The appliance shall be stored so as to prevent mechanical
damage from occurring.
• Servicing shall only be performed as recommended by the
equipment manufacturer. Maintenance and repair requiring the
assistance of other skilled personnel shall be carried out under
the supervision of the person competent in the use of flamma-
ble refrigerants.
• The installation of pipe-work shall be kept to a minimum
• When mechanical connectors are reused indoors, sealing parts
shall be renewed.
• When flared joints are reused indoors, the flare part shall be re-
fabricated.
•
This appliance is not intended for use by persons (including chil-
dren) with reduced physical, sensory or mental capabilities, or
lack of experience and knowledge, unless they have been given
supervision or instruction concerning use of the appliance by a
person responsible for their safety. Children should be super-
vised to ensure that they do not play with the appliance.
• This appliance can be used by children aged from 8 years and
above and persons with reduced physical, sensory or mental
capabilities or lack of experience and knowledge if they have
been given supervision or instruction concerning use of the ap-
pliance in a safe way and Understand the hazards involved.
Children shall not play with the appliance. Cleaning and user
maintenance shall not be made by children without supervision

TABLE OF CONTENTS 9
ENGLISH
2IMPORTANT SAFETY
INSTRUCTIONS
10 INSTALLATION
11 INSTALLATION OF OUT-
DOOR UNIT
11 Select the best location
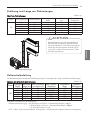
13 Piping length and elevation
13 Refrigerant charge
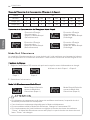
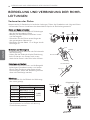
14 FLARING WORK AND
CONNECTION OF PIPING
14 Preparation of Piping
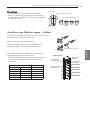
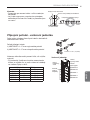
15 Connection of piping - Outdoor
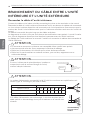
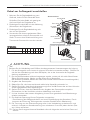
16 CONNECTING THE CABLE
BETWEEN INDOOR UNIT
AND OUTDOOR UNIT
16 Connect the cable to the Indoor unit
17 Connect the cable to the Outdoor unit
19 FORMING THE PIPING
20 AIR PURGING AND EVAC-
UATION
20 Checking method
21 Evacuation
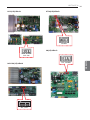
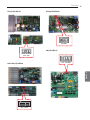
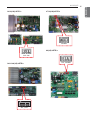
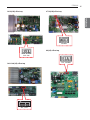
22 INSTALLATION PI485
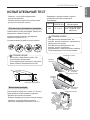
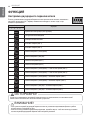
23 TEST RUNNING
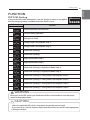
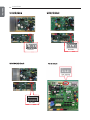
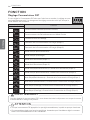
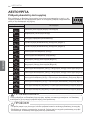
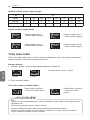
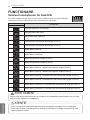
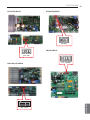
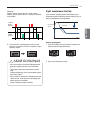
24 FUNCTION
24 DIP S/W Setting
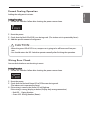
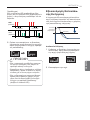
26 Forced Cooling Operation
26 Wiring Error Check
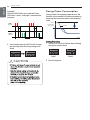
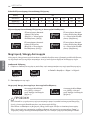
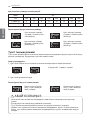
27 Saving Power Consumption
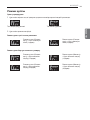
28 Night Quiet Mode
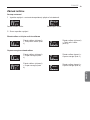
29 Mode Lock
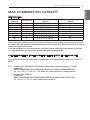
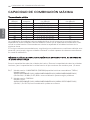
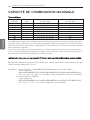
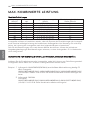
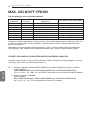
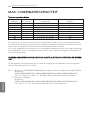
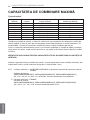
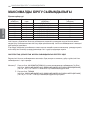
30 MAX COMBINATION
CAPACITY
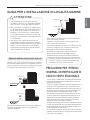
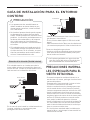
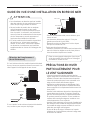
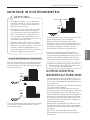
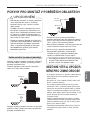
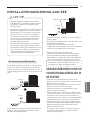
31 INSTALLATION GUIDE AT
THE SEASIDE
31 SEASONAL WIND AND
CAUTIONS IN WINTER
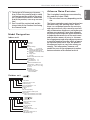
32 Model Designation
32 Airborne Noise Emission
TABLE OF CONTENTS

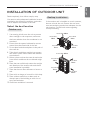
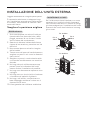
10 INSTALLATION
ENGLISH
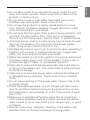
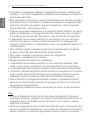
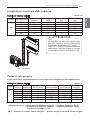
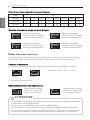
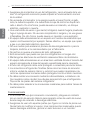
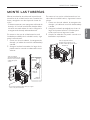
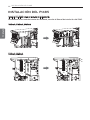
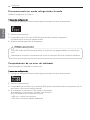
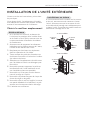
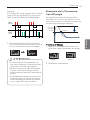
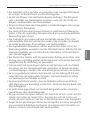
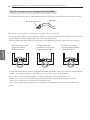
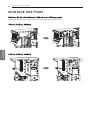
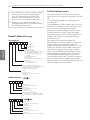
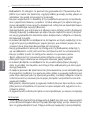
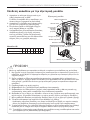
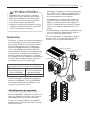
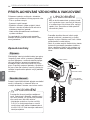
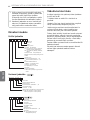
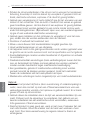
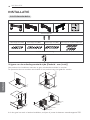
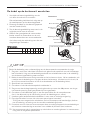
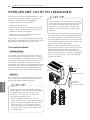
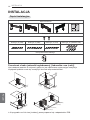
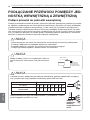
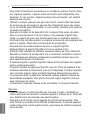
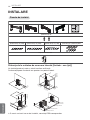
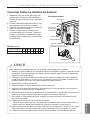
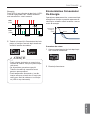
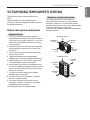
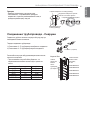
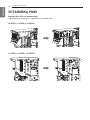
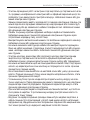
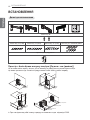
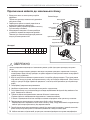
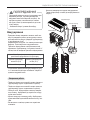
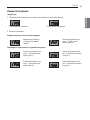
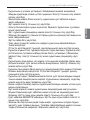
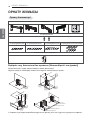
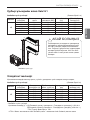
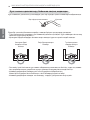
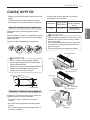
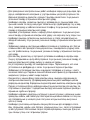
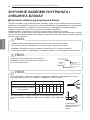
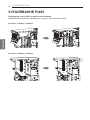
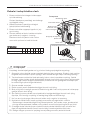
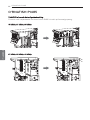
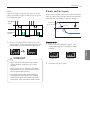
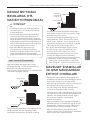
Clearance of side discharge unit [Unit : mm(inch)]
Do not install the product where sufficient ventilation is not secured.
The performance may be decreased or the product may not be operated.
CIn case of series or another installation, please refer to related PDB.
300(11-13/16)
or more
300(11-13/16)
300(11-13/16)
0
0
0
1 (39-3/8) or more
600(23-19/32)
or more
500(19-11/16) or less
or more
or more
L
D
Her
om r
o
)
8
/3-
9
3(
0
0
0
1
1000(39-3/8)
or more
500(19-11/16) or less
300(11-13/16)
or more
600(23-19/32) or more
1000(39-3/8) or more
2000(78-3/4) or more
300(11-13/16)
or more
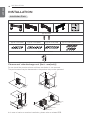
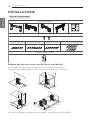
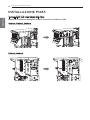
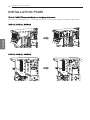
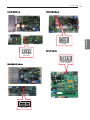
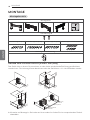
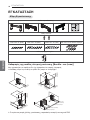
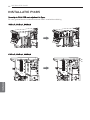
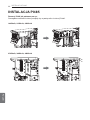
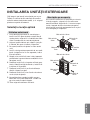
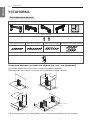
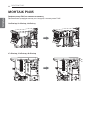
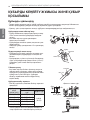
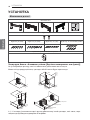
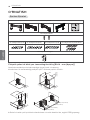
INSTALLATION
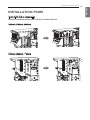
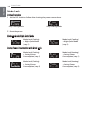
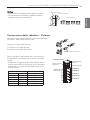
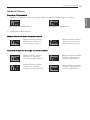
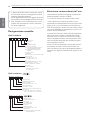
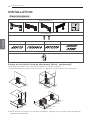
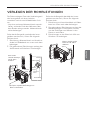
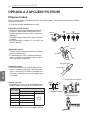
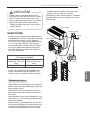
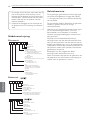
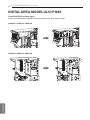
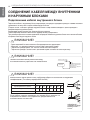
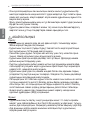
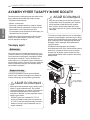
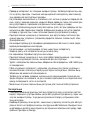
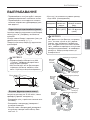
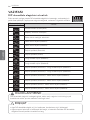
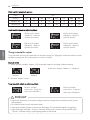
Installation plate
Type "B" screws
Type "A" screw (6 EA) Type "A" screw (8 EA) Type "A" screw (7 EA)
Holder Remote Control
Type "A" screw and plastic anchors
more than
30cm more than
30cm
Installation Parts

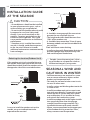
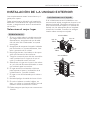
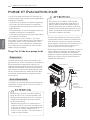
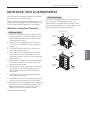
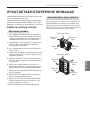
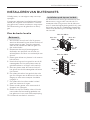
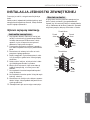
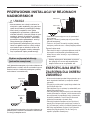
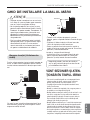
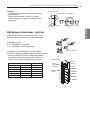
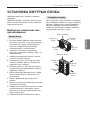
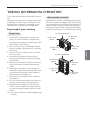
INSTALLATION OF OUTDOOR UNIT 11
ENGLISH
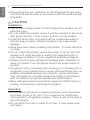
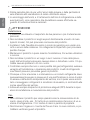
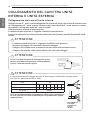
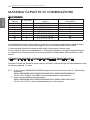
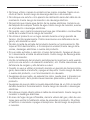
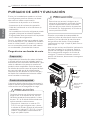
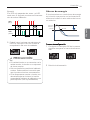
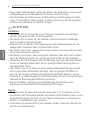
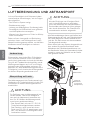
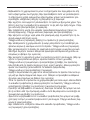
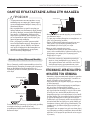
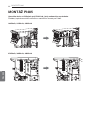
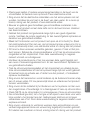
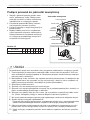
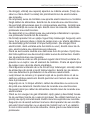
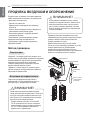
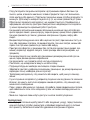
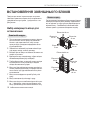
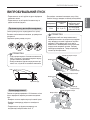
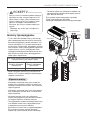
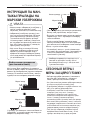
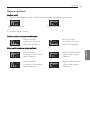
Read completely, then follow step by step.
You need to select adequate installation location
considering the following conditions, and make
sure to acquire the consent of the user.
Select the best location
1
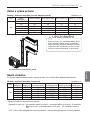
If an awning is built over the unit to prevent
direct sunlight or rain exposure, make sure
that heat radiation from the condenser is not
restricted.
2Ensure that the spaces indicated by arrows
around front, back and side of the unit.
3Do not place animals and plants in the path of
the warm air.
4Take the air conditioner weight into account
and select a place where noise and vibration
are minimum.
5Select a place so that the warm air and noise
from the air conditioner do not disturb neigh-
bors.
6Place that can sufficiently endure the weight
and vibration of the outdoor unit and where
even installation is possible.
7Place that has no direct influence of snow or
rain.
8
Place with no danger of snowfall or icicle drop.
9Place without weak floor or base such as
decrepit part of the building or with a lot of
snow accumulation.
10 Sufficient ventilation is secured.
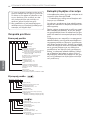
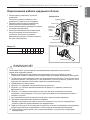
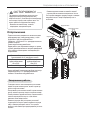
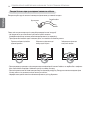
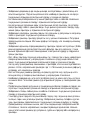
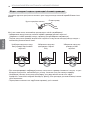
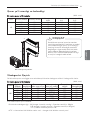
If the outdoor unit is installed on a roof structure,
be sure to level the unit. Ensure the roof struc-
ture and anchoring method are adequate for the
unit location. Consult local codes regarding
rooftop mounting.
more than
70cm
more than
30cm more than
30cm
more than
60cm
more than 60cm
more than
70cm
more than
30cm
more than 60cm
more than
30cm
more than
60cm
INSTALLATION OF OUTDOOR UNIT
Outdoor unit
Rooftop Installations

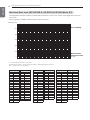
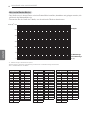
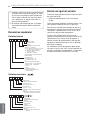
12 INSTALLATION OF OUTDOOR UNIT
ENGLISH
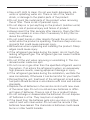
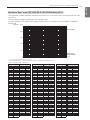
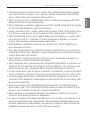
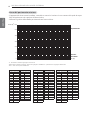
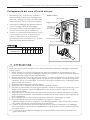
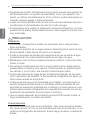
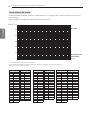
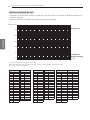
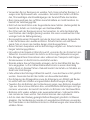
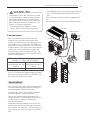
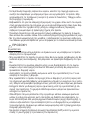
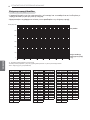
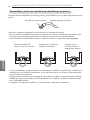
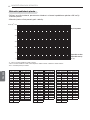
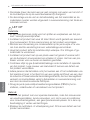
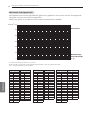
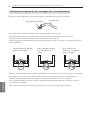
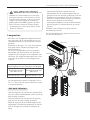
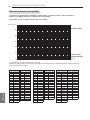
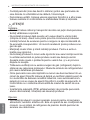
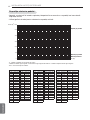
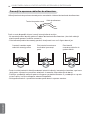
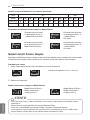
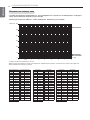
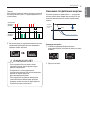
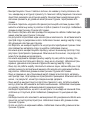
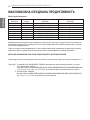
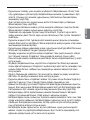
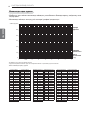
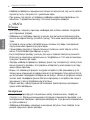
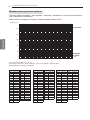
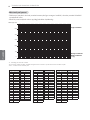
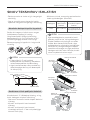
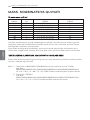
- The appliance shall be installed, operated and stored in a room with a floor area larger than the mini-
mum area.
- Use the graph of table to determine the minimum area.
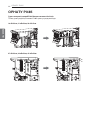
Minimum floor area (IEC 60335-2-40:2013+A1:2016 Edition 5.1)
0
100
200
300
400
500
600
Amin (m2)
m (kg)
0 1.224 2 3 4 5 6 7 8
Floor standing
Wall mounted
Ceiling mounted
- m : Total refrigerant amount in the system
- Total refrigerant amount : factory refrigerant charge + additional refrigerant amount
- Amin : minimum area for installation
Floor standing
m (kg) Amin (m2)
< 1.224
-
1.224 12.9
1.4 16.82
1.6 21.97
1.8 27.80
2 34.32
2.2 41.53
2.4 49.42
2.6 58.00
2.8 67.27
3 77.22
3.2 87.86
3.4 99.19
3.6 111.20
3.8 123.90
4 137.29
4.2 151.36
4.4 166.12
Floor standing
m (kg) Amin (m2)
4.6 181.56
4.8 197.70
5 214.51
5.2 232.02
5.4 250.21
5.6 269.09
5.8 288.65
6 308.90
6.2 329.84
6.4 351.46
6.6 373.77
6.8 396.76
7 420.45
7.2 444.81
7.4 469.87
7.6 495.61
7.8 522.04
Wall mounted
m (kg) Amin (m2)
< 1.224
-
1.224 1.43
1.4 1.87
1.6 2.44
1.8 3.09
2 3.81
2.2 4.61
2.4 5.49
2.6 6.44
2.8 7.47
3 8.58
3.2 9.76
3.4 11.02
3.6 12.36
3.8 13.77
4 15.25
4.2 16.82
4.4 18.46
Wall mounted
m (kg) Amin (m2)
4.6 20.17
4.8 21.97
5.2 25.78
5.4 27.80
5.6 29.90
5.8 32.07
6 34.32
6.2 36.65
6.4 39.05
6.6 41.53
6.8 44.08
7 46.72
7.2 49.42
7.4 52.21
7.6 55.07
7.8 58.00
Ceiling Mounted
m (kg) Amin (m2)
< 1.224
-
1.224 0.956
1.4 1.25
1.6 1.63
1.8 2.07
2 2.55
2.2 3.09
2.4 3.68
2.6 4.31
2.8 5.00
3 5.74
3.2 6.54
3.4 7.38
3.6 8.27
3.8 9.22
4 10.21
4.2 11.26
4.4 12.36
Ceiling Mounted
m (kg) Amin (m2)
4.6 13.50
4.8 14.70
5.2 17.26
5.4 18.61
5.6 20.01
5.8 21.47
6 22.98
6.2 24.53
6.4 26.14
6.6 27.80
6.8 29.51
7 31.27
7.2 33.09
7.4 34.95
7.6 36.86
7.8 38.83

INSTALLATION OF OUTDOOR UNIT 13
ENGLISH
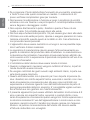
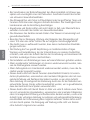
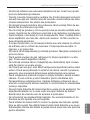
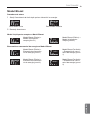
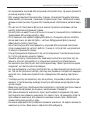
Amin (m2)
m (kg)
0
500
1000
1500
2000
2500
0 2 4 6 8 10 12 14 16
Floor standing
Wall mounted
Ceiling mounted
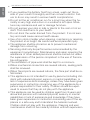
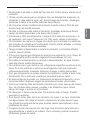
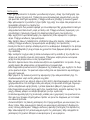
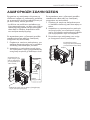
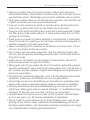
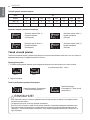
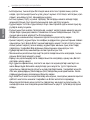
-
The appliance shall be installed, operated and stored in a room with a floor area larger than the mini-
mum area.
-
Use the graph of table to determine the minimum area.
-
Console model(For EU market) should be installed only in accordance with IEC 60335-2-40:2018
Edition 6.0.
-
m : Total refrigerant amount in the system
-
Total refrigerant amount : factory refrigerant charge + additional refrigerant amount
-
Amin : minimum area for installation
Minimum floor area (IEC 60335-2-40:2018 Edition 6.0)
Floor standing
m (kg) Amin (m
2
)
< 1.842 -
1.842 28.88
2.00 34.04
2.20 41.19
2.40 49.02
2.60 57.53
2.80 66.72
3.00 76.60
3.20 87.15
3.40 98.39
3.60 110.30
3.80 122.90
4.00 136.17
4.20 150.13
4.40 164.77
4.60 180.09
4.80 196.09
5.00 212.77
5.20 230.13
5.40 248.18
5.60 266.90
5.80 286.30
6.00 306.39
6.20 327.16
6.40 348.60
6.60 370.73
6.80 393.54
7.00 417.03
7.20 441.20
7.40 466.05
7.60 491.59
7.80 517.80
8.00 544.69
8.20 572.27
8.40 600.52
8.60 629.46
8.80 659.08
Floor standing
m (kg) Amin (m
2
)
9.00 689.38
9.20 720.36
9.40 752.02
9.60 784.36
9.80 817.38
10.00 851.08
10.20 885.47
10.40 920.53
10.60 956.28
10.80 992.70
11.00 1029.81
11.20 1067.60
11.40 1106.07
11.60 1145.22
11.80 1185.05
12.00 1225.56
12.20 1266.75
12.40 1308.62
12.60 1351.18
12.80 1394.41
13.00 1438.33
13.20 1482.93
13.40 1528.20
13.60 1574.16
13.80 1620.80
14.00 1668.12
14.20 1716.12
14.40 1764.80
14.60 1814.17
14.80 1864.21
15.00 1914.94
15.20 1966.34
15.40 2018.43
15.60 2071.19
15.80 2124.64
15.964 2168.98
Wall mounted
m (kg) Amin (m
2
)
< 1.842 -
1.842 4.44
2.00 4.83
2.20 5.31
2.40 5.79
2.60 6.39
2.80 7.41
3.00 8.51
3.20 9.68
3.40 10.93
3.60 12.26
3.80 13.66
4.00 15.13
4.20 16.68
4.40 18.31
4.60 20.01
4.80 21.79
5.00 23.64
5.20 25.57
5.40 27.58
5.60 29.66
5.80 31.81
6.00 34.04
6.20 36.35
6.40 38.73
6.60 41.19
6.80 43.73
7.00 46.34
7.20 49.02
7.40 51.78
7.60 54.62
7.80 57.53
8.00 60.52
8.20 63.59
8.40 66.72
8.60 69.94
8.80 73.23
Wall mounted
m (kg) Amin (m
2
)
9.00 76.60
9.20 80.04
9.40 83.56
9.60 87.15
9.80 90.82
10.00 94.56
10.20 98.39
10.40 102.28
10.60 106.25
10.80 110.30
11.00 114.42
11.20 118.62
11.40 122.90
11.60 127.25
11.80 131.67
12.00 136.17
12.20 140.75
12.40 145.40
12.60 150.13
12.80 154.93
13.00 159.81
13.20 164.77
13.40 169.80
13.60 174.91
13.80 180.09
14.00 185.35
14.20 190.68
14.40 196.09
14.60 201.57
14.80 207.13
15.00 212.77
15.20 218.48
15.40 224.27
15.60 230.13
15.80 236.07
15.964 241.00
Ceiling Mounted
m (kg) Amin (m
2
)
< 1.842 -
1.842 3.64
2.00 3.95
2.20 4.34
2.40 4.74
2.60 5.13
2.80 5.53
3.00 5.92
3.20 6.48
3.40 7.32
3.60 8.20
3.80 9.14
4.00 10.13
4.20 11.17
4.40 12.26
4.60 13.40
4.80 14.59
5.00 15.83
5.20 17.12
5.40 18.46
5.60 19.85
5.80 21.30
6.00 22.79
6.20 24.33
6.40 25.93
6.60 27.58
6.80 29.27
7.00 31.02
7.20 32.82
7.40 34.67
7.60 36.56
7.80 38.51
8.00 40.51
8.20 42.57
8.40 44.67
8.60 46.82
8.80 49.02
Ceiling Mounted
m (kg) Amin (m
2
)
9.00 51.28
9.20 53.58
9.40 55.94
9.60 58.34
9.80 60.80
10.00 63.30
10.20 65.86
10.40 68.47
10.60 71.13
10.80 73.84
11.00 76.60
11.20 79.41
11.40 82.27
11.60 85.18
11.80 88.14
12.00 91.16
12.20 94.22
12.40 97.34
12.60 100.50
12.80 103.72
13.00 106.98
13.20 110.30
13.40 113.67
13.60 117.09
13.80 120.56
14.00 124.08
14.20 127.65
14.40 131.27
14.60 134.94
14.80 138.66
15.00 142.43
15.20 146.26
15.40 150.13
15.60 154.06
15.80 158.03
15.964 161.33

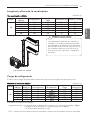
INSTALLATION OF OUTDOOR UNIT
14
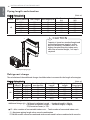
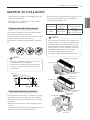
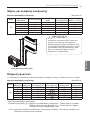
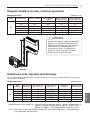
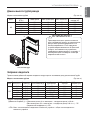
1Ø
h2
h1
A
B
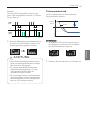
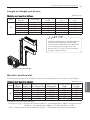
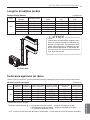
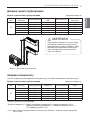
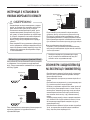
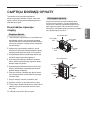
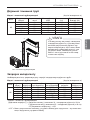
Multiple Piping Type
CAUTION
!
Refrigerant charge
1Ø
Piping length and elevation
ENGLISH

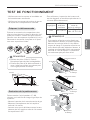
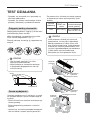
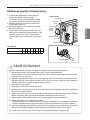
15
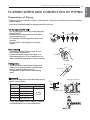
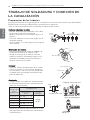
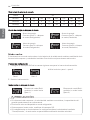
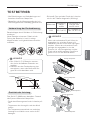
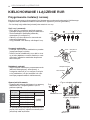
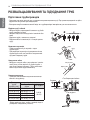
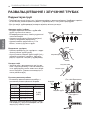
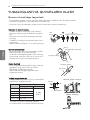
FLARING WORK AND CONNECTION OF PIPING
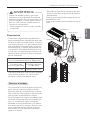
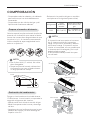
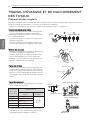
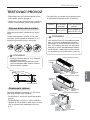
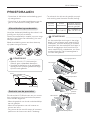
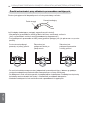
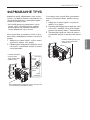
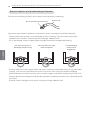
Preparation of Piping
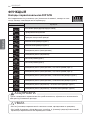
Copper
tube 90° Slanted Uneven Rough
Pipe
Reamer
Point down
Flare nut
Copper tube
FLARING WORK AND CONNECTION OF PIPING
Bar
Copper pipe
"A"
<Wing nut type>
<Clutch type>
ØØ
ØØ
ØØ
ØØ
ØØ
ENGLISH

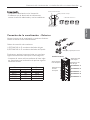
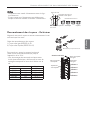
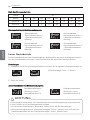
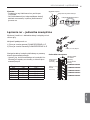
FLARING WORK AND CONNECTION OF PIPING
16
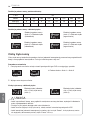
Ø6.35 1/4 16±2
Ø9.52 3/8 38±4
Ø12.7 1/2 55±6
Ø15.88 5/8 75±7
Ø19.05 3/4 110±10
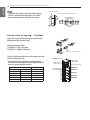
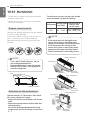
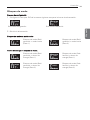
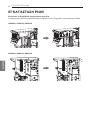
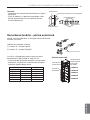
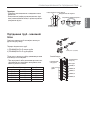
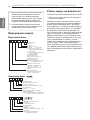
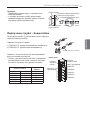
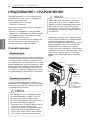
Connection of piping - Outdoor
Inclined
Inside is shining without scratches.
Smooth all round
Even length
all round
Surface
damaged Cracked Uneven
thickness
= Improper flaring =
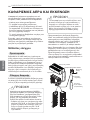
Ø12.7(1/2 inch) Connector
Ou
tdoor unit
Main gas
side valve
Main liquid
side valve Gas side piping
ROOM A
ROOM B
ROOM C
ROOM D
ROOM E
Liquid
side piping
ENGLISH

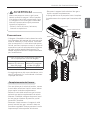
17
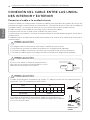
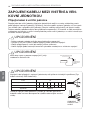
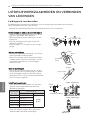
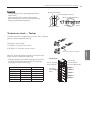
CONNECTING THE CABLE BETWEEN INDOOR UNIT AND OUTDOOR UNIT
ENGLISH
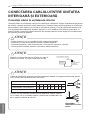
Connect the cable to the Indoor unit
CAUTION
!
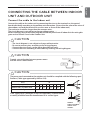
CONNECTING THE CABLE BETWEEN INDOOR
UNIT AND OUTDOOR UNIT
CAUTION
!
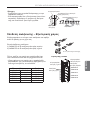
GN/YL 20mm
NORMAL
CROSS-SECTIONAL
AREA 0.75mm
2
H07RN-F
ø7.5mm
GN/YL 20mm
1Ø
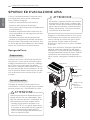
CAUTION
!
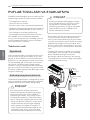
Air
Conditioner
Main power source
Circuit Breaker
Use a circuit breaker
or time delay fuse.
ENGLISH

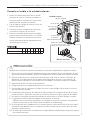
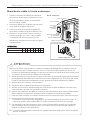
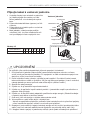
CONNECTING THE CABLE BETWEEN INDOOR UNIT AND OUTDOOR UNIT
18
ENGLISH
CAUTION
!
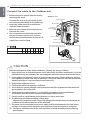
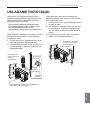
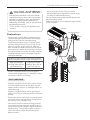
Power cord
Connecting cable
Cover control
Terminal block
Outdoor unit
Over 15mm
Holder for
power supply
cord
Terminal block
Loosen terminal screw
Ø
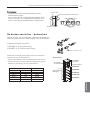
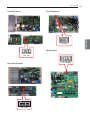
Connect the cable to the Outdoor unit
ENGLISH

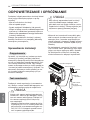
19
CONNECTING THE CABLE BETWEEN INDOOR UNIT AND OUTDOOR UNIT
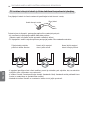
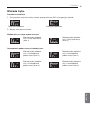
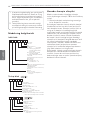
ENGLISH
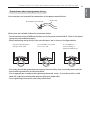
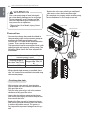
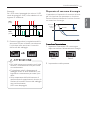
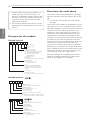
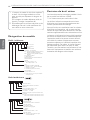
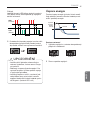
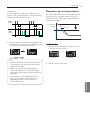
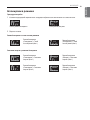
Round pressure terminal Power wire
Connect same thickness
wiring to both sides.
It is forbidden to connect
two to one side.
It is forbidden to
connect wiring of
different thicknesses.
Precautions when laying power wiring
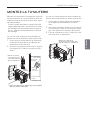
ENGLISH

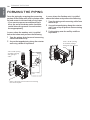
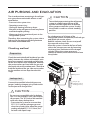
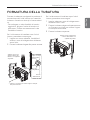
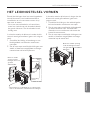
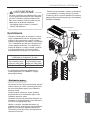
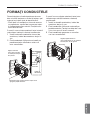
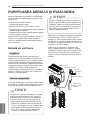
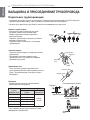
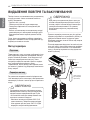
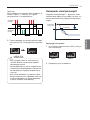
FORMING THE PIPING
20
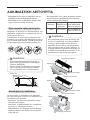
ENGLISH
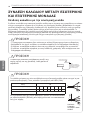
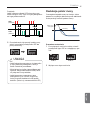
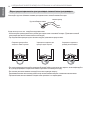
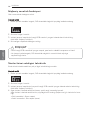
• Trap is required to prevent water from entering
into electrical parts.
Plastic
band
Taping
Drain hose
Pipings
Connecting
cable
Power supply
cord
Seal a small opening
around the pipings
with gum type
sealer.
Seal a small opening
around the pipings
with gum type sealant.
Trap
Trap
FORMING THE PIPING
ENGLISH
Pagina se încarcă...
Pagina se încarcă...
Pagina se încarcă...
Pagina se încarcă...
Pagina se încarcă...
Pagina se încarcă...
Pagina se încarcă...
Pagina se încarcă...
Pagina se încarcă...
Pagina se încarcă...
Pagina se încarcă...
Pagina se încarcă...
Pagina se încarcă...
Pagina se încarcă...
Pagina se încarcă...
Pagina se încarcă...
Pagina se încarcă...
Pagina se încarcă...
Pagina se încarcă...
Pagina se încarcă...
Pagina se încarcă...
Pagina se încarcă...
Pagina se încarcă...
Pagina se încarcă...
Pagina se încarcă...
Pagina se încarcă...
Pagina se încarcă...
Pagina se încarcă...
Pagina se încarcă...
Pagina se încarcă...
Pagina se încarcă...
Pagina se încarcă...
Pagina se încarcă...
Pagina se încarcă...
Pagina se încarcă...
Pagina se încarcă...
Pagina se încarcă...
Pagina se încarcă...
Pagina se încarcă...
Pagina se încarcă...
Pagina se încarcă...
Pagina se încarcă...
Pagina se încarcă...
Pagina se încarcă...
Pagina se încarcă...
Pagina se încarcă...
Pagina se încarcă...
Pagina se încarcă...
Pagina se încarcă...
Pagina se încarcă...
Pagina se încarcă...
Pagina se încarcă...
Pagina se încarcă...
Pagina se încarcă...
Pagina se încarcă...
Pagina se încarcă...
Pagina se încarcă...
Pagina se încarcă...
Pagina se încarcă...
Pagina se încarcă...
Pagina se încarcă...
Pagina se încarcă...
Pagina se încarcă...
Pagina se încarcă...
Pagina se încarcă...
Pagina se încarcă...
Pagina se încarcă...
Pagina se încarcă...
Pagina se încarcă...
Pagina se încarcă...
Pagina se încarcă...
Pagina se încarcă...
Pagina se încarcă...
Pagina se încarcă...
Pagina se încarcă...
Pagina se încarcă...
Pagina se încarcă...
Pagina se încarcă...
Pagina se încarcă...
Pagina se încarcă...
Pagina se încarcă...
Pagina se încarcă...
Pagina se încarcă...
Pagina se încarcă...
Pagina se încarcă...
Pagina se încarcă...
Pagina se încarcă...
Pagina se încarcă...
Pagina se încarcă...
Pagina se încarcă...
Pagina se încarcă...
Pagina se încarcă...
Pagina se încarcă...
Pagina se încarcă...
Pagina se încarcă...
Pagina se încarcă...
Pagina se încarcă...
Pagina se încarcă...
Pagina se încarcă...
Pagina se încarcă...
Pagina se încarcă...
Pagina se încarcă...
Pagina se încarcă...
Pagina se încarcă...
Pagina se încarcă...
Pagina se încarcă...
Pagina se încarcă...
Pagina se încarcă...
Pagina se încarcă...
Pagina se încarcă...
Pagina se încarcă...
Pagina se încarcă...
Pagina se încarcă...
Pagina se încarcă...
Pagina se încarcă...
Pagina se încarcă...
Pagina se încarcă...
Pagina se încarcă...
Pagina se încarcă...
Pagina se încarcă...
Pagina se încarcă...
Pagina se încarcă...
Pagina se încarcă...
Pagina se încarcă...
Pagina se încarcă...
Pagina se încarcă...
Pagina se încarcă...
Pagina se încarcă...
Pagina se încarcă...
Pagina se încarcă...
Pagina se încarcă...
Pagina se încarcă...
Pagina se încarcă...
Pagina se încarcă...
Pagina se încarcă...
Pagina se încarcă...
Pagina se încarcă...
Pagina se încarcă...
Pagina se încarcă...
Pagina se încarcă...
Pagina se încarcă...
Pagina se încarcă...
Pagina se încarcă...
Pagina se încarcă...
Pagina se încarcă...
Pagina se încarcă...
Pagina se încarcă...
Pagina se încarcă...
Pagina se încarcă...
Pagina se încarcă...
Pagina se încarcă...
Pagina se încarcă...
Pagina se încarcă...
Pagina se încarcă...
Pagina se încarcă...
Pagina se încarcă...
Pagina se încarcă...
Pagina se încarcă...
Pagina se încarcă...
Pagina se încarcă...
Pagina se încarcă...
Pagina se încarcă...
Pagina se încarcă...
Pagina se încarcă...
Pagina se încarcă...
Pagina se încarcă...
Pagina se încarcă...
Pagina se încarcă...
Pagina se încarcă...
Pagina se încarcă...
Pagina se încarcă...
Pagina se încarcă...
Pagina se încarcă...
Pagina se încarcă...
Pagina se încarcă...
Pagina se încarcă...
Pagina se încarcă...
Pagina se încarcă...
Pagina se încarcă...
Pagina se încarcă...
Pagina se încarcă...
Pagina se încarcă...
Pagina se încarcă...
Pagina se încarcă...
Pagina se încarcă...
Pagina se încarcă...
Pagina se încarcă...
Pagina se încarcă...
Pagina se încarcă...
Pagina se încarcă...
Pagina se încarcă...
Pagina se încarcă...
Pagina se încarcă...
Pagina se încarcă...
Pagina se încarcă...
Pagina se încarcă...
Pagina se încarcă...
Pagina se încarcă...
Pagina se încarcă...
Pagina se încarcă...
Pagina se încarcă...
Pagina se încarcă...
Pagina se încarcă...
Pagina se încarcă...
Pagina se încarcă...
Pagina se încarcă...
Pagina se încarcă...
Pagina se încarcă...
Pagina se încarcă...
Pagina se încarcă...
Pagina se încarcă...
Pagina se încarcă...
Pagina se încarcă...
Pagina se încarcă...
Pagina se încarcă...
Pagina se încarcă...
Pagina se încarcă...
Pagina se încarcă...
Pagina se încarcă...
Pagina se încarcă...
Pagina se încarcă...
Pagina se încarcă...
Pagina se încarcă...
Pagina se încarcă...
Pagina se încarcă...
Pagina se încarcă...
Pagina se încarcă...
Pagina se încarcă...
Pagina se încarcă...
Pagina se încarcă...
Pagina se încarcă...
Pagina se încarcă...
Pagina se încarcă...
Pagina se încarcă...
Pagina se încarcă...
Pagina se încarcă...
Pagina se încarcă...
Pagina se încarcă...
Pagina se încarcă...
Pagina se încarcă...
Pagina se încarcă...
Pagina se încarcă...
Pagina se încarcă...
Pagina se încarcă...
Pagina se încarcă...
Pagina se încarcă...
Pagina se încarcă...
Pagina se încarcă...
Pagina se încarcă...
Pagina se încarcă...
Pagina se încarcă...
Pagina se încarcă...
Pagina se încarcă...
Pagina se încarcă...
Pagina se încarcă...
Pagina se încarcă...
Pagina se încarcă...
Pagina se încarcă...
Pagina se încarcă...
Pagina se încarcă...
Pagina se încarcă...
Pagina se încarcă...
Pagina se încarcă...
Pagina se încarcă...
Pagina se încarcă...
Pagina se încarcă...
Pagina se încarcă...
Pagina se încarcă...
Pagina se încarcă...
Pagina se încarcă...
Pagina se încarcă...
Pagina se încarcă...
Pagina se încarcă...
Pagina se încarcă...
Pagina se încarcă...
Pagina se încarcă...
Pagina se încarcă...
Pagina se încarcă...
Pagina se încarcă...
Pagina se încarcă...
Pagina se încarcă...
Pagina se încarcă...
Pagina se încarcă...
Pagina se încarcă...
Pagina se încarcă...
Pagina se încarcă...
Pagina se încarcă...
Pagina se încarcă...
Pagina se încarcă...
Pagina se încarcă...
Pagina se încarcă...
Pagina se încarcă...
Pagina se încarcă...
Pagina se încarcă...
Pagina se încarcă...
Pagina se încarcă...
Pagina se încarcă...
Pagina se încarcă...
Pagina se încarcă...
Pagina se încarcă...
Pagina se încarcă...
Pagina se încarcă...
Pagina se încarcă...
Pagina se încarcă...
Pagina se încarcă...
Pagina se încarcă...
Pagina se încarcă...
Pagina se încarcă...
Pagina se încarcă...
Pagina se încarcă...
Pagina se încarcă...
Pagina se încarcă...
Pagina se încarcă...
Pagina se încarcă...
Pagina se încarcă...
Pagina se încarcă...
Pagina se încarcă...
Pagina se încarcă...
Pagina se încarcă...
Pagina se încarcă...
Pagina se încarcă...
Pagina se încarcă...
Pagina se încarcă...
Pagina se încarcă...
Pagina se încarcă...
Pagina se încarcă...
Pagina se încarcă...
Pagina se încarcă...
Pagina se încarcă...
Pagina se încarcă...
Pagina se încarcă...
Pagina se încarcă...
Pagina se încarcă...
Pagina se încarcă...
Pagina se încarcă...
Pagina se încarcă...
Pagina se încarcă...
Pagina se încarcă...
Pagina se încarcă...
Pagina se încarcă...
Pagina se încarcă...
Pagina se încarcă...
Pagina se încarcă...
Pagina se încarcă...
Pagina se încarcă...
Pagina se încarcă...
Pagina se încarcă...
Pagina se încarcă...
Pagina se încarcă...
Pagina se încarcă...
Pagina se încarcă...
Pagina se încarcă...
Pagina se încarcă...
Pagina se încarcă...
Pagina se încarcă...
Pagina se încarcă...
Pagina se încarcă...
Pagina se încarcă...
Pagina se încarcă...
Pagina se încarcă...
Pagina se încarcă...
Pagina se încarcă...
Pagina se încarcă...
Pagina se încarcă...
Pagina se încarcă...
Pagina se încarcă...
Pagina se încarcă...
Pagina se încarcă...
Pagina se încarcă...
Pagina se încarcă...
Pagina se încarcă...
Pagina se încarcă...
Pagina se încarcă...
Pagina se încarcă...
Pagina se încarcă...
Pagina se încarcă...
Pagina se încarcă...
Pagina se încarcă...
Pagina se încarcă...
Pagina se încarcă...
Pagina se încarcă...
Pagina se încarcă...
Pagina se încarcă...
Pagina se încarcă...
Pagina se încarcă...
Pagina se încarcă...
Pagina se încarcă...
Pagina se încarcă...
Pagina se încarcă...
Pagina se încarcă...
Pagina se încarcă...
Pagina se încarcă...
Pagina se încarcă...
Pagina se încarcă...
Pagina se încarcă...
Pagina se încarcă...
Pagina se încarcă...
Pagina se încarcă...
Pagina se încarcă...
Pagina se încarcă...
Pagina se încarcă...
Pagina se încarcă...
Pagina se încarcă...
Pagina se încarcă...
Pagina se încarcă...
Pagina se încarcă...
Pagina se încarcă...
Pagina se încarcă...
Pagina se încarcă...
Pagina se încarcă...
Pagina se încarcă...
Pagina se încarcă...
Pagina se încarcă...
Pagina se încarcă...
Pagina se încarcă...
Pagina se încarcă...
Pagina se încarcă...
Pagina se încarcă...
Pagina se încarcă...
Pagina se încarcă...
Pagina se încarcă...
Pagina se încarcă...
Pagina se încarcă...
Pagina se încarcă...
Pagina se încarcă...
Pagina se încarcă...
Pagina se încarcă...
Pagina se încarcă...
Pagina se încarcă...
Pagina se încarcă...
Pagina se încarcă...
Pagina se încarcă...
Pagina se încarcă...
Pagina se încarcă...
Pagina se încarcă...
Pagina se încarcă...
Pagina se încarcă...
Pagina se încarcă...
Pagina se încarcă...
Pagina se încarcă...
Pagina se încarcă...
Pagina se încarcă...
Pagina se încarcă...
Pagina se încarcă...
Pagina se încarcă...
Pagina se încarcă...
Pagina se încarcă...
Pagina se încarcă...
Pagina se încarcă...
Pagina se încarcă...
Pagina se încarcă...
Pagina se încarcă...
Pagina se încarcă...
Pagina se încarcă...
Pagina se încarcă...
Pagina se încarcă...
Pagina se încarcă...
Pagina se încarcă...
Pagina se încarcă...
Pagina se încarcă...
Pagina se încarcă...
Pagina se încarcă...
-
 1
1
-
 2
2
-
 3
3
-
 4
4
-
 5
5
-
 6
6
-
 7
7
-
 8
8
-
 9
9
-
 10
10
-
 11
11
-
 12
12
-
 13
13
-
 14
14
-
 15
15
-
 16
16
-
 17
17
-
 18
18
-
 19
19
-
 20
20
-
 21
21
-
 22
22
-
 23
23
-
 24
24
-
 25
25
-
 26
26
-
 27
27
-
 28
28
-
 29
29
-
 30
30
-
 31
31
-
 32
32
-
 33
33
-
 34
34
-
 35
35
-
 36
36
-
 37
37
-
 38
38
-
 39
39
-
 40
40
-
 41
41
-
 42
42
-
 43
43
-
 44
44
-
 45
45
-
 46
46
-
 47
47
-
 48
48
-
 49
49
-
 50
50
-
 51
51
-
 52
52
-
 53
53
-
 54
54
-
 55
55
-
 56
56
-
 57
57
-
 58
58
-
 59
59
-
 60
60
-
 61
61
-
 62
62
-
 63
63
-
 64
64
-
 65
65
-
 66
66
-
 67
67
-
 68
68
-
 69
69
-
 70
70
-
 71
71
-
 72
72
-
 73
73
-
 74
74
-
 75
75
-
 76
76
-
 77
77
-
 78
78
-
 79
79
-
 80
80
-
 81
81
-
 82
82
-
 83
83
-
 84
84
-
 85
85
-
 86
86
-
 87
87
-
 88
88
-
 89
89
-
 90
90
-
 91
91
-
 92
92
-
 93
93
-
 94
94
-
 95
95
-
 96
96
-
 97
97
-
 98
98
-
 99
99
-
 100
100
-
 101
101
-
 102
102
-
 103
103
-
 104
104
-
 105
105
-
 106
106
-
 107
107
-
 108
108
-
 109
109
-
 110
110
-
 111
111
-
 112
112
-
 113
113
-
 114
114
-
 115
115
-
 116
116
-
 117
117
-
 118
118
-
 119
119
-
 120
120
-
 121
121
-
 122
122
-
 123
123
-
 124
124
-
 125
125
-
 126
126
-
 127
127
-
 128
128
-
 129
129
-
 130
130
-
 131
131
-
 132
132
-
 133
133
-
 134
134
-
 135
135
-
 136
136
-
 137
137
-
 138
138
-
 139
139
-
 140
140
-
 141
141
-
 142
142
-
 143
143
-
 144
144
-
 145
145
-
 146
146
-
 147
147
-
 148
148
-
 149
149
-
 150
150
-
 151
151
-
 152
152
-
 153
153
-
 154
154
-
 155
155
-
 156
156
-
 157
157
-
 158
158
-
 159
159
-
 160
160
-
 161
161
-
 162
162
-
 163
163
-
 164
164
-
 165
165
-
 166
166
-
 167
167
-
 168
168
-
 169
169
-
 170
170
-
 171
171
-
 172
172
-
 173
173
-
 174
174
-
 175
175
-
 176
176
-
 177
177
-
 178
178
-
 179
179
-
 180
180
-
 181
181
-
 182
182
-
 183
183
-
 184
184
-
 185
185
-
 186
186
-
 187
187
-
 188
188
-
 189
189
-
 190
190
-
 191
191
-
 192
192
-
 193
193
-
 194
194
-
 195
195
-
 196
196
-
 197
197
-
 198
198
-
 199
199
-
 200
200
-
 201
201
-
 202
202
-
 203
203
-
 204
204
-
 205
205
-
 206
206
-
 207
207
-
 208
208
-
 209
209
-
 210
210
-
 211
211
-
 212
212
-
 213
213
-
 214
214
-
 215
215
-
 216
216
-
 217
217
-
 218
218
-
 219
219
-
 220
220
-
 221
221
-
 222
222
-
 223
223
-
 224
224
-
 225
225
-
 226
226
-
 227
227
-
 228
228
-
 229
229
-
 230
230
-
 231
231
-
 232
232
-
 233
233
-
 234
234
-
 235
235
-
 236
236
-
 237
237
-
 238
238
-
 239
239
-
 240
240
-
 241
241
-
 242
242
-
 243
243
-
 244
244
-
 245
245
-
 246
246
-
 247
247
-
 248
248
-
 249
249
-
 250
250
-
 251
251
-
 252
252
-
 253
253
-
 254
254
-
 255
255
-
 256
256
-
 257
257
-
 258
258
-
 259
259
-
 260
260
-
 261
261
-
 262
262
-
 263
263
-
 264
264
-
 265
265
-
 266
266
-
 267
267
-
 268
268
-
 269
269
-
 270
270
-
 271
271
-
 272
272
-
 273
273
-
 274
274
-
 275
275
-
 276
276
-
 277
277
-
 278
278
-
 279
279
-
 280
280
-
 281
281
-
 282
282
-
 283
283
-
 284
284
-
 285
285
-
 286
286
-
 287
287
-
 288
288
-
 289
289
-
 290
290
-
 291
291
-
 292
292
-
 293
293
-
 294
294
-
 295
295
-
 296
296
-
 297
297
-
 298
298
-
 299
299
-
 300
300
-
 301
301
-
 302
302
-
 303
303
-
 304
304
-
 305
305
-
 306
306
-
 307
307
-
 308
308
-
 309
309
-
 310
310
-
 311
311
-
 312
312
-
 313
313
-
 314
314
-
 315
315
-
 316
316
-
 317
317
-
 318
318
-
 319
319
-
 320
320
-
 321
321
-
 322
322
-
 323
323
-
 324
324
-
 325
325
-
 326
326
-
 327
327
-
 328
328
-
 329
329
-
 330
330
-
 331
331
-
 332
332
-
 333
333
-
 334
334
-
 335
335
-
 336
336
-
 337
337
-
 338
338
-
 339
339
-
 340
340
-
 341
341
-
 342
342
-
 343
343
-
 344
344
-
 345
345
-
 346
346
-
 347
347
-
 348
348
-
 349
349
-
 350
350
-
 351
351
-
 352
352
-
 353
353
-
 354
354
-
 355
355
-
 356
356
-
 357
357
-
 358
358
-
 359
359
-
 360
360
-
 361
361
-
 362
362
-
 363
363
-
 364
364
-
 365
365
-
 366
366
-
 367
367
-
 368
368
-
 369
369
-
 370
370
-
 371
371
-
 372
372
-
 373
373
-
 374
374
-
 375
375
-
 376
376
-
 377
377
-
 378
378
-
 379
379
-
 380
380
-
 381
381
-
 382
382
-
 383
383
-
 384
384
-
 385
385
-
 386
386
-
 387
387
-
 388
388
-
 389
389
-
 390
390
-
 391
391
-
 392
392
-
 393
393
-
 394
394
-
 395
395
-
 396
396
-
 397
397
-
 398
398
-
 399
399
-
 400
400
-
 401
401
-
 402
402
-
 403
403
-
 404
404
-
 405
405
-
 406
406
-
 407
407
-
 408
408
-
 409
409
-
 410
410
-
 411
411
-
 412
412
-
 413
413
-
 414
414
-
 415
415
-
 416
416
-
 417
417
-
 418
418
-
 419
419
-
 420
420
-
 421
421
-
 422
422
-
 423
423
-
 424
424
-
 425
425
-
 426
426
-
 427
427
-
 428
428
-
 429
429
-
 430
430
-
 431
431
-
 432
432
-
 433
433
-
 434
434
-
 435
435
-
 436
436
-
 437
437
-
 438
438
-
 439
439
-
 440
440
-
 441
441
-
 442
442
-
 443
443
-
 444
444
-
 445
445
-
 446
446
-
 447
447
-
 448
448
-
 449
449
-
 450
450
-
 451
451
-
 452
452
-
 453
453
-
 454
454
-
 455
455
-
 456
456
-
 457
457
-
 458
458
-
 459
459
-
 460
460
-
 461
461
-
 462
462
-
 463
463
-
 464
464
-
 465
465
-
 466
466
-
 467
467
-
 468
468
-
 469
469
-
 470
470
-
 471
471
-
 472
472
-
 473
473
-
 474
474
-
 475
475
-
 476
476
-
 477
477
-
 478
478
-
 479
479
-
 480
480
-
 481
481
-
 482
482


LG MU5R40 Manual de utilizare
- Tip
- Manual de utilizare
în alte limbi
- italiano: LG MU5R40 Manuale utente