
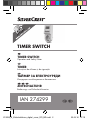
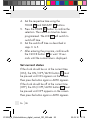
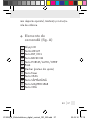
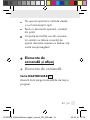
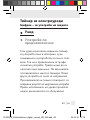
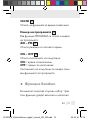
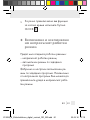
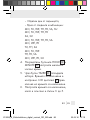
TIMER SWITCH
IAN 274299
ZEITSCHALTUHR
Bedienungs- und Sicherheitshinweise
TIMER SWITCH
Operation and Safety Notes
TIMER
Instrucţiuni de utilizare şi de siguranţă
ТАЙМЕР ЗА ЕЛЕКТРОУРЕДИ
Инструкции за обслужване и безопасност
274299_B_Zeitschaltuhren_digital_cover_RO_BG.indd 2 22.04.16 07:19

GB Operation and Safety Notes Page 5
RO Instrucţiuni de utilizare şi de siguranţă Pagina 33
BG Инструкции за обслужване
и безопасност Cтраница 62
DE / AT / CH Bedienungs- und Sicherheitshinweise Seite 94
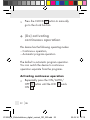
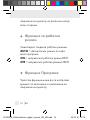
Before reading, unfold the page containing the illustrations and familiarise
yourself with all functions of the device.
Înainte de a citi instrucţiunile, priviţi imaginile şi familiarizaţi-vă cu toate
funcţiile aparatului.
Преди да прочетете отворете страницата с фигурите и след това се
запознайте с всички функции на уреда.
Klappen Sie vor dem Lesen die Seite mit den Abbildungen aus und machen
Sie sich anschließend mit allen Funktionen des Gerätes vertraut.
274299_B_Zeitschaltuhren_digital_cover_RO_BG.indd 3 22.04.16 07:19

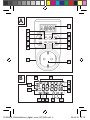
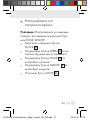
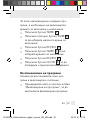
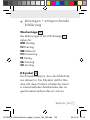
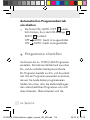
B
14
15
16
1718192021
22
23
24 13
A
1
2
4
3
5
6
12
10
9
8
7
11
274299_B_Zeitschaltuhren_digital_cover_RO_BG.indd 4 22.04.16 07:19

274299_B_Zeitschaltuhren_digital_cover_RO_BG.indd 5 22.04.16 07:19

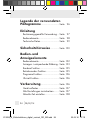
5 GB
List of pictograms used ........Page 7
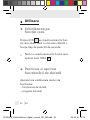
Introduction
Intended use ........................................Page 8
Control elements ..................................Page 9
Technical Data .....................................Page 10
Safety notices ..............................Page 11
Control- and
display elements
Control elements ..................................Page 13
Displays + Explanation .......................Page 13
Random function ..................................Page 15
Operating mode function .................... Page 16
Program function..................................Page 16
Clock function ......................................Page 16
Preparation
Charging the device ............................Page 17
Reset all settings ................................... Page 17
Setting the current time ........................Page 18
Setting standard and summer time .....Page 19
Setting the hour mode .........................Page 20
274299_B_Zeitschaltuhren_digital_content_RO_BG.indd 5 22.04.16 07:19

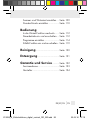
6 GB
Operation
Switching to the clock function ...........Page 21
(De) activating continuous operation ...Page 22
Configuring programs .........................Page 24
Switching the random function
on and off ............................................Page 28
Cleaning ............................................Page 29
Disposal .............................................Page 30
Warranty and Service .......... Page 31
Service address ...................................Page 32
Manufacturer .......................................Page 32
274299_B_Zeitschaltuhren_digital_content_RO_BG.indd 6 22.04.16 07:19

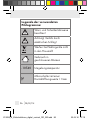
7 GB
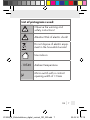
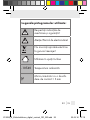
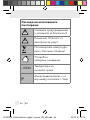
List of pictograms used:
Observe the warning and
safety instructions!
Attention! Risk of electric shock!
Do not dispose of electric equip-
ment in the household waste!
Use indoors
-10T40
Ambient temperature
Micro-switch with a contact
opening width of < 3 mm
274299_B_Zeitschaltuhren_digital_content_RO_BG.indd 7 22.04.16 07:19

8 GB
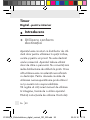
Timer Switch
Digital – for indoors
Introduction
Intended use
The device is intended as a digital weekly
timer switch for use in enclosed, dry rooms
and designed for private use. It is not suita-
ble for commercial use. Only operate the
device individually. Do not connect several
timer switches in series. Any other use is con-
sidered improper. The manufacturer is not
liable for damages due to improper use.
Read the entire instructions for use before
using the device. Keep these instructions for
use. Include the instructions for use when
passing the device on.
274299_B_Zeitschaltuhren_digital_content_RO_BG.indd 8 22.04.16 07:19

9 GB
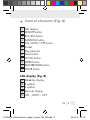
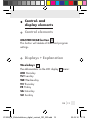
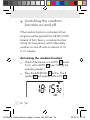
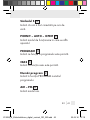
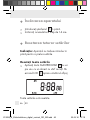
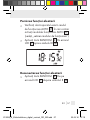
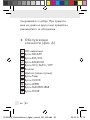
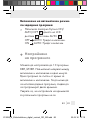
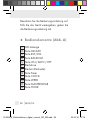
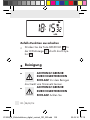
Control elements (Fig. A)
1
LCD display
2
MINUTE button
3
RST / RCL button
4
RANDOM button
5
ON / AUTO / OFF button
6
Socket
7
Plug (reverse)
8
Timer button
9
CLOCK button
10
WEEK button
11
MASTERCLEAR button
12
HOUR button
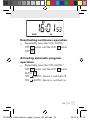
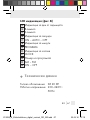
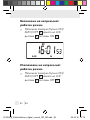
LCD display (Fig. B)
13
Weekday display
14
R symbol
15
S symbol
16
Seconds display
17
ON – AUTO – OFF
274299_B_Zeitschaltuhren_digital_content_RO_BG.indd 9 22.04.16 07:19

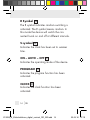
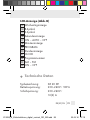
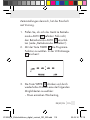
10 GB
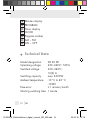
18
Minutes display
19
PROGRAM
20
Hours display
21
CLOCK
22
Program number
23
AM – PM
24
ON – OFF
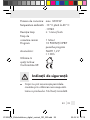
Technical Data
Model designation: DZ 20 DE
Operating voltage: 230–240 V
~
50 Hz
Switched voltage: 230–240 V
~
16(2) A
Switching capacity: max. 3600 W
Ambient temperature: -10 °C to 40 °C
-10T40
Time error: ± 1 minute / month
Shorting switching time: 1 minute
274299_B_Zeitschaltuhren_digital_content_RO_BG.indd 10 22.04.16 07:19

11 GB
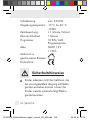
Programs: 10 ON / OFF
program sets
Battery: NiMH 1.2 V
> 100 h
Use
indoors:
CE compliant:
Safety notices
Children are not able to understand the
dangers arising from improper use of
electric devices. Never leave children
unsupervised when using electric devices.
Only plug the device into safely installed
sockets.
Only connect loads within the specified
capacities of the device.
274299_B_Zeitschaltuhren_digital_content_RO_BG.indd 11 22.04.16 07:19

12 GB
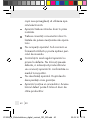
Do not cover the device. Heat accumu-
lates when covered, creating a fire
hazard.
Regularly check the device for damage.
Do not replace damaged parts but con-
tact the manufacturer or dispose of the de-
vice in an environmentally responsible wa
y.
Do not open the device. Opening the
device will void the warranty.
The device contains a rechargeable bat-
tery. A defective rechargeable battery
must be replaced by the manufacturer.
Do not touch the device with wet hands
or bring into contact with water.
Disconnect the device from the power
mains to de-energise.
Do not connect heaters or similar loads
to the device, as these must never be
operated unattended.
274299_B_Zeitschaltuhren_digital_content_RO_BG.indd 12 22.04.16 07:19

13 GB
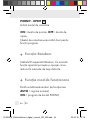
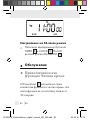
Control- and
display elements
Control elements
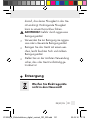
MASTERCLEAR button
11
This button will delete all time and program
settings.
Displays + Explanation
Weekdays
13
The abbreviations on the LCD display
1
mean:
MO Monday
TU Tuesday
WE Wednesday
TH Thursday
FR Friday
SA Saturday
SU Sunday
274299_B_Zeitschaltuhren_digital_content_RO_BG.indd 13 22.04.16 07:19

14 GB
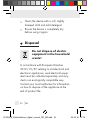
R Symbol
14
The R symbol indicates random switching is
activated. The R symbol means random. In
this mode the device will switch the con-
nected loads on and off at different intervals.
S symbol
15
Indicates the clock has been set to summer
time.
ON – AUTO – OFF
17
Indicates the operating mode of the device.
PROGRAM
19
Indicates the program function has been
activated.
CLOCK
21
Indicates the clock function has been
activated.
274299_B_Zeitschaltuhren_digital_content_RO_BG.indd 14 22.04.16 07:19

15 GB
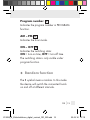
Program number
22
Indicates the program number in PROGRAM
function.
AM – PM
23
Indicates the hour mode.
ON – OFF
24
Indicates the switching state:
ON = turn-on time, OFF = turn-off time.
The switching state is only visible under
program function.
Random function
The R symbol means random. In this mode
the device will switch the connected loads
on and off at different intervals.
274299_B_Zeitschaltuhren_digital_content_RO_BG.indd 15 22.04.16 07:19

16 GB
Operating mode function
The different operating modes are:
AUTO = automatic program operation,
ON = continuous operation ON,
OFF = continuous operation OFF.
Program function
This function allows the on- and off times to
be programmed for the connected load.
Clock function
This function shows the current time in the LCD.
274299_B_Zeitschaltuhren_digital_content_RO_BG.indd 16 22.04.16 07:19

17 GB
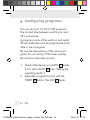
Preparation
To start up the device you must:
1. Charge the device.
2. Reset all settings.
3. Set the current time.
Charging the device
Insert the plug
7
into a mains socket.
Charge the rechargeable battery for
14 hours.
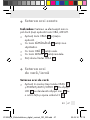
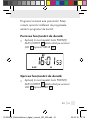
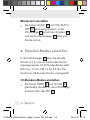
Reset all settings
Note: The device does not need to be con-
nected to the mains to configure the settings.
274299_B_Zeitschaltuhren_digital_content_RO_BG.indd 17 22.04.16 07:19

18 GB
Reset all settings
Press the MASTERCLEAR
11
button with
a pen or other pointy object. The LCD
display
1
will read:
All settings cleared.
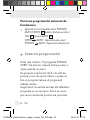
Setting the current time
Note: Hold the HOUR, MINUTE button for
faster programming.
Press and hold the CLOCK
21
button.
Set the current day of the week with the
WEEK
10
button.
Set the hour with the HOUR
12
button.
274299_B_Zeitschaltuhren_digital_content_RO_BG.indd 18 22.04.16 07:19

19 GB
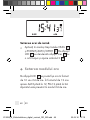
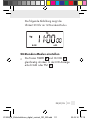
Set the minute with the MINUTE
2
button.
Release the CLOCK button
21
.
Setting standard
and summer time
Setting summer time
Simultaneously press the CLOCK
9
and ON / AUTO / OFF
5
buttons. The
LCD
1
will advance the hour display
20
by one hour and the S symbol
15
disap-
pears.
274299_B_Zeitschaltuhren_digital_content_RO_BG.indd 19 22.04.16 07:19

20 GB
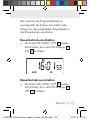
Setting standard time
Simultaneously press the CLOCK
9
and
ON / AUTO / OFF
5
buttons. The S
symbol
15
disappears from the LCD
1
and the hour
20
decreases by one.
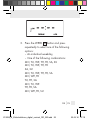
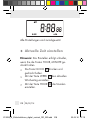
Setting the hour mode
The LCD
1
can display the current time in
12- or 24-hour mode. In 12-hour mode AM
means before 12 noon, PM after 12 noon.
The default is 24 hour mode.
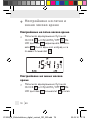
Setting to 12 hour mode
Simultaneously press the TIMER
8
and
CLOCK
9
buttons. The LCD will show
AM or PM
23
.
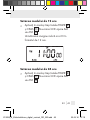
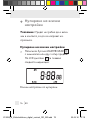
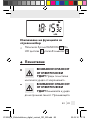
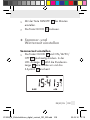
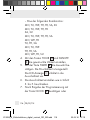
The following illustration shows
23:00 hours in 12-hour mode.
274299_B_Zeitschaltuhren_digital_content_RO_BG.indd 20 22.04.16 07:19
Pagina se încarcă...
Pagina se încarcă...
Pagina se încarcă...
Pagina se încarcă...
Pagina se încarcă...
Pagina se încarcă...
Pagina se încarcă...
Pagina se încarcă...
Pagina se încarcă...
Pagina se încarcă...
Pagina se încarcă...
Pagina se încarcă...
Pagina se încarcă...
Pagina se încarcă...
Pagina se încarcă...
Pagina se încarcă...
Pagina se încarcă...
Pagina se încarcă...
Pagina se încarcă...
Pagina se încarcă...
Pagina se încarcă...
Pagina se încarcă...
Pagina se încarcă...
Pagina se încarcă...
Pagina se încarcă...
Pagina se încarcă...
Pagina se încarcă...
Pagina se încarcă...
Pagina se încarcă...
Pagina se încarcă...
Pagina se încarcă...
Pagina se încarcă...
Pagina se încarcă...
Pagina se încarcă...
Pagina se încarcă...
Pagina se încarcă...
Pagina se încarcă...
Pagina se încarcă...
Pagina se încarcă...
Pagina se încarcă...
Pagina se încarcă...
Pagina se încarcă...
Pagina se încarcă...
Pagina se încarcă...
Pagina se încarcă...
Pagina se încarcă...
Pagina se încarcă...
Pagina se încarcă...
Pagina se încarcă...
Pagina se încarcă...
Pagina se încarcă...
Pagina se încarcă...
Pagina se încarcă...
Pagina se încarcă...
Pagina se încarcă...
Pagina se încarcă...
Pagina se încarcă...
Pagina se încarcă...
Pagina se încarcă...
Pagina se încarcă...
Pagina se încarcă...
Pagina se încarcă...
Pagina se încarcă...
Pagina se încarcă...
Pagina se încarcă...
Pagina se încarcă...
Pagina se încarcă...
Pagina se încarcă...
Pagina se încarcă...
Pagina se încarcă...
Pagina se încarcă...
Pagina se încarcă...
Pagina se încarcă...
Pagina se încarcă...
Pagina se încarcă...
Pagina se încarcă...
Pagina se încarcă...
Pagina se încarcă...
Pagina se încarcă...
Pagina se încarcă...
Pagina se încarcă...
Pagina se încarcă...
Pagina se încarcă...
Pagina se încarcă...
Pagina se încarcă...
Pagina se încarcă...
Pagina se încarcă...
Pagina se încarcă...
Pagina se încarcă...
Pagina se încarcă...
Pagina se încarcă...
Pagina se încarcă...
Pagina se încarcă...
Pagina se încarcă...
Pagina se încarcă...
Pagina se încarcă...
Pagina se încarcă...
Pagina se încarcă...
Pagina se încarcă...
Pagina se încarcă...
Pagina se încarcă...
Pagina se încarcă...
Pagina se încarcă...
Pagina se încarcă...
Pagina se încarcă...
-
 1
1
-
 2
2
-
 3
3
-
 4
4
-
 5
5
-
 6
6
-
 7
7
-
 8
8
-
 9
9
-
 10
10
-
 11
11
-
 12
12
-
 13
13
-
 14
14
-
 15
15
-
 16
16
-
 17
17
-
 18
18
-
 19
19
-
 20
20
-
 21
21
-
 22
22
-
 23
23
-
 24
24
-
 25
25
-
 26
26
-
 27
27
-
 28
28
-
 29
29
-
 30
30
-
 31
31
-
 32
32
-
 33
33
-
 34
34
-
 35
35
-
 36
36
-
 37
37
-
 38
38
-
 39
39
-
 40
40
-
 41
41
-
 42
42
-
 43
43
-
 44
44
-
 45
45
-
 46
46
-
 47
47
-
 48
48
-
 49
49
-
 50
50
-
 51
51
-
 52
52
-
 53
53
-
 54
54
-
 55
55
-
 56
56
-
 57
57
-
 58
58
-
 59
59
-
 60
60
-
 61
61
-
 62
62
-
 63
63
-
 64
64
-
 65
65
-
 66
66
-
 67
67
-
 68
68
-
 69
69
-
 70
70
-
 71
71
-
 72
72
-
 73
73
-
 74
74
-
 75
75
-
 76
76
-
 77
77
-
 78
78
-
 79
79
-
 80
80
-
 81
81
-
 82
82
-
 83
83
-
 84
84
-
 85
85
-
 86
86
-
 87
87
-
 88
88
-
 89
89
-
 90
90
-
 91
91
-
 92
92
-
 93
93
-
 94
94
-
 95
95
-
 96
96
-
 97
97
-
 98
98
-
 99
99
-
 100
100
-
 101
101
-
 102
102
-
 103
103
-
 104
104
-
 105
105
-
 106
106
-
 107
107
-
 108
108
-
 109
109
-
 110
110
-
 111
111
-
 112
112
-
 113
113
-
 114
114
-
 115
115
-
 116
116
-
 117
117
-
 118
118
-
 119
119
-
 120
120
-
 121
121
-
 122
122
-
 123
123
-
 124
124
-
 125
125


Silvercrest IAN 274299 Operation and Safety Notes
- Tip
- Operation and Safety Notes
- Acest manual este potrivit și pentru
în alte limbi
- Deutsch: Silvercrest IAN 274299
Alte documente
-
LG PF391P-P Manual de utilizare
-
JVC KD-DV7301 Manual de utilizare
-
JVC KD-R203 Manual de utilizare
-
Emos P5660SH Thermostatic and Timer Socket Manual de utilizare
-
Auriol ian 91679 Operation and Safety Notes
-
Yamaha MCX-2000 Manualul proprietarului
-
LG F2410.AROMSV Manual de utilizare
-
-
-
LG KG810 Manual de utilizare