
ELEKTRISCHE
EDELSTAHLARMATUR
mit integriertem Durchlauferhitzer
Montage-, Bedienungs- und Sicherheitshinweise
MISCELATORE ELETTRICO IN
ACCIAIO INOX
con scaldacqua istantaneo integrato
Istruzioni per il montaggio, l'uso e la sicurezza
ELEKTRYCZNA BATERIA ZE STALI
NIERDZEWNEJ
z wbudowanym przepływowym
ogrzewaczem wody
Wskazówki dotyczące montażu, obsługi i bezpieczeństwa
ARMĂTURĂ ELECTRICĂ DIN OȚEL
INOXIDABIL
cu încălzitor de apă cu debit continuu
integrat
Instrucțiuni de montare, operare și siguranță
ELECTRIC STAINLESS STEEL
FITTING
with integrated instantaneous water heater
Installation, operating and safety instructions
ELEKTRISK ARMATUR I RUSTFRIT STÅL
med integreret gennemstrømningsvand-
varmer
Monterings-, betjenings- og sikkerhedsanvisninger
ELEKTRICKÁ NEREZOVÁ BATERIE
s integrovaným průtokovým ohřívačem
Montážní, provozní a bezpečnostní pokyny
ELEKTRIČNA ARMATURA OD
NEHRĐAJUĆEG ČELIKA
s integriranim protočnim grijačima vode
Upute za montažu i upotrebu i sigurnosne napomene
IAN 402407_2204
ROBINET ÉLECTRIQUE EN ACIER
INOXYDABLE
avec chauffe-eau instantané intégré
Instructions de montage, d’utilisation et de sécurité
ELEKTROMOS, ROZSDAMENTES
ACÉL CSAPTELEP
b
eépített, átfolyásos rendszerű vízmelegítővel
Szerelési, kezelési és biztonsági utasítások
ELEKTRICKÁ ARMATÚRA Z
NEHRDZAVEJÚCEJ OCELE
s integrovaným prietokovým ohrievačom
Návod na montáž, používanie a bezpečnostné pokyny
ЕЛЕКТРИЧЕСКА АРМАТУРА ОТ
НЕРЪЖДАЕМА СТОМАНА
с вграден проточен нагревател
Указания за монтаж, обслужване и безопасност
ELEKTRISCHE ROESTVRIJSTALEN
ARMATUUR
met geïntegreerde boiler
Montage-, bedienings- en veiligheidsinstructies
ELEKTRIČNA ARMATURA IZ
NERJAVEČEGA JEKLA
z vgrajenim pretočnim bojlerjem
Navodila za montažo, uporabo in varnostni napotki
GRIFERÍA ELÉCTRICA DE ACERO
INOXIDABLE
con calentador de paso integrado
Instrucciones de montaje, uso y seguridad
ΗΛΕΚΤΡΙΚΗ ΜΠΑΤΑΡΙΑ ΑΠΌ
ΑΝΌΞΕΙΔΩΤΌ ΧΑΛΥΒΑ
με ενσωματωμένο ταχυθερμαντήρα νερού
Οδηγίες συναρμολόγησης, λειτουργίας και ασφάλειας
402407_2204-6823550-8-Elektrische_Edelstahlarmatur-full-LB8-man.indd 1402407_2204-6823550-8-Elektrische_Edelstahlarmatur-full-LB8-man.indd 1 26.07.22 06:4326.07.22 06:43

2
FR / BE Instructions de montage, d’utilisation et de sécurité Page 26
NL / BE Montage-, bedienings- en veiligheidsinstructies pagina 35
CZ Montážní, provozní a bezpečnostní pokyny strana 43
PL Wskazówki dotyczące montażu, obsługi i bezpieczeństwa Strona 51
SK Návod na montáž, používanie a bezpečnostné pokyny strana 60
ES Instrucciones de montaje, uso y seguridad Página 68
DK Monterings-, betjenings- og sikkerhedsanvisninger Side 77
IT Istruzioni per il montaggio, l'uso e la sicurezza Pagina 85
HU Szerelési, kezelési és biztonsági utasítások 93. oldal
SI Navodila za montažo, uporabo in varnostni napotki stran 101
HR Upute za montažu i upotrebu i sigurnosne napomene stranica 109
RO Instrucțiuni de montare, operare și siguranță pagina 117
BG
Указания за монтаж, обслужване и безопасност
Страница
125
GR
Οδηγίες συναρμολόγησης, λειτουργίας και ασφάλειας
σελίδα
136
DE / AT / CH Montage-, Bedienungs- und Sicherheitshinweise Seite 17
GB / IE / NI Installation, operating and safety instructions Page 9
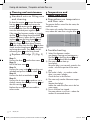
Before reading, fold out the two pages with the illustrations and then familiarise yourself
with all the functions of the appliance.
Klappen Sie vor dem Lesen die beiden Seiten mit den Abbildungen aus und machen Sie
sich anschließend mit allen Funktionen des Gerätes vertraut.
Avant de lire, dépliez les deux pages d’illustrations et familiarisez-vous ensuite avec toutes les
fonctions de l’appareil.
Klap vóór het lezen de beide pagina's met de afbeeldingen uit en maak u vervolgens ver-
trouwd met alle functies van het apparaat.
Před čtením si rozložte obě strany s obrázky a seznamte se se všemi funkcemi zařízení.
Przed przeczytaniem rozłożyć obie strony z rysunkami, a następnie zapoznać się ze wszystkimi
funkcjami urządzenia.
Pred čítaním rozložte obidve strany s ilustráciami a potom sa oboznámte so všetkými funkciami
zariadenia.
Despliegue las dos páginas con las ilustraciones antes de leerlas y familiarícese con todas las
funciones del aparato.
Før du læser anvisningerne, skal du folde de to sider med figurer ud og gøre dig fortrolig med alle
apparatets funktioner.
Prima di leggere, aprire le due pagine con le illustrazioni e acquisire dimestichezza con tutte le
funzioni del dispositivo.
Olvasás előtt hajtsa ki mindkét képeket tartalmazó oldalt, majd ezután ismerkedjen meg a
készülék funkcióival.
Pred branjem odprite obe strani s slikami in se nato seznanite z vsemi funkcijami naprave.
Prije čitanja rastvorite obje strane sa slikama, a zatim se upoznajte sa svim funkcijama uređaja.
Înainte de citire, deschideți cele două părți cu ilustrațiile și familiarizați-vă apoi cu toate funcțiile
aparatului.
Преди четене разгърнете двете страници с изображенията и след това се запознайте с функциите
на уреда.
Πριν από την ανάγνωση, ξεδιπλώστε τις δύο σελίδες με τις εικόνες και, στη συνέχεια, εξοικειωθείτε με
όλες τις λειτουργίες της συσκευής.
402407_2204-6823550-8-Elektrische_Edelstahlarmatur-full-LB8-man.indd 2402407_2204-6823550-8-Elektrische_Edelstahlarmatur-full-LB8-man.indd 2 26.07.22 06:4326.07.22 06:43

3
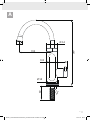
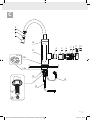
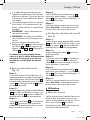
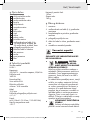
A
380
60
190
Ø 54
Ø 59
22
105
402407_2204-6823550-8-Elektrische_Edelstahlarmatur-full-LB8-man.indd 3402407_2204-6823550-8-Elektrische_Edelstahlarmatur-full-LB8-man.indd 3 26.07.22 06:4326.07.22 06:43

4
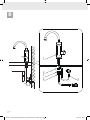
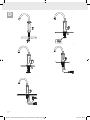
B
3
45
2
1
402407_2204-6823550-8-Elektrische_Edelstahlarmatur-full-LB8-man.indd 4402407_2204-6823550-8-Elektrische_Edelstahlarmatur-full-LB8-man.indd 4 26.07.22 06:4326.07.22 06:43

5
C
1
2
3
4 5 6 7 8 910
12
14
15
16
17
13 (2x)
13b
13a
18
19
11
402407_2204-6823550-8-Elektrische_Edelstahlarmatur-full-LB8-man.indd 5402407_2204-6823550-8-Elektrische_Edelstahlarmatur-full-LB8-man.indd 5 26.07.22 06:4326.07.22 06:43

6
1
3
5
2
13a
4
D
402407_2204-6823550-8-Elektrische_Edelstahlarmatur-full-LB8-man.indd 6402407_2204-6823550-8-Elektrische_Edelstahlarmatur-full-LB8-man.indd 6 26.07.22 06:4326.07.22 06:43

7
1
13b
3
5
2
4
E
402407_2204-6823550-8-Elektrische_Edelstahlarmatur-full-LB8-man.indd 7402407_2204-6823550-8-Elektrische_Edelstahlarmatur-full-LB8-man.indd 7 26.07.22 06:4326.07.22 06:43

8
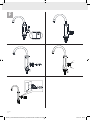
In Out
Out
In
In
Out
In
Out
F
402407_2204-6823550-8-Elektrische_Edelstahlarmatur-full-LB8-man.indd 8402407_2204-6823550-8-Elektrische_Edelstahlarmatur-full-LB8-man.indd 8 26.07.22 06:4326.07.22 06:43

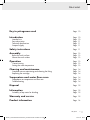
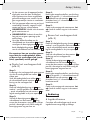
GB/IE/NI 9
Key to pictograms used Page 10
Introduction Page 10
Intended use Page 10
Parts description Page 11
Technical specifications Page 11
Scope of supply Page 11
Safety instructions Page 11
Assembly Page 12
Below the work surface Page 13
Above the work surface Page 13
Operation Page 13
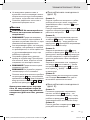
Commissioning Page 13
Setting the water temperature Page 13
Cleaning and maintenance Page 14
Standard note on maintaining and cleaning the fitting Page 14
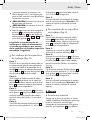
Replacing the cartridge Page 14
Temperature and water flow curve Page 14
Dependence on temperature and flow rate Page 14
Troubleshooting Page 14
Disposal Page 15
Information Page 15
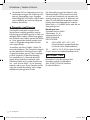
Suitability of tap water for drinking Page 15
Warranty and service Page 15
Product information Page 16
Table of contents
402407_2204-6823550-8-Elektrische_Edelstahlarmatur-full-LB8-man.indd 9402407_2204-6823550-8-Elektrische_Edelstahlarmatur-full-LB8-man.indd 9 26.07.22 06:4326.07.22 06:43

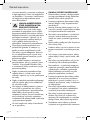
Electric stainless steel fitting
(LH-SH-1)
with integrated instantaneous
water heater
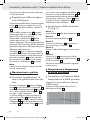
•• Introduction
Congratulations on your purchase
of a new product. You have chosen
a high-quality product. The installa-
tion/operating instructions are an
integral part of this product. Please read
these installation/operating instructions in
their entirety before installation and observe
the information they contain. These instruc-
tions contain important installation, adjust-
ment and care information. Keep the
installation/operating instructions in a safe
place and pass them on to any subsequent
owners.
•• Intended use
The product is a water-saving fitting intended
exclusively for connection to a cold water line
and a power line for regulating and heating
the water and for installation on sink units.
Make sure that the specifications for power
connection and water pressure (see "Technical
specifications") are followed.
The product is not suitable for central heating
systems, instantaneous water heaters, pressure
boilers, low-pressure water heaters or other
water heating systems. It must not be connect-
ed to these.
If in doubt, please contact an install-
er or specialist consultant. Any use
other than those described above
or modification of the product is not
permitted and may result in dam-
age. Improper use can also result
in potentially fatal hazards and
injuries. The product is intended for
private use only, not for medical or
commercial use. The manufactur-
er accepts no liability for damage
caused by improper use.
10 GB/IE/NI
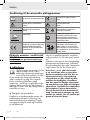
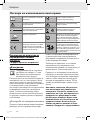
WARNING!
IPX4
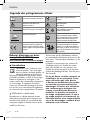
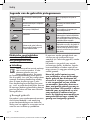
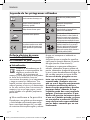
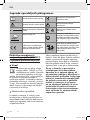
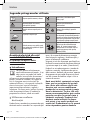
Key to pictograms used
Read the installation and operating
instructions! Risk of death and injury for infants and
children!
Observe the warnings and safety
instructions! Warning of electric shock!
Risk of death!
There is a risk of serious injury or death! Dispose of the packaging and device in an
environmentally friendly manner!
Splash-proof The fitting complies with protection class I.
Protection class I refers to equipment with a
protective conductor connection. Devices with this
protection class must have a protective conductor
connected to the housing.
The SGS label confirms that the product is safe
when used as intended. The symbol "GS" stands
for tested safety. Products marked with this
symbol comply with the requirements of the
German Product Safety Act (ProdSG).
Products marked with this symbol comply
with all applicable Community regulations of
the European Economic Area.
Introduction
402407_2204-6823550-8-Elektrische_Edelstahlarmatur-full-LB8-man.indd 10402407_2204-6823550-8-Elektrische_Edelstahlarmatur-full-LB8-man.indd 10 26.07.22 06:4326.07.22 06:43

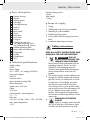
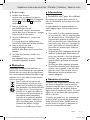
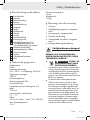
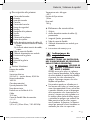
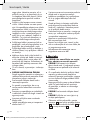
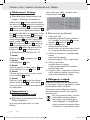
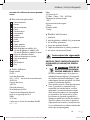
•• Parts description
1Aerator housing
2Aerator
3Aerator gasket
4Cartridge
5Cartridge housing
6Lock nut
7Screws
8Lever wheel
9Screw
10 Hand lever
11 Lever cover
12 Fixing nut
13 Cable guide rings (2x)
a) Cable guide ring, white
b) Cable guide ring, chrome
14 Flexible connecting hose
15 Power cable with mains plug
16 Fitting body
17 Display
18 Fitting thread
19 Filter
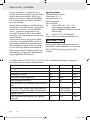
•• Technical specifications
Model number:
LH-SH-1
Power supply:
220 – 240 V ~ AC voltage, 50/60 Hz
Power consumption:
3400 W
Protection class I
Ingress protection rating IPX4
Power connection:
Socket with a 16 A fuse
Cable:
1250 mm
Connection flex. connecting hose:
3/8" – 1/2"
Flow rate:
2.5 l to 6 l (1.5 bar - 5 bar / 150 - 500 kPa)
Max. water temperature:
~55 °C
Minimum flow pressure:
1.5 bar
Total weight:
1,165 g
•• Scope of supply
1. Fitting
2. Cable guide rings (2x), pre-assembled
3. Mounting kit, pre-assembled
4. Flexible connecting hose
5. Power cable with mains plug, pre-assem-
bled
6. Installation/operating instructions
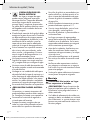
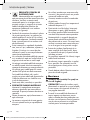
Safety instructions
KEEP ALL SAFETY INSTRUCTIONS AND
MANUALS FOR FUTURE REFERENCE.
WARNING!
RISK OF
DEATH AND ACCIDENT FOR
INFANTS AND CHILDREN!
Never leave children unattended with the
packaging material. There is a risk of
suffocation with packaging material.
Children often underestimate the dangers.
Always keep children away from the
product.
This product may be used by children over
the age of 8 and by people with reduced
physical, sensory or mental skills or a lack
of experience or knowledge, provided
that they are supervised or have been
instructed in how to use the product safely,
and are fully aware of the consequent risks
of use. Children must not play with the
product. Cleaning and user maintenance
must not be carried out by children without
supervision.
WARNING OF ELECTRIC
SHOCK!
Leaks or escaping water can lead
to a risk of fatal injury from electric shock.
Carefully check all connections for leaks
GB/IE/NI 11
Introduction / Safety instructions
402407_2204-6823550-8-Elektrische_Edelstahlarmatur-full-LB8-man.indd 11402407_2204-6823550-8-Elektrische_Edelstahlarmatur-full-LB8-man.indd 11 26.07.22 06:4326.07.22 06:43

and make sure that all electrical equipment
lines close to the sink unit are correctly and
safely installed.
The connection plug of the fitting must
fit into the socket; the plug must not be
changed in any way. Do not use adapter
plugs. Unmodified plugs and matching
sockets reduce the risk of electric shock.
Avoid contact with earthed surfaces such
as pipes, heaters, stoves and refrigerators.
There is an increased risk of electric shock
when your body is earthed.
Never immerse the connecting cable and
the fitting in water or other liquids and
make sure that they do not fall into the
water.
Never touch the connecting cable with wet
hands when it is connected to the mains
power supply.
Do not misuse the cable to pull the mains
plug out of the socket or similar. Keep the
cable away from heat, oil, sharp edges
or moving parts. Damaged or entangled
cables increase the risk of electric shock.
If in doubt, consult a specialist.
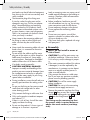
CAUTION! MATERIAL DAMAGE!
Improper assembly and handling of the
product can cause material damage. Have
the installation carried out by a specialist.
Switch off the water supply to your living
spaces before installation.
During installation, ensure that all seals are
correctly positioned on the sealing surfac-
es.
Do not use the fitting on low-pressure and
small electrical storage tanks or other
water heating systems
Only connect the fitting to cold water lines
Only use the product at ambient tempera-
tures above 0 °C.
If there is a risk of frost, shut off the water
supply and drain the fitting.
Do not use the product if it shows signs of
damage or its function is impaired.
Leaks or escaping water can cause consid-
erable material damage to the building or
contents. Therefore, check all connections
carefully for leaks.
Before installation, familiarise yourself
with all conditions on site, e.g. the existing
water connections and shut-off devices
Do not make any changes to the device!
Do not replace the connecting cables
yourself.
Do not carry out repairs yourself, but
appoint a specialist or contact after-sales
service to avoid any risks.
Only have faulty parts replaced with origi-
nal spare parts.
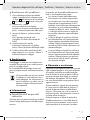
••Assembly
NOTE! Do not install in areas at
risk of frost!
CAUTION! Turn off the main water sup-
ply before installation. Otherwise, there is
a risk of injury and/or damage to proper-
ty.
If the mains connection cable of this device
is damaged, it must be replaced by the
manufacturer, its customer service depart-
ment or an equally qualified person in
order to avoid hazards.
Only connect the device to a cold water
line! If you have any questions or doubts,
please consult a plumbing specialist.
CAUTION! Turn off the water supply
before installation.
CAUTION! Do not twist the connecting
hose and do not apply tension to it.
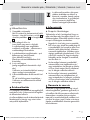
Remove the protective cap from the fitting
thread 18, then unscrew the fixing nut 12
and the two cable guide rings 13a and
13b from the fitting thread 18.
The fitting can be mounted so that
the power cable is routed below or
above the work surface (worktop,
sink).
12 GB/IE/NI
Safety instructions / Assembly
402407_2204-6823550-8-Elektrische_Edelstahlarmatur-full-LB8-man.indd 12402407_2204-6823550-8-Elektrische_Edelstahlarmatur-full-LB8-man.indd 12 26.07.22 06:4326.07.22 06:43

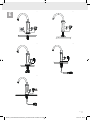
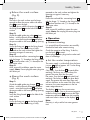
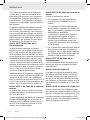
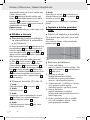
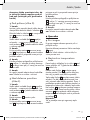
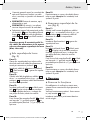
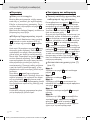
•• Below the work surface
(Fig. D)
Step 1:
The hole in the work surface must be large
enough to allow the power cable with mains
plug 15 to pass through.
Insert the power cable with mains plug 15 and
the fitting thread 18 into the hole of the work
surface
Step 2:
Guide the cable guide ring white 13a from
below– with the closed surface facing down-
wards– onto the fitting thread 18 and place
the power cable in the corresponding opening.
Step 3:
Screw the fixing nut 12 onto the fitting thread
18. Make sure that the housing is firmly
mounted on the work surface and tighten the
fastening nut again if necessary.
Step 4:
Fasten the enclosed flex. connecting hose 14
with the larger 1/2" thread on the fitting thread
18, and on the other side (3/8" thread) on the
cold water valve.
Step 5:
After successful installation, open the water
supply. Note: Do not plug the mains plug into
the socket yet!
•• Above the work surface
(Fig. E)
Step 1:
Guide the cable guide ring chrome 13b from
below– with the closed surface facing down-
wards– onto the fitting thread 18 and place
the power cable in the corresponding opening.
Step 2:
Insert the fitting thread 18 into the hole of the
work surface
Step 3:
Screw the fixing nut 12 onto the fitting thread
18. Make sure that the housing is firmly
mounted on the work surface and tighten the
fastening nut again if necessary.
Step 4:
Fasten the enclosed flex. connecting hose 14
with the larger 1/2" thread on the fitting thread
18, and on the other side (3/8" thread) on the
cold water valve.
Step 5:
After successful installation, open the water
supply. Note: Do not plug the mains plug into
the socket yet!
•• Operation
•• Commissioning
It is essential that all connections are carefully
checked for leaks after commissioning.
Check the operation of the fitting. To do this,
turn the lever 10 forwards.
Do not plug the mains plug into the socket until
there is no leakage.
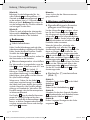
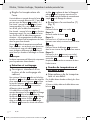
•• Set the water temperature
The water supply is switched off when the lever
is at an 10 angle of approx. 45°C to the fitting
body, 16 symbol "0"
Cold water: Turn the lever 10 forwards (blue
marking). The lower you turn the lever, the
greater the water flow (the flow rate)
Hot water: Turn the lever 10 backwards (red
marking). The further you turn the lever back-
wards, the greater the water flow (flow rate)
will be. Attention: as the water flow (flow rate)
increases, the water temperature in the hot
water range decreases.
The display 17 shows the current water
temperature. Note: Due to the measuring point
inside the fitting body 16, there may be slight
temperature deviations between the escaping
water and what is shown on the display 17.
Note:
Electricity is only used for hot water genera-
tion!
GB/IE/NI 13
Assembly / Operation
402407_2204-6823550-8-Elektrische_Edelstahlarmatur-full-LB8-man.indd 13402407_2204-6823550-8-Elektrische_Edelstahlarmatur-full-LB8-man.indd 13 26.07.22 06:4326.07.22 06:43

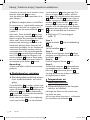
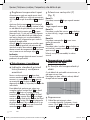
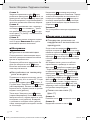
•• Cleaning and maintenance
•• Standard note on fitting care
and cleaning
To clean the aerator, 2 unscrew the aerator
housing 1 anticlockwise and remove the
aerator 2 and aerator gasket 3. Remove
limescale residues from the aerator 2 and
screw the individual parts together again.
If the water flow becomes weaker or irregular,
the filter 19 in the fitting thread should be 18
cleaned. To clean it, loosen the flex. connect-
ing hose 14 from the fitting thread 18 and
remove the filter 19 from the fitting thread
18 with a finger or a blunt object. Remove
limescale residues from the filter 19 and place
it back into the fitting thread 18 with the open-
ing facing downwards. Then fasten the flex.
connecting hose 14 on the fitting thread.
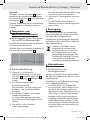
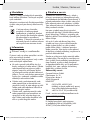
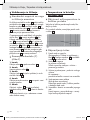
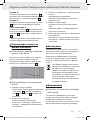
•• Replace cartridge (7) (Fig. F)
Step 1:
Unscrew the lever 10 from the lever cover 11.
Step 2:
Pull off the lever cover 11
Step 3:
Unscrew the screw inside 9 (screwdriver not
included) and pull out the lever wheel 8
Step 4:
Unscrew the lock nut anticlockwise 6
Step 5:
Unscrew the 6 screws 7 (screwdriver not in-
cluded), remove the cartridge housing 5 and
then the cartridge 4.
Replace the cartridge and reassemble in
reverse order.
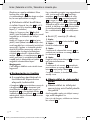
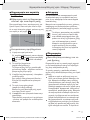
•• Temperature and
water flow curve
•• Dependence on temperature
and flow rate
The greater the flow rate of the hot water, the
cooler the water.
If the water only reaches lukewarm tempera-
ture, reduce the water flow using the lever 10
4000
3500
3000
2500
2000
1500
1000
500 4500 5000 5500 6000
5
10
15
20
25
30
35
40
45
50
55
60
65
70
75
80
85
90
95
(mL
)
100
0
Temperature
Water flow
(°C)
•• Troubleshooting
1) Water flow becomes weaker:
see chapter Cleaning and maintenance–
The filter 18 in the fitting thread 18 and
the aerator 2 should be cleaned.
2) The water does not heat up
(no display):
the mains plug is not correctly seated in the
socket– correct the position of the mains
plug
3) The socket is faulty– try another socket:
there is no mains voltage–
Check the fuse in the fuse box
4) The water only reaches lukewarm temper-
ature
(despite the display):
reduce the water flow/flow rate in the hot
water range
5) Fuse in fuse box has tripped:
Too many devices in a circuit– reduce the
number of connected devices.
14 GB/IE/NI
Cleaning and maintenance / Temperature and water flow curve
402407_2204-6823550-8-Elektrische_Edelstahlarmatur-full-LB8-man.indd 14402407_2204-6823550-8-Elektrische_Edelstahlarmatur-full-LB8-man.indd 14 26.07.22 06:4326.07.22 06:43

GB/IE/NI 15
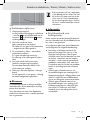
•• Disposal
The packaging is made of environmentally
friendly materials, which you can dispose of at
the local recycling points.
Contact your local authority or municipality for
information on disposing of the product at the
end of its service life.
If your product has reached the end
of its useful life, do not dispose of it
with household waste, but dispose of
it in the correct way to help protect
the environment. You can find
information on collection points and
their opening hours from your
responsible authority.
••Information
•• Suitability of tap water for
drinking
Check with your local authorities for informa-
tion the drinkability of the water in your city/
municipality.
In general, the following recommendation
applies to the drinkability of tap water:
Allow water from pipes to run for a short
time if it has stagnated in the pipes for
more than four hours. Do not use stagnant
water to prepare food and for drinking,
especially when feeding infants. Failure to
follow these recommendations may lead to
discomfort. Fresh water can be recognised
by the fact that it comes out of the tap
noticeably cooler than stagnant water.
Do not use stagnant water from
chrome-plated pipes for food and/or per-
sonal care if you are allergic to nickel. This
water can be contain high levels of nickel
and cause an allergic reaction.
Do not use stagnant water from
chrome-plated pipes for food and/or per-
sonal care if you are allergic to nickel. This
water can be contain high levels of nickel
and cause an allergic reaction.
••Warranty and service
The product has been carefully produced in
accordance with strict quality guidelines and
carefully tested before delivery. In the event of
defects in this product, you have legal rights
against the seller of the product. These statuto-
ry rights are not limited by our warranty as set
out below.
This product is covered under warranty for 3
years from the date of purchase. The warranty
period begins on the date of purchase. Please
keep the original receipt safe. This document is
required as proof of purchase.
If a material or manufacturing defect occurs
within 3 years of the date of purchase of this
product, we will repair or replace the product
for you, at our discretion, free of charge. This
warranty is rendered void if the product has
been damaged, used incorrectly or not main-
tained correctly.
The warranty applies to material or manufac-
turing defects. This warranty does not cover
product parts that are subject to normal wear
and tear (e.g. batteries) and can therefore be
regarded as wear parts, or damage to fragile
parts, e.g. switches, batteries or those made
of glass.
After-sales service
Conmetall Meister GmbH
Oberkamper Str 39
Incoming goods gate 3
42349 Wuppertal
GERMANY
Tel. 0202 24750 430 / 431 / 432
(call costs according to the landline
tariff of your service provider)
Tel. +800 34 99 67 53 (from abroad)
E-mail: meister-service@conmetallmeister.de
IAN 402407_2204
Please keep the receipt and the article number
(e.g. IAN 402407_2204) as proof of purchase
for any inquiries.
Disposal / Information / Warranty and service
402407_2204-6823550-8-Elektrische_Edelstahlarmatur-full-LB8-man.indd 15402407_2204-6823550-8-Elektrische_Edelstahlarmatur-full-LB8-man.indd 15 26.07.22 06:4326.07.22 06:43

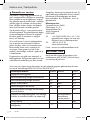
16 GB/IE/NI
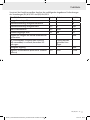
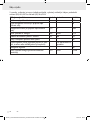
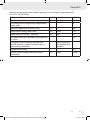
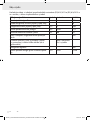
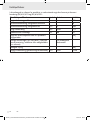
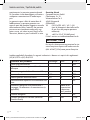
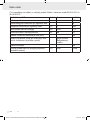
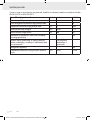
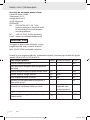
Product information
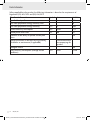
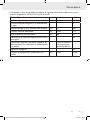
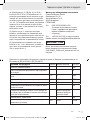
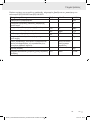
Where applicable to the product, the following information is based on the requirements of
Regulations (EU) 812/2013 and (EU) 814/2013
Product information Symbols Unit LH-SH-1
Specified load profile 3XS
Hot water preparation energy efficiency class A
Hot water preparation energy efficiency ŋWH %38,9
Annual electricity consumption AEC kWh 7 7,9
Sound power level inside LWA dB 15
Indication of the ability to operate outside peak
hours No
Special precautions to be taken during assembly,
installation or maintenance (if applicable): See documentation
accompanying the
product
Intelligent control No
Daily electricity consumption (average climate
conditions) Qelec kWh 0,358
402407_2204-6823550-8-Elektrische_Edelstahlarmatur-full-LB8-man.indd 16402407_2204-6823550-8-Elektrische_Edelstahlarmatur-full-LB8-man.indd 16 26.07.22 06:4326.07.22 06:43

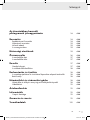
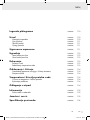
DE/AT/CH 17
Legende der verwendeten Piktogramme Seite 18
Einleitung Seite 18
Bestimmungsgemäße Verwendung Seite 18
Teilebeschreibung Seite 19
Technische Daten Seite 19
Lieferumfang Seite 19
Sicherheitshinweise Seite 19
Montage Seite 21
Unterhalb der Arbeitsfläche Seite 21
Oberhalb der Arbeitsfläche Seite 21
Bedienung Seite 22
Inbetriebnahme Seite 22
Wassertemperatur einstellen Seite 22
Wartung und Reinigung Seite 22
Standardhinweis Armatur pflegen und Reinigung Seite 22
Kartusche austauschen Seite 22
Temperatur und Wasserdurchflusskurve Seite 23
Abhängigkeit von Temperatur und Durchflussmenge Seite 23
Problembehebung Seite 23
Entsorgung Seite 23
Informationen Seite 23
Trinkbarkeit von Leitungswasser Seite 23
Garantie und Service Seite 24
Produktdaten Seite 25
Inhaltsverzeichnis
402407_2204-6823550-8-Elektrische_Edelstahlarmatur-full-LB8-man.indd 17402407_2204-6823550-8-Elektrische_Edelstahlarmatur-full-LB8-man.indd 17 26.07.22 06:4326.07.22 06:43

Elektrische Edelstahlarmatur
(LH-SH-1)
mit integriertem Durchlauferhitzer
••Einleitung
Wir beglückwünschen Sie zum Kauf
Ihres neuen Produkts. Sie haben
sich damit für ein hochwertiges
Produkt entschieden. Die Montage-/
Bedienungsanleitung ist Bestandteil dieses
Produkts. Bitte lesen Sie vor der Installation
diese Montage-/Bedienungsanleitung
vollständig durch und beachten Sie die
Hinweise. Diese Anleitung enthält wichtige
Montage-, Einstell- und Pflegeinformationen.
Bewahren Sie die Montage-/Bedienungsan-
leitung deshalb gut auf und geben Sie diese
auch an eventuelle Nachbesitzer weiter.
•• Bestimmungsgemäße
Verwendung
Bei dem Produkt handelt es sich um eine
wassersparende Armatur, die ausschließlich
zum Anschluss an eine Kaltwasser- und eine
Stromleitung zur Regulierung und Erwärmung
des Wassers und zur Installation an Spülti-
schen bestimmt ist.
Es ist sicherzustellen, dass die Vorgaben zum
Stromanschluss und Wasserdruck (siehe „Tech-
nische Daten“) befolgt werden.
Das Produkt ist weder für Zentralheizungen,
Durchlauferhitzer, Druckboiler, Niederdruck-
Warmwasserbereiter oder andere Wasser-
erwärmungssysteme geeignet. Es darf damit
nicht verbunden werden.
Wenden Sie sich im Zweifelsfall an
einen Installateur oder Fachberater.
Eine andere Verwendung als oben
beschrieben oder eine Veränderung
des Produkts ist nicht zulässig und
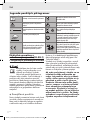
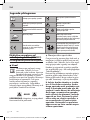
WARNUNG!
IPX4
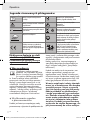
Legende der verwendeten Piktogramme
Lesen Sie die Montage- und Bedienungs-
anleitung! Lebens- und Unfallgefahr für Kleinkinder
und Kinder!
Beachten Sie die Warn- und Sicherheits-
hinweise! Warnung vor elektrischem Schlag!
Lebensgefahr!
Es besteht die Gefahr von schweren oder
tödlichen Verletzungen! Entsorgen Sie Verpackung und Gerät
umweltgerecht!
Spritzwassergeschützt Die Armatur entspricht der Schutzklasse I.
Die Schutzklasse I bezeichnet Betriebsmittel mit
einem Schutzleiteranschluss. Geräte mit dieser
Schutzklasse müssen am Gehäuse einen Schutz-
leiter angeschlossen haben. Dieser Schutzleiter ist
mit dem Potentialausgleich der Elektroinstallation
verbunden und legt das Betriebsmittel auf das
Erdpotential.
Das SGS-Siegel bestätigt, dass das Produkt bei
bestimmungsgemäßem Gebrauch sicher ist.
Das Symbol „GS“ steht für geprüfte Sicherheit.
Produkte, die mit diesem Zeichen gekennzeich-
net sind, entsprechen den Anforderungen des
deutschen Produktsicherheitsgesetzes (ProdSG).
Mit diesem Symbol gekennzeichnete
Produkte erfüllen alle anzuwendenden
Gemeinschaftsvorschriften des Europäischen
Wirtschaftsraums.
Einleitung
18 DE/AT/CH
402407_2204-6823550-8-Elektrische_Edelstahlarmatur-full-LB8-man.indd 18402407_2204-6823550-8-Elektrische_Edelstahlarmatur-full-LB8-man.indd 18 26.07.22 06:4326.07.22 06:43

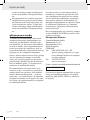
kann zu Beschädigungen führen. Da-
rüber hinaus können aus einer nicht
bestimmungsgemäßen Verwendung
lebensgefährliche Gefahren und Ver-
letzungen resultieren. Das Produkt
ist nur zur Anwendung im privaten
Bereich, nicht aber für den medizini-
schen oder kommerziellen Gebrauch
vorgesehen. Für durch unsachgemä-
ße Verwendung entstandene Schä-
den übernimmt der Hersteller keine
Haftung.
••Teilebeschreibung
1Gehäuse Luftsprudler
2Luftsprudler
3Luftsprudlerdichtung
4Kartusche
5Kartuschengehäuse
6Sicherungsmutter
7Schrauben
8Hebelrad
9Schraube
10 Hebel
11 Hebelabdeckung
12 Befestigungsmutter
13 Kabelführungsringe (2x)
a) Kabelführungsring, weiß
b) Kabelführungsring, chrom
14 Flexibler Anschlussschlauch
15 Stromkabel mit Netzstecker
16 Armaturenkörper
17 Display
18 Armaturengewinde
19 Filter
•• Technische Daten
Modellnummer:
LH-SH-1
Spannungsversorgung:
220 – 240 V ~ Wechselspannung, 50/60 Hz
Leistungsaufnahme:
3400 W
Schutzklasse I
Schutzart IPX4
Stromanschluss:
Steckdose mit einer 16 A Sicherung
Kabel:
1250 mm
Anschluss flex. Anschlussschlauch:
3/8" – 1/2"
Durchfluss:
2,5 l bis 6 l (1,5 bar - 5 bar / 150 – 500 kPa)
Max. Wassertemperatur:
~55 °C
Mindestfließdruck:
1,5 bar
Gewicht gesamt:
1.165 g
•• Lieferumfang
1. Armatur
2. Kabelführungsringe (2x), vormontiert
3. Befestigungssatz, vormontiert
4. Flexibler Anschlussschlauch
5. Stromkabel mit Netz-Stecker, vormontiert
6. Montage / Bedienungsanleitung
Sicherheitshinweise
BEWAHREN SIE ALLE SICHERHEITS-
HINWEISE UND ANWEISUNGEN FÜR
DIE ZUKUNFT AUF.
WARNUNG!
LEBENS-
UND UNFALLGEFAHR FÜR
KLEINKINDER UND KINDER!
Lassen Sie Kinder niemals unbeaufsichtigt
mit dem Verpackungsmaterial. Es besteht
Erstickungsgefahr durch Verpackungsmate-
rial. Kinder unterschätzen häufig die
Gefahren. Halten Sie Kinder stets vom
Produkt fern.
Dieses Produkt kann von Kindern ab
8Jahren und darüber sowie von Personen
mit verringerten physischen, sensorischen
Einleitung / Sicherheitshinweise
DE/AT/CH 19
402407_2204-6823550-8-Elektrische_Edelstahlarmatur-full-LB8-man.indd 19402407_2204-6823550-8-Elektrische_Edelstahlarmatur-full-LB8-man.indd 19 26.07.22 06:4326.07.22 06:43

oder mentalen Fähigkeiten oder Mangel
an Erfahrung und Wissen benutzt werden,
wenn sie beaufsichtigt oder bezüglich des
sicheren Gebrauchs des Produktes unter-
wiesen wurden und die daraus resultie-
renden Gefahren verstehen. Kinder dürfen
nicht mit dem Produkt spielen. Reinigung
und Benutzerwartung dürfen nicht von Kin-
dern ohne Beaufsichtigung durchgeführt
werden.
VORSICHT VOR ELEKTRI-
SCHEM SCHLAG!
Undichtigkeiten oder Wasseraus-
tritt können zu Lebensgefahr durch
elektrischen Schlag führen. Prüfen Sie alle
Verbindungen sorgfältig auf Dichtigkeit
und stellen Sie sicher, dass alle Leitungen
von elektrischen Geräten in der Nähe des
Spültischs korrekt und sicher installiert sind.
Der Anschlussstecker der Armatur muss in
die Steckdose passen. Der Stecker darf in
keiner Weise verändert werden. Verwen-
den Sie keine Adapterstecker. Unverän-
derte Stecker und passende Steckdosen
verringern das Risiko eines elektrischen
Schlages.
Vermeiden Sie Kontakt mit geerdeten
Oberflächen, wie von Rohren, Heizungen,
Herden und Kühlschränken. Es besteht ein
erhöhtes Risiko durch elektrischen Schlag,
wenn Ihr Körper geerdet ist.
Die Anschlussleitung und die Armatur
niemals in Wasser oder andere Flüssigkei-
ten eintauchen und sicherstellen, dass diese
nicht ins Wasser fallen.
Die Anschlussleitung niemals mit feuchten
Händen berühren, wenn sie an das Strom-
leitungsnetz angeschlossen ist.
Zweckentfremden Sie das Kabel nicht, um
den Netzstecker aus der Steckdose zu zie-
hen oder ähnliches. Halten Sie das Kabel
fern von Hitze, Öl, scharfen Kanten oder
sich bewegenden Geräteteile. Beschädigte
oder verwickelte Kabel erhöhen das Risiko
eines elektrischen Schlages.
Ziehen Sie im Zweifelsfall eine Fachkraft zu
Rate.
VORSICHT! SACHSCHÄDEN!
Durch unsachgemäße Montage und Hand-
habung des Produkts können Sachschäden
verursacht werden. Lassen Sie die Monta-
ge von einer Fachkraft durchführen.
Stellen Sie vor der Montage die Wasser-
zufuhr zu Ihren Wohnräumen ab.
Achten Sie bei der Montage darauf, dass
alle Dichtungen korrekt auf den Dichtflä-
chen aufliegen.
Verwenden Sie die Armatur nicht an Nie-
derdruck- und Elektrokleinspeichern oder
anderen Wassererwärmungssystemen
Schließen Sie die Armatur nur an Kaltwas-
serleitungen an
Verwenden Sie das Produkt nur bei einer
Umgebungstemperatur über 0 °C. Nutzen
Sie das Produkt nicht, wenn die Gefahr
besteht, dass das Wasser in der Armatur
gefroren ist.
Unterbrechen Sie bei Frostgefahr die Was-
serzufuhr und entleeren Sie die Armatur.
Verwenden Sie das Produkt nicht, wenn es
Beschädigungen aufweist oder in seiner
Funktionsweise beeinträchtigt ist.
Undichtigkeiten und Wasseraustritt können
zu erheblichen Sachschäden an Gebäu-
den und Hausrat führen. Prüfen Sie daher
alle Verbindungen sorgfältig auf Dichtig-
keit.
Machen Sie sich vor der Installation mit
allen Gegebenheiten vor Ort vertraut, z. B.
den vorhandenen Wasseranschlüssen und
den Absperrvorrichtungen
Nehmen Sie keine Änderungen am Gerät
vor! Tauschen Sie die Anschlussleitungen
nicht selbstständig aus.
Führen Sie Reparaturen nicht selber aus,
sondern beauftragen Sie eine Fachkraft
oder wenden Sie sich an den Kundenser-
vice um Gefährdungen zu vermeiden.
Sicherheitshinweise
20 DE/AT/CH
402407_2204-6823550-8-Elektrische_Edelstahlarmatur-full-LB8-man.indd 20402407_2204-6823550-8-Elektrische_Edelstahlarmatur-full-LB8-man.indd 20 26.07.22 06:4326.07.22 06:43
Pagina se încarcă ...
Pagina se încarcă ...
Pagina se încarcă ...
Pagina se încarcă ...
Pagina se încarcă ...
Pagina se încarcă ...
Pagina se încarcă ...
Pagina se încarcă ...
Pagina se încarcă ...
Pagina se încarcă ...
Pagina se încarcă ...
Pagina se încarcă ...
Pagina se încarcă ...
Pagina se încarcă ...
Pagina se încarcă ...
Pagina se încarcă ...
Pagina se încarcă ...
Pagina se încarcă ...
Pagina se încarcă ...
Pagina se încarcă ...
Pagina se încarcă ...
Pagina se încarcă ...
Pagina se încarcă ...
Pagina se încarcă ...
Pagina se încarcă ...
Pagina se încarcă ...
Pagina se încarcă ...
Pagina se încarcă ...
Pagina se încarcă ...
Pagina se încarcă ...
Pagina se încarcă ...
Pagina se încarcă ...
Pagina se încarcă ...
Pagina se încarcă ...
Pagina se încarcă ...
Pagina se încarcă ...
Pagina se încarcă ...
Pagina se încarcă ...
Pagina se încarcă ...
Pagina se încarcă ...
Pagina se încarcă ...
Pagina se încarcă ...
Pagina se încarcă ...
Pagina se încarcă ...
Pagina se încarcă ...
Pagina se încarcă ...
Pagina se încarcă ...
Pagina se încarcă ...
Pagina se încarcă ...
Pagina se încarcă ...
Pagina se încarcă ...
Pagina se încarcă ...
Pagina se încarcă ...
Pagina se încarcă ...
Pagina se încarcă ...
Pagina se încarcă ...
Pagina se încarcă ...
Pagina se încarcă ...
Pagina se încarcă ...
Pagina se încarcă ...
Pagina se încarcă ...
Pagina se încarcă ...
Pagina se încarcă ...
Pagina se încarcă ...
Pagina se încarcă ...
Pagina se încarcă ...
Pagina se încarcă ...
Pagina se încarcă ...
Pagina se încarcă ...
Pagina se încarcă ...
Pagina se încarcă ...
Pagina se încarcă ...
Pagina se încarcă ...
Pagina se încarcă ...
Pagina se încarcă ...
Pagina se încarcă ...
Pagina se încarcă ...
Pagina se încarcă ...
Pagina se încarcă ...
Pagina se încarcă ...
Pagina se încarcă ...
Pagina se încarcă ...
Pagina se încarcă ...
Pagina se încarcă ...
Pagina se încarcă ...
Pagina se încarcă ...
Pagina se încarcă ...
Pagina se încarcă ...
Pagina se încarcă ...
Pagina se încarcă ...
Pagina se încarcă ...
Pagina se încarcă ...
Pagina se încarcă ...
Pagina se încarcă ...
Pagina se încarcă ...
Pagina se încarcă ...
Pagina se încarcă ...
Pagina se încarcă ...
Pagina se încarcă ...
Pagina se încarcă ...
Pagina se încarcă ...
Pagina se încarcă ...
Pagina se încarcă ...
Pagina se încarcă ...
Pagina se încarcă ...
Pagina se încarcă ...
Pagina se încarcă ...
Pagina se încarcă ...
Pagina se încarcă ...
Pagina se încarcă ...
Pagina se încarcă ...
Pagina se încarcă ...
Pagina se încarcă ...
Pagina se încarcă ...
Pagina se încarcă ...
Pagina se încarcă ...
Pagina se încarcă ...
Pagina se încarcă ...
Pagina se încarcă ...
Pagina se încarcă ...
Pagina se încarcă ...
Pagina se încarcă ...
Pagina se încarcă ...
Pagina se încarcă ...
Pagina se încarcă ...
-
 1
1
-
 2
2
-
 3
3
-
 4
4
-
 5
5
-
 6
6
-
 7
7
-
 8
8
-
 9
9
-
 10
10
-
 11
11
-
 12
12
-
 13
13
-
 14
14
-
 15
15
-
 16
16
-
 17
17
-
 18
18
-
 19
19
-
 20
20
-
 21
21
-
 22
22
-
 23
23
-
 24
24
-
 25
25
-
 26
26
-
 27
27
-
 28
28
-
 29
29
-
 30
30
-
 31
31
-
 32
32
-
 33
33
-
 34
34
-
 35
35
-
 36
36
-
 37
37
-
 38
38
-
 39
39
-
 40
40
-
 41
41
-
 42
42
-
 43
43
-
 44
44
-
 45
45
-
 46
46
-
 47
47
-
 48
48
-
 49
49
-
 50
50
-
 51
51
-
 52
52
-
 53
53
-
 54
54
-
 55
55
-
 56
56
-
 57
57
-
 58
58
-
 59
59
-
 60
60
-
 61
61
-
 62
62
-
 63
63
-
 64
64
-
 65
65
-
 66
66
-
 67
67
-
 68
68
-
 69
69
-
 70
70
-
 71
71
-
 72
72
-
 73
73
-
 74
74
-
 75
75
-
 76
76
-
 77
77
-
 78
78
-
 79
79
-
 80
80
-
 81
81
-
 82
82
-
 83
83
-
 84
84
-
 85
85
-
 86
86
-
 87
87
-
 88
88
-
 89
89
-
 90
90
-
 91
91
-
 92
92
-
 93
93
-
 94
94
-
 95
95
-
 96
96
-
 97
97
-
 98
98
-
 99
99
-
 100
100
-
 101
101
-
 102
102
-
 103
103
-
 104
104
-
 105
105
-
 106
106
-
 107
107
-
 108
108
-
 109
109
-
 110
110
-
 111
111
-
 112
112
-
 113
113
-
 114
114
-
 115
115
-
 116
116
-
 117
117
-
 118
118
-
 119
119
-
 120
120
-
 121
121
-
 122
122
-
 123
123
-
 124
124
-
 125
125
-
 126
126
-
 127
127
-
 128
128
-
 129
129
-
 130
130
-
 131
131
-
 132
132
-
 133
133
-
 134
134
-
 135
135
-
 136
136
-
 137
137
-
 138
138
-
 139
139
-
 140
140
-
 141
141
-
 142
142
-
 143
143
-
 144
144
-
 145
145


în alte limbi
- français: LIVARNO 402407 Le manuel du propriétaire
- slovenčina: LIVARNO 402407 Návod na obsluhu
- italiano: LIVARNO 402407 Manuale del proprietario
Lucrări conexe
Alte documente
-
ESAB Thermal Dynamics Cutmaster 60i Plasma Cutting System Manual de utilizare
-
-
Sames SFLOW Manual de utilizare
-
ESAB A40i, A60i Plasma Cutting System Manual de utilizare
-
-
Gardena 1759 Manual de utilizare
-
-
-
 Thermo Fisher Scientific ThermoFlex Recirculating Chillers Manual de utilizare
-
