OWIM GmbH & Co. KG
Stiftsbergstraße 1
74167 Neckarsulm
GERMANY
Model No.: HG04892
Version: 05/2023
IAN 419349_2210

IAN 419349_2210
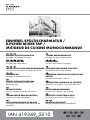
EINHEBEL-SPÜLTISCHARMATUR/
KITCHEN MIXER TAP /
MITIGEUR DE CUISINE MONOCOMMANDE
EINHEBEL-SPÜLTISCHARMATUR
Montage- und Sicherheitshinweise
KITCHEN MIXER TAP
Assembly and safety advice
MITIGEUR DE CUISINE MONOCOMMANDE
Instructions de montage et consignes de sécurité
MENGKRAAN
Montage- en veiligheidsinstructies
BATERIA ZLEWOZMYWAKOWA
Wskazówki dotyczące montażu oraz
bezpieczeństwa
PÁKOVÁ BATERIE
Pokyny k montáži a bezpečnostní pokyny
JEDNOPÁKOVÁ DREZOVÁ BATÉRIA
Pokyny pre montáž a bezpečnosť
GRIFO MONOMANDO DE COCINA
Instrucciones de montaje y de advertencias de
seguridad
1-GREBS KØKKENARMATUR
Montage- og sikkerhedsanvisninger
MISCELATORE
Istruzioni di sicurezza e montaggio
EGYKAROS MOSOGATÓ CSAPTELEP
Használati- és biztonsági utasítások
ENOROČNA ARMATURA ZA POMIVALNO
KORITO
Navodila za montažo in varnost
JEDNORUČNA MJEŠALICA ZA SUDOPER
Napomene za montažu i sigurnosne napomene
BATERIE MONOCOMANDĂ
Instrucţiuni de montare și de siguranţă
СМЕСИТЕЛ С ИЗТЕГЛЯЩ СЕ ДУШ
Инструкции за монтаж и безопасност
ΜΠΑΤΑΡΊΑ ΚΟΥΖΊΝΑΣ
Οδηγίε συναρολόγηση και ασφάλεια

DE/AT/CH Montage- und Sicherheitshinweise Seite 5
GB/IE/NI/CY/MT Assembly and safety advice Page 11
FR/BE/CH Instructions de montage et consignes de sécurité Page 17
NL/BE Montage- en veiligheidsinstructies Pagina 24
PL Wskazówki dotyczące montażu oraz bezpieczeństwa Strona 30
CZ Pokyny k montáži a bezpečnostní pokyny Strana 36
SK Pokyny pre montáž a bezpečnosť Strana 42
ES Instrucciones de montaje y de advertencias de seguridad Página 48
DK Montage- og sikkerhedsanvisninger Side 54
IT/MT/CH Istruzioni di sicurezza e montaggio Pagina 60
HU Használati- és biztonsági utasítások Oldal 66
SI Navodila za montažo in varnost Stran 72
HR Napomene za montažu i sigurnosne napomene Stranica 79
RO Instrucţiuni de montare și de siguranţă Pagina 85
BG Инструкции за монтаж и безопасност
Страница
91
GR/CY Οδηγίε συναρολόγηση και ασφάλεια Σελίδα
100

A B
C
D
14
13
12
16a
17a
16b
17b
7
24
4
5
9
8
10
11
15
14
27
13
2
13
19
18
6
E
max. 50 mm
F
G
H
J
10 2
1
0
2
K
80º
30º
9
12
27
16a
19
16b
8
9
10
11
15
123
20
21
22
23
7
24
25 26
19
12
19
12
I
22
23

A B
C
D
14
13
12
16a
17a
16b
17b
7
24
4
5
9
8
10
11
15
14
27
13
2
13
19
18
6
E
max. 50 mm
F
G
H
J
10 2
1
0
2
K
80º
30º
9
12
27
16a
19
16b
8
9
10
11
15
123
20
21
22
23
7
24
25 26
19
12
19
12
I
22
23

A B
C
D
14
13
12
16a
17a
16b
17b
7
24
4
5
9
8
10
11
15
14
27
13
2
13
19
18
6
E
max. 50 mm
F
G
H
J
10 2
1
0
2
K
80º
30º
9
12
27
16a
19
16b
8
9
10
11
15
123
20
21
22
23
7
24
25 26
19
12
19
12
I
22
23

A B
C
D
14
13
12
16a
17a
16b
17b
7
24
4
5
9
8
10
11
15
14
27
13
2
13
19
18
6
E
max. 50 mm
F
G
H
J
10 2
1
0
2
K
80º
30º
9
12
27
16a
19
16b
8
9
10
11
15
123
20
21
22
23
7
24
25 26
19
12
19
12
I
22
23

5
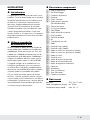
DE/AT/CH
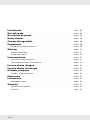
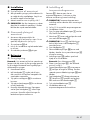
Einleitung ............................................................ Seite 6
Bestimmungsgemäße Verwendung.............................. Seite 6
Teilebeschreibung .................................................. Seite 6
Technische Daten ................................................... Seite 6
Sicherheitshinweise ................................................ Seite 7
Vorbereitung ........................................................ Seite 7
Benötigtes Werkzeug und Material ......................................... Seite 7
Montage ............................................................. Seite 8
Armatur installieren ..................................................... Seite 8
Armatur durchspülen .................................................... Seite 8
Bedienung ........................................................... Seite 8
In Betrieb nehmen ...................................................... Seite 8
Temperaturbegrenzung einstellen .......................................... Seite 8
Wassersparfunktion ............................................... Seite 9
Energiesparfunktion ............................................... Seite 9
Wartung und Reinigung ........................................... Seite 9
Armatur pflegen und reinigen ............................................. Seite 9
Entsorgung .......................................................... Seite 9
Informationen....................................................... Seite 9
Trinkbarkeit von Leitungswasser ............................................ Seite 9
Garantie ............................................................. Seite 10
Abwicklung im Garantiefall ............................................... Seite 10
Service ............................................................... Seite 10

6
DE/AT/CH
EINHEBEL-SPÜLTISCHARMATUR
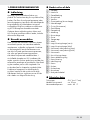
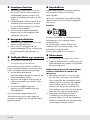
Einleitung
Wir beglückwünschen Sie zum Kauf Ihres
neuen Produkts. Sie haben sich damit für ein
hochwertiges Produkt entschieden. Machen
Sie sich vor der ersten Inbetriebnahme mit dem
Produkt vertraut. Lesen Sie hierzu aufmerksam
die nachfolgende Bedienungsanleitung und die
Sicherheitshinweise. Benutzen Sie das Produkt
nur wie beschrieben und für die angegebenen
Einsatzbereiche. Bewahren Sie diese Anleitung
an einem sicheren Ort auf. Händigen Sie alle
Unterlagen bei Weitergabe des Produktes an
Dritte mit aus.
Bestimmungsgemäße
Verwendung
Dieses Produkt ist für alle druckfesten Warm-
wasser systeme wie Zentralheizung, Durch-
lauf erhitzer, Druckboiler o.ä. geeignet. Nicht
geeignet ist es für Niederdruck-Warm wasser-
bereiter wie z.B. Holz- oder Kohlebadeöfen,
Öl-/Gasbadeöfen oder offene Elektrospeicher.
Im Zweifelsfall wenden Sie sich bitte an einen
Installateur oder Fachberater. Eine andere
Ver wendung als zuvor beschrieben oder eine
Ver änderung des Produkts ist nicht zulässig und
führt zur Beschädigung. Darüber hinaus können
weitere lebensgefährliche Gefahren und Ver let-
zun gen die Folgen sein. Das Produkt ist nur zur
Eigen anwendung, nicht für den medizinischen
oder kommerziellen Gebrauch vorgesehen. Für
durch unsachgemäße Verwendung entstandene
Schäden übernimmt der Hersteller keine Haftung.
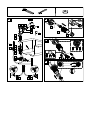
Teilebeschreibung
[1] 1 Einstellhebel
[2] 1 Arretierungsschraube
[3] 1 Kunststoffabdeckung
[4] 1 Brause
[5] 1 Armaturenkörper
[6] 1 Gummidichtung (Brauseschlauch)
[7] 1 Innensechskantschlüssel
[8] 1 O-Ring (vormontiert)
[9] 1 Gewinderohr
[]
1 Kunststoff-Dichtring
[]
1 Metallscheibe
[]
1 Brauseschlauch
[]
2 Schrauben
[]
1 Schlauchgewicht
[]
1 Mutter
[] 1 Langer Flexschlauch (heiß)
[] 1 Langer Flexschlauch (kalt)
[] 1 Überwurfmutter mit Dichtung (heiß)
[] 1 Überwurfmutter mit Dichtung (kalt)
[]
1 Überwurfmutter
[]
1 Kurzer Flexschlauch
[]
1 Kartuschen-Abdeckring
[]
1 Kartuschen-Sicherungsring
[]
1 Kartuschen-Einstellring
[]
1 Kartusche
[]
1 Mischdüse
[]
1 Umschalter (Mischdüse)
[]
1 Umschalter (Brause)
[]
1 Schutzabdeckung
Technische Daten
Anschlüsse: G3⁄8” (ca. 17 mm)
Mutter (Wasseranschluss): ca. 19 mm
Heißwassertemperatur: max.: 85 °C

7
DE/AT/CH
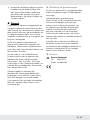
Sicherheitshinweise
WARNUNG! LEBENS-
UND UNFALLGEFAHR FÜR
KLEINKINDER UND KINDER!
Lassen Sie Kinder niemals
unbeaufsichtigt mit dem
Verpackungsmaterial. Es besteht
Erstickungsgefahr. Halten Sie das Produkt
von Kindern fern. Das Produkt ist kein
Spielzeug.
VORSICHT VOR
ELEKTRISCHEM SCHLAG!
Undichtigkeiten oder
Wasseraustritt können zu
Lebensgefahr durch elektrischen Schlag
führen. Prüfen Sie alle Verbindungen
sorgfältig auf Dichtigkeit. Stellen Sie zudem
sicher, dass alle Leitungen von elektrischen
Geräten korrekt und sicher installiert sind.
VORSICHT! VERLETZUNGSGEFAHR!
Stellen Sie sicher, dass alle Teile un-
beschä digt und sachgerecht montiert sind.
Bei un sach gemäßer Montage besteht
Verletzungs gefahr. Bitte beachten Sie,
dass Unterleg scheiben und Dichtungen
Verschleiß teile sind, welche von Zeit zu Zeit
ausgetauscht werden müssen. Beschädigte
Teile können die Sicherheit und Funktion
beeinflussen.
ACHTUNG! GEFAHR DER
SACHBESCHÄDIGUNG! Lassen Sie
die Montage nur durch fachkundige
Personen durchführen. Undichtigkeiten
oder Wasseraustritt können zu erheblichen
Sachschäden an Gebäude oder Hausrat
führen. Prüfen Sie daher alle Verbindungen
sorgfältig auf Dichtigkeit.
Achten Sie darauf, dass alle Dichtungen
den korrekten Sitz haben, um Wasseraustritt
durch Undichtigkeit zu verhindern.
Drehen Sie den Ausguss in die von Ihnen
gewünschte Position. Achten Sie darauf,
den Ausguss auf den Spültisch zu richten.
Anderenfalls kann Wasseraustritt zu
erheblichen Wasserschäden am Gebäude
führen.
VORSICHT! VERBRÜHUNGSGEFAHR!
Achten Sie bei der Warmwassereinstellung
darauf, dass die Temperatur des Wassers
nicht zu heiß eingestellt ist.
Machen Sie sich vor der Installation mit
allen Gegebenheiten vor Ort vertraut, z.B.
Wasseranschluss und Absperrvorrichtung.
Bitte lesen Sie diese Bedienungsanleitung vor
Montage und Gebrauch aufmerksam durch.
Bewahren Sie alle Sicherheitshinweise und
Anweisungen für die Zukunft auf!
Vorbereitung
Benötigtes Werkzeug und
Material
Die genannten Werkzeuge und Materialien
sind nicht im Lieferumfang enthalten. Es
handelt sich hierbei um unverbindliche
Angaben und Werte zur Orientierung. Die
Beschaffenheit des Materials richtet sich
nach den individuellen Gegebenheiten vor
Ort.
− Rohrzange/
verstellbarer Schraubenschlüssel
− Abdichtungsband
− Sechskantschlüssel S3
− Schlitzschraubendreher

8
DE/AT/CH
Montage
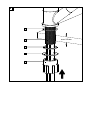
Armatur installieren
Stellen Sie die Haupt-Wasserzufuhr ab,
um Wasseraustritt durch Undichtigkeit
zu verhindern. Lassen Sie das restliche
Leitungswasser ablaufen.
Installieren Sie die Armatur, wie in Abbildung
A und F dargestellt.
m VORSICHT! Verbiegen Sie die
Flexschläuche nicht und bringen Sie sie
nicht unter Spannung. Ansonsten besteht die
Gefahr der Sachbeschädigung.
Armatur durchspülen
Um mögliche Verunreinigungen zu
beseitigen, muss die Armatur vor dem ersten
Gebrauch gespült werden. Gehen Sie dazu
wie folgt vor (s. Abb. H):
Schrauben Sie die Mischdüse
[]
ab.
Öffnen Sie die Haupt-Wasserzufuhr und
lassen Sie das Wasser zwei Minuten lang
laufen.
Schrauben Sie die Mischdüse
[]
anschließend wieder an.
Bedienung
In Betrieb nehmen
Hinweis: Spülen Sie nach längerem
Nichtgebrauch der Armatur die Leitungen
zunächst gründlich durch, um Trinkwasser-
Stagnation und Rückstände aufzulösen.
Öffnen Sie die Haupt-Wasserzufuhr.
Heben Sie den Einstellhebel [1] an und
schwenken Sie ihn nach rechts oder
links, um die Stärke bzw. Temperatur des
Wasserflusses zu regulieren.
Drücken Sie den Umschalter (Brause)
[]
,
um den Brausestrahl einzustellen.
Drücken Sie den Umschalter (Mischdüse)
[]
, um den Normalstrahl einzustellen.
Prüfen Sie den Betrieb der Mischbatterie.
Schwenken Sie dafür den Einstellhebel [1]
in alle erlaubten Positionen. Prüfen Sie die
Anschlüsse regelmäßig auf Dichtigkeit.
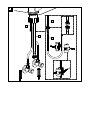
Temperaturbegrenzung
einstellen
Die Kartusche
[]
dieser Armatur verfügt über
eine Temperaturbegrenzung. Diese Funktion ist
werksseitig nicht aktiviert (neutrale Einstellung).
m VORSICHT! Verändern Sie die Einstellung
der Temperaturbegrenzung erst, nachdem
Sie die Armatur montiert haben.
Folgen Sie Abbildung G, um die
Temperaturbegrenzung einzustellen.
Stellen Sie die Haupt-Wasserzufuhr ab.
Entfernen Sie die Kunststoffabdeckung [3]
vorsichtig mit einem kleinen, flachen
Schraubendreher.
Lösen Sie die Arretierungsschraube [2]
mit dem Innensechskantschlüssel [7] durch
Drehen gegen den Uhrzeigersinn.
m VORSICHT! Schraube [2] nicht vollständig
herausdrehen. Nur lösen, bis sich der
Einstellhebel [1] leicht abnehmen lässt.
Entnehmen Sie den Einstellhebel [1].
Lösen Sie den Kartuschen-Abdeckring
[]
von Hand. Schrauben Sie dann den
Kartuschen-Sicherungsring
[]
mit einer
Rohrzange ab.
Ziehen Sie nun den Kartuschen-Einstellring
[]
mit einem Schraubendreher nach oben.
Hinweis: Entfernen Sie nicht die Kartusche
[]
.
Platzieren Sie den Kartuschen-Einstellring
[]
in ge wünschter Position (s. Abb. I).
Ziehen Sie den Kartuschen-Sicherungs ring
[]
mit der Rohrzange wieder auf dem
Armaturenkörper [5] fest. Befestigen Sie den
Kartuschen-Abdeckring
[]
von Hand.
Setzen Sie den Einstellhebel [1] wieder auf
den Armaturenkörper [5]. Ziehen Sie die
Arretierungs schraube [2] mit dem Innen-
sechs kant schlüssel [7] durch Drehen im
Uhr zeiger sinn fest.
Drücken Sie die Kunststoffabdeckung
[3] in die Öffnung.
Stellen Sie die Haupt-Wasserzufuhr an und
überprüfen Sie die Temperaturbegrenzung.

9
DE/AT/CH
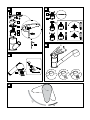
Wassersparfunktion
Die Kartusche
[]
in dieser Armatur verfügt
über eine Ökofunktion. Diese vermindert die
Durchflussmenge durch den Wasserhahn.
Dadurch können Sie bis zu 50 % Wasser
einsparen (s. Abb. J).
Heben Sie den Einstellhebel an, bis Sie
einen leichten Widerstand spüren. In dieser
Einstellung wird der Wasserfluss begrenzt.
Wenn Sie den Wasserfluss erhöhen wollen,
heben Sie den Einstellhebel weiter an, bis
Sie den Widerstand überwunden haben.
Energiesparfunktion
Die Kartusche
[]
in dieser Armatur verfügt
über eine Energiesparfunktion.
Nur kaltes Wasser fließt aus, wenn der
Einstellhebel [1] in die mittlere Position
gestellt wird, und reduziert so den
Energieverbrauch (s. Abb. K).
Wartung und Reinigung
Armatur pflegen und reinigen
Beachten Sie, dass Sanitärarmaturen einer
besonderen Pflege bedürfen. Beachten Sie
daher die folgenden Anweisungen:
Verwenden Sie keine ätzenden oder
alkoholhaltigen Mittel zur Reinigung, da
diese das Produkt beschädigen könnten.
Reinigen Sie Ihre Armaturen nur mit klarem
Wasser, milden Reinigungsmitteln und einem
weichen Tuch bzw. Leder.
Schrauben Sie die Mischdüse
[]
in
regelmäßigen Abständen heraus und
entfernen Sie kalkhaltige Rückstände oder
Fremdkörper.
Bei Nichtbeachtung der Pflegeanleitung muss mit
Schäden an der Oberfläche gerechnet werden.
Garantieansprüche können dann nicht geltend
gemacht werden.
Entsorgung
Die Verpackung besteht aus umweltfreundlichen
Materialien, die Sie über die örtlichen
Recyclingstellen entsorgen können.
Möglichkeiten zur Entsorgung des ausgedienten
Produkts erfahren Sie bei Ihrer Gemeinde- oder
Stadtverwaltung.
Produkt:
Das Produkt inkl. Zubehör und die
Verpackungsmaterialien sind recyclebar
und unterliegen einer erweiterten
Herstellerverantwortung.
Entsorgen Sie diese getrennt, den abgebildeten
Info-tri (Sortierinformation) folgend, für eine
bessere Abfallbehandlung.
Das Triman-Logo gilt nur für Frankreich.
Informationen
Trinkbarkeit von
Leitungswasser
Informieren Sie sich bei Ihren örtlichen
Behörden über die Trinkbarkeit des Wassers
in Ihrer Stadt / Gemeinde.
Generell gilt für die Trinkbarkeit von
Leitungswasser folgende Empfehlung:
Lassen Sie Wasser aus Leitungen eine kurze
Zeit laufen, wenn es länger als vier Stunden
in den Leitungen stagniert hat. Verwenden
Sie kein Stagnationswasser zur Zubereitung
von Speisen und Getränken, besonders
nicht bei der Ernährung von Säuglingen.
Anderenfalls können gesundheitliche
Beschwerden auftreten. Frisches Wasser
können Sie daran erkennen, dass es
spürbar kühler die Leitung verlässt als
Stagnationswasser.

10
DE/AT/CH
Verwenden Sie kein Stagnationswasser aus
verchromten Leitungen zur Ernährung und/
oder zur Körperpflege, wenn Sie gegen
Nickel allergisch sind. Solches Wasser kann
stark nickelhaltig sein und eine allergische
Reaktion hervorrufen.
Nutzen Sie kein Trinkwasser aus
Bleileitungen für die Zubereitung von
Säuglingsnahrung und / oder während
der Schwangerschaft für die Zubereitung
von Lebensmitteln. Blei wird ins Trinkwasser
abgegeben und ist für Säuglinge und
Kleinkinder besonders gesundheitsschädlich.
Garantie
Das Produkt wurde nach strengen
Qualitätsrichtlinien sorgfältig produziert und vor
Anlieferung gewissenhaft geprüft. Im Falle von
Mängeln dieses Produkts stehen Ihnen gegen
den Verkäufer des Produkts gesetzliche Rechte
zu. Diese gesetzlichen Rechte werden durch
unsere im Folgenden dargestellte Garantie nicht
eingeschränkt.
Sie erhalten auf dieses Produkt 5 Jahre Garantie
ab Kaufdatum. Die Garantiefrist beginnt mit dem
Kaufdatum. Bitte bewahren Sie den Original-
Kassenbon gut auf. Diese Unterlage wird als
Nachweis für den Kauf benötigt.
Tritt innerhalb von 5 Jahren ab dem
Kaufdatum dieses Produkts ein Material- oder
Fabrikationsfehler auf, wird das Produkt von
uns – nach unserer Wahl – für Sie kostenlos
repariert oder ersetzt. Diese Garantie verfällt,
wenn das Produkt beschädigt, nicht sachgemäß
benutzt oder gewartet wurde.
Die Garantieleistung gilt für Material- oder
Fabrikationsfehler. Diese Garantie erstreckt sich
nicht auf Produktteile, die normaler Abnutzung
ausgesetzt sind (z. B. Batterien) und daher als
Verschleißteile angesehen werden können oder
Beschädigungen an zerbrechlichen Teilen, z. B.
Schalter, Akkus oder die aus Glas gefertigt sind.
Abwicklung im Garantiefall
Um eine schnelle Bearbeitung Ihres Anliegens
zu gewährleisten, folgen Sie bitte den folgenden
Hinweisen:
Bitte halten Sie für alle Anfragen den Kassenbon
und die Artikelnummer (IAN 419349_2210) als
Nachweis für den Kauf bereit.
Die Artikelnummer entnehmen Sie bitte dem
Typenschild, einer Gravur, auf dem Titelblatt
Ihrer Bedienungsanleitung (unten links) oder
als Aufkleber auf der Rück- oder Unterseite des
Produkts.
Sollten Funktionsfehler oder sonstige Mängel
auftreten, kontaktieren Sie zunächst die
nachfolgend benannte Serviceabteilung
telefonisch oder per E-Mail.
Ein als defekt erfasstes Produkt können Sie dann
unter Beifügung des Kaufbelegs (Kassenbon)
und der Angabe, worin der Mangel besteht und
wann er aufgetreten ist, für Sie portofrei an die
Ihnen mitgeteilte Service-Anschrift übersenden.
Service
Service Deutschland
Tel.: 0800 5435 111
Service Österreich
Tel.: 0800 292726
Service Schweiz
Tel.: 0800562153

11 GB/IE/NI/CY/MT
Introduction ......................................................... Page 12
Proper use ........................................................... Page 12
Description of parts................................................. Page 12
Technical data....................................................... Page 12
Safety advice........................................................ Page 13
Preparation ......................................................... Page 13
Required tools and material ............................................... Page 13
Installation .......................................................... Page 14
Installing the tap........................................................ Page 14
Flushing the tap ........................................................ Page 14
Operation............................................................ Page 14
Bringing into use........................................................ Page 14
Setting the temperature limiter ............................................. Page 14
Water-saving function ............................................. Page 15
Energy-saving function ............................................ Page 15
Maintenance and cleaning ........................................ Page 15
Tap care and cleaning................................................... Page 15
Disposal.............................................................. Page 15
Information.......................................................... Page 15
Potability of mains water ................................................. Page 15
Warranty ............................................................ Page 16
Warranty claim procedure................................................ Page 16
Service ............................................................... Page 16

12 GB/IE/NI/CY/MT
KITCHEN MIXER TAP
Introduction
We congratulate you on the purchase of your
new product. You have chosen a high quality
product. Familiarise yourself with the product
before using it for the first time. In addition,
please carefully refer to the operating instructions
and the safety advice below. Only use the
product as instructed and only for the indicated
field of application. Keep these instructions in a
safe place. If you pass the product on to anyone
else, please ensure that you also pass on all the
documentation with it.
Proper use
This product is suitable for all pressure-tight hot
water systems such as central heating boilers,
instantaneous water heaters, pressurised boilers
and the like. It is not suitable for low-pressure
water heaters such as wood or coal burning
bath geysers, oil or gas bath geysers, open
electrically heated water tanks. If in doubt
please seek the advice of a plumber or heating
engineer. Any use other than that described here
or modification to the product is not permitted
and may lead to damage to persons or property.
There is also the risk of injury and loss of life. The
product is intended for personal use only and not
for medical or commercial use. The manufacturer
accepts no liability for loss or damage arising
from improper use.
Description of parts
[1] 1 Handle
[2] 1 Locking screw
[3] 1 Plastic cover
[4] 1 Shower head
[5] 1 Tap body
[6] 1 Rubber seal (shower hose)
[7] 1 Hexagonal key
[8] 1 O-ring (pre-installed)
[9] 1 Threaded rod
[]
1 Plastic gasket
[]
1 Metal ring
[]
1 Shower hose
[]
2 Screws
[]
1 Hose weight
[]
1 Nut
[] 1 Long connection hose (hot)
[] 1 Long connection hose (cold)
[] 1 Union nut with seal (hot)
[] 1 Union nut with seal (cold)
[]
1 Union nut
[]
1 Short connection hose
[]
1 Cartridge covering ring
[]
1 Cartridge retaining ring
[]
1 Adjusting ring
[]
1 Cartridge
[]
1 Aerator
[]
1 Aerator button
[]
1 Shower button
[]
1 Protective cover
Technical data
Connections: G3⁄8” (approx. 17 mm)
Water connection nut: approx. 19 mm
Hot water temperature: max.: 85 °C

13 GB/IE/NI/CY/MT
Safety advice
WARNING! RISK OF
LOSS OF LIFE OR
ACCIDENT TO INFANTS
AND CHILDREN! Never
leave children unsupervised with the
packaging materials. Danger of suffocation.
Keep the product away from children. The
product is not a toy.
CAUTION - RISK OF
ELECTRIC SHOCK! Leaks or
the escape of water can lead to
danger to life from electric shock.
Check all connections for leaks carefully. In
addition, ensure that all cables from electrical
devices are correctly and safely installed.
CAUTION! RISK OF INJURY! Please
ensure that no parts are damaged and that
all parts are correctly assembled. Incorrect
assembly could lead to injury. Please note
that seals are wear parts and therefore will
require to be replaced from time to time.
Damaged parts could adversely affect safety
and proper function.
CAUTION! RISK OF DAMAGE TO
PROPERTY! Have the installation done by
experienced persons only. Leaks or escape
of water can lead to serious damage to
buildings or household fittings and furniture.
Check all connections for leaks carefully.
Ensure that all seals are correctly seated to
prevent leakage of water.
The spout can be swiveled to your desired
position. Make sure the spout is always
positioned within the area of the sink,
otherwise escape of water can lead to
serious flooding to your house or building.
CAUTION! DANGER OF SCALDING!
When making the hot water setting please
ensure that the temperature of the water is
not too high.
Before installation, make yourself familiar
with all the existing services, e.g. water
connection and stopcocks.
Please read carefully through these
operating instructions before installing and
using the product. Keep all the safety advice
and instructions in a safe place for future
reference!
Preparation
Required tools and material
The tools and materials specified are
not included. This information and these
values are non-binding and they are only
for guidance. The nature of the material
is determined by the individual local
conditions.
− spanner or adjustable wrench
− sealing tape
− hex key S3
− small flat (slotted) screwdriver

14 GB/IE/NI/CY/MT
Installation
Installing the tap
Turn off the main water supply to prevent
serious leakage of water. Allow any
remaining water in the pipework to drain.
Install the tap as shown in Figs. A to F.
m CAUTION! Do not bend the hoses or place
them under tension. Otherwise material
damage could result.
Flushing the tap
The tap must be flushed through before first
use to remove any dirt. To do this, follow
these steps (see Fig. H):
Screw the aerator
[]
off.
Open the main water supply and allow the
water to run for two minutes.
Then screw the aerator
[]
on again.
Operation
Bringing into use
Note: If the fitting has not been used for a
long period flush the pipes through thoroughly
in order to avoid stagnation and build-up of
residues in the drinking water supply.
Open the main water supply.
Lift the adjusting lever [1] and swing it to the
right or left in order to regulate the speed or
temperature of the water flow.
Press the shower button
[]
to set the spray
jet.
Press the aerator button
[]
to set to normal
spray jet operation.
Check operation of the mixer. For this
purpose move the lever [1] in all possible
positions. Please regularly check all
connections to ensure that they are tight.
Setting the temperature
limiter
The cartridge
[]
in this unit has a temperature
limiter. This function is not activated in the factory
(neutral setting).
m CAUTION! Change the temperature limiter
setting only after the tap has been installed.
Follow Fig. G to set the temperature
limitation.
Turn off the main water supply.
Remove the plastic cover [3] carefully by a
small flat screwdriver.
Release the locking screw [2] by turning it
anticlockwise using the hexagonal key [7].
m CAUTION! Do not take the screw [2]
completely out; just loosen it until the control
lever [1] can be easily taken off.
Take off the control lever [1].
Loosen the cartridge covering ring
[]
by
hand, then screw off the cartridge retaining
ring
[]
by using a pipe wrench.
Now pull the adjusting ring
[]
upwards with
the help of a screwdriver.
Note: Do not remove the cartridge
[]
.
Place the adjusting ring
[]
in the desired
position (see Fig. I).
Tighten the cartridge retaining ring
[]
onto
the tap body [5] again by using a pipe
wrench. Then tighten the cartridge covering
ring
[]
by hand.
Place the control lever [1] back on to the
tap body [5]. Tighten the locking screw [2]
by turning it clockwise using the hexagonal
key [7].
Press the plastic cover [3] into the opening.
Turn on the main water supply and check the
temperature limiter.

15 GB/IE/NI/CY/MT
Water-saving function
The cartridge
[]
in this tap has an Eco-Click
function. This feature limits the water flow
through the tap. This means you can save up
to 50 % water (see Fig. J).
Lift the lever until you notice a slight
resistance. This resistance will cause a stop
in case of partial opening and will therefore
simply limit the flow of water.
If you want to increase the flow rate,
exert slight pressure on the lever until you
overcome the resistance.
Energy-saving function
The cartridge
[]
in this tap has an energy
function.
Only cold water will flow out when the
control lever [1] is set to the middle position,
and thus reduce energy consumption (see
Fig. K).
Maintenance and cleaning
Tap care and cleaning
Please note that sanitary fittings require special
care and attention. Therefore you should follow
the following advice:
Never use corrosive or alcohol-based
materials for cleaning, as these could
damage the product.
Clean your fittings with clean water, mild
detergent and a soft cloth or leather only.
Screw out the aerator
[]
at regular intervals
and remove lime deposits or foreign bodies.
Non-observance of the above care advice can
be expected to result in damage to the surface
of the fittings. In this event your rights under the
warranty may be invalidated.
Disposal
The packaging is made entirely of recyclable
materials, which you may dispose of at local
recycling facilities.
Contact your local refuse disposal authority for
more details of how to dispose of your worn-out
product.
Product:
The product incl. accessories and packaging
materials are recyclable and are subject to
extended producer responsibility.
Dispose them separately, following the illustrated
Info-tri (sorting information), for better waste
treatment.
The Triman logo is valid in France only.
Information
Potability of mains water
Find out about the potability of your mains
water supply. Your local water authority or
water supply company will be able to inform
you.
The following general
recommendations apply to the
potability of the water from your
pipework:
Let the water run freely for a short time if
it has been stagnating in the pipework for
more than four hours. Do not use any of this
stagnant water in the preparation of food
or for drinking. This applies particularly as
far as babies and infants are concerned.
Failure to observe this advice may result in
risks to health. Fresh water can be readily
distinguished from stagnant as fresh water is
noticeably cooler.

16 GB/IE/NI/CY/MT
Do not use stagnant water from chromium-
plated pipework for the preparation of food
or for drinking or for personal hygiene if you
are allergic to nickel. This water may contain
high quantities of nickel and trigger an
allergic reaction.
Do not use water from lead pipework for
preparing food or drink for babies or infants.
Do not use it for preparing food or drink
during pregnancy. Lead dissolves in drinking
water and is particularly damaging to the
health of babies and young children.
Warranty
The product has been manufactured to strict
quality guidelines and meticulously examined
before delivery. In the event of product defects
you have legal rights against the retailer of this
product. Your legal rights are not limited in any
way by our warranty detailed below.
The warranty for this product is 5 years from the
date of purchase. The warranty period begins
on the date of purchase. Please keep the original
sales receipt in a safe location. This document is
required as your proof of purchase.
Should this product show any fault in materials
or manufacture within 5 years from the date of
purchase, we will repair or replace it – at our
choice – free of charge to you. This warranty
becomes void if the product has been damaged,
or used or maintained improperly.
The warranty applies to defects in material
or manufacture. This warranty does not cover
product parts subject to normal wear, thus
possibly considered consumables (e.g. batteries)
or for damage to fragile parts, e.g. switches,
rechargeable batteries or glass parts.
Warranty claim procedure
To ensure quick processing of your case, please
observe the following instructions:
Please have the till receipt and the item number
(IAN 419349_2210) available as proof of
purchase.
You will find the item number on the rating
plate, an engraving, on the front page of the
instructions for use (bottom left), or as a sticker
on the rear or bottom of the product.
If functional or other defects occur, please
contact the service department listed either by
telephone or by e-mail.
You can return a defective product to us free
of charge to the service address that will be
provided to you. Ensure that you enclose the
proof of purchase (till receipt) and information
about what the defect is and when it occurred.
Service
Service Great Britain
Tel.: 08000569216
Service Ireland
Tel.: 1800 200736
Service Northern Ireland
Tel.: 0800 0927852
Service Malta
Tel.: 80062960
Service Cyprus
Tel.: 8009 4211

17 FR/BE/CH
Introduction ......................................................... Page 18
Utilisation conforme aux prescriptions .......................... Page 18
Description des pièces.............................................. Page 18
Caractéristiques techniques ....................................... Page 18
Consignes de sécurité .............................................. Page 19
Préparation ......................................................... Page 19
Outils et matériel nécessaires.............................................. Page 19
Montage ............................................................. Page 20
Installation du robinet.................................................... Page 20
Rinçage du robinet...................................................... Page 20
Utilisation............................................................ Page 20
Mise en service ........................................................ Page 20
Réglage de la limitation de la température ................................... Page 20
Fonction d'économie d'eau ........................................ Page 21
Fonction d'économie d'énergie ................................... Page 21
Maintenance et nettoyage ........................................ Page 21
Entretien et nettoyage du robinet ........................................... Page 21
Mise au rebut........................................................ Page 21
Informations......................................................... Page 21
Potabilité de l’eau du robinet .............................................. Page 21
Garantie ............................................................. Page 22
Faire valoir sa garantie .................................................. Page 23
Service après-vente ..................................................... Page 23
Pagina se încarcă...
Pagina se încarcă...
Pagina se încarcă...
Pagina se încarcă...
Pagina se încarcă...
Pagina se încarcă...
Pagina se încarcă...
Pagina se încarcă...
Pagina se încarcă...
Pagina se încarcă...
Pagina se încarcă...
Pagina se încarcă...
Pagina se încarcă...
Pagina se încarcă...
Pagina se încarcă...
Pagina se încarcă...
Pagina se încarcă...
Pagina se încarcă...
Pagina se încarcă...
Pagina se încarcă...
Pagina se încarcă...
Pagina se încarcă...
Pagina se încarcă...
Pagina se încarcă...
Pagina se încarcă...
Pagina se încarcă...
Pagina se încarcă...
Pagina se încarcă...
Pagina se încarcă...
Pagina se încarcă...
Pagina se încarcă...
Pagina se încarcă...
Pagina se încarcă...
Pagina se încarcă...
Pagina se încarcă...
Pagina se încarcă...
Pagina se încarcă...
Pagina se încarcă...
Pagina se încarcă...
Pagina se încarcă...
Pagina se încarcă...
Pagina se încarcă...
Pagina se încarcă...
Pagina se încarcă...
Pagina se încarcă...
Pagina se încarcă...
Pagina se încarcă...
Pagina se încarcă...
Pagina se încarcă...
Pagina se încarcă...
Pagina se încarcă...
Pagina se încarcă...
Pagina se încarcă...
Pagina se încarcă...
Pagina se încarcă...
Pagina se încarcă...
Pagina se încarcă...
Pagina se încarcă...
Pagina se încarcă...
Pagina se încarcă...
Pagina se încarcă...
Pagina se încarcă...
Pagina se încarcă...
Pagina se încarcă...
Pagina se încarcă...
Pagina se încarcă...
Pagina se încarcă...
Pagina se încarcă...
Pagina se încarcă...
Pagina se încarcă...
Pagina se încarcă...
Pagina se încarcă...
Pagina se încarcă...
Pagina se încarcă...
Pagina se încarcă...
Pagina se încarcă...
Pagina se încarcă...
Pagina se încarcă...
Pagina se încarcă...
Pagina se încarcă...
Pagina se încarcă...
Pagina se încarcă...
Pagina se încarcă...
Pagina se încarcă...
Pagina se încarcă...
Pagina se încarcă...
Pagina se încarcă...
Pagina se încarcă...
-
 1
1
-
 2
2
-
 3
3
-
 4
4
-
 5
5
-
 6
6
-
 7
7
-
 8
8
-
 9
9
-
 10
10
-
 11
11
-
 12
12
-
 13
13
-
 14
14
-
 15
15
-
 16
16
-
 17
17
-
 18
18
-
 19
19
-
 20
20
-
 21
21
-
 22
22
-
 23
23
-
 24
24
-
 25
25
-
 26
26
-
 27
27
-
 28
28
-
 29
29
-
 30
30
-
 31
31
-
 32
32
-
 33
33
-
 34
34
-
 35
35
-
 36
36
-
 37
37
-
 38
38
-
 39
39
-
 40
40
-
 41
41
-
 42
42
-
 43
43
-
 44
44
-
 45
45
-
 46
46
-
 47
47
-
 48
48
-
 49
49
-
 50
50
-
 51
51
-
 52
52
-
 53
53
-
 54
54
-
 55
55
-
 56
56
-
 57
57
-
 58
58
-
 59
59
-
 60
60
-
 61
61
-
 62
62
-
 63
63
-
 64
64
-
 65
65
-
 66
66
-
 67
67
-
 68
68
-
 69
69
-
 70
70
-
 71
71
-
 72
72
-
 73
73
-
 74
74
-
 75
75
-
 76
76
-
 77
77
-
 78
78
-
 79
79
-
 80
80
-
 81
81
-
 82
82
-
 83
83
-
 84
84
-
 85
85
-
 86
86
-
 87
87
-
 88
88
-
 89
89
-
 90
90
-
 91
91
-
 92
92
-
 93
93
-
 94
94
-
 95
95
-
 96
96
-
 97
97
-
 98
98
-
 99
99
-
 100
100
-
 101
101
-
 102
102
-
 103
103
-
 104
104
-
 105
105
-
 106
106
-
 107
107
-
 108
108


în alte limbi
- français: LIVARNO 419349 Le manuel du propriétaire
- slovenčina: LIVARNO 419349 Návod na obsluhu
- italiano: LIVARNO 419349 Manuale del proprietario