
USER MANUAL
hElix

2
Notes:

3
ENGLISH ................................14
DEUTSCH .............................15
FRANÇAIS ............................17
FUNCTIONS ............................ 6
SPARE PARTS 2ND LAST PAGE
QUICK START GUIDE ............ 4
SVENSKA .......................... 18
ITALIANO ........................... 20
ESPAÑOL .......................... 21
PORTUGUÊS ..................... 23
NEDERLANDS .................. 24
SUOMI ................................. 26
DANSK ................................ 27
NORSK ................................. 29
POLSKI ................................ 30
ČEŠTINA .............................. 32
MAGYAR .............................. 33
TÜRKÇE ............................... 35
ΕΛΛΗΝΙΚΑ
............................... 36
БЪЛГАРСКИ ......................... 38
SLOVENSKY ........................ 39
SLOVENSKI ............................41
ROMÂNĂ .............................. 42
EESTI .................................... 44
LATVIEŠU ............................. 45
РУССКИЙ .............................. 47
HRVATSKI ............................. 48

4
Low battery (blinking)
Charging battery
Fully charged battery
!
1
charging
1
2
3
4
2
Head size adjustment
nose pad
if not installed
3 a
inside cover lens exchange
3 b
3 c
4
welding
Sensitivity
Delay
Shade Tronic
choose sensitivity choose delay
choose sensitivity choose delay
Manual mode
choose ShadeTronic & shade level correction
choose Manual & shade level
QUICK START
GUIDE
4<13
5
6
grinding
Manual
Mode
ShadeTronic
Manual
Mode
ShadeTronic
tighten
release
30° turn
Link for instruction video on p. 42
1
2
1
211
223
3
Pos. 1
Pos. 2
Pos. 3
Excenter/ angle adjustment
Sensitivity
Delay
isot setting

5
Low battery (blinking)
Charging battery
Fully charged battery
!
1
charging
1
2
3
4
2
Head size adjustment
nose pad
if not installed
3 a
inside cover lens exchange
3 b
3 c
4
welding
Sensitivity
Delay
Shade Tronic
choose sensitivity choose delay
choose sensitivity choose delay
Manual mode
choose ShadeTronic & shade level correction
choose Manual & shade level
QUICK START
GUIDE
4<13
5
6
grinding
Manual
Mode
ShadeTronic
Manual
Mode
ShadeTronic
tighten
release
30° turn
Link for instruction video on p. 42
1
2
1
211
223
3
Pos. 1
Pos. 2
Pos. 3
Excenter/ angle adjustment
Sensitivity
Delay
isot setting

6
Functions
Manual
Manual mode
ShadeTronic
4<13
Shade
Tronic
grinding
welding
Sensitivity
time
start welding stop welding
opening delay
clear
opening delay with FadeTronic
clear
+ FadeTronic
+ delay
no delay
time
start welding stop welding
+FadeTronic
+ delay
no delay
Delay
Delay
Delay
clear
No Delay
Delay
Delay & FadeTronic
Delay and FadeTronic Function
time
tack tack tack tack
time
tack tack tack tack
Delay
Delay
Delay
contineous welding tack welding
No Delay
Delay
Delay & FadeTronic
+13 +8
Manual Shade level adjustment
shade level 8 up to shade level 13
ShadeTronic
individual shade level correction +/- 2 shade levels
+1
+2 -1 -2
N
I
II
III
IV
V
Manual
Mode
ShadeTronic
Manual
Mode
ShadeTronic
ManualManual
I II III IV
Example
Helix quattro
low Amperagehigh Amperage

7
Functions
Manual
Manual mode
ShadeTronic
4<13
Shade
Tronic
grinding
welding
Sensitivity
time
start welding stop welding
opening delay
clear
opening delay with FadeTronic
clear
+ FadeTronic
+ delay
no delay
time
start welding stop welding
+FadeTronic
+ delay
no delay
Delay
Delay
Delay
clear
No Delay
Delay
Delay & FadeTronic
Delay and FadeTronic Function
time
tack tack tack tack
time
tack tack tack tack
Delay
Delay
Delay
contineous welding tack welding
No Delay
Delay
Delay & FadeTronic
+13 +8
Manual Shade level adjustment
shade level 8 up to shade level 13
ShadeTronic
individual shade level correction +/- 2 shade levels
+1
+2 -1 -2
N
I
II
III
IV
V
Manual
Mode
ShadeTronic
Manual
Mode
ShadeTronic
ManualManual
I II III IV
Example
Helix quattro

8
Spare parts
micro USB cable
1
23
USB dust protection
1
2
3
4
exchange of headband nose protection micro USB cable/ USB dust protection
Exchange of front cover lens
see 2nd last page
123
click
3.1
3.2
3.3
3.1
3.2
nose protection

9
Spare parts
micro USB cable
1
23
USB dust protection
1
2
3
4
exchange of headband nose protection micro USB cable/ USB dust protection
Exchange of front cover lens
see 2nd last page
123
click
3.1
3.2
3.3
3.1
3.2
nose protection

10
click
Inner ip
IsoFit assembly
IsoFit disassembly
Helmet Shell Minimizer
click

11
click
Inner ip
IsoFit assembly
IsoFit disassembly
Helmet Shell Minimizer
click

12
Ampere
Fe
Al
CO
2
Process 1.5610 15 30 40 60 70 100 125 150 175 200 225 250 300 350 400 450 500 600
8910 11 12 13 14
91011121314
14
8910 11 12
9
9
10 11 12 13
10 1311 12
8
8
910111213
10 11 12 13
5467
MMA
TIG
MIG heavy
metals
MIG light
metals, AI,
Stainless
Plasma
cutting
Micro plasma
welding
MAG
Schutzstufentabelle EN169
Shade level chart EN169
Tableau des niveaux de protection EN169
Tabella dei livelli di protezione EN169
Je nach persönlichem Empfinden kann
die nächst höhere oder tiefere Schutzstufe
verwendet werden.
According to the perception of the welder it is
possible to use the next higher or lower shade
number.
Selon la perception du soudeur il est possible
d‘utiliser un échelon de protection plus haut
ou plus bas.
A seconda della sensibilità personale è possibile
impostare il livello di protezione immediatamente
superiore o inferiore.
Nummer der Norm
Number of the standard
Numero della norma
Hersteller
Optische Klasse
Mittlere Stossenergie
Manufacturer
Optical class
Medium energy impact
Classe optique
Impacts moyenne énergie
Classe ottica
Impatto media energia
Kennzeichnung
Sicherheitsschutztscheibe: Marking safety protection lens: Marquages écran de protection : Marcaggi vetro di protezione:
OS 1 B EN 166 OS 1 B EN 166 OS 1 B EN 166 OS 1 B EN 166
Hersteller
Nummer der Norm
Impact level E (45 m/s)
Kennzeichnung Schweisshelm
16321 OS C HM CE
Impact Level High Mass
Konformität
Manufacturer
Number from the standard
Impact level E (45 m/s)
Marking welding helmet
16321 OS C HM CE
Impact Level High Mass
Conformity
Fabricant
Numéro de la norme
Niveau d'impact E (45 m/s)
Marquage du casque de soudure
16321 OS C HM CE
Impact Level High Mass
Conformité
Produttore
Numero dello standard
Livello d'impatto E (45 m/s)
Marcatura del casco per saldatura
16321 OS C HM CE
Livello di impatto High Mass
Conformità
Inside cover lens +1 5000.173
Description
To increase the protection level by +1
Suitable for helix and panoramaxx series
The inside cover lens is only suitable for use with an optrel
panoramaxx quattro or helix quattro. Observe the instructions in
the operating instructions of your existing system.
Informations
Colourfast +1.0 (set of 5)
Model IPL +1
Lens with protection level 2.0

Hellstufe
Dunkelstufen
Hersteller
Optische Klasse
Streulichtklasse
Homogenität
Blickwinkelabhängigkeit
Nummer der Norm
Light shade
Dark Shade range
Manufacturer
Optical Class
Diusion of light class
Homogeneity
Angular dependence
Number of the standard
Échelon de protection à l' état clair
Échelon de protection à l' état foncé
Identication du fabricant
Classe optique
Classe de la diraction de la lumière
Homogéneité
Angulaire dépendance
Marque de certications
Grado di protezione in stato chiaro
Grado di protezione in stato scuro
Identicazione del fabbricante
Classe ottica
Classe della diusione della luce
Omogeneità
Angolare dipendenza
Numero della norma
Die auf dem Schweisserschutzlter
angebrachte Kennzeichnung bedeutet:
The marking on the welding lter
indicates:
Le marquage apposé sur le ltre de
protection pour soudeur signie :
IIl contrassegno riportato sul ltro di
protezione per saldatore contiene i
seguenti dati:
2.5/ 5<12M
OS / 1 / 1 / 1 / 2 EN379
2.5/ 7-12
OS / 1 / 1 / 1 / 2 EN379
2.5/ 5<12M
OS / 1 / 1 / 1 / 2 EN379
2.5/ 7-12
OS / 1 / 1 / 1 / 2 EN379
2.5/ 5<12M
OS / 1 / 1 / 1 / 2 EN379
2.5/ 7-12
OS / 1 / 1 / 1 / 2 EN379
2.5/ 5<12M
OS / 1 / 1 / 1 / 2 EN379
2.5/ 7-12
OS / 1 / 1 / 1 / 2 EN379
helix 2.5
helix clt
helix quattro
Hellstufe
Dunkelstufen
Hersteller
Optische Klasse
Streulichtklasse
Homogenität
Blickwinkelabhängigkeit
Nummer der Norm
Light shade
Dark Shade range
Manufacturer
Optical Class
Diffusion of light class
Homogeneity
Angular dependence
Number of the standard
Échelon de protection à l' état clair
Échelon de protection à l' état foncé
Identification du fabricant
Classe optique
Classe de la diffraction de la lumière
Homogéneité
Angulaire dépendance
Marque de certifications
Grado di protezione in stato chiaro
Grado di protezione in stato scuro
Identificazione del fabbricante
Classe ottica
Classe della diffusione della luce
Omogeneità
Angolare dipendenza
Numero della norma
Die auf dem Schweisserschutzfilter
angebrachte Kennzeichnung bedeutet: The marking on the welding filter
indicates:
Le marquage apposé sur le filtre de
protection pour soudeur signifie :
I
Il contrassegno riportato sul filtro
di protezione per saldatore
contiene i seguenti dati:
2/ 4<12M OS / 1 / 1 / 1 / 2 EN379
2/ 7-12 OS / 1 / 1 / 1 / 2 EN379
2/ 4<12M OS / 1 / 1 / 1 / 2 EN379
2/ 7-12 OS / 1 / 1 / 1 / 2 EN379
2/ 4<12M OS / 1 / 1 / 1 / 2 EN379
2/ 7-12 OS / 1 / 1 / 1 / 2 EN379
2/ 4<12M
OS / 1 / 1 / 1 / 2 EN379
2/ 7-12
OS / 1 / 1 / 1 / 2 EN379
Hellstufe
Dunkelstufen
Hersteller
Optische Klasse
Streulichtklasse
Homogenität
Blickwinkelabhängigkeit
Nummer der Norm
Light shade
Dark Shade range
Manufacturer
Optical Class
Diffusion of light class
Homogeneity
Angular dependence
Number of the standard
Échelon de protection à l' état clair
Échelon de protection à l' état foncé
Identification du fabricant
Classe optique
Classe de la diffraction de la lumière
Homogéneité
Angulaire dépendance
Marque de certifications
Grado di protezione in stato chiaro
Grado di protezione in stato scuro
Identificazione del fabbricante
Classe ottica
Classe della diffusione della luce
Omogeneità
Angolare dipendenza
Numero della norma
Die auf dem Schweisserschutzfilter
angebrachte Kennzeichnung bedeutet: The marking on the welding filter
indicates:
Le marquage apposé sur le filtre de
protection pour soudeur signifie :
IIl contrassegno riportato sul filtro
di protezione per saldatore
contiene i seguenti dati:
3/ 4<13M
OS / 1 / 1 / 1 / 2 EN379
3/ 8-13
OS / 1 / 1 / 1 / 2 EN379
3/ 4<13M
OS / 1 / 1 / 1 / 2 EN379
3/ 8-13
OS / 1 / 1 / 1 / 2 EN379
3/ 4<13M
OS / 1 / 1 / 1 / 2 EN379
3/ 8-13
OS / 1 / 1 / 1 / 2 EN379
3/ 4<13M
OS / 1 / 1 / 1 / 2 EN379
3/ 8-13
OS / 1 / 1 / 1 / 2 EN379
13
Informations
Colourfast +1.0 (set of 5)
Model IPL +1
Lens with protection level 2.0

Introduction
A welding helmet is an item of headgear that is used to protect the eyes, face and neck from
burns, UV light, sparks, infrared light and heat during certain welding operations. The helmet
consists of several parts (see spare parts list). An automatic welding filter combines a passive
UV filter and a passive IR filter with an active filter whose light transmittance in the visible
range of the spectrum varies depending on the light intensity in the welding arc. The light
transmittance of the automatic welding filter has a high initial value (light state).
After switching on the welding arc and within a defined response time, the light transmittance
of the filter changes to a low value (dark state). Depending on the model, the helmet can be
combined with a safety helmet and/or a PAPR (Powered Air Purifying Respirator) system.
Safety instructions
Read the instruction manual before using the helmet. Make sure thefront cover lense is
mounted correctly. If faults cannot be remedied, the helmet must no longer be used. For
further information, please contact your authorised retailer.
Precautions & protective restrictions / risks
During the welding process, heat and radiation are released; this can cause eye and skin
injuries. This product provides protection for the eyes and face. Your eyes are always protected
against ultraviolet and infrared radiation when wearing the helmet, regardless of the protection
level selected. Appropriate protective clothing must also be worn to protect the rest of your
body. Particles and substances released during the welding process can trigger allergic skin
reactions in persons with this disposition. With sensitive persons, skin contact with the head
part can lead to allergic reactions. The welding helmet may only be used for welding and
grinding and not for other applications. The manufacturer accepts no liability if the welding
helmet is not used as intended or not used in accordance with the instructions for use.It`s not
allowed to apply stickers, prints or similar to the helmet. The helmet is suitable for all common
welding processes, except gas and laser welding.
Please note the protection level recommendation according to EN169 in this manual. The
helmet does not replace a safety helmet. The helmet can be combined with a safety helmet.
The design features of the helmet may affect the field of vision (no peripheral vision without
turning the head) and the light transmittance of the automatic darkening filter may affect colour
perception. As a result, signal lamps or warning indicators may not be seen. Furthermore,
there is a risk of impact due to the larger contour (head with helmet). The helmet also impairs
hearing and reduces the sensation of heat.
Warning: For the overall marking of the safety class of the helmet, the lowest of all
components used is always decisive.
For use in extreme temperatures, pay attention to the appropriate labeling: FT, BT or AT. When
wearing glasses, shocks can be transferred directly from the helmet to the head.
Colour view
To increase convenience and safety, you can recognize colours with this welding helmet.
Sleep mode
The ADF has an automatic switch-off function that increases the battery life. If less than 1 lux of
light reaches the ADF for approx. 10 minutes, the ADF switches off automatically. To switch the
cassette back on, the solar cells must be briefly exposed to daylight. If the ADF can no longer
be activated or does not darken when the welding arc is ignited, the batteries must be replaced.
Warranty & liability
The warranty conditions can be found in the instructions of the manufacturer's national sales
organisation. Contact your authorised retailer for more details. A warranty is only given for
material and manufacturing defects. In the event of damage due to improper use, unauthorised
intervention or use not provided for by the manufacturer, the warranty and liability are void.
The liability and warranty are alsoavoid if spare parts other than those distributed by the
manufacturer are used.
Expected Lifetime
The welding helmet doesnot have an end-of-life date. The product can be used as
long as no visible or invisible damage or malfunctions occur.
Application (Quick Start Guide p. 4-5 / Functions p. 6-7)
Correct adjustment of the headband is very important for this product, because the benefits
of the large field of view are only ensured if the headband is correctly adjusted.
1. Headband head size/circumference. Adjust the rear dial to your head size. Make sure that
your eyes are approximately in the centre of the field of vision. (p. 5 no.3a)
2. Eye distance. With the dovetail connection, the distance between the helmet and eyes
is adjusted.Position the helmet as close as possible to the eyes (the closer the ADF is to
the eyes, the larger your field of vision will be). Adjust both sides equally without tilting.
(p. 5 no.3b).
3. Helmet angle (excentre) The helmet angle can be adjusted using the rotary knob. Adjust
the angle so that the nose does not touch the cut-out for the nose. Carefully perform a
test to ensure that the helmet shell does not touch your nose, even when you nod (use the
supplied nose pad to protect your nose). (p. 5 no.3c).
4. ShadeTronic/manual mode. You can use the slide switch to select the protection level
adjustment mode. In automatic (ShadeTronic) mode, the protection level is automatically
adapted to the intensity of the arc by means of sensors (EN 379:2003 standard). In manual
mode, the protection level can be set by turning the knob (p. 7 No. III + IV).
5. Protection level. Manual mode: In "Manual" mode, you can choose between protection
levels by turning the protection level control knob. (Protection mode correction is disabled
in manual mode). (p. 7 No. IV)
ShadeTronic: In ShadeTronic mode, the protection level is automatically adjusted and
corresponds to protection level according to EN 379 when the rotary knob is set to position
"N". By turning the knob, the automatically set protection level can be corrected by up to two
protection levels upwards or downwards depending on your personal preferences (the absolute
minimum and maximum protection levels, respectively cannot be undershot or exceeded,
regardless of the correction setting). (p. 7 No. III)
6. Opening time controller/delay. The opening time controller (Delay) (p. 6) allows you to select
the opening time delay from dark to light. The rotary knob supports continuous adjustment
from dark to light between 0.1 and 2.0 s (p. 6 no. II)
7. FadeTronic: The smooth transition from dark to light of the "FadeTronic" twilight effect offers
even better protection for the eyes against fatigue and irritation from afterglow objects and
gives the eye the time it needs to get used to the brightness. (p. 6 no. II) CAUTION: For quick
tack welding, do not set the rotary knob to the Twilight range. The “Tack” range with a minimal
opening delay is best suited.
8. Sensitivity. With the sensitivity button the light sensitivity is adjusted according to the welding
arc and the ambient light. This can be individually adjusted by turning the rotary knob. A very
high light sensitivity is achieved in the "Super High" range; this guarantees darkening even
with weak arcs. (p. 6 no. I)
9. Sensors. This welding helmet has 5 sensors. 4 sensors detect the welding light and 1 sensor
is responsible for detecting the light intensity (automatic mode) and the innovative Stay-Dark
function.
Cleaning and disinfection
The ADF must be cleaned regularly with a soft cloth. Do not use strong cleaning agents,
solvents, alcohol or cleaning agents containing abrasives. Scratched or damaged lenses should be
replaced.
Storage
The welding helmet should be stored at room temperature and low humidity. The helmet should
be stored in the light.
Replacing the front cover lens (p. 8) / inside cover lens (p. 4 nr. 4)
1. The front cover lens is removed from the anchorage, pull the tab on the inside, and push the
side lever to release the fastening.
2. Hook the new front cover lens into a lateral clip. Pull the finisher to the second side clip and
lock it in place. This manual action requires some application of pressure for the seal on the
finisher to have the desired effect.
Battery/charging process (p. 9)
The helmet has a high performance lithium polymer (LiPo) battery. Before using the battery
for the first time, fully charge it with the supplied Micro-USB cable via a commercially available
USB connector (not included). After charging, the Micro-USB socket on the helmet must be
protected from dust and dirt with the protective cap. The battery is also charged by external light
sources (ceiling light, welding light) via the solar cell. If the helmet is used frequently, the battery
will very rarely need charging. We recommend charging the helmet completely every 6 months.
If the battery is discharged, charging for approx. 15 minutes is sufficient for an operating time
of approx. 8 hours.
State of charge:
1) Red flash: Battery is almost discharged (charge immediately)
2) Orange permanently lit: Battery is charging
3) Green permanently lit: Battery is fully charged
If the helmet fails to darken when the welding arc is ignited, please check the state of charge (press the
grinding button: if the LED no longer f lashes blue, the batter y is completely discharged). If the ADF does
not function correctly when the battery is charged, contact your authorised retailer.
A defective battery can be replaced by the manufacturer or an approved optrel service partner.
Hard Hat
See extra manual for the Hard Hat.
Troubleshooting
ADF fails to darken
→ Adjust the sensitivity (p. 6 no. I)
→ Clean the sensors or front cover lens → Charge the battery (p. 9))
→ Switch off the opening delay - switch to "tack" for fast tack welding (p. 6 no. II)
Protection level too bright
→ In manual mode, select a higher protection level (p. 7 no. IV) → Replace the front cover
lens (p. 8)
→ In automatic mode, set the rotary knob to +1 or +2 (p. 7)
Protection level too dark
→ In manual mode, select a lower protection level (p. 7 no. IV)
→ In automatic mode, set the rotary knob to -1 or -2 (p.7 no. III)
ADF flickers
→ Adjust the position of the opening time control (delay) to suit the welding process (p. 6 no. II)
→ Adjust the sensitivity controller to suit the welding process (p. 6 no. I)
→ Charge the battery (p. 8)
Poor visibility
→ Clean the front cover lens or ADF
→ In manual mode, adjust the protection level to suit the welding process (p. 7 no. IV)
→ In automatic mode adapt the protection level correction to suit the welding proc ess (p. 7 no. III)
→ Increase the ambient light
Welding helmet slips
→ Re-adjust/tighten the headband (p. 5 no. 3a- 3c)
Flip up does not work
Check if the cover lens is inserted correctly.
If the fastening tab is pointing inwards, the inner flip may be jammed.
ENGLISH
14

Declaration of conformity
See the Internet address on the last page.
Legal information
This document complies with the requirements of EU Regulation 2016/425 section 1.4
of Annex II.
Notified body
For detailed information see last page.
This document complies with the requirements of EU Regulation 2016/425 section 1.4
Specifications Helix clt - 1050.200
Protection level auto mode: 2 (light mode) 4 < 12 (dark mode)
manual mode: 2 (light mode) 7 - 12 (dark mode)
UV/IR protection Maximum protection in light and dark modes
Switching time from light to dark 90μs (23°C / 73°F) 70μs (55°C / 131°F)
Switching time from dark to light fast = 0.1 - 2.0 s with “twilight effect”
Power supply Solar cells, lithium polymer battery
Weight 640 g / 16.9315 oz
Operating temperature -10°C – 55°C / 14°F – 131°F
Storage temperature -20°C – 70°C / - 4°F – 158°F
Classification according to
EN379 Optical class = 1 Homogeneity = 1
Scattered light = 1 Dependence on angle of view = 2
Approvals CE, UKCA, ANSI, ISO 16321 "WIG+
Specifications Helix quattro - 1050.100
Protection level auto mode: 3 (light mode) 4 < 13 (dark mode)
manual mode: 3 (light mode) 8 - 13 (dark mode)
UV/IR protection Maximum protection in light and dark modes
Switching time from light to dark 90μs (23°C / 73°F) 70μs (55°C / 131°F)
Switching time from dark to light fast = 0.1 - 2.0 s with “twilight effect”
Power supply Solar cells, lithium polymer battery
Weight 620 g / 16.9315 oz
Operating temperature -10°C – 55°C / 14°F – 131°F
Storage temperature -20°C – 70°C / - 4°F – 158°F
Classification according to
EN379 Optical class = 1 Homogeneity = 1
Scattered light = 1 Dependence on angle of view = 1
Approvals CE, UKCA, ANSI, ISO 16321 "WIG+
Specifications Helix 2.5 - 1050.000
Protection level auto mode: 2.5 (light mode) 5 < 12 (dark
mode)
manual mode: 2.5 (light mode) 7 - 12 (dark
mode)
UV/IR protection Maximum protection in light and dark modes
Switching time from light to dark 100μs (23°C / 73°F) 70μs (55°C / 131°F)
Switching time from dark to light fast = 0.1 - 2.0 s with “twilight effect”
Power supply Solar cells, lithium polymer battery
Weight 618 g / 16.9315 oz
Operating temperature -10°C –+55°C / +14°F –+131°F
Storage temperature -20°C – +70°C / - 4°F – +158°F
Classification according to
EN379 Optical class = 1 Homogeneity = 1
Scattered light = 1 Dependence on angle of view = 2
Approvals CE, UKCA, ANSI, ISO 16321 "WIG+
DEUTSCH
15
Einführung
Ein Schweißerhelm ist eine Kopfbedeckung, die bei bestimmten Schweißarbeiten Augen, Gesicht
und Hals vor Verbrennungen, UV-Licht, Funken, Infrarotlicht und Hitze schützt. Der Helm besteht
aus mehreren Teilen (siehe Ersatzteilliste). Ein Automatikschweißfilter kombiniert einen passiven
UV-Filter und einen passiven IR-Filter mit einem aktiven Filter, dessen Lichtdurchlässigkeit im
sichtbaren Bereich des Spektrums je nach Lichtintensität des Schweißlichtbogens variiert. Die
Lichtdurchlässigkeit des Automatikschweißfilters hat einen hohen Anfangswert (heller Zustand).
Nach dem Einschalten des Lichtbogens und innerhalb einer definierten
Reaktionszeit wechselt die Lichtdurchlässigkeit des Filters auf einen niedrigen
Wert (dunkler Zustand). Je nach Modell kann der Helm mit einem Schutzhelm und/
oder einem PAPR-System (Powered Air Purifying Respirator) kombiniert werden.
Sicherheitshinweise
Lesen Sie die Gebrauchsanweisung, bevor Sie den Helm benutzen. Vergewissern Sie sich, dass
die vordere Abdeckscheibe richtig montiert ist. Können Fehler nicht behoben werden, darf der
Helm nicht mehr verwendet werden. Für weitere Informationen wenden Sie sich bitte an Ihren
autorisierten Fachhändler.
Vorsichtsmaßnahmen und Schutzbeschränkungen/Risiken
Beim Schweißen werden Wärme und Strahlung freigesetzt, die zu Augen- und Hautverletzungen
führen können. Dieses Produkt bietet Schutz für die Augen und das Gesicht. Ihre Augen sind beim
Tragen des Helms immer gegen ultraviolette und infrarote Strahlung geschützt, unabhängig
von der gewählten Schutzstufe. Zum Schutz des übrigen Körpers muss ebenfalls geeignete
Schutzkleidung getragen werden. Die beim Schweißen freigesetzten Partikel und Stoffe
können bei entsprechend veranlagten Personen allergische Hautreaktionen auslösen. Bei
empfindlichen Personen kann der Hautkontakt mit dem Kopfteil zu allergischen Reaktionen führen.
Der Schweißhelm darf nur zum Schweißen und Schleifen und nicht für andere Anwendungen
verwendet werden. Der Hersteller übernimmt keine Haftung, wenn der Schweißhelm
nicht bestimmungsgemäß oder nicht in Übereinstimmung mit der Gebrauchsanweisung
verwendet wird. Der Helm ist für alle gängigen Schweißverfahren geeignet, ausgenommen
Gas- und Laserschweißen. Bitte beachten Sie die Schutzstufenempfehlung nach EN169 in
dieser Anleitung. Der Helm ist kein Ersatz für einen Schutzhelm. Der Helm kann mit einem
Schutzhelm kombiniert werden. Die konstruktiven Merkmale des Helms können das Sichtfeld
beeinträchtigen (keine periphere Sicht ohne Kopfdrehung) und die Lichtdurchlässigkeit des
automatischen Verdunkelungsfilters kann die Farbwahrnehmung beeinflussen. Dies kann dazu
führen, dass Signallampen oder Warnblinker nicht gesehen werden. Außerdem besteht aufgrund
der größeren Kontur (Kopf mit Helm) die Gefahr eines Aufpralls. Der Helm beeinträchtigt auch
das Gehör und reduziert das Wärmeempfinden. Warnhinweis: Für die Gesamtkennzeichnung
der Sicherheitsklasse des Helms ist immer die niedrigste aller verwendeten Komponenten
entscheidend. Für den Einsatz bei extremen Temperaturen ist auf die entsprechende
Kennzeichnung zu achten: FT, BT oder AT. Beim Tragen einer Brille können Stöße direkt vom
Helm auf den Kopf übertragen werden.
Farbige Ansicht
Um den Komfort und die Sicherheit zu erhöhen, können Sie mit diesem Schweißhelm Farben
erkennen.
Schlafmodus
Der ADF verfügt über eine automatische Abschaltfunktion, die die Lebensdauer der Batterie
verlängert. Wenn ca. 10 Minuten lang weniger als 1 Lux Licht auf das ADF trifft, schaltet sich das
ADF automatisch ab. Um die Kassette wieder einzuschalten, müssen die Solarzellen kurz dem
Tageslicht ausgesetzt werden. Lässt sich der ADF nicht mehr aktivieren oder verdunkelt er sich
nicht, wenn der Schweißlichtbogen gezündet wird, müssen die Batterien ausgetauscht werden.
Garantie und Haftung
Die Garantiebedingungen finden Sie in der Anleitung der nationalen Vertriebsorganisation des
Herstellers. Wenden Sie sich für weitere Einzelheiten an Ihren autorisierten Händler. Eine Garantie
wird nur für Material- und Herstellungsfehler gewährt. Bei Schäden, die auf unsachgemäßen
Gebrauch, unbefugte Eingriffe oder nicht vom Hersteller vorgesehenen Gebrauch zurückzuführen
sind, erlischt die Garantie und Haftung. Die Haftung und die Garantie entfallen auch, wenn andere
als die vom Hersteller vertriebenen Ersatzteile verwendet werden.
Erwartete Lebensdauer
Für den Schweißerhelm gibt es kein Enddatum der Lebensdauer. Das Produkt kann so
lange verwendet werden solange keine sichtbaren oder unsichtbaren Schäden oder
Fehlfunktionen auftreten.
Application (Quick Start Guide p. 4-5 / Functions p. 6-7)
Die korrekte Einstellung des Kopfbandes ist bei diesem Produkt sehr wichtig, da die Vorteile
Die Vorteile des großen Sichtfeldes sind nur dann gewährleistet, wenn der Kopfbügel richtig
eingestellt ist.
1. Kopfband Kopfgröße/Umfang. Stellen Sie das hintere Einstellrad auf Ihre Kopfgröße ein. Achten
Sie darauf, dass sich Ihre Augen ungefähr in der Mitte des Sichtfeldes befinden. (S. 5 Nr.3a)
2. Augenabstand. Mit der Schwalbenschwanzverbindung wird der Abstand zwischen Helm und
Augen eingestellt, wobei der Helm so nah wie möglich an den Augen positioniert wird (je näher
der ADF an den Augen ist, desto größer ist das Sichtfeld). je näher der ADF an den Augen ist,
desto größer ist Ihr Sichtfeld). Stellen Sie beide Seiten gleich ein, ohne
Kippen. (S. 5 Nr.3b).
3. Helmwinkel (Exzenter) Der Helmwinkel kann mit dem Drehknopf eingestellt werden. Stellen Sie
Stellen Sie den Winkel so ein, dass die Nase nicht den Ausschnitt für die Nase berührt. Führen
Sie einen vorsichtigen Test durch, um sicherzustellen, dass die Helmschale Ihre Nase nicht
berührt, selbst wenn Sie nicken (verwenden Sie das mitgelieferte Nasenpolster zum Schutz
Ihrer Nase). (S. 5 Nr.3c).

16
4. ShadeTronic/Manuell-Modus. Mit dem Schiebeschalter können Sie den Modus der
Schutzstufen einstellen. Im automatischen Modus (ShadeTronic) wird das Schutzniveau
automatisch der Intensität des Lichtbogens angepasst (Norm EN 379:2003). Im manuellen
Modus kann die Schutzstufe durch Drehen des Knopfes (S. 7 Nr. III + IV) eingestellt werden.
5. Schutzniveau. Manueller Modus: In der Betriebsart "Manuell" können Sie durch Drehen des
Schutzstufen durch Drehen des Schutzstufenreglers wählen. (Im manuellen Modus ist die
Schutzmoduskorrektur im manuellen Modus deaktiviert). (S. 7 Nr. IV)
ShadeTronic: Im ShadeTronic-Modus wird die Schutzstufe automatisch eingestellt und entspricht
und entspricht der Schutzstufe nach EN 379, wenn der Drehknopf auf die Position "N". Durch
Drehen des Drehknopfes kann die automatisch eingestellte Schutzstufe um bis zu zwei
Schutzstufen nach oben oder unten korrigiert werden. um bis zu zwei Schutzstufen nach oben
oder nach unten korrigiert werden (die (die absoluten Mindest- und Höchstschutzwerte können
unabhängig von der unabhängig von der Korrektureinstellung nicht unter- bzw. überschritten
werden). (S. 7 Nr. III)
6. Öffnungszeitregler/Verzögerung. Mit dem Öffnungszeitregler (Verzögerung) (S. 6) können
Sie die die Öffnungszeitverzögerung von dunkel nach hell. Der Drehknopf ermöglicht eine
stufenlose Einstellung von dunkel nach hell zwischen 0,1 und 2,0 s (S. 6 Nr. II)
7. FadeTronic: Der sanfte Übergang von Dunkel zu Hell des "FadeTronic"-Dämmerungseffekts
bietet noch besseren Schutz der Augen vor Ermüdung und Reizung durch eine nachleuchtende
Schweissnaht und gibt dem Auge die nötige Zeit, sich an die Helligkeit zu gewöhnen. (S. 6 Nr.
II) ACHTUNG: Beim schnellen Heftschweißen den Drehknopf nicht auf den Bereich "Twilight"
stellen. Der Bereich "Tack" mit minimaler Öffnungsverzögerung ist am besten geeignet.
8. Empfindlichkeit. Mit dem Empfindlichkeitsknopf wird die Lichtempfindlichkeit je nach
Schweißlichtbogen und Umgebungslicht eingestellt. Diese kann durch Drehen des
Drehknopfes individuell eingestellt werden. Eine sehr sehr hohe Lichtempfindlichkeit wird im
Bereich "Super High" erreicht, die eine Verdunkelung auch bei bei schwachen Lichtbögen.
(S. 6 Nr. I)
9. Die Sensoren. Dieser Schweißhelm verfügt über 5 Sensoren. 4 Sensoren erkennen das
Schweißlicht und 1 Sensor ist für die Erfassung der Lichtintensität (Automatikmodus) und
die innovative Stay-Dark Funktion.
Reinigung und Desinfektion
Der Schweissfilter muss regelmäßig mit einem weichen Tuch gereinigt werden. Verwenden Sie
keine starken Reinigungsmittel, Lösungsmittel, Alkohol oder Desinfektionssmittel. Verwenden
Sie keine Reunigungsmittel die Scheuermittel enthalten. Zerkratzte oder beschädigte
Vorsatzscheiben müssen ersetzt werden.
Lagerung
Der Schweißhelm sollte bei Raumtemperatur und niedriger Luftfeuchtigkeit gelagert werden.
Der Helm sollte im Licht gelagert werden.
Auswechseln der vorderen Abdeckscheibe (S. 8) / inneren Abdeckscheibe (S. 4 Nr. 4)
1. Nehmen Sie die vordere Scheibe aus der Verankerung, ziehen Sie an der Lasche auf der
Innenseite und drücken Sie den seitlichen Hebel, um die Befestigung zu lösen.
2. Die neue Frontscheibe in eine seitliche Klammer einhaken. Ziehen Sie die Wäschemangel
zur zweiten seitlichen Klammer und rasten Sie sie ein. Bei diesem manuellen Vorgang muss
etwas Druck ausgeübt werden, damit die Dichtung der Wäschemangel die gewünschte
Wirkung erzielt.
Batterie/Aufladevorgang (S. 9)
Der Helm verfügt über einen Hochleistungs-Lithium-Polymer-Akku (LiPo). Laden Sie den Akku
vor der ersten Verwendung mit dem mitgelieferten Micro-USB-Kabel über einen handelsüblichen
USB-Stecker (nicht im Lieferumfang enthalten) vollständig auf. Nach dem Aufladen muss die
Micro-USB-Buchse am Helm mit der Schutzkappe vor Staub und Schmutz geschützt werden.
Der Akku wird auch durch externe Lichtquellen (Deckenleuchte, Schweißlicht) über die Solarzelle
aufgeladen. Wenn der Helm häufig benutzt wird, muss der Akku nur sehr selten aufgeladen
werden. Wir empfehlen, den Helm alle 6 Monate vollständig aufzuladen. Ist der Akku entladen,
reicht eine Ladezeit von ca. 15 Minuten für eine Betriebszeit von ca. 8 Stunden.
Ladezustand:
1) Rotes Blinken: Akku ist fast entladen (sofort aufladen)
2) Orange leuchtet dauerhaft: Akku wird geladen
3) Grünes Dauerleuchten: Akku ist voll geladen
Wenn sich der Helm beim Zünden des Schweißlichtbogens nicht verdunkelt, überprüfen Sie bitte
den Ladezustand (drücken Sie die Schleifknopf drücken: wenn die LED nicht mehr blau blinkt,
ist der Akku vollständig entladen).
Wenn der Helm nicht richtig funktioniert, wenden Sie sich bitte an Ihren Fachhändler.
Ein defekter Akku kann durch den Hersteller oder einen autorisierten optrel Servicepartner
ausgetauscht werden.
Hard Hat
Siehe zusätzliches Handbuch für den Schutzhelm.
Troubleshooting
Der Schweissfilter wird nicht dunkel
→ Stellen Sie die Empfindlichkeit ein (S. 6 Nr. I)
→ Reinigen Sie die Sensoren oder die Linse der Frontabdeckung → Laden Sie den Akku
auf (S. 9))
→ Ausschalten der Öffnungsverzögerung - Umschalten auf "Riegel" für schnelles
Riegelschweißen (S. 6 Nr. II)
Schutzstufe zu hell
→ Im Handbetrieb eine höhere Schutzstufe wählen (S. 7 Nr. IV) → Frontlinse austauschen
(S. 8)
→ Stellen Sie im Automatikbetrieb den Drehknopf auf +1 oder +2 (S. 7)
Schutzstufe zu dunkel
→ Wählen Sie im manuellen Modus eine niedrigere Schutzstufe (S. 7 Nr. IV)
→ Stellen Sie den Drehknopf im Automatikmodus auf -1 oder -2 (S. 7 Nr. III)
Schweissfilter flackert
→ Passen Sie die Position des Öffnungszeitreglers (Verzögerung) an den
Schweißprozess an (S. 6 Nr. II)
→ Passen Sie den Empfindlichkeitsregler an den Schweißprozess an (S. 6 Nr. I)
→ Laden Sie den Akku auf (S. 8)
Schlechte Sicht
→ Reinigen Sie die Linse der Frontabdeckung oder den ADF
→ Passen Sie im manuellen Modus die Schutzstufe an den Schweißprozess an (S.
7 Nr. IV)
→ Im Automatikbetrieb die Schutzstufenkorrektur an den Schweißprozess anpassen
(S. 7 Nr. III)
→ Erhöhen Sie das Umgebungslicht
Schweißerhelm rutscht
→ Kopfband nachjustieren/festziehen (S. 5 Nr. 3a- 3c)
→Hochklappen funktioniert nicht
Prüfen Sie, ob die Abdeckscheibe richtig eingesetzt ist.
Wenn die Befestigungslasche nach innen zeigt, kann die innere Klappe verklemmt
sein.
Konformitätserklärung
Siehe die Internetadresse auf der letzten Seite.
Rechtliche Informationen
Dieses Dokument erfüllt die Anforderungen der Verordnung (EU) 2016/425 Abschnitt 1.4
des Anhangs II.
Benannte Stelle
Ausführliche Informationen finden Sie auf der letzten Seite.
Dieses Dokument entspricht den Anforderungen der EU-Verordnung 2016/425, Abschnitt 1.4.
Spezifikationen Helix clt - 1050.200
Schutzniveau Auto-Modus: 2 (heller Modus) 4 < 12 (dunkler Modus)
manueller Modus: 2 (heller Modus) 7 - 12 (dunkler
Modus)
UV/IR-Schutz Maximaler Schutz im Hell- und Dunkelmodus
Umschaltzeit von hell auf dunkel 90μs (23°C / 73°F) 70μs (55°C / 131°F)
Schaltzeit von dunkel nach hell schnell = 0,1 - 2,0 s mit "Dämmerungseffekt"
Stromzufuhr Solarzellen, Lithium-Polymer-Akku
Gewicht 640 g / 16,9315 Unzen
Betriebstemperatur -10°C - 55°C / 14°F - 131°F
Lagertemperatur -20°C - 70°C / -4°F - 158°F
Klassifizierung nach EN379 Optische Klasse = 1 Homogenität = 1
Streulicht = 1 Abhängigkeit vom Blickwinkel = 2
Zulassungen CE, UKCA, ANSI, ISO 16321 "WIG+
Spezifikationen Helix quattro - 1050.100
Schutzniveau Auto-Modus: 3 (heller Modus) 4 < 13 (dunkler
Modus)
Manueller Modus: 3 (heller Modus) 8 - 13 (dunkler
Modus)
UV/IR-Schutz Maximaler Schutz im hellen und dunklen Modus
Umschaltzeit von hell auf dunkel 90μs (23°C / 73°F) 70μs (55°C / 131°F)
Schaltzeit von dunkel nach hell schnell = 0,1 - 2,0 s mit "Dämmerungseffekt"
Stromzufuhr Solarzellen, Lithium-Polymer-Akku
Gewicht 620 g / 16,9315 Unzen
Betriebstemperatur -10°C - 55°C / 14°F - 131°F
Lagertemperatur -20°C - 70°C / -4°F - 158°F
Klassifizierung nach EN379 Optische Klasse = 1 Homogenität = 1
Streulicht = 1 Abhängigkeit vom Blickwinkel = 1
Zulassungen CE, UKCA, ANSI, ISO 16321 "WIG+
Spezifikationen Helix 2.5 - 1050.000
Schutzniveau Auto-Modus: 2,5 (heller Modus) 5 < 12 (dunkler Modus)
manueller Modus: 2,5 (heller Modus) 7 - 12 (dunkler
Modus)
UV/IR-Schutz Maximaler Schutz im Hell- und Dunkelmodus
Umschaltzeit von hell auf dunkel 100μs (23°C / 73°F) 70μs (55°C / 131°F)
Schaltzeit von dunkel nach hell schnell = 0,1 - 2,0 s mit "Dämmerungseffekt"
Stromzufuhr Solarzellen, Lithium-Polymer-Akku
Gewicht 618 g / 16.9315 oz
Betriebstemperatur -10°C -+55°C / +14°F -+131°F
Lagertemperatur -20°C - +70°C / -4°F - +158°F
Klassifizierung nach EN379 Optische Klasse = 1 Homogenität = 1
Streulicht = 1 Abhängigkeit vom Blickwinkel = 2
Zulassungen CE, UKCA, ANSI, ISO 16321 "WIG+

17
FRANÇAIS
Introduction
Un casque de soudage est un article de coiffure qui sert à protéger les yeux, le visage et le
cou des brûlures, des rayons UV, des étincelles, des rayons infrarouges et de la chaleur lors
de certaines opérations de soudage. Le casque est constitué de plusieurs pièces (voir la
liste des pièces détachées). Un filtre de soudage automatique combine un filtre UV passif
et un filtre IR passif avec un filtre actif dont la transmission de la lumière dans la gamme
visible du spectre varie en fonction de l'intensité lumineuse de l'arc de soudage. Le facteur
de transmission de la lumière du filtre de soudage automatique a une valeur initiale élevée
(état lumineux). Après l'allumage de l'arc de soudage et dans un temps de réponse défini, le
facteur de transmission de la lumière du filtre passe à une valeur faible (état sombre). Selon
le modèle, le casque peut être combiné avec un casque de sécurité et/ou un système PAPR
(Powered Air Purifying Respirator).
Consignes de sécurité
Lisez le manuel d'instructions avant d'utiliser le casque. Assurez-vous que la lentille de
protection frontale est montée correctement. S'il n'est pas possible de remédier aux défauts,
le casque ne doit plus être utilisé. Pour de plus amples informations, veuillez contacter votre
revendeur agréé.
Précautions et restrictions de protection / risques
Pendant le processus de soudage, de la chaleur et des radiations sont libérées ; cela peut
provoquer des blessures aux yeux et à la peau. Ce produit offre une protection pour les yeux et
le visage. Vos yeux sont toujours protégés contre les rayons ultraviolets et infrarouges lorsque
vous portez le casque, quel que soit le niveau de protection sélectionné. Des vêtements de
protection appropriés doivent également être portés pour protéger le reste de votre corps. Les
particules et les substances libérées pendant le processus de soudage peuvent déclencher
des réactions allergiques cutanées chez les personnes ayant cette disposition. Chez les
personnes sensibles, le contact de la peau avec la partie de la tête peut entraîner des réactions
allergiques. Le casque de soudage ne doit être utilisé que pour le soudage et le meulage et non
pour d'autres applications. Le fabricant décline toute responsabilité si le casque de soudage
n'est pas utilisé comme prévu ou conformément au mode d'emploi.Il est interdit d'apposer
des autocollants, des impressions ou autres sur le casque. Le casque convient à tous les
procédés de soudage courants, à l'exception du soudage au gaz et au laser.
Veuillez noter la recommandation du niveau de protection selon la norme EN169 dans ce
manuel. Le casque ne remplace pas un casque de sécurité. Le casque peut être combiné
avec un casque de sécurité. Les caractéristiques de conception du casque peuvent affecter
le champ de vision (pas de vision périphérique sans tourner la tête) et la transmission de la
lumière du filtre d'obscurcissement automatique peut affecter la perception des couleurs. Par
conséquent, les feux de signalisation ou les indicateurs d'avertissement peuvent ne pas être
vus. En outre, il existe un risque d'impact en raison du contour plus large (tête avec casque).
Le casque altère également l'audition et réduit la sensation de chaleur. Avertissement : Pour
le marquage global de la classe de sécurité du casque, le plus faible de tous les composants
utilisés est toujours déterminant. Pour une utilisation dans des températures extrêmes, faites
attention à l'étiquetage approprié : FT, BT ou AT. Lorsque vous portez des lunettes, les chocs
peuvent être transférés directement du casque à la tête.
Vue en couleur
Pour plus de commodité et de sécurité, vous pouvez reconnaître les couleurs avec ce casque
de soudage.
Mode veille
L'ADF dispose d'une fonction d'extinction automatique qui augmente la durée de vie de la
batterie. Si moins de 1 lux de lumière atteint l'ADF pendant environ 10 minutes, l'ADF s'éteint
automatiquement. Pour le remettre en marche, les cellules solaires doivent être brièvement
exposées à la lumière du jour. Si l'ADF ne peut plus être activé ou ne s'assombrit pas lorsque
l'arc de soudage est allumé, les piles doivent être remplacées.
Garantie et responsabilité
Les conditions de garantie se trouvent dans les instructions de l'organisation nationale de
vente du fabricant. Contactez votre revendeur agréé pour plus de détails. Une garantie
n'est accordée que pour les défauts de matériel et de fabrication. En cas de dommages
dus à une utilisation inappropriée, une intervention non autorisée ou une utilisation non
prévue par le fabricant, la garantie et la responsabilité sont annulées. La responsabilité et
la garantie sont également annulées en cas d'utilisation de pièces de rechange autres que
celles distribuées par le fabricant.
Durée de vie prévue
Le casque de soudage n'a pas de date de fin de vie. Le produit peut être utilisé tant que
tant qu'il n'y a pas de dommages ou de dysfonctionnements visibles ou invisibles.
Application (Quick Start Guide p. 4-5 / Functions p. 6-7)
Un ajustement correct du bandeau est très important pour ce produit, car les avantages
du grand champ de vision ne sont garantis que si le bandeau est correctement ajusté.
car les avantages du grand champ de vision ne sont garantis que si le bandeau est
correctement ajusté.
1. Taille/circonférence de la tête du bandeau. Réglez la molette arrière en fonction de votre
taille de tête. Assurez-vous que vos yeux se trouvent approximativement au centre du
champ de vision. (p. 5 no.3a)
2. Distance entre les yeux. La connexion en queue d'aronde permet de régler la distance
entre le casque et les yeux.Positionnez le casque aussi près que possible des yeux (plus
l'ADF est proche des yeux, plus votre champ de vision sera grand). Plus l'ADF est proche
des yeux, plus le champ de vision est large). Réglez les deux côtés de manière égale sans
inclinaison. (p. 5 no.3b).
3. Angle du casque (excentrique) L'angle du casque peut être réglé à l'aide du bouton rotatif.
Réglez l'angle de façon à ce que le nez ne touche pas la découpe pour le nez. Effectuez
soigneusement un test pour vérifier que la coque du casque ne touche pas votre nez, même
lorsque vous hochez la tête (utilisez la protection nasale fournie pour protéger votre nez).
(utilisez le coussinet nasal fourni pour protéger votre nez). (p. 5 no.3c).
4. Mode ShadeTronic/manuel. Vous pouvez utiliser l'interrupteur à glissière pour
sélectionner le mode de réglage du niveau de protection. mode de réglage du niveau de
protection. En mode automatique (ShadeTronic), le niveau de protection est automatiquement
adapté à l'intensité de l'arc au moyen de capteurs (EN 379). automatiquement à l'intensité de l'arc
électrique grâce à des capteurs (norme EN 379:2003). En mode manuel le niveau de protection
peut être réglé en tournant le bouton (p. 7 No. III + IV).
5. Niveau de protection. Mode manuel : En mode "Manuel", vous pouvez choisir le niveau de
protection en niveaux de protection en tournant le bouton de contrôle du niveau de protection.
(La correction du mode de protection est désactivée en mode manuel). (p. 7 n° IV)
ShadeTronic : En mode ShadeTronic, le niveau de protection est automatiquement ajusté et
correspond au niveau de protection selon la norme EN 379. correspond au niveau de protection
selon la norme EN 379 lorsque le bouton rotatif est réglé sur la position "N". En tournant le
bouton, le niveau de protection réglé automatiquement peut être corrigé de deux niveaux d e
protection au maximum, vers le haut ou vers le bas, en fonction de la position de l'écran. deux
niveaux de protection vers le haut ou vers le bas, selon vos préférences personnelles (les
niveaux de protection minimum et maximum absolus, respectivement). les niveaux de protection
minimum et maximum absolus, respectivement, ne peuvent pas être sous ou dépassés, quel
que soit le réglage de la correction). (p. 7 No. III)
6. Contrôleur de temps d'ouverture/délai. Le contrôleur de temps d'ouverture (Delay) (p. 6) vous
permet de sélectionner le délai d'ouverture de l'obscurité à la lumière. le délai d'ouverture de
l'obscurité à la lumière. Le bouton rotatif permet un réglage continu de l'obscurité à la lumière
entre 0,1 et 2,0 s (p. 6 no. II).
7. FadeTronic : La transition en douceur de l'obscurité à la lumière de l'effet crépusculaire
"FadeTronic" offre une protection encore plus efficace des yeux contre la fatigue et l'irritation
causées par les objets rémanents. donne à l'œil le temps nécessaire pour s'habituer à la
luminosité. (p. 6 no. II) ATTENTION : Pour le soudage rapide à l'arc, ne réglez pas la rotation
de la lampe à l'aide d'un tournevis. ne réglez pas le bouton rotatif sur la plage crépusculaire. La
gamme "Tack" avec un délai d'ouverture délai d'ouverture minimal est la plus appropriée.
8. Sensibilité. Le bouton de sensibilité permet de régler la sensibilité de la lumière en fonction de
l'arc de soudage et de la lumière ambiante. l'arc de soudage et de la lumière ambiante. Elle peut
être réglée individuellement en tournant le bouton rotatif. Une très Une sensibilité à la lumière
très élevée est obtenue dans la gamme "Super High" ; cela garantit l'obscurcissement même
avec des arcs faibles. (p. 6 no. I)
9. Capteurs. Ce casque de soudage est équipé de 5 capteurs. 4 capteurs détectent la lumière
de soudage et 1 capteur est responsable de la détection de l'intensité lumineuse (mode
automatique) et de la fonction innovante
Nettoyage et désinfection
L'ADF doit être nettoyé régulièrement avec un chiffon doux. N'utilisez pas de produits de nettoyage
puissants, solvants, de l'alcool ou des produits de nettoyage contenant des abrasifs. Les lentilles
rayées ou endommagées doivent êtreremplacées.
Stockage
Le casque de soudage doit être stocké à température ambiante et à faible humidité. Le casque
doit être stocké
à la lumière.
Remplacement de la lentille du couvercle avant (p. 8) / de la lentille du couvercle intérieur (p. 4 nr. 4)
1. La lentille de couverture avant est retirée de l'ancrage, tirez la languette à l'intérieur et poussez
le levier latéral pour libérer la fixation.
2. Accrochez la nouvelle lentille de couverture frontale dans un clip latéral. Tirer le finisseur
jusqu'au deuxième clip latéral et le verrouiller en place. Cette action manuelle nécessite une
certaine pression pour que le joint du finisseur ait l'effet désiré.
Batterie/processus de charge (p. 9)
Le casque est équipé d'une batterie lithium polymère (LiPo) haute performance. Avant d'utiliser
la batterie pour la première fois, chargez-la complètement avec le câble Micro-USB fourni via
un connecteur USB disponible dans le commerce (non inclus). Après le chargement, la prise
Micro-USB du casque doit être protégée de la poussière et de la saleté à l'aide du capuchon de
protection. La batterie est également chargée par des sources de lumière externes (plafonnier,
lampe de soudage) via la cellule solaire. Si le casque est utilisé fréquemment, la batterie aura
très rarement besoin d'être rechargée. Nous recommandons de charger complètement le casque
tous les 6 mois. Si la batterie est déchargée, une charge d'environ 15 minutes est suffisante pour
une durée de fonctionnement d'environ 8 heures.
État de charge :
1) Clignotement rouge : la batterie est presque déchargée (chargez-la immédiatement).
2) Orange allumé en permanence : La batterie est en cours de charge
3) Vert allumé en permanence : La batterie est complètement chargée.
Si le casque ne s'assombrit pas lors de l'allumage de l'arc de soudage, veuillez vérifier l'état
de charge (appuyer sur le bouton de broyage : si la LED ne clignote plus en bleu, la batterie est
complètement déchargée). Si l'ADF ne ne fonctionne pas correctement lorsque la batterie est
chargée, contactez votre revendeur agréé. Une batterie défectueuse peut être remplacée par le
fabricant ou un partenaire de service agréé optrel.
Hard Hat
Voir le manuel supplémentaire pour le casque de sécurité.
Dépannage
L'ADF ne parvient pas à foncer
→ Réglez la sensibilité (p. 6 no. I)
→ Nettoyez les capteurs ou la lentille du capot avant → Chargez la batterie (p. 9)).
→ Désactivez le délai d'ouverture - passez en mode " tack " pour un soudage rapide par points
(p. 6 n° II).
Niveau de protection trop lumineux
→ En mode manuel, sélectionnez un niveau de protection plus élevé (p. 7 n° IV) →
Remplacez la lentille du couvercle avant (p. 8).
→ En mode automatique, réglez le bouton rotatif sur +1 ou +2 (p. 7).
Niveau de protection trop sombre
→ En mode manuel, sélectionnez un niveau de protection inférieur (p. 7 n° IV).
→ En mode automatique, réglez le bouton rotatif sur -1 ou -2 (p. 7 n° III).
L'ADF c lign ote
→ Réglez la position de la commande de temps d'ouverture (délai) en fonction du procédé de

18
SVENSKA
soudage (p. 6 n° II).
→ Réglez le contrôleur de sensibilité en fonction du procédé de soudage (p. 6 n° I).
→ Chargez la batterie (p. 8).
Mauvaise visibilité
→ Nettoyer la lentille du capot avant ou l'ADF.
→ En mode manuel, adaptez le niveau de protection en fonction du processus de soudage
(p. 7 n° IV).
→ En mode automatique, adapter la correction du niveau de protection en fonction du
procédé de soudage (p. 7 n° III).
→ Augmenter la lumière ambiante
Glissements du casque de soudage
→ Réajuster/serrer le serre-tête (p. 5 n° 3a- 3c).
Le basculement vers le haut ne fonctionne pas
Vérifiez si la lentille de couverture est insérée correctement.
If the fastening tab is pointing inwards, the inner flip may be jammed.
Declaration of conformity
See the Internet address on the last page.
Legal information
This document complies with the requirements of EU Regulation 2016/425 section 1.4
of Annex II.
Notified body
For detailed information see last page.
Ce document est conforme aux exigences du règlement européen 2016/425 section 1.4.
Spécifications Helix clt - 1050.200
Niveau de protection mode automatique : 2 (mode clair) 4 < 12 (mode sombre)
mode manuel : 2 (mode clair) 7 - 12 (mode foncé)
Protection UV/IR Protection maximale en modes clair et foncé
Temps de passage de la
lumière à
l'obscurité
90μs (23°C / 73°F) 70μs (55°C / 131°F)
Temps de commutation de
l'obscurité
à la lumière
rapide = 0,1 - 2,0 s avec " effet crépusculaire ".
Alimentation électrique Cellules solaires, batterie au lithium polymère
Poids 640 g / 16,9315 oz
Température de fonctionnement -10°C - 55°C / 14°F - 131°F
Température de stockage -20°C - 70°C / - 4°F - 158°F
Classification selon la norme
EN379 Classe optique = 1 Homogénéité = 1
Lumière diffusée = 1 Dépendance de l'angle de vue = 2
Homologations CE, UKCA, ANSI, ISO 16321 "WIG+
Spécifications Helix quattro - 1050.100
Niveau de protection mode automatique : 3 (mode clair) 4 < 13 (mode
sombre)
mode manuel : 3 (mode clair) 8 - 13 (mode foncé)
Protection UV/IR Protection maximale en modes clair et foncé.
Temps de passage de la
lumière à
l'obscurité
90μs (23°C / 73°F) 70μs (55°C / 131°F)
Temps de commutation de
l'obscurité
à la lumière
rapide = 0,1 - 2,0 s avec " effet crépusculaire ".
Alimentation électrique Cellules solaires, batterie au lithium polymère
Poids 620 g / 16,9315 oz
Température de fonctionnement -10°C - 55°C / 14°F - 131°F
Température de stockage -20°C - 70°C / - 4°F - 158°F
Classification selon la norme
EN379 Classe optique = 1 Homogénéité = 1
Lumière diffusée = 1 Dépendance à l'angle de vue = 1
Homologations CE, UKCA, ANSI, ISO 16321 "WIG+
Spécifications Helix 2.5 - 1050.000
Niveau de protection mode automatique : 2,5 (mode clair) 5 < 12 (mode
sombre)
mode manuel : 2,5 (mode clair) 7 - 12 (mode foncé)
Protection UV/IR Protection maximale en modes clair et sombre.
Temps de passage de la
lumière à
l'obscurité
100μs (23°C / 73°F) 70μs (55°C / 131°F)
Temps de commutation de
l'obscurité
à la lumière
rapide = 0,1 - 2,0 s avec " effet crépusculaire ".
Alimentation électrique Cellules solaires, batterie au lithium polymère
Poids 618 g / 16,9315 oz
Température de fonctionnement -10°C -+55°C / +14°F -+131°F
Température de stockage -20°C - +70°C / - 4°F - +158°F
Classification selon la norme
EN379 Classe optique = 1 Homogénéité = 1
Lumière diffusée = 1 Dépendance de l'angle de vue = 2
Homologations CE, UKCA, ANSI, ISO 16321 "WIG+
Introduktion
En svetshjälm är en huvudbonad som används för att skydda ögon, ansikte och hals från
brännskador, UV-ljus, gnistor, infrarött ljus och värme under vissa svetsarbeten. Hjälmen består
av flera delar (se reservdelsförteckning). Ett automatiskt svetsfilter kombinerar ett passivt
UV-filter och ett passivt IR-filter med ett aktivt filter vars ljusgenomsläpplighet i det synliga
spektrumområdet varierar beroende på ljusintensiteten i svetsbågen. Ljusgenomsläppligheten
hos det automatiska svetsfiltret har ett högt utgångsvärde (ljustillstånd).
Efter att svetsbågen har slagits på och inom en definierad svarstid ändras filtrets
ljusgenomsläpplighet till ett lågt värde (mörkt tillstånd). Beroende på modell kan hjälmen
kombineras med en skyddshjälm och/eller ett PAPR-system (Powered Air Purifying
Respirator).
Säkerhetsanvisningar
Läs bruksanvisningen innan du använder hjälmen. Kontrollera att den främre
skyddsglasögonlinsen är korrekt monterad. Om felet inte kan åtgärdas får hjälmen inte längre
användas. Kontakta din auktoriserade återförsäljare för ytterligare information.
Försiktighetsåtgärder och skyddsrestriktioner/risker
Under svetsprocessen frigörs värme och strålning; detta kan orsaka ögon- och hudskador.
Den här produkten ger skydd för ögon och ansikte. Dina ögon är alltid skyddade mot ultraviolett
och infraröd strålning när du bär hjälmen, oavsett vald skyddsnivå. Lämpliga skyddskläder
måste också bäras för att skydda resten av kroppen. Partiklar och ämnen som frigörs under
svetsprocessen kan utlösa allergiska hudreaktioner hos personer med denna läggning.
Hos känsliga personer kan hudkontakt med huvuddelen leda till allergiska reaktioner.
Svetshjälmen får endast användas för svetsning och slipning och inte för andra tillämpningar.
Tillverkaren tar inget ansvar om svetshjälmen inte används på avsett sätt eller om den inte
används i enlighet med bruksanvisningen. det är inte tillåtet att anbringa klistermärken,
tryck eller liknande på hjälmen. Hjälmen är lämplig för alla vanliga svetsprocesser, utom
gas- och lasersvetsning. Observera rekommendationen för skyddsnivå enligt EN169 i denna
bruksanvisning. Hjälmen ersätter inte en skyddshjälm. Hjälmen kan kombineras med en
skyddshjälm. Hjälmens konstruktionsegenskaper kan påverka synfältet (ingen perifer syn
utan att vrida huvudet) och ljusgenomsläppligheten hos det automatiska mörkläggningsfiltret
kan påverka färguppfattningen. Som en följd av detta kan signal- eller varningslampor inte
ses. Dessutom finns det en risk för kollisioner på grund av den större konturen (huvudet med
hjälm). Hjälmen försämrar också hörseln och minskar värmeupplevelsen. Varning: För den
övergripande märkningen av hjälmens säkerhetsklass är alltid den lägsta av alla använda
komponenter avgörande. Vid användning i extrema temperaturer ska du vara uppmärksam
på lämplig märkning: FT, BT eller AT. När man bär glasögon kan stötar överföras direkt från
hjälmen till huvudet.
Färgvisning
För att öka bekvämligheten och säkerheten kan du känna igen färger med den här
svetshjälmen.
Sömnläge
ADF:n har en automatisk avstängningsfunktion som ökar batteriets livslängd. Om mindre än
1 lux ljus når ADF:n under ca 10 minuter stängs ADF:n av automatiskt. För att slå på kassetten
igen måste solcellerna utsättas kortvarigt för dagsljus. Om ADF:n inte längre kan aktiveras
eller inte mörknar när svetsbågen antänds måste batterierna bytas ut.
Garanti och ansvar
Garantivillkoren finns i anvisningarna från tillverkarens nationella försäljningsorganisation.
Kontakta din auktoriserade återförsäljare för mer information. Garanti ges endast för material-
och tillverkningsfel. I händelse av skador som beror på felaktig användning, obehörigt ingrepp
eller användning som inte är föreskriven av tillverkaren, upphör garantin och ansvaret att
gälla. Ansvaret och garantin upphör också om andra reservdelar än de som distribueras
av tillverkaren används.
Förväntad livslängd
Svetshjälmen har inget slutdatum för sin livslängd. Produkten kan användas som
så länge inga synliga eller osynliga skador eller fel uppstår.
Applikation (Snabbstartguide s. 4-5 / Funktioner s. 6-7)
Korrekt justering av huvudbandet är mycket viktigt för den här produkten, eftersom fördelarna
av det stora synfältet endast säkerställs om huvudbandet är korrekt justerat.
1. Huvudbandets huvudstorlek/omkrets. Justera den bakre ratten till din huvudstorlek. Se
till att dina ögon befinner sig ungefär i mitten av synfältet. (s. 5 nr 3a)
2. Ögonavstånd. Med hjälp av svalkstjärneanslutningen justeras avståndet mellan hjälmen
och ögonen. placera hjälmen så nära ögonen som möjligt (ju närmare ADF:en är. till
ögonen, desto större blir ditt synfält). Justera båda sidorna lika mycket utan lutning. (s.
5 nr 3b).
3. Hjälmvinkel (excenter) Hjälmvinkeln kan justeras med hjälp av vridknappen. Justera
vinkeln så att näsan inte vidrör uttaget för näsan. Utför försiktigt en test för att se till att
hjälmskalet inte rör vid näsan, även när du nickar (använd den medföljande nässkyddet
för att skydda din näsa). (s. 5 nr 3c).
4. ShadeTronic/manuellt läge. Du kan använda skjutknappen för att välja skyddsnivå.
justeringsläge. I det automatiska läget (ShadeTronic) är skyddsnivån automatiskt
automatiskt till ljusbågens intensitet med hjälp av sensorer (standard EN 379:2003). I
manuellt läge kan skyddsnivån ställas in genom att vrida på vredet (s. 7 nr III + IV).
5. Skyddsnivå. Manuellt läge: I det manuella läget kan du välja mellan skydd. nivåer genom

19
att vrida på kontrollratten för skyddsnivå. (Korrigering av skyddsläget är inaktiverad.
i manuellt läge). (s. 7 nr IV) ShadeTronic: I läget ShadeTronic justeras skyddsnivån
automatiskt och motsvarar skyddsnivån enligt EN 379 när vridknappen är inställd
på läge "N". Genom att vrida vredet kan den automatiskt inställda skyddsnivån
korrigeras med upp till två skyddsnivåer uppåt eller nedåt beroende på dina personliga
preferenser (den absoluta lägsta och högsta skyddsnivåerna kan inte underskridas
eller överskridas, oavsett korrigeringsinställningen). (s. 7 nr III)
6. Regler/fördröjning av öppningstid. Med öppningstidsregulatorn (fördröjning) (s. 6)
kan du välja följande. öppningstidsfördröjningen från mörkt till ljust. Vridratten stöder
kontinuerlig justering från mörker till ljus mellan 0,1 och 2,0 s (s. 6 nr II).
7. FadeTronic: Den mjuka övergången från mörker till ljus i skymningseffekten
"FadeTronic" erbjuder ett ännu bättre skydd för ögonen mot trötthet och irritation från
efterlysande föremål och ger ögat den tid det behöver för att vänja sig vid ljusstyrkan.
(s. 6 nr II) FÖRSIKTIGHET: För snabb häftsvetsning får du inte ställa in vridknappen
på Twilight-området. Området "Tack" med en minimal öppningsfördröjning är bäst
lämpat.
8. Känslighet. Med känslighetsknappen justeras ljuskänsligheten enligt svetsningen.
bågen och det omgivande ljuset. Detta kan justeras individuellt genom att vrida på
vridknappen. En mycket hög ljuskänslighet uppnås i området "Super High".med
svaga ljusbågar. (s. 6 nr. I)
9. Sensorer. Den här svetshjälmen har 5 sensorer. 4 sensorer registrerar svetsljuset
och 1 sensor är ansvarig för att upptäcka ljusintensiteten (automatiskt läge) och den
innovativa Stay-Dark funktion.
Rengöring och desinfektion
ADF:n måste rengöras regelbundet med en mjuk trasa. Använd inte starka
rengöringsmedel, lösningsmedel, alkohol eller rengöringsmedel som innehåller
slipmedel. Repade eller skadade linser ska bytas ut.
Förvaring
Svetshjälmen ska förvaras vid rumstemperatur och låg luftfuktighet. Hjälmen bör
förvaras i ljuset.
Byte av linsen på framsidan (s. 8) / linsen på insidan (s. 4 nr. 4).
1. Den främre täcklinsen avlägsnas från förankringen, dra i fliken på insidan och tryck
på sidospaken för att lossa fästet.
2. Haka fast den nya linsen för det främre täcklocket i ett sidoklipp. Dra finishen till
det andra sidoklippet och lås den på plats. Denna manuella åtgärd kräver ett visst
tryck för att förseglingen på finishen ska få önskad effekt.
Batteri/laddningsprocess (s. 9)
Hjälmen har ett högpresterande litiumpolymerbatteri (LiPo). Innan du använder batteriet
för första gången ska du ladda det fullständigt med den medföljande Micro-USB-kabeln
via en kommersiellt tillgänglig USB-kontakt (ingår inte). Efter laddning måste Micro-
USB-uttaget på hjälmen skyddas från damm och smuts med skyddslocket. Batteriet
laddas också av externa ljuskällor (taklampa, svetslampa) via solcellen. Om hjälmen
används ofta behöver batteriet mycket sällan laddas. Vi rekommenderar att hjälmen
laddas fullständigt var sjätte månad. Om batteriet är urladdat räcker en laddning på ca
15 minuter för en drifttid på ca 8 timmar.
Laddningstillstånd:
1) Röd blinkning: Batteriet är nästan urladdat (ladda omedelbart).
2) Orangefärgad permanent tändning: Batteriet laddas
3) Grön permanent tänd: Batteriet är fullt laddat.
Om hjälmen inte mörknar när svetsbågen antänds, kontrollera laddningstillståndet (tryck
på slipningsknappen: om lysdioden inte längre blinkar blått är batteriet helt urladdat).
Om ADF:n inte inte fungerar korrekt när batteriet är laddat, kontakta din auktoriserade
återförsäljare.
Ett defekt batteri kan bytas ut av tillverkaren eller en godkänd optrel-servicepartner.
Hard Hat
Se den extra manualen för den hårda hatten.
Felsökning
ADF fails to darken
→ Adjust the sensitivity (p. 6 no. I)
→ Clean the sensors or front cover lens → Charge the battery (p. 9))
→ Switch off the opening delay - switch to "tack" for fast tack welding (p. 6 no. II)
Protection level too bright
→ In manual mode, select a higher protection level (p. 7 no. IV) → Replace the front
cover lens (p. 8)
→ In automatic mode, set the rotary knob to +1 or +2 (p. 7)
Protection level too dark
→ In manual mode, select a lower protection level (p. 7 no. IV)
→ In automatic mode, set the rotary knob to -1 or -2 (p.7 no. III)
ADF flickers
→ Adjust the position of the opening time control (delay) to suit the welding process
(p. 6 no. II)
→ Adjust the sensitivity controller to suit the welding process (p. 6 no. I)
→ Charge the battery (p. 8)
Poor visibility
→ Clean the front cover lens or ADF
→ In manual mode, adjust the protection level to suit the welding process (p. 7 no. IV)
→ In automatic mode adapt the protection level correction to suit the welding process
(p. 7 no. III)
→ Increase the ambient light
Welding helmet slips
→ Re-adjust/tighten the headband (p. 5 no. 3a- 3c)
Flip up does not work
Check if the cover lens is inserted correctly.
If the fastening tab is pointing inwards, the inner flip may be jammed.
Försäkran om överensstämmelse
Se Internetadressen på sista sidan.
Juridisk information
Detta dokument uppfyller kraven i EU-förordning 2016/425 avsnitt 1.4.
i bilaga II.
Anmält organ
För detaljerad information se sista sidan.Detta dokument uppfyller kraven i EU-förordning
2016/425 avsnitt 1.4.
Specifications Helix clt - 1050.200
Skyddsnivå Autoläge: 2 (ljust läge) 4 < 12 (mörkt läge)
Manuellt läge: 2 (ljusläge) 7 - 12 (mörkt läge)
UV/IR-skydd Maximalt skydd i ljusa och mörka lägen
Tid för växling från ljus till mörker 90μs (23°C / 73°F) 70μs (55°C / 131°F)
Växlingstid från mörkt till ljust snabbt = 0,1 - 2,0 s med "skymningseffekt".
Strömförsörjning Solceller, litiumpolymerbatteri
Vikt 640 g / 16.9315 oz
Driftstemperatur -10°C - 55°C / 14°F - 131°F
Lagringstemperatur -20°C - 70°C / - 4°F - 158°F
Klassificering enligt EN379 Optisk klass = 1 Homogenitet = 1
Spridning av ljus = 1 Beroende av synvinkel = 2
Godkännanden CE, UKCA, ANSI, ISO 16321 "WIG+
Specifications Helix quattro - 1050.100
Skyddsnivå automatiskt läge: 3 (ljust läge) 4 < 13 (mörkt läge)
manuellt läge: 3 (ljusläge) 8 - 13 (mörkt läge)
UV/IR-skydd Maximalt skydd i ljusa och mörka lägen
Tid för växling från ljus till mörker 90μs (23°C / 73°F) 70μs (55°C / 131°F)
Växlingstid från mörkt till ljust snabbt = 0,1 - 2,0 s med "skymningseffekt".
Strömförsörjning Solceller, litiumpolymerbatteri
Vikt 620 g / 16.9315 oz
Driftstemperatur -10°C - 55°C / 14°F - 131°F
Lagringstemperatur -20°C - 70°C / - 4°F - 158°F
Klassificering enligt EN379 Optisk klass = 1 Homogenitet = 1
Spridning av ljus = 1 Beroende av synvinkel = 1
Godkännanden CE, UKCA, ANSI, ISO 16321 "WIG+
Specifications Helix 2.5 - 1050.000
Skyddsnivå autoläge: 2,5 (ljusläge) 5 < 12 (mörkt läge)
Manuellt läge: 2,5 (ljusläge) 7 - 12 (mörkt läge)
UV/IR-skydd Maximalt skydd i ljusa och mörka lägen
Tid för växling från ljus till mörker 100μs (23°C / 73°F) 70μs (55°C / 131°F)
Växlingstid från mörkt till ljust snabbt = 0,1 - 2,0 s med "skymningseffekt".
Strömförsörjning Solceller, litiumpolymerbatteri
Vikt 618 g / 16.9315 oz
Driftstemperatur -10°C -+55°C / +14°F -+131°F
Lagringstemperatur -20°C - +70°C / - 4°F - +158°F
Klassificering enligt EN379 Optische Klasse = 1 Homogenität = 1
Streulicht = 1 Abhängigkeit vom Blickwinkel = 2
Godkännanden CE, UKCA, ANSI, ISO 16321 "WIG+

20
ITALIANO
Introduzione
Il casco da saldatura è un copricapo utilizzato per proteggere gli occhi, il viso e il collo da ustioni,
raggi UV, scintille, raggi infrarossi e calore durante alcune operazioni di saldatura. Il casco
è composto da diverse parti (vedere l'elenco dei ricambi). Un filtro automatico per saldatura
combina un filtro UV passivo e un filtro IR passivo con un filtro attivo la cui trasmittanza
luminosa nella gamma visibile dello spettro varia in base all'intensità luminosa dell'arco di
saldatura. La trasmittanza luminosa del filtro di saldatura automatico ha un valore iniziale
elevato (stato di luce). Dopo l'accensione dell'arco di saldatura ed entro un tempo di risposta
definito, la trasmittanza luminosa del filtro passa a un valore basso (stato scuro). A seconda
del modello, il casco può essere abbinato a un casco di sicurezza e/o a un sistema PAPR
(Powered Air Purifying Respirator).
Istruzioni di sicurezza
Prima di utilizzare il casco, leggere le istruzioni per l'uso. Assicurarsi che la lente di copertura
anteriore sia montata correttamente. Se non è possibile rimediare ai difetti, il casco non deve
più essere utilizzato. Per ulteriori informazioni, rivolgersi al rivenditore autorizzato.
Precauzioni e restrizioni protettive / rischi
Durante il processo di saldatura si sprigionano calore e radiazioni che possono causare
lesioni agli occhi e alla pelle. Questo prodotto protegge gli occhi e il viso. Gli occhi sono
sempre protetti dalle radiazioni ultraviolette e infrarosse quando si indossa il casco,
indipendentemente dal livello di protezione selezionato. Per proteggere il resto del corpo
è necessario indossare indumenti protettivi adeguati. Le particelle e le sostanze rilasciate
durante il processo di saldatura possono scatenare reazioni allergiche della pelle in persone
con questa predisposizione. Nelle persone sensibili, il contatto della pelle con la parte della
testa può provocare reazioni allergiche. Il casco per saldatura può essere utilizzato solo per
la saldatura e la molatura e non per altre applicazioni. Il produttore non si assume alcuna
responsabilità se il casco per saldatura non viene utilizzato come previsto o non viene utilizzato
secondo le istruzioni per l'uso. Non è consentito applicare adesivi, stampe o simili sul casco.
Il casco è adatto a tutti i comuni processi di saldatura, ad eccezione della saldatura a gas e
al laser. Si prega di notare il livello di protezione raccomandato secondo la norma EN169 in
questo manuale. Il casco non sostituisce un casco di sicurezza. Il casco può essere combinato
con un casco di sicurezza. Le caratteristiche costruttive dell'elmetto possono influire sul
campo visivo (assenza di visione periferica senza girare la testa) e la trasmittanza luminosa
del filtro oscurante automatico può influire sulla percezione dei colori. Di conseguenza, le luci di
segnalazione o gli indicatori di avvertimento potrebbero non essere visibili. Inoltre, vi è il rischio
di urti a causa del profilo più ampio (testa con casco). Il casco inoltre ostacola l'udito e riduce
la sensazione di calore.Attenzione: Per la marcatura complessiva della classe di sicurezza
dell'elmetto, è sempre determinante il livello più basso di tutti i componenti utilizzati. Per l'uso
a temperature estreme, prestare attenzione all'etichettatura appropriata: FT, BT o AT. Quando
si indossano gli occhiali, gli urti possono essere trasferiti direttamente dal casco alla testa.
Visione a colori
Per aumentare la praticità e la sicurezza, con questo casco da saldatura è possibile
riconoscere i colori.
Modalità sleep
L'ADF è dotato di una funzione di spegnimento automatico che aumenta la durata della
batteria. Se l'ADF riceve meno di 1 lux di luce per circa 10 minuti, si spegne automaticamente.
Per riaccendere la cassetta, le celle solari devono essere esposte brevemente alla luce del
giorno. Se l'ADF non si attiva più o non si oscura quando si accende l'arco di saldatura, è
necessario sostituire le batterie.
Garanzia e responsabilità
Le condizioni di garanzia sono riportate nelle istruzioni dell'organizzazione di vendita
nazionale del produttore. Per maggiori dettagli, contattare il rivenditore autorizzato. La
garanzia viene concessa solo per i difetti di materiale e di fabbricazione. In caso di danni
dovuti a un uso improprio, a interventi non autorizzati o a un uso non previsto dal produttore,
la garanzia e la responsabilità decadono. La responsabilità e la garanzia decadono anche
se si utilizzano pezzi di ricambio diversi da quelli distribuiti dal produttore.
Durata prevista
Il casco per saldatura non ha una data di fine vita. Il prodotto può essere utilizzato
Il prodotto può essere utilizzato finché non si verificano danni visibili o invisibili o
malfunzionamenti.
Applicazione (Guida rapida p. 4-5 / Funzioni p. 6-7)
La corretta regolazione dell'archetto è molto importante per questo prodotto, perché i vantaggi
dell'ampio campo visivo sono garantiti solo se l'archetto è regolato correttamente. dell'ampio
campo visivo sono garantiti solo se l'archetto è regolato correttamente.
1. Misura/circonferenza della testa dell'archetto. Regolare il quadrante posteriore in base
alle dimensioni della testa. Assicurarsi che gli occhi si trovino all'incirca al centro del
campo visivo. (pag. 5 n. 3a)
2. Distanza degli occhi. Con l'attacco a coda di rondine, si regola la distanza tra il casco e gli
occhi Posizionare il casco il più vicino possibile agli occhi (più l'ADF è vicino agli occhi, più
ampio sarà il campo visivo). agli occhi, più ampio sarà il campo visivo). Regolare entrambi
i lati allo stesso modo, senza inclinazione. (pag. 5 n. 3b).
3. Angolo del casco (excentre) L'angolo del casco può essere regolato con la manopola.
Regolare l'angolo in modo che il naso non tocchi l'apertura per il naso. Eseguire con
attenzione una test per verificare che la calotta del casco non tocchi il naso, anche quando
si annuisce (usare il nasello in dotazione per proteggere il naso). il nasello in dotazione per
proteggere il naso). (pag. 5 n. 3c).
4. Modalità ShadeTronic/manuale. Con l'interruttore a scorrimento è possibile selezionare
la modalità di regolazione del livello di protezione. modalità di regolazione del livello di
protezione. In modalità automatica (ShadeTronic), il livello di protezione viene
adattato automaticamente all'intensità dell'arco automaticamente all'intensità dell'arco grazie
a dei sensori (norma EN 379:2003). In modalità manuale manuale, il livello di protezione può
essere impostato ruotando la manopola (pag. 7 n. III + IV).
5. Livello di protezione. Modalità manuale: In modalità "Manuale", è possibile scegliere tra i livelli
di protezione ruotando la manopola di controllo del livello di protezione. livelli di protezione
ruotando la manopola di controllo del livello di protezione. (La correzione della modalità
di protezione è disabilitata in modalità manuale). (pag. 7 n. IV) ShadeTronic: in modalità
ShadeTronic, il livello di protezione viene regolato automaticamente e corrisponde al livello di
protezione secondo la norma EN 379. corrisponde al livello di protezione secondo la norma EN
379 quando la manopola è impostata sulla posizione "N". "N". Ruotando la manopola, il livello
di protezione impostato automaticamente può essere corretto fino a due livelli di protezione
in più o in meno, a seconda della posizione "N". di due livelli di protezione verso l'alto o verso il
basso, a seconda delle preferenze personali (i livelli di protezione livelli di protezione minimi e
massimi assoluti, rispettivamente, non possono essere sotto o superare, indipendentemente
dall'impostazione della correzione). (pag. 7 n. III)
6. Regolatore del tempo di apertura/ritardo. Il regolatore del tempo di apertura (Delay) (p. 6)
consente di selezionare il tempo di il ritardo di apertura dal buio alla luce. La manopola consente
la regolazione continua da buio a luce tra 0,1 e 2,0 s (p. 6 n. II).
7. FadeTronic: La transizione fluida dal buio alla luce dell'effetto crepuscolare "FadeTronic" offre
una protezione ancora migliore per gli occhi protezione degli occhi contro l'affaticamento e
l'irritazione causati dagli oggetti in penombra e dà all'occhio il tempo necessario per abituarsi
alla luminosità. e dà all'occhio il tempo necessario per abituarsi alla luminosità. (pag. 6 n. II)
ATTENZIONE: Per la saldatura rapida per una saldatura rapida, non impostare la manopola
sulla gamma Twilight. La gamma "Tack" con un ritardo minimo di ritardo di apertura è la
più adatta.
8. Sensibilità. Con il pulsante di sensibilità si regola la sensibilità della luce in base all'arco di
saldatura e alla luce ambientale. arco di saldatura e alla luce ambientale. La sensibilità può
essere regolata individualmente ruotando la manopola. Nella gamma "Super High" si ottiene
una sensibilità alla luce molto elevata nella gamma "Super High", che garantisce l'oscuramento
anche in caso di archi deboli. con archi deboli. (pag. 6n. I)
9. Sensori. Questo casco per saldatura è dotato di 5 sensori. 4 sensori rilevano la luce di saldatura
e 1 sensore è responsabile del rilevamento dell'intensità della luce (modalità automatica). è
responsabile del rilevamento dell'intensità luminosa (modalità automatica) e dell'innovativa
funzione Stay-Dark.
Pulizia e disinfezione
L'ADF deve essere pulito regolarmente con un panno morbido. Non utilizzare detergenti forti,
solventi, alcool o detergenti contenenti sostanze abrasive. Le lenti graffiate o danneggiate
devono essere sostituite.
Conservazione
Il casco per saldatura deve essere conservato a temperatura ambiente e a bassa umidità. Il casco
deve essere conservato alla luce.
Sostituzione della lente frontale (p. 8) / della lente interna (p. 4 n. 4)
1. La lente frontale viene rimossa dall'ancoraggio, tirando la linguetta all'interno e spingendo
la leva laterale per sbloccare il fissaggio.
2. Agganciare la nuova lente del coperchio anteriore in una clip laterale. Tirare la finitrice verso
il secondo fermaglio laterale e bloccarla in posizione. Questa azione manuale richiede una
certa pressione affinché la guarnizione della finitrice produca l'effetto desiderato.
Batteria/processo di ricarica (pag. 9)
Il casco è dotato di una batteria ai polimeri di litio (LiPo) ad alte prestazioni. Prima di utilizzare la
batteria per la prima volta, caricarla completamente con il cavo Micro-USB in dotazione tramite
un connettore USB disponibile in commercio (non incluso). Dopo la ricarica, la presa Micro-USB
sul casco deve essere protetta dalla polvere e dallo sporco con il cappuccio di protezione. La
batteria viene ricaricata anche da fonti di luce esterne (plafoniera, luce di saldatura) attraverso la
cella solare. Se il casco viene utilizzato frequentemente, la batteria dovrà essere ricaricata molto
raramente. Si consiglia di ricaricare completamente il casco ogni 6 mesi. Se la batteria è scarica,
è sufficiente una ricarica di circa 15 minuti per un'autonomia di circa 8 ore.
Stato di carica:
1) Rosso lampeggiante: batteria quasi scarica (caricare immediatamente)
2) Arancione acceso fisso: La batteria è in carica
3) Verde acceso fisso: La batteria è completamente carica
Se il casco non si scurisce quando si accende l'arco di saldatura, verificare lo stato di carica
(premere il tasto di se il LED non lampeggia più in blu, la batteria è completamente scarica).
Se l'ADF non funziona non funziona correttamente quando la batteria è carica, rivolgersi al
rivenditore autorizzato. Una batteria difettosa può essere sostituita dal produttore o da un partner
di assistenza optrel autorizzato.
Hard Hat
Vedere il manuale aggiuntivo per il casco rigido.
Risoluzione dei problemi
L'ADF non si scurisce
→ Regolare la sensibilità (p. 6 n. I)
→ Pulire i sensori o la lente del coperchio anteriore → Caricare la batteria (p. 9))
→ Disattivare il ritardo di apertura - commutare su "tack" per la saldatura a presa rapida (p.
6 n. II)
Livello di protezione troppo luminoso
→ In modalità manuale, selezionare un livello di protezione più alto (p. 7 n. IV) → Sostituire la
lente del coperchio anteriore (p. 8)
→ In modalità automatica, impostare la manopola su +1 o +2 (p. 7)
Livello di protezione troppo scuro
Pagina se încarcă...
Pagina se încarcă...
Pagina se încarcă...
Pagina se încarcă...
Pagina se încarcă...
Pagina se încarcă...
Pagina se încarcă...
Pagina se încarcă...
Pagina se încarcă...
Pagina se încarcă...
Pagina se încarcă...
Pagina se încarcă...
Pagina se încarcă...
Pagina se încarcă...
Pagina se încarcă...
Pagina se încarcă...
Pagina se încarcă...
Pagina se încarcă...
Pagina se încarcă...
Pagina se încarcă...
Pagina se încarcă...
Pagina se încarcă...
Pagina se încarcă...
Pagina se încarcă...
Pagina se încarcă...
Pagina se încarcă...
Pagina se încarcă...
Pagina se încarcă...
Pagina se încarcă...
Pagina se încarcă...
Pagina se încarcă...
Pagina se încarcă...
-
 1
1
-
 2
2
-
 3
3
-
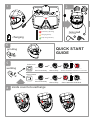 4
4
-
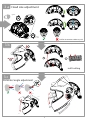 5
5
-
 6
6
-
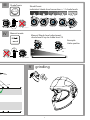 7
7
-
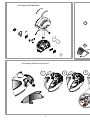 8
8
-
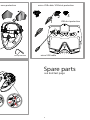 9
9
-
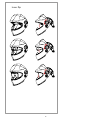 10
10
-
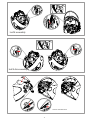 11
11
-
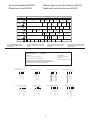 12
12
-
 13
13
-
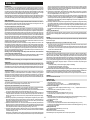 14
14
-
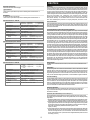 15
15
-
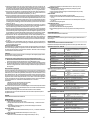 16
16
-
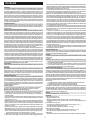 17
17
-
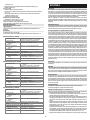 18
18
-
 19
19
-
 20
20
-
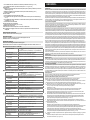 21
21
-
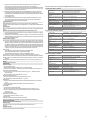 22
22
-
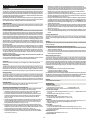 23
23
-
 24
24
-
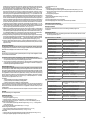 25
25
-
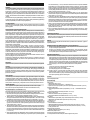 26
26
-
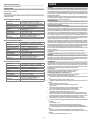 27
27
-
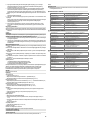 28
28
-
 29
29
-
 30
30
-
 31
31
-
 32
32
-
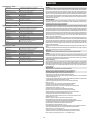 33
33
-
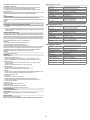 34
34
-
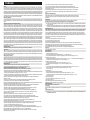 35
35
-
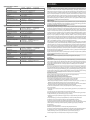 36
36
-
 37
37
-
 38
38
-
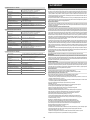 39
39
-
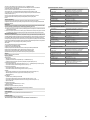 40
40
-
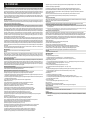 41
41
-
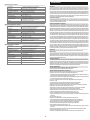 42
42
-
 43
43
-
 44
44
-
 45
45
-
 46
46
-
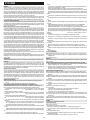 47
47
-
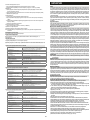 48
48
-
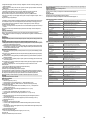 49
49
-
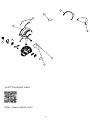 50
50
-
 51
51
-
 52
52


în alte limbi
- slovenčina: optrel Helix Návod na obsluhu
Lucrări înrudite


Alte documente
-
EWM Powershield 2.5 Manual de utilizare
-
ESAB ESAB SAVAGE A40 Welding Helmet Manual de utilizare
-
-
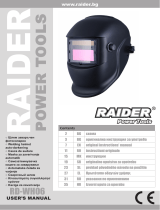 Raider Power Tools RD-WH06 Manual de utilizare
-
DELTA PLUS Screen Instrucțiuni de utilizare
-
Ferm WEA1057 Manualul proprietarului
-
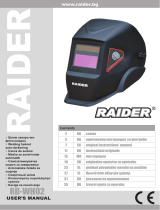 Raider Power Tools RD-WH02 Manual de utilizare
-
 Raider Power Tools RD-WH07 Manual de utilizare
-
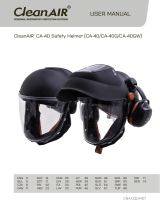 Manila, S.R.O. 30-500-22-I Instrucțiuni de utilizare
-
Telwin 955170 Manual de utilizare


