SPEEDLINK RACING DRONES Competition Set Manualul utilizatorului
- Categorie
- Jucării telecomandate
- Tip
- Manualul utilizatorului

RACING DRONES
COMPETITION SET
USER GUIDE

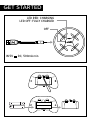
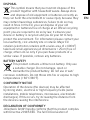
GET STARTED
LED RED: CHARGING
LED OFF: FULLY CHARGED
OFF
IN 5V DC, 500mA min.

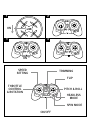
THROTTLE
CONTROL
& ROTATION
ON/OFF
SPIN MODE
HEADLESS
MODE
PITCH & ROLL
FLIP
TRIMMING
SPEED
SETTING
ON
1
3
2
4
ON

EN
1.
Make sure the drone is powered o (switch on the drone set to
OFF). Plug the accompanying charging cable into the drone and
then connect the cable to a USB port (5V DC, 500mA min.). The
red charging LED will glow. It takes around 30 minutes to charge
the drone, after which the LED will stop glowing. Be aware that the
initial charge may take a little longer.
2.
Using the supplied screwdriver, unscrew the battery compartment
screw on the remote and insert the batteries (2 × AAA alkaline;
not included), making sure you insert them in accordance with the
polarity markings. Replace the battery compartment cover.
3.
Leave the remote powered o (switch set to OFF). Place the drone
on a flat level surface and power on the drone (set switch to ON).
Wait until the drone’s LEDs start to flash.
Note: If you intend to use multiple drones at the same time, power
on and connect each drone individually, not simultaneously.
4.
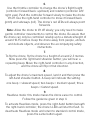
On the remote, pull back on the throttle controller (left controller),
then power on the remote (set switch to ON).
Note: To use Headless mode (see step 9), place the remote directly
behind the drone (facing the drone’s blue LEDs) before switching it on.
5.
Push the throttle controller all the way forward and then pull it
all the way back again. The LEDs on the remote and the drone
will remain solid after a few seconds. The connection is now
established and the drone is ready to fly.

6.
Use the throttle controller to change the drone’s flight height
(controller forward/back: up/down) and rotation (controller left/
right: yaw). Push the controller forward slowly to make the drone
lift o. Use the right-hand controller to move it forward/back
(pitch) and sideways (roll). The drone’s red LEDs will always point
forwards.
Note: Allow the drone to lift o slowly; you only need to make
gentle controller movements to control the drone. Be aware that
the drone can only be controlled reliably up to a distance/height of
around 10-15 metres. Keep the drone away from people, animals
and delicate objects, and observe the accompanying safety
instructions.
7.
To flip the drone, fly the drone to a height of around 2-3 metres.
Now press the right-hand shoulder button; you will hear a
repeating beep. Move the right-hand controller in any direction,
and the drone will flip in that direction.
8.
To adjust the drone’s maximum speed, land it and then press the
left-hand shoulder button. A beep will indicate the setting:
one beep = slowest speed; two beeps = medium speed; three
beeps = fastest speed.
9.
Headless mode: this mode makes the drone easier to control.
Follow the guidance given in step 4.
To activate Headless mode, press the right-hand button beneath
the right-hand controller; the drone’s LEDs will start to flash. To
deactivate Headless mode and return to standard control mode,
press the same button again.

In Headless mode, the drone can be controlled from the user’s
perspective regardless of its direction. Fly your drone straight
ahead, it will move away from you; fly it backwards, it will return to
you – even if it has rotated around its own axis in the meantime.
In this mode, the red LEDs may not necessarily point forward.
Headless mode is perfect for beginners, but does not oer the
same level of accuracy as in standard control mode and only
allows the user to make limited position changes.
10.
You can correct navigational drift in a certain direction by trimming
the control. To do this, press the appropriate button located
between the controllers depending on the navigational correction
you want to make: the two upper buttons gradually increase the
level of forward/back flight direction correction (pitch trimming),
while the two lower buttons do the same for the left/right flight
direction (roll trimming). Repeat the procedure until the drone
remains stable while in flight.
11.
If the drone’s LEDs flash suddenly, this indicates that the battery
level is very low. Land the drone safely, switch it o and let it cool
down for a few minutes before charging it (see step 1).
If the drone becomes increasingly dicult to control, change the
batteries in the remote.
12.
If one of the rotor blades comes o, reattach it carefully to the
motor. Do not use damaged rotor blades; spares are provided.
Use the correct rotor blade: the front left and rear right blades
are labelled with an A or D; the front right and rear left blades are
labelled with a B or C.

GAME GUIDE: MULTI-PLAYER DRONE RACE
1.
Separate the accompanying foam obstacles and place them on
their stands.
2.
Place the portal, starting + landing pad as well as the mast on the
floor or tabletop. Make sure there are no delicate objects within
the flightpath or immediate vicinity.
3.
Welcome to the drone race, where two players battle it out to
complete the racing circuit using all their skills.
The winner is the first one to pilot their drone from the
starting + landing pad, around the mast, through the portal and
back to the landing pad again. If a drone crashes, it must go
straight back to the starting + landing pad again for another go.
To make the game more dicult: if a player crashes their drone
into an obstacle, the wall or an item of furniture, they must do a
360° flip before continuing.
Observe the accompanying safety instructions.

DE
1.
Stellen Sie sicher, dass die Drohne abgeschaltet ist (Schalter an
der Drohne auf „OFF“). Verbinden Sie sie zum Aufladen über das
beiliegende Ladekabel mit einer USB-Buchse (5V DC, 500 mA
min.). Die rote Lade-LED beginnt zu leuchten; der Ladevorgang
nimmt etwa 30 Minuten in Anspruch, anschließend erlischt die
LED. Beachten Sie, dass der erste Ladevorgang etwas länger
dauern kann.
2.
Lösen Sie mit dem mitgelieferten Schraubendreher die Schraube
am Batteriefach der Fernsteuerung und legen Sie Batterien ein (2
× AAA, Alkali-Mangan; nicht enthalten), achten Sie auf die korrekte
Polarität. Schließen Sie das Batteriefach wieder.
3.
Lassen Sie die Fernsteuerung abgeschaltet („OFF“). Legen Sie
die Drohne auf eine waagerechte, ebene Fläche und schalten Sie
sie ein („ON“). Warten Sie, bis die LEDs an der Drohne zu blinken
beginnen.
Hinweis: Möchten Sie mehrere Drohnen zugleich einsetzen,
führen Sie den Einschalt- und Verbindungsprozess für die
einzelnen Geräte nicht gleichzeitig durch, sondern nacheinander.
4.
Ziehen Sie den Schubregler der Fernsteuerung (linker Regler)
zurück, schalten Sie sie anschließend ein („ON“).
Hinweis: Um den „Headless“-Modus zu verwenden (s. Schritt 9),
legen Sie die Fernsteuerung vor dem Einschalten direkt hinter die
Drohne (in Richtung der blauen Drohnen-LEDs).

5.
Schieben Sie den Schubregler einmal ganz nach vorn und ziehen
Sie ihn anschließend wieder zurück. Die LEDs der Fernsteuerung
und der Drohne beginnen nach wenigen Sekunden konstant
zu leuchten. Die Verbindung ist damit hergestellt, die Drohne
startbereit.
6.
Mithilfe des Schubreglers ändern Sie die Flughöhe (Regler vor/
zurück; steigen) und Drehung (Regler rechts/links; gieren) der
Drohne. Schieben Sie ihn langsam nach vorne, um die Drohne
abheben zu lassen. Mit dem rechten Regler bewegen Sie sie vor
und zurück (nicken) sowie seitwärts (rollen); die roten Drohnen-
LEDs zeigen dabei nach vorne.
Hinweis: Lassen Sie es langsam angehen, behutsame
Steuerbefehle reichen für die Kontrolle der Drohne völlig
aus. Beachten Sie, dass die Drohne nur bis zu einer Distanz/
Höhe von ca. 10-15 Metern sicher kontrolliert werden kann.
Halten Sie die Drohne fern von Menschen, Tieren oder
empfindlichen Gegenstände und beachten Sie die beiliegenden
Sicherheitshinweise.
7.
Zur Durchführung eines Überschlags („Flip“) lassen Sie die Drohne
zunächst auf 2-3 Meter Höhe steigen. Betätigen Sie nun die rechte
Schultertaste, ein wiederholter Signalton ertönt. Geben Sie nun mit
dem rechten Regler einen Steuerbefehl, führt die Drohne einen
Überschlag in die entsprechende Richtung aus.

8.
Um die Höchstgeschwindigkeit der Drohne zu variieren, lassen
Sie sie landen und betätigen Sie die linke Schultertaste. Ein
akustisches Signal bestätigt die Einstellung:
einzelnes Signal = niedrigste Geschwindigkeit, zwei Signale =
mittlere Geschwindigkeit, drei Signale = höchste Geschwindigkeit
9.
„Headless“-Modus: Dieser Modus vereinfacht die
Drohnensteuerung. Beachten Sie auch den Hinweis in Schritt 4.
Um den „Headless“-Modus zu aktivieren, betätigen Sie die rechte
Taste unter dem rechten Regler; die Drohnen-LEDs beginnen
darauin zu blinken. Um den Modus zu deaktivieren und zur
normalen Steuerung zurückzukehren, betätigen Sie die Taste erneut.
Im „Headless“-Modus lässt sich die Drohne aus Nutzersicht
steuern, unabhängig von ihrer Ausrichtung: Lassen Sie die Drohne
geradeaus fliegen, bewegt sich diese von Ihnen weg; steuern
Sie sie rückwärts, kehrt sie zu Ihnen zurück – auch wenn sie sich
zwischenzeitlich um die eigene Achse gedreht hat. Die roten
LEDs weisen in diesem Modus nicht zwangsläufig nach vorne. Der
„Headless“-Modus ist für Einsteiger geeignet, bietet aber nicht
dieselbe Präzision wie der reguläre Steuermodus und erlaubt nur
eingeschränkte Positionsveränderungen des Nutzers.
10.
Driftet die Drohne stark in eine bestimmte Richtung, trimmen
Sie die Steuerung. Betätigen Sie dafür – je nach gewünschter
Richtungskorrektur – eine der vier Tasten zwischen den Reglern:
Die beiden oberen Tasten korrigieren die Flugrichtung schrittweise
stärker nach vorne/hinten (Nick-Trimmung), die beiden unteren
Tasten nach links/rechts (Roll-Trimmung). Wiederholen Sie den
Vorgang, bis die Drohne wieder stabil in der Luft steht.

11.
Plötzlich blinkende Drohnen-LEDs signalisieren, dass der Akku
nahezu erschöpft ist. Lassen Sie die Drohne sicher landen,
schalten Sie sie ab und lassen Sie sie für einige Minuten abkühlen,
bevor Sie mit dem Ladevorgang beginnen (s. Schritt 1).
Lässt sich die Drohne nicht mehr zuverlässig steuern, wechseln Sie
die Batterien in der Fernsteuerung.
12.
Löst sich eines der Rotorblätter, stecken Sie es vorsichtig wieder
auf den Motor. Verwenden Sie keine beschädigten Rotorblätter,
Ersatzrotorblätter liegen bei.
Setzen Sie nur passende Rotorblätter ein: Die Blätter vorne links
und hinten rechts sind mit „A“ oder „D“ markiert, die Blätter vorne
rechts und hinten links mit „B“ oder „C“.

SPIELANLEITUNG: DROHNEN-RENNEN FÜR
MEHRERE SPIELER
1.
Lösen Sie die beiliegenden Schaumsto-Hindernisse voneinander
und nutzen Sie die Standfüße, um sie aufzustellen.
2.
Stellen Sie das Tor, den Start- und Landeplatz sowie den Pylonen
nach Belieben auf dem Boden oder auf Tischen auf. Achten Sie
darauf, dass keine empfindlichen Gegenstände in Reichweite sind.
3.
Zwei Spieler versuchen mit ihren Drohnen gleichzeitig den
Rennparcours zu absolvieren. Gewinner ist, wer es zuerst
schat, seine Drohne vom Start- und Landeplatz um den Pylonen
und durch das Tor zu steuern und schließlich wieder auf dem
Landeplatz abzusetzen. Stürzt eine Drohne ab, muss sie wieder auf
den Startpunkt gelegt werden.
Zusatzregel für erhöhte Schwierigkeit: Wer seine Drohne mit einem
Hindernis, der Wand oder einem Möbelstück kollidieren lässt,
muss sie in der Luft zunächst einen Überschlag vollführen lassen,
bevor der Parcours fortgesetzt werden darf.
Beachten Sie stets die beiliegenden Sicherheitshinweise.
FOR ADDITIONAL USER GUIDE LANGUAGES,
PLEASE VISIT www.speedlink.com


EN
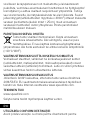
INTENDED USE
This drone is intended for entertainment purposes only for
purely domestic use in calm, dry environments. It contains no
user-serviceable parts. Do not disassemble it and stop using it
immediately if damaged. Jöllenbeck GmbH accepts no liability
whatsoever for any damage to this product or injuries caused
due to careless or improper use or for purposes for which it is not
intended.
SAFETY INSTRUCTIONS
You use the drone at your own risk. This product is intended
for users over 14 years old. It should always be used under
adult supervision. Never allow supervision by someone under
the influence of alcohol or drugs, or with physical or mental
disabilities. Avoid touching the motors as they may become hot
during use. Keep fast rotating blades away from your fingers, face,
hair and clothing to prevent injury. Only use in large, indoor spaces
or outdoors on calm, dry and mild days.
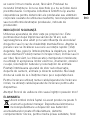
Do not use near high-voltage power lines; busy trac areas
(including airports, roads and railways); water bodies; areas where
animals are bred; and animal-protection areas. Always keep
the drone in sight. Keep it away from people, pets and delicate
objects. Do not let the drone fall from a great height onto a hard
surface. Flying drones is subject to CAA guidelines, for more
information visit: http://dronesafe.uk
To charge, only use the accompanying charging cable/device. Do
not use the charging cable/device for any other devices.
Warning! Contains small parts which may pose a choking hazard if
swallowed!

EN
DISPOSAL
This symbol means that you must not dispose of this
product together with household waste. Always store
and dispose of old equipment or batteries correctly as
they can harm the environment or cause injury because they
may contain hazardous substances; failure to do so may
result in fines. In the EU, you can dispose of your old
equipment or batteries free of charge at an ocial recycling
point: you are required to do so by law, it ensures your
device or battery is recycled and you do your bit to help
protect the environment. For information please contact your
local authority, civic amenity site or retailer. Major EU
retailers (electronics retailers with a sales area of ≥ 400m²)
take back small appliances (all dimensions < 25cm) free of
charge; others do so only if you purchase products of a
similar value. If possible, remove any batteries.
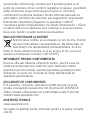
BATTERY SAFETY
This product contains a lithium-ion battery. Only use
a suitable charger. Do not damage, open or
dismantle the product/battery. Do not use in wet/
corrosive conditions. Do not throw into fire or expose to high
temperatures (> 60°C/140°F).
CONFORMITY NOTICE
Operation of the device (the devices) may be aected
by strong static, electrical or high-frequency fields (radio
installations, mobile telephones, microwaves, electrostatic
discharges). If this occurs, try increasing the distance from
the devices causing the interference.
DECLARATION OF CONFORMITY
Jöllenbeck GmbH hereby confirms that this product complies
with Directive 2014/53/EU. The full EU Declaration of

Conformity text can be requested from www.speedlink.com.
TECHNICAL SUPPORT
www.speedlink.com
Please keep this information for later reference.
DE
BESTIMMUNGSGEMÄSSER GEBRAUCH
Dieses Produkt dient als Flugdrohne zur Unterhaltung für
den Heimgebrauch in trockener, windstiller Umgebung.
Es ist wartungsfrei. Nicht önen oder bei Beschädigung
nutzen. Die Jöllenbeck GmbH übernimmt keine Haftung für
Produktschäden oder Verletzungen von Personen durch
unachtsame, unsachgemäße oder nicht dem angegebenen Zweck
entsprechende Verwendung.
SICHERHEITSHINWEISE
Die Nutzung des Fluggeräts erfolgt auf eigene Gefahr. Sie ist nur
zulässig nach Vollendung des 14. Lebensjahres, unter Aufsicht
Erwachsener und nicht unter Alkohol-/Medikamenteneinfluss
oder bei geistigen/körperlichen Einschränkungen. Vorsicht vor
sich erhitzenden oder schnell rotierenden Teilen: Finger, Gesicht,
Haare und Kleidung fernhalten, Verletzungsgefahr! Nur verwenden
in großen, geschlossenen Räumen oder im Freien bei Windstille,
Trockenheit und gemäßigten Temperaturen, nicht verwenden
in der Nähe von Hochspannungsleitungen, Verkehrswegen,
Wasserflächen, Brut- und Tierschutzgebieten. Fluggerät stets
im Blick behalten, Abstand halten zu Menschen, Tieren und
empfindlichen Gegenständen. Drohne nicht aus großer Höhe auf
harten Boden fallen lassen.
Zum Aufladen nur das beiliegende Ladekabel/-gerät verwenden;
Ladekabel/-gerät nicht für andere Geräte verwenden.

DE
Achtung! Erstickungsgefahr durch verschluckbare Kleinteile!
ENTSORGUNG
Dieses Symbol bedeutet, dass das Produkt nicht mit
dem Hausmüll entsorgt werden darf. Unsachgemäße
Lagerung/Entsorgung von Altgeräten oder Batterien/
Akkus kann wegen möglicherweise enthaltener Schadstoe
der Umwelt und/oder menschlichen Gesundheit schaden
und zu Sanktionen gemäß der Gesetzgebung führen. Die
Abgabe bei einer oziellen Sammelstelle ist kostenlos und
gesetzlich vorgeschrieben, stellt die korrekte Entsorgung
oder Verwertung/Wiederverwendung sicher und leistet einen
Beitrag zum Umweltschutz. Auskunft erteilen Behörden,
Wertstohöfe oder Fachgeschäfte. Große Händler
(Elektrogeräte-Verkaufsfläche ≥ 400 m²) nehmen Kleingeräte
(alle Maße < 25 cm) kostenlos an, andere nur bei Kauf
gleichwertiger Produkte. Batterien/Akkus möglichst
entnehmen.
BATTERIEHINWEISE
Dieses Produkt enthält einen Lithium-Ionen-
Akkumulator. Ausschließlich geeignete Ladegeräte
verwenden. Produkt/Akku nicht beschädigen, önen
oder zerlegen. Nicht in feuchter/korrodierender Umgebung
verwenden. Nicht ins Feuer werfen oder hohen
Temperaturen aussetzen (> 60 °C/140 °F).
KONFORMITÄTSHINWEIS
Unter Einwirkung von starken statischen, elektrischen
oder hochfrequenten Feldern (Funkanlagen,
Mobiltelefonen, Mikrowellen-Entladungen) kann es zu
Funktionsbeeinträchtigungen des Gerätes (der Geräte)
kommen. Versuchen Sie in diesem Fall, die Distanz zu den
störenden Geräten zu vergrößern.

KONFORMITÄTSERKLÄRUNG
Hiermit erklärt die Jöllenbeck GmbH, dass dieses Produkt
der Richtlinie 2014/53/EU entspricht. Der vollständige Text
der EU-Konformitätserklärung lässt sich anfordern über die
Internetadresse www.speedlink.com.
TECHNISCHER SUPPORT
www.speedlink.com
Bitte bewahren Sie diese Information zur künftigen Verwendung
auf.
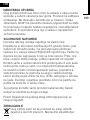
FR
CADRE D’UTILISATION
Ce produit est destiné à servir de drone récréatif dans un cadre
domestique et doit être utilisé dans un environnement sec et sans
vent. Il ne demande pas d’entretien. Ne pas l’ouvrir et ne pas
l’utiliser s’il est abîmé. La société Jöllenbeck GmbH décline toute
responsabilité en cas de dégradations du produit ou de blessures
dues à une utilisation inconsidérée, incorrecte ou contraire à la
destination indiquée.
CONSIGNES DE SÉCURITÉ
L’utilisation de l’engin volant a lieu à vos risques et périls. Elle
n’est autorisée qu’aux personnes de 14 ans au moins, sous la
surveillance d’adultes et à condition de ne pas être sous l’emprise
de l’alcool ou de médicaments et de ne pas présenter de troubles
mentaux ou physiques pouvant altérer la capacité à contrôler
l’engin. Attention aux pièces brûlantes ou en rotation : tenir à
l’écart des doigts, du visage, des cheveux et des vêtements –
risque de blessure ! Utiliser uniquement dans de vastes locaux
fermés ou bien à l’extérieur par temps sec, en l’absence de vent
et à des températures modérées. Ne pas utiliser à proximité de
lignes haute tension, de voies de communication, de plans d’eau,

FR
de zones de reproduction animale ni de réserves naturelles.
Ne pas quitter des yeux l’engin et le garder à distance
des personnes, des animaux et des objets fragiles. Ne pas
laisser le drone chuter de haut sur un sol dur.
Pour recharger l’engin, toujours utiliser le câble/le chargeur
fourni ; ne pas utiliser le câble/le chargeur pour d’autres
appareils.
Attention ! Risque d’étouement en cas d’ingestion de
petites pièces !
ÉLIMINATION
Ce symbole signifie que le produit ne doit pas être
placé avec les ordures ménagères. Le stockage et
l’élimination incorrects d’appareils usagés ou de piles/
accumulateurs peuvent être nocifs à l’environnement et/ou à
la santé humaine en raison des substances toxiques
possiblement contenues à l’intérieur et ils sont passibles de
sanctions prévues par la loi. Le dépôt dans une borne de
collecte ocielle est gratuit et prescrit par la loi. Cela
garantit une élimination ou un recyclage corrects et
contribue à protéger l’environnement. Vous pouvez vous
informer à ce sujet auprès des administrations, des
déchetteries ou des magasins spécialisés. Les magasins
d’une certaine taille (surface de vente d’appareils
électriques ≥ 400 m²) reprennent gratuitement les petits
appareils (toutes les dimensions < 25 cm) et les autres
uniquement en cas d’achat de produits équivalents. Retirer
dans la mesure du possible les piles/accumulateurs.
REMARQUES RELATIVES AUX PILES
Ce produit contient un accumulateur lithium-ion.
Utiliser exclusivement des chargeurs adaptés. Ne pas
abîmer le produit/l’accu, ne pas l’ouvrir et ne pas le

démonter. Ne pas utiliser dans un environnement humide/corrosif.
Ne pas jeter au feu ni exposer à des températures élevées (> 60
°C/140 °F).
INDICATION DE CONFORMITÉ
La présence de champs statiques, électriques ou à haute
fréquence intenses (installations radio, téléphones mobiles,
décharges de micro-ondes) peut perturber le bon
fonctionnement de l’appareil (ou des appareils). Dans ce cas,
essayez d’éloigner les appareils à l’origine des perturbations.
DÉCLARATION DE CONFORMITÉ
La société Jöllenbeck GmbH déclare que ce produit est conforme
à la directive 2014/53/UE. Le texte intégral de la déclaration de
conformité européenne peut être demandé sur le site www.
speedlink.com.
ASSISTANCE TECHNIQUE
www.speedlink.com
Veuillez conserver ces informations afin de pouvoir vous y référer
ultérieurement.
IT
USO CONFORME ALLA DESTINAZIONE
Questo prodotto serve come drone da intrattenimento per
uso domestico in ambienti asciutti e privi di vento. Il prodotto
non richiede manutenzione. Non aprire o usare in caso di
danneggiamenti. La Jöllenbeck GmbH non risponde di danni
al prodotto o lesioni personali a seguito di un uso negligente,
improprio o non conforme all’uso indicato.
ISTRUZIONI DI SICUREZZA
L‘utilizzo del velivolo avviene a proprio rischio ed è consentito solo
dopo i 14 anni compiuti, sotto la supervisione di adulti e non sotto
Pagina se încarcă...
Pagina se încarcă...
Pagina se încarcă...
Pagina se încarcă...
Pagina se încarcă...
Pagina se încarcă...
Pagina se încarcă...
Pagina se încarcă...
Pagina se încarcă...
Pagina se încarcă...
Pagina se încarcă...
Pagina se încarcă...
Pagina se încarcă...
Pagina se încarcă...
Pagina se încarcă...
Pagina se încarcă...
Pagina se încarcă...
Pagina se încarcă...
Pagina se încarcă...
Pagina se încarcă...
Pagina se încarcă...
Pagina se încarcă...
Pagina se încarcă...
Pagina se încarcă...
Pagina se încarcă...
Pagina se încarcă...
Pagina se încarcă...
Pagina se încarcă...
Pagina se încarcă...
Pagina se încarcă...
Pagina se încarcă...
Pagina se încarcă...
Pagina se încarcă...
Pagina se încarcă...
Pagina se încarcă...
Pagina se încarcă...
Pagina se încarcă...
Pagina se încarcă...
Pagina se încarcă...
Pagina se încarcă...
Pagina se încarcă...
Pagina se încarcă...
Pagina se încarcă...
Pagina se încarcă...
Pagina se încarcă...
Pagina se încarcă...
Pagina se încarcă...
Pagina se încarcă...
-
 1
1
-
 2
2
-
 3
3
-
 4
4
-
 5
5
-
 6
6
-
 7
7
-
 8
8
-
 9
9
-
 10
10
-
 11
11
-
 12
12
-
 13
13
-
 14
14
-
 15
15
-
 16
16
-
 17
17
-
 18
18
-
 19
19
-
 20
20
-
 21
21
-
 22
22
-
 23
23
-
 24
24
-
 25
25
-
 26
26
-
 27
27
-
 28
28
-
 29
29
-
 30
30
-
 31
31
-
 32
32
-
 33
33
-
 34
34
-
 35
35
-
 36
36
-
 37
37
-
 38
38
-
 39
39
-
 40
40
-
 41
41
-
 42
42
-
 43
43
-
 44
44
-
 45
45
-
 46
46
-
 47
47
-
 48
48
-
 49
49
-
 50
50
-
 51
51
-
 52
52
-
 53
53
-
 54
54
-
 55
55
-
 56
56
-
 57
57
-
 58
58
-
 59
59
-
 60
60
-
 61
61
-
 62
62
-
 63
63
-
 64
64
-
 65
65
-
 66
66
-
 67
67
-
 68
68


SPEEDLINK RACING DRONES Competition Set Manualul utilizatorului
- Categorie
- Jucării telecomandate
- Tip
- Manualul utilizatorului
în alte limbi
Lucrări înrudite
Alte documente
-
Hama 00126851 Manualul proprietarului
-
-
Overmax OV-X-BEE DRONE 3.3 WiFi Manual de utilizare
-
-
-
Crivit 306200 Instructions For Use Manual
-
-
Evolio One HD Manualul proprietarului
-
dji Matrice 350 RTK Informații despre produs
-
dji Goggles 2 Manual de utilizare