Overmax OV-X-BEE DRONE 7.2 FPV Manual de utilizare
- Tip
- Manual de utilizare


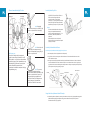
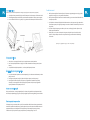
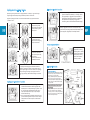
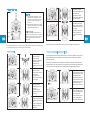
Chart indicating each key function on the transmitter
Important!
Before you begin, please read the Safety Warnings could lead to injuries. The RC aircraft is not intended
for those under 14 years of age without proper adult supervision.
2.5G antenna head
Power indicator
Tumbling key
Front/Rear trimmer
Directional lever
Side-flying trimmer
ON/OFF
Speed switch key
Non-head mode
Camera
Video
Throttle Trimmer
Throttle lever
Directional trimmer
One-key return
Emergency stop
Start/landing
Camera control

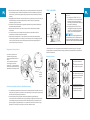
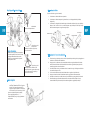
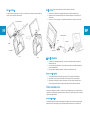
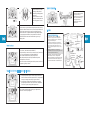
Aircraft shielding installation method:
P
ay attention to
The protective hood and the blade should be
assembled as per the two direction of A, B
indicated. Please note that the protective
hood of the aircraft should be correctly loaded
as per the correct loading position shown,
which is corresponding to the picture above.
Please DO NOT load it wrong.
Step 1: Please pull out the decoration piece
of the 4 protective hoods as the left picture
shown and well keep it.
Step 2: As the left
picture shown, please insert the protective
hood into the groove as per the correct
position shown.
Step 3: As the left
picture shown, lock the screw included into
the hole position of the two screws.
Following the same method to load the
other 3 protective hoods, please load and
well lock the screws as the correct position
shown, thus finish the assembly.
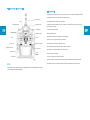
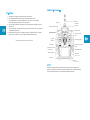
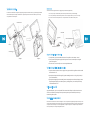
Battery installation
1. As the picture shown, please unload battery
cover of the transmitter. Load 4 PCS “AA”
batteries (not included) as the correct
polarity shown in the battery compartment,
and then load the battery cover and tightly
wrench the screw.
Caution: a. When loading batteries, please load the
batteries as per the correct “+” “-“ polarity shown
on the battery compartment. Please DO NOT load
them upside down.
b. Please DO NOT mix using the old batteries with
the new ones or mix batteries of different types of
brand.
A shielding
B shielding
B shielding
A shielding
A the blades
A the blades
B the blades
B the blades
Warnings:
*Please follow the instruction or packing instructions for proper installation and use. Some parts are
assembled by the adult.
*The product contains small parts, eating or possible choking hazard.
*Please put away the packing material in time, so as not to couse harm to children.
*Need to regularly chock the charger, wire, plug, shell and other components, found that damage, should
stop using, until the repair.
*The charger, the battery pack, and the charging device must be inserted in the same power as the
product labeling.
*Can only use the original configuration of the charger, the charger is not a toy.
*Clean toys should be disconnected from the charger.
*Non rechargeable battery.
*When charging the rechargeable battery, the need for adult guardianship.
*Do not mix old and new batteries or batteries of different types, the exhaustion of the battery should be
promptly removed.
*Do not short-circuit the battery, break down, or fall into the fire.
*Long time does not control the product, please take out the battery.
*Do not touch the rotating parts, to avoid causing harm to the body.
*Please do not serious impact or drop aircraft and remote control.
*Clean the product with a clean, soft cloth.
*Users are responsible for ensuring that the product will not cause damage to itself or others, and that the
manufacturer or distributor does not take any responsibility for the operation of the damage caused by
improper operation of their own or other people’s safety.
*The package and the instruction manual contain the important information of the product, please keep
it.

Preparation before operating the aircraft
Battery loading and power
connection: Load the battery into the
battery compartment as the picture
A shown and then well connects with
the power plug.
Caution:
When connecting the power plug,
please do recognize well the “+” “-“
polarity, say red line to red line.
Decoding operation
1. When connecting correctly with the power plug, please point the tail part of the aircraft to yourself
and place it on the flat ground. This time the light on the aircraft will be flashing quickly and please
DO NOT move the fuselage.
2. Switch on the transmitter, this time you will hear two sound of “di, di” sending ot from the
transmitter. Then pleas push the throttle lever to the highest position. The LED light on the
aircraft will be flashing slowly, and then please pull it to the lowest position and you will hear “di”
sound sending out from the transmitter, the power indicator of the transmitter and the LED light
of the aircraft will show eternal bright, which represents decoding is successfully made and you can
control the aircraft.
START/STOP operating method of the aircraft
START/STOP
1. Press “START/STOP” key to start the
aircraft. This time the motor of the aircraft
will be running slowly. Push upward the
throttle leaver, the aircraft will take off.
2. Press “START/STOP” key during the course
of flying, the aircraft will be landing slowly
until landing on the ground and stop flying.
E
mergency STOP
In case that the aircraft is fallen off by accident
during the process of flying or meeting the danger,
please press the Emergency Stop key, this time the
aircraft will stop working quickly.
Figure A
Figure B
The power
switch
Emergency
STOP
START/STOP
Charging instruction of lithium battery
(Please remove the batteries from the aircraft before charging)
1. Insert the power plug of the power adaptor into the assigned power socket.
2. Insert manually the plug of the power adaptor into the bale gear, this time the green indicator of
the balancing charger will show eternal blighting char.
3. Insert manually another end of the balancing charger into the charging plug of the battery, this
time the red indicator will turn bright “ON”. Charging for about 3.5 hours, the red indicator will be
OFF, which represented the charging is finish. Please disconnect all the links and put it on the safe
position.
Related matters needing attention in the use of lithium batteries:
A. Charging, the staff do not leave and charging time is not too long, charging process found the
battery, please stop charging, avoid battery damage or fire, etc…
B. Do not put the battery in the inflammable and explosive goods next to charge, when the battery in
the use or recharging process, once the small or battery suddenly become hot, deformation,
discoloration and other abnormal phenomenon, please stop using the battery.
C. If the battery leaks, avoid contact with skin and eyes. If contact with skin and eyes, rinse
immediately with plenty of cold water and immediately seek medical attention.
D. Can only use the original charger to charge the product to the product, and determine the charger
voltage to meet your local standards.
E. Do not put the battery into the fire, microwave or pressure tank.
F. Please do not use solvents, industrial alcohol or other flammable solvents to clean the product and
the charger.
G. Products include plastic, electronic components and battery components, please do not use such
items as daily garbage disposal, please according to the local garbage collection requirements, the
classification process.
The power adapter
The red light
The green light
Balance charger
The lithium battery

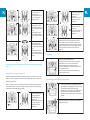
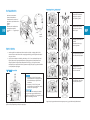
Instruction on Action Trimming of the aircraft
Push slowly throttle lever. When the aircraft ascending till about 1,5 meters, if the aircraft make spinning
in the air or titling toward different direction, you can use Trimmer to correct the action.
Caution: When the aircraft flies 30 cm above the ground, the aircraft may become instable due to the
turbulence by its own blade. This is called “Gravity Reaction”. The lighter of the weight of the aircraft the
bigger affection of the “Gravity Reaction” in maybe.
When spinning to the left,
please trim it to the right till it
is well repaired.
When the right spin, spinner
left adjusted until repaired.
When deviating toward forward,
please trim it to the back until it
is well repaired.
When trimming to before
adjustment, until repaired.
When deviating to the left,
please trim it to right until it is
well repaired.
The bias to the right, fine-
tuning adjustments to the left,
until the repair.
If the aircraft cannot be ascending vertically when taking off, you can
calibrate the aircraft. As the method shown in the picture, pull the
throttle lever and direction lever both in the same time to the down
left corner, this time the indicator of the aircraft will be flashing
quickly and then release all the actions on the transmitter, wait until
the indicator shows eternal bright “ON”, the calibration can be
finished.
Operating method on the Non-head Mode of the aircraft
1. Before entering into Non-head Mode, please well confirm the
Forward direction of the decoding. Press the key for Non-head
Mode, you will hear the transmitter sending out inter-mitten
sound of “Di, Di, Di”, this time it enters into the Non-head
Mode. No matter which direction the aircraft may rotate to,
the flying direction will be as per the direction that the
decoding is made.
2. If you need to exit from the Non-head Mode, please press the
key for Non-head Mode once again. When hearing the sound
of “Di, Di, Di” sending out from the transmitter, it will exit and
enter into the Ordinary Mode.
Tips on Height Setting: Push upward the throttle lever and the aircraft will be ascending to the assigned
height. Then please loosen the throttle lever and the aircraft will be flying steadily as per this height.
Instruction on normal flying and tumbing control of the aircraft
When pushing the throttle lever
upward, the aircraft will be
ascending;
When the throttle lever is
pushed down, the aircraft
drops.
When pushing the throttle lever
left, the aircraft will be turning
left.
When the throttle lever is
pushed to the right, the aircraft
turns right.
When pushing the direction
lever upward, the aircraft will be
advancing forward.
When the direction of the lever
back to pull down the aircraft.
When pushing the direction
lever to the left, the aircraft will
be flying to the left side.
When the direction of the
joystick to the right, aircraft fly
on the right side.
When pushing the direction
lever upward, the aircraft will be
tumbling forward.
When the direction of the lever
is pulled down, the aircraft
turn.
When the direction of the
joystick to the left, the aircraft
left turn.
When the direction of the
joystick to the right, aircraft
right turn.
Tips: Please fly the aircraft to the height of 3 meters or above, and then make the aircraft tumbling.

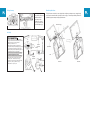
Assembly of the Monitor:
As picture 1 shown, please load the monitor and the fixing parts on the root part of the 2.4G antenna in
the transmitter and then fix the screws included firmly. Well assemble the monitor of the transmitter, as
picture 2 shown.
Figure 1
Figure 2
According to the fixed
accessories
Screw
Display
The remote control
Operating instruction on One-key Return of the aircraft
1. Press the “One key Return” key the transmitter will send out
inter-mitten sound “Di, Di”, this time it has entered into the
“One key Return Mode”, the aircraft will be flying backward
slowly as per the backward direction the decoding is made.
2. When the aircraft is flying too closed to you, please DO NOT
press “One key Return” key so as to avoid being wounded by
accident due to carelessness.
When entering “One key Return Mode”, simply pushing the Direction
Lever toward either direction (forward or backward or to the left or to
the right) can exit from the “One key Return Mode”
Instruction on the adjustment of the Camera angle
Adjusting method of the
Camera angle: Press
downward the Angle
Adjusting key, the Camera
head will turn downward;
Press upward the Angle
Adjusting key, the Camera
head will turn upward.
Instruction on Camera/Video recording
Component installation:
1. Point the Camera assembly upward to the fixing
groove as the right picture “1” shown, and then
push toward inside into the fixing seat as the
direction of right picture “2” indicated.
2. As the position shown on the right picture, firstly
please insert correctly the rudder plug into the
rudder socked at the base of the aircraft, and then
insert correctly the plug of the Camera board into
the F/C socket.
Caution: The plug of the Camera board is not to be
inserted to the WIFI socket. Otherwise it may damage
to recording components. Please Do remember this!
3. As the right picture shown, please correctly load
the SD card into the card groove of the Camera
component, gently press it and load the SD card,
and then press it gently and the SD card will pop
out automatically.
Steering gear
socket
F/C outlet
The steering gear
plug
SD card slot
SD card
The camera board plug

Characteristics Instruction
5.8G transmitting system is applied on this product with transmitting distance reaching 80 meters.
Strong anti-interference ability and no need to debug. 720p High Definition Camera is applied, 4.3 inch of
screen.
Precautions
1. When the remote control or the aircraft power is low, the remote distance affected.
2. If the aircraft power is low, there will be flying high enough or take off difficult.
3. If the aircraft appeared damaged, deformation please timely repair, severe wind leaves broken or
damage do not fly, doing so may result in injury.
4. The long-term is not used when the remote controller of the battery to prevent damage to the
product from battery leakage.
5. Cut cannot let the aircraft crashed from a height or a serious collision, this will damage the aircraft
or shorten the aircraft life.
6. In order to ensure the stability of the aircraft, when the aircraft hit to the real object and then fall,
place the aircraft placed level ground to stay for 2-3 seconds, until the air craft automatic detection
level, and then manipulate.
Used photos are illustrative and may differ from the real.
Charging instruction of monitor (please pull the power switch to OFF position before charging).
1. Insert the USB cable into the USB port of the computer, this time the USB indicator will be ON.
2. Then insert another end of the USB cable into the charging port of the monitor, this time the USB
indicator will be OFF.
3. Charging for about 1.5 hours, the USB indicator will be ON, which represents the charging is finish.
FPV monitor operating method
1. Please connect the power of the aircraft as per the correct method, switch on the power of the
transmitter and make decoding successfully.
2. Please pull the ON/OFF of the monitor to “ON” position, after several seconds, the screen will
show the image transmitted from the Camera.
3. This time you can control the aircraft, the screen will show the real-time transmitting image.
Camera & Video Recording
1. When the aircraft is successfully decoded, please confirm if the TF card is well loaded into the
Camera Assembly.
2. Press the Camera key on the transmitter, the Camera will take picture and preserve.
3. Press the Video Recording key on the transmitter, the Camera will start recording, this time the
monitor will start record the recording time. Press this key once again to exit the recording and
preserve.
Read the content of SD card
Switch off the power of the aircraft and remove the SD card, Either the SD card is put into the card reader
and read on the computer or loaded directly into the mobile, then you can use the corresponding format to
play the video or see the picture.
The charging jack
Switch
USB charging cable
The USB light

Ostrzeżenia:
* Należy zawsze postępować zgodnie z zaleceniami umieszczonymi na produkcie, jego opakowaniu oraz w
instrukcji obsługi. Niektóre części produktu wymagają zamontowania przez osobę dorosłą.
* Produkt zawiera małe części, które w przypadku połknięcia mogą doprowadzić do zadławienia lub
innych poważnych obrażeń.
* Po rozpakowaniu produktu wszelkie elementy opakowania należy trzymać poza zasięgiem dzieci.
* Należy regularnie sprawdzać ładowarkę, przewody, wtyczki, obudowy oraz inne elementy urządzenia. W
przypadku wykrycia jakichkolwiek uszkodzeń należy natychmiast zaprzestać jego użytkowania dopóki nie
zostanie ono naprawione.
* Używane z urządzeniem ładowarki oraz baterie muszą mieć parametry zasilania zgodne z wytycznymi
umieszczonymi na produkcie.
* Należy używać wyłącznie oryginalnej ładowarki. Ładowarka nie jest zabawką.
* Przed czyszczeniem urządzenia należy odłączyć ładowarkę oraz baterię.
* Akumulatorki należy ładować wyłącznie pod nadzorem osoby dorosłej.
* Nie należy mieszać ze sobą baterii różnych rodzajów ani baterii starych (zużytych) z nowymi.
Wyczerpane baterie należy wyjąć z urządzenia.
*Nie należy dopuścić do zwarcia ani dotykania metalowych złącz baterii. Nie należy demontować baterii
ani wrzucać ich do ognia.
* W przypadku nieużywania produktu przez dłuższy okres czasu, należy wyjąć baterie z urządzenia.
* Aby uniknąć obrażeń, nie należy dotykać obracających się śmigieł ani innych ruchomych części
urządzenia.
* Nie należy dopuszczać do wstrząsów ani upuszczenia drona ani pilota.
* Produkt należy czyścić za pomocą miękkiej i suchej szmatki.
* Obowiązkiem użytkowników jest zadbanie o to, by produkt był bezpieczny zarówno dla nich jak i dla
otoczenia. Zarówno producent, importer jak i dystrybutor nie ponoszą żadnej odpowiedzialności za
korzystanie z niniejszego produktu, ani ewentualne szkody i obrażenia spowodowane jego niewłaściwą
obsługą.
* Zarówno opakowanie jak i instrukcja obsługi zawierają ważne informacje o produkcie, dlatego należy je
zachować do przyszłego wglądu.
Schemat funkcji pilota
Ważne!
Przed rozpoczęciem korzystania z urządzenia należy przeczytać poniższe informacje oraz ostrzeżenia.
Niezastosowanie się do zaleceń niniejszej instrukcji może doprowadzić do obrażeń. Dron nie jest
przeznaczony do użytku przez osoby poniżej 14 roku życia bez odpowiedniego nadzoru osób dorosłych.
Antena 2.5G
Kontrolka zasilania
Przycisk akrobacji
Trymer lotu do przodu
Drążek kierunków
Trymer lotu w lewo / w prawo
Włącznik/Wyłącznik
Przycisk trybów prędkości
Tryb Headless mode
Przycisk aparatu
Przycisk wideo
Trymer obrotów
Drążek obrotów
silnika
Trymer kierunków
Przycisk powrotu do
miejsca startu
Lądowanie awaryjne
Start / Stop
Sterowanie kamerą

Instalacja baterii w pilocie
1. Zdejmij pokrywę komory baterii pilota tak,
jak pokazano na rysunku obok. Umieść w
komorze 4 baterie typu AA (brak w
zestawie) zgodnie z oznaczeniami
polaryzacji (+ -) wyszczególnionymi na dnie
komory. Następnie załóż pokrywę baterii i
przytwierdź ją na miejscu za pomocą śrubki.
Uwaga:
a) Podczas wkładania baterii należy zwrócić
uwagę na ich prawidłowe ustawienie,
zgodne z oznaczeniami polaryzacji (+ -) na
dnie komory. NIE należy wkładać ich
odwrotnie.
b) Nie należy mieszać ze sobą baterii
różnych rodzajów, marek ani baterii starych
(zużytych) z nowymi.
Instrukcja ładowania baterii drona
Przed rozpoczęciem ładowania należy wyjąć baterię z drona.
1. Wsuń wtyczkę zasilacza do gniazdka sieci elektrycznej.
2. Drugi koniec zasilacza wsuń w port zasilania balansera. Zielona kontrolka balansera zacznie
świecić światłem stałym.
3. Następnie wsuń wtyczkę przewodu baterii do gniazda ładowania balansera. Podczas ładowania
czerwona dioda balansera świeci światłem stałym. Proces ładowania trwa około 3,5 godziny. Po
jego zakończeniu czerwona dioda zgaśnie. Należy wówczas odłączyć wszystkie przewody i odłożyć
je w bezpieczne miejsce do przyszłego użycia.
Uwagi odnośnie użytkowania baterii litowych:
A. Ładowanie powinno odbywać się zawsze pod nadzorem osoby dorosłej. W przypadku wystąpienia
jakichkolwiek niepokojących objawów należy przerwać ładowanie tak, by nie dopuścić do
uszkodzenia baterii, ani jej zapalenia.
Zasilacz
Czerwona
dioda
Zielona dioda
Balanser
Bateria litowa
Schemat montażu śmigieł i osłon
Zwróć uwagę na:
Osłonki oraz śmigła należy zamontować
zgodnie z oznaczonymi stronami (A oraz B).
Należy zadbać o to, by były one zamontowane
we właściwej pozycji oraz odpowiednią stroną,
dokładnie tak, jak pokazano na powyższym
rysunku. Niewłaściwy montaż może
spowodować uszkodzenie urządzenia lub jego
nieprawidłową pracę.
Krok 1: Wyciągnij
część ozdobną z każdej z 4 osłonek tak, jak
pokazano na rysunku obok i zachowaj je.
Krok 2: Wsuń osłonki
w odpowiadające im otwory zwracając
uwagę na ich odpowiednią pozycję tak, jak
pokazano na rysunku obok.
Krok 3: Za pomocą
załączonego w zestawie śrubokręta
przykręć osłonkę dwiema śrubkami tak, jak
pokazano na rysunku obok. Czynność tę
należy powtórzyć w przypadku trzech
pozostałych osłonek, za każdym razem
zwracając uwagę na ich prawidłowe
położenie oraz stabilność mocowania.
Osłonka A
Osłonka B
Osłonka B
Osłonka A
Śmigło A
Śmigło A
Śmigło B
Śmigło B

START / LĄDOWANIE
START/STOP
1. Naciśnij przycisk “START/STOP”, aby
uruchomić drona. Tuż po włączeniu silnik
będzie pracował na wolnych obrotach.
Przesuń w górę drążek obrotów silnika, aby
dron wzbił się w powietrze.
2. Wciśnięcie przycisku “START/STOP” w
chwili, gdy dron znajduje się w powietrzu
spowoduje, że urządzenie zacznie wolno
opadać, aż do momentu wylądowania.
L
ądowanie awaryjne
Jeśli podczas lotu dron ulegnie wypadkowi lub w
innej nieprzewidzianej sytuacji przydatnym może
się okazać przycisk lądowania awaryjnego. Po jego
naciśnięciu dron wykona szybki manewr lądowania.
Kontrola wysokości: Przesuń w górę drążek obrotów silnika, aby dron wzbił się w górę. Gdy osiągnie
pożądaną wysokość, zwolnij drążek obrotów do pozycji neutralnej. Dron będzie wówczas kontynuował
swój lot na tej wysokości.
Kontrola lotu drona
Przesuń drążek obrotów silnika
w górę, aby dron wzbił się w
górę.
Przesuń drążek obrotów silnika
w dół, aby dron zaczął opadać.
Przesuń drążek obrotów silnika
w lewo, aby dron skręcił w lewo.
Przesuń drążek obrotów silnika
w prawo, aby dron skręcił w
prawo.
Przesuń drążek kierunków w
górę, aby dron leciał do przodu.
Przesuń drążek kierunków w
dół, aby dron leciał do tyłu.
Lądowanie
awaryjne
START / STOP
B. Nie należy umieszczać baterii w pobliżu źródeł ognia, substancji wybuchowych, łatwopalnych itp.
Jeśli w dowolnym momencie ładowania lub używania bateria zacznie nadmiernie się nagrzewać,
zmieniać kolor, pęcznieć lub wystąpią inne nietypowe zjawiska, należy natychmiast przerwać jej
używanie.
C. W przypadku wycieku elektrolitu, należy nie dopuszczać do jego kontaktu ze skórą lub oczami. Jeśli
kontakt taki wystąpi, należy jak najszybciej przemyć to miejsce dużą ilością zimnej wody i
natychmiast zgłosić się do lekarza.
D. Do ładowania należy używać wyłącznie oryginalnej ładowarki, której parametry zasilania będą
odpowiadać lokalnym standardom.
E. Nie należy wrzucać baterii do ognia, umieszczać jej w kuchence mikrofalowej ani zbiorniku
ciśnieniowym.
F. Do czyszczenia drona, pilota i ładowarki nie należy używać rozpuszczalników, alkoholu
przemysłowego ani innych substancji łatwopalnych.
G. Komponenty zestawu wykonane są z tworzyw sztucznych oraz elementów elektronicznych.
Ponadto korzystają również z baterii, dlatego też nie należy wyrzucać ich do zwykłego pojemnika
na śmieci. Każdy z elementów zestawu należy utylizować zgodnie z lokalnymi przepisami w
przeznaczonych do tego celu miejscach.
Przygotowanie do użycia drona
Instalacja baterii: Umieść baterię w
komorze tak, jak pokazano na
rysunku A. Następnie podłącz
wtyczki przewodu baterii do drona.
Uwaga:
Podczas podłączania przewodu
zwróć uwagę na oznaczenia
polaryzacji (+ -). Czerwony przewód
powinien zostać podłączony do jego
odpowiednika o tym samym kolorze.
Synchronizacja nadajnika (pilota) z odbiornikiem (dronem)
1. Po odpowiednim podłączeniu baterii, ustaw drona na płaskiej powierzchni tak, by był zwrócony do
Ciebie tylną częścią (ogonem). Dioda drona zacznie szybko mrugać. Podczas procesu synchronizacji
nie należy zmieniać pozycji ani położenia drona.
2. Przesuń włącznik pilota do pozycji ON. Pilot wyemituje dwukrotny sygnał dźwiękowy.
Przesuń drążek obrotów silnika (Throttle) z pozycji najniższej do najwyższej. Dioda drona zacznie
powoli mrugać. Następnie przesuń drążek obrotów silnika (Throttle) do pozycji najniższej. Pilot
wyemituje pojedynczy sygnał dźwiękowy. Proces synchronizacji zakończy się w momencie, gdy
diody pilota oraz drona przestaną mrugać i zaczną świecić światłem stałym.
Obrazek A
Obrazek B
Przycisk
zasilania /
Włącznik

Jeśli dron zbacza w przód, użyj
trymera lotu w tył, aby
skorygować lot.
Jeśli dron zbacza w tył, użyj
trymera lotu w przód, aby
skorygować lot.
Jeśli dron zbacza w lewo, użyj
trymera lotu w prawo, aby
skorygować lot.
Jeśli dron zbacza w prawo, użyj
trymera lotu w lewo, aby
skorygować lot.
Jeśli nie udaje się wzbić drona pionowo do góry, należy przeprowadzić
proces kalibracji. By to zrobić, przesuń jednocześnie oba drążki
(obrotów silnika i sterowania) w lewy dolny róg. Gdy dioda drona
zacznie szybko mrugać zwolnij oba drążki i poczekaj na zakończenie
kalibracji (dioda drona będzie świecić światłem ciągłym). Kalibracja
musi być przeprowadzona, gdy dron znajduję się na poziomej
powierzchni.
Tryb headless
1. Jak włączyć/wyłączyć funkcję HEADLESS?
Naciśnij przycisk na kontrolerze (jak na zdjęciu). Kontroler będzie
wydawał dźwięk, oznacza to że jesteś w trybie HEADLESS.
Aby powrócić do zwykłego trybu, naciśnij ten sam przycisk.
2. Tryb ustawia kierunek lotu do przodu niezależnie od ustawienia
drona dla łatwiejszej kontroli.
Jeśli chcesz zmienić ustawienie przodu drona, musisz wyłączyć
urządzenie i ustawić je na nowo.
Powrót do miejsca startu przy użyciu jednego przycisku
1. Po wciśnięciu przycisku powrotu do poprzedniego położenia
pilot wyemituje dwa sygnały dźwiękowe, a dron zacznie wolno
lecieć w kierunku przeciwnym do dotychczasowego.
2. Funkcji tej nie powinno się aktywować w przypadku, gdy dron
znajduje się blisko osoby sterującej. W przeciwnym razie
zawracający statek może uderzyć w operatora powodując jego
obrażenia.
Aby powrócić do zwykłego trybu lotu, wystarczy poruszyć drążkiem
kierunków w dowolną stronę.
Przesuń drążek kierunków w
lewo, aby dron leciał w
wybranym kierunku.
Przesuń drążek kierunków w
prawo, aby dron leciał w
wybranym kierunku.
Wciśnij przycisk akrobacji i
przesuń drążek kierunków w
górę, aby dron wykonał obrót w
przód.
Wciśnij przycisk akrobacji i
przesuń drążek kierunków w
dół, aby dron wykonał obrót w
tył.
Wciśnij przycisk akrobacji i
przesuń drążek kierunków w
lewo, aby dron wykonał obrót w
lewo.
Wciśnij przycisk akrobacji i
przesuń drążek kierunków w
prawo, aby dron wykonał obrót
w prawo.
Wskazówka: Przed rozpoczęciem wykonywania akrobacji należy wzbić drona na wysokość minimum 3
metrów.
Korygowanie lotu drona (przyciski trymerów)
Powoli przesuwaj drążek obrotów silnika w górę dopóki dron nie wzbije się na wysokość 1,5 metra. Jeśli
podczas lotu zacznie on przechylać się lub obracać w niepożądanym kierunku, można użyć przycisków -
trymerów, by skorygować lot.
Uwaga: Po osiągnięciu wysokości 30cm nad ziemią dron może wpaść w turbulencje wywoływane przez
własne śmigła. Zjawisko to związane jest z działającą na niego siłą grawitacji. Im lżejszy jest dron tym
bardziej podatny jest na wspomniane wyżej zjawisko.
Jeśli dron niepożądanie obraca
się w lewo, użyj trymera
kierunków (w prawo), aby
skorygować lot.
Jeśli dron niepożądanie obraca
się w prawo, użyj trymera
kierunków (w lewo), aby
skorygować lot.

Montaż wyświetlacza:
Tak jak pokazano na Obrazku 1, zamocuj wyświetlacz do pilota u podstawy anteny, a następnie użyj
załączonych w zestawie śrubek, aby dokręcić zacisk mocujący. Obrazek 2 przedstawia pilota wraz z
prawidłowo przymocowanym do niego wyświetlaczem.
Obrazek 1
Obrazek 2
Zacisk mocujący
Śrubki
Wyświetlacz
Pilot
Obsługa kamery
Zmiana kąta pochylenia
kamery: Naciśnij dolną część
przycisku sterowania
kamerą, aby pochylić
obiektyw w dół. Naciśnij
górną część przycisku, aby
odchylić obiektyw w górę.
Instalacja
Instalacja komponentów kamery:
1. Skieruj podstawę kamery tak, by odpowiadała
pozycją otworowi mocowania w dronie (Obrazek 1).
Następnie wsuń ją i dociśnij w kierunku
wskazanym na obrazku nr. 2.
2. Wsuń wtyczkę przewodu sterowania kątem
pochylenia kamery do odpowiadającego jej gniazda
na podstawie drona. Następnie podłącz drugą
wtyczkę kamery (F/C) do odpowiedniego portu na
podstawie drona (patrz - obrazek obok).
Uwaga: Nie należy umieszczać wtyczki F/C kamery w
porcie Wi-Fi. W przeciwnym razie może to
doprowadzić do uszkodzenia komponentów kamery!
3. Wsuń kartę pamięci SD do slotu kart pamięci
kamery (patrz - obrazek obok) i dociśnij ją
delikatnie aż do momentu jej zablokowania. Aby
wyjąć kartę, naciśnij ją delikatnie, a po jej
odblokowaniu - wysuń z portu.
Gniazdo
przewodu
Port F/C
Wtyczka
przewodu
Port karty SD
Karta SD
Wtyczka F/C kamery

Środki ostrożności
1. Niski poziom energii baterii zarówno pilota jak i drona ma negatywny wpływ na zasięg, w jakim
urządzenia te mogą się ze sobą sprawnie komunikować.
2. Niski poziom energii baterii drona może również utrudnić jego start oraz uniemożliwić wzbicie się
na większe wysokości.
3. Jeśli dojdzie do uszkodzenia jakiegokolwiek elementu drona, należy zaprzestać jego używania, aż
do momentu naprawy. Obsługa niesprawnego drona może skutkować obrażeniami operatora oraz
innych osób.
4. Jeśli dron nie będzie używany przez dłuższy okres czasu, należy wyjąć baterie z pilota tak, aby
uniknąć wycieku elektrolitu.
5. Należy dbać o to, aby dron nie uderzył w żadną przeszkodę ani nie spadł na ziemię z dużej
wysokości. W przeciwnym razie może to doprowadzić do jego uszkodzenia lub całkowitego
zniszczenia.
Użyte zdjęcia są poglądowe i mogą się różnić od rzeczywistych.
Ładowanie wyświetlacza
Przed rozpoczęciem ładowania wyświetlacza należy go wyłączyć (przesunąć włącznik do pozycji OFF).
1. Wsuń jeden koniec przewodu USB do portu USB komputera. Dioda na wtyczce USB zacznie świecić.
2. Wsuń drugą wtyczkę przewodu USB do portu ładowania wyświetlacza. Dioda na wtyczce zgaśnie.
3. Proces ładowania trwa około 1,5 godziny. Po jego zakończeniu dioda wtyczki USB zacznie świecić.
Obsługa wyświetlacza
1. Włącz drona, a następnie pilota tak, by móc zsynchronizować z nimi wyświetlacz.
2. Przesuń włącznik wyświetlacza do pozycji ON. Po kilku sekundach na ekranie pojawi się obraz z
kamery.
3. Od tej chwili ekran będzie wyświetlał to, co w danej chwili rejestruje kamera.
Robienie zdjęć oraz nagrywanie wideo
1. Po zsynchronizowaniu wyświetlacza z dronem upewnij się, że w kamerze zainstalowana jest karta
pamięci micro SD.
2. Naciskaj przycisk aparatu (na pilocie), aby zrobić zdjęcie i zapisać je na karcie pamięci.
3. Naciśnij przycisk wideo (na pilocie), aby rozpocząć nagrywanie. Na wyświetlaczu pojawi się
informacja o czasie nagrywania. Naciśnij ten przycisk ponownie, aby zakończyć nagrywanie i
zapisać plik wideo na karcie pamięci micro SD.
Odczyt zawartości karty SD
Wyłącz zasilanie drona, a następnie wyjmij kartę SD z kamery. Użyj czytnika kart w komputerze, bądź
wsuń kartę do odpowiadającego jej portu, aby móc przeglądać zapisane na niej pliki zdjęciowe oraz wideo.
Charakterystyka komponentów
Pilot wyposażony jest w antenę odbiorczą 5.8G, która umożliwia odbiór obrazu z kamery w promieniu do
80 metrów. Urządzenie charakteryzuje się wysoką odpornością na zakłócenia oraz brakiem konieczności
przeprowadzania procesu debugowania. Dron wyposażony jest w kamerę HD rejestrującą obrazy o
rozdzielczości 720p. Do pilota dołączony jest wyświetlacz o przekątnej długości 4,3 cala.
Port ładowania
Włącznik
Przewód USB
Dioda ładowarki USB

Távirányító gombjai és azok funkciói
Fontos!
Használat előtt, kérjük, olvassák el a Biztonsági Figyelmeztetéseket. Az RC repülőgépet 14 éven aluliak
csak szülői felügyelet mellett használhatják.
2.5G antenna feje
Bekapcsolást jelző
Tumbling gomb
Elülső/hátsó trimmer
Iránykar
Oldalsó repülé trimmer
Be/Ki
Sebességváltó gomb
Non-head mód
Kamera
Video
Gázkar Trimmer
Gázkar
Irány trimmer
Egygombos visszatérés
Vészhelyzeti stop
Start/landolás
Figyelmeztetések:
*Kérjük kövesse az utasításokat a telepítés és a használat esetén. Csak felnőtt tartsa karban a készüléket
*Készüléknek kis alkatrészei vannak, azok evése fulladást okozhat.
*Kérjük, gyerekektől elzárt helyen tartsa a készüléket.
*Folyamatosan ellenőrizni szükséges a töltőt, vezetékeket, és a készülék a jelzett töltési áramforráson
keresztül lehet csak tölteni.
*Csak az eredeti töltőt használja.
*Nem újratölthető elemek.
*Ha újratölthető elemet használ, szükséges a szülői felügyelet.
*Ne keverje a régi és új vagy különböző típusú elemeket.
*Ne zárja rövidre az akkumulátort, vagy dobja a tűzbe.
*Ha hosszabb ideig nem használja a készüléket, vegye ki az elemeket.
*Ne érjen hozza a forgó alkatrészekhez, mert sérülést okozhat.
*Kérjük, ne dobja le a készüléket.
*Tiszta és lány ruhával tartsa tisztán a készüléket.
*A gyártó és értékesítő semmilyen felelősséget nem vállalat a működtetésből eredő bármilyen kárért.
*A használati útmutató és az instrukciók fontos információt tartalmaznak, kérjük, őrizze be őket.
Kamera vezérlése

Repülőgép védőinek telepítése:
Ü
gyeljen a következőkre
Védőburkolatot és a lapátokat (szárnyakat) az
A, B-t kettő irányból kell összeszerelni. Kérjük,
a repülőgép védőburkolatát helyesen kell
rögzíteni, ahogy a képen látható. Kérjük, NE
rosszul helyezze fel őket.
1 lépés: Húzza ki a 4 védőburkolat
díszítését, ahol képen látható.
2 lépés: Ahogy a bal
képen látható, kérjük, helyezze be a
védőburlatot a vájatba, amíg a helyes
pozíciót fel nem veszi.
3 lépés: Ahogy a bal
oldali képen látható, mindkét csavart
csavarja be a lyukba. Ugyanezt hajtsa végre
a másik 3 védő esetében is, kérjük, jól
csavarozza be csavarokat.
Telepek telepítése
1. Ahogy a képen látható, vegye le a
távirányító akkumulátor fedelét. Tegyen be
4 darab “AA” elemet (nem tartozék), és
ügyeljen a megfelelő polaritásra, majd tegye
vissza fedelet és jól csavarozza meg csavart.
Figyelem: Az elemek behelyezésekor kérjük,
ügyeljen a megfelelő polaritásra “+” “-“.
b. Kérjük, NE KEVERJE a régi és új vagy különböző
típusú elemeket.
A védő
B védő
B védő
A védő
A lapát
A lapát
B lapáts
B lapát
Lithium elemek töltése
(Kérjük, töltés előtt vegye ki az elemeket)
1. Csatlakoztassa a hálózati kábelt az adapterhez.
2. Csatlakoztassa a hálózati adaptert a fogaskerékhez, és a zöld kiegyenlítő töltő jelzőfénye
világítani fog.
3. Csatlakoztassa a kiegyenlítő töltő másik végét az akkumulátor töltőhöz, ekkor a piros jelzőfény
bekapcsol “ON”. A töltés kb. 3,5 óra, a töltés befejeztét a piros jelzőfény OFF állása jelzi. Kérjük
húzzon ki minden dugaszt és tegye biztonságos helyre.
Lithium elemekkel kapcsolatos kérdések:
A. Töltéskor ne hagyja túl sokáig tölteni, a töltési folyamat befejezését fény jelzi, kérjük ügyeljen rá a
sérülések és tűzeset elkerülése érdekében.
B. Ne tegyen tűz- és robbanásveszélyes termékeket a töltésben vagy használatban lévő elemek
mellé. Ha hirtelen felforrósodik, deformálódik, elszíneződik és egyéb kódos jelenség alakul ki,
azonnal hagyja abba az elem használatát.
C. Ha az akkumulátor szivárog, ne érintkezzen bőrrel, szemmel. Ha mégis, bő hideg vízzel öblítse le
és azonnal forduljon orvoshoz.
D. Csak az eredeti töltőt használja a készülék töltéséhez és ügyeljen a helyi előírásokra.
E. Ne tegye az elemeket a tűzbe, mikrohullámú sütőbe vagy nyomással ellátott tartályba.
F. Ne tisztítsa az elemeket és a töltőt oldószerrel, ipari alkohollal vagy más gyúlékony oldószerrel.
G. Készülék műanyagot, elektronikai alkatrészeket és elemeket tartalmaz, kérjük ne a napi
szemetesládába dobja, hanem a helyi előírásoknak megfelelően a gyűjtőhelyen dobja ki.
Hálózati adapter
Piros fény
Zöld fény
Kiegyenlítő töltő
Lithium elem

Repülőgép előkészítése
Töltse fel az elemeket és
csatlakoztassa a hálózathoz:
helyezze az akkumulátort az
akkumulátor tartóba, amint az „A”
képen látható, majd csatlakoztassa a
hálózathoz.
Vigyázat:
A hálózathoz való csatlakozáskor,
kérjük ügyeljen a megfelelő
polaritáshoz “+” “-“, ügyeljen a piros
vonalra.
Dekódoló működése
1. Amikor megfelelően csatlakoztatta a hálózati csatlakozót, kérjük, a repülőgép farka Ön felé
nézzen és helyezze sima felületre. Ekkor a repülőgépen lévő fény gyorsan villogni kezd, kérjük, ne
mozgassa a törzset.
2. Kapcsolja be a távirányítót és hallani fog kettő hangot - “di, di”, ami a távirányítóból jön. Majd
kérjük a gázkart tolja a legmagasabb helyzetbe. A repülőgépen lévő LED lámpa elkezd lassan
villogni, majd húzza a legalacsonyabb helyzetbe és hallani fog egy “di” hangot ami szintén
távirányítóból jön. A repülőn lévő LED fény folyamatosan világít, mely jelzi, hogy sikeres dekódolta
és tudja irányítani a repülőgépet.
START/STOP használata
START/STOP
1. Nyomja meg “START/STOP” gombot a
repülő elindításához. A repülőgép motorja
lassan elindul. Nyomja a gázkart előre a
felszálláshoz.
2. Nyomja meg “START/STOP” gombot
repülés közben a lassú landoláshoz, majd a
leszállás után a repülő megáll.
V
észhelyzet STOP
Ha a készülék balesetet szenved repülés közben
vagy egy veszélyes tárggyal találkozik, kérjük,
nyomja meg a Vészhelyzet STOP - Emergency Stop
gombot és a készülék gyorsan leáll.
Tippek a magasság beállításához: Nyomja felfelé a házkart és a repülő emelkedni fog. Majd engedje el a
gázkart és a repülő repülni fog és tartja ezt a magasságot.
„A” kép
„B” kép
Hálózati
kapcsoló
Emergency
STOP
START/STOP
Normál repülés és „bukdácsolás”
Nyomja meg a gázkart felfelé
és a repülő elkezd emelkedni;
Ha megnyomja a gázkart a
repülő süllyedni fog lefelé.
Nyomja meg a gázkart balra és
repülő balra fordul, ha jobbra
nyomja meg akkor jobbra fog
fordulni a repülő.
Ha az iránykart előrefelé
nyomja meg, a repülő előre felé
fog haladni.
Ha hátrahúzza, akkor a gép
hátrafelé fog haladni.
Ha az iránykart balra nyomja,
akkor a gép balra fog repülni, ha
jobbra, akkor jobbra fog repülni.
Ha az iránykart felfelé nyomja,
a repülőgép előrefele fog
„bukdácsolni”, ha hátrafelé
húzza, akkor visszafelé.
Ha a irány joystick-t balra
nyomja akkor balra, míg jobbra
nyomja akkor jobbra repül a
gép.
Tippek: Kérjük, a gépet minimum 3 méter magasan reptesse, így gond nélkül tudja „bukdácsoltatni”.

Repülőgép használata „Trimming” akcióban
Nyomja meg lassan a gázkart. Amikor a repülőgép felszáll kb. 1,5 méterig és a gép elkezd forogni a
levegőben vagy különböző irányba mozog, használhatja a Trimmer-t korrekcióhoz.
Vigyázat: A repülőgép a föld felett 30 cm-n turbulenciába kerülhet a saját propellerei miatt. Ez a
„Gravitációs reakció”.
Amikor balra forog, kérjük,
jobbra irányítsa, amíg meg nem
javul. Ha jobbra forog, akkor
balra irányítsa.
Ha előrefele eltér, kérjük,
irányítsa hátrafelé, amíg meg
nem javul. Ha hátrafelé.
Ha eltérés van a baloldalon,
kérjük, jobbra irányítsa, amíg
meg nem javul.
A torzítás a jobb oldalon van,
finomhangolás kell balra.
Ha a repülőgép nem tud függőlegesen emelkedni felszálláskor,
kalibrálhatja a repülőgépet. A módszer a képen látható, húzza az
iránykart és gázkart egyszerre a bal alsó sarokba, ekkor a repülőgép
jelzőfénye elkezd gyorsan villogni, majd engedje el a karokat, és
várjon, míg a jelzőfény az „ON” állásban nem világít és a kalibrálás
kész.
Repülőgép Non-head módjának használata
1. Mielőtt belép a Non-head Módba, kérjük, hagyja jóvá az
előrefelé haladás dekódolását. Amikor megnyomja a Non-
head Mód gombot, a távirányítóból hangot fog hallani: “Di, Di,
Di”, ekkor belép a Non-head Módba. Nem számít, hogy a
repülő milyen irányba halad a repülő, a repülés irányát a
dekódolás határozza meg.
2. Ha ki szeretne lépni a Non-head Módból, kérjük, nyomja meg
újra a Non-head Mód gombot. Ha hallja a “Di, Di, Di” hangot a
távirányítóból, akkor rendszer kilépett és normális módba
lépett be.
Egygombos visszatérés használata
1. Nyomja meg az “Egygombos visszatérés - One key Return”
gombot a távirányítón és hallani fog “Di, Di” hangot, ami azt
jelzi, hogy belépett az “Egygombos visszatérés módba”, a
repülőgép lassan visszafelé fog repülni. Ha a repülőgép túl
közel repül Önhöz, NE nyomja meg az “Egygombos
visszatérés” gombot a véletlen balesetek elkerülések végett.
Ha belép az “Egygombos visszatérés - One key Return” módja,
egyszerűen csak nyomja meg az iránykart valamilyen irányba (előre,v
agy hátra, vagy balra, vagy jobbra) és ki tud lépni a módból.
Kamera szögének beállítása
Kamera szögének beállítása:
Nyomja lefelé a Látószög
beállítása gombot, a kamera
feje lefelé fog mozdulni; ha
felfelé nyomja a látószög
gombot, akkor a kamera
felfelé fog mozdulni.
Fénykép/videó rögzítés
Komponensek telepítése:
1. Rögzítse a kamerát az „1” képen látható módon a
rögzítő horonyhoz, majd nyomja befelé az rögzítő
irányába, ahogy a „2” képen látható.
2. Ahogy a jobboldali képen látható, kérjük, először
illessze be helyesen a kormánylapát dugót a
kormánylapát foglalatba a repülőgép alján, majd
helyezze be helyesen a fedélzeti kamera dugóját
az F/C foglalatba.
Vigyázat: A fedélzeti kamera dugója nem helyezhető
be a WIFI foglalatba. Ellenkező esetben a felvétel
sérülhet. Ne feledje!
3. Ahogy a jobboldali képen látható, kérjük, helyesen
tegye be az SD kamerát a kamera foglalatába,
nyomja meg óvatosan az SD kártyát a rögzítéshez.
Ha újra óvatosan megnyomja az SD kártyát akkor
automatikusa kiugrik a helyéről.
Kormánymű
aljzat
F/C kimenet
Kormánymű
dugó
SD kártya foglalat
SD kártya
Kamera fedélzeti dugó

Monitor szerelése:
Az 1 képen látható a módon rögzítse a monitort és a 2.4G antennát az távirányítóra, majd csavarhúzóval
rögzítse. A helyes rögzítést a 2 ábrán láthatja.
1 kép
2 kép
Tartozékok rögzítése
Csavar
Kijelző
Távirányító
Monitor töltése (töltés előtt, kérjük, állítsa az erőforrás váltót OFF pozícióba).
1. Helyezze be az USB kábelt a számítógép USB portjába, az USB jelző ON állásban lesz.
2. Majd helyezze be az USB kábel másik felét a monitor töltési portjába, az USB jelzőfény OFF
állásban lesz.
3. A töltés kb. 1,5 órát vesz igénybe, az USB jelzőfény ON állásban lesz, mely jelzi a töltés végét.
FPV monitor használata
1. Csatlakoztassa a repülőgépet hálózathoz, kapcsolja be a távirányító bekapcsoló gombját és
dekódolja sikeresen.
2. A monitor ON/OFF gombját állítsa “ON” pozícióba, pár másodperc után a kijelzőn megjelenik a
kamera továbbított képe.
3. Ekkor már tudja a repülőgépen irányítani, a kijelzőn valós időben jelenik a kép.
Kamera & Video rögzítés
1. Ha a repülőgépet sikeresen dekódolta, hagyja jóvá, ha a TF kártyát sikeresen behelyezte.
2. Nyomja meg a Kamera gombot a távirányítón, a kamera képet készít és mentésre kerül.
3. Nyomja meg a videó rögzítés gombot a távirányítón, és a kamera elkezdi a rögzítést. Ekkor a
monitoron megjelenik a rögzítési idő. Nyomja meg újra és befejezi a rögzítést, majd ment.
SD kártya tartalmának olvasása
Kapcsolja ki a repülőgépet és távolítsa el a kamerát. Vagy az SD kártyát helyezze be a kártyaolvasóba és
csatlakoztassa a számítógépre, vagy mobil eszközhöz csatlakoztassa, ahol le tudja játszani a videókat és
a képeket meg tudja tekinteni.
Jellemzők Instruction
5.8G továbbító rendszer 80 méteres hatótávolságig van kalibrálva. Erős anti-interferencia képességgel
rendelkezik és nincs szükség debug-ra. 720p HD (High Definition) kamerának 4.3 colos kijelzője van.
Töltési jack
Váltó
USB töltési kábel
USB fény

Óvintézkedések
1. A távirányító és a repülőgép energiája befolyásolja a hatótávolságot.
2. Ha a repülőgép akkumulátorszintje alacsony, akkor nehezen száll fel és landol.
3. Ha a repülőgép sérült, deformált, kérjük, időben javítsa meg, mert az erős szél különösen
befolyásolja az ilyen gépek repülését és balesethez vezethet.
4. Ha hosszú ideig nem használja a távirányítót, akkor a szivárgás elkerülése érdekében vegye ki az
akkumulátort.
5. Ha sérült a repülőgép, a magasból leesett vagy súlyos ütközést szenvedett, akkor ezek a sérülések
csökkentik a gép élettartamát.
6. Annak érdekében, hogy biztosítsa a repülőgép stabilitását, a tárggyal való ütközés után a gépet
helyezze 2-3 percig a talajra és várjon, míg a gép automatikusan érzékeli a szintet.
A felhasznált képek illusztrációk és eltérhetnek a valóságtól.
Schema funcțiile telecomenzii
Important!
Înainte de utilizarea dispozitivului, citiți următoarele informații și avertismente. Nerespectarea
urmatoarelor instrucțiuni poate duce la deteriorarea dispozitivului, ulterior la un prejudiciu. Dronul nu
este destinat utilizării de către persoane sub 14 ani fără supravegherea unui adult.
Antena 2.5G
Indicator de
alimentare
Buton acrobație
Trimmer zbor in fata/
inapoi
Buton navigare directii
Trimmer zbor de la stânga /
dreapta
ON / OFF
Modul de schimbare viteză
Modul Headless mode
Buton aparat
Buton video
Trimmer de rotatie a
motorului
Tija turația
motorului
Trimer directii
Buton pentru a reveni la
locul de lansare
Aterizare de urgenta
Start / Stop
Upravleniye kameroy

Avertismente:
* Urmați întotdeauna instrucțiunile plasate pe produs, ambalajul său și în manualul de instrucțiuni.
Anumite părți ale produsului necesită instalarea de către un adult.
* Produsul conține piese de mici dimensiuni, care, în caz de înghițire, pot duce la sufocare sau alte leziuni
grave.
* După despachetare produsului toate materialele de ambalare trebuie să fie păstrate nu la îndemâna
copiilor.
* Verificați în mod regulat încărcător, cabluri, prize, locuințe și alte părți ale dispozitivului. Dacă observați
daune întrerupeți imediat utilizarea acestuia până când este reparat.
* Utilizarrea încărcătorului dispozitivului și bateriile trebuie să fie la o sursă de alimentare în conformitate
cu parametrii si cerintele producatorului acestui produs.
* Utilizați numai încărcătorul original. Încărcătorul nu este o jucărie, a nu lasa la indemana copiilor.
* Înainte de a curăța aparatul, deconectați încărcătorul și bateria.
* Bateriile reîncărcabile trebuie sa fie introduse numai sub supravegherea unui adult.
* Nu asamblați diferite tipuri de baterii sau se amestecă vechi (utilizate), cu altele noi. Bateriile epuizați
trebuie scoasă din dispozitiv.
* Nu permiteți la un scurt-circuit, sau de a atinge bornele metalice ale bateriei. Nu demontați bateriile sau
să le aruncați în foc.
* În cazul în care nu utilizați produsul pentru o perioadă mai lungă de timp, scoateți bateriile din aparat.
* Pentru a evita rănirea, nu atingeți elice rotative sau alte părți în mișcare.
* Nu expuneți dispozitivul a şoc sau aruncarea telecomenzii.
* Produsul trebuie să fie curățat cu o cârpă moale, uscată.
* Responsabilitatea utilizatorilor este de a se asigura că produsul sa fie utilizat în condiții de siguranță,
atât pentru ei cât și pentru mediu. Atât producătorul, importatorul și distribuitorul nu își asumă
responsabilitatea pentru utilizarea acestui produs, sau orice daune sau prejudicii cauzate de manipularea
necorespunzatoare.
* Atât instrucțiunile de utilizare precum și ambalajul produsului conțin informații importante despre
produs, deci pastrați-le pentru consultare ulterioară.
Schema de instalare elice și scuturi
Acorda o atenție:
Carcasele și elice trebuie să fie instalate în
conformitate cu părțile desemnate (A și B). Ar
trebui să se asigure că acestea sunt instalate
în poziția corectă și partea corectă, exact așa
cum sa arătat mai sus. Instalare
necorespunzătoare poate provoca deteriorări
sau defecțiuni.
Pasul 1: Eliminați partea decorativă a
fiecăreia dintre carcasele 4, așa cum se
arată în imagine.
Pasul 2: Glisați
carcasa în găuri acordând o atenție la
poziția corectă corespunzătoare, așa cum
se arată în imagine.
Pasul 3: Folosind
închise în capacul filetat kit de șurubelniță
cu două șuruburi așa cum se arată în
figură. Repetați acest pas pentru celelalte
trei cofraje, de fiecare dată, acordând o
atenție la poziția lor corectă și stabilitatea
de montare.
Carcasa A
Carcasa B
Carcasa B
Carcasa A
Elice A
Elice A
Elice B
EliceB
Pagina se încarcă...
Pagina se încarcă...
Pagina se încarcă...
Pagina se încarcă...
Pagina se încarcă...
Pagina se încarcă...
Pagina se încarcă...
-
 1
1
-
 2
2
-
 3
3
-
 4
4
-
 5
5
-
 6
6
-
 7
7
-
 8
8
-
 9
9
-
 10
10
-
 11
11
-
 12
12
-
 13
13
-
 14
14
-
 15
15
-
 16
16
-
 17
17
-
 18
18
-
 19
19
-
 20
20
-
 21
21
-
 22
22
-
 23
23
-
 24
24
-
 25
25
-
 26
26
-
 27
27


Overmax OV-X-BEE DRONE 7.2 FPV Manual de utilizare
- Tip
- Manual de utilizare
în alte limbi
Lucrări înrudite
Alte documente
-
Hama 00126853 Manualul proprietarului
-
Evolio One HD Manualul proprietarului
-
-
dji Mavic Air 2 Manual de utilizare
-
dji FPV Manual de utilizare
-
dji mini 2 Manual de utilizare
-
-
Lionelo Thermup Go Portable bottle warmer Manual de utilizare
-
SPEEDLINK RACING DRONES Competition Set Manualul utilizatorului
-
Allview L801 Manual de utilizare