
Before reading, fold out the illustration page and get to know all of the functions of your unit.
Prije čitanja otvorite stranicu sa slikama i upoznajte se sa svim funkcijama uređaja.
Pre početka čitanja rasklopite stranicu sa slikama a zatim se u nastavku upoznajte sa svim funkcijama
uređaja.
Înainte să citiţi, deschideţi pagina cu imagini şi după aceea familiarizaţi-vă cu toate funcţiunile
aparatului.
Разгънете страницата със схемите преди да я прочетете и се запознайте с всички функции на
уреда.
Ξεδιπλώστε πριν την ανάγνωση την πλευρά με τις απεικονίσεις και εξοικειωθείτε κατόπιν με όλες τις
λειτουργίες της συσκευής.
Klappen Sie vor dem Lesen die Seite mit den Abbildungen aus und machen Sie sich anschließend
mitallen Funktionen des Artikels vertraut.
DELTA-SPORT HANDELSKONTOR GMBH
Wragekamp 6
DE-22397 Hamburg
GERMANY
10/2018
Delta-Sport-Nr.: QK-5612 / QK-5613
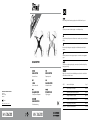
QUADCOPTER
GB/CY Instructions and Safety Notice Page 11
HR Sigurnosne upute i način korištenja Strana 23
RS Uputstva za upotrebu i bezbednosne napomene Strana 35
RO Indicaţii privind utilizarea şi siguranţa Pagina 47
BG Указания за обслужване и безопасност Страни 60
GR/CY Οδηγίες λειτουργίας και ασφάλειας Σελίδα 76
DE/AT/CH Gebrauchs- und Sicherheitshinweise Seite 89
IAN 306200IAN 306200
QUADCOPTER
Instructions for use
DRON
Uputstva za korisnike
КВАДРОКОПТЕР
Ръководство за обслужване
QUADROCOPTER
Gebrauchsanweisung
KVADRIKOPTER
Upute za upotrebu
QUADROCOPTER
Instrucţiuni de utilizare
ΤΕΤΡΑΚΌΠΤΕΡΟ
Οδηγιεσ χρησησ

101
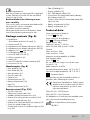
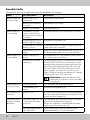
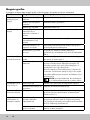
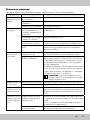
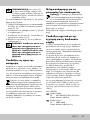
Mögliche Fehler
Im Folgenden werden Ihnen mögliche Fehler, ihre Ursachen und die Behebung aufgezeigt.
DE/AT/CH
A
B
C J
D
F
H
E
G
I
1x 1
2x 3 2x 4 2x 5 1x 6 1x 7
1x 9 1x 10
1x 8
1x 2
1a
1d
1e
1g
1b
1b 1a
1c
1f
1h
1h
2g
2f
2h
2d
2i 2k
2j
2e
2a
2b 2c
2m
2p 2n
2l
2o
1d
SPEED4
SPEED3
SPEED2
SPEED1
STATUS
FLIP
NORMAL
CAMERA
HEADLESS
2a
2i
2q
5
2r
2
90 - 100 min
9a
9b
6a
6b
9
9
10
10
1e
7
7
9
9
9b
1i
1i
1g
1g
9a
9a 9b
1e
1A
B A
1B
1B 1A
1B 1A
A/B
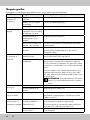
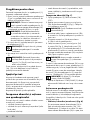
Fehler Mögliche Ursache Behebung
Fernsteuerung (2)
reagiert nicht.
Fernsteuerung (2) ist
ausgeschaltet.
Fernsteuerung (2) einschalten.
Batterien (5) falsch
eingelegt.
Batterien (5) richtig einlegen.
Batterien (5) sind leer. Batterien (5) austauschen.
Quadrocopter (1)
reagiert nicht.
Batterien (5) in der
Fernsteuerung (2) sind
falsch eingelegt oder leer.
Batterien (5) überprüfen und gegebenfalls austauschen.
Akku (9) im Quadrocopter
(1) ist leer.
Akku (9) laden.
Kontrollleuchte (1h) blinken
bzw. leuchten nicht.
Akku-Steckverbindung (9a) mit Quadrocopter-
Steckverbindung verbinden.
Quadrocopter (1) außer
Reichweite.
Stellen Sie sicher, dass der Abstand zwischen
Fernsteuerung (2) und Quadrocopter (1) nicht mehr als
maximal 50 m beträgt.
Quadrocopter
(1) lässt sich nicht
kontrollieren.
Zu starker Wind oder
Luftzug.
Der Quadrocopter (1) ist nur für eine nahezu windstille
Umgebung bis Windstärke 3 geeignet.
Quadrocopter (1) muss
kalibriert werden.
Stellen Sie den eingeschalteten Quadrocopter (1) auf
eine waagerechte, ebene Fläche. Schieben Sie an der
eingeschalteten Fernbedienung (2) gleichzeitig den
Gashebel (2h) nach hinten links und den Steuerhebel
(2l) nach hinten rechts.
Die Kontrollleuchten (1h) des Quadrocopters (1) blinken
ca. 3 Sekunden auf. Sobald die Kontrollleuchten (1h)
dauerhaft leuchten, ist die Kalibrierung abgeschlossen
und der Quadrocopter (1) flugbereit.
HINWEIS: Wiederholen Sie die Kalibrierung,
wenn der Quadrocopter (1) noch immer unkont-
rolliert in eine Richtung fliegt.
Quadrocopter (1)
fliegt nicht nach
oben.
Nicht genug Gas. Schieben Sie den Gashebel (2h) ganz nach vorne.
Akku (9) ist leer. Akku (9) laden.
Rotorschutz (1c) sitzt
nicht fest.
Kollision, Absturz Falls sich ein Rotorschutz (1c) löst, ziehen Sie die Be-
festigungsschrauben wieder an und überprüfen Sie die
Funktion und den korrekten Sitz des Rotorschutzes (1c).
Lichter (1h) vom
Quadrocopter
(1) blinken
abwechselnd.
Der Quadrocopter (1) hat
keinen Kontakt mit der
Fernbedienung (2)
Schieben Sie den Gashebel (2h) der Fernsteuerung (2)
ganz nach vorne und danach ganz nach hinten.
Durch diesen Vorgang wird zwischen dem Quadrocop-
ter (1) und der Fernsteuerung (2) ein Kontakt hergestellt.
Der Akku (9) ist fast leer. Schalten Sie den Quadrocopter (1) aus und entfernen
Sie den Akku, um ihn zu laden.
4

5
K
L
M
N
SPEED4
SPEED3
SPEED2
SPEED1
STATUS
FLIP
NORMAL
CAMERA
HEADLESS
SPEED4
SPEED3
SPEED2
SPEED1
STATUS
FLIP
NORMAL
CAMERA
HEADLESS
SPEED4
SPEED3
SPEED2
SPEED1
STATUS
FLIP
NORMAL
CAMERA
HEADLESS
SPEED4
SPEED3
SPEED2
SPEED1
STATUS
FLIP
NORMAL
CAMERA
HEADLESS

6
O
Q
S
U
P
R
T
SPEED4
SPEED3
SPEED2
SPEED1
1x 3sec
SPEED4
SPEED3
SPEED2
SPEED1
STATUS
FLIP
NORMAL
CAMERA
HEADLESS
SPEED4
SPEED3
SPEED2
SPEED1
STATUS
FLIP
NORMAL
CAMERA
HEADLESS
3sec
SPEED4
SPEED3
SPEED2
SPEED1
STATUS
FLIP
NORMAL
CAMERA
HEADLESS

7
Package contents ...................... 11
Quadrocopter ...................... 11
Remote control ...................... 11
Technical data ........................ 11
Intended use ......................... 12
Symbols used ......................... 12
Safety information .................. 12 - 15
Battery warning notices ............ 14 - 15
Foreseeable misuse .................. 15
Inserting the batteries into the remote control .15
Charging the battery ................... 16
Under-voltage warning ................. 16
Inserting the battery .................... 16
Removing the battery ....................16
Setting the camera ..................... 16
Transferring data . . . . . . . . . . . . . . . . . . . . . . 16
Suitable flight environment ............ 16 - 17
Flight preparation ..................... 17
Personal space ........................ 17
Taking off and controlling
the quadrocopter ...................17 - 19
Taking off ....................... 17 - 18
Controlling the quadrocopter ....... 18 - 19
Setting the speed .................... 19
360°-rollover ....................... 19
Calibration ......................... 19
Recording data ....................... 19
Ending the flight ....................... 20
Rotor protection ....................... 20
Cleaning, repair and storage ............ 20
Replacing the rotor blades ............. 20
Disposal ............................. 20
Disposal measures for the batteries/
storage battery ....................... 21
Notes on the guarantee and
service handling ....................... 21
Possible faults ......................... 22
Opseg isporuke ....................... 23
Kvadrikopter ....................... 23
Daljinski upravljač ................... 23
Tehnički podaci ....................... 23
Namjenska upotreba ................... 24
Upotrijebljeni simboli ................... 24
Sigurnosne napomene ............... 24 - 27
Upozorenja u vezi s baterijama /
akumulatorskom baterijom .......... 26 - 27
Predvidljiva nepropisna upotreba ....... 27
Umetanje baterija u daljinski upravljač .. 27 - 28
Punjenje akumulatorske baterije .......... 28
Upozorenje o podnaponu ............... 28
Umetanje akumulatorske baterije ......... 28
Uklanjanje akumulatorske baterije ......... 28
Podešavanje kamere ................... 28
Prijenos podataka .................. 28 - 29
Prikladno okruženje za let ............... 29
Priprema za let ........................ 29
Privatnost ............................ 29
Polet i upravljanje kvadrikopterom ...... 29 - 32
Polet .............................. 30
Upravljanje kvadrikopterom ......... 30 - 31
Podešavanje brzine .................. 31
Prevrtanje za 360° . . . . . . . . . . . . . . . . . . 31
Kalibriranje ..................... 31 - 32
Snimanje podataka .................... 32
Završetak leta ........................ 32
Štitnici rotora ......................... 32
Čišćenje, popravak i skladištenje ....... 32 - 33
Zamjena krakova rotora ........... 32 - 33
Uputa za zbrinjavanje .................. 33
Postupci za zbrinjavanje baterija /
akumulatorske baterije .................. 33
Napomene vezane za garanciju i
usluge servisa ........................ 33
Moguće greške ....................... 34
Contents / Sadržaj

8
Obim isporuke ........................ 35
Kvadrokopter ....................... 35
Daljinski upravljač ................... 35
Tehnički podaci ....................... 35
Namenska upotreba ................... 36
Korišćeni simboli ...................... 36
Bezbednosne napomene ............. 36 - 39
Upozorenja za bateriju/
punjivu bateriju! .................. 38 - 39
Moguća nepravilna upotreba .......... 39
Stavljanje baterija u daljinski upravljač .. 39 - 40
Punjenje punjive baterije ................ 40
Upozorenje na nedovoljan napon ......... 40
Stavljanje punjive baterije ............... 40
Vađenje punjive baterije ................ 40
Podešavanje kamere ................... 40
Prenos podataka . . . . . . . . . . . . . . . . . . . . . . 40
Pogodna okolina za let ................. 41
Priprema za let ........................ 41
Privatnost ............................ 41
Poletanje i upravljanje kvadrokopterom .. 41 - 43
Poletanje ....................... 41 - 42
Upravljanje kvadrokopterom ........ 42 - 43
Podešavanje brzine .................. 43
360°-luping ........................ 43
Kalibracija ......................... 43
Snimanje podataka .................... 44
Završavanje leta ...................... 44
Zaštita rotora ......................... 44
Čišćenje, popravka i skladištenje ....... 44 - 45
Zamena lopatica rotora ............ 44 - 45
Napomene u vezi odlaganja uotpad ...... 45
Mere za odlaganje istrošenih baterija/
punjivih baterija ....................... 45
Napomene za garanciju i postupak
za servisiranje ........................ 45
Moguće greške ....................... 46
Pachet de livrare ...................... 47
Quadcopter ........................ 47
Telecomandă ....................... 47
Date tehnice .......................... 47
Destinație de utilizare .................. 48
Simboluri utilizate ..................... 48
Indicații cu privire la siguranță ......... 48 - 52
Indicații de avertizare cu privire
la baterii/acumulator! ............. 50 - 51
Utilizare incorectă care poate
fi prevăzută ..................... 51 - 52
Introducerea bateriilor în telecomandă ..... 52
Încărcarea acumulatorului ............... 52
Avertisment cu privire la subtensiune ....... 53
Introducerea acumulatorului ............. 53
Scoaterea acumulatorului ............... 53
Setarea camerei ...................... 53
Transferul datelor ...................... 53
Mediu corespunzător pentru zbor ......... 53
Pregătirea pentru zbor .................. 54
Spațiul privat ......................... 54
Începerea zborului și acționarea
quadcopterului ..................... 54 - 59
Începerea zborului ................... 54
Acționarea quadcopterului ......... 54 - 55
Reglarea vitezei ..................... 56
Zborul în buclă la 360° .............. 56
Calibrare . . . . . . . . . . . . . . . . . . . . . . . . . . 56
Înregistrarea datelor ................... 57
Încheierea zborului .................... 57
Dispozitivul de protecție a rotorului ........ 57
Curățarea, repararea și depozitarea ....... 57
Înlocuirea palelor de rotor ............. 57
Instrucţiuni privind eliminarea ............ 58
Măsuri de eliminare a bateriilor/
acumulatorului ........................ 58
Indicații referitoare la garanție și
operațiuni de service ................... 58
Defecțiuni posibile ..................... 59
Sadržaj / Cuprins

9
Обхват на доставката ................. 60
Квадрокоптер ...................... 60
Дистанционно управление ........... 60
Технически данни .................. 60 - 61
Използване по предназначение ......... 61
Използвани символи .................. 61
Указания за безопасност ........... 61 - 65
Предупредителни указания за батериите/
акумулаторната батерия .......... 63 - 65
Предвидима неправилна употреба..... 65
Поставяне на батерии в
дистанционното управление ............ 65
Зареждане на акумулаторната батерия .. 66
Предупреждение за ниско напрежение ... 66
Поставяне на акумулаторната батерия ... 66
Сваляне на акумулаторната батерия .... 66
Настройване на камерата ............. 66
Пренос на данни .................. 66 - 67
Подходяща среда за полети ............ 67
Подготовка на полета ................. 67
Лично пространство .................. 67
Начало на полета и
управление на квадрокоптера ....... 68 - 70
Начало на полета .................. 68
Управление на квадрокоптера ..... 68 - 69
Настройка на скоростта ............. 69
Превъртане на 360° ................ 70
Калибриране ...................... 70
Записване на данни .................. 70
Прекратяване на полета ................70
Предпазители на роторите . . . . . . . . . . . . . 70
Почистване, ремонт и съхранение ....... 71
Смяна на роторните лопатки ......... 71
Указания за отстраняване като отпадък .. 71
Мерки за изхвърляне на
батериите/акумулаторната батерия ..... 71
Указания за гаранцията и процеса
насервизно обслужване ............ 72 - 74
Възможни неизправности .............. 75
Παραδοτέος εξοπλισμός ................ 76
Τετρακόπτερο ...................... 76
Τηλεχειριστήριο ..................... 76
Τεχνικά χαρακτηριστικά .............. 76 - 77
Προβλεπόμενη χρήση .................. 77
Σύμβολα που χρησιμοποιούνται .......... 77
Προειδοποιήσεις ασφαλείας .......... 77 - 81
Προειδοποιήσεις για τις μπαταρίες/
τον συσσωρευτή ................. 79 - 81
Προβλέψιμη εσφαλμένη χρήση ......... 81
Τοποθέτηση μπαταριών στο
τηλεχειριστήριο ....................... 81
Φόρτιση συσσωρευτή ............... 81 - 82
Προειδοποίηση υπότασης ............... 82
Τοποθέτηση συσσωρευτή ............... 82
Αφαίρεση συσσωρευτή ................. 82
Ρύθμιση κάμερας ...................... 82
Μεταφορά δεδομένων ................. 82
Κατάλληλο περιβάλλον πτήσης ........ 82 - 83
Προετοιμασία πτήσης .................. 83
Ιδιωτικός χώρος ....................... 83
Έναρξη πτήσης και έλεγχος
τετρακόπτερου ..................... 83 - 85
Έναρξη πτήσης .................. 83 - 84
Έλεγχος τετρακόπτερου ............ 84 - 85
Ρύθμιση ταχύτητας ................... 85
Αναστροφή 360° ................... 85
Βαθμονόμηση ...................... 85
Λήψη δεδομένων ...................... 86
Τερματισμός πτήσης .................... 86
Προστατευτικό ροτόρα ................. 86
Καθαρισμός, επισκευή και αποθήκευση . 86 - 87
Αντικατάσταση έλικα .............. 86 - 87
Υποδείξεις ως προς την απόρριψη ........ 87
Μέτρα απόρριψης για τις μπαταρίες/
τον συσσωρευτή ...................... 87
Υποδείξεις σχετικά με την εγγύηση
και τη διαδικασία σέρβις ................ 87
Πιθανά σφάλματα ..................... 88
Съдържание / Πινακας περιεχοµενων

10
Inhaltsverzeichnis
Lieferumfang ......................... 89
Quadrocopter ...................... 89
Fernsteuerung ...................... 89
Technische Daten ...................... 89
Bestimmungsgemäße Verwendung ........ 90
Verwendete Symbole ................... 90
Sicherheitshinweise ................. 90 - 94
Warnhinweise Batterie/Akku ........ 92 - 93
Vorhersehbarer Missbrauch ......... 93 - 94
Batterien in die Fernsteuerung einsetzen .... 94
Akku laden ........................... 94
Unterspannungs-Warnung ............... 94
Akku einsetzen ........................ 95
Akku entfernen ........................ 95
Kamera einstellen ..................... 95
Daten übertragen ..................... 95
Geeignete Flugumgebung ............... 95
Flugvorbereitung ................... 95 - 96
Privatsphäre .......................... 96
Flug starten und Quadrocopter steuern .. 96 - 98
Flug starten ........................ 96
Quadrocopter steuern ............. 96 - 97
Geschwindigkeit einstellen .......... 97 - 98
360°-Überschlag ................... 98
Kalibrierung ........................ 98
Daten aufnehmen ..................... 98
Flug beenden ...................... 98 - 99
Rotorschutz .......................... 99
Reinigung, Reparatur und Lagerung ....... 99
Rotorblätter austauschen .............. 99
Hinweise zur Entsorgung ................ 99
Entsorgungsmaßnahmen Batterien/Akku ... 100
Hinweise zur Garantie und
Serviceabwicklung .................... 100
Mögliche Fehler ...................... 101

11GB/CY
Congratulations!
With this purchase you have opted for a high-qual-
ity item. Familiarise yourself with the item before
using it for the fist time.
Read and follow the following instruc-
tions carefully.
Only use this item in the manner described and for
the purpose for which it is intended.
Store these instructions carefully.
When passing the item on to third parties, hand
over all accompanying documents as well.
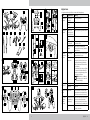
Package contents (Fig.A)
1 x quadcopter
(with camera and micro-SD card) (1)
1 x remote control (2)
2 x replacement rotor blades (description A,B) (3)
2 x replacement rotor blades (description A,B) (4)
2 x batteries (1.5V LR6, AA) (5)
1 x USB charging cable (6)
1 x micro-SD card USB stick (7)
1 x Phillips screwdriver (8)
1 x battery (9)
1 x micro SD card (for inside the camera) (10)
1 x instructions for use
Quadrocopter (Fig.B)
• Rotor blade A (1a)
• Rotor blade (B) (1b)
• Rotor protection (1c)
• On/off switch (1d)
• Camera (1e)
• Quadrocopter feet (1f)
• Battery compartment (1g)
• Light (1h)
• Battery compartment lid (1i)
Remote control (Fig.C/D)
• On/off switch (2a)
• Take photos/record video (2b)
• Headless Mode/Automatic return (2c)
• Rotation (fine-tuning clock-wise rotation) (2d)
• Switch for speed reduction (2e)
• Rotation (fine-tuning anti-clock-wise rotation) (2f)
• Switch for speed increase (2g)
• Throttle lever (control for up/down/right turn/left
turn) (2h)
• Take-off/landing (2i)
• Display indication (2j)
• FLIP - 360 degree rotation (2k)
• Control lever (forwards/backwards/sideways
left/sideways right) (2l)
Direction (fine-tuning forwards/backwards/left/
right) (2m -2p)
• Battery compartment lid (2q)
• Battery compartment (2r)
Technical data
Power supply control (battery):
2 x 1.5V LR6, AA
Power supply for drive (battery):
3.7V
Li-Polymer 850mAh
Range: approx. 50m
Flight time: approx. 7–10 mins.
Micro-SD card: 4GB (to max. 32GB)
Camera:
Photo resolution: 2MP
Video resolution: 1.2MP
Maximum sending capability: 6.82dBm
USB charging cable:
Input: 5V
1A
Do not use power supply units with an output
current of > 1A
Radio frequency: 2.4GHz
Operating temperature range: 10°C to 45°C
Optimum storage temperature: 10°C to 25°C
= Protection class II
This item may only be connected to devices of
protection class II bearing this symbol.
Delta-Sport Handelskontor GmbH, hereby
declares that this product meets the follow-
ing basic requirements, as well as other
important regulations:
2014/53/EU – RED Directive
2011/65/EU – RoHS Directive
Full declarations of conformity are available under
http://www.conformity.delta-sport.com
Date of manufacture (month/year):
10/2018

12 GB/CY
Intended use
This item is a recreational item for children aged
14 years and over and is intended for private,
domestic use (house and garden) only.
This item may only be used in suitable weather con-
ditions and in authorised areas. Further information
is provided under the headings “Safety informa-
tion”, “Foreseeable misuse” and “Suitable areas for
flying the quadrocopter”.
Symbols used
WARNING:
The signal word indicates a hazard
with a medium risk level, which, if not
avoided, can result in death or serious
injury.
CAUTION:
The signal word indicates a hazard
with low risk level that can result in mi-
nor or moderate injury if not avoided.
NOTE:
Further information on the use of the
device!
Moving parts.
Keep away from the body!
Safety information
WARNING: Not suitable for children
under 14 years.
• Before using for the first time: Read through the
user information with your child.
WARNING: All packaging/fastening
materials are not part of the item and, for
safety reasons, must be removed before
the item is used.
• If you do not yet have adequate knowledge
of handling remote-controlled quadrocopters,
please get in touch with an experienced model
enthusiast or a model club.
• Check that the quadrocopter is assembled
according to the instructions for use.
WARNING: Risk of eye injuries. To
prevent eye injuries, do not use in close
proximity to your face.
• Make sure weather conditions are suitable. The
item must not get wet.
• Check that the rotors are correctly and securely
fitted before each use.
• Do not operate a damaged quadrocopter.
• Do not make any alterations or modifications to
the quadrocopter.
• Please check that your quadrocopter and the
remote control are in reliable working order
before each use, checking for visible damage
such as faulty connectors or damaged cables.
All moving parts on the item must move smoothly,
but there must be no play in the bearings.
• If cables or connections are damaged, have
them replaced by authorised service personnel
or by customer service.
• Always switch on the remote control first. Only
then can the rechargeable battery in the model
be connected up and the quadrocopter switched
on. Otherwise, the item may react unpredictably
and the rotors could start unintentionally!
• When the rotors are running, make sure that
there are no objects or body parts are in the
rotary and suction area of the rotors. Keep
hands, face, hair and loose clothing away from
the rotors. Do not touch any moving parts.
• Always remove the battery from the Quadrocop-
ter when you are performing maintenance and
cleaning jobs.
• Do not take any risks when operating the
quadrocopter! Your own safety and the safety
of your immediate environment depends on your
responsible handling of the quadrocopter.
• Check for potential causes of accidents in the
flying area, e.g. candles or glasses, and ensure
that there are no children, pets or other animals
in the vicinity of the quadrocopter. Maintain a
distance of at least 5m.
• For indoor flying, you must have an area of at
least 6 x 4m. If you do not have access to such
a large indoor area, the quadrocopter may only
be flown outdoors. Outdoors, the quadrocopter
must not be flown beyond your line of sight, and
may not fly higher than a maximum altitude of
100m.
Always maintain a minimum distance of 5m.

13GB/CY
• Do not fly the quadrocopter in areas where
temperatures can change rapidly, e.g. over a fire
or over water surfaces.
• Select a suitable location (open space) to
operate the quadrocopter. Flight over the
following areas is prohibited, and a distance of
100m from these must be maintained: Crowds
of people, accident areas, areas in a state of
emergency and other areas where governmental
or other organizations are occupied with rescue
and safety operations, as well as over mobile
structures of German defence troops within the
framework of registered exercises or manoeu-
vres, nature reserves, residential properties,
industrial facilities, correctional facilities, psychi-
atric institutions, military facilities and organ-
izations, power-plants or energy distribution
facilities, or over facilities where registered activ-
ities within the scope of safety regulations level
4, according to the Ordinance on Biological
Substances, insofar as the operator of the plant
has not specifically given permission, hospitals,
federal highways, federal waterways, railway
infrastructure, state and federal constitutional
bodies or supreme or higher state or federal au-
thorities, embassies and consulates; international
organisations that are located in an area based
on international law, and police property and
property belonging to other security agencies.
Flight over the following areas is prohibited,
and a distance of 1.5km from these areas must
be maintained: airports, airfield control zones,
state and military buildings. Local flight exclusion
zones must be checked before each flight.
• The scope of application for the quadrocopter
has been laid out so that it can be used by
laypeople as well as experienced/trained users.
Users with sight or hearing impairments must
only use the quadrocopter under the supervision
of those without impairments.
The user’s reactive capacity must not be compro-
mised – tiredness, and the influence of alcohol
or medication can lead to incorrect responses.
Additional skills are not required (e.g. training
etc.). There are no restrictions on use based on
sex or left/right-handedness.
• Never fly the quadrocopter directly at other
people, animals or yourself.
• The motor, electronics and rechargeable battery
can heat up while operating the quadrocopter.
For this reason, take a break of 5-10 minutes be-
fore recharging the battery or installing another
previously charged battery.
• Improper operation can cause serious personal
injury and damage to property! For this reason,
make sure that you maintain a safe distance from
other people, animals and objects when flying.
• Always leave the remote control switched on
while the Quadrocopter is in operation. Always
first disconnect the battery connector and the
Quadrocopter connector after landing. The
remote control can be switched off.
• In the event of a fault or a malfunction, the cause
of the defect must first be resolved before you
restart the quadrocopter.
• Do not expose the quadrocopter or the remote
control to direct sunlight or high temperatures for
extended time periods.
• In the event of a serious crash (for example, from
a great height), the electronic gyro calibration
sensors may be damaged or detuned. Before a
new flight therefore, it is imperative that complete
functionality is checked!
• In the event of a crash, the throttle must be
reduced to zero immediately. Rotating rotors
can be damaged during contact with obstacles
or on impact. Before a new flight, these must be
checked for possible cracks or breakages!
• In order to prevent damage to the quadrocop-
ter from crashing due to under-voltage, or the
battery due to deep discharge, the light signals
for the under-voltage indicator must be strictly
observed (see section on “Under-voltage warn-
ing”).
• In some countries, insurance is mandatory for
model aircraft and model helicopters which are
flown outdoors. Please consult your personal
liability insurer and ensure that your quadrocop-
ter is included in this insurance.
• Always make sure to respect the personal space
of other people and animals around you. Do
not film people close up unless they have given
you permission to do so. Note also that it is not
always permitted to film wherever and whenever
you wish. Pay attention to the applicable legal
provisions.

14 GB/CY
Battery warning notices!
GENERAL WARNING NOTICES
• Always keep batteries out of reach of children.
• Cleaning and maintenance may not be carried
out by children without supervision.
• When necessary, clean the battery and device
contacts with a clean, dry cloth.
• Do not expose the batteries to extreme condi-
tions (e.g. radiators or direct sunlight).
• Handle damaged or leaking batteries with
extreme caution and dispose of them properly as
soon as possible. Wear gloves when doing so.
• If you come into contact with battery acid, wash
the affected area with soap and water. If battery
acid gets in your eye, rinse it with water and
seek medical attention immediately!
• Batteries must not be swallowed! However, if this
does happen, you must see a doctor immediate-
ly!
• Never throw batteries into fire or put them on
hot surfaces (e.g., a radiator or a stove). Never
open the battery casing or the foil or short-circuit
the contacts. There is a risk of fire or explosion!
• Avoid external mechanical influences (e.g.,
blows, sharp objects or crushing). There is a risk
of fire or explosion!
• Do not expose the batteries or the rechargeable
battery to temperatures below 10°C or over
45°C.
ADDITIONAL BATTERY WARNING
NOTICES (REMOTE CONTROL)
• Only use batteries from the same manufacturer
and of the same type.
• Remove the batteries when they are flat, or if the
item is not in use for an extended period.
• New and used batteries must not be used
together.
• Replace all batteries at the same time.
• Non-rechargeable batteries must not be
charged.
• Warning: Batteries may not be charged or
reactivated by other means, taken apart, thrown
into fire, or short-circuited. There is a risk of fire
or explosion!
• Pay attention to the correct polarity (+/-) when
inserting the batteries.
• Dispose of used batteries properly at municipal
collection points or retail outlets.
ADDITIONAL WARNINGS FOR
BATTERY (QUADROCOPTER)
• Never leave rechargeable batteries charging
unattended.
• Rechargeable batteries may only be charged
under adult supervision.
• Rechargeable batteries should be removed from
the product before being charged.
• Never charge the battery immediately after use.
Always leave the battery cool down first (min.
5-10 minutes).
• Due to the special battery connector, it is not
possible to charge the battery with conventional
chargers.
• Only use the USB charging cable supplied for
charging the battery.
• Only charge intact and undamaged batteries. If
the outer insulation of the battery is damaged or
the battery is deformed or bloated, it must not be
charged under any circumstances. In this case,
there is an extreme risk of fire and explosion!
• Since both the USB charging cable and the
battery heat up during the charging process, it
is vital to ensure there is adequate ventilation.
Never cover the USB charging cable and the
rechargeable battery!
• Disconnect the rechargeable battery from the
USB charging cable when it is fully charged.
• Never charge the battery while it is still mounted
to the quadrocopter. It could catch fire and
destroy the item.
• Never charge or store the rechargeable battery
near large heat sources or open fires, as this
could result in a fire or an explosion.
• Do not leave the battery unattended while
charging and watch out for possible overheating
of the underside of the battery.
• Never charge a battery that is swollen from
overheating, falling or overcharging.
• Never charge a battery that is punctured or
damaged. Examine the battery very closely after
a fall for this kind of damage. If the rechargea-
ble battery is damaged, dispose of it according
to the regulations in your country.

15GB/CY
• If the rechargeable battery burns during the
charging process, extinguish this type of re-
chargeable battery with plenty of water.
• The USB charging cable may only be used in
dry, closed indoor areas. The USB charging
cable and battery may not get damp
or wet.
• Never short-circuit the battery terminals. There is
a risk of fire or explosion.
• Never carry rechargeable batteries in trouser
pockets or carrier bags. Watch out for sharp
or angular objects which could damage your
battery.
• If the rechargeable battery has been subjected
to a strong surge, store it in a very secure place
(e.g. in a metal box) for the next 30minutes. Pay
attention to whether the rechargeable battery
swells and/or overheats.
• Never try to manipulate, modify or repair the
rechargeable battery.
• After the flight, disconnect the battery from the
electronics of the Quadrocopter. Do not leave
the battery connected to the electronics if you
are not using the device (e.g. during transport or
storage). Otherwise, the battery could be heav-
ily discharged. As a result, it will be destroyed
and unusable! There is also the risk of malfunc-
tion due to interference impulses. The rotors
could start unintentionally and cause damage or
injury.
• Never damage the outer shell of the battery.
Do not cut the foil sheath. Do not pierce the
rechargeable battery with sharp objects. There is
a risk of fire and explosion!
• Dispose of used batteries after the end of their
life span properly at local collection points or
retail outlets.
Foreseeable misuse
Take care not to misuse the item in the following
ways:
• Do not operate the quadrocopter in unsuitable
weather or environmental conditions (e.g. in rain,
snow, fog or at night).
• Do not operate the quadrocopter in too small
a space (under 6 x 4m), or if there are objects,
people or animals within a radius of 5m.
• Never fly over flight exclusion zones, prohibited
areas or official installations, and always comply
with the minimum distances from such areas (see
also “Safety information”).
• Do not invade the personal space of others (e.g.
with the camera function).
• Do not give the item to anyone under the age of
14 years.
• Attaching loads or making modifications in any
way is strictly prohibited.
• Do not operate the quadrocopter if there are
loose or defective parts (e.g. after a
collision or crash).
Inserting the batteries into the
remote control (Fig.D)
CAUTION: Observe the following
instructions to avoid mechanical
and electrical damage.
Insert the enclosed batteries (5) into the battery
compartment (2r) of the remote control (2).
Inserting the batteries
1. Using the Phillips screwdriver (8), loosen the
screw (2q) of the battery compartment lid on the
back of the remote control (2) and remove the
lid (2q).
2. Carefully insert 2 x 1.5V LR6-type batteries (5)
into the battery compartment (2r). The batteries
must fit into the battery compartment complete-
ly(2r).
CAUTION: Check the positive/negative
poles of the batteries (5) and ensure that
they are inserted correctly, as marked
on the bottom of the battery compart-
ment(2r).
3. Secure the battery compartment lid (2q) onto
the back side once again.
Replacing the batteries
CAUTION: Observe the following
instructions to avoid mechanical
and electrical damage.
Should the batteries (5) no longer function, replace
them as described in the instructions above.
Remove the batteries (5) that are in the device
before inserting new ones (5).

16 GB/CY
Charging the battery
1. Remove the battery (9) from the battery com-
partment (1g) of the quadrocopter (1) (Fig.E).
WARNING:Never charge the battery
(9) while it is still mounted to the quadro-
copter (1). It could catch fire and destroy
the item.
Do not remove the outer case of the battery (9).
This protects the battery (9).
2. Connect the end of the cable (6a) of the USB
charging cable (6) to the battery connector (9a)
of the battery (9) (Fig.F).
3. The battery charge indicator of the USB charg-
ing cable (6) is automatically activated (Fig.F).
4. Plug the other end (6b) of the USB charging
cable (6) into a USB port on a powered-on
computer or charging station with a USB port
(Fig.F).
5. The charge indicator light on the cable end (6b)
turns itself off.
NOTE: Charging takes
about 110-120 minutes.
6. After charging, disconnect the battery connector
(9a) from the end (6a) of the USB charging
cable (6) and unplug the end (6b) of the USB
charging cable (6) from the USB port.
7. Insert the rechargeable battery (9) into the
battery slot (1g) correctly (see “Inserting the
rechargeable battery”).
Under-voltage warning
The lights (1h) start flashing when the rechargeable
battery (9) is almost empty. Land the quadrocop-
ter(1) as soon as you notice this.
Inserting the battery
1. Open the battery compartment lid (1i) of the
battery compartment (1g) and insert the bat-
tery(9).
2. Connect the battery connection (9a) (9b) with
the quadrocopter (1).
3. Close the battery compartment (1g) completely.
Removing the battery (Fig.F)
Open the lid (1i) of the battery compartment (1g)
and insert the battery (9).
NOTE: If the battery connector (9a) (9b)
is connected to the quadrocopter (1), you
must disconnect this before removing the
rechargeable battery (9) from the quadro-
copter (1).
Setting the camera (Fig.G)
The camera (1e) is firmly attached under the quad-
rocopter (1). Turn the camera wheel-buttons up or
down to set the camera lens position.
NOTE: The camera (1e) has a small LED
indicating status. For good visibility, the
camera functions are also shown via the
quadcopter (1) LEDs.
Transferring data (Fig.H)
Photographs and film are stored on the micro-SD
card (10). The data is transferred to a computer
or device with a USB port (such as a television) as
follows:
1. The Micro-SD card (10) is positioned inside
the camera (1e). Press down on the micro-SD
card(10) and remove it from the port (1e).
2. Slide the micro-SD card (10) fully into the mi-
cro-SD card USB stick (7), as shown in Figure H.
NOTE: Take care to insert the micro-SD
card (10) properly. It needs to be almost
completely inside the micro-SD card USB
stick (7).
3. Insert the micro-SD card USB stick (7) into the
USB port of a computer.
4. The computer will recognise the micro-SD card
USB stick (7) and you will then be able to copy
the data to the computer.
Suitable flight environment
For ideal flight conditions, the following criteria
should be met:
• Calm wind conditions, up to force 3 winds.
• Check local weather report for current weather
conditions and forecast changes.
• People must remain a safe distance (5m) from
the quadrocopter when it is taking off.
• Be aware of obstacles before flying, and move
them out of the way if possible, or maintain a
safe distance from them (> 5m).

17GB/CY
• Observe your surroundings and look out for var-
iables such as pedestrians, cyclists and traffic/
vehicles.
• Find a large, wide, open area without obstruc-
tions; pay particular attention to buildings,
crowds, power lines and trees.
• For aerobatic activities, such as loops, there
should be a space of approx. 10m in all direc-
tions.
• Take care to select a dry and rain free environ-
ment. Do not fly the quadrocopter in poor or
damp weather conditions (e.g. in snow, fog or at
night). The quadrocopter must only be operated
when visibility is good.
• The quadrocopter may only be operated in
temperatures between 10°C and 45°C.
• Pay attention to the restrictions in the Drone
Ordinance in respect of prohibited areas (see
the section on “Safety information”).
Flight preparation
Pay attention to the following, before you start
flying the quadrocopter (1):
1. Always place the quadrocopter (1) on an even
surface for take-off.
NOTE: The camera lens indicates the front
of the quadrocopter (1).
2. Always move the throttle (2h) and control
lever(2l) slowly and carefully, with sensitivity.
NOTE: After activation, the control lever
springs back to the centre position, and the
quadrocopter rises/lowers a specific height
and remains there.
3. Keep your attention continuously focused on the
quadrocopter during the flight (1)!
CAUTION: Always keep the quadrocop-
ter in sight during flight operations!
4. Do not hang any loads onto the
Quadrocopter(1).
CAUTION: Check the rotor protection
(1c) (Fig.B) before each flight to ensure
that it is secure and undamaged.
Otherwise there is a risk of damage to the rotor
blades (1a), (1b) during a flight and this may
cause injury.
Personal space
Always make sure to respect the personal space
of other people and animals around you. Do not
film people close up unless they have given you
permission to do so.
Note also that it is not always permitted to film
wherever and whenever you wish.
Pay attention to the applicable legal provisions.
Taking off and controlling the
quadrocopter
When flying, watch out for foreseeable misuse as
a result of:
• Sudden changes in the weather
• Sudden changes in wind (gusts)
• Loss of visibility
• Direct sunshine (overheating, loss of control as a
result of dazzle).
Taking off (Fig.J)
1. Turn the quadrocopter (1) to the OFF position via
the switch (1d).
2. Press the on/off switch (2a) on the remote con-
trol (2) (Fig.J). The display lights blink (2j).
NOTE: Always switch the remote control (2)
on first.
3. Insert the current-regulating cable (9b) into the
designated plug-in connector of the quadrocop-
ter.
4. Connect the battery plug-in connector (9a) to
the Quadrocopter plug-in connector.
5. Switch the on/off switch (1d) to the ON position
(Fig.J). The control indicators (1h) of the quad-
rocopter (1) blink alternately and a signal tone is
emitted from the remote control (2).
6. Slide the throttle (2h) all the way forward, and
then all the way back.
NOTE: This process establishes contact be-
tween the quadrocopter (1) and the remote
control (2).
If the throttle (2h) is not first moved forward and
then back, the quadrocopter (1) remains secured
and will not be ready for flight. Acoustic signals
are emitted from the remote control (2). The control
lights (1h) on the quadrocopter (1) light up continu-
ously. The quadrocopter (1) is now ready for flight.

18 GB/CY
NOTE: The display (2j) shows the speed
and NORMAL mode.
7. Press the button START/LAND (2i), positioned
on the front of the remote control. The rotor
blades will start to turn.
Controlling the quadrocopter
The integrated height sensor ensures that the quad-
rocopter keeps a steady height, and it facilitates
initial flight manoeuvres, thereby also facilitating
photo and video operations. You have several
controlling options:
• Ascending/descending (throttle)
(Fig.K)
By pressing the throttle (2h) forward, the rota-
tional speed of the rotors (1a, 1b) is increased.
The quadrocopter (1) will then begin to rise. By
pressing the throttle (2h) forward, the rotational
speed of the rotors (1a, 1b) is decreased. The
quadrocopter (1) will then begin to descend.
• Turning left/right (yawing) (Fig.L)
By moving the throttle (2h) to the left or right, the
quadrocopter (1) rotates on its vertical axis, i.e.
the quadrocopter (1) rotates to the right or left.
• Moving forwards/backwards (pitch)
(Fig.M)
By moving the control lever (2l) to the front or
back, the quadrocopter (1) moves in the corre-
sponding direction.
• Hover left/right (roll) (Fig.N)
If you want to perform a movement to the right
or left without rotating the quadrocopter (1), i.e.
hover sideways, move the right control lever (2l)
to the left or right.
• Turning (yaw trimming) (Fig.Q)
If the quadrocopter (1) moves around its own
axis of its own accord, without controlling the
steering lever (2l) you can correct this with the
yaw-trimming. If the quadcopter (1) turns clock-
wise, press the yaw-trim lever to the left (2f), and
if it turns anti-clockwise, press the roll-trim lever to
the right (2d). In this way you counter the yaw
movement by trimming in the opposite direction.
• Direction (roll and pitch trimming)
(Fig.R)
If there is a forwards or backwards movement,
even though you are not using the control lever
(2l) at all, you can correct this by pitch trimming.
If the quadrocopter (1) is flying forwards, press
the pitch-trimming button (2o) and vice versa
(2m).
You can counteract the unwanted movement with
the trim setting. If the quadrocopter (1) moves
sideways of its own accord, you can correct this
by roll trimming.
If the quadrocopter hovers to the left (1) side-
ways, press the trimming button (2n) to the right
and vice versa (2p). This allows you to counter-
act the unwanted movement.
• Headless Mode (Fig.T)
This refers to a flight aid that when activated
enables the quadrocopter (1) to always fly in
the direction it is steered. It is recommended for
pilots with little flying experience.
When the button (2c) of the headless mode is
activated, from the pilot’s viewpoint, the quad-
rocopter (1) always flies to the right when the
control lever (2l) is steered to the right, regard-
less of whether the front of the quadrocopter (1)
(camera lens) is facing backwards, forwards, left
or right.
If this mode is deactivated, the quadrocopter (1)
will fly in the direction in which its front (camera
lens) is facing (even if the quadrocopter (1) has
rotated).
NOTE: The direction of the remote control
(2) and the quadrocopter (1) must cor-
respond exactly when Headless mode is
activated! Only activate Headless mode in
the position specified, otherwise it may re-
sult in control commands not being carried
out correctly.
1. To activate Headless mode, put the quadrocop-
ter (1) and the remote control (2) behind one
another and press the button (2c) on the remote
control (2). The display (2j) message HEADLESS
lights up and the quadrocopter lights blink slowly
as long as the mode is activated.
2. To deactivate the mode, press the button (2c)
again. On the display (2j), the message HEAD-
LESS lights up and the quadrocopter lights light
up continuously again.

19GB/CY
• Automatic return to the pilot (Fig.U)
Press the active button (2c) for about 3 seconds,
if the quadrocopter is to return via the same
route flown.
NOTE Note that the return route can vary
as a result of the quadrocopter turning. The
process is brought to a halt via repeated
pressing of the button (2c), or via moving
the steering lever (2l).
Setting the speed (Fig.O)
You can adjust the flight speed by repeatedly
pressing the throttles (2e, 2g) on the remote control
(2). The default setting is speed 2, from a total of
four speed levels.
The display lights show the various levels (2j).
Speed 1
(beep sounds once)
For first attempts with little flight experience.
Speed 2
(beep sounds twice)
For pilots with some experience.
Speed 3
(beep sounds three times)
For experienced pilots.
Speed 4
(beep sounds four times)
For very experienced pilots.
NOTE: When the remote control is turned
off and on, the quadrocopter (1) is reset to
speed2.
360° Rollover (Fig.P)
1. Fly the quadrocopter (1) to a height of approx.
10m.
2. Keep it hovering and press the control button(2k)
once, which can be found on the front of the
remote control. A signal tone is emitted and the
FLIP light is shown on the display (2j).
3. Move the control lever (2l) in the direction in
which the rollover is to be performed.
4. The quadrocopter (1) will perform a 360° rollo-
ver.
After the rollover, the quadrocopter (1) will be in
normal flight mode and you can perform another
rollover.
Repeat steps 1-4 to do so.
Press the button (2k) again if you do not want to
perform a rollover, yet you had already pressed it.
CAUTION: You need sufficient flight
altitude for a 360° rollover (at least 10m).
Calibration
There are instances when the quadrocopter (1) flies
erratically and needs to be calibrated. In such a
case, follow the steps below:
1. Place the quadrocopter (1) on a horizontal, level
surface.
2. Switch the remote control (2) on and simultane-
ously push the throttle (2h) backwards and to
the left and the joystick (2l) backwards and to
the right. The control lights (1h) on the quadro-
copter (1) will flash for approx. 3 seconds. Once
the control lights (1h) light up continuously, the
calibration is complete and the quadrocopter is
ready to fly.
NOTE: Repeat the calibration if the quadro-
copter still flies erratically in one direction.
Recording data (Fig.S)
Photographs or videos can be taken with the
camera.
NOTE: Remove the protective covering from
the lens before using it for the first time.
Photos
1. Press the camera button (2b) once.
2. A signal tone is emitted, and on the display (2j)
the CAMERA light lights up and the LED lights
(1h) of the quadrocopter (1) stop lighting up for
a short time. This indicates that the camera (1e)
has taken a photo.
Video
1. Hold the camera button (2b) down for approx.
3 seconds.
2. A signal tone is emitted, and the LED lights (1h)
on the quadrocopter (1) blink. This indicates that
the camera (1e) is filming.
3. Press the video capture button (2b) again to stop
filming with the camera (1e). A signal tone is
emitted as confirmation, and the LED lights (1h)
on the quadrocopter (1) light up continuously.

20 GB/CY
Ending the flight
1. Press the button START/LAND (2i).
Thequadrocopter slowly descends and lands.
After the quadrocopter (1) has landed safely,
switch it off in the proper sequence.
1. Switch the on/off switch (1d) on the quadrocop-
ter to the OFF position.
2. Turn off the on/off switch (2a) on the remote
control (2).
3. Remove the rechargeable battery (9). (see
“Removing the rechargeable battery”).
Rotor protection
The rotor guard (1c) acts as protection against in-
juries (e.g. cuts, skin injuries or eye injuries) and to
protect against, or in the event of, collisions. These
are fixed. If a rotor guard becomes loose, tighten
the screws again and double-check the correct
placement of the rotor guards (1c).
WARNING: Never operate the quadro-
copter (1) without rotor protection (1c)! Do
not remove the rotor guards (1c) arbitrarily
so as not to endanger yourself, and /or
other people and animals!
Cleaning, repair and storage
CAUTION: Before undertaking
any work on the quadrocopter,
the on/off switch (1d) must be
switched to the OFF position and
the battery (9) must be removed.
The quadrocopter (1) must always be kept dry, and
any dirt, such as wool fibres, hair, dust etc., must be
removed after every flight.
Use a dry cloth to dry the quadrocopter, and the
electronics, rechargeable battery and motor must
not be exposed to water.
Store the quadrocopter (1) in a dry, dust-free loca-
tion away from direct sunlight. The optimum storage
temperature is between 10 °C and 25 °C. Discon-
nect the rechargeable battery connector (9a/9b),
or the charging cable (6) when not in use. Remove
the batteries (5) from the remote control.
Replacing the rotor blades (Fig.I)
Replace the rotor blades (3,4) if they become
damaged.
NOTE:
There are two different kinds of rotor blades
(3,4). The rotor blades (3) are right-rotating and
the rotor blades (4) are left-rotating. These are
shaded in grey on the diagrams for clarity.
Both kinds are marked on the upper side with (A
orB), which must be noted when replacing and
must match the markings on the quadrocopter (1).
WARNING: If the rotor blades (3,4) are
damaged, there is a danger of parts be-
coming detached during use and causing
damage, or this may be hazardous to the
immediate environment.
Follow the steps below to change a rotor blade
(3,4):
1. Detach and remove the screw for the rotor bald
(3,4) which is to be replaced, with a Phillip
screwdriver (8).
2. Pull the broken rotor blade (3,4) off to remove it
from the quadrocopter (1).
3. Place the replacement rotor blade (3,4) into the
same position as the damaged rotor blade.
4. Screw the new rotor blade (3,4) tightly onto the
quadrocopter (1) with the screw.
CAUTION: Always place the rotor
blades marked A onto the rotor
arms labelled A. Place the rotor
blades marked B onto the rotor
arms labelled B.
Disposal
Dispose of the product and the packaging materi-
als in accordance with the current local regulations.
Packaging materials such as foil bags must be kept
away from children. Keep the packaging material
out of the reach of children.
Devices with this symbol may not be disposed
of with household waste. You are obliged to
dispose of such old electrical and electronic
appliances separately. Please research information
on controlled waste disposal options from your
local authority. Remove the batteries from the item
before disposing of it.

21
Disposal measures for the
batteries/storage battery
Please note: Batteries/storage batteries
are hazardous waste and may not, by law,
be disposed of with domestic waste. You can
deposit used batteries/storage batteries at local
authority collection points or your retailer free of
charge. Special collection containers are available
there.
Notes on the guarantee and
service handling
The product was produced with great care and un-
der constant supervision. You receive a three-year
warranty for this product from the date of purchase.
Please retain your receipt.
The warranty applies only to material and work-
manship and does not apply to misuse or improper
handling. Your statutory rights, especially the war-
ranty rights, are not affected by this warranty.
With regard to complaints, please contact the fol-
lowing service hotline or contact us by e-mail. Our
service employees will advise as to the subsequent
procedure as quickly as possible.
We will be personally available to discuss the
situation with you. Any repairs under the warranty,
statutory guarantees or through goodwill do not
extend the warranty period. This also applies to
replaced and repaired parts. Repairs after the
warranty are subject to a charge.
IAN: 306200
Service Great Britain
Tel.: 0800 404 7657
E-Mail: deltasport@lidl.co.uk
Service Cyprus
Tel.: 8009 4409
E-Mail: deltasport@lidl.com.cy
GB/CY

22 GB/CY
Possible faults
Possible faults, their causes and the resolution are described in the following.
Fault Possible cause Resolution
Remote control (2) is
not responding.
Remote control (2) is
switched off.
Switch remote control (2) on.
Batteries (5) are inserted
incorrectly.
Insert batteries (5) correctly.
Batteries (5) are empty. Change batteries (5).
Quadrocopter (1) is
not responding.
The batteries (5) in the
remote control (2) have
been inserted incorrectly or
are empty.
Check the batteries (5) and change them if necessary.
Storage battery (9) in the
quadrocopter (1) is empty.
Charge the storage battery (9).
Control lamps (1h) are not
flashing or not on.
Connect the remote control plug connector (9a) to the
quadrocopter plug connection.
Quadrocopter (1) out of
range.
Make sure that the distance between the remote control
(2) and the quadrocopter (1) is not more than 50m.
Quadrocopter (1) is
uncontrollable.
Wind or draught is too
strong.
The quadrocopter (1) is only suitable for almost wind-
still conditions up to wind force 3.
Quadrocopter (1) needs
calibrating.
Switch the quadrocopter (1) on and place it on a level,
smooth surface. Switch the remote control (2) on and
simultaneously push the throttle backwards and to the
left and the joystick (2h) backwards and to the right.
The control lamps (1h) on the quadrocopter (1) will
flash for approx. 3seconds. As soon as the control
lamps (1h) are lit constantly the calibration is complete
and the quadrocopter (1) is ready to fly.
PLEASE NOTE: Repeat the calibration if the
quadrocopter (1) continues to fly uncontrollably
in one direction.
Quadrocopter (1) is
not flying upwards.
Not enough throttle. Push the throttle (2h) all the way forwards.
Storage battery (9) is
empty.
Charge the storage battery (9).
Rotor guard (1c) is
not secure.
Collision, crash If a rotor guard (1c) becomes loose then please tighten
the screws again and check the functioning and correct
position of the rotor guard (1c).
The quadrocopter
(1) lights (1h) blink
alternately.
The quadrocopter (1) is not
connected to the remote
control (2)
Slide the throttle (2h) on the remote control (2) all the
way forward, and then all the way back.
This process establishes contact between the quadro-
copter (1) and the remote control (2).
The rechargeable battery
(9) is almost flat.
Switch off the quadrocopter (1) and remove the
rechargeable battery, so it can be charged.
Pagina se încarcă...
Pagina se încarcă...
Pagina se încarcă...
Pagina se încarcă...
Pagina se încarcă...
Pagina se încarcă...
Pagina se încarcă...
Pagina se încarcă...
Pagina se încarcă...
Pagina se încarcă...
Pagina se încarcă...
Pagina se încarcă...
Pagina se încarcă...
Pagina se încarcă...
Pagina se încarcă...
Pagina se încarcă...
Pagina se încarcă...
Pagina se încarcă...
Pagina se încarcă...
Pagina se încarcă...
Pagina se încarcă...
Pagina se încarcă...
Pagina se încarcă...
Pagina se încarcă...
Pagina se încarcă...
Pagina se încarcă...
Pagina se încarcă...
Pagina se încarcă...
Pagina se încarcă...
Pagina se încarcă...
Pagina se încarcă...
Pagina se încarcă...
Pagina se încarcă...
Pagina se încarcă...
Pagina se încarcă...
Pagina se încarcă...
Pagina se încarcă...
Pagina se încarcă...
Pagina se încarcă...
Pagina se încarcă...
Pagina se încarcă...
Pagina se încarcă...
Pagina se încarcă...
Pagina se încarcă...
Pagina se încarcă...
Pagina se încarcă...
Pagina se încarcă...
Pagina se încarcă...
Pagina se încarcă...
Pagina se încarcă...
Pagina se încarcă...
Pagina se încarcă...
Pagina se încarcă...
Pagina se încarcă...
Pagina se încarcă...
Pagina se încarcă...
Pagina se încarcă...
Pagina se încarcă...
Pagina se încarcă...
Pagina se încarcă...
Pagina se încarcă...
Pagina se încarcă...
Pagina se încarcă...
Pagina se încarcă...
Pagina se încarcă...
Pagina se încarcă...
Pagina se încarcă...
Pagina se încarcă...
Pagina se încarcă...
Pagina se încarcă...
Pagina se încarcă...
Pagina se încarcă...
Pagina se încarcă...
Pagina se încarcă...
Pagina se încarcă...
Pagina se încarcă...
Pagina se încarcă...
Pagina se încarcă...
-
 1
1
-
 2
2
-
 3
3
-
 4
4
-
 5
5
-
 6
6
-
 7
7
-
 8
8
-
 9
9
-
 10
10
-
 11
11
-
 12
12
-
 13
13
-
 14
14
-
 15
15
-
 16
16
-
 17
17
-
 18
18
-
 19
19
-
 20
20
-
 21
21
-
 22
22
-
 23
23
-
 24
24
-
 25
25
-
 26
26
-
 27
27
-
 28
28
-
 29
29
-
 30
30
-
 31
31
-
 32
32
-
 33
33
-
 34
34
-
 35
35
-
 36
36
-
 37
37
-
 38
38
-
 39
39
-
 40
40
-
 41
41
-
 42
42
-
 43
43
-
 44
44
-
 45
45
-
 46
46
-
 47
47
-
 48
48
-
 49
49
-
 50
50
-
 51
51
-
 52
52
-
 53
53
-
 54
54
-
 55
55
-
 56
56
-
 57
57
-
 58
58
-
 59
59
-
 60
60
-
 61
61
-
 62
62
-
 63
63
-
 64
64
-
 65
65
-
 66
66
-
 67
67
-
 68
68
-
 69
69
-
 70
70
-
 71
71
-
 72
72
-
 73
73
-
 74
74
-
 75
75
-
 76
76
-
 77
77
-
 78
78
-
 79
79
-
 80
80
-
 81
81
-
 82
82
-
 83
83
-
 84
84
-
 85
85
-
 86
86
-
 87
87
-
 88
88
-
 89
89
-
 90
90
-
 91
91
-
 92
92
-
 93
93
-
 94
94
-
 95
95
-
 96
96
-
 97
97
-
 98
98


Lucrări înrudite
Alte documente
-
LRP 220703 Manual de utilizare
-
Delta Clay Instrucțiuni de utilizare
-
LIVARNO 400059 Manualul proprietarului
-
-
CANGAROO Video baby tor Focus BM-280 Instrucțiuni de utilizare
-
-
-
-
Hama 00126853 Manualul proprietarului
-
Silvercrest 282352 Operation and Safety Notes