
PL
F
D
GB
RO
Operating Instructions
Bedienungsanleitung
Mode d‘emploi
Instrukcja obsługi
Manual de utilizare
RacemachineQuadrocopter/RC Car
Quadrocopter/RC-Car
2in1
00
126853


1
81
3 10
1111
2
2 12 9
3
75 10
7
6
4
5
13
64

6
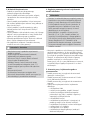
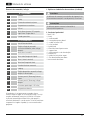
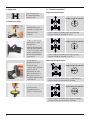
G Operating instruction
Controls and displays
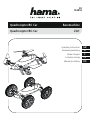
A: Model aircraft
1
Rotors
2
Fuselage
3
Landing/standing legs
4
Battery bay
5
LEDs
6
Slide switch for OFF and Car/Drone
mode
7
Cameraconnection
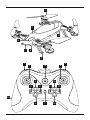
B: Remote control
1
Actual Direction mode
2
Left control lever (climb/descend, turn
left/right)
3
Hbutton (highest speed)
4
Video button (recordvideo)
5
Lbutton (lowest speed)
6
Photo button (take apicture)
7
Automatic takeoff/landing
8
Loop
9
Right control lever (left/right, forwards/
backwards)
10
Tweaking (trimming), forwards/
backwards
11
Tweaking (trimming), left/right
12
On/off button /LED indicator
13
Battery compartment
Thank you for choosing aHama product.
Take your time and read the following instructions and
information completely.Please keep these instructions in a
safe place for futurereference. If you sell the device, please
pass these operating instructions on to the new owner.
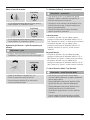
1. Explanation of Warning Symbols and Notes
Warning
This symbol is used to indicate safety instructions or to
draw your attention to specic hazards and risks.
Note
This symbol is used to indicate additional information or
important notes.
2. Package contents
• 2-in-1drone
• 4xwheels
• 1xremote control
• 1xbattery for the drone
• 1xUSB charging cable
• 2xwrench
• 4xwheel nuts
• 4xreplacement rotor blades
• 1xcamera
• 1xcarrier lm with stickers
• 4xAA batteries
• 2xpylons including base
• 1xdrone takeoff/landing pad
• These operating instructions

7
3. Safety instructions
• The product is intended for private, non-commercial use
only.
• Protect the product from dirt, moistureand overheating,
and only use it in adry environment.
• Do not drop the product and do not expose it to any
major shocks.
• Do not operate the product outside the power limits
given in the specications.
• Make surethat you y the drone in such amanner that
you always have the product under control, and do not
overestimate your capabilities.
• Keep hair,face, hands and loose clothing away from the
product during operation. The rotors pose arisk of injury,
as does the moving product in general.
• Keep the packaging material out of the reach of children
due to the risk of suffocation..
• Do not modify the product in any way.Doing so voids
the warranty.
Warning -Batteries
• Immediately remove and dispose of dead batteries
from the product.
• Only use batteries (or rechargeable batteries) that
match the specied type.
• Do not mix old and new batteries or batteries of a
different type or make.
• When inserting batteries, note the correct polarity (+
and -markings) and insert the batteries accordingly.
Failuretodosocould result in the batteries leaking or
exploding.
• Do not overcharge batteries.
• Keep batteries out of the reach of children.
• Do not short circuit the batteries/rechargeable
batteries and keep them away from uncoated metal
objects.
4. Legal regulations/limitations when operating
model aircraft
Note
• The information on legal regulations set out in these
instructions covers only the German regulations and
laws at the time of printing. Beforeusing the product
in other countries, nd out about the applicable
regulations!
• Please note that in accordance with §1, para. 2, no.
9ofthe German Air Trac Act(Luftverkehrsgesetz or
LuftVG), amodel aircraft is considered to be aircraft,
and in accordance with §43 LuftVG, liability insurance
is needed. Find out from your insurance provider
whether your personal liability insurance already
covers the control of amodel aircraft.
• Alicence may be required for commercial use. Contact
your local authorities (for example, public order oce) to
clarify the legal issues.
• If you take photos or videos with this product, their use
is considered commercial if they arepublished on the
Internet, for example, and you allow any associated
advertising!
5. Operating environment and proper use
• This product is intended for use only in sporting and
leisureactivities.
• This product is intended for use by children aged 14 or
older under parental supervision.
• This product is intended for use only outside buildings.
• Thereisageneral prohibition on climbing and operating
model aircraft:
• Over gatherings of people
• Over accident sites and disaster areas
• Over operation sites of state bodies (for example,
police, authorities) and organisations with security
responsibilities
• Over penal institutions
• Over industrial and energy generation plants
(including solar parks)
• Over military facilities and restricted areas
• Over and near airelds/airports
• Over and near hospitals
• Over federal highways, federal waterways and
railway facilities
• Over conservation areas
• Over stadiums
• Over amusement parks

8
• Note that special, extended regulations and prohibitions
on climbing model aircraft apply in large cities such as
Berlin, Hamburg, Cologne, etc.
• Respect the personal and property rights of others! Do
not use cameradrones to captureimages of other people
without rst asking for their permission.
• Do not y over third-party property!
• Do not y near people, waters, radio masts or power
lines, and do not frighten animals with the product!
• In areas whereyou areallowed to operate and climb
amodel aircraft, observe amaximum ying altitude of
100 m.
• In areas whereyou areallowed to operate and climb a
model aircraft, only y within the range of vision.
• In general, the following applies: Do not disturb your
fellow human beings and your environment through
actions that go against general decorum and/or that you
yourself would consider to be anuisance.
• The pilot in command of the drone is, in principle, liable
for all damages that may be caused during aight.
• Keep an eye on the battery of the drone. Land
immediately if the battery loses power,soasnot to
crash.
• Beforeying, make surethe weather conditions are
suitable.
• Always anticipate hazards when ying! Payattention to
both the drone and your environment.
• Do not use any technical devices to extend the range of
vision.
• Unmanned aviation systems and model aircraft are
obliged to give way to manned aircraft and manned
balloons.
6. Getting started
Note
• Beforegetting started, familiarise yourself with the
product and its operation, ideally under the guidance
of aperson who is experienced with similar products.
• The packaging can be used to storethe product; it
protects the product from dust and damage.
6.1 Remote control –inserting the batteries
•Open the battery compartment (13) and insert four
AA batteries, observing correct polarity.Then close the
battery compartment cover.
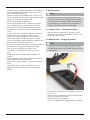
6.2 Model aircraft –charging the battery
Note
• The battery,drone and charging adapter included in
the delivery go together and should always be used in
combination.
• Fully charge thebattery of the drone beforeusing it for
the rst time.
• Open the battery compartment cover of the battery bay
(4) on the underside of the drone.
• Remove the battery of the drone.
• Connect the supplied USB charging cable to the battery.

9
• Connect the unused plug on the USB cable to an
available USB port on your computer or another suitable
USB charger.Please refer to the operating instructions for
the USB charger used.
• The LED indicator of the USB charging plug is lit red
during charging. When the battery is fully charged, the
LED indicator goes out.
• Remove the connection cable from the battery bay (4) of
the drone.
• Connect the charged battery to the connection cable.
• Put the connected battery back into the battery bay (4)
and then close the battery compartment cover.
Warning –rechargeable battery
• Only use suitable charging devices with USB
connections for charging.
• As arule, do not use charging devices or USB
connections that aredefective and do not try to repair
them yourself.
• Do not overcharge the product or allow the battery to
completely discharge.
• Avoid storing, charging or using batteries in extreme
temperatures.
• When stored over along period of time, batteries
should be charged regularly (at least every three
months).
• After every ight and beforecharging, allow the
motors and the battery to completely cool!
• Continually monitor charging!
• Stop charging immediately if the battery becomes hot
and/or deformed!
• Use aheat-resistant, re-proof surface for charging!
Note –charging/battery capacity
• It takes approximately 1hours to fully charge the
battery.
• The battery comes partially charged. Initial charging
may thereforetake less time.
• After acharging time of 60 minutes, the ying time is
approximately 8-10 minutes.
• The actual ying time varies according to use of the
product, the settings and ambient conditions (for
example, temperatures below 5°C and above 25°C
reduce battery capacity).
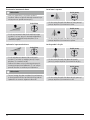
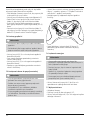
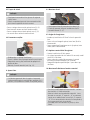
7. Flight mode
7.1 Flight control
Move the slide switch
(6) on the drone to the
position of the drone
symbol.
• Press the on/off switch (12) to switch on the remote
control.
Note
• Control the drone only with minimal movements
of the control levers so as to ensuresmooth ight
behaviour.
• Avoid jerky movements. The drone could get out of
control.
• The direction specications assume that the drone
is in front of you and facing forward, or is in Actual
Direction mode (see Section 7.4)

10
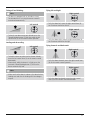
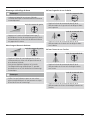
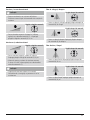
Taking off and climbing
Note
• The drone is equipped with an altitude assistant.
The altitude that is set using the remote control is
maintained automatically.
Left control
• To launch your drone or to gain altitude, press the
Takeoff/Landing button (7) and then move the left
control lever (2) on the remote control upwards.
Landing and descending
Left control
• To land the drone or to descend to alower altitude,
move the left control lever (2) on the remote control
downwards.
• Alternatively,while the drone is in ight, press the
Automatic takeoff/landing button (7) to have the
drone automatically land.
Note
• Make surethat the drone is above aat, obstacle-free
landing area and that the landing will not endanger
anyone.
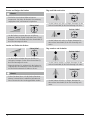
Flying left and right
Right control
• To y the drone left, move the right control lever (9)
on the remote control to the left.
Right control
• To y the drone right, move the right control lever (9)
on the remote control to the right.
Flying forwards and backwards
Right control
• To y the drone forwards, move the right control lever
(9) on the remote control upwards.
Right control
• To y the drone backwards, move the right control
lever (9) on the remote control downwards.

11
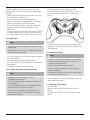
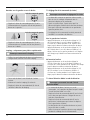
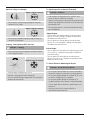
Turning left or right
Left control
• To turn the drone left, move the left control lever (2)
on the remote control to the left.
Left control
• To turn the drone right, move the left control lever (2)
on the remote control to the right.
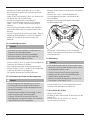
Loops –only for experienced pilots!
Note –Loops
• The battery of the drone must be fully charged to be
able to use the loop function.
Right control
• Fly the drone at an altitude of approximately 3m.
• Press and hold the Loop button (8).
• Move the right control lever (9) to control the loop
direction.
7.2 Tweaking the control (trimming)
Note –Trimming
• The drone should be smooth and stable in the air,
and should y only in the direction that is set using
the control.
• After acertain time, theremay be slight directional
tilts even though the control levers areinthe resting/
neutral position.
• These directional tilts can be eliminated by trimming
the control.
Left/right
• If the drone continually tilts to the right during the ight,
briey push the Tweaking button (11) to the left. Repeat
this step until the drone is aligned.
• If the drone continually tilts to the left during the ight,
briey push the Tweaking button (11) to the right.
Repeat this step until the drone is aligned.
Forwards/backwards
• If the drone continually tilts forwards during the ight,
briey push the Tweaking button (10) downwards.
Repeat this step until the drone is aligned.
• If the drone continually tilts backwards during the ight,
briey push the Tweaking button (10) upwards. Repeat
this step until the drone is aligned.
7.3 Actual Direction mode
Note –Actual Direction mode
• If Actual Direction mode is activated, the control of
the drone when sending commands is guided by the
position of the pilot.
• If you move the right control lever (9) upwards/
downwards, the drone ies away from you /towards
you.
• If you move the right control lever (9) to the left/right,
the drone ies left/right.
• The ight direction and position of the drone is
irrelevant in this mode.
• Make surethat you remain in the position that you
take during calibration with the remote control.

12
Position the drone directly in front of you so that its
fuselage points away from you and in the desired ight
direction.
• Hold the remote control such that it points to the rear
part of the drone in adirect line.
• Press the Automatic takeoff/landing button (7).
• Press the Actual Direction mode button (1) during the
ight to activate the Actual Direction mode.
• The Actual Direction mode is conrmed through two
signal tones and fast ashing of the drone’sLED
indicator (5).
• If you press the Actual Direction mode button (1) again,
the mode is deactivated. Asignal tone will sound and
the LED indicator (5) of the drone is now constantly lit.
7.4 Speed levels
Note
• When you switch on the product, the drone is in low
speed mode.
• Experienced pilots can increase the drone’sspeed by
setting the top speed mode.
• Press the [H] button (3) to increase the drone’sspeed to
the highest speed.
• Twosignal tones conrm the highest setting.
• Press the [L] button (5) to limit the drone’sspeed to the
lowest speed.
• Asignal tone conrms the lowest setting.
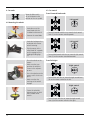
7.5 Resetting the drone to neutral position
Note
• Frequent/incorrect trimming can result in
misalignment of the drone.
• This can be eliminated by resetting the control to the
neutral position.
• If the landing/standing legs (3) aredamaged, precise
alignment of the control is not possible.
• In this case, the alignment must not be reset to
the neutral position. This would inuence the ight
behaviour of the drone.
• Position the drone on aat horizontal surface.
• Activate the highest speed as described in Section 7.4.
• Then move the two control levers as shown in the
picture:
• Asignal tone along with ashing of the drone’sLED
indicator (5) conrm the resetting of the control to the
neutral position.
7.6 Emergency landing
Note
• If you lose control over the drone or need to quickly
bring the drone to the ground, you can use the
emergency landing function.
• Make sureyou do not endanger anyone.
• Make surethat no damage is caused through an
emergency landing.
• Payheed to the information on safety and the legal
situation (see Sections 3to5).
• Press the buttons (1) and (8) simultaneously to get the
drone to quickly descend.
7.7 Switching off the drone
• Land the drone.
• Move the slide switch (6) on the drone to the OFF
position.
• Press the on/off switch (12) to switch off the remote
control.

13
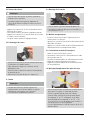
8. Car mode
Move the slide switch
(6) on the drone to the
position of the car symbol.
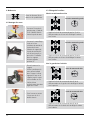
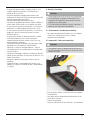
8.1 Mounting the wheels
• Undo the nut of the
rotor blade with the
included socket wrench.
• Remove the rotor blade.
• Undo the locking on the
underside of the rotor/
wheel fastening.
• Flip the mount of the
rotor blade 90° upwards
until it engages on the
landing/standing legs
(3).
• Place the wheel on the
mount.
• Make surethat you
position the wheel as
shown in the adjacent
picture.
• Press the wheel onto the
mount until it clicks into
place.
• Make surethat the
two lugs of the wheel
engage.
• Fasten the wheel by
tightening the nut with
the included socket
wrench.
8.2 Car control
Travel forwards/backwards
Left control
• To travel forwards with the car,move the left control
lever (2) on the remote control upwards.
Left control
• To travel backwards with the car,move the left control
lever (2) on the remote control downwards.
Travel left/right
Right control
• To travel left with the car,move the right control lever
(9) on the remote control to the left.
Right control
• To travel right with the car,move the right control
lever (9) on the remote control to the right.

14
8.3 Speed levels
Note
• When you switch on the product, the car is in low
speed mode.
• Experienced pilots can increase the car’sspeed by
selecting the top speed mode.
• Press the [H] button (3) to increase the car’sspeed to the
highest speed.
• Twosignal tones conrm the highest setting.
• Press the [L] button (5) to limit the car’sspeed to the
lowest speed.
• Asignal tone conrms the lowest setting.
8.4 Dismounting the wheels
• Undo the nut on the outside of the wheel using the
included socket wrench.
• Press the lugs inwards to release the wheel.
• Remove the wheel and ip the drive motors back into
the ight position.
• Now mount the rotor blades (see Section 10).
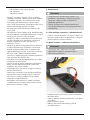
9. Camera
Note
• When using the camera, observe the legal regulations
and limitations specied in Sections 4and 5, as well
as the allowed operating environment for drones!
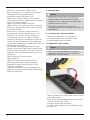
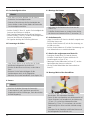
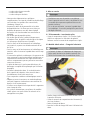
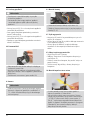
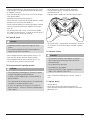
9.1 Mounting the camera
• Attach the cameratothe underside of the drone. (A)
• Connect the camerabyinserting the cameraplug into
the cameraconnection (7). (C)
9.2 Recording mode
• Insert amicroSD cardinto the cameraslot provided for
the purpose (B).
• Press the Photo button (6) on the remote control to take
apicture.
• Press the Video button (4) on the remote control to start/
stop avideo recording.
9.3 Retrieving the recorded material
• Remove the camera’smicroSD card.
• Connect the microSD cardtoyour PC using the SD card
reader.
• Transfer the image material to your PC to free up storage
space on the camera.
• Delete the pictures/videos on the cameradirectly on your
PC.
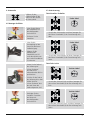
10. Mounting/changing the rotor blades
• If necessary,remove the existing rotor blade as
described in Section 8.1 Mounting the wheels.
• Place the new rotor blade on the motor shaft. Make
sureyou mount the rotor blade marked ‘A’ on the
motor shaft marked with the same letter (‘A’); similarly,
the rotor blade marked ‘B’ should be mounted on
the motor shaft marked ‘B’. Otherwise, the rotation
direction will not be correct and no drive is generated.
• Securethe rotor blade using the nut and the included
socket wrench.

15
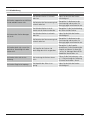
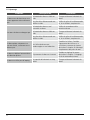
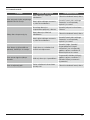
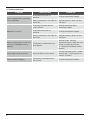
11. Troubleshooting
Problem Possible cause Solution
The drone stops for no apparent
reason and/or does not launch.
The battery of the drone is weak or
empty.
Fully charge the battery of the
drone.
The batteries of the remote control
areweak or empty.
Check the batteries of the remote
control and replace them with new
batteries if necessary.
The rotors of the drone do not move.
The drone’sbattery is not correctly
connected to the drone.
Check the plug-in connection of the
battery and the drone.
The battery of the drone is weak or
empty.
Fully charge the battery of the
drone.
The batteries of the remote control
areweak or empty.
Check the batteries of the remote
control and replace them with new
batteries if necessary.
The drone rotates only around its
vertical axis, overturns or does not
launch.
The propellers of the drone are
damaged or incorrectly arranged.
Check the propellers. Check the
arrangement of the propellers and, if
necessary,attach them as described
in Section 10. Mounting/changing
the rotor blades.
The drone pulls strongly in a
particular direction.
The drone is not properly aligned.
Carry out tweaking as described in
Section 7.2 Tweaking the control
(trimming).
The drone won’t perform loops. The battery charge is too low.
Fully charge the battery of the
drone.

16
12. Care and Maintenance
•Only clean this product with aslightly damp, lint-free
cloth and do not use aggressive cleaning agents.
•Make surethat water does not get into the product.
13. Warranty Disclaimer
Hama GmbH &CoKGassumes no liability and provides no
warranty for damage resulting from improper installation/
mounting, improper use of the product or from failureto
observe the operating instructions and/or safety notes.
14. Service and Support
Please contact Hama Product Consulting if you have any
questions about this product.
Hotline: +49 9091 502-115 (German/English)
Further support information can be found here:
www.hama.com
15. Technical specifications
Max. range: 100 m
Number of channels 4
Recording format 720p/30fps
Lighting Single-colour LEDs
Camera Yes
With (diagonal, without
propellers)
260 mm
Width xdepth xheight 310 x310 x70mm
Weight 150 g
Rotor diameter 145 mm
Battery requirement for
drone
1xlithium polymer battery
(replaceable),
Capacity 900 mAh
Battery requirement for
remote control
4xAAbattery
Type of charging USB-A connection
Frequency range 2.4 GHz
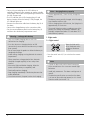
16. Recycling Information
Note on environmental protection:
After the implementation of the European Directive
2012/19/EU and 2006/66/EU in the national legal
system, the following applies: Electric and
electronic devices as well as batteries must not be
disposed of with household waste. Consumers areobliged
by law to return electrical and electronic devices as well as
batteries at the end of their service lives to the public
collecting points set up for this purpose or point of sale.
Details to this ar
edened by the national law of the
respective country.This symbol on the product, the
instruction manual or the package indicates that aproduct
is subject to these regulations. By recycling, reusing the
materials or other forms of utilising old devices/batteries,
you aremaking an important contribution to protecting
our environment.
17. Declaration of Conformity
Hereby,Hama GmbH &CoKGdeclares that the
radio equipment type [00126853] is in compliance
with Directive 2014/53/EU.The full text of the EU
declaration of conformity is available at the following
internet address:
www.hama.com -
>
00126853-
>
Downloads.
Frequency band(s) 2.413-2.461 GHz
Maximum radio-frequency
power transmitted
0.29 mW EIRP

2
D Bedienungsanleitung
Bedienungselemente und Anzeigen
A: Flugmodell
1
Rotoren
2
Rumpf
3
Lande-/Standbeine
4
Akkuschacht
5
LEDs
6
Schiebeschalter für OFF bzw.Auto-/
Drohnenmodus
7
Kameraanschluss
B: Fernsteuerung
1
Actual Direction Mode
2
Linker Steuerhebel (Steigen/Sinken,
links-/rechts Rotieren)
3
Taste (max. Geschwindigkeit)
4
Video-Taste (Videoaufnahme)
5
L-Taste (min. Geschwindigkeit)
6
Foto-Taste (Bildaufnahme)
7
automatische(r) Start/Landung
8
Looping
9
rechter Steuerhebel (links/rechts,
vorwärts/rückwärts)
10
Feinjustierung (Trimmung) vorwärts/
rückwärts
11
Feinjustierung (Trimmung) links/rechts
12
Ein-/Ausschalter /LED-Anzeige
13
Batteriefach
Vielen Dank, dass Sie sich für ein Hama Produkt
entschieden haben!
Nehmen Sie sich Zeit und lesen Sie die folgenden
Anweisungen und Hinweise zunächst ganz durch.
Bewahren Sie diese Bedienungsanleitung anschließend an
einem sicheren Ort auf,umbei Bedarf darin nachschlagen
zu können. Sollten Sie das Gerät veräußern, geben Sie
diese Bedienungsanleitung an den neuen Eigentümer
weiter.
1. Erklärung von Warnsymbolen und Hinweisen
Warnung
Wirdverwendet, um Sicherheitshinweise zu
kennzeichnen oder um Aufmerksamkeit auf besondere
Gefahren und Risiken zu lenken.
Hinweis
Wirdverwendet, um zusätzlich Informationen oder
wichtige Hinweise zu kennzeichnen.
2. Packungsinhalt
• 2in1-Drohne
• 4x Räder
• 1x Fernsteuerung
• 1x Akku für die Drohne
• 1x USB-Ladekabel
• 2x Schraubenschlüssel
• 4x Radmuttern
• 4x Ersatz-Rotorblätter
• 1x Kamera
• 1x Trägerfolie mit Stickern
• 4x AA-Batterien
• 2x Pylonen inkl. Standfuß
• 1x Drohnen Start-/Landeplatz
• Diese Bedienungsanleitung

3
3. Sicherheitshinweise
• Das Produkt ist für den privaten, nicht-gewerblichen
Haushaltsgebrauch vorgesehen.
• Schützen Sie das Produkt vor Schmutz, Feuchtigkeit und
Überhitzung und verwenden Sie es nur in trockenen
Räumen.
• Lassen Sie das Produkt nicht fallen und setzen Sie es
keinen heftigen Erschütterungen aus.
• Betreiben Sie das Produkt nicht außerhalbseiner in den
technischen Daten angegebenen Leistungsgrenzen.
• Achten Sie darauf,stets nur so zu iegen, dass Sie das
Produkt immer unter Kontrolle haben und überschätzen
Sie nicht IhreFähigkeiten.
• Halten Sie Haare, Gesicht, Hände und lose Kleidung
im Betrieb von dem Produkt fern. Es besteht
Verletzungsgefahr durch die Rotoren und/oder generell
durch das sich bewegende Produkt.
• Halten Sie Kinder unbedingt von dem
Verpackungsmaterial fern, es besteht Erstickungsgefahr.
• Nehmen Sie keine Veränderungen am Produkt vor.
Dadurch verlieren sie jegliche Gewährleistungsansprüche.
Warnung -Batterien
• Entfernen und entsorgen Sie verbrauchte Batterien
unverzüglich aus dem Produkt.
• Verwenden Sie ausschließlich Akkus (oder Batterien),
die dem angegebenen Typentsprechen.
• Mischen Sie alte und neue Batterien nicht, sowie
Batterien unterschiedlichen Typs oder Herstellers.
• Beachten Sie unbedingt die korrekte Polarität
(Beschriftung +und -) der Batterien und legen Sie
diese entsprechend ein. Bei Nichtbeachtung besteht
die Gefahr des Auslaufens oder einer Explosion der
Batterien.
• Laden Sie Batterien nicht.
• Bewahren Sie Batterien außerhalb der Reichweite von
Kindern auf.
• Schließen Sie Akkus/Batterien nicht kurz und halten
Sie sie von blanken Metallgegenständen fern.
4. Gesetzliche Regelungen/Einschränkungen beim
Betrieb von Flugmodellen
Hinweis
• Beachten Sie, dass Hinweise zu gesetzlichen
Regelungen in diesen Hinweisen nur die deutschen
Vorschriften und Gesetze zum Zeitpunkt der
Drucklegung abbilden. Informieren Sie sich in anderen
Staaten vor der Verwendung des Produktes über die
dort geltenden Regelungen!
• Beachten Sie, dass gem. Luftverkehrsgesetz (LuftVG)
§1, Abs.2, Nr.9, ein Flugmodell als Luftfahrzeug
angesehen wirdund hierfür gem. LuftVG §43 eine
Haftpichtversicherung vorhanden sein muss.
Informieren Sie sich bei Ihrem Versicherungsanbieter,
ob ihrePrivathaftpicht die Steuerung eines
Flugmodells bereits abdeckt.
• Eine gewerbliche Nutzung ist ggf.genehmigungs-
pichtig. Wenden Sie sich an die lokalen Behörden (z.B.
Ordnungsamt), um die rechtlichen Fragen zu klären.
• Beachten Sie, dass mit diesem Produkt aufgenommene
Fotos/Videos als gewerbliche Nutzung gelten, wenn diese
Aufnahmen z.B. im Internet veröffentlicht werden und Sie
Werbung zu den Fotos/Videos erlauben!
5. Betriebsumgebung und bestimmungsgemäße
Verwendung
• Dieses Produkt ist nur für die Verwendung in Sport und
Freizeit vorgesehen.
• Dieses Produkt ist für die Verwendung ab 14 Jahren und
unter elterlicher Aufsicht vorgesehen.
• Dieses Produkt ist nur für die Verwendung außerhalb von
Gebäuden vorgesehen.
• Ein generelles Aufstiegs- und Betriebsverbot besteht:
• Über Menschenansammlungen
• Über Unfall-/Unglücksorten und
Katastrophengebieten
• Über Einsatzorten von Organen des Staates
(z.B. Polizei, Behörden) und Organisationen mit
Sicherheitsaufgaben
• Über Justizvollzugsanstalten
• Über Industrie- und Energieerzeugungsanlagen (auch
Solarparks)
• Über militärischen Anlagen und Sperrgebieten
• Über und in der Nähe von Flugplätzen/-häfen
• Über und in der Nähe von Krankenhäusern
• Über Bundesfernstraßen, Bundeswasserstraßen und
Bahnanlagen
• Über Naturschutzgebieten
• Über Stadien
• Über Vergnügungsparks

4
• Beachten Sie, dass in großen Städten, wie z.B.
Berlin, Hamburg, Köln etc., besondereund erweiterte
Regelungen und Aufstiegsverbote gelten!
• Respektieren Sie die Persönlichkeits- und
Eigentumsrechte Anderer! Machen Sie mit Kamera-
Drohnen keine Aufnahmen anderer Personen, ohne diese
vorher um Erlaubnis zu fragen.
• Fliegen Sie nicht über fremde Grundstücke!
• Fliegen Sie nicht in der Nähe von Personen, Gewässern,
Funkmasten, Stromleitungen und erschrecken Sie keine
Tieremit dem Produkt!
• Beachten Sie in Bereichen, in denen Betrieb und
Aufstieg erlaubt sind, eine Flughöhe von max. 100m.
• Beachten Sie in Bereichen, in denen Betrieb und
Aufstieg erlaubt sind, nur in Sichtweite zu iegen.
• Generell gilt: belästigen Sie ihreMitmenschen und ihre
Umwelt nicht durch Handlungen, die den allgemeinen
Anstandsregeln widersprechen und/oder die Sie selbst als
Belästigung ansehen würden.
• Der Führer der Drohne haftet grundsätzlich für alle
Schäden, die bei einem Flug verursacht werden können.
• Behalten Sie den Akku der Drohne im Blick. Landen Sie
umgehend, wenn die Akkuleistung abnimmt, um nicht
abzustürzen.
• Achten Sie vor dem Flug auf passende
Wetterverhältnisse.
• Fliegen Sie immer vorausschauend! Achten Sie
gleichzeitig auf die Drohne und IhreUmgebung.
• Verwenden Sie keine technischen Geräte, um die
Sichtweite zu verlängern.
• Unbemannte Luftfahrtsysteme und Flugmodelle sind
verpichtet, bemannten Luftfahrzeugen und bemannten
Ballonen auszuweichen.
6. Inbetriebnahme
Hinweis
• Machen Sie sich vor der ersten Inbetriebnahme
mit dem Produkt und seiner Bedienung vertraut,
idealerweise unter Anleitung einer mit gleichartigen
Produkten erfahrenen Person.
• Bei Nichtbenutzung dient die Verpackung als
Aufbewahrung und schützt das Produkt vor Staub und
Beschädigung.
6.1 Fernsteuerung –Batterien einlegen
•Öffnen Sie das Batteriefach (13) und legen Sie
4AA-Batterien polrichtig ein. Schließen Sie die
Batteriefachabdeckung anschließend.
6.2 Flugmodell –Akku aufladen
Hinweis
• Akku, Drohne und Ladeadapter sind aufeinander
abgestimmt und dürfen nur in der ausgelieferten
Kombination verwendet werden.
• Laden Sie vor dem ersten Gebrauch den Akku der Drohne
einmal vollständig auf.
• Öffnen Sie die Batteriefachabdeckung des Akkuschachts
(4) auf der Unterseite der Drohne.
• Entnehmen Sie den Akku der Drohne.
• Schließen Sie das mitgelieferte USB-Ladekabel am Akku
der Drohne an.

5
• Schließen Sie den freien Stecker des USB-Kabels an einer
freien USB-Buchse Ihres Computers oder einem anderen
geeigneten USB-Ladegerät an. Beachten Sie hierzu die
Bedienungsanleitung des verwendeten USB-Ladegeräts.
• Die LED-Anzeige des USB-Ladesteckers leuchtet während
des Ladevorgangs rot. Ist der Akku vollständig geladen,
erlischt die LED-Anzeige.
• Nehmen Sie das Anschlusskabel aus dem Akkuschacht
(4) der Drohne heraus.
• Schließen Sie den aufgeladenen Akku am Anschlusskabel
an.
• Legen Sie den angeschlossenen Akku zurück in den
Akkuschacht (4) und verschließen Sie anschließend die
Batteriefachabdeckung.
Warnung -Akku
• Verwenden Sie nur geeignete Ladegeräte mit USB
Anschlüssen zum Auaden.
• Verwenden Sie defekte Ladegeräte oder USB
Anschlüsse generellnicht mehr und versuchen Sie
nicht, diese zu reparieren.
• Überladen oder tiefentladen Sie das Produkt nicht.
• Vermeiden Sie Lagerung, Laden und Benutzung bei
extremen Temperaturen.
• Laden Sie bei längerer Lagerung regelmäßig (mind.
vierteljährig) nach.
• Lassen Sie die Motoren und den Akku nach jedem
Flug und vor jedem Ladevorgang vollständig
abkühlen!
• Überwachen Sie stets den Ladevorgang!
• Brechen Sie den Ladevorgang sofort ab, wenn der
Akku heiß wirdund/oder sich verformt!
• Verwenden Sie beim Laden eine hitzebeständige und
feuersichereUnterlage!
Hinweis -Ladevorgang/ Akkukapazität
• Ein kompletter Ladevorgang dauert ca. 1Stunde.
• Im Auslieferungszustand ist der Akku teilgeladen. Der
erste Ladevorgang kann somit kürzer ausfallen.
• Nach einer Ladedauer von 60 Minuten beträgt die
Flugdauer ca. 8-10 Minuten.
• Die tatsächliche Flugdauer variiert ja nach
Nutzung des Produktes, den Einstellungen
und Umgebungsbedingungen (z.B. verringern
Temperaturen unter 5°C und über 25°C die
Akkukapazität).
7. Flugmodus
7.1 Flugsteuerung
Schieben Sie den
Schiebeschalter (6) der
Drohne auf die Position
des Drohnensymbols.
• Drücken Sie den Ein-/Ausschalter (12), um die
Fernsteuerung einzuschalten.
Hinweis
• Steuern Sie die Drohne nur durch minimale
Bewegungen der Steuerhebel, um ein ruhiges
Flugverhalten der Drohne zu sichern.
• Vermeiden Sie ruckartige Bewegungen. Die Drohne
könnte außer Kontrolle geraten.
• Die Richtungsangaben beziehen sich immer darauf,
dass die Drohne nach vorn ausgerichtet ist und sich
vor Ihnen bendet oder,dass sich die Drohne im
Actual-Direction-Mode (siehe Kapitel 7.4) bendet.

6
Starten und Steigen der Drohne
Hinweis
• Die Drohne ist mit einem Höhenassistenten
ausgestattet. Die Höhe, die über die Fernsteuerung
vorgegeben wird, wirdautomatisch gehalten.
Linker Hebel
• Um die Drohne zu starten bzw.umanHöhe zu
gewinnen, drücken Sie die Start/Lande Taste (7) und
bewegen Sie anschließend den linken Steuerhebel (2)
der Fernsteuerung nach oben.
Landen und Sinken der Drohne
Linker Hebel
• Um die Drohne zu landen bzw.umdie Höhe zu
verringern, bewegen Sie den linken Steuerhebel (2)
der Fernsteuerung nach unten.
• Alternativ drücken Sie, während sich die Drohne im
Flug bendet, die automatische Start-/Landetaste (7),
um die Drohne automatisch landen zu lassen.
Hinweis
• Achten Sie darauf,dass sich die Drohne über einer
ebenen, hindernisfreien Landeäche bendet und
keine Personen bei der Landung gefährdet werden.
Flug nach links und rechts
Rechter Hebel
• Um die Drohne nach links zu iegen, bewegen Sie den
rechten Steuerhebel (9) der Fernsteuerung nach links.
Rechter Hebel
• Um die Drohne nach rechts zu iegen, bewegen Sie
den rechten Steuerhebel (9) der Fernsteuerung nach
rechts.
Flug vorwärts und rückwärts
Rechter Hebel
• Um die Drohne vorwärts zu iegen, bewegen Sie den
rechten Steuerhebel (9) der Fernsteuerung nach oben.
Rechter Hebel
• Um die Drohne rückwärts zu iegen, bewegen Sie
den rechten Steuerhebel (9) der Fernsteuerung nach
unten.

7
Drehung nach links oder rechts
Linker Hebel
• Für die Drehung der Drohne nach links bewegen Sie
den linken Steuerhebel (2) der Fernsteuerung nach
links.
Linker Hebel
• Für die Drehung der Drohne nach rechts bewegen Sie
den linken Steuerhebel (2) der Fernsteuerung nach
rechts.
Looping der Drohne –nur für geübte Piloten!
Hinweis -Looping
• Achten Sie darauf,dass der Akku der Drohne
vollständig geladen sein muss, um die Looping-
Funktion zu nutzen.
Rechter Hebel
• Fliegen Sie die Drohne auf eine Höhe von ca. 3m.
• Drücken und halten Sie die Looping-Taste (8).
• Bewegen Sie den rechten Steuerhebel (9), um die
Richtung des Loopings zu kontrollieren.
7.2 Feinjustierung der Steuerung (Trimmen)
Hinweis -Trimmen
• Die Drohne sollte ruhig und stabil in der Luft liegen
und nur in die Richtung iegen, die durch die
Steuerung vorgegeben wird.
• Nach gewisser Zeit kann es zu geringen
Richtungsneigungen der Drohne kommen, obwohl
sich die Steuerhebel in der Ruheposition/Nullstellung
benden.
• Durch Trimmen der Steuerung können diese
Richtungsneigungen behoben werden.
links/ rechts
• Neigt sich die Drohne während des Flugs stets nach
rechts, drücken Sie die Feinjustierungstaste (11) kurz
nach links. Wiederholen Sie diesen Schritt, bis die Drohne
ausgerichtet ist.
• Neigt sich die Drohne während des Flugs stets nach
links, drücken Sie die Feinjustierungstaste (11) kurz nach
rechts. Wiederholen Sie diesen Schritt, bis die Drohne
ausgerichtet ist.
vorwärts/ rückwärts
• Neigt sich die Drohne während des Flugs stets nach
vorne, drücken Sie die Feinjustierungstaste (10) kurz
nach unten. Wiederholen Sie diesen Schritt, bis die
Drohne ausgerichtet ist.
• Neigt sich die Drohne während des Flugs stets nach
hinten, drücken Sie die Feinjustierungstaste (10) kurz
nach oben. Wiederholen Sie diesen Schritt, bis die
Drohne ausgerichtet ist.
7.3 Actual Direction Mode /Richtungsmodus
Hinweis -Actual Direction Mode
• Ist der Actual Direction Mode aktiviert, orientiert
sich die Steuerung der Drohne bei Befehlen an der
Position des Piloten.
• Bewegen Sie den rechten Steuerhebel (9) nach oben/
unten, iegt die Drohne von Ihnen weg/auf Sie zu.
• Bewegen Sie den rechten Steuerhebel (9) nach links/
rechts, iegt die Drohne nach links/rechts.
• Die Flugrichtung und Position der Drohne ist bei
diesem Modus irrelevant.
• Achten Sie darauf,die Position, die Sie während der
Kalibrierung mit der Fernbedienung einnehmen,
beizubehalten.
Pagina se încarcă...
Pagina se încarcă...
Pagina se încarcă...
Pagina se încarcă...
Pagina se încarcă...
Pagina se încarcă...
Pagina se încarcă...
Pagina se încarcă...
Pagina se încarcă...
Pagina se încarcă...
Pagina se încarcă...
Pagina se încarcă...
Pagina se încarcă...
Pagina se încarcă...
Pagina se încarcă...
Pagina se încarcă...
Pagina se încarcă...
Pagina se încarcă...
Pagina se încarcă...
Pagina se încarcă...
Pagina se încarcă...
Pagina se încarcă...
Pagina se încarcă...
Pagina se încarcă...
Pagina se încarcă...
Pagina se încarcă...
Pagina se încarcă...
Pagina se încarcă...
Pagina se încarcă...
Pagina se încarcă...
Pagina se încarcă...
Pagina se încarcă...
Pagina se încarcă...
Pagina se încarcă...
Pagina se încarcă...
Pagina se încarcă...
Pagina se încarcă...
Pagina se încarcă...
Pagina se încarcă...
-
 1
1
-
 2
2
-
 3
3
-
 4
4
-
 5
5
-
 6
6
-
 7
7
-
 8
8
-
 9
9
-
 10
10
-
 11
11
-
 12
12
-
 13
13
-
 14
14
-
 15
15
-
 16
16
-
 17
17
-
 18
18
-
 19
19
-
 20
20
-
 21
21
-
 22
22
-
 23
23
-
 24
24
-
 25
25
-
 26
26
-
 27
27
-
 28
28
-
 29
29
-
 30
30
-
 31
31
-
 32
32
-
 33
33
-
 34
34
-
 35
35
-
 36
36
-
 37
37
-
 38
38
-
 39
39
-
 40
40
-
 41
41
-
 42
42
-
 43
43
-
 44
44
-
 45
45
-
 46
46
-
 47
47
-
 48
48
-
 49
49
-
 50
50
-
 51
51
-
 52
52
-
 53
53
-
 54
54
-
 55
55
-
 56
56
-
 57
57
-
 58
58
-
 59
59


în alte limbi
- français: Hama 00126853 Le manuel du propriétaire
- English: Hama 00126853 Owner's manual
- polski: Hama 00126853 Instrukcja obsługi
- Deutsch: Hama 00126853 Bedienungsanleitung
Lucrări înrudite
Alte documente
-
Overmax X-bee drone 2.0 Manual de utilizare
-
SPEEDLINK RACING DRONES Competition Set Manualul utilizatorului
-
-
-
-
Carson 500507160 Manual de utilizare
-
Carson Nano Tyrann 230 Manual de utilizare
-
Evolio One HD Manualul proprietarului
-
LRP 220703 Manual de utilizare
-
dji mini 2 Manual de utilizare