Lenovo ThinkVision S27i-30 Manualul utilizatorului
- Categorie
- Televizoare
- Tip
- Manualul utilizatorului

ThinkVision S27i-30
User Guide
Machine Type:63DF-KAR4-WW

Product No.
H23270FS0
63DF-KAR4-WW
Version 1 (September 2022)
All rights reserved Lenovo 2022
LENOVO products, data, computer software, and services are developed on earmarked funds and are sold to
government agencies as commodities as defined in 48 C.F.R. 2.101, with limited restricted rights of use,
duplication, and disclosure granted to the government agencies.
Restricted limited rights statement: If products, data, computer software, or services are delivered under a
General Services Manager "GSA" contract, their use, duplication, or disclosure is subject to the restrictions
outlined in Contract No. GS-35F-05925.

Contents
Safety Matters…………………………………………………………………………….……………….…iv
General Safety Principles…………………………………….……………………….………………..…iv
TCO Certified………………………..…………………………………………………………………….v
Chapter 1. New Member Guide………………………………………………………………………….…1-1
Items List………………………………………………………………………………………….……1-1
Precautions For Use…........………………………………………....…………………………………1-2
Product Overview……………………………………………………………………………...………1-2
Set Up the Display……………………………………………………………………………...………1-4
Chapter 2. Adjusting and Using the Display……………………………………………………………...…2-1
Comfort and Assistance Functions………………………………………………….………………....2-1
Arrange Your Working Area………………………………………………….…………………….....2-1
Placing and Viewing the Display……………………………………………………… …………...…2-1
Tips on Healthy Work Habits…………………………………………………….……………………2-2
Auxiliary function Information……………………………………………………………………………………………………….2-2
Adjusting the Display Image…………………………………………………..…….………….…..….2-3
Select Supported Display Modes……………………………………………….…………….…..……2-7
Understanding Power Management……………………………………………….……….……..……2-8
Maintaining the Display……………………………………………………………….….……………2-9
Remove the Display Base and Support Arm…………………………….……………...………..……2-9
Wall-mounted (optional)……………………………………………………………………..…………2-9
Chapter 3. Reference Information……………………………………………………...……………...……3-1
Display Specifications……………………………………..…………….………………………………3-1
Troubleshooting…………………………………………………………………………………...…….3-3
Manually Install the Driver for the Display…………………………………………………………..…3-5
Appendix A. Services and Support………………………………..…………….…………………………A-1
Telephone Technical Support………………………………………………………….……………...…A-1
Appendix B. Declaration……………………………………………………………….………………..…B-1
Trademark……………………………………………………………………..………………...………B-2
Power Cord…………………………………………………………………..………………..…………B-2

Safety Matters
General Safety Principles
For tips on safe computer use, please go to:
http://www.lenovo.com/safety
Before installing this product, please read the safety matters.
Avant d’installer ce produit, lisez les consignes de securite.
Vor der Installation dieses Produkts die Sicherheitshinweise lesen.
Πριν εγκαταστήσετε το προϊόν αυτό, διαβάστε τις πληροφορίες ασφάλειας (safety information).
A termék telepítés előtt olvassa el a Biztonsági Tudnivalókat!
Prima di installare questo prodotto, leggere le Informazioni sulla Sicurezza.
Antes de instalar este produto, leia as Informações de Segurança.
Läs säkerhetsinformationen innan du installerar den här produkten.
Prije instaliranja ovog produkta obavezno pročitajte Sigurnosna Upute.
Les sikkerhetsinformasjonen (Safety Information) før du installerer dette produktet.
Przed zainstalowaniem tego produktu, należy zapoznać się z książka"Informacje dotyczące
bezpieczeństwa" (Safety Information).
Пред да се инсталира овој продykт, прочитајте информацијата за безбедност
Pred inštaláciou tohto zariadenia si prečítajte Bezpečnostné predpisy.
Pred namestitvijo tega proizvoda preberite Varnostne informacije.
Ennen kuin asennat tämän tuotteen, lue turvaohjeet.
Před instalací tohoto produktu si přečtěte příslušné bezpečnostní instrukcí.
在安装本产品之前,请仔细阅读 Safety Information (安全信息)。
安装本产品之前,请先阅读「安全信息」。
Before installing this product, please read the Safety Information carefully.
Bacalah informasi keselamatan dengan saksama sebelum memasang produk ini.
Vă rugăm să citiți cu atenție informațiile de siguranță înainte de a instala acest produs.
Pažljivo pročitajte bezbednosne informacije pre nego što instalirate ovaj proizvod.
Bu ürünü kurmadan önce lütfen güvenlik bilgilerini dikkatlice okuyun.
Будь ласка, уважно прочитайте інформацію про безпеку перед встановленням цього виробу.
Læse sikkerhedsforskrifterne, før du installerer dette produkt.
制品の设置の前に、安全情报をお読みください。
본 제품을 설치하기 전에 안전 정보를 읽으십시오。
Antes de instalar este producto lea la Información de seguridad.
Antes de instalar este produto, leia as Informações de Segurança.
Перед установкой продукта прочтите инструкции по безопасности.
Lees voordat u dit product installeert eerst de veiligheidsvoorschriften.
Note: This equipment is not suitable for use in locations where children are likely to be present.
iv


Chapter 1. New Member Guide
This user guide provides users with detailed operating instructions. For a quick overview of the instructions,
please refer to the Setup coloring page for brief information.
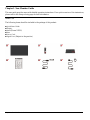
Items List
The following items should be included in the package of this product:
■Quick Start Guide
■Display
■Stand (Screw*1PCS)
■Base
■Power Cord
■Signal Line (Subject to the practice)
Chapter 1. New Member Guide 1-1

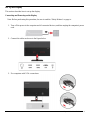
Precautions For Use
To set up your display, please refer to the following illustration.
Note: Do not touch the screen area of the display. The screen area is a glass product and can be easily
damaged by friction or pressure.
1. Place the display screen down on a soft flat surface.
2. Align the stand with the base, and then tighten the screws clockwise.
3. Insert the installed stand base into the corresponding position on the back of the monitor, and then
tighten the screws clockwise.
Note: To install the VESA mount, see "Wall-mounted (optional)" on pages 2-9.
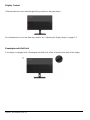
Product Overview
This section describes how to adjust the display position, set the user controls, and use the cable lock slot.
Adjustment Types
Tilt
See the figure below for an example of the tilt range.
Chapter 1. New Member Guide 1-2

Display Control
Different functions can be used through the key controls on the panel frame.
For information on how to use these key controls, see "Adjusting the Display Image" on pages 2-3.
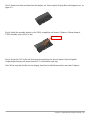
Kensington anti-theft lock
Your display is equipped with a Kensington anti-theft lock, which is located on the back of the display.
Chapter 1. New Member Guide 1-3

Set Up the Display
This section describes how to set up the display.
Connecting and Powering on the Display
Note: Before performing this procedure, be sure to read the "Safety Matters" on page iv.
1. Turn off the power to the computer and all connected devices, and then unplug the computer's power
cord.
2. Connect the cables as shown in the figure below.
3. For computers with VGA connections.
Chapter 1. New Member Guide 1-4

4. For computers with HDMI1/2 connections.
5. Connect the audio cable of the speaker and the audio jack of the monitor to transmit the audio source from
HDMI.
Note: HDMI mode audio output.
Chapter 1. New Member Guide 1-5

6. Plug the power cord into the display, and then plug the display power cord and computer cord into a
grounded power outlet.
Note: A certified power cord must be used for this equipment. The installation and/o r equipment regulations
of the country concerned should be taken into account. The certified power cable used should not be lighter
than the normal PVC cable (marked H05VV-F 3G 0.75mm2 or H05VVH2-F2 3G 0.75mm2) as specified in
IEC 60227. In addition, synthetic rubber cords as specified in IEC 60245 (marked H05RR-F 3G 0.75mm2)
should be used.
7. Use cable clamps when connecting cables
Chapter 1. New Member Guide 1-6

8. Turn on the power to the display and computer.
9. When you install the display driver, download the driver that corresponds to your display model from the
Lenovo website at http://support.lenovo.com/docs/S27i_30. To install the driver, see the "Manually Install
the Driver for the Display" section on pages 3-5.
Chapter 1. New Member Guide 1-7

Chapter 2. Adjusting and Using the Display
This section describes how to adjust and use this display.
Comfort and Assistance Functions
Good ergonomic designs are important for the comfortable use of your personal computer. Your
workplace and the equipment you use should be arranged appropriately for your personal needs and the
type of work you do. In addition, healthy work habits can help you achieve optimal efficiency and comfort
when using a computer.
Arrange Your Working Area
Use a work surface of the right height and enough work area so that you can work comfortably.
Arrange your work area according to the way you use materials and equipment. Keep frequently used
materials neatly organized in your work area, and place frequently used items (such as a computer mouse
or telephone) in an easily accessible location. The placement and setup of equipment are very important
to your work posture. The following topics describe how to optimize equipment settings to achieve and
maintain a good working posture.
Placing and Viewing the Display
For comfortable viewing of the display, the following factors should be considered when placing and
adjusting computer displays:
• Viewing Distance: The recommended viewing distance between your eyes and the display screen
is 1.5X the screen diagonal. Solutions to meet this required distance in a small office include:
keeping the desk a certain distance from the wall or partition to allow space for the display, using a
flat panel or smaller display and keeping the display in the corner of the desk, or placing the
keyboard in an adjustable drawer board to create a deeper work surface.
• Display Height: If your display is not height-adjustable, place your head and neck in a natural,
comfortable (vertical or upright) position. If your display is not height-adjustable, you can place a
book or other sturdy object under the base of the display to achieve the desired height. The general
rule is to sit comfortably with the top of the display screen at eye level or slightly lower. However,
it is important to optimize the height of the display so that the relative position between the eyes
and the center of the display provides the right visual distance and a comfortable viewing
experience when the eye muscles are relaxed.
• Tilt: Adjusting the tilt of your display optimizes the appearance of your screen content and keeps
your head and neck in the best possible position.
• Regular Location: Place the display in such a way that overhead lighting or nearby windows do
not cause glare or reflection on the screen.
Chapter 2. Adjusting and Using the Display 2-1

Here are some additional tips for comfortable viewing of your display:
• Use adequate lighting for the type of work you do.
• Use display brightness, contrast, and image controls (if available) to optimize the image on the screen for
your visual needs.
• Keep the display screen clean so that you can see the content clearly.
Long periods of focused visual activity tend to strain the eyes. Be sure to periodically move away from the
display screen and gaze at a distant object to relax your eye muscles. If you have any questions about eye
strain or visual discomfort, consult vision care professional for advice.
Tips on Healthy Work Habits
The following is a summary of some important factors that are useful to keep you comfortable and
productive while using your computer.
• Good posture comes from equipment placement: The layout of your work area and the placement
of your computer equipment can have a significant impact on your posture while using the
computer. Be sure to follow the tips listed in " Arrange Your Working Area" on pages 2-1 to
optimize the placement and orientation of your equipment so you can maintain comfortable
posture and efficiency. In addition, be sure to use the adjustment features of your computer
components and office furniture to meet your needs, and adjust them over time as your needs
change.
• Slight changes in posture help keep you comfortable: the longer you sit in front of a computer, the
more important it becomes to pay attention to your work posture. Avoid maintaining one posture
for long periods. Regular slight changes in posture can help prevent possible discomfort. Use the
adjustment function provided by office furniture or equipment to adapt to changes in posture.
• Regular short breaks help ensure healthy computing: Because computing is primarily a static
activity, it is especially important to take short breaks during the workday. Take regular breaks to
stand in front of your work area, stretch your limbs, walk around or have a drink, or otherwise take
a short break from using the computer. Taking short breaks during work allows for changes in
body posture that can help you stay comfortable and productive while working.
Accessibility Information
Lenovo is committed to providing greater access to information and technology for people with
disabilities. With assistive technologies, users with disabilities can access information most appropriate
for their specific situation. Some of these technologies are already available in the operating system;
others can be purchased through resellers or by visiting the following website:
https://lenovo.ssbbartgroup.com
Chapter 2. Adjusting and Using the Display 2-2

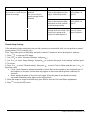
Adjusting the Display Image
This section describes the functions of the user controls used to adjust the display image.
Using Direct Access Controls
When On Screen Display (OSD) is not displayed, you can use direct access controls.
Icon
Control
Description
Power Power on / off
Menu/Confirm
Open the OSD Menu
Enter the next level menu.
Press and hold for 10s to lock or unlock the menu.
Right
Perform the corresponding shortcut function set in the OSD menu Quick
Settings.
In the OSD menu, enter the next level menu.
Left When OSD menu is opened, it serves as a return/exit
Up
Perform the corresponding shortcut functions set in the OSD menu Quick
Settings.
When OSD menu is opened, it serves to move the cursor upwards.
In the adjustment bar, it acts as a value increase
Down
Perform the corresponding shortcut functions set in the OSD menu Quick
Settings.
When OSD menu is opened, it serves to move the cursor downwards.
In the adjustment bar, it acts as a value reduction
Signal source
selection
Signal Source Selection Shortcut Keys
Press and hold for 10 seconds to enable or disable the DDC-CI function
Chapter 2. Adjusting and Using the Display 2-3

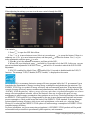
Use the On-Screen Display (OSD) Control
When adjusting the settings, you can view the user controls through the OSD.
Use controls:
1. Press to open the OSD Main Menu.
2. Use or to move between icons. Select an icon and press to access the feature. If there is a
submenu, use or to move between options, and then press to select the feature. Use or to
make adjustments, and then press to save.
3. Press to exit the submenu in sequence, and then exit the OSD.
4. When OSD is not displayed, press and hold for 10 seconds to lock the OSD. In this way, you can
prevent accidental adjustment of the OSD. Press and hold for 10 seconds to unlock the OSD for OSD
adjustment.
5. DDC/CI is enabled by default. Press and hold for 10 seconds to disable/enable the DDC/CI
function. The message "DDC/CI disable (DDC/CI enable)" is displayed on the screen.
ENERGY STAR is a consumer electronics energy efficiency program led by the U.S. government. It was
launched at the Department of Energy to reduce energy consumption and greenhouse gas emissions. The
ENERGY STAR logo is a symbol of energy efficiency and environmental protection. It has improved the
concept of energy efficiency among consumers and manufacturers, and effectively guided the market. The
“ENERGY STAR Regulations” improve energy efficiency and reduce air pollution through the use of more
energy-efficient equipment in homes, offices, and factories. One way to achieve this goal is to use
management to reduce energy consumption when products are not in use. The default settings of the monitor
are ENERGY STAR qualified. Any changes made by the user to more features and functions can increase
power consumption, which would exceed the limits of the ENERGY STAR standard. If the user changes
options related to energy efficiency while in use, such as brightness, color mode, etc., selecting Reset
Factory All or selecting the ENERGY STAR option will restore energy consumption to ENERGY STAR-
compliant energy efficiency.
For more information, see (www.enercystar.gov/products). All ENERGY STAR products will be posted
online and directly accessible to governments, public agencies, and consumers.
Chapter 2. Adjusting and Using the Display 2-4

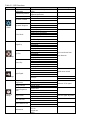
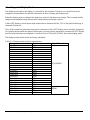
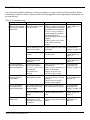
Table 2-1. OSD Functions
Main Menu
Sub-Menu
Instruction
Controls and Adjustment
Display
Control
Brightness
Adjustment
Adjust the overall brightness of the
screen
Contrast Adjustment
Adjusts the degree of difference between
bright and dark areas
Volume
Volume adjustment
Dynamic Contrast
On
Off
Dynamic Response
Off
Normal
Extremely
Color Mode
sRGB
Standard Color Temperature
Warm Color Temperature
Cool Color Temperature
User
Low Blue Light
Quick Setup
Right Key
Brightness Adjustment
Users can choose from
these shortcuts
Contrast Adjustment
Color Mode
Auto Settings
Language
Up Key
Brightness Adjustment
Contrast Adjustment
Color Mode
Auto Settings
Language
Down Key
Brightness Adjustment
Contrast Adjustment
Color Mode
Auto Settings
Language
Port Settings
Input Signal
Automatic
Signal source switch
VGA
HDMI1
HDMI2
FreeSync
Auto
Off
Advanced
Settings
Image Position
Adjustment
Horizontal position
Under the VGA signal
Vertical position
Image Settings
Automatic setting
Manual setting
Button Repetition
Rate
Default value
Slow
Off
Aspect Ratio
Full Screen
Non-16:9 signal adjustable
Original Aspect Ratio
LED Indicator
On
Off
Power Button Lock
On
Off
Information
Product Name
S27i-30
Refresh rate
100Hz

Menu Settings
Firmware
LEN0.0
Serial No.
Language
English
Français
Italiano
Simplified Chinese
Español
Japanese
Deutsch
Pусский
Українська
OSD display time
setting
5-60
Set the OSD display time
OSD position
(0-100,0-100)
Setting the OSD Location
Transparency
0-100
Setting OSD Transparency
Restore factory
settings
Factory Setup
Restore factory settings
except for language
No
Low Blue Light
Concerns on blue light affecting eye health have risen over the years. Blue light have wavelength between 300 nm to 500
nm. The monitors under default setting modereduce blue light emissions. The monitors achieve the requirement of Low blue
Light (Hardware Solution).
Chapter 2. Adjusting and Using the Display 2-6

Select Supported Display Modes
The display mode used by the display is controlled by the computer. Therefore, you should refer to the
computer's documentation for detailed information on how to change the display mode.
When the display mode is changed, the image size, position, and shape may change. This is normal and the
image can be readjusted using the automatic image settings and image controls.
Unlike CRT displays, which require high refresh rates to minimize flicker, LCD or flat panel technology is
inherently flicker-free.
Note: If the system has previously been used in conjunction with a CRT display and is currently configured
for a display mode outside the range of that display, you may need to temporarily reconnect the CRT display
until the system has been reconfigured; it is best to set it to 1920x1080 (100Hz), the normal display mode.
The display modes shown below are factory optimized.
Table 2-2. Display modes set by the manufacturer
Timing sequence
Refresh rate
Signal Channel
640×480
60Hz
VGA/HDMI
640×480
72Hz
640×480
75Hz
720×400
70Hz
800×600
56Hz
800×600
60Hz
800×600
72Hz
800×600
75Hz
832×624
75Hz
1024×768
60Hz
1024×768
70Hz
1024×768
75Hz
1152×864
75Hz
1280×1024
60Hz
1280×1024
70Hz
1280×1024
75Hz
1440×900
60Hz
1600×900
60Hz
1680×1050
60Hz
1920×1080
60Hz
1366×768
60Hz
HDMI
1600×900
75Hz
1920×1080
75Hz
1920×1080
100Hz
Chapter 2. Adjusting and Using the Display 2-7
Pagina se încarcă...
Pagina se încarcă...
Pagina se încarcă...
Pagina se încarcă...
Pagina se încarcă...
Pagina se încarcă...
Pagina se încarcă...
Pagina se încarcă...
Pagina se încarcă...
Pagina se încarcă...
Pagina se încarcă...
Pagina se încarcă...
Pagina se încarcă...
Pagina se încarcă...
-
 1
1
-
 2
2
-
 3
3
-
 4
4
-
 5
5
-
 6
6
-
 7
7
-
 8
8
-
 9
9
-
 10
10
-
 11
11
-
 12
12
-
 13
13
-
 14
14
-
 15
15
-
 16
16
-
 17
17
-
 18
18
-
 19
19
-
 20
20
-
 21
21
-
 22
22
-
 23
23
-
 24
24
-
 25
25
-
 26
26
-
 27
27
-
 28
28
-
 29
29
-
 30
30
-
 31
31
-
 32
32
-
 33
33
-
 34
34


Lenovo ThinkVision S27i-30 Manualul utilizatorului
- Categorie
- Televizoare
- Tip
- Manualul utilizatorului
în alte limbi
Alte documente
-
Eizo EV2456 Manual de utilizare
-
Eizo S1933 Manual de utilizare
-
-
-
-
Gigabyte GS32QC Manual de utilizare
-
BenQ MX661 Manual de utilizare
-
 Radiforce MX242W Manualul proprietarului
-
-
Eizo FDF2382WT Manual de utilizare
