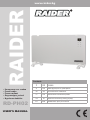
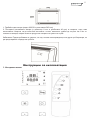
Raider Power Tools RD-PH02 Manual de utilizare
- Tip
- Manual de utilizare

USER’S MANUAL
www.raider.bg
RAIDER
Contents
2 BG схема
3 BG инструкция за употреба
10 EN instructions’ manual
17 RO manualul de instrucțiuni
24 EL πρωτότυπο οδηγιών χρήσης
32 ALB udhëzime për përdorim
RD-PH02
• Конвектор със стойка
• Panel heater
• Panou radiant
• Θερμαντήρας πάνελ
• Ngrohese elektrike

2www.raider.bg
Прочетете ръководството преди употреба!
Refer to instruction manual booklet!
BG Снимките са с илюстративна цел. Изобразеният модел може да не е напълно идентичен със закупената от вас машина.
EN The pictures are for illustration purpose. The pattern shown may not be exactly the same as the machine you purchased.
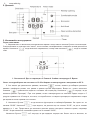
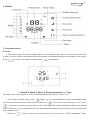
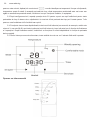
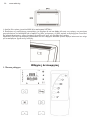
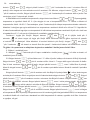
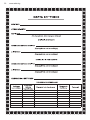
BG
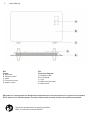
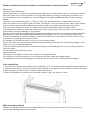
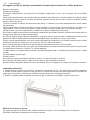
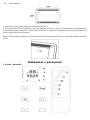
Схема
A: Дисплей
B: Преден панел
C: Крак
D: Стенен монтаж
E: Заден панел
EN
Structure diagram
A: Display-board
B: Front panel
C: Foot
D: Wall-mounted parts
E: Back panel

3
Оригинална инструкция за употреба
Уважаеми потребители,
Поздравления за покупката на машина от най-бързо развиващата се марка за електрически,
бензинови и пневматични машини - RAIDER. При правилно инсталиране и експлоатация, RAIDER са
сигурни и надеждни машини и работата с тях ще Ви достави истинско удоволствие. За Вашето удобство
е изградена и отлична сервизна мрежа с 45 сервиза в цялата страна.
Преди да използвате тази машина, моля, внимателно се запознайте с настоящата “Инструкция за
употреба”.
В интерес на Вашата безопасност и с цел осигуряване на правилната й употреба, прочетете
настоящите инструкции внимателно, включително препоръките и предупрежденията в тях. За избягване
на ненужни грешки и инциденти, важно е тези инструкции да останат на разположение за бъдещи
справки на всички, които ще ползват машината. Ако я продадете на нов собственик то “Инструкцията
за употреба” трябва да се предаде заедно с нея, за да може новия ползвател да се запознае със
съответните мерки за безопасност и инструкциите за работа.
“Евромастер Импорт Експорт” ООД е упълномощен представител на производителя и собственик на
търговската марка RAIDER. Адресът на управление на фирмата е гр. София 1231, бул. “Ломско шосе”
246, тел. 02 934 33 33, 934 10 10, www.raider.bg; www.euromasterbg.com; e-mail: info@ euromasterbg.com.
От 2006 година във фирмата е въведена системата за управление на качеството ISO 9001:2008 с
обхват на сертификацията: Търговия, внос, износ и сервиз на професионални и хоби електрически,
пневматични и механични инструменти и обща железария. Сертификатът е издаден от Moody
International Certication Ltd, England.
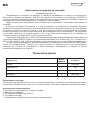
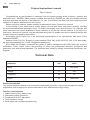
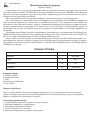
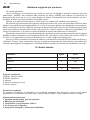
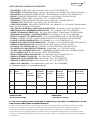
Технически данни
Параметър Мерна
единица Стойност
Модел -RD-PH02
Напрежение: V230
Честота Hz 50
Мощност W 1000-2000
Представяне на продукт
Този продукт има функции както за лъчист, така и за конвекторен топлообмен , той може бързо да повиши
вътрешната температура и е супер тих, без открит пламък, безопасен, ефективен и енергоспестяващ.
Функционални характеристики
1. Нагревателят загрява бързо, готов за употреба
2. Защита от прегряване
3. Регулируема температура 10-49º C
4. Три режима за избор
5. Седемдневно потребителско интелигентно програмиране
BG

4www.raider.bg
Моля, прочетете внимателно това ръководство с инструкции, преди да използвате
продукта
Правила за безопасност
Експлоатация и поддръжка
Непрофесионалисти или неоторизиран персонал по поддръжката нямат право да ремонтират или
модифицират машината.
Когато захранващият кабел е износен/наплетен или щепселът е повреден, незабавно спрете да го
използвате, захранващият кабел трябва да бъде заменен от производителя, негов сервизен агент или
лица с подобна квалификация, за да се избегне опасност.
Типът връзка на захранващия кабел е тип Y, потребителят не може да разглобява или подменя
захранващия кабел.
Когато машината е в нормална или неактивна употреба, дръжте я на повече от 1,5 m от вода и огън,
почиствайте я с влажна кърпа. За да се предотврати разпръскване на вода, продуктът не трябва да се
мие директно с водопроводни тръби.
Използвайте само заземен електрически контакт, нагревателят не може да се поставя директно под
електрическия контакт.
Забранено е на деца да вкарват метална жица или други чужди предмети в отворите на машината, за
да избегнат токов удар и повреда на машината.
Не използвайте машината в близост до запалими и експлозивни предмети или в подобна среда.
Нагревателите трябва да се държат далеч от топлинно деформиращи се/обезцветени/развалящи се
предмети. Не използвайте в силно запрашени зони.
За да избегнете прегряване, е строго забранено покриването на нагревателя. Не използвайте предмети,
за да блокирате вентилационните отвори в нагревателя и не пъхайте нищо във вентилационния отвор.
Забранено е удължаването на захранващия кабел или използването му в мобилен контакт.
Включете захранващия кабел, моля, проверете дали номиналното напрежение на този продукт
съответства на напрежението във вашия дом, ако не, не използвайте уреда.
Почиствайте машината с влажна кърпа, навлажнена с вода или мек почистващ препарат, не използвайте
силни разтворители и не изплаквайте с вода.
Не потапяйте машината във вода.
Използвайте среда
Този продукт е подходящ за употреба на закрито, не трябва да се използва на открито.
Забранено е използването на тази машина в среда със запалими и експлозивни газове.
Уредът трябва да се постави далеч от източници на топлина като печки и да се избягва пряка слънчева
светлина.
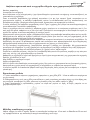
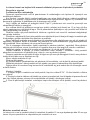
Монтаж на крака
1. Обърнете тялото на машината с главата надолу, извадете трите ST4 * 12 винта и крачетата, доставени
с уреда.
2. Подравнете отворите за винтове на краката с монтажните отвори в долната част на задния корпус и
след това вкарайте винтовете през кръглите отвори в краката, затегнете винтовете.
3. След като инсталацията приключи, завъртете тялото и го обърнете надясно, можете да го използвате
сега.
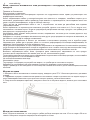
Метод на стенен монтаж
Моля, обърнете внимание, че този продукт трябва да бъде монтиран на поне 15 см от пода и 50 см от
тавана. Извършете следната операция за монтиране на стена.

5
1. Пробийте два отвора (модел 2000 W с разстояние 545 mm)
2. Поставете доставените анкери (с диаметър 8 mm и дълбочина 40 mm) в отворите, след това
използвайте отвертка, за да затегнете винтовете с котви, винтовете трябва да стърчат на 6 mm от
главата на анкера, накрая окачете продукта в отворите на куките на гърба.
Забележка: Преди пробиване се уверете, че под стената няма проводници или други тръбопроводи, за
да предотвратите повреда на тръбите.
Инструкции за експлоатация
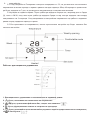
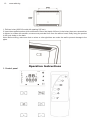
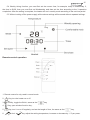
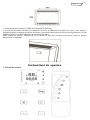
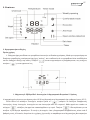
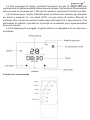
1. Контролен панел

6www.raider.bg
2. Дисплей
3. Използвайте инструкциите
Първо използване
1. Нагревателят се включва в електрическата мрежа и след това се натиска бутонът за включване.
След включване се чува звук като “капка”, което показва, че захранването е свързано и няма дисплей на
екрана. Натиснете “ “, за да включите нагревателя, и след това натиснете “ “, за да се покаже
това:
1. Отопление 2. Ден от седмицата 3. Режим 4. Стайна температура 5. Време
Часът по подразбиране на системата е 12:30 в Неделя и температурата е настроена на 25 °C.
2. Ако искате да превключите режима, натиснете “ “ отново, можете да изберете различни
режими: комфортен режим, еко режим и режим против замръзване; Всеки път, когато натиснете
клавиша “ “, превключете веднъж и оставате на същия ред; Натиснете “ “ 3 секунди, за да
включите режим “Прозорец”. При този режим, когато температурата на околната среда спадне с 5
градуса в рамките на 10 минути, се счита, че потребителят е отворил прозореца и нагревателят спира
да загрява и влиза в режим на готовност.
3. Натиснете бутона “ “, за да включите функцията за таймер/отброяване. За първи път се
показва “00:00”. Натиснете “ “ още веднъж, на дисплея ще се покаже “01:00”, за да се покаже
времето от 1 час. Продължете да натискате дисплея докато настроите исканото време, например
“02:00”. За да изключите, натискайте докато не се покаже “24:00”;
Натиснете бутона “ “ за 3 секунди, за да зададете текущия час. Когато часът е включен, по

7
подразбиране е 12:30. Може да се настрои според действителното време. След първото продължително
натискане за 3 секунди, броят на часовете започва да мига, което показва, че текущото време може
да бъде настроено. Можете да настроите часа, като натиснете бутона “ “ или “ “, натиснете
отново бутона “ “ за 3 секунди и числото на минутата започва да мига, което показва, че текущият
час може да бъде настроен. За Минутите натиснете бутона “ “ или “ “, за да зададете минутата;
Натиснете бутона “ “ отново за 3 секунди, за да зададете деня от седмицата. След настройката
изчакайте 5 секунди, за да излезете.
4. Ако искате да зададете температура, натиснете бутона за настройка “ “ или “ “. По
подразбиране температурата на нагревателя е 20° C. С всяко натискане увеличавате или намалявате
температурата с 1° C. Обхватът на настройка на температурата е: 10- 49° C. След настройка изчакайте
5 секунди, за да се покаже текущата стайна температура.
Режимът за защита от замръзване е включен, когато температурата на околната среда е по-ниска от
5° C. Нагревателят автоматично ще включи отоплението на ниска температура, докато температурата
на околната среда не бъде по-висока или равна на 9 °C, тогава се връща в режим на готовност.
Функция за заключване от деца: Натиснете едновременно бутоните “ “ и “ “ за 3 секунди.
“ “ на дисплея показва, че защитата за деца е включена и всички операции на панела за управление
ще бъдат неуспешни. Ако искате да отмените заключването за деца, натиснете “ “ и “ “ за 3
секунди. “ “ на екрана на дисплея изгасва и операционният панел се връща към нормална работа.
Всички горепосочени 1-4 операции се извършват, когато режимът за седмично време е
изключен.
5. Настройка на седмичен режим
5.1 Задръжте “ “ 3 секунди, за да отворите режима за седмично време, “ “ на дисплея
светва, в режим на седмично време;
5.2 Натиснете веднъж бутона “ “ и цифрата “1” на деня от седмицата, показана на дисплея,
ще започне да мига. Натиснете бутона “ “ или “ “, за да зададете деня. Числото 1-7 показва
дните от Понеделник до Неделя. След като зададете точния ден от седмица, натиснете отново бутона
“ “, номерът на деня започва да мига. Можете да натиснете бутона “ “ или “ “, за да
зададете периода от време. Може да зададе 6 периода от време.
Натиснете отново бутона “ “, за да настроите часовете. Те започват да мигат, а “ “ свети,
което показва, че времето за настройка на началото на отоплението може да бъде зададено чрез
натискане на бутона “ “ или “ “; Натиснете отново бутона “ “, за да насторите броят
на минутите. Те започват да мигат. Натиснете бутона “ “ или “ “, за да настроите минутите.
Натиснете бутона “ “ отново, броят на часовете мига отново, В същото време “ “ светлината
показва отново настройката за време за изключване на отоплението. Натиснете бутона “ “ или
“ “, за да зададете часа; Натиснете отново бутона “ “, за да покаже, че броят на минутите
започва да мига. Натиснете бутона “ “ или “ “, за да настроите минутите; Натиснете отново
бутона “ “, номерът на дисплея на температурата започва да мига, температурата може да се
настрои през този период от време, когато температурата на околната среда е по-висока или равна на
тази зададена температура, нагревателят ще изключи функцията за отопление, в в готовност.

8www.raider.bg
5.3 След настройка в Понеделник повторете операцията от 5.2, за да включите или изключите
нагревателя за всички периоди от време в рамките на една седмица. Общо 42 периода от време могат
да бъдат зададени за 7 дни, за да настроите нагревателя да се нагрява или изключва.
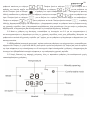
5.4 Функция за седмично време. Първо трябва да зададете текущия час, например днес е Сряда
(3), часът е 08:30, след това първо трябва да зададете Сряда и след това да зададете часа според
завършването на 3 операция. След завършване на настройката нагревателят ще работи в седмичен
режим според зададения период от време.
5.5 Без прекъсване на захранването, всички горепосочени настройки ще бъдат запазени без
повторни настройки.
Работа с дистанционно управление
1. Дистанционното управление се използва само в нормален режим
2. бутон, включване или изключване на нагревателя
3. бутон, превключва файловия бит, същият като клавиша “ ”.
4. бутон, функционален клавиш за отваряне на прозореца.
5. бутон, включвайте го или изключвайте редовно и задайте продължителността на времето,
същото като бутона “ “.

9
6. и бутони, регулирайте зададената температура, увеличете или намалете с 1
°C на натискане.
Предпазни мерки
1. Прочетете ръководството на продукта, преди да използвате нагревателя, и следвайте инструкциите
в това ръководство.
2. Когато използвате нагревателя, той трябва да бъде поставен стабилно, моля, не преобръщайте и не
накланяйте уреда, когато се използва.
3. Не използвайте машината в близост до запалими и експлозивни предмети или в подобна среда.
Нагревателите трябва да се държат далеч от топлинно деформиращи се/обезцветени/развалящи се
предмети. Не използвайте в силно запрашени зони.
4. Забранено е използването на нагревателя на място, където висящ предмет е лесен за изпускане, и е
забранено използването на нагревателя на място, подложено на удар или с нестабилно разположение.
5. Забранено е покриването на нагревателя, когато се използва: Строго е забранено използването на
предмети за блокиране на входа или изхода на въздуха на нагревателя, не поставяйте никакви неща
вътре в машината през отвора на тялото. Строго е забранено да вмъквате проводници или други чужди
предмети в отворите на машината, за да избегнете инцидент с токов удар.
6. Не използвайте нагревателя около басейна.
7. Когато използвате нагревателя, захранващият кабел трябва да бъде поставен в задната част на
тялото, поставянето му пред тялото ще го накара да прегрее или да го повреди или дори да причини
инцидент, свързан с безопасността.
8. Забранено е директното включване или изваждане на захранващия кабел за включване и изключване
на уреда.
9. Забранено е използването на този нагревател като оборудване за запазване на топлината за животни
и растения.
10. Не включвайте други мощни електрически уреди в същия контакт. Нагревателят не трябва да се
намира непосредствено под контакт.
11. Децата, възрастните хора или пациентите, които нямат възможност да се обслужват сами, трябва
да бъдат обгрижвани, когато са без надзор, а нагревателите трябва да бъдат изключени, когато са без
надзор.
12. Не дърпайте директно захранващия кабел, за да преместите уреда.
13. Ако нагревателят се повреди, незабавно го изключете и извадете захранващия кабел, изпратете го
в най-близкия сервизен център за професионален ремонт.
14. Ако захранващият кабел е повреден, използвайте само същия тип захранващ кабел като
оригиналния за подмяна. Захранващият кабел трябва да бъде сменен от производителя или негов
оторизиран сервизен агент.
Почистване и поддръжка
1. Преди почистване и поддръжка първо изключете захранващия кабел, изключете захранването,
оставете устройството да се охлади за 10 минути преди почистване.
2. Не изплаквайте корпуса на уреда с вода, леко го избършете с мека кърпа, съдържаща малко
количество неутрален почистващ препарат, след което подсушете. Не използвайте разтворители като
бензин.
3. След почистване и поддръжка изчакайте, докато уредът изсъхне напълно, преди да го използвате
или свържете към захранването.
4. Моля, изключете щепсела от контакта, когато не го използвате, за да избегнете прах, покрийте уреда
с найлонова торбичка. Най-добре е да използвате оригиналните опаковъчни торби, за да съхранявате
уреда на сухо място.
Опазване на околната среда. С оглед опазване на околната среда електроинструментът, допълнителните
приспособления и опаковката трябва да бъдат подложени на подходяща преработка за повторното използване на
съдържащите се в тях суровини.Не изхвърляйте електроинструменти при битовите отпадъци! Съгласно Директивата на ЕС
2012/19/EC относно излезлите от употреба електрическ и и електронни устройства и утвърждаването и като национален
закон електроинструментите, които не могат да се използват повече, трябва да се събират отделно и да бъдат подлагани на
подходяща преработка за оползотворяване на съдържащите се в тях вторични суровини.

10 www.raider.bg
Original instructions’ manual
Dear Customer,
Congratulations on the purchase of machinery from the fastest growing brand of electric, gasoline and
pneumatic tools - RAIDER. When properly installed and operating, RAIDER are safe and reliable machines
and work with them will deliver a real pleasure. For your convenience has been built and excellent service
network of 45 service stations across the country.
Before using this machine, please carefully acquainted with these “instructions’ manual”.
In the interest of your safety and to ensure proper use and read these instructions carefully, including
the recommendations and warnings in them. To avoid unnecessary errors and accidents, it is important that
these instructions will remain available for future reference to all who will use the machine. If you sell it to a
new owner “Instructions’ manual” must be submitted along with it to enable new users to become familiar with
relevant safety and operating instructions.
Euromaster Import Export Ltd. is an authorized representative of the manufacturer and owner of the
trademark RAIDER.
Address: Soa City 1231, Bulgaria “Lomsko shausse” Blvd. 246, tel 02 934 33 33, 934 10 10, www.raider.
bg; www.euromasterbg.com; e-mail: [email protected].
Since 2006 the company introduced the system of quality management ISO 9001:2008 with scope of
certication: Trade, import, export and servicing of hobby and professional electrical, mechanical and
pneumatic tools and general hardware. The certicate was issued by Moody International Certication Ltd,
England.
Technical Data
parameter unit value
Model -RD-PH02
Voltage V230
Frequency Hz 50
Power W 1000-2000
Product introduction
This product has both radiation and convection heat transfer functions, it can quickly increase the indoor
temperature, and is super-quiet, without open ame, safe, ecient and energy saving.
Function characteristics
1. Heater heats quickly, ready to use
2. Overheating safety protection
3. Temperature 10-49ºC adjustable
4. Three modes to choose
5. Seven days user intelligent programming
EN

11
Please read this instruction manual carefully before using the product
Safety rules
Operation and maintenance
Non-professionals or unauthorized maintenance personnel are not allowed to repair or modify the machine.
When the power cord is worn/ knotted or the plug is damaged, stop using it immediately, the power cord
must be replaced by the manufacturer, its service agent or similarly qualied persons in order to avoid a
hazard.
The power cord connection type is Y -Type, the user may not disassemble or replace the power cord.
When the machine is in normal or idle use, keep it more than 1.5m from water and re, clean it with a damp
cloth. In order to prevent water-splashing, the product shall not be directly washed with water pipes.
Only use a grounded power outlet, the heater cannot be placed directly under the power outlet.
It is forbidden for children to insert any metal wire or other foreign matter into any holes in the machine to
avoid electric shock and damage to the machine.
Do not use the machine near ammable and explosive objects or in similar environment. Heaters should be
kept away from heat- deformable/discolored/deteriorating objects. Do not use in areas with heavy dust.
To avoid overheating, it is strictly forbidden to cover the heater. Do not use objects to block the air vents in
the heater or plug anything into the vent-hole.
It is forbidden to extend the power cord or use it on a mobile socket.
Plug in the power cord, please check whether the rated voltage of this product matches the voltage in your
home, if not, do not use the appliance.
Clean the machine with damp cloth moistened with water or mild detergent, do not use strong solvents or
rinse with water.
Do not immerse the machine in water.
Use environment
This product is suitable for indoor use, it should not be used outdoors.
It is forbidden to use this machine in an environment with ammable and explosive gas.
The appliance should be placed away from heat sources such as stoves, and avoid direct sunlight.
Foot installation
1. Turn the machine-body upside down, take out the three ST4 * 12 screws and feet supplied with the appliance.
2. Align the screw holes on the feet with the mounting holes on the bottom of the rear case, and then insert the
screws through the circular holes in the feet, tighten the screws.
3. After the installation is complete, turn the body and ip it right, you can use it now.
Wall mounting method
Please note that this product must be installed at least 15 cm from the oor and 50 cm from the ceiling.
Perform the following wall mount operation.

12 www.raider.bg
1. Drill two holes (2000 W model with spacing 545 mm)
2. Insert the supplied anchors (with a diameter of 8mm and depth of 40mm) in the holes, then use a screwdriver
to tighten in screws with anchors, screws must protrude 6mm from the anchor head, nally hang the product
in the hook holes on the back.
Note: Before drilling, make sure that no wires or other pipelines are under the wall to prevent damage to the
pipes.
Operation Instructions
1. Control panel

13
2. Display
3. Use instructions
First use
1. The heater plugs in the power supply and turns on the power switch. After turning on the power switch,
a “drop” sound is issued, indicating that the power supply is connected and there is no display on the screen.
Press “ “ to turn on the heater, and then press “ “ to display as:
1. Heated 2. Week 3. Mode 4. Room temperature 5. Time
The default time of the system is 12:30 on Sunday and the temperature is set to 25 °C.
2. If you want to switch mode, press “ “ again, you can choose dierent modes: comfortable mode,
eco mode and anti-frost mode; Each time you press the “ “ key, switch once, and loop in turn; Press “
“ 3 seconds to open the window mode. In this mode, when the ambient temperature drops by 5 degrees
within 10 minutes, it is considered that the user has opened the window and the heater will stop heating and
enter standby mode.
3. Press the “ “ button to turn on the timing function. For the rst time, “00:00” is displayed. Press “

14 www.raider.bg
“ once again ,the display as “01:00” to indicate the timing of 1 hour. Continue to analogy the display as
“02:00”. Press once again to shut down when displayed as “24:00”;
Press the “ “ key for 3 seconds to set the current time. When the time is turned on, the default is 12:30.
It can be set according to the actual time.
After the rst long press 3 seconds, the number of hours begins to ash, indicating that the current time
can be designed. You can set the hour by pressing the “ “ or “ “ key, press the “ “ key again
for 3 seconds, and the number at the minute begins to ash, indicating that the current time can be set. The
minute, Press the “ “ or “ “ key to set the minute; Press the “ “ key again for 3 seconds, to set
the week. After setting, wait 5 seconds to exit.
4. If you want to set the temperature, press the “ “ or “ “ key setting, the heater boot setting
temperature is 20 °C by default, each time press 1 °C increase or decrease, the temperature setting range is:
10-49 °C; After setting, wait 5 seconds to show the current ambient temperature.
When the frost-proof mode is turned on, when the ambient temperature is detected to be less than 5 °C,
the heater will automatically turn on the low-gear heating until the ambient temperature is turned o and heated
when it is greater than or equal to 9 °C, returning to standby.
Child lock function: Press the “ “ and “ “ keys at the same time for 3 seconds. The “ “ in the
display shows that the child lock is turned on and all operations on the operating panel will fail. If you want to
cancel the child lock, press “ “ and “ “ for 3 seconds. The “ “ in the display screen goes out and the
operating panel returns to normal operation. All of the above 1-4 operations are performed when the weekly
timing mode is turned o.
5. Weekly mode opening and setting
5.1 Long press “ “ 3 seconds to open the weekly timing mode, “ “ in the display light up, into
the weekly timing mode;
5.2 In weekly mode, press the “ “ button once, and the number “1” of the week displayed on the
display will start to ash. Press the “ “ or “ “ button to set the week. The number 1-7 indicates
Monday to Sunday. After setting a good week, press the “ “ key again, the number of the display period
begins to ash, you can press the “ “ or “ “ key to set the time period, a day can set 6 time period;
Press the “ “ key again to show that the number of hours begins to ash, and the “ “ is lit, indicating that
the time for setting the start of heating can be set by pressing the “ “ or “ “ key; Press the “ “ key
again to show that the number of minutes begins to ash. Press the “ “ or “ “ key to set the minute;
Press the “ “ button again, the number of hours ashes again, At the same time “ “ light upindicate the
time setting for heating o ,Press the “ “ or “ “ button to set the hour; Press the “ “ key again to
show that the number of minutes begins to ash. Press the “ “ or “ “ key to set the minute; Press the
“ “ button again, the temperature display number begins to ash, the temperature can be set during this
period of time, when the ambient temperature is greater than or equal to this set temperature, the heater will
turn o the heating function, into standby.
5.3 After setting up Monday, repeat the operation of 5.2 to set the heater on or o for all periods of time
within one week. A total of 42 time periods can be set up for 7 days to set the heater to be heated or turned o.

15
5.4 Weekly timing function, you must rst set the current time, for example, today is Wednesday 3,
the time is 08:30, then you must rst set Wednesday, and then set the time according to the 3 operation
completion. After the setting is complete, the heater will run in weekly mode according to the set time period.
5.5 Without cutting o the power supply, all the above settings will be saved without repeated settings.
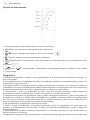
Remote control operation
1. Remote control is only used in normal mode
2. Key, turn the heater on or o
3. Key, toggle the le bit, same as the “ ” key.
4. Key, open window function key .
5. Key, turn it on or o regularly, and set the length of time, the same as the “ “ key.
6. And key, adjust the setting temperature, increase or decrease by 1 °C per press.

16 www.raider.bg
Precautions
1. Read the product manual before using the heater, and follow the instructions in this manual.
2. When using the heater, it should be placed steady, please do not overturn or tilt the appliance when in
use.
3. Do not use the machine near ammable and explosive objects or in similar environment. Heaters should
be kept away from heat- deformable/discolored/deteriorating objects. Do not use in areas with heavy dust.
4. It is forbidden to use the heater in a place where a hanging object is easy to drop, and it is forbidden to
use the heater in a place under shock or with an unstable placement.
5. It is forbidden to cover the heater when in use: It is strictly forbidden to use objects to block the air inlet
or outlet of the heater, do not put any stu inside the machine through the hole of the body. It is strictly
forbidden to insert wires or other foreign objects into any holes in the machine to avoid electric shock
accident.
6. Do not use the heater around the pool.
7. When using the heater, the power cord should be placed in the back of the body, placing in front of the
body will make it overheating or damaged, or even cause a safety accident.
8. It is forbidden to plug or unplug the power cord directly to switch on and o the appliance.
9. It is forbidden to use this heater as heat preservation equipment for animals and plants.
10. Do not plug other high-power electrical appliances into the same power outlet. The heater must not be
located immediately below a socket outlet.
11. Children, the elderly or patients who do not have the ability to take care of themselves should be taken
care of when they are unattended, and the heaters must be turned o when unattended.
12. Do not pull the power cord directly to move the appliance.
13. If the heater fails, immediately shut it down and unplug the power cord, send it to the nearest service
center for professional repair.
14. If the power cord is damaged, use only the same type of power cord as the original for replacement. The
power cord must be replaced by the manufacturer or its authorized service agent.
Cleaning and maintenance
1. Before cleaning and maintenance unplug the power cord rstly, disconnect the power, let the unit cool for
10 minutes before cleaning.
2. Do not rinse the appliance body with water, lightly wipe it with a soft cloth containing a small amount of
neutral detergent, then wipe dry. Do not use solvents such as gasoline.
3. After cleaning and maintenance wait until the appliance becomes fully dry before using or connection to
power.
4. Please unplug the power plug from the socket when not in use, to avoid dust cover the appliance with a
plastic bag. It is best to use the original packaging bags to store the unit in a dry place.
Environmental protection. In order to protect the environment, the power tool, accessories and packaging
must undergo appropriate processing for the reuse of the raw materials contained in them. Do not dispose
of power tools with household waste! According to the EU Directive 2012/19/EC on end-of-life electrical and
electronic equipment and the approval and as a national law, power tools that can no longer be used must be
collected separately and subjected to appropriate processing to recover the contents are in them secondary
raw materials.

17
Stimate prieten,
Felicitări pentru achiziţionarea unui ciocan rotopercutor de la marca cu cea mai rapidă creştere pe scule
electrice si pneumatice - Raider. Cu o instalare si operare corecta, produsele Raider sunt echipamente sigure,
abile şi lucrul cu ele vă va oferi o adevarata placere. Pentru confort si servicii excelente am construit o reţea de
service-uri pe întreg teritoriul ţării.
Înainte de a utiliza acest produs, vă rugăm să citiţi cu atenţie “manualul de utilizare”. În interesul siguranţei
şi pentru a asigura utilizarea corectă, citiţi cu atenţie aceste instrucţiuni, inclusiv recomandările şi avertismentele
pentru ele. Pentru a evita greşelile inutile şi accidentele, este important ca aceste instrucţiuni să rămână disponi-
bile pentru referinţe viitoare tuturor celor care vor utiliza aparatul. Daca vindeti produsul “manualul de utilizare”
trebuie predat noului proprietar, astfel incat acesta sa e familiarizat cu masurile de siguranta si instructiunile de
utilizare. “Euromaster Import Export” SRL este un reprezentant autorizat al producătorului şi proprietar al marcii
Raider. Adresa companiei este Soa 1231, B-dul “Lom Road” 246, tel 02 934 33 33 934 10 10, www.raider.bg;
www.euromasterbg.com, e-mail: info @ euromasterbg. com
Începând cu anul 2006, compania a introdus un sistem de management al calităţii ISO 9001:2008 de certi-
care cu domeniul de aplicare: instrumente de comerţ, import, export şi de servicii profesionale si hobby elec-
trice, pneumatice şi de putere şi hardware-ul general. Certicatul a fost emis de catre Moody International de
Certicare Ltd, Anglia.
Date tehnice
parametru unitate valoare
Model -RD-PH02
Voltaj V230
Frecvență Hz 50
Putere W 1000-2000
Diagrama structurii
A: Placă de așare
B: Panoul frontal
C: Picior
D: Piese montate pe perete
E: Panoul din spate
Introducerea Produsului
Acest produs are atât funcții de transfer de căldură prin radiație, cât și prin convecție, poate crește rapid
temperatura interioară și este super-liniștit, fără acără deschisă, sigur, ecient și economisește energie.
Caracteristicile funcției
1. Încălzitorul se încălzește rapid, gata de utilizare
2. Protecție de siguranță la supraîncălzire
3. Temperatura 10-49º C reglabila
4. Trei moduri de ales
5. Șapte zile de programare inteligentă pentru utilizator
RO

18 www.raider.bg
Vă rugăm să citiți cu atenție acest manual de instrucțiuni înainte de a utiliza produsul
Reguli de siguranță
Operare și întreținere
Personalul neprofesionist sau personal de întreținere neautorizat nu are voie să repare sau să modice
mașina.
Când cablul de alimentare este uzat/înnodat sau ștecherul este deteriorat, încetați imediat să îl utilizați, cablul
de alimentare trebuie înlocuit de către producător, agentul său de service sau persoane calicate similare
pentru a evita un pericol.
Tipul de conectare a cablului de alimentare este de tip Y, utilizatorul nu poate dezasambla sau înlocui cablul
de alimentare.
Când mașina este în utilizare normală sau inactiv, păstrați-o la mai mult de 1,5 m de apă și foc, curățați-o cu o
cârpă umedă. Pentru a preveni stropirea cu apă, produsul nu trebuie spălat direct cu conducte de apă.
Utilizați numai o priză cu împământare, încălzitorul nu poate plasat direct sub priza.
Este interzis copiilor să introducă orice sârmă metalică sau alte materii străine în oriciile din mașină pentru a
evita șocurile electrice și deteriorarea mașinii.
Nu utilizați mașina lângă obiecte inamabile și explozive sau în medii similare. Încălzitoarele trebuie ținute
departe de obiecte deformabile termic/decolorate/deteriorate. Nu utilizați în zone cu praf intens.
Pentru a evita supraîncălzirea, este strict interzisă acoperirea încălzitorului. Nu folosiți obiecte pentru a bloca
oriciile de aerisire din încălzitor și nu introduceți nimic în oriciul de aerisire.
Este interzisă prelungirea cablului de alimentare sau utilizarea acestuia la o priză mobilă.
Conectați cablul de alimentare, vă rugăm să vericați dacă tensiunea nominală a acestui produs se potrivește
cu tensiunea din casa dvs., dacă nu, nu utilizați aparatul.
Curățați mașina cu o cârpă umedă umezită cu apă sau detergent slab, nu utilizați solvenți puternici și nu clătiți
cu apă.
Nu scufundați mașina în apă.
Utilizați mediul
Acest produs este potrivit pentru utilizare în interior, nu trebuie utilizat în aer liber.
Este interzisă utilizarea acestei mașini într-un mediu cu gaz inamabil și exploziv.
Aparatul trebuie amplasat departe de surse de căldură, cum ar aragazul, și evitați lumina directă a soarelui.
Instalarea piciorului
1. Întoarceți corpul mașinii cu susul în jos, scoateți cele trei șuruburi ST4 * 12 și picioarele furnizate cu aparatul.
2. Aliniați oriciile pentru șuruburi de pe picioare cu oriciile de montare din partea inferioară a carcasei din
spate, apoi introduceți șuruburile prin oriciile circulare din picioare, strângeți șuruburile.
3. După ce instalarea este completă, întoarceți corpul și întoarceți-l la dreapta, îl puteți utiliza acum.
Metoda de montare pe perete
Vă rugăm să rețineți că acest produs trebuie instalat la cel puțin 15 cm de podea și 50 cm de tavan.
Efectuați următoarea operațiune de montare pe perete.

19
1. Faceți două găuri (model de 2000 W cu distanță de 545 mm)
2. Introduceți ancorele furnizate (cu diametrul de 8mm și adâncimea de 40mm) în găuri, apoi folosiți o
șurubelniță pentru a strânge șuruburile cu ancore, șuruburile trebuie să iasă cu 6mm din capul ancorei, în nal
agățați produsul în oriciile cârligului de pe partea din spate.
Notă: Înainte de găurire, asigurați-vă că nu există re sau alte conducte sub perete pentru a preveni
deteriorarea conductelor.
Instrucțiuni de operare
1. Panou de control

20 www.raider.bg
2. Așare
3. Folosiți instrucțiuni
Prima utilizare
1. Încălzitorul conectează sursa de alimentare și pornește întrerupătorul de alimentare. După pornirea
comutatorului de alimentare, se emite un sunet de „scădere”, care indică faptul că sursa de alimentare este
conectată și nu există niciun așaj pe ecran.Apăsați “ “ pentru a porni încălzitorul, apoi apăsați “ “
pentru a așa ca:
1. Încălzit 2. Săptămâna 3. Mod 4. Temperatura camerei 5. Ora
Ora implicită a sistemului este 12:30 duminica, iar temperatura este setată la 25 °C.
2.Dacă doriți să comutați modul, apăsați din nou “ “, puteți alege diferite moduri: modul confortabil,
modul eco și modul anti-îngheț; De ecare dată când apăsați tasta “ “, comutați o dată și faceți bucla pe
rând; Apăsați “ “ 3 secunde pentru a deschide modul fereastră. În acest mod, atunci când temperatura
ambientală scade cu 5 grade în decurs de 10 minute, se consideră că utilizatorul a deschis fereastra și
Pagina se încarcă...
Pagina se încarcă...
Pagina se încarcă...
Pagina se încarcă...
Pagina se încarcă...
Pagina se încarcă...
Pagina se încarcă...
Pagina se încarcă...
Pagina se încarcă...
Pagina se încarcă...
Pagina se încarcă...
Pagina se încarcă...
Pagina se încarcă...
Pagina se încarcă...
Pagina se încarcă...
Pagina se încarcă...
Pagina se încarcă...
Pagina se încarcă...
Pagina se încarcă...
Pagina se încarcă...
Pagina se încarcă...
Pagina se încarcă...
Pagina se încarcă...
Pagina se încarcă...
Pagina se încarcă...
Pagina se încarcă...
Pagina se încarcă...
Pagina se încarcă...
Pagina se încarcă...
Pagina se încarcă...
Pagina se încarcă...
Pagina se încarcă...
Pagina se încarcă...
Pagina se încarcă...
-
 1
1
-
 2
2
-
 3
3
-
 4
4
-
 5
5
-
 6
6
-
 7
7
-
 8
8
-
 9
9
-
 10
10
-
 11
11
-
 12
12
-
 13
13
-
 14
14
-
 15
15
-
 16
16
-
 17
17
-
 18
18
-
 19
19
-
 20
20
-
 21
21
-
 22
22
-
 23
23
-
 24
24
-
 25
25
-
 26
26
-
 27
27
-
 28
28
-
 29
29
-
 30
30
-
 31
31
-
 32
32
-
 33
33
-
 34
34
-
 35
35
-
 36
36
-
 37
37
-
 38
38
-
 39
39
-
 40
40
-
 41
41
-
 42
42
-
 43
43
-
 44
44
-
 45
45
-
 46
46
-
 47
47
-
 48
48
-
 49
49
-
 50
50
-
 51
51
-
 52
52
-
 53
53
-
 54
54


