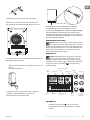
HL-246VB W
230V~ 50Hz 1000/2000W
EN FAN HEATER 2-9
Usage and Storage Instructions
BG ВЕНТИЛАТОРНА ПЕЧКА 10-17
Инструкции за употреба и съхранение
RO AEROTERMĂ 18-25
Instrucţuni de utilizare şu depozitare
HR FEN GRIJALICA 26-33
Upute za uporabu i skladištenje
GR ΑΕΡΟΘΕΡΜΟ 34-41
Οδηγιες χρησης και αποθηκευσης
LT VENTILIATORINIS ŠILDYTUVAS 42-49
Naudojimo ir saugojimo instrukcijos
LV TERMOVENTILATORS 50-56
Ekspluatācijas un uzglabāšanas instrukcija
RS УВЕНТИЛАТОРСКА ПЕЋ 57-63
Инструкции за употреба и складирање
DE HEIZKÖRPER MIT VENTILATOR 64-71
Bedienungs und Aufbewahrungsanleitung
www.tesy.com
is a registered trade mark of Tesy ltd.

2 Usage and Storage Instructions
EN IMPORTANT SAFETY PRECAUTIONS:
WARNING!
• Please read this manual before operating the appliance
and keep it at a safe place for future reference. In case
the appliance is obtained by a new owner, it should be
transferred together with its manual.
•CAUTION: Children under 3 years of age should be
kept away from the appliance unless they are under
constant supervision.
Children from 3 to 8 years of age are allowed to
operate the on/off button ONLY, provided that the
appliance is installed and ready for operation and
such children have been supervised and instructed in
safe operation of the appliance and they understand
all related risks.
Children from 3 to 8 years of age MUST NOT: connect
the plug to power sockets, make adjustments, clean it
or carry out user maintenance operations.
This appliance can be used by children older than
8 years of age and by people with reduced physical,
sensor and mental capabilities, as well as by people
with insufficient experience and knowledge provided
they are supervised or instructed in safe operation
of the appliance and understand the related risks.
Children should not be allowed to play with the
appliance. Cleaning and user maintenance operations
must not be carried out by children without
supervision.
•CAUTION: Some of the appliance parts may get very
hot during operation and thus cause burns to users. In
case there are children and vulnerable people in the
room, special attention should be paid.
• WARNING: In order to avoid
overheating, do not cover the appliance!
• The appliance should not be positioned right under
a power socket!
• If the supply cord is damaged, it must be replaced by
the manufacturer, its service agent or similarly qualified
persons in order to avoid a hazard.
• Before connecting the fan heater, you should check
if the voltage on the technical information plate
corresponds to the voltage of the main electrical
system of the place of use /at home or in the office/.
The appliance is intended for the voltage, shown on
the technical information plate.
• HL-246VB W fan heater must be installed in
accordance with the good professional practices
and in accordance with the legislature of the
particular state (Electricity Directive of EU and
requirements for special installations and places
of installation including bathroom or shower box
HD60364-7-701:2007(IEC 60364-7- 701:2007)).
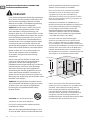
• The heater is classified as class II and is provided with IP24
water protection. For that reason it must be mounted
in position (VOLUME) 2. That prevents the chance of
reach to the control board (switch and thermostat) of the
fan heater by a person who is in a shower or in a bath.
Minimum permissible distance between the appliance
and a water source must not be less than 1 meter! The
appliance is to be mounted on a wall only!
• This appliance must be used only with its main
function, which it was intended for, i.e. heating of
domestic premises. Every different usage is considered
incorrect and hence dangerous. The manufacturer does
not assume responsibility for break-downs, caused by
incorrect and unreasonable usage. Non-adherence to
the safety precautions will render the guarantee invalid
• Do not leave your home, while the appliance is
turned on: assure that the switch is in position
OFF(0) (turned-off) and the thermostat switch is in
position – minimum. Always disconnect the plug of
the device from the socket.
• Keep inflammable objects as furniture, cushions,
bedding, paper, clothes, curtains etc. at a distance of
minimum 100 cm away from the fan heater.
• Do not use the device in areas of usage and storage
of inflammable substances. Do not use the device in
combustible areas /for example near inflammable gases
and aerosols/ - there is a great risk of explosion and fire!
• Do not insert or allow any objects to get into the
ventilation openings (inlets and outlets), because
that can cause break-down of the appliance or any
other damages.
• The appliance is not suitable for animal breeding
and is intended only for domestic use!
• Keep the air outlet free from any objects: you should
keep a clear distance of at least 1m in front the
heater. Do not allow any objects to get into in the
air inlet or outlet because that can cause electrical

Usage and Storage Instructions 3
EN
English
shock, fire or damage of the heating element.
• The most common reason for over-heating is the
accumulation of dust and dirt in the appliance.
You should clean regularly ventilation openings
with a vacuum cleaner. Before cleaning you must
disconnect the appliance from the mains. Keep the
fan heater always clean.
• You should never touch the appliance with wet or
moist hands – there is danger for your life!
• In order to disconnect the plug from the socket
outlet when necessary the socket should be
accessible all the time!
• You must never pull the electric cord or the
appliance itself when disconnecting from the mains
• Warning! The air outlet gets hot when the appliance
is operating (more than 80°С).
• Do not cover the appliance. If the appliance is
covered there is danger of overheating.
• The electrical system to which the appliance is
connected must be provided with automatic safety
fuse. The distance between the sockets and the
appliance (in turned-off state) must be at least 3mm.
• Grounding is forbidden! After unpacking and before
use you must check if the mechanical parts and
their gear are in a good state. If you have any doubts
you should not use the appliance and search advice
from a qualified electrician.
• If the appliance is damaged or not functioning
properly you must stop it and not try to repair it
yourself. For any type of repairs you must consult
the Service Center for post-sale help. There you
will have your damaged part replaced with an
original spare one. Not obeying this instruction will
compromise the appliance safety.
• If you decide to stop using an appliance of that kind
it is recommended to make it unusable as you cut
the electric cord, after you have disconnected it
from the mains. It is also recommended all hazards,
related to the appliance to be checked. That is
very important if there is a chance the discarded
appliance to be used for play by children.
• You should never keep the appliance unnecessarily
plugged-in. Disconnect the appliance from the
mains if you do not intend to use it for a long time.
• In order to avoid any overheating of the electric cord
it is recommended to unreel the whole electric cord.
•Warning:
Do not use this appliance with a programmer,
counter or another device which can automatically turn
it on because if the appliance is covered or incorrectly
positioned there is a danger of fire.
• Place the electric cord in such a way that it does
not hamper the movement of people and not
to be stepped on! You must use only approved
connection blocks, which are suitable for the
appliance, i.e. there is a sign of compliance!
• The electric cord must not be in touch with the hot
parts of the appliance!
• You must never move the appliance by pulling it by
its electric cord. You must never use the electric cord
for moving of other objects.
• Do not reel the electric cord round the appliance!
Do not use the appliance with its electric cord
reeled – this is also valid if a cable drum is used!
• Do not press the cord and do not stretch it by sharp
edges. Do not place the cord over hot plates or in
open fire!
PACKAGE
• After unpacking the appliance you should check if
it is not damaged during transportation and if all
the components are included! In case that you find
out any damage or incomplete package you should
connect with your authorized retailer!
• Do not discard the original packing box! It could be
used to store the appliance during transportation in
order damages to be avoided!
• The disposal of the packing material should be
done in the appropriate way! Children should be
prevented from playing with the polyethylene bags!
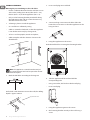
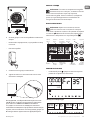
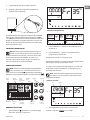
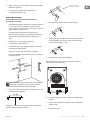
MOUNTING ON A WALL
1. Please ensure that the walls of the installation
location without wires, pipes, etc., to ensure that the
device can be securely mounted on the wall
2. The appliance is intended only for vertical wall
mounting! Floor or ceiling mounting is forbidden!
3. Never position the appliance right below a socket
outlet!
4. The appliance should be assembled and connected
by a qualified electrician. The installation process
should be isolated from the mains before electrical
connection works are to be done.
5. Position the power cord so that it does not hamper
free movement of people and not to be stepped on!
Use only approved extensions, which are proper to
the appliance, i.e. they have a compliance sign!
6. The power cord should not be in touch with hot
parts of the appliance!
7. Do not use the appliance in rooms smaller than 4
square meters.

4 Usage and Storage Instructions
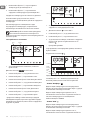
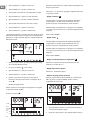
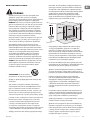
EN FIXING TO THE WALL
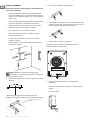
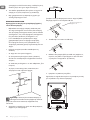
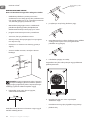
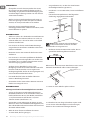
Warning! To prevent damage or the risk of fire:
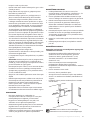
• Ensure a sufficient distance from the wall (min. 25 cm
at the sides), ceiling (min. 20 cm), floor (min. 1.5 m),
fixtures (min. 1 m) or other appliances (min. 1 m).
• Only use the fastening bracket provided for fixing
the appliance to the wall, to ensure the necessary
distance from the rear wall.
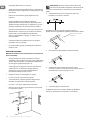
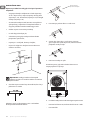
1. Selecting a place to install the appliance
• on a wall that is sufficiently strong
• which is somewhat sheltered, so that the appliance
is not shaken excessively by strong winds;
• at least 1 m from people, animals and plants;
• which complies with the distances shown in the
sketch below
Note: The appliance is manufactured entirely of
rust-proof materials and can be exposed to normal
environmental impacts
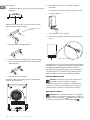
2. Mark the drill holes according to the diagram:
Drill 2 holes with diameter 6 mm in the wall, The drilling
depth is approx. 40 mm
Supplied round sticker
3. Insert a wall plug into each hole.
4. Screw two long screws into each hole. Allow the
head of the screw 5mm so that the appliance can be
hung on these.
5. Hang the appliance on the screws.
Mark the drill hole for screwing the fastening bracket
6. Take the appliance off the wall and drill the
corresponding hole.
• Using a 6 mm bit, drill a hole to fit the wall plug.
• Insert a wall plug.
7. Hang the appliance again on the screws.
8. the fastening bracket securely to the wall using a
screw.

Usage and Storage Instructions 5
EN
English
We thank you for choosing HL-246VB W fan heater.
This is a product, which provides heating at 1000W or
2000W in cold weather in accordance with the desired
temperature conditions in the room. The appliance will
provide long-life service if being correctly maintained
and taken care of in accordance with the manual.
OPERATING
Note: As the appliance and heating elements are
supplied with a thin film of grease, there might be a
small amount of smoke and odour the first time the
appliance is used. This is not harmful and will stop after a
short while. Please ensure in the meantime that there is
sufficient ventilation)
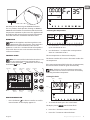
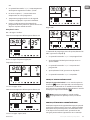
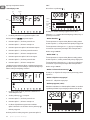
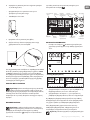
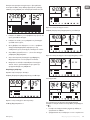
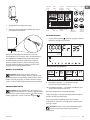
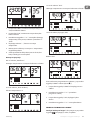
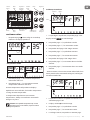
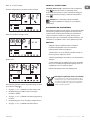
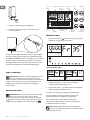
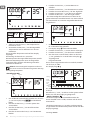
CONTROL PANEL
Note: The screen will be locked when the device is on
or in any mode if without any operation after 1
minute. Screen will display Unlock the screen Pressing
and holding in 3S
Timer/min
Week
Working
mode
Working
situation
PRO setting
display
PRO detail
per day
Stand by /
Power on
"+” add
“-” less
Exchange PRO
Open window
and Lock
HEATING OPERATION
• Press the button . The device switches on with Fr
manual mode. On the display appears Fr
- Selecting the temperature
1. Use the button “+” to increase the set temperature
up to a maximum of 35°C.
2. Use the button “–” to reduce the set temperature
down to a minimum of 10°C.
The set temperature is shown on the display.
The heater switches off as soon as the room reaches the
set temperature.
If the room temperature falls below the set temperature,
the heater and fan switch on again automatically
Note: The device shows the temperature around the
location of the sensor and is not a means of accurately
measuring the ambient temperature.
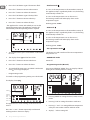
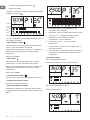
-Setting the clock
Days
Hours Minutes
1. To switch the clock, press the “C/M” button.
The display shows and the hours flash.
2. Press the “+” button to increase the hours.
3. Press the “-” button to reduce the hours.

6 Usage and Storage Instructions
EN 4. Press the “C/M” button again. The minutes flash.
5. Press the “+” button to increase the minutes.
6. Press the “-” button to reduce the minutes.
7. Press the “C/M” button again. The days flash.
8. Press the “+” button to increase the days.
9. Press the “-” button to reduce the days.
- The appliance has a timer with which you can set the
required operating time. The appliance switches off
automatically once the operating time has expired
Timer
1. To switch the timer, press and hold the “C/M” button
for 3 sec.
2. The display shows and the hours flash.
3. Press the “+” button to increase the hours.
4. Press the “-” button to reduce the hours.
5. To switch off the timer, press and hold “C/M” button
until is no longer displayed.
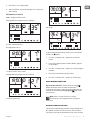
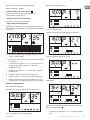
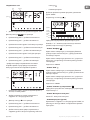
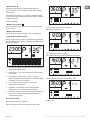
• Programming modes
To switch on the programming mode, press the “P/PRO”.
The display shows
Heating
Comfort
mode
ECO
mode
Hour
The appliance has seven working modes between P1
and P7.
Press the “+” and “-” button repeatedly until desired
working mode is shown on display
- Comfort mode .
As soon as the temperature in the immediate vicinity of
the appliance drops significantly below 9°C, the heating
automatically switches on.
As soon as the temperature rises to above 35°C,
the heating switches off and display shows room
temperature again.
Working power 2000W
- ECO mode
As soon as the temperature in the immediate vicinity of
the appliance drops significantly below 7°C, the heating
automatically switches on.
As soon as the temperature rises to above 35°C,
the heating switches off and display shows room
temperature again.
Working power 1000W
- Frost protection mode
The device now will switch on if the room temperature
drops below 7°C.
- POWER OFF mode
Power off
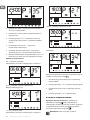
- Programming modes (Manual)
Pressing and holding “P/PRO” for 3 sec. displays ”PROG”
during P1-P7 working mode to setting.
1. Pressing “PROG” to setting the time(1-24H) in each
mode
2. Pressing” C/M” to setting the mode in each time.
3. Pressing “+” and “-” to setting different temperature
what you want under Comfort and ECO mode.
4. display“- -”when setting OFF

Usage and Storage Instructions 7
EN
English
5. Anti-forst in 7°C unadjustable
6. You can choose any mode during P1-P7 in any hour
after setting
SETTING Demonstration:
0-6H in mode:Comfort mode
Setting different temperature in each hour
6-12H in mode:Anti-forst
Fix temperature in 7°C
12-18H in mode: "ECO" mode
Setting different temperature in each hour
18-24H in mode: OFF
AU mode
In the manual programming modes, press the “P/PRO”
button, the flash.
1. Use the “+” button and “-” button to set the AU
mode.
2. Press the “P/PRO” button until the “PROG” appears
in the display.
3. Use the “+” button and “-” button to set the program
number.
4. Press the “C/M” button, the days flash.
5. Use the “+” button and “-” button to set the days.
OPEN WINDOW FUNCTION
Open window Function: Activated by pressing .
When the device works and the environment
temperature change in a big range the appliance will
shut off automatically. Pressing again will cancel
this function.
Note: After 5 seconds the preset is shown
continuously in the display and the settings are
taken over.
OVERHEATING PROTECTION
The in-built overheating protection automatically turns
the appliance off in case of an error! In that situation
the plug must be disconnected from the mains and the

8 Usage and Storage Instructions
EN control switch put in position “0”. After a short period of
cooling the appliance is ready for operation (in about
10-15 minutes)! If that error is repeated – consult an
authorized service at your location!
CLEANING
• You must first turn off the appliance and disconnect
its plug from the socket. Do not use abrasive
detergents!
• Clean the body with wet cloth, vacuum cleaner or
a brush!
• You must never submerge the appliance under
water – there is life danger!
• If the appliance should not be used for a certain
period of time it must be secured from excessive
dirt and dust by placing it in its original package.
• You must never place the hot appliance in its
package!
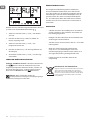
Instructions for environment protection
Electric appliances out of use contain valuable
materials and hence must not be disposed in
domestic dumbs! We kindly ask you for cooperation
and active role in preservation of natural resources by
disposing the appliance to the organized buy-back
locations (if there are any).

Usage and Storage Instructions 9
EN
English
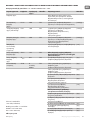
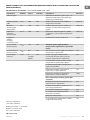
TABLE 2: INFORMATION REQUIREMENTS FOR ELECTRIC LOCAL SPACE HEATERS
Model identifier(s): 1.HL-246VB W 2000W/230V~ 50Hz
Item Symbol
Value 1.
Unit Item Unit
Heat output Type of heat input for electric storage local
space heaters only (select one)
Nominal heat
output
Pnom 2.00 kW Manual heat charge control, with integrated
thermostat
[yes/no]
Minimum heat
output (indicative)
Pmin 1.00 kW Manual heat charge control, with room and/
or outdoor temperature feedback
[yes/no]
Maximum
continuous heat
output (indicative)
Pmax,C 2.00 kW Electric heat charge control, with room
and/or outdoor temperature feedback heat
charge control, with integrated thermostat
[yes/no]
Auxiliary electricity
consumption
Fan assisted head output [yes]
At nominal heat
output
elmax 1.92 kW Type of heat output/room temperature
control (select one)
-
At minimum heat
output
elmin 0.97 kW Single stage heat output and no room
temperature control
[no]
In standby mode el SB 0
Stand by
0.0003
kW Two or more manual stages, no room
temperature control
[no]
With mechanic thermostat room
temperature control
[no]
With electronic room temperature control [no]
With electronic room temperature control
plus day timer
[no]
With electronic room temperature control
plus week timer
[yes]
Other control options (multiple selections
possible)
Room temperature control, with presence
detection
[no]
Room temperature control, with open
window detection
[yes]
With distance control option [no]
With adaptive start control [no]
With working time limitation [no]
With black bulb sensor [no]
TESY Ltd - Head office
1166 Sofia, Sofia Park,
Building 16V, Office 2.1. 2nd Floor
PHONE: +359 2 902 6666,
FAX: +359 2 902 6660,
office@tesy.com

10 Инструкции за употреба и съхранение
BG ВАЖНИ ПРЕДПАЗНИ МЕРКИ И ИНСТРУКЦИИ ЗА
БЕЗОПАСНОСТ:
ВНИМАНИЕ!
• Прочетете настоящите инструкции преди да
използвате този уред и съхранявайте тези указания
за бъдещо ползване. При смяна на собственика,
инструкцията за експлоатация трябва да се предава
заедно с уреда.
•ВНИМАНИЕ: Деца на по-малко от 3 години, трябва
да се държат на разстояние, освен ако не са под
непрекъснато наблюдение.
Деца на възраст от 3 години до 8 години могат
само да използват бутона вкл./изкл. на уреда,
при условие, че уреда е инсталиран и е готов
за нормална работа и са били наблюдавани
и инструктирани относно използването му по
безопасен начин и разбират, че може да е опасно.
Деца на възраст от 3 години до 8 години не трябва
да включват уреда в контакта, да го настройват,
да го почистват или да извършват потребителска
поддръжка.
Този уред може да се използва от деца на
възраст над 8 години и лица с ограничени
физически, сетивни или умствени способности,
или с недостатъчен опит и познания, ако те
са наблюдавани или инструктирани относно
безопасното използване на уреда и разбират
опасностите. Децата не трябва да си играят с уреда.
Почистване и потребителска поддръжка не трябва
да се прави от деца без наблюдение.
•ВНИМАНИЕ: Някои части на този продукт може да
станат много горещи и да предизвикат изгаряния.
Там където, присъстват деца и уязвими хора,трябва
да бъде предоставено специално внимание.
• ПРЕДУПРЕЖДЕНИЕ:
За да се избегне
прегряване, не покривайте уреда!
• Уреда не трябва да се поставя
непосредствено под щепселна кутия!
• Когато захранващият шнур се повреди, той трябва
да се замени от производителя или негов сервизен
представител, или подобно квалифицирано лице, за
да се избегне опасност.
• Преди да свържете вентилаторната печка, проверете
дали посоченото напрежение върху типовата табелка
съответства на напрежението на електрическата
мрежа в дома (офиса). Уреда е предназначен само за
напрежението посочено на неговата типова табелка.
• Вентилаторната печка HL-246VB W трябва да бъде
монтирана съобразно с нормалната търговска
практика и в съгласие със законодателството на
съответната страна(директивите за електричество
на ЕО и изискванията за специални монтажи или
места включващи бани, или душ кабини HD60364-
7-701:2007(IEC 60364-7-701:2007)).
• Уреда е клас ІІ и е със защита от изпръскване с
вода IP24. Поради този факт трябва да се монтира
в пространство (volume) 2, за да се избегне
възможността от това контролното табло (ключ и
терморегулатор) на вентилаторната печка да бъде
достигнато от човек който е под душа или във
ваната. Минималното разстояние от уреда до воден
източник трябва да бъде не по малко от 1метър и
уреда да бъде задължително монтиран на стената!
• Този уред трябва да се използва само по
предназначението, за което е бил предвиден,
т.е. да отоплява битови помещения. Всяка
различна употреба да се счита за неправилна и
следователно опасна. Производителят не може
да носи отговорност за повреди, произтичащи от
неправилна и неразумна употреба. Неспазване
на информацията за безопасност ще направи
невалидна поетата гаранция за уреда!
• Не напускайте дома си, докато уреда е включен:
уверете се, че ключа е изключено положение, а
терморегулатора е в минимум позиция. Винаги
изваждайте щепсела на уреда от контакта.
• Дръжте запалими предмети, като мебели,
възглавници, спално бельо, хартия, дрехи,
пердета и т.н. на разстояние от поне 100 см далеч
от вентилаторната печка.
• Не използвайте уреда в зони където се
използват или съхраняват огнеопасни вещества.
Не използвайте уреда в зони със запалими
атмосфери (например: в близост до запалими
газове или аерозоли) - съществува много голяма
опасност от експлозия и пожар!
• Не вкарвайте и не допускайте чужди тела да
попаднат в отворите за вентилация (входящи
или изходящи), тъй като това може да доведе до
повреда на уреда или други щети.

Инструкции за употреба и съхранение 11
BG
Български
• Уреда не е подходящ за отглеждане на животни,
и същия е предвиден само за домашно ползване!
• Пазете изхода на въздушен поток свободен от
предмети: поне на разстояние от 1 м пред печката.
Не допускайте навлизането на всякакви предмети
в отвора за входящ въздух или в отвора за
изходящ въздух, тъй като това ще причини токов
удар, пожар или повреда в нагревателя.
• Най-често срещаната причина за прегряване е
натрупването на мъх и прах в уреда. Редовно
почиствайте с прахосмукачка вентилационните
отвори, като преди това задължително
изключите уреда от електрическата мрежа.
Пазете вентилаторната печка чиста.
• Никога не пипайте уреда с мокри или влажни
ръце - съществува опасност за живота!
• Контакта трябва да бъде достъпен по
всяко време, за да може щепсела да бъде
освобождаван при нужда възможно най-бързо!
• Никога не теглете захранващия шнур или самия
уред при разкачане от мрежата.
• Обърнете внимание! Изхода на въздух се загрява
по време на работа (повече от 80°С).
• Не покривайте уреда. Ако е покрит има опасност
от прегряване.
• Електроинсталацията към която се свързва
уреда трябва да бъде снабдена с автоматичен
предпазител, при който разстоянието между
контактите когато е изключен трябва да бъде
най-малко 3мм.
• Забранява се заземяване! След разопаковане и
преди употреба, проверете дали механичните
части и всички техни приспособления са в добро
състояние. Ако имате съмнение, не използвайте
уреда и се посъветвайте с квалифициран
електротехник.
• Ако уреда не е в ред или неправилно
функционира, спрете го и не го ремонтирайте. За
всякакви ремонти се обърнете за съдействие към
Сервизния Център за обслужване след продажба.
Само там ще подменят дефектиралата част с
оригинална резервна такава. Не спазването на
това условия ще компроментира безопасността
на уреда.
• Ако решите да престанете да използвате уред
от този тип, препоръчва се да го направите
неизползваем, като срежете шнура, след като
сте го разкачили от мрежата. Препоръчва се още
всички опасности, свързани с уреда да бъдат
обезопасени, особено за деца, които биха могли
да използват амортизираното устройство (уреда)
за игра.
• Никога не оставяйте ненужно уреда включен.
Изключвайте го от захранващата мрежа, когато
няма да го ползвате дълго време.
• За да се избегне опасно прегряване на
захранващия шнур, се препоръчва напълно да се
развие захранващия шнур.
•Внимание: Не използвайте този уред с
програматор, брояч или друг уред който
автоматично го включва тъй като ако уреда е
покрит или неправилно поставен съществува
опасност от пожар.
• Поставете захранващия шнур, така че да не
пречи на движението на хората и да не бъде
настъпван! Използвайте само одобрени
удължители, които са подходящи за уреда, т.е.
имат знак за съответствие!
• Захранващия шнур не трябва да влиза в допир с
горещите части на уреда!
• Никога не премествайте уреда, като го дърпате
за шнура както и не използвайте шнура за
пренасяне на предмети!
• Не навивайте шнура около уреда! Не използвайте
уреда с намотан шнур - това важи особено за
използване на барабан за навиване на кабел!
• Не пречупвайте шнура и не го дърпайте през
остри ръбове и не го поставяйте върху горещи
плочи или открит огън!
ОПАКОВКА
• След разопаковане на уреда, проверете дали при
транспортирането не е увреден и дали е напълно
окомплектован! В случай че бъде констатирана
повреда или непълна доставка, свържете се с
Вашия упълномощен продавач!
• Не изхвърляйте оригиналната кутия! Тя би могла
да се използва за съхранение и транспортиране,
за да се избегнат повреди от превозването!
• Изхвърлянето на опаковачния материал трябва
да става по подходящ начин! Децата трябва да се
пазят да не си играят с полиетиленовите торби!
МОНТИРАНЕ НА СТЕНА
• Моля, уверете се , че стените на мястото за
монтиране на уреда са без проводници, тръби и
т.н, за да се гарантира , че уредът може да бъде

12 Инструкции за употреба и съхранение
BG монтиран безопасно на стената.
• Уреда е предназначен единствено за вертикален
монтаж на стена! Забранява се монтиране на под
или таван!
• Никога не поставяйте уреда директно под
контакт!
• Уредът трябва да се сглоби и свърже от
правоспособен електротехник. Инсталирането
трябва да бъде изолирано от подаването на ток
преди извършване на електрическата работа.
• Поставете силовия кабел, така че да не пречи на
движението на хората и да не бъде настъпван!
Използвайте само одобрени удължители,
които са подходящи за уреда, т.е. имат знак за
съответствие!
• Силовият кабел не трябва да влиза в допир с
горещите части на уреда!
• Не използвайте уреда в помещения с площ по-
малка от 4м².
МОНТАЖ НА СТЕНА
Внимание! За да избегнете нанасяне на щети или
риск от пожар:
• Осигурете достатъчно разстояние от стената
(минимум 25 см от двете страни), тавана (минимум
20 см), пода (минимум 1,5 м), фитинги (минимум 1
m) или други уреди (минимум 1 м).
• За монтиране на уреда на стената, използвайте
само планката за окачване, предоставена в
комплекта, за да осигурите необходимото
разстояние между него и стената.
1. Избор на място за монтиране на уреда
• на стена, която е достатъчно здрава
• закътано място, където уредът няма да бъде
изложен на прекалено силни ветрове;
• на поне 1 м от хора, животни и растения;
• мястото да отговаря на разстоянията, посочени
на чертежа по-долу;
Забележка: Уредът е произведен изцяло от
устойчиви на ръжда материали и може да бъде
излаган на обичайните въздействия на околната
среда
2. Отбележете местата на отворите, които ще
пробиете, съгласно чертежа:
Пробийте 2 отвора с диаметър 6 мм в стената.
Дълбочината на пробиване трябва да бъде около 40 мм
Кръгъл стикер, предоставен
в комплекта
3. Поставете по един дюбел във всеки отвор.
4. Завийте два дълги винта във всеки отвор.
Оставете главите на винтовете да стърчат 5мм, за
да можете да закачите уреда на тях.
5. Закачете уреда на винтовете.
Отбележете мястото, където трябва да пробиете
отвор за завинтване на планката за окачване

Инструкции за употреба и съхранение 13
BG
Български
6. Свалете уреда от стената и пробийте съответните
отвори.
• Използвайте свредло 6 мм, за да пробиете отвор
в стената.
• Поставете дюбел.
7. Отново окачете уреда на винтовете.
8. здраво планката за окачване към стената като
използвате отвертка.
Благодарим Ви, че избрахте Вентилаторна печка HL-
246VB W. Това е изделие, което предлага отопление
през зимата от 1000W или 2000W в зависимост
от нуждите за постигане на комфортна топлина в
отопляемото помещение. При правилна експлоатация
и грижа, както е описано в тези инструкции, уредът ще
Ви осигури много години полезно функциониране.
РАБОТА С УРЕДА
Забележка: Тъй като по нагревателя на уреда
има нанесен тънък слой грес, възможно е да има
малко количество дим и мирис при първото
използване на уреда. Това не е опасно и след кратко
време ще спре. Междувременно е необходимо да
осигурите достатъчна вентилация
КОНТРОЛЕН ПАНЕЛ
Забележка: Екранът се заключва, когато
уредът е включен или се заключва 1 минута,
след като е преминал в който и да е режим. На екрана
се показва Можете да отключите екрана като
натиснете и задържите за 3 секунди бутона
Таймер/
минути
Седмица
Режим на
работа
Работна
станция
Показване
настройките
на програмата
Подробности
на програмата
по дни
Готовност/
Включен
"+” добавяне
“-” намаляване
Смяна Програма
Отворен
прозорец и
заключване
РЕЖИМ НАГРЯВАНЕ
• Натиснете бутона . Уредът се включва в ръчен
режим Fr. На дисплея се показва Fr
- Избор на температура

14 Инструкции за употреба и съхранение
BG 1. Използвайте бутона “+”, за да настроите
температурата до максимум 35°C.
2. Използвайте бутона “–”, за да намалите
зададената температурата до минимум 10°C.
Зададената температурата се показва на дисплея.
Отоплителният уред се изключва, когато
температурата в помещението достигне зададената
температура.
Ако температурата в помещението падне
под зададената температура, нагревателят и
вентилаторът автоматично се включват отново.
Забележка: Уредът показва температурата
около местоположението на сензора и не е
средство за прецизно измерване на температурата на
околната среда.
-Настройване на часовника
Days
Hours Minutes
1. За да преминете към часовника, натиснете
бутона “C/M”.
Дисплеят показва и часът мига.
2. Натиснете бутона “+”, за да увеличите часа.
3. Натиснете бутона “-”, за да намалите часа.
4. Натиснете отново бутона “C/M”. Минутите мигат.
5. Натиснете бутона “+”, за да увеличите минутите.
6. Натиснете бутона “-”, за да намалите минутите.
7. Натиснете отново бутона “C/M”. Денят мига.
8. Натиснете бутона “+”, за да увеличите деня.
9. Натиснете бутона “-”, за да намалите деня.
- Уредът има таймер, с който можете да зададете
необходимото време, през което да работи. Уредът
автоматично се изключва, когато изтече зададеното
му време за работа
Таймер
1. За да преминете към таймера, натиснете и
задръжте за 3 секунди бутона “C/M”.
2. Дисплеят показва и часът мига.
3. Натиснете бутона “+”, за да увеличите часа.
4. Натиснете бутона “-”, за да намалите часа.
5. За да изключите таймера, натиснете и задръжте
бутона “C/M” докато на дисплея вече не се
показва .
• Програмни режими
За да преминете към програмен режим, натиснете
бутона “P/PRO”.
На дисплея се показва
Отопление
Режим
Комфорт
Режим
ЕСО
Час
Уредът има седем програмни режима от P1 до P7.
С помощта на “+” и “-” можете да достигнете до
желания режим, който се показва на дисплея
- Режим “Комфорт“ .
Веднага щом температурата в непосредствена
близост до уреда падне значително под 9°C, уредът
автоматично започва да отоплява.
Веднага щом температурата достигне 35°C,
отоплението се изключва и на дисплея отново се
показва температурата на помещението.
Работна мощност: 2000 W
- Режим “ECO“
Веднага щом температурата в непосредствена
близост до уреда падне значително под 7°C, уредът
автоматично започва да отоплява.
Веднага щом температурата достигне 35°C,
отоплението се изключва и на дисплея отново се

Инструкции за употреба и съхранение 15
BG
Български
показва температурата на помещението.
Работна мощност: 1000W
- Режим “Защита от замръзване“
Уредът ще се включи, ако температурата в
помещението падне под 7°C.
- Режим “Изключено захранване”
Power off – изключено захранване
- Програмни режими (ръчни)
Натиснете и задръжте за 3 секунди бутона “P/PRO”, на
дисплея се показва “PROG” за настройване на режими
от P1 до P7.
1. Натиснете “PROG”, за да зададете времето (1-24
часа) за всеки режим.
2. Натиснете “C/M”, за да настроите режима за всеки
от часовете.
3. С помощта на бутоните “+” и “-” задайте различна
температура, каквато желаете за режими
“Комфорт“ и “ECO“.
4. На дисплея се показва “- -”, когато няма зададена
температура.
5. В режим “Против замръзване“ зададената
температура от 7°C не може да бъде променяна.
6. Можете да изберете който и да е режим от P1 до P7,
за който и да е час, след като направите настройките.
Пример за настройване:
0-6 ч. в режим: “Комфорт“
Задаване на различна температура за всеки час
6-12 ч. в режим: “Против замръзване“
Фиксирана температура 7°C
12-18 ч. в режим: "ECO"
Задаване на различна температура за всеки час
18-24 ч. в режим: “Изключен“ (OFF)
Режим “AU“
При ръчни програмни режими натиснете бутона “P/
PRO” и на екрана мига .
1. С помощта на бутоните “+” и “-” настройте режим
“AU“.

16 Инструкции за употреба и съхранение
BG 2. Натиснете бутона “P/PRO” докато на дисплея се
появи “PROG”.
3. С помощта на бутоните “+” и “-” задайте номера на
програмата.
4. Натиснете бутона “C/M”, на дисплея мигат дните.
5. С помощта на бутоните “+” и “-” настройте дните.
ФУНКЦИЯ “ОТВОРЕН ПРОЗОРЕЦ”
Функция “Отворен прозорец”: Активира се като
натиснете бутона . Когато уредът работи и
температурата на околната среда се променя
драстично, уредът автоматично ще се изключи.
Можете да деактивирате тази функция като
натиснете отново бутона .
Забележка: След 5 секунди предварително
зададените настройки се показват на дисплея
и тези настройки стават активни.
ЗАЩИТА ОТ ПРЕГРЯВАНЕ
Вградената защита от прегряване автоматично
изключва уреда в случай на грешка! В този случай,
щепсела трябва да бъде разкачен от контакта, а
контролите зададени на “0” след кратка фаза на
охлаждане, уреда отново е готов за ползване (около
10-15 минути)! Ако грешката се повтаря – свържете
се с оторизиран сервиз във вашето населено място!
ПОЧИСТВАНЕ
• Задължително първо изключете уреда от ключа
и извадете щепсела от контакта в стената. Не
използвайте абразивни почистващи препарати!
• Почиствайте корпуса с влажна кърпа,
прахосмукачка или четка.
• Никога не потапяйте уреда във вода - съществува
опасност за живота!
• Ако за известно време уреда няма да се използва,
той трябва да се предпази от прекомерно
напрашване и замърсяване , като се прибере в
оригиналната си опаковка.
• Никога не прибирайте топъл уред в опаковка му!
•
•
•
Указания за опазване на околната среда
Старите електроуреди съдържат ценни материали
и поради това не трябва да се изхвърлят заедно с
битовата смет! Молим Ви да съдействате с активния
си принос за опазване на ресурсите и околната
среда и да предоставите уреда в организираните
изкупвателни пунктове(ако има такива).

Инструкции за употреба и съхранение 17
BG
Български
ТАБЛИЦА 2: ИЗИСКВАНИЯ КЪМ ИНФОРМАЦИЯТА ЗА ЕЛЕКТРИЧЕСКИ ЛОКАЛНИ ОТОПЛИТЕЛНИ
ТОПЛОИЗТОЧНИЦИ
Идентификатори на модела: 1.HL-246VB W 2000W/230V~ 50Hz
Позиция Символ
Стойност
1.
Мерна
единица
Позиция Мерна
единица
Топлинна
мощност
Вид топлинно зареждане, само за
електрически акумулиращи локални
отоплителни топлоизточници (изберете
един)
Номинална
топлинна
мощност
Pnom 2.00 kW ръчен регулатор на топлинното
зареждане с вграден термостат
[да/не]
Минимална
топлинна
мощност
Pmin 1.00 kW ръчен регулатор на топлинното
зареждане с обратна връзка за
температурата в помещението и/или
навън
[да/не]
Максимална
непрекъсната
топлинна
мощност
Pmax,C 2.00 kW електронен регулатор на топлинното
зареждане с обратна връзка за
температурата в помещението и/или
навън
[да/не]
Спомагателно
потребление на
електроенергия
отдавана чрез обдухване топлинна
енергия
[Да]
При номинална
топлинна
мощност
elmax 1.92 kW Вид топлинна мощност/регулиране
на температурата в помещението
(изберете един)
При минимална
топлинна
мощност
elmin 0.97 kW една степен на топлинна мощност и
без регулиране на температурата в
помещението
[не]
В режим
готовност
el SB 0
Stand by
0.0003
kW Две или повече ръчни степени, без
регулиране на температурата на
помещението
[не]
с механичен термостат за регулиране на
температурата в помещението
[не]
с електронен регулатор на
температурата в помещението
[не]
електронен регулатор на температурата
в помещението и денонощен таймер
[не]
електронен регулатор на температурата
в помещението и седмичен таймер
[Да]
Други варианти за регулиране
(възможен е повече от един избор)
регулиране на температурата в
помещението с откриване на човешко
присъствие
[не]
регулиране на температурата в
помещението с откриване на отворен
прозорец
[Да]
с възможност за дистанционно
управление
[не]
с адаптивно управление на пускането в
действие
[не]
с ограничение на времето за работа [не]
с датчик във вид на черна полусфера [не]
ТЕСИ ООД - Главен офис
1166 София, София парк,
Сграда 16V, Офис 2.1. 2-ри етаж
Телефон: +359 2 902 6666,
Факс: +359 2 902 6660,
office@tesy.com

18 Instrucţuni de utilizare şu depozitare
RO PRECAUŢII IMPORTANTE:
PRUDENŢĂ!
• Citiţi instrucţiunile de utilizare înaintea utilizării
produsului. Păstraţi instrucţiunile de utilizare pe
toata durata de viaţa a produsului, pentru eventuale
consultări ulterioare La schimbarea proprietarului,
instrucţiunile trebuie să fie transmise, împreună cu
aparatul!
•PRUDENȚĂ: Copiii mai mici de 3 ani, trebui să fie
ţinute departe, cu excepţia cazului în care acestea sunt
sub supraveghere constantă.
Copiii în vârsta între 3 şi 8 ani pot folosi doar butonul
porn./opr. a aparatului cu condiţia ca aparatul este
instalat și este gata pentru funcţionarea normală și
au fost monitorizate și instruiţi cu privire la utilizarea
acestuia în condiţii de siguranţă și înţeleg că ar putea
fi periculos.Copiii în vârsta între 3 şi 8 ani nu trebui să
sa pună cablul aparatului in priză, să-l setează sau să
efectueze întreţinerea.
Acest aparat nu este destinat utilizării de către persoane
(inclusiv copii mici), cu capacităţi fizice, senzoriale
sau mentale reduse, precum şi lipsa de experienţă şi
cunoştinţe cu excepţia cazului în care au văzut sau au
fost dat instrucţiuni cu privire la utilizarea aparatului de
către o persoană responsabilă pentru siguranţa lor!Nu
lăsaţi copiii mici să se joace cu aparatul! Curăţarea
și întreţinerea nu trebui să fie făcută de către copii
nesupravegheaţi.
•PRUDENȚĂ: Unele părţi acestui aparat pot deveni
foarte fierbinţi și pot cauza arsuri. Acolo unde sunt
copii și persoanele vulnerabile trebuie să se acorde o
atenţie deosebită.
•ATENȚIE: Pentru a evita supraîncălzirea,
nu acoperiţi aparatul!
• Aparatul nu trebui să fie aşezat direct sub cutia prizei!
• În cazul în care cablul de alimentare este deteriorat,
acesta trebuie înlocuit de producător, agentul de
service sau de persoane calificate în mod similar,
pentru a evita un pericol.
• Înainte de a conecta aparatul de încălzire, verificaţi
dacă tensiunea de pe plăcuţa de tip corespunde
cu tensiunea de alimentare in casa (biroul) Dvs.
Aparatul este conceput numai pentru tensiunea,
indicată pe plăcuţa de tip.
• Aeroterma trebuie să fie montată în conformitate
cu practica comercială normală şi în conformitate
cu legile ţării (directive pentru energie electrică şi
cerinţele CE pentru instalaţii speciale sau locaţii,
inclusiv bai sau cabine de dușuri HD60364-7-701
2007 (IEC 60364-7-701:2007)).
• Aparatul este clasă II şi este cu protecţie împotriva
stropirii cu apă IP24. Datorită acestui fapt trebuie
să fie montată într-o încăpere (volum) 2, pentru a
evita posibilitatea panoul de control (comutator şi
termostat) a aerotermei să fie ajuns de persoana
care se află în duş sau cadă. Distanţa minimă între
aparat şi sursă de apă ar trebui să fie de cel puţin
1m iar aparatul trebuie să fie neapărat montat pe
perete!
• Acest aparat trebuie folosit numai în scopul pentru
care au fost achiziţionat, şi anume a încălzi camere
de utilitate. Orice altă utilizare poate fi considerată
improprie şi, prin urmare, periculoasă. Producătorul
nu poate fi tras la răspundere pentru pagubele
rezultate din utilizarea incorectă şi nerezonabilă.
Nerespectarea informaţiilor de siguranţa va anula
garanţia aparatului ingerate!
• Nu plecaţi de acasă atunci când aparatul este
pornit: asiguraţi-vă că comutatorul este în poziţia
oprit și termostatul este în poziţia minimă. Scoateţi
întotdeauna ştecherul de la priza de alimentare.
• Păstraţi o distanţa între convectorul şi obiectele
inflamabile, cum ar fi mobila, perne, lenjerie de pat,
hârtie, îmbrăcăminte, perdele, de cel puţin 100 de
cm.
• Nu utilizaţi aparatul în zonele în care sunt utilizate
sau depozitate substanţe inflamabile. Nu utilizaţi
aparatul în zone cu atmosfere inflamabile (de
exemplu: în apropierea gazelor inflamabile sau
aerosolilor) - există un pericol extrem de explozie şi
incendiu!
• Nu introduceţi sau nu permite obiecte străine să
cadă în orificiile de ventilaţie (de intrare sau de
ieşire), deoarece acest lucru va provoca un şoc
electric, incendiu sau deteriorarea aparatului.
• Aparatul nu este potrivit pentru utilizare în creşterea
animalelor, acesta este destinat numai pentru uz
casnic!
• Feriţi deschiderea de evacuare a aerului liberă
de obiecte: cel puţin la o distanţă de 1 m în faţa

Instrucţuni de utilizare şu depozitare 19Românesc
RO
încălzitorului. Nu introduceţi sau nu permite obiecte
străine să cadă în orificiile de ventilaţie (de intrare
sau de ieşire), deoarece acest lucru va provoca un
şoc electric, incendiu sau deteriorare a ventilatorului
• Cea mai frecventa cauza de supraîncălzire este
acumularea de scame și praf în unitate. Curăţaţi
regulat cu aspirator orificiile de ventilare, dar
înainte de aceasta scoateţi aparatul de la reţeaua de
alimentare. Păstraţi aerpoterma curată.
• Nu atingeţi aparatul cu mâini ude - există pericol
pentru viaţă!
• Priză trebuie să fie ușor accesibilă pentru a scoate
ștecherul când este nevoie cât mai repede posibil!
• Nu trageţi niciodată de cablul de alimentare sau de
aparatul pentru a-l deconecta de la priza..
• ATENŢIE! Aerul de evacuare este încălzit în timpul
funcţionării (mai mult de 80°С).
• Nu acoperiţi aparatul. Dacă este acoperit există
pericol de supraîncălzire.
• Instalaţia electrică la care se conectează aparatul
trebuie să fie dotată cu o siguranţă automată, la
care distanţa între contactele, atunci când este oprit,
trebuie să fie cel puţin 3 mm.
• Este interzisă împământarea! După despachetare
şi înainte de utilizare, verificaţi dacă toate
componentele mecanice si accesoriile lor sunt în
stare bună. Dacă aveţi îndoieli, nu folosiţi acest
produs și consultaţi un electrician calificat.
• În cazul în care unitatea nu este în ordine sau
funcţionează defectuos, opriţi - și nu reparaţi. Pentru
orice reparaţii, pentru asistenţa contactaţi Centrul
de Servicii pentru servicii post-vanzare. Numai acolo
vor înlocui piesa defectuoasă cu piesă originală.
Nerespectarea acestei condiţii ar putea compromite
siguranţa aparatului.
• Dacă decideţi să nu mai utilizaţi un dispozitiv de
acest tip, se recomandă să - faceţi inutilizabil, şă
tăiaţi cablul, după ce l-aţi deconectat de la sursa de
alimentare.. Se recomandat toate pericolele asociate
cu aparatul să fie protejate, în special pentru copiii
care ar putea folosi dispozitivul amortizat(dispozitiv)
pentru a se juca cu el.
• Niciodată nu lăsaţi aparatul pornit inutil.
Deconectaţi-l din reţeaua de alimentare, dacă nu-l
veţi folosi o perioada lungă de timp.
• Pentru a evita supraîncălzirea periculoasă a cablului
de alimentare, se recomandă deconectare completă
a cablul de alimentare.
•Atenție: Nu conectaţi aparatul la un cronometru,
programator sau orice alt dispozitiv care conectează
aparatul automat, pentru că există riscul de a lua
foc dacă aeroterma este acoperită sau poziţionată
incorect.
• Conectaţi cablul de alimentare astfel încât să nu
împiedice circulaţia persoanelor şi să nu fie călcat!
Utilizaţi numai prelungitoare aprobate, care sunt
adecvate pentru acest instrument, adică au semn de
conformitate!
• Cablul de alimentare nu trebuie să vină în contact
cu părţile fierbinţi ale aparatului!
• Niciodată nu mutaţi aparatul trăgând de cablu şi nu
utilizaţi cablul pentru a transporta obiecte!!
• Nu înfășuraţi cablul de alimentare în jurul
aparatului! Nu utilizaţi aparatul cu cablu înfăşurat
- acest lucru este valabil mai ales pentru utilizarea
unui tambur pentru înfăşurarea cablurilor!
• Nu striviţi cablul şi nu-l trageţi peste muchii ascuţite.
Nu-l amplasaţi deasupra unor plite încinse sau
deasupra flăcărilor!
AMBALAJ
• După despachetarea aparatului, verii caţi
integralitatea acestuia şi existenţa unor eventuale
deteriorări apărute la transport În cazul constatării
unei deteriorări sau al unei livrări incomplete,
contactaţi distribuitorul autorizat!
• Nu aruncaţi cutia originală! Aceasta poate fi utilizată
la depozitare şi mutare pentru evitarea deteriorărilor
la transport!
• Evacuaţi materialul ambalajului la deşeuri într-un
mod corespunzător! Nu lăsaţi pungile de plastic la
îndemâna copiilor!
MONTARE PE PERETE
1. Vă rugăm să vă asiguraţi, că pereţii, la locul de fixare
a aparatului,nu au în ele cabluri, ţevi etc., pentru a se
asigura, că aparatul poate fi montat în siguranţă pe perete.
2. Aparatul este destinat exclusiv pentru montare verticală
pe perete! Este interzisă montarea pe podea sau tavan!
3. Nu aşezaţi niciodată aparatul direct sub priza!
4. Montajul şi conectarea trebuie efectuată de către un
electrician autorizat. Instalarea trebuie să fie izolată
de la sursa de energie electrică înainte de efectuarea
lucrărilor electrice.
5. Conectaţi cablul de alimentare astfel încât să nu
împiedice circulaţia persoanelor şi să nu fie călcat!
Utilizaţi numai prelungitoare aprobate, care sunt
adecvate pentru acest instrument, adică au semn de
conformitate!
6. Cablul de alimentare nu trebuie să intre în contact
cu părţile fierbinţi ale aparatului!
7. Nu utilizaţi aparatul în încăperi cu o suprafaţă mai
mică de 4m².

20 Instrucţuni de utilizare şu depozitare
RO MONTAJ PE PERETE
Atenţie! În vederea evitării producerii unor daune sau
a riscului de incendiu:
• Asiguraţi o distanţă suficientă de la perete (minim
25 cm pe ambele părţi), tavan (minim 20 cm), podea
(minim 1,5 m), racorduri (minim 1 m) sau alte aparate
(minim 1 m).
• Atunci când montaţi aparatul pe perete folosiţi numai
placa de suspendare, prevăzută în set, pentru a
asigura distanţa necesară dintre acesta și peretele.
1. Избор на място за монтиране на уреда
• pe un perete care este suficient de solid
• într-un loc în care aparatul va fi ferit de vânturi
extrem de puternice;
• cel puţin la o distanţă de 1 metru de la oameni,
animale și plante;
• locul trebuie să corespundă distanţelor indicate în
desenul de mai jos;
Nota: Aparatul este realizat în întregime din
materiale rezistente la rugină și poate să fie expus la
efectele de mediu normale
2. Marcaţi locurile găurilor pe care le veţi face conform
desenul:
Faceţi două găuri în perete cu diametru de 6 mm.
Adâncimea de găurire trebuie să fie de aproximativ 40 mm
Autocolant rotund furnizat
în kit-ul
3. Puneţi câte un diblu în fiecare gaură.
4. Înșurubaţi în fiecare gaură două șuruburi lungi. Lăsaţi
capetele șuruburilor să iese înafara cu cel puţin 5 mm
pentru a putea suspenda aparatul pe ele.
5. Suspendaţi aparatul pe şuruburile.
Marcaţi locul în care trebuie făcută gaura pentru
montarea plăcii de suspendare
6. Daţi jos aparatul de pe perete și faceţi găurile
respective.
• Folosiţi un burghiu de 6 mm pentru a face gaură în
perete.
• Puneţi un diblu.
Pagina se încarcă...
Pagina se încarcă...
Pagina se încarcă...
Pagina se încarcă...
Pagina se încarcă...
Pagina se încarcă...
Pagina se încarcă...
Pagina se încarcă...
Pagina se încarcă...
Pagina se încarcă...
Pagina se încarcă...
Pagina se încarcă...
Pagina se încarcă...
Pagina se încarcă...
Pagina se încarcă...
Pagina se încarcă...
Pagina se încarcă...
Pagina se încarcă...
Pagina se încarcă...
Pagina se încarcă...
Pagina se încarcă...
Pagina se încarcă...
Pagina se încarcă...
Pagina se încarcă...
Pagina se încarcă...
Pagina se încarcă...
Pagina se încarcă...
Pagina se încarcă...
Pagina se încarcă...
Pagina se încarcă...
Pagina se încarcă...
Pagina se încarcă...
Pagina se încarcă...
Pagina se încarcă...
Pagina se încarcă...
Pagina se încarcă...
Pagina se încarcă...
Pagina se încarcă...
Pagina se încarcă...
Pagina se încarcă...
Pagina se încarcă...
Pagina se încarcă...
Pagina se încarcă...
Pagina se încarcă...
Pagina se încarcă...
Pagina se încarcă...
Pagina se încarcă...
Pagina se încarcă...
Pagina se încarcă...
Pagina se încarcă...
Pagina se încarcă...
Pagina se încarcă...
-
 1
1
-
 2
2
-
 3
3
-
 4
4
-
 5
5
-
 6
6
-
 7
7
-
 8
8
-
 9
9
-
 10
10
-
 11
11
-
 12
12
-
 13
13
-
 14
14
-
 15
15
-
 16
16
-
 17
17
-
 18
18
-
 19
19
-
 20
20
-
 21
21
-
 22
22
-
 23
23
-
 24
24
-
 25
25
-
 26
26
-
 27
27
-
 28
28
-
 29
29
-
 30
30
-
 31
31
-
 32
32
-
 33
33
-
 34
34
-
 35
35
-
 36
36
-
 37
37
-
 38
38
-
 39
39
-
 40
40
-
 41
41
-
 42
42
-
 43
43
-
 44
44
-
 45
45
-
 46
46
-
 47
47
-
 48
48
-
 49
49
-
 50
50
-
 51
51
-
 52
52
-
 53
53
-
 54
54
-
 55
55
-
 56
56
-
 57
57
-
 58
58
-
 59
59
-
 60
60
-
 61
61
-
 62
62
-
 63
63
-
 64
64
-
 65
65
-
 66
66
-
 67
67
-
 68
68
-
 69
69
-
 70
70
-
 71
71
-
 72
72