
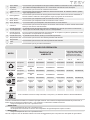
USER MANUAL
For Domestic Hot Water Heat Pump
BOMBA DE CALOR PARA AGUA CALIENTE
SANITARIA
WARMWASSER – WÄRMEPUMPE
POMPA DI CALORE PER ACQUA CALDA
SANITARIA
DOMESTIC HOT WATER HEAT PUMP
EN
ES
DE
IT
POMPY CIEPŁA DO CIEPŁEJ WODY
WARMTEPOMP VOOR SANITAIR WARM WATER
BOMBA DE CALOR PARA ÁGUA QUENTE
SANITÁRIA
POMPE À CHALEUR EAU CHAUDE SANITAIRE
FR
PL
NL
PT
ТЕРМОПОМПА ЗА БИТОВА ГОРЕЩА ВОДА
TOPLINSKA PUMPA ZA TOPLU VODU U
KUĆANSTVU
TOPLOTNA ČRPALKA ZA SANITARNO TOPLO
VODO
ΟΙΚΙΑΚΗ ΑΝΤΛΙΑ ΘΕΡΜΑΝΤΙΚΗΣ ΘΕΡΜΑΝΣΗΣ
ΝΕΡΟΥ
GR
BG
HR
SL
TOPLOTNA PUMPA ZA VRUĆU VODU U
DOMAĆINSTVU
POMPĂ DE CALDURĂ PENTRU APĂ CALDĂ
MENAJERĂ
SRB
RO
HPWH 3.2 100
HPWH 3.2 150
206963 rev.0.00


3
DOMESTIC HOT WATER HEAT PUMP
EN
Dear Customer,
Thank you for having purchasing this product.
We, has always paid a great deal of attention to environmental problems, therefore, it has used technologies and materials with a
low environmental impact to manufacture its products in conformity with WEEE – RоHS (2011/65/ЕU and 2012/19/EU community
standards.
IMPORTANT RULES AND SAFETY INSTRUCTIONS
IMPORTANT! Non observance of below described rules leads to warranty fault and the producer bear no more responsi-
bilities for your appliance!
• This appliance is not intended for use by persons (including children) with re-
duced physical, sensory or mental capabilities, or lack of experience and knowl-
edge, unless they have been given supervision or instruction concerning use of the
appliance by a person responsible for their safety.
• Children should be supervised to ensure that they do not play with the appli-
ance.
• Children must not play with the equipment. Cleaning and maintenance intended
to be carried out by the user must not be performed by unsupervised children.
• The use of the appliance for any purpose other than that it is intended is prohib-
ited
• Do not use the storage tank if it is not lled with water.
• Installation, commissioning and maintenance of the device must be performed
by qualied and authorized personnel. Do not attempt to install the device yourself.
• The appliance must only be installed in premises with normal re resistance.
• Usage of this device at temperature and pressure level above prescribed leads
to warranty violation!
• This device is intended for heating of potable water in liquid state. using dier-
ent uids in dierent states leads to warranty violation!
• Read carefully the “Installation and maintenance manual”, that is an integral part
of your appliance!
• Check if the unit is installed and connected according to the “Installation and
maintenance manual”, that is an integral part of your appliance!
• Check if the tank is full with water!
• Check if the electric main supply is present an it is with accordance to the local
regulations!
• Check that the air ducts or air inlet/outlet are not blocked!
BEFORE STARTING THE UNIT!

4
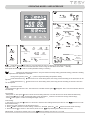
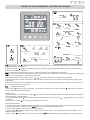
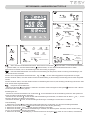
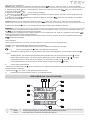
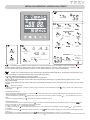
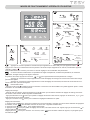
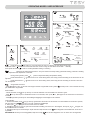
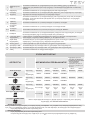
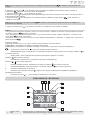
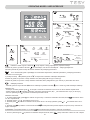
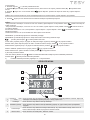
OPERATING MODES. USER INTERFACE
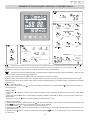
1 Press this button and hold it for 3 seconds when the unit is in standby, the unit will be turned ‘ON’.
Press this button and hold it for 3 seconds when the unit is running, the unit will be turned OFF - “Standby”.
Short press this button to enter or exit the parameter setting or checking.
- These are the multi-purpose buttons. They are used for the temp setting, parameter setting, parameter checking,
clock adjustment and adjustment of the timer.
- During running status, press or button to adjust the setting temperature directly.
- Press these buttons when the unit is on clock setting status, the hour(s) and the minute(s) of the clock time can be
adjusted.
- Press these buttons when the unit is on timer setting status, the hour(s) and the minute(s) of the timer ‘ON’/’OFF’
can be adjusted.
2
Unlock the screen:
- Press the button for at least 3 sec. The buttons are unlocked and the symbol will appear. After 1 minute the buttons will lock
automatically.
Clock setting:
- After power on, short press button to enter the clock setting interface, hour and minute icons “88:88” ash simultaneously.
- Short press button to switch hour/minute setting, press the and buttons to set the exact hour(s) and minute(s);
- Press button again to conrm the settings/changes and exit.
Timer setting:
1- After power on, long press button for 5 seconds to enter the timer setting interface, the timer on icon ONONON
OFOFFFOFF
111
222 and hour icon “88:”
ash simultaneously;
2- Press the and buttons to set the exact hour(s).
3- Press button to transfer to minute setting, minute icon “:88” ash, press the and buttons to set the exact minute(s).
4- Press the button to conrm. In this moment, timer on icon ONONON
111
222 stops ashing that means “timer on” is set
IMPORTANT: If step No4 is omitted, timer on icon ONONON
111
222 will stay ashing and “timer on” is not set!
3
Turn ON
Standby
Change working
mode:
Check Parameters
+
Auto Heat Pump E-Heater
BOOST Ventilation
Set Temp
Adjust
Hour/Minute
Set
Hour/Minute
Timer Set Hour
Set
Minute
Transfer
Unlock Buttons
After 1 Minute
Buttons
are Locked
Automatically
3
2
4
1
SET
SET
TEMP
TEMP
SET
SET
TEMP
TEMP
3s
3s
5s
5s
3s
3s
3s
3s
5s
5s
ON
ON
OFF
OFF
1
1
2
2
C
C
C
C
SET OUT
SET OUT
TEMP
TEMP
ON
ON
ON
ON
OFF
OFF
OFF
OFF

5
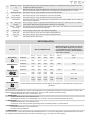
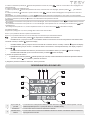
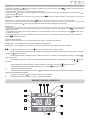
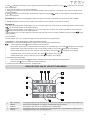
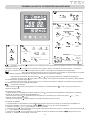
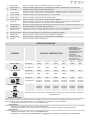
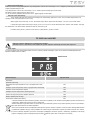
1 Hot water available The icon indicates that the domestic hot water temperature has reached the set point. The hot water
is available for use. Heat pump is in standby.
2 Fan ventilation The icon indicates that the fan ventilation function is enabled.
3 Electrical heating The icon indicates that the electrical heating function is enabled. The electrical heater will work ac-
cording to the control program.
4 Defrosting The icon indicates that the defrosting function is enabled. This is an automatic function; the system
will enter or exit the defrosting according to the internal control program
5“Green” mode The icon indicates that the unit is operating in “Green” mode.
6 “AUTO” mode The icon indicates that the unit is operating in “AUTO” mode.
1) Short press the button and the working mode could be set.
• AUTO mode. (Heat pump + E-heater will work according to the controller logic). The symbol will appear on the display.
• GREEN mode. (Only heat pump will work at normal working condition). The symbol will appear on the display.
• BOOST mode (Heat pump + E-heater will work at the same time). The symbol + will appear on the display.
• E-HEATER mode. (Only E-heater will work). The symbol will appear on the display.
• VENTILATION mode. (Only fan will work). The symbol will appear on the display.
2) Check the system parameters
• In any status, press this button and hold for 3 seconds, entry the system parameter checking interface.
• Press the and buttons to check the system parameters.
4
5- Press button again to transfer to timer o setting, the “timer o” icon OFOFFFOFF
111
222 and hour icon “88:” ash simultaneously.
6- Press the and buttons to change the hour(s).
7- Press button button to transfer to minute setting, minute icon “:88” ash, press the and buttons to change the minute(s).
8- Press button to conrm. In this moment, “timer o” icon OFOFFFOFF
111
222 stops ashing that means “timer o” is set
IMPORTANT: If step No8 is omitted, timer o icon ONONON
111
222 will stay ashing and “timer o” is not set!
9- Press button again to save and exit the timer setting interface.
IMPORTANT:
- If step No4 is omitted and all steps from 5 to 9 are done, “timer o” will be set and in stand by mode icon OFOFFFOFF
111
222 will light on display.
- If step No8 is omitted, and all steps from 1 to 4 are done, “timer on” will be set and in stand by mode icon ONONON
111
222 will light on display.
- If all steps from 1 to 9 are done, both “timer on” and “timer o” will be set and icon ONONON
OFOFFFOFF
111
222 will light on display.
Timer cancelling:
Do all steps from 1 to 9, without steps No4 and No8. The timer will be cancelled
NOTE: 1) The timer settings are automatically repeating.
NOTE: 2) The timer settings are still valid after a sudden power cut.
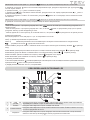
MEANING OF LED ICONS!
ONON
OFFOFF
11
22
CCCC
SET OUT SET OUT
TEMPTEMP
1
24
36
7
9
8
10
11
12
13
5

6
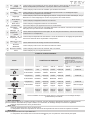
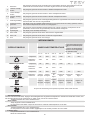
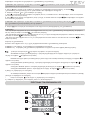
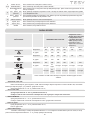
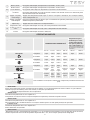
MODE AMBIENT TEMP
Lower tank water temp
or Upper tank water
temp
*(when lower tank water
temp sensor has prob-
lem)
≤-5 °C ≥-2 °C >43 °C ≤41 °C >60 °C ≤58 °C
AUTO mode Compressor OFF ON OFF ON OFF ON
E-heater ON OFF ON OFF
GREEN mode Compressor OFF ON OFF ON OFF ON
E-heater ON OFF ON OFF
BOOST mode Compressor OFF ON OFF ON OFF ON
E-heater Acc. to
logic
Acc. to
logic
Acc. to
logic
Acc. to
logic
Acc. to
logic
Acc. to
logic
E-Heater mode
Acc. to
logic
Acc. to
logic
Acc. to
logic
Acc. to
logic
Acc. to
logic
Acc. to
logic
Fan mode
Only the fan will working at low speed,compressor and E-heater are OFF
5+3 “BOOST” mode The icons indicate that the unit is operating in “BOOST” mode.
7 Key lock The icon indicates the key lock function is enabled. The keys Will be deactivated until this function is
disabled
8Left temperature
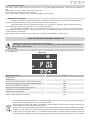
display
The display shows the set water temperature. In case any malfunction occurs, this section will display
the related error code ”P”.
9Right temperature
display’
The icon indicates reached water temperature. When checking or adjusting the parameters, this
section will display the related parameter value
10 Time display The display shows the clock time or timer time.
11 Timer ‘ON’ The icon indicates that the timer ‘ON’ function is enabled.
12 Timer ‘OFF’ The icon indicates that the timer ‘OFF’ function is enabled.
13 Error The icon indicates there is a malfunction.
OPERATING MODES
AUTO mode
When the unit is ON, the main controller “understands” how to reach the desired temperature in a few hours, through the rational
use of the heat pump and, if necessary, the E-heater will work too.
Temperature range 38°C~60°C default 50°C
GREEN mode
Temp range 38°C~60°C default 50°C
The compressor will work only, according to upper and lower tank water temperature.
BOOST mode
Temp range 38°C~70°C default 50°C
Both compressor and E-heater will work simultaneously for fastest production of hot water
E-Heater mode
Temp range 38°C~70°C default 50°C
Only E-heater is working!
Defrost mode
“Normal defrost”. When the coil temperature ≤ 1 °C, and the compressor accumulatively run over 45 minutes, and if after that 45
min. coil temperature is ≤ -3°C, than the defrosting operation starts.

7
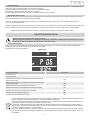
Error Code
Stand by
Normal running
Lower tank water temp. sensor failure P01
Upper tank water temp. sensor failure P02
Coil temp. sensor failure P03
Suction air temp sensor failure P04
Ambient temp. sensor failure P05
Winter Anti-frozen protection failure P06
High pressure protection (HP Switch) E01
This symbol on the product(s) and / or accompanying documents means that used electrical and electronic equipment
(WEEE) should not be mixed with general household waste. For proper treatment, recovery and recycling, please take
this product(s) to designated collection points where it will be accepted free of charge. Disposing of this product correctly
will help save valuable resources and prevent any potential negative eects on human health and the environment,
which could otherwise arise from inappropriate waste handling.
IF SOMETHING GOES WRONG!
• Switch o the unit! Disconnect it the from main power supply!
• Call to the service and inform them about the error code or describe all abnormalities and strange behavior
or noise of your appliance!
During standby or running status, if there is a malfunction, the unit will stop automatically and show the error code on the screen of
the controller. Call to the service!
ERROR CODE
Error codes
Antifreeze mode
Disinfection weekly cycle
Even when the appliance is in standby mode, if lower tank temp. ≤ 5°C, anti-frozen protection starts. The Heat pump is forced to
work.
When lower tank temp. ≥ 10°C, it exits Anti-frozen protection.
Symbol P06 is ashing on display, without icon “Error”.
If both P06 and “Error” appear on display, see chapter “error codes”
The E-heater will start each week at the setting time automatically. (When the unit is o at constant temperature or at
standby mode, Anti-legionnaire function is on)
When upper water tank temp. ≥ 70°C, the heater stops. When upper water tank temp. ≤ 70°C-2°C, the heater starts.
It keeps the upper water tank temp in range (70°C-2°C) to 70°C for he set disinfection time 30mins, after 30mins, then quit
the disinfection. The timer will be cleared and start to next timer cycle.
E-heater Priority level: 1) defrost or anti-frozen; 2) disinfection; 3) other controls

8
BOMBA DE CALOR PARA AGUA CALIENTE SANITARIA
ES
Estimados clientes
Gracias por comprar este producto.
El equipo de TESY siempre ha prestado gran atención a los problemas ambientales, por lo que utiliza tecnologías y materiales
de bajo impacto para producir sus productos de acuerdo con las Directivas de la Comunidad sobre la limitación de ciertas
sustancias peligrosas en equipos eléctricos y electrónicos, y sobre RAEE y residuos de RoHS (2011/65 / UE y 2012/19 / UE).
NORMAS E INSTRUCCIONES IMPORTANTES DE SEGURIDAD
¡Importante! La garantía queda anulada y el fabricante exento de responsabilidad de las posibles consecuencias
generadaspor no seguir estas instrucciones.
• El aparato no está diseñado para ser utilizado por personas con capacidades
físicas, sensoriales o mentales limitadas o falta de experiencia y conocimiento, a
menos que hayan sido capacitados o instruidos para usar el aparato por una per-
sona cualicada y responsable de su seguridad.
• Los niños deben ser supervisados para evitar que jueguen con el aparato.
• La limpieza y el mantenimiento del aparato, que debe ser realizado por el usuario,
no puede ser llevada a cabo por menores sin supervisión.
• Está prohibido usar el aparato para cualquier otro propósito que no sea su uso
previsto.
• No use el tanque de agua si no está lleno de agua.
• La instalación, la puesta en servicio y el mantenimiento del aparato deben ser
realizados por una persona cualicada y autorizada. No intente instalar el aparato
usted mismo.
• El aparato solo debe instalarse en habitaciones con protección contra el fuego.
• El uso de este aparato a temperaturas y niveles de presión diferentes a los esp-
cicados anulará la garantía.
• El aparato está diseñado para calentar agua potable en estado líquido. El uso de
otros uidos en diferentes condiciones anulará la garantía.
• Lea atentamente el Manual de instalación y mantenimiento, que constituye una
parte integral de su equipo.
• Asegúrese de que el equipo esté instalado y conectado de acuerdo con el “Manu-
al de instalación y mantenimiento”.
• Asegúrese de que el tanque de agua esté lleno de agua
• Asegúrese de que la fuente de alimentación está disponible y en línea con la
normativa local.
• Asegúrese de que los conductos de aire o los terminales de entrada / salida de
aire no estén bloqueados
ANTES DE ENCENDER LA UNIDAD

9
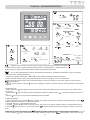
MODOS DE FUNCIONAMIENTO. INTERFAZ DE USUARIO
1Presione este botón y manténgalo presionado durante 3 segundos cuando el dispositivo esté en modo de espera, de este
modo el dispositivo se encenderá
Presione este botón y manténgalo presionado durante 3 segundos cuando el dispositivo esté funcionando, de este modo el
dispositivo se apagará - “En espera”.
Presione brevemente este botón para ingresar o salir de la conguración o vericación de parámetros.
Estos son los botones multifunción. Se utilizan para el ajuste de la temperatura, el ajuste de parámetros, la vericación de
parámetros, el ajuste del reloj y el ajuste del temporizador.
En la posición de encendido, presione el botón y , para ajustar directamente la temperatura establecida.
Presione estos botones cuando el dispositivo esté en el estado de ajuste del reloj, se pueden ajustar la(s) hora(s) y el(los) minu-
to(s) del reloj.
Presione estos botones cuando el dispositivo esté en el estado de conguración del temporizador, se pueden ajustar las horas y
los minutos del temporizador “ON”/”OFF”.
2
Desbloquear la pantalla:
-Pulse el botón durante al menos 3 segundos. Los botones se desbloquean y aparece el símbolo . Después de 1 minuto los
botones se bloquearán automáticamente.
Ajuste del reloj:
-Tras el encendido, pulse brevemente el botón para acceder a la interfaz de ajuste del reloj, los iconos de la hora y los minutos
“88:88” parpadean simultáneamente.
- Pulse brevemente el botón para cambiar el ajuste de horas/minutos, pulse los botones y para ajustar la hora y los minu-
tos exactos;
-Pulse de nuevo el botón para conrmar los ajustes/cambios y salir.
Ajuste del temporizador:
1- Después de encender el aparato, pulse el botón durante 5 segundos para entrar en la interfaz de ajuste del temporizador, el
icono del temporizador encendido y el icono ONONON
OFOFFFOFF
111
222 de la hora “88:” parpadean simultáneamente;
2- Pulse los botones y para ajustar la(s) hora(s) exacta(s).
3- Pulse el botón para pasar al ajuste de los minutos, el icono de los minutos “:88” parpadea, pulse los botones y para
ajustar los minutos exactos.
4- Pulse el botón para conrmar. En este momento, el icono ONONON
111
222 del temporizador deja de parpadear, lo que signica que el
3
Turn ON
Standby
Change working
mode:
Check Parameters
+
Auto Heat Pump E-Heater
BOOST Ventilation
Set Temp
Adjust
Hour/Minute
Set
Hour/Minute
Timer Set Hour
Set
Minute
Transfer
Unlock Buttons
After 1 Minute
Buttons
are Locked
Automatically
3
2
4
1
SET
SET
TEMP
TEMP
SET
SET
TEMP
TEMP
3s
3s
5s
5s
3s
3s
3s
3s
5s
5s
ON
ON
OFF
OFF
1
1
2
2
C
C
C
C
SET OUT
SET OUT
TEMP
TEMP
ON
ON
ON
ON
OFF
OFF
OFF
OFF

10
1) Presione brevemente el botón y podrá congurar el modo de operación.
• Modo AUTOMÁTICO.(La bomba de calor + el calentador eléctrico funcionarán de acuerdo con la lógica del controlador).
El símbolo aparecerá en la pantalla.
• Modo VERDE.(Solo la bomba de calor funcionará en condiciones normales de operación). El símbolo aparecerá en la
pantalla.
• Modo BOOST.(La bomba de calor + el calentador eléctrico funcionarán simultáneamente). El símbolo + aparecerá
en la pantalla.
• Modo E-HEATER. (Solo funcionará el calentador electrónico). El símbolo aparecerá en la pantalla.
• Modo VENTILACIÓN. (Solo funcionará el ventilador). El símbolo aparecerá en la pantalla.
2) Verique los parámetros del sistema
• En cualquier estado, presione este botón y manténgalo presionado durante 3 segundos para ingresar a la interfaz de veri-
cación de los parámetros del sistema.
• Pulse los botones , para comprobar los parámetros del sistema.
3) Ajuste los parámetros del sistema. Consulte el apartado 9.2. “Lista de parámetros”.
4
temporizador está activado.
IMPORTANTE: Si se omite el paso nº 4, el icono ONONON
111
222 del temporizador permanecerá parpadeando y el “temporizador encendido”
no estará ajustado.
5- Pulse de nuevo el botón para pasar a la conguración del temporizador apagado, el icono de “temporizador apagado” y el
icono OFOFFFOFF
111
222 de la hora “88:” parpadean simultáneamente.
6- Pulse los botones y para cambiar la(s) hora(s).
7- Pulse el botón para pasar a la conguración de los minutos, el icono de los minutos “:88” parpadea, pulse los botones y
para cambiar los minutos.
8- Pulse el botón para conrmar. En este momento, el icono OFOFFFOFF
111
222 “timer o” deja de parpadear, lo que signica que el “timer o”
está ajustado.
IMPORTANTE: Si se omite el paso nº 8, el icono ONONON
111
222 de “timer o” permanecerá parpadeando y el “timer o” no estará ajustado.
9- Pulse de nuevo el botón para guardar y salir de la interfaz de ajuste del temporizador.
IMPORTANTE:
- Si se omite el paso No4 y se realizan todos los pasos del 5 al 9, el icono de “timer o” se ajustará y el icono OFOFFFOFF
111
222 de modo stand
by se iluminará en la pantalla.
- Si se omite el paso nº 8 y se realizan todos los pasos del 1 al 4, se activará el “temporizador” y se iluminará el icono ONONON
111
222 del
modo de espera en la pantalla.
- Si se realizan todos los pasos del 1 al 9, tanto el “temporizador activado” como el “temporizador desactivado” se activarán y el
icono ONONON
OFOFFFOFF
111
222 se iluminará en la pantalla.
Cancelación del temporizador:
Realice todos los pasos del 1 al 9, sin los pasos No4 y No8. El temporizador se cancelará
NOTA: 1) Los ajustes del temporizador se repiten automáticamente.
NOTA: 2) Los ajustes del temporizador siguen siendo válidos después de un corte de corriente repentino.
DESCRIPCIÓN DE LOS ICONOS LED
ONON
OFFOFF
11
22
CCCC
SET OUT SET OUT
TEMPTEMP
1
24
36
7
9
8
10
11
12
13
5

11
MODO TEMPERATURA
AMBIENTE
Lower tank water temp or
Upper tank water temp
*(when lower tank water
temp sensor has problem)
≤-5 °C ≥-2 °C >43 °C ≤41 °C >60 °C ≤58 °C
Modo AUTO Compresor APAGADO ENCENDIDO APAGADO ENCENDIDO APAGADO ENCENDIDO
Calentador
eléctrico
ENCENDI-
DO APAGADO ENCENDIDO APAGADO
Modo VERDE Compresor APAGADO ENCENDIDO APAGADO ENCENDIDO APAGADO ENCENDIDO
Calentador
eléctrico
ENCENDI-
DO APAGADO ENCENDIDO APAGADO
Modo BOOST Compresor APAGADO ENCENDIDO APAGADO ENCENDIDO APAGADO ENCENDIDO
Calentador
eléctrico
Según la
lógica
Según la
lógica
Según la
lógica
Según la
lógica
Según la
lógica
Según la
lógica
Modo Calenta-
dor eléctrico Según la
lógica
Según la
lógica
Según la
lógica
Según la
lógica
Según la
lógica
Según la
lógica
Modo
VENTILADOR Solo el ventilador funcionará a baja velocidad, el compresor y el calentador eléctrico estarán APAGADOS.
1Agua caliente
disponible
El icono indica que la temperatura del agua caliente sanitaria ha alcanzado el valor congurado. El
agua caliente está disponible para su uso. La bomba de calor está en modo de espera.
2Ventilación El icono indica que la función de ventilación está activada.
3Calefacción eléc-
trica
El icono indica que la función de calefacción eléctrica está activada. El calentador eléctrico operará
según el programa de control.
4Descongelación El icono indica que la función de descongelación está activada. Esta es una función automática; el
sistema entrará o saldrá de la descongelación según el programa de control interno.
5Modo "Verde" El icono indica que el dispositivo está funcionando en modo "Verde".
6 Modo “AUTO” El icono indica que el dispositivo está funcionando en modo “AUTO”.
5+3 Modo “BOOST” Los iconos indican que el dispositivo está funcionando en modo “BOOST”.
7 Cerradura El icono indica que la función de bloqueo de las teclas está activada. Las teclas estarán deactivadas
hasta que esta función esté deactivada.
8Pantalla izquierda
de la temperatura
La pantalla muestra la temperatura del agua establecida. En caso de que ocurra un mal funciona-
miento, aquí se mostrará el código de error "P" correspondiente.
9Pantalla derecha
de la temperatura
El icono muestra la temperatura del agua alcanzada. Al comprobar o ajustar los parámetros, el valor
del parámetro correspondiente se mostrará aquí.
10 Pantalla de la hora La pantalla muestra la hora del reloj o la hora del temporizador.
11 Temporizador "ON" El icono indica que la función "ON" del temporizador está activada.
12 Temporizador
„OFF” El icono indica que la función 'OFF' del temporizador está activada.
13 Error El icono indica que hay un mal funcionamiento.
RANGO DE OPERACIÓN
AUTO mode
Cuando la unidad está encendida, el controlador principal “entiende” cómo alcanzar la temperatura deseada en pocas horas, a
través del uso racional de la bomba de calor y, si es necesario, el calentador E también funcionará.
Rango de temperatura 38°C~60°C por defecto 50°C
GREEN mode
Rango de temperatura 38°C~60°C por defecto 50°C
El compresor sólo funcionará en función de la temperatura del agua del depósito superior e inferior.
BOOST mode
Rango de temperatura 38°C~70°C por defecto 50°C
Tanto el compresor como el calentador eléctrico funcionan simultáneamente para una producción más rápida de agua caliente

12
Protección/ Mal funcionamiento Código de error
En espera
Operación normal
Falla del sensor de temperatura del agua en la parte inferior del
tanque P01
Falla del sensor de temperatura del agua en la parte superior
del tanque P02
Falla del sensor de temperatura del serpentín P03
Falla del sensor de temperatura del aire de admisión P04
Falla del sensor de la temperatura ambiente P05
Protección invernal contra las heladas P06
Protección de alta presión (HP Switch) E01
De acuerdo con las Directivas de la UE 2011/65/EU (RoHS), 2012/19/EU (WEEE), relacionadas con la reducción del
uso de sustancias peligrosas en equipos eléctricos y electrónicos, así como la eliminación de residuos.
El símbolo de la papelera, que se puede ver en el equipo o en su embalaje, indica que el dispositivo debe ser recogido
por separado de otros residuos al nal de su vida útil.
Por lo tanto, al nal de la vida útil del dispositivo, el usuario deberá llevar el equipo a los centros adecuados para la
recogida selectiva de residuos electrónicos y eléctricos o devolverlo al distribuidor al adquirir otro dispositivo equiva-
lente, en una relación de uno a uno.
La adecuada recogida separada de residuos asociada al posterior envío de equipos desechados para su reciclaje,
procesamiento y/o eliminación ambientalmente racional contribuye a evitar posibles impactos negativos tanto en el
medio ambiente como en la salud; fomenta también la reutilización y/o el reciclaje de los materiales con los que está
fabricado el equipo.
EN CASO DE ERROR O FALLO DEL EQUIPO
• Apague el equipo. Desenchúfelo.
• Llame servicio técnico ocial e infórmeles sobre el código de error o describa cualquier comportamiento
inusual o ruido de su equipo
Cuando se produce un error o el modo de protección se activa automáticamente, el número de error se indicará en la pantalla del
panel de control y parpadeará un icono en la placa del controlador.
CÓDIGO DE ERROR
Códigos de errores
Antifreeze mode
Disinfection weekly cycle
Incluso cuando el aparato está en modo de espera, si la temperatura del depósito es ≤ 5°C, la protección anticongelante se pone
en marcha. La bomba de calor se ve obligada a trabajar.
Cuando la temperatura del depósito inferior es ≥ 10°C, sale de la protección anticongelante.
El símbolo P06 parpadea en la pantalla, sin el icono “Error”.
Si aparecen tanto P06 como “Error” en el display, ver capítulo “códigos de error”
El calentador E se pondrá en marcha cada semana a la hora jada automáticamente. (Cuando la unidad está apagada a
temperatura constante o en modo de espera, la función antilegionaria está activada)
Cuando la temp. del tanque de agua superior ≥ 70°C, el calentador se detiene. Cuando la temperatura del depósito supe-
rior de agua es ≤ 70°C-2°C, el calentador se pone en marcha.
Mantiene la temperatura del tanque de agua superior en el rango (70°C-2°C) a 70°C durante el tiempo de desinfección
establecido de 30 minutos, después de 30 minutos, entonces deja la desinfección. El temporizador se borrará y se iniciará el sigui-
ente ciclo del temporizador.
Nivel de prioridad del calentador electrónico: 1) descongelación o anticongelación; 2) desinfección; 3) otros controles
E-Heater mode
Rango de temperatura 38°C~70°C por defecto 50°C
¡Sólo funciona el calentador E!
Defrost mode
“Desescarche normal”. Cuando la temperatura de la bobina es ≤ 1 °C, y el compresor funciona de forma acumulada durante 45
minutos, y si después de esos 45 minutos la temperatura de la bobina es ≤ -3°C, se inicia la operación de desescarche.

13
WARMWASSER – WÄRMEPUMPE
DE
Sehr geehrte Kunden,
Danke für Ihren Einkauf.
Das Team von TESY hat immer eine große Aufmerksamkeit den Umweltprobleme geschenkt und verwendet dazu
Technologien und Stoe mit niedriger Einwirkung auf die Natur bei der Herstellung seiner Produkte entsprechend der
Richtlinien der Gemeinschaft zur Einschränkung bestimmter gefährlichen Stoen in elektrischen und elektronischen Geräte,
sowie bezüglich der Abfälle WEEE und RоHS (2011/65/ЕU и 2012/19/EU).
WICHTIGE SICHERHEITSREGELN UND -HINWEISE
Wichtig! Die Garantie fällt weg und der Hersteller übernimmt keine Haftung für die Folgen bei Nichteinhaltung der
gegebenen Anweisungen!
Das Gerät ist nicht zur Verwendung von Personen (einschl. Kinder) mit beschränk-
ten leiblichen, sensitiven oder Sinnmöglichkeiten oder fehlender ausreichender
Erfahrung und Kenntnisse, ausgenommen wenn sie zur Verwendung des
Geräts von einer Person ausgebildet und angewiesen sind, die für ihre Sicherheit
verantwortlich ist.
• Die Kinder sollen untergewiesen werden, mit dem Gerät nicht zu spielen.
• Die Kinder dürfen nicht mit dem Gerät spielen. Die Ausführung der Reinigung und
Wartung des Geräts, die durch Verbraucher erfolgen sollen, ist verboten für Kinder
ohne Aufsicht.
• Die Anwendung des Geräts für ein anderes Ziel ist verboten, ausgenommen zum
Zweck, für welches es bestimmt ist.
• Nutzen Sie den Wasserbehälter nicht, wenn er nicht mit Wasser voll ist.
• Der Einbau, die Inbetriebnahme und die Wartung des Geräts sollen durch eine
qualizierte und zuständige Person erfolgen. Probieren Sie nicht das Gerät allein
einzubauen.
• Das Gerät darf nur in brandgeschützten Räumen eingebaut werden.
• Die Verwendung dieses Geräts bei Temperaturen und Druckhöhen, die verschie-
den als die angegebenen sind, führt zum Wegfallen der Garantie!
• Das Gerät ist bestimmt zur Erwärmung vom Trinkwasser im üssigen Zustand.
Die Nutzung anderer Medien in verschiedenen Aggregatzuständen führt zum Weg-
fallen der Garantie
Lesen Sie gründlich die „Einbau- und Wartungsanleitung“ durch, die untrennbarer
Teil Ihres Geräts ist!
• Überzeugen Sie sich, dass das Gerät laut der “Einbau- und Wartungsanleitung“
eingebaut und angeschlossen ist, die untrennbarer Teil Ihres Geräts ist!
• Versichern Sie sich, dass der Wasserbehälter voll mit Wasser ist!
• Versichern Sie sich, dass die Stromversorgung vorliegt und den örtlichen Normen
entspricht!
• Überzeugen Sie sich, dass die Luftleitungen oder Lufteingang/-ausgang nicht
gesperrt sind!
VOR DEM STARTEN DES GERÄTS

14
BETRIEBSMODI. ANWENDERSCHNITTSTELLE
1 Wenn das Gerät in Betriebsbereitschaft ist, diese Taste für 3 Sekunden gedrückt halten, um das Gerät EINzuschalten.
• gedrückt halten, um das Gerät EINzuschalten. gedrückt halten, um das Gerät auf Betriebsbereitschaft zu stellen.
Diese Taste kurz drücken, um zu den Einstellungen oder ihrer Prüfung zu gelangen
Das sind Multifunktionstasten. Sie werden für die Einstellung der Temperatur, Werte zur Prüfung der Einstellungen, der
Uhr und des Timers verwendet
Drücken Sie im eingeschalteten Zustand die Taste oder , um den direkt eingegebenen Temperaturwert zu regeln.
Drücken Sie diese Tasten, wenn das Gerät im Modus Uhrzeiteinstellung ist, die Stunde(n) und Minute(n) können damit eingestellt
werden;
Drücken Sie diese Tasten, wenn das Gerät im Modus zur Einstellung des Timers ist, die Stunde(n) und Minute(n) des Timers “EIN/
AUS” können damit eingestellt werden.
2
Entsperren Sie den Bildschirm:
- Drücken Sie die Taste für mindestens 3 Sekunden. Die Tasten werden entriegelt und das Symbol erscheint. Nach 1 Minute
werden die Tasten automatisch gesperrt.
Einstellung der Uhr:
- Drücken Sie nach dem Einschalten kurz auf die Taste , um die Oberäche für die Uhreinstellung aufzurufen. Die Symbole für
Stunde und Minute “88:88” blinken gleichzeitig.
- Drücken Sie kurz die Taste , um die Stunden-/Minuteneinstellung umzuschalten, und drücken Sie die Tasten und , um die
genaue(n) Stunde(n) und Minute(n) einzustellen;
- Drücken Sie die Taste erneut, um die Einstellungen/Änderungen zu bestätigen und das Menü zu verlassen.
Timer-Einstellung:
1- Drücken Sie nach dem Einschalten des Geräts 5 Sekunden lang auf die Taste, um die Timer-Einstellungsoberäche
aufzurufen; das Timer-Ein-Symbol ONONON
OFOFFFOFF
111
222 und das Stunden-Symbol “88:” blinken gleichzeitig;
2- Drücken Sie die Tasten und , um die genaue(n) Stunde(n) einzustellen.
3- Drücken Sie die Taste , um zur Minuteneinstellung zu wechseln, das Minutensymbol “:88” blinkt, drücken Sie die Tasten
und , um die genaue(n) Minute(n) einzustellen.
4- Drücken Sie die Taste zur Bestätigung. In diesem Moment hört das Symbol ONONON
111
222 “Timer ein” auf zu blinken, was bedeutet,
3
Turn ON
Standby
Change working
mode:
Check Parameters
+
Auto Heat Pump E-Heater
BOOST Ventilation
Set Temp
Adjust
Hour/Minute
Set
Hour/Minute
Timer Set Hour
Set
Minute
Transfer
Unlock Buttons
After 1 Minute
Buttons
are Locked
Automatically
3
2
4
1
SET
SET
TEMP
TEMP
SET
SET
TEMP
TEMP
3s
3s
5s
5s
3s
3s
3s
3s
5s
5s
ON
ON
OFF
OFF
1
1
2
2
C
C
C
C
SET OUT
SET OUT
TEMP
TEMP
ON
ON
ON
ON
OFF
OFF
OFF
OFF

15
1Warmwasser auf-
bereitet
Dieses Symbol zweigt an, dass die Warmwassertemperatur ihren Sollwert erreicht hat. Das Warmwas-
ser kann verbraucht werden. Die Wärmepumpe ist in Betriebsbereitschaft.
2Lüftung Das Symbol zeigt an, dass die Lüftungsfunktion aktiv ist.
1) Durch kurzes Betätigen der -Taste in den Betriebsmodus gelangen.
AUTO-Modus. (Wärmepumpe + E-Heizung arbeiten nach den Steuerungsangaben). Auf der Anzeige erscheint das
-Symbol.
GRÜNER Modus. (Nur die Wärmepumpe arbeitet unter Normalbetrieb). Auf der Anzeige erscheint das -Symbol.
BOOST-Modus (Wärmepumpe + Е-Heizung arbeiten gleichzeitig). Auf der Anzeige erscheinen + - Symbole.
E-HEIZUNG-Modus (nur die Е-Heizung ist in Betrieb). Auf der Anzeige erscheint das -Symbol.
LÜFTUNGS-MODUS. (nur die Lüftung ist in Betrieb). Auf der Anzeige erscheint das -Symbol.
2) Prüfung der Systemparameter
- Drücken Sie in jedem Zustand die -Taste und halten Sie für 3 Sekunden lang gedrückt, um auf die Oberäche zur Prüfung der
Systemparameter zu gelangen;
- Drücken Sie die - und -Taste, um die Systemparameter zu prüfen.
3) Einstellung der Systemparameter. Siehe 9.2. „Parameterverzeichnis“
4
dass “Timer ein” eingestellt ist.
WICHTIG: Wenn Schritt Nr. 4 ausgelassen wird, blinkt das Symbol ONONON
111
222 “Timer on” weiter und “Timer on” ist nicht eingestellt!
5- Drücken Sie die Taste erneut, um zur Einstellung “Timer aus” zu wechseln, das Symbol OFOFFFOFF
111
222 ”Timer aus” und das Stunden-
symbol “88:” blinken gleichzeitig.
6- Drücken Sie die Tasten und , um die Stunde(n) zu ändern.
7- Drücken Sie die Taste , um zur Minuteneinstellung zu wechseln, das Minutensymbol “:88” blinkt, drücken Sie die Tasten
und , um die Minute(n) zu ändern.
8- Drücken Sie die Taste zur Bestätigung. In diesem Moment hört das Symbol OFOFFFOFF
111
222 “Timer aus” auf zu blinken, was bedeutet,
dass “Timer aus” eingestellt ist.
WICHTIG: Wird Schritt Nr. 8 ausgelassen, blinkt das Symbol ONONON
111
222 “Timer aus” weiter und der “Timer aus” ist nicht eingestellt!
9- Drücken Sie die Taste erneut, um zu speichern und die Timer-Einstellungsschnittstelle zu verlassen.
WICHTIG!
- Wenn Schritt Nr. 4 ausgelassen wird und alle Schritte von 5 bis 9 durchgeführt wurden, wird “Timer aus” eingestellt und das Sym-
bol OFOFFFOFF
111
222 für den Standby-Modus leuchtet auf dem Display.
- Wenn Schritt Nr. 8 ausgelassen wird und alle Schritte von 1 bis 4 erledigt sind, wird “Timer ein” eingestellt und das Symbol ONONON
111
222
für den Standby-Modus leuchtet auf dem Display auf.
- Wenn alle Schritte von 1 bis 9 ausgeführt wurden, werden sowohl “Timer ein” als auch “Timer aus” eingestellt und das Symbol
ONONON
OFOFFFOFF
111
222 leuchtet auf dem Display.
Timer abschalten:
Führen Sie alle Schritte von 1 bis 9 aus, ohne die Schritte Nr. 4 und Nr. 8. Der Timer wird abgebrochen.
HINWEIS: 1) Die Timer-Einstellungen wiederholen sich automatisch.
HINWEIS: 2) Die Timer-Einstellungen sind auch nach einem plötzlichen Stromausfall noch gültig.
BESCHREIBUNG VON LED IKONEN
ONON
OFFOFF
11
22
CCCC
SET OUT SET OUT
TEMPTEMP
1
24
36
7
9
8
10
11
12
13
5

16
3Elektrische Heizu-
ng
Das Symbol zeigt an, dass die Heizfunktion aktiviert ist. Die elektrische Heizung arbeitet nach den
Vorgaben des Steuerprogramms.
4 Auftauen Das Symbol zeigt an, dass die Auftaufunktion aktiviert ist. Das ist eine automatische Funktion; das
System schaltet das Auftauen entsprechend dem integrierten Steuerprogramm ein oder aus.
5GRÜNER Modus Das Symbol zeigt an, dass das Gerät im Grünen Modus arbeitet.
6 AUTO-Modus Das Symbol zeigt an, dass das Gerät im AUTO-Modus arbeitet.
5+3 BOOST-Modus Das Symbol zeigt an, dass das Gerät im BOOST-Modus arbeitet.
7 Tastensperre Das Symbol zeigt an, dass die Tastensperre eingeschaltet ist. Die Tasten bleiben bis zur Aufhebung
dieser Funktion deaktiviert.
8Linke Temperatur-
anzeige
Auf der Anzeige wird die vorgegebene Wassertemperatur angezeigt. Sollte eine Störung auftreten,
wird in diesem Bereich der entsprechende Fehlercode "P" angezeigt.
9Rechte Tempera-
turanzeige
Das Symbol zeigt die erreichte Wassertemperatur. Beim Prüfen oder Ändern der Parameter wird hier
der entsprechende Parameterwert angezeigt.
10 Zeitanzeige Auf der Anzeige wird die Uhr- oder Timerzeit angegeben.
11 Timer EIN Das Symbol zeigt an, dass die Timerfunktion EINgeschaltet ist.
12 Timer AUS Das Symbol zeigt an, dass die Timerfunktion AUSgeschaltet ist.
13 Fehler das Symbol gibt eine Störung an.
MODUS UMLUFTTEMPERATUR
Wassertemperatur im unteren Teil des Be-
hälters oder Wassertemperatur im oberen
Teil des Behälters*(wenn der Wassertem-
peraturfühler im unteren Teil des Behälters
einen Fehler aufweist)
≤-5 °C ≥-2 °C >43 °C ≤41 °C >60 °C ≤58 °C
AUTO Modus Verdichter AUS EIN AUS EIN AUS EIN
E-Heizung EIN AUS AUS AUS
GRÜNER Modus Verdichter AUS EIN AUS EIN AUS EIN
E-Heizung EIN AUS AUS AUS
BOOST Modus Verdichter AUS EIN OFF EIN AUS EIN
E-Heizung nach
Logik
nach
Logik
nach
Logik
nach
Logik nach Logik nach Logik
E-Heizung MODUS nach
Logik
nach
Logik
nach
Logik
nach
Logik nach Logik nach Logik
LÜFTUNGS Modus Nur das Gebläse lauft mit niedriger Geschwindigkeit, der Verdichter und die elektrische Heizung ist aus-
geschaltet.
BETRIEBSARTEN
AUTO mode
Wenn das Gerät eingeschaltet ist, “versteht” der Hauptregler, wie die gewünschte Temperatur in einigen Stunden durch den ratio-
nellen Einsatz der Wärmepumpe erreicht werden kann, und wenn nötig, arbeitet auch die E-Heizung.
Temperaturbereich 38°C~60°C Voreinstellung 50°C
GREEN mode
Temperaturbereich 38°C~60°C Standard 50°C
Der Kompressor arbeitet nur in Abhängigkeit von der oberen und unteren Wassertemperatur des Tanks.
BOOST mode
Temperaturbereich 38°C~70°C Standard 50°C
Kompressor und E-Heizung arbeiten gleichzeitig für die schnellste Produktion von Warmwasser
E-Heater mode
Temperaturbereich 38°C~70°C Standard 50°C
Nur die E-Heizung funktioniert!
Defrost mode
“Normale Abtauung”. Wenn die Temperatur des Wärmetauschers ≤ 1 °C ist und der Kompressor 45 Minuten lang läuft, und wenn
die Temperatur des Wärmetauschers nach diesen 45 Minuten ≤ -3 °C ist, beginnt der Abtauvorgang.

17
Schutz / Störung Fehlercode
Bereitschaftsbetrieb
Regelbetrieb
Ausfall des Wassertemperaturfühlers im unteren Teil des Be-
hälters P01
Ausfall des Wassertemperaturfühlers im oberen Teil des Be-
hälters P02
Ausfall des Temperaturfühlers des Wärmetauschers P03
Ausfall des Ansauglufttemperatur-fühlers P04
Ausfall des Umgebungstemperatur-fühlers P05
Winterfrostschutz P06
Sicherheitsdruckschalter (HP Schalter) E01
Dieses Symbol auf dem/den Produkt(en) und/oder den Begleitdokumenten bedeutet, dass gebrauchte elektrische und
elektronische Geräte (WEEE) nicht mit dem allgemeinen Haushaltsmüll vermischt werden dürfen. Für eine ordnungs-
gemäße Behandlung, Wiederverwertung und Recycling bringen Sie dieses Produkt bitte zu ausgewiesenen Sammel-
stellen, wo es kostenlos angenommen wird. Die ordnungsgemäße Entsorgung dieses Produkts trägt dazu bei, wert-
volle Ressourcen zu sparen und mögliche negative Auswirkungen auf die menschliche Gesundheit und die Umwelt zu
vermeiden, die durch unsachgemäße Abfallbehandlung entstehen könnten.
FALLS ETWAS VERWIRRT WIRD!
- Schalten Sie das Gerät aus! Trennen Sie das Gerät vom Stromnetz!
- Rufen Sie den Kundendienst an und teilen Sie ihm den Fehlercode mit oder beschreiben Sie alle Auälligkeit-
en und das seltsame Verhalten oder Geräusch Ihres Gerätes!
Wenn im Standby- oder Betriebszustand eine Störung auftritt, schaltet sich das Gerät automatisch ab und zeigt den Fehlercode auf
dem Bildschirm des Steuergeräts an. Rufen Sie den Service an!
ERROR CODE
Fehlercodes
Antifreeze mode
Disinfection weekly cycle
Auch wenn sich das Gerät im Standby-Modus bendet, wird der Frostschutz aktiviert, wenn die untere Tanktemperatur ≤ 5°C ist.
Die Wärmepumpe wird gezwungen, zu arbeiten.
Wenn die untere Tanktemperatur ≥ 10°C ist, wird der Gefrierschutz verlassen.
Das Symbol P06 blinkt auf dem Display, ohne das Symbol “Fehler”.
Wenn sowohl P06 als auch “Fehler” auf dem Display erscheinen, siehe Kapitel “Fehlercodes”.
Die E-Heizung wird jede Woche zur eingestellten Zeit automatisch gestartet. (Wenn das Gerät bei konstanter Temperatur
oder im Standby-Modus ausgeschaltet ist, ist die Antilegionärsfunktion eingeschaltet).
Wenn die Temperatur des oberen Wassertanks ≥ 70°C ist, schaltet sich die Heizung aus. Wenn die Temperatur des ober-
en Wassertanks ≤ 70°C-2°C ist, startet die Heizung.
Sie hält die Temperatur des oberen Wassertanks im Bereich (70°C-2°C) bis 70°C für die eingestellte Desinfektionszeit von
30 Minuten, nach 30 Minuten wird die Desinfektion beendet. Der Timer wird gelöscht und der nächste Timer-Zyklus beginnt.
E-Heizung Prioritätsstufe: 1) Abtauen oder Gefrierschutz; 2) Desinfektion; 3) andere Steuerungen

18
POMPA DI CALORE PER ACQUA CALDA SANITARIA
IT
Spettabili clienti,
Grazie per aver acquistato questo prodotto.
Il team di TESY ha sempre prestato grande attenzione alle questioni ambientali, quindi utilizza tecnologie e materiali a basso
impatto sulla natura per la produzione dei suoi prodotti, in conformità con le direttive comunitarie sulla limitazione di
determinate sostanze pericolose nelle apparecchiature elettriche ed elettroniche, nonchè sui riutiWEEE e RоHS (2011/65/ЕU
e 2012/19/EU).
NORME E ISTRUZIONI IMPORTANTI PER LA SICUREZZA
Importante! La garanzia è nulla e il produttore non è responsabile per le conseguenze del mancato rispetto di queste
istruzioni!
• L’apparecchio non è destinato all’uso da parte di persone (compresi i bambini)
con capacità siche, sensoriali o mentali limitate o mancanza di esperienza e cono-
scenza a meno che non siano state addestrate o istruite a utilizzare l’apparecchio
da una persona responsabile della loro sicurezza.
• I bambini devono essere istruiti a non giocare con l’apparecchio.
• I bambini non devono giocare con l’apparecchio . La pulizia e la manutenzione
dell’apparecchio, che devono essere eseguite dall’utente, è vietata a bambini in-
custoditi.
• È vietato utilizzare l’apparecchio per scopi diversi da quelli previsti.
• Non utilizzare il serbatoio dell’acqua se non è pieno d’acqua.
• L’installazione, la messa in servizio e la manutenzione dell’apparecchio devono
essere eseguite da personale qualicato e autorizzato. Non tentare di installare
l’apparecchio da soli.
• L’apparecchio deve essere installato solo in locali ignifughi.
• L’uso di questo apparecchio a temperature e livelli di pressione diversi da quelli
descritti invaliderà la garanzia!
• L’apparecchio è destinato al riscaldamento di acqua potabile allo stato sico liq-
uido. L’uso di altri uidi in diversi stati sici renderà nulla la garanzia!
• Leggere attentamente il “Manuale di installazione e manutenzione”, che è parte
integrante del vostro apparecchio!
• Assicurarsi che l’apparecchio sia installato e collegato secondo il “Manuale di
installazione e manutenzione”, che è parte integrante del vostro apparecchio!
• Assicurarsi che il serbatoio dell’acqua sia pieno d’acqua!
• Assicurarsi che l’alimentazione sia disponibile e in conformità con le normative
locali!
• Accertarsi che le prese d’aria o l’ingresso/l’uscita non siano bloccate!
PRIMA DI AVVIARE L’APPARECCHIO

19
MODALITÀ OPERATIVE. INTERFACCIA UTENTE
1 Premere questo pulsante e tenerlo premuto per 3 secondi quando l’unità è in standby, l’unità si accenderà.
Premere questo pulsante e tenerlo premuto per 3 secondi quando l’unità è in funzione, l’unità si spegnerà - “Standby”.
Premere brevemente questo pulsante per entrare o uscire dall’impostazione o dal controllo dei parametri.
-Questi sono i pulsanti multiuso. Sono utilizzati per l’impostazione della temperatura, l’impostazione dei parametri, il con-
trollo dei parametri, la regolazione dell’orologio e la regolazione del timer.
Durante lo stato di funzionamento, premere il pulsante
o per regolare direttamente la temperatura di impostazione.
Premere questi pulsanti quando l’unità è nello stato di impostazione dell’orologio, è possibile quindi regolare le ore e i minuti
dell’ora dell’orologio.
Premere questi pulsanti quando l’unità è nello stato di impostazione del timer, l’ora e i minuti del timer “ON”/”OFF” possono essere
regolati.
2
Sbloccare lo schermo:
- Premere il tasto per almeno 3 secondi. I pulsanti vengono sbloccati e viene visualizzato il simbolo . Dopo 1 minuto i tasti si bloccano auto-
maticamente.
Impostazione dell’orologio:
- Dopo l’accensione, premere brevemente il pulsante per accedere all’interfaccia di impostazione dell’orologio, le icone delle ore e dei minuti
“88:88” lampeggiano simultaneamente.
- Premere brevemente il pulsante per passare all’impostazione dell’ora e dei minuti, premere i pulsanti e per impostare l’ora e i minuti
esatti;
- Premere nuovamente il pulsante per confermare le impostazioni/modiche e uscire.
Impostazione del timer:
1- Dopo l’accensione, premere a lungo il pulsante per 5 secondi per accedere all’interfaccia di impostazione del timer; l’icona del ONONON
OFOFFFOFF
111
222 timer
acceso e l’icona dell’ora “88:” lampeggiano contemporaneamente;
2- Premere i pulsanti e per impostare l’ora esatta.
3- Premere il pulsante per passare all’impostazione dei minuti, l’icona dei minuti “:88” lampeggia, premere i pulsanti e per impostare i
minuti esatti.
4- Premere il pulsante per confermare. In questo momento, l’icona ONONON
111
222 del timer smette di lampeggiare, il che signica che è stato impostato
“timer on”.
IMPORTANTE: se si omette il passaggio No4, l’icona ONONON
111
222 del timer rimane lampeggiante e il “timer on” non è impostato!
3
Turn ON
Standby
Change working
mode:
Check Parameters
+
Auto Heat Pump E-Heater
BOOST Ventilation
Set Temp
Adjust
Hour/Minute
Set
Hour/Minute
Timer Set Hour
Set
Minute
Transfer
Unlock Buttons
After 1 Minute
Buttons
are Locked
Automatically
3
2
4
1
SET
SET
TEMP
TEMP
SET
SET
TEMP
TEMP
3s
3s
5s
5s
3s
3s
3s
3s
5s
5s
ON
ON
OFF
OFF
1
1
2
2
C
C
C
C
SET OUT
SET OUT
TEMP
TEMP
ON
ON
ON
ON
OFF
OFF
OFF
OFF

20
1Acqua calda dis-
ponibile
L'icona indica che la temperatura dell'acqua calda sanitaria ha raggiunto il valore impostato. L'acqua
calda è disponibile per l'uso. La pompa di calore è in modalità standby.
2 Ventilazione L'icona indica che la funzione di ventilazione è attivata.
3Riscaldamento
elettrico
L'icona indica che la funzione di riscaldamento elettrico è attivata. Il riscaldatore elettrico funzionerà
sul programma di controllo.
1) Premere brevemente il pulsante per impostare la modalità di funzionamenro
• Modalità AUTO. (La pompa di calore + il riscaldatore elettrico funzioneranno secondo le impostazioni automatiche della
scheda di controllo). Il simbolo apparirà sul display
• Modalità VERDE. (Solo la pompa di calore funzionerà alle condizioni di lavoro normali). Il simbolo apparirà sul display.
• Modalità BOOST (pompa di calore + riscaldatore elettrico funzioneranno contemporaneamente). Sul display compare il
simbolo +
• Modalità RISCALDATORE ELETTRICO. (Funzionerà solo il riscaldatore elettrico). Il simbolo apparirà sul display.
• Modalità VENTILAZIONE. (Solo la ventola funzionerà). Il simbolo pparirà sul display.
2) Verica dei parametri di sistema
• In qualsiasi stato, premere il pulsante e tenerlo premuto per 3 secondi, entrare nell’interfaccia di verica dei parametri di sistema.
• Premere i pulsanti per controllare i parametri del sistema.
3) Regolare i parametri di sistema. Vedere 9.2. “Elenco parametri”
4
5- Premere nuovamente il pulsante per passare all’impostazione di “timer o”; l’icona OFOFFFOFF
111
222 “timer o” e l’icona dell’ora “88:” lampeggiano con-
temporaneamente.
6- Premere i pulsanti e per modicare le ore.
7- Premere il pulsante per passare all’impostazione dei minuti, l’icona dei minuti “:88” lampeggia, premere i pulsanti e per modicare i
minuti.
8- Premere il pulsante per confermare. In questo momento, l’icona OFOFFFOFF
111
222 “timer o” smette di lampeggiare, il che signica che il “timer o” è
impostato.
IMPORTANTE: se si omette il passaggio n. 8, l’icona ONONON
111
222 del timer spento continuerà a lampeggiare e il “timer spento” non sarà impostato!
9- Premere nuovamente il pulsante per salvare e uscire dall’interfaccia di impostazione del timer.
IMPORTANTE:
- Se il passo No4 viene omesso e tutti i passi da 5 a 9 sono stati eseguiti, “timer o” sarà impostato e l’icona OFOFFFOFF
111
222 in modalità stand by si accend-
erà sul display.
- Se il passo No8 viene omesso e tutti i passi da 1 a 4 sono stati eseguiti, verrà impostato “timer on” e sul display si accenderà l’icona ONONON
111
222 della
modalità stand by.
- Se si eseguono tutti i passi da 1 a 9, verranno impostati sia “timer on” che “timer o” e l’icona ONONON
OFOFFFOFF
111
222 si accenderà sul display.
Annullamento del timer:
Eseguire tutti i passaggi da 1 a 9, senza i passaggi No4 e No8. Il timer verrà annullato
NOTA: 1) Le impostazioni del timer si ripetono automaticamente.
NOTA: 2) Le impostazioni del timer sono ancora valide dopo un’interruzione improvvisa dell’alimentazione.
DESCRIZIONE DELLE ICONE LED
ONON
OFFOFF
11
22
CCCC
SET OUT SET OUT
TEMPTEMP
1
24
36
7
9
8
10
11
12
13
5
Pagina se încarcă...
Pagina se încarcă...
Pagina se încarcă...
Pagina se încarcă...
Pagina se încarcă...
Pagina se încarcă...
Pagina se încarcă...
Pagina se încarcă...
Pagina se încarcă...
Pagina se încarcă...
Pagina se încarcă...
Pagina se încarcă...
Pagina se încarcă...
Pagina se încarcă...
Pagina se încarcă...
Pagina se încarcă...
Pagina se încarcă...
Pagina se încarcă...
Pagina se încarcă...
Pagina se încarcă...
Pagina se încarcă...
Pagina se încarcă...
Pagina se încarcă...
Pagina se încarcă...
Pagina se încarcă...
Pagina se încarcă...
Pagina se încarcă...
Pagina se încarcă...
Pagina se încarcă...
Pagina se încarcă...
Pagina se încarcă...
Pagina se încarcă...
Pagina se încarcă...
Pagina se încarcă...
Pagina se încarcă...
Pagina se încarcă...
Pagina se încarcă...
Pagina se încarcă...
Pagina se încarcă...
Pagina se încarcă...
Pagina se încarcă...
Pagina se încarcă...
Pagina se încarcă...
Pagina se încarcă...
Pagina se încarcă...
Pagina se încarcă...
Pagina se încarcă...
Pagina se încarcă...
Pagina se încarcă...
Pagina se încarcă...
Pagina se încarcă...
Pagina se încarcă...
-
 1
1
-
 2
2
-
 3
3
-
 4
4
-
 5
5
-
 6
6
-
 7
7
-
 8
8
-
 9
9
-
 10
10
-
 11
11
-
 12
12
-
 13
13
-
 14
14
-
 15
15
-
 16
16
-
 17
17
-
 18
18
-
 19
19
-
 20
20
-
 21
21
-
 22
22
-
 23
23
-
 24
24
-
 25
25
-
 26
26
-
 27
27
-
 28
28
-
 29
29
-
 30
30
-
 31
31
-
 32
32
-
 33
33
-
 34
34
-
 35
35
-
 36
36
-
 37
37
-
 38
38
-
 39
39
-
 40
40
-
 41
41
-
 42
42
-
 43
43
-
 44
44
-
 45
45
-
 46
46
-
 47
47
-
 48
48
-
 49
49
-
 50
50
-
 51
51
-
 52
52
-
 53
53
-
 54
54
-
 55
55
-
 56
56
-
 57
57
-
 58
58
-
 59
59
-
 60
60
-
 61
61
-
 62
62
-
 63
63
-
 64
64
-
 65
65
-
 66
66
-
 67
67
-
 68
68
-
 69
69
-
 70
70
-
 71
71
-
 72
72


Tesy AquaThermica Compact 150 Manual de utilizare
- Tip
- Manual de utilizare
- Acest manual este potrivit și pentru
în alte limbi
Lucrări înrudite
Alte documente
-
Philips UV-C disinfection desk lamp Manual de utilizare
-
-
Samsung AE160JNYDGH/EU Manual de utilizare
-
 Raider Power Tools RD-PH02 Manual de utilizare
-
LG UV48H.NL1 Manualul proprietarului
-
 Rotex RKHB*016AB6WN Ghid de instalare
-
LG ARNH10GK2A2 Manual de utilizare
-
LG MV12AH Manual de utilizare
-
LG MC12AHV.NE1 Manual de utilizare
-
Samsung MIM-E03AN Manual de utilizare

