
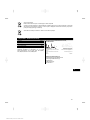
*2004954*
2004954
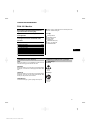
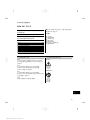
PSA 100
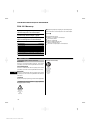
Bedienungsanleitung de
Operating instructions en
Mode d’emploi fr
Istruzioni d’uso it
Manual de instrucciones es
Manual de instruções pt
Gebruiksaanwijzing nl
Brugsanvisning da
Bruksanvisning sv
Bruksanvisning no
Käyttöohje
Οδηγιεςχρησεως el
Használati utasítás hu
Instrukcjaobsługi pl
Инструкцияпозксплуатации ru
Návod k obsluze cs
Návod na obsluhu sk
Upute za uporabu hr
Navodila za uporabo sl
Ръководствозаобслужване bg
Instrucţiunideutilizare ro
KulllanmaTalimatı tr
ar
Lietošanaspamācība lv
Instrukcija lt
Kasutusjuhend et
Інструкціязексплуатації uk
ja
ko
zh
cn
Printed: 25.04.2016 | Doc-Nr: PUB / 5070450 / 000 / 04

0,
1
Printed: 25.04.2016 | Doc-Nr: PUB / 5070450 / 000 / 04

0,
0,
23
4
5
Printed: 25.04.2016 | Doc-Nr: PUB / 5070450 / 000 / 04

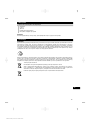
ORIGINAL BEDIENUNGSANLEITUNG
PSA 100 Monitor
Lesen Sie die Bedienungsanleitung vor Inbe-
triebnahme unbedingt durch.
Bewahren Sie diese Bedienungsanleitung im-
mer beim Gerät auf.
Geben Sie das Gerät nur mit Bedienungsanlei-
tung an andere Personen weiter.
Inhaltsverzeichnis Seite
1 Allgemeine Hinweise 1
2 Beschreibung 2
3 Sicherheitshinweise 2
4 Inbetriebnahme 3
5 Bedienung 3
6 Einstellungen 5
7Entsorgung 6
8 EG-Konformitätserklärung (Original) 6
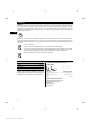
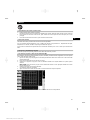
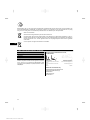
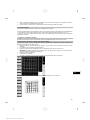
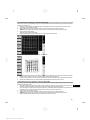
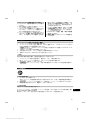
1 Die Zahlen verweisen auf Abbildungen. Die Abbildun-
gen finden Sie am Anfang der Bedienungsanleitung.
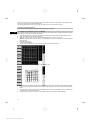
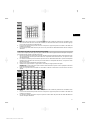
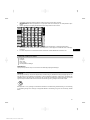
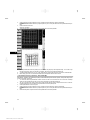
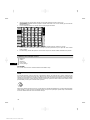
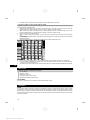
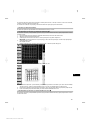
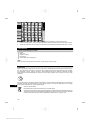
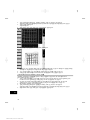
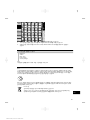
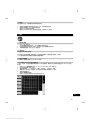
Tasten 1
@
Funktionstasten
;
Betriebszustands-LED
=
Ein/Aus‑Taste
%
Schaltwippe
&
Bestätigungstaste (OK)
(
Home- und Hilfe Taste
)
Ladezustands-LED
1 Allgemeine Hinweise
1.1 Signalwörter und ihre Bedeutung
GEFAHR
Für eine unmittelbar drohende Gefahr, die zu schweren
Körperverletzungen oder zum Tod führt.
WARNUNG
Für eine möglicherweise gefährliche Situation, die zu
schweren Körperverletzungen oder zum Tod führen kann.
VORSICHT
Für eine möglicherweise gefährliche Situation, die zu
leichten Körperverletzungen oder zu Sachschaden führen
könnte.
HINWEIS
Für Anwendungshinweise und andere nützliche Informa-
tionen.
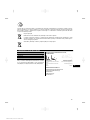
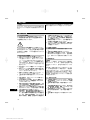
1.2 Erläuterung der Piktogramme und weitere
Hinweise
Warnzeichen
Warnung vor
allgemeiner
Gefahr
Gebotszeichen
Vor
Benutzung
Bedienungs-
anleitung
lesen
de
1
Printed: 25.04.2016 | Doc-Nr: PUB / 5070450 / 000 / 04

2Beschreibung
2.1 Verwendung
Der Monitor dient zur Anzeige und ausführlichen Analyse
von Scans, die von Hilti Scan-Systemen aufgenommen
wurden.
Sie können Scans in Projekten verwalten und anschlies-
send zur weiteren Datenevaluierung und Archivierung an
einen PC übertragen.
3 Sicherheitshinweise
3.1 Allgemeine Sicherheitshinweise
Lesen Sie die im Gerät gespeicherte Bedienungsanlei-
tung.
Neben den sicherheitstechnischen Hinweisen in den
einzelnen Kapiteln dieser Bedienungsanleitung sind
folgende Bestimmungen jederzeit strikt zu beachten.
Lesen Sie alle Sicherheitshinweise und Anweisungen.
Versäumnisse bei der Einhaltung der Sicherheitshinweise
und Anweisungen können elektrischen Schlag, Brand
und/oder schwere Verletzungen verursachen.Bewahren
Sie alle Sicherheitshinweise und Anweisungen für die
Zukunft auf.
3.2 Grundlegende Sicherheitsvermerke
a) Halten Sie Kinder von Lasergeräten fern.
b) Prüfen Sie das Anzeigefeld, nachdem Sie das Ge-
rät eingeschaltet haben. Das Anzeigefeld sollte das
Hilti Logo und den Namen des Geräts anzeigen.
Danach erscheint im Anzeigefeld ein Haftungsaus-
schluss, welchen Sie akzeptieren müssen, um in das
Hauptmenü mit dem aktuellen Projekt zu gelangen.
c) Beachten Sie immer die Warnungsmeldungen auf
dem Anzeigefeld.
d) Halten Sie das Anzeigefeld lesbar (z.B. fassen Sie
nicht mit den Fingern auf das Anzeigefeld, lassen
Sie das Anzeigefeld nicht verschmutzen).
e) Verwenden Sie niemals ein defektes Gerät. Kon-
taktieren Sie den Hilti Service.
f)
Überprüfen Sie die Geräteeinstellungen vor Ge-
brauch.
g) Transportieren Sie das Gerät nur mit herausge-
nommenem Akku-Paket.
h) Transportieren und lagern Sie das Gerät sicher.
Die Lagertemperatur liegt zwischen -25°C und
63°C (-13°F - +145°F).
i) Wenn das Gerät aus grosser Kälte in eine wär-
mere Umgebung gebracht wird oder umgekehrt,
lassen Sie das Gerät vor dem Gebrauch akklima-
tisieren.
j) Bohren Sie nicht an Positionen, an denen das
Gerät Objekte gefunden hat. Berücksichtigen Sie
den Bohrdurchmesser und rechnen Sie immer
einen geeigneten Sicherheitsfaktor mit ein.
k) Die Messergebnisse können prinzipbedingt durch
bestimmte Umgebungsbedingungen beeinträch-
tigt werden. Dazu gehören z.B. die Nähe von
Geräten, die starke magnetische oder elektro-
magnetische Felder erzeugen, Nässe, metallhal-
tige Baumaterialien, alukaschierte Dämmstoffe,
Schichtaufbauten, Untergründe mit Hohlräumen
sowie leitfähige Tapeten oder Fliesen. Beachten
Sie deshalb vor dem Bohren, Sägen oder Fräsen
in UntergründenauchandereInformationsquellen
(z. B. Baupläne).
l) Berücksichtigen Sie Umgebungseinflüsse. Benut-
zen Sie das Gerät nicht, wo Brand- oder Explosi-
onsgefahr besteht.
m) Achten Sie vor dem Arbeiten mit Zubehör darauf,
dass es richtig montiert ist.
3.3 Sachgemässe Einrichtung des Arbeitsplatzes
a) Verwenden Sie das Gerät nur innerhalb der defi-
nierten Einsatzgrenzen.
b) Beachten sie die landesspezifischen Unfallverhü-
tungsvorschriften.
c) Vermeiden Sie, bei Ausrichtarbeiten auf Leitern,
eine abnormale Körperhaltung. Sorgen Sie für si-
cheren Stand und halten Sie jederzeit das Gleich-
gewicht.
3.4 Elektromagnetische Verträglichkeit
HINWEIS
Nur für Korea: Dieses Gerät ist für im Wohnbereich auf-
tretende elektromagnetische Wellen geeignet (Klasse B).
Es ist im Wesentlichen für Anwendungen im Wohnbe-
reich vorgesehen, kann aber auch in anderen Bereichen
eingesetzt werden.
Obwohl das Gerät die strengen Anforderungen der ein-
schlägigen Richtlinien erfüllt, kann Hilti die Möglichkeit
nicht ausschliessen, dass das Gerät durch starke Strah-
lung gestörtwird, waszueiner Fehloperation führenkann.
In diesem Fall oder anderen Unsicherheiten müssen Kon-
trollmessungen durchgeführt werden. Ebenfalls kann Hilti
nicht ausschliessen dass andere Geräte (z.B. Navigati-
onseinrichtungen von Flugzeugen) gestört werden.
3.5 Allgemeine Sicherheitsmassnahmen
a)
Überprüfen Sie das Gerät vor dem Gebrauch. Falls
das Gerät beschädigt ist, lassen Sie es durch eine
Hilti-Servicestelle reparieren.
de
2
Printed: 25.04.2016 | Doc-Nr: PUB / 5070450 / 000 / 04

b) Halten Sie das Gerät stets sauber und trocken.
c) Obwohl das Gerät für den harten Baustellenein-
satz konzipiert ist, sollten Sie es, wie andere op-
tische und elektrische Geräte (Feldstecher, Brille,
Fotoapparat) sorgfältig behandeln.
d) Obwohl das Gerät gegen den Eintritt von Feuch-
tigkeit geschützt ist, solltenSie das Gerät vor dem
Verstauen in dem Transportbehälter trockenwi-
schen.
e)
Ein Öffnen oder eine Modifikation des Gerätes ist
nicht erlaubt.
3.6 Sorgfältiger Umgang und Gebrauch von
Akku‑Paketen
a) Akkus dürfen nicht in die Hände von Kindern ge-
langen.
b) Nehmen Sie das Akku-Paket aus dem Gerät, wenn
Sie es längere Zeit nicht benutzen.
c)
Überhitzen Sie das Akku-Paket nicht und setzen
Sie es nicht einem Feuer aus. Das Akku-Paket
kann explodieren oder es können toxische Stoffe
freigesetzt werden.
d) Bei falscher Anwendung kann Flüssigkeit aus dem
Akku austreten. Vermeiden Sie den Kontakt da-
mit. Bei zufälligem Kontakt mit Wasser abspülen.
Kommt die Flüssigkeit in die Augen, spülen Sie
diese mit viel Wasser aus und nehmen Sie zu-
sätzlich ärztliche Hilfe in Anspruch. Austretende
Flüssigkeit kann zu Hautreizungen oder Verbrennun-
gen führen.
e) Laden Sie die Akkus nur in Ladegeräten auf, die
vom Hersteller empfohlen werden. Für ein Lade-
gerät, das für eine bestimmte Art von Akkus geeignet
ist, besteht Brandgefahr, wenn es mit anderen Akkus
verwendet wird.
f) Beachten Sie die besonderen Richtlinien
für Transport, Lagerung und Betrieb von
Li‑Ionen-Akkus.
g) Mechanisch beschädigte Akku-Pakete dürfen
nicht mehr verwendet werden.
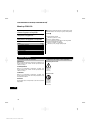
4 Inbetriebnahme
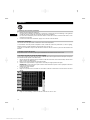
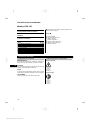
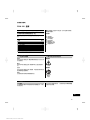
4.1 Akku‑Paket einsetzen und Gerät einschalten 23
1. Setzen Sie das PSA 82 Akku‑Paket auf der Rückseite des Geräts ein.
2. Laden Sie das PSA 82 Akku-Paket vollständig auf (siehe Bedienungsanleitung des PUA 81 Netzteils, des PSA
82 Akku‑Pakets, und des PUA 82 Kfz-Batteriesteckers).
HINWEIS Alternativ können Sie das PSA 82 Akku-Paket mit dem separat erhältlichen PSA 85 Ladegerät
ausserhalb des PSA 100 Monitors laden.
3. Schalten Sie das Gerät mit der Ein/Aus-Taste ein.
4. Akzeptieren Sie den Haftungsausschluss, der auf dem Bildschirm erscheint, um das Gerät zu bedienen.
5. Zum Ausschalten halten Sie die Ein/Aus-Taste 3 Sekunden gedrückt.
4.2 Einstellungen
Bei fabrikneuen Geräten werden Sie als erstes aufgefordert, die landesspezifischen Einstellungen zu wählen.
1. Wählen Sie über die Schaltwippe die gewünschte Sprache aus und bestätigen Sie Ihre Wahl über die Funktions-
taste "Ok".
2. Wählen Sie dann über die Schaltwippe und die Bestätigungstaste "OK" jeweils die weiteren Einstellungen aus.
3. Bestätigen Sie die durchgeführten Einstellungen über die Funktionstaste "Ok".
HINWEIS Sie können diese Einstellungen über die Funktionstaste "Überspringen" auch auf das nächste Ein-
schalten des Geräts verschieben.
5 Bedienung
5.1 Bedienungsanleitung anzeigen
1. Drücken Sie die Home-Taste für 5 Sek.
Die Bedienungsanleitung wird Ihnen kontextsensitiv im Anzeigefeld angezeigt. Sie können danach in der vollstän-
digen Bedienungsanleitung navigieren.
2. Sie können sich die Bedienungsanleitung auch über das Einstellungsmenü im Hauptmenü über die Funktionstaste
Hilfe anzeigen lassen.
de
3
Printed: 25.04.2016 | Doc-Nr: PUB / 5070450 / 000 / 04

3. Um die Bedienungsanleitung zu schliessen, drücken Sie die Funktionstaste Zurück.
5.2 Grundlegende Funktionen
Über die Funktionstasten können Sie die verfügbaren Funktionen wählen.
Über die Schaltwippe können Sie den Fokus verschieben, Parameterwerte verändern oder je nach Einstellung das
Fadenkreuz verschieben, die Schichtdicke und Schichttiefe verändern, usw..
Über die Bestätigungstaste Ok können Sie das fokussierte Element wählen oder die Datenverarbeitung starten.
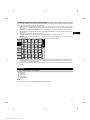
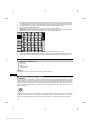
5.3 Projekte und Datenverwaltung
Innerhalb eines Projekts können gleichzeitig Ferroscan- und X-Scan-Daten verwaltet werden.
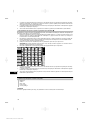
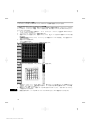
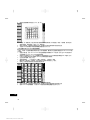
5.3.1 PS 1000 X-Scan-Projekte und -Daten verwalten 4
Im Untermenü "Projekte" können Sie Projekte verwalten, sich aufgezeichnete Scans anzeigen lassen und analysieren
und neue Daten vom PS 1000 X-Scan importieren.
1. Importieren Sie die Daten (Projekte/Scans) über das PSA 50/51 Datenkabel direkt vom PS 1000 X-Scan.
2. Wählen Sie im Hauptmenü die Funktion Projekte.
3. Wählen Sie das gewünschte Projekt aus. Das aktive Projekt ist mit einer abgeknickten oberen rechten Ecke
erkennbar.
HINWEIS Das aktuell aktive Projekt können Sie auch direkt vom Hauptmenü aus über die Funktionstaste
Projektöffnen erreichen.
4. Wählen Sie den gewünschten Scan aus.
Der Scan wird angezeigt.
5. Stellen Sie das Steuerverhalten der Schaltwippe über die Funktionstaste oben links ein.
6. Stellen Sie die Darstellungsart über die Funktionstaste auf "2D" oder "3D" ein.
7. Über die Funktionstasten Param. und Darstell-ung können Sie die Visualisierungs- und Berechnungsparameter
ändern. Wenn Sie die Werte in Param. ändern, müssen die Daten neu berechnet werden. Drücken Sie hierfür die
Bestätigungstaste Ok.
de
4
Printed: 25.04.2016 | Doc-Nr: PUB / 5070450 / 000 / 04

8. Über die Funktionstaste Extras können Sie unter anderem einen einfachen Bericht als PDF exportieren oder
Markerpositionen setzen.
9. Für weitere Analysen können Sie die Daten über das USB Datenkabel PSA 92 an einen PC übertragen.
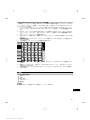
5.3.2 PS 200 S Ferroscan-Projekte und -Daten verwalten 5
Im Untermenü "Projekte" können Sie Projekte verwalten, sich aufgezeichnete Scans anzeigen lassen und analysieren
und neue Daten vom PS 200 S Ferroscan importieren.
1. Importieren Sie die Scandaten über die Infrarotschnittstelle direkt vom PS 200 S Ferroscan zum PSA 100 Monitor.
Weitere Informationen zum Import vom PS 200 S Ferroscan finden Sie in der PS 200 Bedienungsanleitung.
2. Oder importieren Sie die Scandaten mit dem PUA 95 Micro-USB-Kabel vom PSA 55 Adapter-IR auf den PSA 100
Monitor. Weitere Informationen zum PSA 55 Adapter-IR finden Sie in der PS 200 Bedienungsanleitung.
3. Wählen Sie im Hauptmenü die Funktion Projekte.
4. Wählen Sie das gewünschte Projekt aus. Das aktive Projekt ist mit einer abgeknickten oberen rechten Ecke
erkennbar.
HINWEIS Das aktuell aktive Projekt können Sie auch direkt vom Hauptmenü aus über die Funktionstaste
Projektöffnen erreichen.
5. Stellen Sie das Steuerverhalten der Schaltwippe über die Funktionstaste oben links ein.
6. Über die Funktionstasten Param. und Darstell-ung können Sie die Visualisierungs- und Berechnungsparameter
ändern.
7. Über die Funktionstaste Extras können Sie unter anderem einen einfachen Bericht als PDF exportieren oder
Markerpositionen setzen.
8. Für weitere Analysen können Sie die Daten vom PSA 100 Monitor über das PSA 92 USB-Datenkabel an einen
PC übertragen.
6 Einstellungen
6.1 Folgende Einstellungen können Sie vornehmen:
Helligkeit
Lautstärke
Datum / Zeit
Energie-Modi
Landeseinstellungen
HINWEIS
Drücken Sie die Funktionstaste "Hilfe", um die vollständige Bedienungsanleitung aufzurufen.
de
5
Printed: 25.04.2016 | Doc-Nr: PUB / 5070450 / 000 / 04

7 Entsorgung
VORSICHT
Bei unsachgemässem Entsorgen der Ausrüstung können folgende Ereignisse eintreten: Beim Verbrennen von Kunst-
stoffteilen entstehen giftige Abgase, an denen Personen erkranken können. Batterien können explodieren und dabei
Vergiftungen, Verbrennungen, Verätzungen oder Umweltverschmutzung verursachen, wenn sie beschädigt oder stark
erwärmt werden. Bei leichtfertigem Entsorgen ermöglichen Sie unberechtigten Personen, die Ausrüstung sachwidrig
zu verwenden. Dabei können Sie sich und Dritte schwer verletzen sowie die Umwelt verschmutzen.
Hilti-Geräte sind zu einem hohen Anteil aus wiederverwertbaren Materialien hergestellt. Voraussetzung für eine
Wiederverwertung ist eine sachgemässe Stofftrennung. In vielen Ländern ist Hilti bereits eingerichtet, Ihr Altgerät zur
Verwertung zurückzunehmen. Fragen Sie den Hilti Kundenservice oder Ihren Verkaufsberater.
Nur für EU Länder
Werfen Sie elektronische Messgeräte nicht in den Hausmüll!
Gemäss Europäischer Richtlinie über Elektro- und Elektronik-Altgeräte und Umsetzung in nationales
Recht müssen verbrauchte Elektrowerkzeuge getrennt gesammelt und einer umweltgerechten Wieder-
verwertung zugeführt werden.
Entsorgen Sie die Akku-Pakete nach den nationalen Vorschriften
8 EG-Konformitätserklärung (Original)
Bezeichnung: Monitor
Typenbezeichnung: PSA 100
Generation: 01
Konstruktionsjahr: 2010
Wir erklären in alleiniger Verantwortung, dass dieses
Produkt mit den folgenden Richtlinien und Normen
übereinstimmt: bis 19. April 2016: 2004/108/EG, ab 20.
April 2016: 2014/30/EU, 2011/65/EU, EN ISO 12100,
2006/66/EG.
Hilti Aktiengesellschaft, Feldkircherstrasse 100,
FL‑9494 Schaan
Paolo Luccini Edward Przybylowicz
Head of BA Quality and Process Mana-
gement
Head of BU Measuring Systems
Business Area Electric Tools & Acces-
sories
BU Measuring Systems
06/2015 06/2015
Technische Dokumentation bei:
Hilti Entwicklungsgesellschaft mbH
Zulassung Elektrowerkzeuge
Hiltistrasse 6
86916 Kaufering
Deutschland
de
6
Printed: 25.04.2016 | Doc-Nr: PUB / 5070450 / 000 / 04

ORIGINAL OPERATING INSTRUCTIONS
PSA 100 monitor
It is essential that the operating instructions
are read before the tool is operated for the
first time.
Always keep these operating instructions to-
gether with the tool.
Ensure that the operating instructions are
with the tool when it is given to other persons.
Contents Page
1 General information 7
2Description 8
3 Safety instructions 8
4Beforeuse 9
5 Operation 9
6 Settings 11
7Disposal 12
8 EC declaration of conformity (original) 12
1 These numbers refer to the illustrations. You can
find the illustrations at the beginning of the operating
instructions.
Buttons 1
@
Function buttons
;
Operating status LED
=
On/off button
%
4-way controller
&
Confirmation button (OK)
(
Home and help button
)
Charge state LED
1 General information
1.1 Safety notices and their meaning
DANGER
Draws attention to imminent danger that will lead to
seriousbodilyinjuryorfatality.
WARNING
Draws attention to a potentially dangerous situation that
could lead to serious personal injury or fatality.
CAUTION
Draws attention to a potentially dangerous situation that
could lead to slight personal injury or damage to the
equipment or other property.
NOTE
Draws attention to an instruction or other useful informa-
tion.
1.2 Explanation of the pictograms and other
information
Warning signs
General
warning
Obligation signs
Read the
operating
instructions
before use.
en
7
Printed: 25.04.2016 | Doc-Nr: PUB / 5070450 / 000 / 04

2 Description
2.1 Use
The monitor is designed to be used to display, and thus
allow evaluation, of scans made with Hilti scan systems.
Scans can be managed in projects and subsequently
transferred to a PC for data evaluation and archival.
3 Safety instructions
3.1 General safety instructions
Read the operating instructions stored in memory in the
device.
In addition to the information relevant to safety given
in eachofthesections of these operatinginstructions,
the following points must be strictly observed at all
times.
Read all safety instructions and other instructions.
Failure to observe the safety precautions and instruc-
tions may result in electric shock, fire and/or serious
injury.Keep all safety precautions and instructions for
future reference.
3.2 Basic information concerning safety
a) Keep laser tools out of reach of children.
b) Check the display after switching the tool on. The
display should show the Hilti logo and the name of the
tool. The disclaimer notice subsequently displayed
must be accepted by the user before the main menu
for the current project can be accessed.
c) The warnings shown in the display must always
be observed.
d) Make sure that the display area can be easily
read (e.g. do not touch the display area with the
fingers, keep the display area clean).
e) Do not use the device if it is defective. Contact Hilti
Service.
f) Always check how the tool is set before using it.
g) Always remove the battery pack before transport-
ing the tool.
h) Store and transport the device safely. The per-
missible storage temperature range is -25°C to
63°C (-13°F to +145°F).
i) When the tool is brought into a warm environment
from very cold conditions, or vice-versa, allow it
to become acclimatized before use.
j) Do not drill at positions where the device has
located an object. Take the diameter of the drill
bit into account and always allow an adequate
safety factor.
k) Due to the scanning principle employed, the res-
ults of the scan may be negatively affected by
certain ambient conditions. These include, e.g.
proximity to devices that generate powerful mag-
netic or electromagnetic fields, dampness, con-
struction materials containing metal, aluminium
foil-backed insulation, multiple layers, materials
with cavities or electrically conductive wall cov-
erings or tiles. Accordingly, other sources of in-
formation (e.g. plans of the building) should also
be consulted before beginning drilling, sawing or
grinding in the area scanned.
l) Take the influences of the surrounding area into
account. Do not use the device where there is a
risk of fire of explosion.
m) When accessories are to be used, check that they
are fitted correctly before beginning use.
3.3 Proper organization of the workplace
a) Only use the appliance within the defined limits.
b) Observe the accident prevention regulations ap-
plicable in your country.
c) When performing alignment work on ladders,
avoid postures to which you are unaccustomed.
Make sure you work from a safe stance and stay
in balance at all times.
3.4 Electromagnetic compatibility
NOTE
OnlyforKorea:Thisdeviceissuitablefortheelectromag-
netic radiation encountered in residential environments
(Class B). It is intended mainly for use in residential en-
vironments but may also be used in other environments.
Although the device complies with the strict requirements
of the applicable directives, Hilti cannot entirely rule out
the possibility of interference to the device caused by
powerful electromagnetic radiation, leading to incorrect
operation. Accuracy must be checked by taking meas-
urements by other means when working under such
conditions or if you are unsure. Likewise, Hilti cannot rule
out the possibility of interference with other devices (e.g.
aircraft navigation equipment).
3.5 General safety instructions
a) Check the condition of the device before use.
If the device is found to be damaged, have it
repaired at a Hilti Service Center.
b)
Keep the device clean and dry at all times.
c) Although the device is designed for the tough
conditions of jobsite use, as with other optical
and electronic instruments (e.g. binoculars, spec-
tacles, cameras) it should be treated with care.
en
8
Printed: 25.04.2016 | Doc-Nr: PUB / 5070450 / 000 / 04

d) Although the appliance is protected against the
entry of moisture, it should be wiped dry before
being put away in its transport container.
e) Do not open the casing or modify the device in
any way.
3.6 Precautions for handling and using batteries
a) Keep batteries out of reach of children.
b) Remove the battery from the device if it is to remain
unused for some time.
c) Do not expose the battery to high temperatures
or fire. This may cause the battery to explode or
release toxic substances.
d) Under abusive conditions, liquid may be ejected from
the battery, Avoid contact. If contact accidentally
occurs, flush with water. In the event of the liquid
coming into contact with the eyes, rinse the eyes
with plenty of water and consult a doctor. Liquid
ejected from the battery may cause irritation or burns.
e) Recharge only with the charger specified by the
manufacturer. A charger that is suitable for a certain
type of battery may present a risk of fire when used
with other types of battery.
f) Observe the special guidelines applicable to the
transport, storage and use of Li-ion batteries.
g) Do not use damaged batteries.
4Beforeuse
4.1 Inserting the battery pack and switching the tool on 23
1. Insert the PSA 82 battery pack in the back of the tool.
2. Fully charge the PSA 82 battery pack (please refer to the operating instructions for the PUA 81 mains adapter,
the PSA 82 battery pack and the PUA 82 charger for use in motor vehicles).
NOTE Alternatively, the PSA 82 battery pack can be removed from the PSA 100 monitor and charged using the
separately available PSA 85 charger.
3. Switch the tool on by pressing the on/off button.
4. You must accept the terms of the disclaimer notice displayed on the screen before the tool can be operated.
5. To switch off, press and hold the on/off button for 3 seconds.
4.2 Settings
When operating a brand new tool you will first be requested to select the country-specific settings.
1. Use the 4-way controller to select the desired language and confirm your choice by pressing the “OK” button.
2. Make further settings using the 4-way controller and the “OK” button.
3. Use the “OK” button to confirm the settings made.
NOTE You can also use the “Skip” button to skip making these settings until the next time the tool is switched
on.
5Operation
5.1 Displaying the operating instructions
1. Press the “Home” button for 5 seconds.
The operating instructions will be shown in the right context in the display. You can then browse through the
complete operating instructions.
2. The operating instructions can also be displayed by way of the settings menuinthemainmenubypressingthe
Help function button.
3. To close the operating instructions, press the Back function button.
5.2 Basic functions
The function buttons can be used to select the available functions.
en
9
Printed: 25.04.2016 | Doc-Nr: PUB / 5070450 / 000 / 04

The 4-way controller can be used to shift the focus, change parameter values or, depending on the setting, shift the
cross hairs or change the layer thickness/depth, etc.
The Ok confirmation button can be used to select the object in focus or to start data processing.
5.3 Project and data management
Ferroscan and X-Scan data can be managed within a project at the same time.
5.3.1 Managing PS 1000 X-Scan projects and data 4
The “Projects” submenu provides access to functions that let you manage projects, display and analyze recorded
scans and import new data from the PS 1000 X-Scan.
1. Import the data (projects / scans) directly from the PS 1000 X-Scan using the PSA 50/51 data transfer cable.
2. Select the Projects function from the main menu.
3. Select the desired project. The active project can be identified by its “dog ear” at top right.
NOTE The currently active project can also be accessed directly from the main menu by way of the Openproject
function button.
4. Select the desired scan.
The scan is then displayed.
5. Set the control behavior of the 4-way controller using the function button at top left.
6. Use the function button to set the display mode to “2D” or “3D”.
7. TheParam.andVisu-alizationfunction buttons canbe usedto change the visualization and calculation parameters.
If you change the parameters under Param. the data must be recalculated. To do this, press the Ok confirmation
button.
8. The Extras function button provides access to additional functions including the ability to export a simple report
in PDF format or to set a marker position.
9. The data can be transferred to a PC for further analysis using the PSA 92 data transfer USB cable.
en
10
Printed: 25.04.2016 | Doc-Nr: PUB / 5070450 / 000 / 04

5.3.2 Managing PS 200 S Ferroscan projects and data 5
The “Projects” submenu provides access to functions that let you manage projects, display and analyze recorded
scans and import new data from the PS 200 S Ferroscan.
1. Transfer the scan data directly from the PS 200 S Ferroscan system to the PSA 100 monitor via the infrared
interface. Further information about importing PS 200 S Ferroscan data canbefoundinthePS200operating
instructions.
2. Alternatively, the PUA 95 micro USB cable can be used to transfer scan datafromthePSA55infraredadapterto
the PSA 100 monitor. Further information about the PSA 55 infrared adapter can be found in the PS 200 operating
instructions.
3. Select the Projects function from the main menu.
4. Select the desired project. The active project can be identified by its “dog ear” at top right.
NOTE The currently active project can also be accessed directly from the main menu by way of the Openproject
function button.
5. Set the control behavior of the 4-way controller using the function button at top left.
6. TheParam.andVisu-alizationfunction buttons canbe usedto change the visualization and calculation parameters.
7. The Extras function button provides access to additional functions including the ability to export a simple report
in PDF format or to set a marker position.
8. Using the PSA 92 USB data cable, the data from the PSA 100 monitor can be transferred to a PC for further
analysis.
6Settings
6.1 The following settings can be adjusted:
Brightness
Volume level
Date / time
Power modes
Country settings
NOTE
Press the “Help” button to display the complete operating instructions.
en
11
Printed: 25.04.2016 | Doc-Nr: PUB / 5070450 / 000 / 04

7 Disposal
CAUTION
Improper disposal of the equipment may have serious consequences: The burning of plastic components generates
toxic fumes which may present a health hazard. Batteries may explode if damaged or exposed to very high
temperatures, causing poisoning, burns, acid burns or environmental pollution. Careless disposal may permit
unauthorized and improper use of the equipment. This may result in serious personal injury, injury to third parties and
pollution of the environment.
Most of the materials from which Hilti tools or appliances are manufactured can be recycled. The materials must
be correctly separated before they can be recycled. In many countries, Hilti has already made arrangements for
taking back old tools and appliances for recycling. Ask Hilti Customer Service or your Hilti representative for further
information.
For EC countries only
Disposal of electrical appliances together with household waste is not permissible.
In observance of the European Directive on waste electrical and electronic equipment and its imple-
mentation in accordance with national law, electrical appliances that have reached the end of their life
must be collected separately and returned to an environmentally compatible recycling facility.
Dispose of the battery in accordance with national regulations.
8 EC declaration of conformity (original)
Designation: Monitor
Type: PSA 100
Generation: 01
Year of design: 2010
We declare, on our sole responsibility, that this product
complies with the following directives and standards:
until 19th April 2016: 2004/108/EC, from 20th April 2016:
2014/30/EU, 2011/65/EU, EN ISO 12100, 2006/66/EC.
Hilti Corporation, Feldkircherstrasse 100,
FL‑9494 Schaan
Paolo Luccini Edward Przybylowicz
Head of BA Quality and Process Man-
agement
Head of BU Measuring Systems
Business Area Electric Tools & Ac-
cessories
BU Measuring Systems
06/2015 06/2015
Technical documentation filed at:
Hilti Entwicklungsgesellschaft mbH
Zulassung Elektrowerkzeuge
Hiltistrasse 6
86916 Kaufering
Deutschland
en
12
Printed: 25.04.2016 | Doc-Nr: PUB / 5070450 / 000 / 04

NOTICE ORIGINALE
PSA 100 Moniteur
Avantdemettrel'appareilenmarche,lireim-
pérativement son mode d'emploi et bien res-
pecter les consignes.
Le présent mode d'emploi doit toujours ac-
compagner l'appareil.
Ne pas prêter ou céder l'appareil à un autre
utilisateur sans lui fournir le mode d'emploi.
Sommaire Page
1 Consignes générales 13
2Description 14
3 Consignes de sécurité 14
4 Mise en service 15
5Utilisation 16
6Réglages 18
7Recyclage 18
8 Déclaration de conformité CE (original) 19
1 Les numéros renvoient aux illustrations. Les illustra-
tions se trouvent au début de la notice d'utilisation.
Touches 1
@
Touches de fonction
;
DELétatdemarche
=
Touche Marche / Arrêt
%
Commutateur à bascule
&
Touche de confirmation (OK)
(
ToucheHomeetAide
)
DELétatdecharge
1 Consignes générales
1.1 Termes signalant un danger et leur signification
DANGER
Pour un danger imminent qui peut entraîner de graves
blessures corporelles ou la mort.
AVERTISSEMENT
Pour attirer l'attention sur une situation pouvant présen-
ter des dangers susceptibles d'entraîner des blessures
corporelles graves ou la mort.
ATTENTION
Pour attirer l'attention sur une situation pouvant présen-
ter des dangers susceptibles d'entraîner des blessures
corporelles légères ou des dégâts matériels.
REMARQUE
Pour des conseils d'utilisation et autres informations
utiles.
1.2 Explication des pictogrammes et autres
symboles d'avertissement
Symboles d'avertissement
Avertisse-
ment danger
général
Symboles d'obligation
Lire le mode
d'emploi
avant
d'utiliser
l'appareil
fr
13
Printed: 25.04.2016 | Doc-Nr: PUB / 5070450 / 000 / 04

2 Description
2.1 Emploi
Le moniteur sert à afficher et à procéder à une analyse
détaillée des scans qui ont été enregistrés par le biais de
systèmes de scan Hilti.
Il est possible de gérer les scans dans des projets, puis
de procéder à d'autres évaluations de données et de
transmettre les données vers un PC pour archivage.
3 Consignes de sécurité
3.1 Consignes générales de sécurité
Lire les instructions d'utilisation enregistrées dans l'ap-
pareil.
En plus des consignes de sécurité figurant dans les
différentes sections du présent mode d'emploi, il im-
porte de toujours bien respecter les directives sui-
vantes.
Lire et comprendre toutes les consignes de sécurité
et instructions. Le non-respect des consignes de sé-
curité et instructions indiquées peut entraîner un choc
électrique, un incendie et / ou de graves blessures sur
les personnes. Les consignes de sécurité et instruc-
tions doivent être intégralement conservées pour les
utilisations futures.
3.2 Remarques fondamentales concernant la
sécurité
a) Tenir l’appareil laser hors de portée des enfants.
b) Contrôler la zone d'affichage après avoir mis l'ap-
pareil en marche. La zone d'affichage devrait affi-
cher le logo Hilti et le nom de l'appareil. Une clause
de non-responsabilité apparaît ensuite dans la zone
d'affichage, que vous devez accepter pour pouvoir
accéder au menu principal dans le projet actuel.
c) Toujours tenir compte des messages d'avertisse-
ment apparaissant dans la zone d'affichage.
d) Veiller à ce que l'écran soit toujours lisible (par
ex. ne jamais mettre les doigts sur la zone d'affi-
chage, veiller à ce que l'écran ne se salisse pas).
e) Ne jamais utiliser un appareil défectueux. Contac-
ter le S.A.V. Hilti.
f) Contrôler les réglages de l'appareil avant utilisa-
tion.
g) Ne transporter l'appareil qu'après avoir sorti le
bloc-accu.
h) Transporter et stocker l'appareil en toute sécu-
rité. La température de stockage doit être com-
priseentre-25°Cet63°C(-13à+145°F).
i) Lorsque l’appareil est déplacé d’un lieu très froid
à un plus chaud ou vice-versa, le laisser atteindre
la température ambiante avant de l’utiliser.
j) Ne jamais percer/forer à des endroits où l'appareil
a détecté des objets. Tenir compte du diamètre de
forage et toujours intégrer un facteur de sécurité
approprié au calcul.
k) Les résultats de mesure peuvent de principe
être compromis dans certaines conditions
environnementales. C'est par ex. le cas à
proximité d'appareils qui génèrent de puissants
champs magnétiques ou électromagnétiques,
en présence d'humidité, de matériaux de
construction qui contiennent du métal, de
matériaux isolants aluminisés, de structures
multicouches, de supports avec cavités ainsi que
des papiers peints ou carrelages conducteurs.
C'est pourquoi, avant de procéder au perçage,
sciage ou fraisage, il est recommandé d'étudier
les matériaux support dans d'autres sources
d'information (par ex. plans de construction).
l) Prêter attention aux influences de l'environne-
ment de l'espace de travail. Ne pas utiliser l'ap-
pareil dans des endroits présentant un danger
d'incendie ou d'explosion.
m) Avant d'utiliser un accessoire, vérifier qu'il est
bien monté.
3.3 Aménagement correct du poste de travail
a) Utiliser l'appareil uniquement dans les limites
d’application définies.
b) Respecter la réglementation locale en vigueur en
matière de prévention des accidents.
c) Lors de travaux d’alignement sur une échelle,
éviter toute mauvaise posture. Veiller à toujours
rester stable et à garder l'équilibre.
3.4 Compatibilité électromagnétique
REMARQUE
Uniquement pour la Corée : Cet appareil est conçu pour
des ondes électromagnétiques survenant dans des zones
d'habitation (classe B). Il est essentiellement prévu pour
une utilisation dans des zones d'habitation, mais peut
aussi être utilisé dans d'autres secteurs.
Bien que l’appareil réponde aux exigences les plus sé-
vères des directives respectives, Hilti ne peut entièrement
exclure la possibilité qu'un rayonnement très intense pro-
duise des interférences sur l'appareil et perturbe son
fonctionnement.Danscecasouencasd'autresincer-
titudes, procéder à des mesures de contrôle. De même,
Hilti n'exclut pas la possibilité qu'il produise des inter-
férences sur d'autres appareils (par ex. systèmes de
navigation pour avions).
fr
14
Printed: 25.04.2016 | Doc-Nr: PUB / 5070450 / 000 / 04

3.5 Mesures de sécurité générales
a) Avant toute utilisation, l'appareil doit être
contrôlé. Si l'appareil est endommagé, le faire
réparer par le S.A.V. Hilti.
b) Tenir l'appareil toujours en état sec et propre.
c) Bien que l'appareil soit conçu pour être utilisé
dans les conditions de chantier les plus dures,
en prendre soin comme de tout autre instrument
optique et électrique (par ex. jumelles, lunettes,
appareil photo).
d) Bien que l’appareil soit parfaitement étanche, il
est conseillé d'éliminer toute trace d'humidité en
l’essuyant avant de le ranger dans son coffret de
transport.
e) Il est interdit d'ouvrir ou de modifier l'appareil.
3.6 Utilisation et emploi scrupuleux des
blocs-accus
a) Les accus doivent être tenus hors de portée des
enfants.
b) Le bloc-accu doit être retiré de l'appareil lorsque
celui-ci n'est pas utilisé pendant un temps prolongé.
c) Ne pas surchauffer le bloc-accu et ne pas l'expo-
ser au feu. Le bloc-accu risque d'exploser ou il y a
risque de dégagement de substances toxiques.
d) En cas d’utilisation abusive, du liquide peut sortir
de l’accumulateur. Éviter tout contact avec ce li-
quide. En cas de contact par inadvertance, rincer
soigneusement avec de l’eau. Si le liquide rentre
dans les yeux, les rincer abondamment à l'eau et
consulter en plus un médecin. Le liquide qui sort
peut entraîner des irritations de la peau ou causer
des brûlures.
e) Ne charger les accumulateurs que dans des char-
geurs recommandés par le fabricant. Si un char-
geur approprié à un type spécifique d’accumulateurs
est utilisé avec des accus non recommandés pour
celui-ci, il y a risque d'incendie.
f) Respecter les directives spécifiques relatives au
transport, au stockage et à l'utilisation des accus
Li‑Ions.
g) Ne plus utiliser de blocs-accus ayant subi des
dommages mécaniques.
4 Mise en service
4.1 Insertion du bloc-accu et mise en marche de l'appareil 23
1. Insérer le bloc-accu PSA 82 sur la face arrière de l'appareil.
2. Charger complètement le bloc-accu PSA 82 (se reporter aux instructions d'utilisation du bloc d'alimentation
PUA 81, du bloc-accu PSA 82 et de la fiche de batterie de votre voiture PUA 82).
REMARQUE Il est également possible, en guise d'alternative, de charger le bloc-accu PSA 82 hors du moniteur
PSA 100 à l'aide d'un chargeur PSA 85 disponible séparément.
3. Mettre l'appareil en marche à l'aide de la touche Marche / Arrêt.
4. Vous devez accepter la clause de non-responsabilité qui apparaît à l'écran pour pouvoir utiliser l'appareil.
5. Pour arrêter l'appareil, maintenir la touche Marche/ Arrêt enfoncée pendant 3 secondes.
4.2 Réglages
Dans le cas d'un appareil neuf (qui sort d'usine), il sera d'abord demandé de sélectionner les réglages spécifiques au
pays (Options régionales).
1. À l'aide du commutateur à bascule, sélectionner la langue souhaitée et confirmervotrechoixàl'aidedelatouche
de fonction "OK".
2. Procéder ensuite de même pour les autres paramètres de configuration, respectivement en sélectionnant à l'aide
du commutateur à bascule puis en confirmant à l'aide de "OK".
3. Confirmer les réglages effectués à l'aide de la touche de fonction "OK".
REMARQUE Cesréglagesdeparamètrespeuventêtreignorésàl'aidedelatouchedefonction "Abandonner"
mêmeàlamiseenmarchesuivantedel'appareil.
fr
15
Printed: 25.04.2016 | Doc-Nr: PUB / 5070450 / 000 / 04

5 Utilisation
5.1 Affichage des instructions d'utilisation
1. Appuyer sur la touche Home pendant 5 s.
Les instructions d'utilisation sont affichées en fonction du contexte dans la zone d'affichage. Il est également
possible de naviguer ensuite dans l'ensemble des instructions d'utilisation.
2. Les instructions d'utilisation peuvent aussi être affichée à l'aide de la touche de fonction Aide dans le menu
Config du menu principal.
3. Pour fermer les instructions d'utilisation, appuyer sur la touche de fonction Retour.
5.2 Fonctions essentielles
Les touches de fonction permettent de sélectionner les fonctions disponibles.
Le commutateur à bascule permet de déplacer la cible, modifier les valeurs des paramètres ou, selon le réglage,
déplacer le réticule, modifier l'épaisseur et la profondeur de la couche, etc.
La touche de confirmation Ok permet de sélectionner l'élément ciblé ou de lancer le processus de traitement des
données.
5.3 Projets et gestion de données
Il est possible au sein d'un même projet de gérer simultanément des données Ferroscan et X-Scan.
5.3.1 Gestion de projets et données PS 1000 X-Scan 4
Le sous-menu "Projets" permet de gérer des projets, d'afficher des scans enregistrés à des fins d'analyse et d'importer
de nouvelles données à partir de PS 1000 X-Scan.
1. Importer les données (projets/scans) par le biais du câble de transmission de données PSA 50/51 directement à
partir du scanner PS 1000 X-Scan.
2. Dans le menu principal, sélectionner la fonction Projets.
3. Sélectionner le projet souhaité. Le projet actif se reconnaît par l'angle supérieur droit replié.
REMARQUE Le projet actif courant peut aussi être atteint directement à partir du menuprincipalàl'aidedela
touche de fonction Ouvrirprojet.
4. Sélectionner le scan souhaité.
Le scan est affiché.
5. Régler le comportement de commande du commutateur à bascule à l'aide de latouchedefonctionenhautà
gauche.
6. Régler le mode d'affichage à l'aide de la touche de fonction sur "2D" ou "3D".
fr
16
Printed: 25.04.2016 | Doc-Nr: PUB / 5070450 / 000 / 04

7. Les touches de fonction Param. et Visu-alisation permettent de modifier les paramètres de visualisation et de
calcul. Si des valeurs de Param. doivent être modifiées, les données doivent être à nouveau calculées. Appuyer
pour ce faire sur la touche de confirmation Ok.
8. La touche de fonction Extras permet entre autre d'exporter un rapport simple en format PDF ou de définir des
positions de marquage.
9. Ces données peuvent ensuite être envoyées vers un PC par le biais du câble USB PSA 92 à des fins d'analyses
ultérieures.
5.3.2 Gestion de projets et données PS 200 S Ferroscan 5
Le sous-menu "Projets" permet de gérer des projets, d'afficher des scans enregistrés à des fins d'analyse et d'importer
de nouvelles données à partir de PS 200 S Ferroscan.
1. Importez les données numérisées par le biais de l'interface infrarouge directement à partir de PS 200 S Ferroscan
vers le moniteur PSA 100. Pour plus d'informations sur l'importation de PS 200 S Ferroscan, se reporter au mode
d'emploi du PS 200.
2. Les données numérisées peuvent aussi être importées avec le câble USB PUA 95 Micro à partir de l'adaptateur
IR PSA 55 sur le moniteur PSA 100. Pour plus d'informations sur l'adaptateurIRPSA55,sereporteraumode
d'emploi du PS 200.
3. Dans le menu principal, sélectionner la fonction Projets.
4. Sélectionner le projet souhaité. Le projet actif se reconnaît par l'angle supérieur droit replié.
REMARQUE Le projet actif courant peut aussi être atteint directement à partir du menuprincipalàl'aidedela
touche de fonction Ouvrirprojet.
5. Régler le comportement de commande du commutateur à bascule à l'aide de latouchedefonctionenhautà
gauche.
6. Les touches de fonction Param. et Visu-alisation permettent de modifier les paramètres de visualisation et de
calcul.
7. La touche de fonction Extras permet entre autre d'exporter un rapport simple en format PDF ou de définir des
positions de marquage.
8. Ces données peuvent ensuite être envoyées à partir du moniteur PSA 100 parlebiaisducâbleUSBPSA92à
desfinsd'analysesultérieures.
fr
17
Printed: 25.04.2016 | Doc-Nr: PUB / 5070450 / 000 / 04
Pagina se încarcă...
Pagina se încarcă...
Pagina se încarcă...
Pagina se încarcă...
Pagina se încarcă...
Pagina se încarcă...
Pagina se încarcă...
Pagina se încarcă...
Pagina se încarcă...
Pagina se încarcă...
Pagina se încarcă...
Pagina se încarcă...
Pagina se încarcă...
Pagina se încarcă...
Pagina se încarcă...
Pagina se încarcă...
Pagina se încarcă...
Pagina se încarcă...
Pagina se încarcă...
Pagina se încarcă...
Pagina se încarcă...
Pagina se încarcă...
Pagina se încarcă...
Pagina se încarcă...
Pagina se încarcă...
Pagina se încarcă...
Pagina se încarcă...
Pagina se încarcă...
Pagina se încarcă...
Pagina se încarcă...
Pagina se încarcă...
Pagina se încarcă...
Pagina se încarcă...
Pagina se încarcă...
Pagina se încarcă...
Pagina se încarcă...
Pagina se încarcă...
Pagina se încarcă...
Pagina se încarcă...
Pagina se încarcă...
Pagina se încarcă...
Pagina se încarcă...
Pagina se încarcă...
Pagina se încarcă...
Pagina se încarcă...
Pagina se încarcă...
Pagina se încarcă...
Pagina se încarcă...
Pagina se încarcă...
Pagina se încarcă...
Pagina se încarcă...
Pagina se încarcă...
Pagina se încarcă...
Pagina se încarcă...
Pagina se încarcă...
Pagina se încarcă...
Pagina se încarcă...
Pagina se încarcă...
Pagina se încarcă...
Pagina se încarcă...
Pagina se încarcă...
Pagina se încarcă...
Pagina se încarcă...
Pagina se încarcă...
Pagina se încarcă...
Pagina se încarcă...
Pagina se încarcă...
Pagina se încarcă...
Pagina se încarcă...
Pagina se încarcă...
Pagina se încarcă...
Pagina se încarcă...
Pagina se încarcă...
Pagina se încarcă...
Pagina se încarcă...
Pagina se încarcă...
Pagina se încarcă...
Pagina se încarcă...
Pagina se încarcă...
Pagina se încarcă...
Pagina se încarcă...
Pagina se încarcă...
Pagina se încarcă...
Pagina se încarcă...
Pagina se încarcă...
Pagina se încarcă...
Pagina se încarcă...
Pagina se încarcă...
Pagina se încarcă...
Pagina se încarcă...
Pagina se încarcă...
Pagina se încarcă...
Pagina se încarcă...
Pagina se încarcă...
Pagina se încarcă...
Pagina se încarcă...
Pagina se încarcă...
Pagina se încarcă...
Pagina se încarcă...
Pagina se încarcă...
Pagina se încarcă...
Pagina se încarcă...
Pagina se încarcă...
Pagina se încarcă...
Pagina se încarcă...
Pagina se încarcă...
Pagina se încarcă...
Pagina se încarcă...
Pagina se încarcă...
Pagina se încarcă...
Pagina se încarcă...
Pagina se încarcă...
Pagina se încarcă...
Pagina se încarcă...
Pagina se încarcă...
Pagina se încarcă...
Pagina se încarcă...
Pagina se încarcă...
Pagina se încarcă...
Pagina se încarcă...
Pagina se încarcă...
Pagina se încarcă...
Pagina se încarcă...
Pagina se încarcă...
Pagina se încarcă...
Pagina se încarcă...
Pagina se încarcă...
Pagina se încarcă...
Pagina se încarcă...
Pagina se încarcă...
Pagina se încarcă...
Pagina se încarcă...
Pagina se încarcă...
Pagina se încarcă...
Pagina se încarcă...
Pagina se încarcă...
Pagina se încarcă...
Pagina se încarcă...
Pagina se încarcă...
Pagina se încarcă...
Pagina se încarcă...
Pagina se încarcă...
Pagina se încarcă...
Pagina se încarcă...
Pagina se încarcă...
Pagina se încarcă...
Pagina se încarcă...
Pagina se încarcă...
Pagina se încarcă...
Pagina se încarcă...
Pagina se încarcă...
Pagina se încarcă...
Pagina se încarcă...
Pagina se încarcă...
Pagina se încarcă...
Pagina se încarcă...
Pagina se încarcă...
Pagina se încarcă...
Pagina se încarcă...
Pagina se încarcă...
Pagina se încarcă...
Pagina se încarcă...
Pagina se încarcă...
Pagina se încarcă...
Pagina se încarcă...
Pagina se încarcă...
Pagina se încarcă...
Pagina se încarcă...
Pagina se încarcă...
Pagina se încarcă...
Pagina se încarcă...
Pagina se încarcă...
Pagina se încarcă...
Pagina se încarcă...
Pagina se încarcă...
Pagina se încarcă...
-
 1
1
-
 2
2
-
 3
3
-
 4
4
-
 5
5
-
 6
6
-
 7
7
-
 8
8
-
 9
9
-
 10
10
-
 11
11
-
 12
12
-
 13
13
-
 14
14
-
 15
15
-
 16
16
-
 17
17
-
 18
18
-
 19
19
-
 20
20
-
 21
21
-
 22
22
-
 23
23
-
 24
24
-
 25
25
-
 26
26
-
 27
27
-
 28
28
-
 29
29
-
 30
30
-
 31
31
-
 32
32
-
 33
33
-
 34
34
-
 35
35
-
 36
36
-
 37
37
-
 38
38
-
 39
39
-
 40
40
-
 41
41
-
 42
42
-
 43
43
-
 44
44
-
 45
45
-
 46
46
-
 47
47
-
 48
48
-
 49
49
-
 50
50
-
 51
51
-
 52
52
-
 53
53
-
 54
54
-
 55
55
-
 56
56
-
 57
57
-
 58
58
-
 59
59
-
 60
60
-
 61
61
-
 62
62
-
 63
63
-
 64
64
-
 65
65
-
 66
66
-
 67
67
-
 68
68
-
 69
69
-
 70
70
-
 71
71
-
 72
72
-
 73
73
-
 74
74
-
 75
75
-
 76
76
-
 77
77
-
 78
78
-
 79
79
-
 80
80
-
 81
81
-
 82
82
-
 83
83
-
 84
84
-
 85
85
-
 86
86
-
 87
87
-
 88
88
-
 89
89
-
 90
90
-
 91
91
-
 92
92
-
 93
93
-
 94
94
-
 95
95
-
 96
96
-
 97
97
-
 98
98
-
 99
99
-
 100
100
-
 101
101
-
 102
102
-
 103
103
-
 104
104
-
 105
105
-
 106
106
-
 107
107
-
 108
108
-
 109
109
-
 110
110
-
 111
111
-
 112
112
-
 113
113
-
 114
114
-
 115
115
-
 116
116
-
 117
117
-
 118
118
-
 119
119
-
 120
120
-
 121
121
-
 122
122
-
 123
123
-
 124
124
-
 125
125
-
 126
126
-
 127
127
-
 128
128
-
 129
129
-
 130
130
-
 131
131
-
 132
132
-
 133
133
-
 134
134
-
 135
135
-
 136
136
-
 137
137
-
 138
138
-
 139
139
-
 140
140
-
 141
141
-
 142
142
-
 143
143
-
 144
144
-
 145
145
-
 146
146
-
 147
147
-
 148
148
-
 149
149
-
 150
150
-
 151
151
-
 152
152
-
 153
153
-
 154
154
-
 155
155
-
 156
156
-
 157
157
-
 158
158
-
 159
159
-
 160
160
-
 161
161
-
 162
162
-
 163
163
-
 164
164
-
 165
165
-
 166
166
-
 167
167
-
 168
168
-
 169
169
-
 170
170
-
 171
171
-
 172
172
-
 173
173
-
 174
174
-
 175
175
-
 176
176
-
 177
177
-
 178
178
-
 179
179
-
 180
180
-
 181
181
-
 182
182
-
 183
183
-
 184
184
-
 185
185
-
 186
186
-
 187
187
-
 188
188
-
 189
189
-
 190
190
-
 191
191
-
 192
192
-
 193
193
-
 194
194
-
 195
195
-
 196
196


Lucrări înrudite
-
Hilti PRA 86 Instrucțiuni de utilizare
-
-
Hilti PS 1000 Instrucțiuni de utilizare
-
-
-
-
Hilti PRI 36 Instrucțiuni de utilizare
-
-
-