Ryobi EBS9576VFHG Manualul proprietarului
- Categorie
- Șlefuitoare cu putere
- Tip
- Manualul proprietarului
Acest manual este potrivit și pentru

EBS-9576V / EBS-1310V
GB
BELT SANDER USER’S MANUAL 1
FR
PONCEUSE A BANDE MANUEL D’UTILISATION 4
DE
BANDSCHLEIFER
BEDIENUNGSANLEITUNG 7
ES
LIJADORA DE BANDA MANUAL DE UTILIZACIÓN 10
IT
LEVIGATRICE A NASTRO
MANUALE D’USO 13
NL
BANDSCHUURMACHINE GEBRUIKERSHANDLEIDING 16
PT
LIXADEIRA DE ROLOS MANUAL DE UTILIZAÇÃO 19
DK
BÅNDSLIBEMASKINE
BRUGERVEJLEDNING 22
SE
BANDPUTSMASKIN INSTRUKTIONSBOK 25
FI
HIHNAHIOMAKONE
KÄYTTÄJÄN KÄSIKIRJA 28
NO
BÅNDPLANSLIPER
BRUKSANVISNING 31
RU
ЭЛЕКТРИЧЕСКАЯ ЛЕНТОШЛИФОВАЛЬНАЯ МАШИНА
êìäéÇéÑëíÇé èé ùäëèãìÄíÄñàà 34
PL
SZLIFIERKA TAŚMOWA INSTRUKCJA OBSŁUGI 37
CZ
PÁSOVÁ BRUSKA
NÁVOD K OBSLUZE 40
HU
SZALAGCSISZOLÓ
HASZNÁLATI ÚTMUTATÓ 43
RO
SLEFUITOR CU BANDA
MANUAL DE UTILIZARE 46
LV
LENTES SLĪPMAŠĪNA LIETOTĀJA ROKASGRĀMATA 49
LT
JUOSTINIS ŠLIFUOKLIS NAUDOJIMO VADOVAS 52
EE
LINTLIHVIJA KASUTAJAJUHEND 55
HR
TRAČNA BRUSILICA KORISNI»KI PRIRU»NIK 58
SI
TRAČNI BRUSILNIK UPORABNIŠKI PRIROČNIK 61
SK
PÁSOVÁ BRÚSKA NÁVOD NA POUŽITIE 64
GR
ΤΑΙΝΙΟΦΟΡΟΣ ΛΕΙΑΝΤΗΡΑΣ ΟΔΗΓΙΕΣ ΧΡΗΣΗΣ 67
TR
ŞERİT ZIMPARA MAKİNESİ KULLANiM KILAVUZU 70
GB ORIGINAL INSTRUCTIONS FR TRADUCTION DES INSTRUCTIONS ORIGINALES DE ÜBERSETZUNG DER ORIGINALANLEITUNG ES TRADUCCIÓN DE
LAS INSTRUCCIONES ORIGINALES IT TRADUZIONE DELLE ISTRUZIONI ORIGINALI NL VERTALING VAN DE ORIGINELE INSTRUCTIES PT TRADUÇÃO
DAS INSTRUÇÕES ORIGINAIS DK OVERSÆTTELSE AF DE ORIGINALE INSTRUKTIONER SE ÖVERSÄTTNING AV DE URSPRUNGLIGA INSTRUKTIONERNA
FI
ALKUPERÄISTEN OHJEIDEN SUOMENNOS NO OVERSETTELSE AV DE ORIGINALE INSTRUKSJONENE RU ПЕРЕВОД ОРИГИНАЛЬНЫХ ИНСТРУКЦИЙ
PL TŁUMACZENIE INSTRUKCJI ORYGINALNEJ CZ PŘEKLAD ORIGINÁLNÍCH POKYNŮ HU AZ EREDETI ÚTMUTATÓ FORDÍTÁSA RO TRADUCEREA
INSTRUCŢIUNILOR ORIGINALE LV TULKOTS NO ORIĢINĀLĀS INSTRUKCIJAS LT ORIGINALIŲ INSTRUKCIJŲ VERTIMAS EE ORIGINAALJUHENDI TÕLGE
HR
PRIJEVOD ORIGINALNIH UPUTA SI PREVOD ORIGINALNIH NAVODIL SK PREKLAD POKYNOV V ORIGINÁLI GR ΜΕΤΑΦΡΑΣΗ ΤΩΝ ΠΡΩΤΟΤΥΠΩΝ
ΟΔΗΓΙΩΝ TR ORIJINAL TALIMATLARIN TERCÜMESI
961067431-01_EBS-9576V&EBS-1310V_EU.indd A1961067431-01_EBS-9576V&EBS-1310V_EU.indd A1 2010.4.21 11:32:02 AM2010.4.21 11:32:02 AM

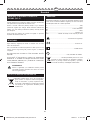
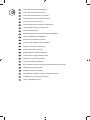
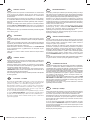
Fig.2
10
7
8
9
6
Fig.1
8
7
10
Fig.3 Fig.4
9
3
5
5
4
3
1
12
11
9
1
9
3
5
4
2
2
11
12
EBS-9576V
EBS-1310V
961067431-01_EBS-9576V&EBS-1310V_EU.indd A2961067431-01_EBS-9576V&EBS-1310V_EU.indd A2 2010.4.21 11:32:11 AM2010.4.21 11:32:11 AM

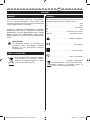
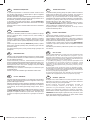
Fig.6
Fig.7
13
14
Fig.5
3
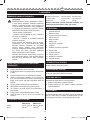
Fig.8
961067431-01_EBS-9576V&EBS-1310V_EU.indd A3961067431-01_EBS-9576V&EBS-1310V_EU.indd A3 2010.4.21 11:32:17 AM2010.4.21 11:32:17 AM

Important!
It is essential that you read the instructions in this manual before mounting and operating
this machine.
Attention !
Il est indispensable que vous lisiez les instructions contenues dans ce manuel avant
le montage et la mise en service de l’appareil.
Achtung!
Bitte lesen Sie unbedingt vor Montage und Inbetriebnahme die Hinweise dieser Bedienungsanleitung.
¡Atención!
Es imprescindible que lea las instrucciones de este manual antes del montaje y de la
puesta en servicio.
Attenzione!
Prima di procedere al montaggio e alla messa in funzione, è indispensabile leggere
attentamente le istruzioni del presente manuale.
Let op !
Het is absoluut noodzakelijk vóór montage en inbedrijfstelling de aanwijzingen in deze
handleiding te lezen.
Atenção!
É indispensável ler as instruções deste manual antes de montar e pôr em serviço.
OBS!
Denne brugsanvisning skal læses igennem inden montering og ibrugtagning.
Observera!
Det är nödvändigt att läsa instruktionerna i denna bruksanvisning före montering och
driftsättning.
Huomio!
On ehdottoman välttämätöntä lukea tässä käyttöohjeessa annetut ohjeet ennen
asennusta ja käyttöönottoa.
Advarsel!
Vennligst les instruksjonene i denne bruksanvisningen før du monterer og tar i bruk
maskinen.
ÇÌËχÌËe! èee‰ Ò·ÓÍÓÈ Ë Á‡ÔÛÒÍÓÏ ËÌÒÚÛÏeÌÚ‡ ÌeÓ·ıÓ‰ËÏÓ ÔÓ˜eÒÚ¸ ËÌÒÚÛ͈ËË ËÁ ̇ÒÚÓfl˘e„Ó
ÛÍÓ‚Ó‰ÒÚ‚‡.
Uwaga!
Przed montowaniem i uruchomieniem, koniecznie musicie się Państwo zapoznać
z zaleceniami zawartymi w niniejszym sposobie użycia.
Důležité upozornění!
Před montáží nářadí a uvedením do provozu je nutné si přečíst následující pokyny.
Figyelem!
Feltétlenül fontos, hogy a jelen használati útmutatóban foglalt előírásokat az
összeszerelés és az üzembe helyezés ellőt elolvassa!
Atenţie!
Este indispensabil sã citiţi instrucţiunile conţinute în acest mod de utilizare înainte de montaj
şi de punerea în funcţiune.
Uzmanību! Ir ļoti būtiski, lai jūs izlasītu norādījumus, kas sniegti šajā rokasgrāmatā, pirms ķeraties
pie ierīces montēšanas un iedarbināšanas!
Dėmesio! Prieš surinkdami ir paleisdami aparatą į darbą, reikia, kad jūs perskaitytumėte šiame
vadove esančias instrukcijas.
Tähtis! Lugege enne seadme kokkupanekut ja kasutamist kindlasti läbi selles juhendis
sisalduvad eeskirjad ja juhised!
Upozorenje! Vaæno je da upute u ovom KorisniËkom priruËniku proËitate prije postavljanja i uporabe ovog alata.
Pomembno!
Zelo pomembno je, da pred namestitvijo in prvo uporabo te naprave preberete
navodila v tem priročniku.
Upzornenie! Je dôležité, aby ste si pred montážou a spustením zariadenia prečítali pokyny, ktoré sa
nachádzajú v tomto návode.
Προσοχή!
Είναι απαραίτητο να διαβάσετε τις συστάσεις των οδηγιών αυτών πριν τη
συναρμολόγηση και τη θέση σε λειτουργία
Dikkat!
Cihazın montajından ve çalıştırılmasından önce bu kılavuzda bulunan talimatları okumanız zorunludur.
Subject to technical modifications / Sous réserve de modifications techniques /Technische Änderungen vorbehalten /
Bajo reserva de modificaciones técnicas / Con riserva di eventuali modifiche tecniche /Technische wijzigingen voorbehouden /
Com reserva de modificações técnicas / Med forbehold for tekniske ændringer / Med förbehåll för tekniska ändringar /
Tekniset muutokset varataan / Med forbehold om tekniske endringer /
åÓ„ÛÚ ·˚Ú¸ ‚ÌeÒeÌ˚ ÚeıÌ˘eÒÍËe ËÁÏeÌeÌËfl /
Z zastrzeżeniem modyfikacji technicznych / Změny technických údajů vyhrazeny / A műszaki módosítás jogát fenntartjuk /
Sub rezerva modificaţiilor tehnice /
Paturam tiesības mainīt tehniskos raksturlielumus / Pasiliekant teisę daryti techninius pakeitimus /
Tehnilised muudatused võimalikud /
Podloæno tehniËkim promjenama / Tehnične spremembe dopuščene /
Technické zmeny vyhradené / Υπό την επιφύλαξη τεχνικών τροποποιήσεων / Teknik değişiklik hakkı saklıdır
961067431-01_EBS-9576V&EBS-1310V_EU.indd A4961067431-01_EBS-9576V&EBS-1310V_EU.indd A4 2010.4.21 11:32:20 AM2010.4.21 11:32:20 AM

1
English
GB
FR DE ES IT NL PT DK SE FI NO RU PL CZ HU RO LV LT EE HR SI SK GR
TR
GENERAL SAFETY RULES
WARNING
Some dust created by power sanding, sawing,
grinding, drilling, and other construction activities
contains chemicals known to cause cancer,
birth defects or other reproductive harm. Some
examples of these chemicals are:
- Lead from lead-based paints.
- Crystalline silica from bricks and cement and
other masonry products.
- Arsenic and chromium from chemically-treated
lumber.
Your risk from these exposures varies, depending
on how often you do this type of work. To reduce
your exposure to these chemicals: work in a well
ventilated area, and work with approved safety
equipment, such as those dustmasks that are
specially designed to filter out microscopic dust
particles.
Wear a face mask or dust mask if the cutting
operation generates dust, and connect the hose
connector of vacuum cleaner to the dust pipe
joint.
BELT SANDER SAFETY PRECAUTIONS
■ Hold the tool firmly with both hands.
■ Keep the cord away from the rotating abrasive belt.
■ Keep your hands away from rotating parts.
■ Do not place the tool on a surface while the belt is still
moving since belt rotation will cause it to move, and may
result in the tool being damaged or personal injury.
■ The tool must be used only for dry sanding.
■ Do not continue to use worn or torn abrasive belts.
■ Clamp the work piece if it does not remain stationary
due to its own weight.
■ Turn the tool on before applying it to the work piece.
■ Turn the tool off after it has been lifted away from the
work piece.
SPECIFICATIONS
EBS-9576V EBS-1310V
Input 230 V 50 Hz 230 V 50 Hz
Power 950W 1350W
No load speed 240-400 m/min 240-400 m/min
Belt size 76x533 mm 100x610 mm
Net weight 5.0 kg 6.4 kg
Be sure to check the nameplate on the product,
because the voltage is subject to change depending
on the area in which the product is to be used.
DESCRIPTION
1. Front handle
2. Sanding belt
3. Tension release lever
4. Rear handle
5. Dust bag
6. Dust point
7. Lock-on button
8. Switch
9. Tracking knob
10. Speed dial
11. Front roller
12. Rear roller
13. Adjustment knob
14. Slot holder
STANDARD ACCESSORIES
Dust bag, Abrasive belt.
OPTIONAL ACCESSORIES
G-Clamp, Sanding frame.
APPLICATIONS
Use only for the purpose listed below:
1. Surface finishing for wood.
2. For removal of rust and surface finishing for metal.
NOISE BUILD-UP
Noise (sound pressure level) in the workplace can exceed
85 dB(A). In this case, sound insulation and hearing
protection measure must be taken by the operator.
SWITCH (FIG. 1)
This tool is started and stopped by squeezing and
releasing the trigger (8).
For continous operation, press the lock-on button (7)
while trigger is being squeezed. Squeeze trigger again to
release the lock.
The belt speed can be freely adjusted from 240 to 400 m/
min by turning the speed adjusting dial (10) (EBS-9576V
/ EBS-1310V) (A = lowest speed / F = highest speed)
961067431-01_EBS-9576V&EBS-1310V_EU.indd Sec2:1961067431-01_EBS-9576V&EBS-1310V_EU.indd Sec2:1 2010.4.21 11:32:20 AM2010.4.21 11:32:20 AM

2
English
GB
FR DE ES IT NL PT DK SE FI NO RU PL CZ HU RO LV LT EE HR SI SK GR
TR
DUST BAG (FIG. 2)
When sanding wood, the dust bag (5) should be used.
Although the dust bag has a substantial capacity, it
should be emptied frequently.
Opening the zipper of the dust bag allows complete
cleaning.
CAUTION!
When sanding metal, the dust bag should not be
used, because of the risk of fire from flying
sparks.
CHANGING THE ABRASIVE BELT(FIG.3 TO 5)
WARNING!
BE SURE TO DISCONNECT THE TOOL FROM
THE POWER SUPPLY WHEN MOUNTING AND
REMOVING THE SANDING BELT.
■ Place the tool on its side and lift the lever (3) to retract
the front roller and release the belt tension (Fig. 3).
■ Pull the sanding belt off.
If the belt tension is not released after lifting the lever,
loosen the adjustment knob (9) (Fig. 4).
■ Mount a new sanding belt.
NOTE!
Be sure that the arrow inside of the belt is pointing in
the same direction as that of the tool.
■ Push the lever down to the original position (Fig. 5).
CAUTION!
Ensure that your fingers are not trapped.
TRACKING ADJUSTMENT (FIG. 6)
The belt life will be increased by using the tracking
adjustment.
Turn the tool upside down and hold it firmly with one
hand, then start the tool and observe the tracking of the
sanding belt.
Stop the tool and adjust the tracking of the belt by rotating
the tracking knob until the edge of the belt is even with
the outer edges of both the front and rear rollers.
CAUTION!
Check that the belt does not rub against the
tool’s frame.
OPERATING (FIG. 7)
NEVER COVER AIR VENTS SINCE THEY MUST
ALWAYS BE OPEN FOR PROPER MOTOR COOLING.
MAKE SURE THAT THE WORK PIECE IS FREE OF
NAILS AND OTHER FOREIGN OBJECTS THAT
COULD TEAR THE ABRASIVE BELT.
Hold the tool firmly with both hands. Turn the switch on
and permit the rotation of the abrasive belt to reach full
speed. Then gently place the tool on the work piece
surface. Move the tool back and forth. Never exert
excessive pressure on the tool. The weight of the tool
applies adequate pressure. Excessive pressure will retard
the abrasive action, leave an uneven finish and cause
extra wear to both the tool and the abrasive belt. Always
lift the tool off the work piece before turning the switch off.
CLAMP
(Optional accessory)
The clamp is designed to stabilize the tool when using it
tin the bench configuration.
MOUNTING & ADJUSTING THE OPTIONAL
SANDING FRAME (FIG. 8)
Put the belt sander on the sanding frame and attach four
slot into slot holder (14).
By turning the adjustment bolt counterclockwise, the
sanding frame will down and can be taken out. If turning
clockwise, it will raise and the depth will be added.
Fine adjustment of the abrasive action is possible by
turning the adjustment bolt (13).
MAINTENANCE
After use, check the tool to make sure that it is in top
condition. It is recommended that you take this tool to a
Ryobi Authorized Service Centre for a thorough cleaning
and lubrication at least once a year.
DO NOT MAKE ANY ADJUSTMENT WHILE THE
MOTOR IS IN MOTION. ALWAYS DISCONNECT THE
POWER CORD FROM THE RECEPTACLE BEFORE
CHANGING REMOVABLE OR EXPENDABLE PARTS
(BLADE, BIT, SANDING PAPER, ETC.), LUBRICATING
OR WORKING ON THE UNIT.
WARNING!
To ensure safety and reliability, all repair should
be performed by an AUTHORIZED SERVICE
CENTRE or other QUALIFIED SERVICE
ORGANIZATION.
961067431-01_EBS-9576V&EBS-1310V_EU.indd Sec2:2961067431-01_EBS-9576V&EBS-1310V_EU.indd Sec2:2 2010.4.21 11:32:20 AM2010.4.21 11:32:20 AM

3
English
GB
FR DE ES IT NL PT DK SE FI NO RU PL CZ HU RO LV LT EE HR SI SK GR
TR
ENVIRONMENTAL PROTECTION
Recycle raw materials instead of disposing
as waste. The machine, accessories and
packaging should be sorted for
en-vironmental-friendly recycling.
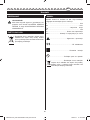
SYMBOL
The following show the symbols used for the tool. Be
sure that you understand their meaning before use.
V.................................................................................Volts
Hz..............................................................................Hertz
..........................................................Alternating Current
W...............................................................................Watts
no................................................................No load Speed
min
-1
.....................Revolutions or reciprocation per minute
...............................................................Safety Alert
..........................................................CE conformity
.....................................................Double Insulation
..........................................Read instruction manual
.................................Recycle raw materials
instead of disposing as waste. The machine,
accessories and packaging should be sorted for
environmental-friendly recycling.
961067431-01_EBS-9576V&EBS-1310V_EU.indd Sec1:3961067431-01_EBS-9576V&EBS-1310V_EU.indd Sec1:3 2010.4.21 11:32:21 AM2010.4.21 11:32:21 AM

4
Français
FR
GB DE ES IT NL PT DK SE FI NO RU PL CZ HU RO LV LT EE HR SI SK GR
TR
CONSIGNES DE SÉCURITÉ GÉNÉRALES
AVERTISSEMENT
Certaines poussières générées par les opérations
de ponçage, sciage, meulage, perçage et autres
activités du bâtiment contiennent des produits
chimiques susceptibles d'être cancérigènes et de
provoquer des anomalies congénitales ou des
problèmes de fertilité. Voici quelques exemples
de ces produits chimiques :
- le plomb, dans les peintures à base de plomb,
- la silice cristallisée que l'on trouve dans des
briques, ciments et autres produits de
maçonnerie, et
- l'arsenic et le chrome que l'on trouve dans
certains bois traités chimiquement.
Les risques liés à ces produits varient en fonction
de la fréquence de ce type de travaux. Afin de
réduire les risques d'exposition à de tels produits
chimiques, travaillez dans un environnement bien
aéré, avec du matériel de sécurité agréé, tel que
les masques anti-poussière spécifiquement
conçus pour filtrer les particules microscopiques.
Portez un masque facial ou un masque anti-
poussière si le travail de coupe génère de la
poussière. Connectez également le tuyau d'un
aspirateur à la buse d'évacuation de la poussière.
CONSIGNES DE SÉCURITÉ SPÉCIFIQUES
AUX PONCEUSES À BANDE
■ Tenez votre outil fermement à deux mains.
■ Maintenez le cordon d'alimentation éloigné de la
bande abrasive en défilement.
■ Tenez vos mains éloignées des éléments rotatifs.
■ Ne posez pas votre ponceuse sur une surface si la
bande est toujours en mouvement. Cela pourrait
provoquer des blessures et/ou endommager la
ponceuse.
■ Cet outil ne doit être utilisé que pour le ponçage de
surfaces sèches.
■ N'utilisez pas votre ponceuse si la bande abrasive est
usée ou déchirée.
■ Si la pièce à usiner est trop légère, maintenez-la en
place à l'aide d'un étau.
■ Mettez votre ponceuse en marche avant de l'appliquer
sur la pièce à usiner.
■ Votre ponceuse ne doit plus être en contact avec la
pièce à usiner lorsque vous l'arrêtez.
CARACTÉRISTIQUES
EBS-9576V EBS-1310V
Alimentation 230 V 50 Hz 230 V 50 Hz
Puissance 950 W 1350 W
Vitesse de
défilement à vide 240-400 m/min 240-400 m/min
Format de la
bande abrasive 76 x 533 mm 100 x 610 mm
Poids net 5,0 kg 6,4 kg
Vérifiez la plaque signalétique du produit, car la tension
peut être différente en fonction de l'endroit où le produit
doit être utilisé.
DESCRIPTION
1. Poignée avant
2. Bande abrasive
3. Levier de relâchement de la tension
4. Poignée arrière
5. Sac à poussières
6. Buse d’aspiration
7. Bouton de verrouillage en position "marche"
8. Gâchette
9. Molette de calage de la bande
10. Variateur de vitesse
11. Rouleau avant
12. Rouleau arrière
13. Vis de réglage
14. Rainures de blocage
ACCESSOIRES STANDARD
Sac à poussières, bande abrasive.
ACCESSOIRES EN OPTION
Serre-joint, cadre de ponçage.
APPLICATIONS
N'utilisez votre ponceuse que pour les applications
mentionnées ci-après:
1. Ponçage de bois.
2. Ponçage de surfaces rouillées et polissage de métaux.
EXPOSITION AU BRUIT
Le bruit (ou niveau de pression acoustique) sur le lieu de
travail peut dépasser 85 dB(A). Dans ce cas, l'utilisateur
est tenu de prendre des mesures d'isolation acoustique
et de porter des protections auditives.
961067431-01_EBS-9576V&EBS-1310V_EU.indd 4961067431-01_EBS-9576V&EBS-1310V_EU.indd 4 2010.4.21 11:32:21 AM2010.4.21 11:32:21 AM

5
Français
FR
GB DE ES IT NL PT DK SE FI NO RU PL CZ HU RO LV LT EE HR SI SK GR
TR
GÂCHETTE (FIG. 1)
Pour mettre en marche ou arrêter cet outil, appuyez ou
relâchez la gâchette (8).
Pour que votre ponceuse fonctionne en continu, enfoncez
le bouton de verrouillage en position "marche" (7) tout en
appuyant sur la gâchette. Pour déverrouiller cette
fonction, appuyez de nouveau sur la gâchette.
Vous pouvez régler la vitesse de défilement de la bande
entre 240 et 400 m/min à l'aide du variateur de vitesse
(10) (EBS-9576V / EBS-1310V uniquement).
(A= vitesse minimale / F = vitesse maximale)
SAC À POUSSIÈRES (FIG. 2)
Nous vous recommandons d'utiliser le sac à poussières
(5) lorsque vous poncez du bois.
Malgré la grande capacité de ce sac, celui-ci doit être
vidé régulièrement.
Pour un nettoyage complet du sac, ouvrez-le à l'aide de
la fermeture Eclair.
AVERTISSEMENT !
N'utilisez pas le sac à poussières lorsque vous
poncez du métal: les étincelles produites
risqueraient d'y mettre le feu.
CHANGEMENT DE LA BANDE ABRASIVE
(FIG. 3 À 5)
AVERTISSEMENT !
ASSUREZ-VOUS QUE LAPONCEUSE EST
DÉBRANCHÉE LORSQUE VOUS RETIREZ ET
REMETTEZ EN PLACE UNE BANDE
ABRASIVE.
■ Posez la ponceuse sur le côté et tirez le levier (3) afin
de rétracter le rouleau avant et de relâcher la tension
de la bande (fig. 3).
■ Tirez sur la bande pour la retirer.
Si le fait de tirer le levier ne suffit pas à relâcher
suffisamment la tension de la bande, desserrez la
molette de calage (9) (fig. 4).
■ Mettez une nouvelle bande abrasive en place.
REMARQUE:
Assurez-vous que la flèche dessinée à l'intérieur
de la bande est orientée dans la même direction
que celle qui figure sur la ponceuse.
■ Replacez le levier dans sa position initiale (fig. 5).
AVERTISSEMENT !
Prenez garde de ne pas vous coincer les doigts
pendant l'opération.
CALAGE DE LA BANDE (FIG. 6)
Un calage correct de la bande permet d'augmenter sa
durée de vie.
Placez la ponceuse à l'envers et tenez-la fermement
d'une main, puis mettez-la en marche et observez
l'alignement de la bande de ponçage.
Arrêtez ensuite l'outil et calez la bande en tournant la
molette de calage jusqu'à ce que le bord de la bande soit
bien aligné avec les extrémités des rouleaux avant et
arrière.
AVERTISSEMENT !
Assurez-vous que la bande ne frotte pas contre le
carter de l'outil.
UTILISATION (FIG. 7)
VEILLEZ À NE PAS COUVRIR LES FENTES DE
VENTILATION POUR PERMETTRE UN
REFROIDISSEMENT CORRECT DU MOTEUR.
ASSUREZ-VOUS QUE LA PIÈCE À USINER NE
COMPORTE NI CLOUS NI AUTRES OBJETS
ÉTRANGERS POUVANT DÉCHIRER LA BANDE.
Tenez votre outil fermement à deux mains. Mettez votre
ponceuse en marche et attendez que le défilement de la
bande abrasive ait atteint sa vitesse maximale. Appliquez
ensuite doucement la ponceuse sur la surface de la pièce
à usiner et effectuez des va-et-vient avec l'outil. Ne
forcez jamais votre outil : le poids de la ponceuse exerce
une pression suffisante. Une pression excessive entrave
l'action abrasive de la bande, ne permet pas un ponçage
régulier, et entraîne une usure précoce aussi bien de la
bande que de l'outil. Retirez toujours l'outil de la pièce à
usiner avant de l'arrêter.
SERRE-JOINT
(Accessoire en option)
Le serre-joint permet de maintenir l'outil en place lorsque
celui-ci est utilisé comme outil fixe.
MONTAGE ET RÉGLAGE DU CADRE DE
PONCAGE (FIG. 8)
Placez la ponceuse sur le cadre de ponçage et fixez-le
en plaçant les quatre fentes dans les rainures de blocage
(14).
Pour retirer le cadre de ponçage, abaissez-le en tournant
la vis de réglage vers la gauche. Pour soulever le cadre
de ponçage et augmenter ainsi la profondeur de ponçage,
tournez la vis vers la droite.
Cette vis de réglage vous permet de régler avec précision
l'action abrasive de la bande (13).
961067431-01_EBS-9576V&EBS-1310V_EU.indd 5961067431-01_EBS-9576V&EBS-1310V_EU.indd 5 2010.4.21 11:32:22 AM2010.4.21 11:32:22 AM

6
Français
FR
GB DE ES IT NL PT DK SE FI NO RU PL CZ HU RO LV LT EE HR SI SK GR
TR
ENTRETIEN
Après utilisation, assurez-vous que votre outil est en
parfait état de marche.
Il est recommandé d'apporter votre outil au moins une
fois par an dans un Centre Service Agréé Ryobi pour une
lubrification et un nettoyage complets.
N'EFFECTUEZ AUCUN RÉGLAGE LORSQUE LE
MOTEUR EST EN MARCHE.
VEILLEZ À TOUJOURS DÉBRANCHER LE CORDON
D'ALIMENTATION AVANT DE CHANGER LES
ACCESSOIRES OU LES PIÈCES D'USURE (LAME,
EMBOUT, PAPIER DE VERRE, ETC.), ET AVANT DE
LUBRIFIER OU DE MANIPULER L'OUTIL.
AVERTISSEMENT !
Pour une sécurité et une fiabilité maximales,
toutes les réparations doivent être effectuées par
un Centre Service Agréé Ryobi.
PROTECTION DE L’ENVIRONNEMENT
Recyclez les matières premières au lieu de
les jeter. Pour le respect de l'environnement,
triez vos déchets et déposez l'outil usagé,
les accessoires et l'emballage dans des
conteneurs spéciaux ou auprès d'organismes
chargés de leur recyclage.
SYMBOLES
Les symboles suivant peuvent figurer sur votre outil ou
dans le présent manuel d'utilisation. Assurez-vous de
connaître leur signification avant d'utiliser votre outil.
V.................................................................................Volts
Hz..............................................................................Hertz
............................................................Courant alternatif
W...............................................................................Watts
n
o..................................................................Vitesse à vide
min
-1
.......Nombre de tours ou de mouvements par minute
.......................................................
Alerte de Sécurité
..........................................................
Conformité CE
.......................................................Double isolation
.......................................Lisez le manuel d'utilisation
....................................Recyclez les matiè-res
premières au lieu de les jeter aux ordures
ménagères. Pour protéger l'environnement,
l'outil, les accessoi-res et les emballages doivent
être triés.
961067431-01_EBS-9576V&EBS-1310V_EU.indd 6961067431-01_EBS-9576V&EBS-1310V_EU.indd 6 2010.4.21 11:32:22 AM2010.4.21 11:32:22 AM

7
Deutsch
DE
GB ES IT NL PT DK SE FI NO RU PL CZ HU RO LV LT EE HR SI SK GR TR
FR
ALLGEMEINE SICHERHEITSVORSCHRIFTEN
WARNUNG
Bestimmte Staubarten, die durch Schleifen,
Sägen, Abschleifen, Bohren und andere
Tätigkeiten im Hausbau entstehen können,
enthalten chemische Produkte, die möglicher-
weise krebserregend sind und zu angeborenen
Anomalien oder Fruchtbarkeits-problemen führen
können. Die folgende Liste enthält einige
Beispiele für diese chemischen Produkte:
- Blei, in Farben auf Bleibasis,
- kristallisiertes Siliziumdioxid, das in Ziegeln,
Zementen und anderen Mauerprodukten
enthalten ist, und
- Arsen und Chrom, das in bestimmten chemisch
behandelten Holzarten enthalten ist.
Die mit diesen Produkten verbundenen Risiken
variieren je nach Häufigkeit dieser Art von
Arbeiten. Um die Risiken einer Belastung durch
diese Produkte zu reduzieren, sollten Sie in einer
gut belüfteten Umgebung arbeiten und
zugelassene Schutzausrüstungen verwenden,
wie z. B. spezifische Staubschutzmasken,
um die mikroskopischen Partikel zu filtern.
SPEZIFISCHE SICHERHEITSVORSCHRIFTEN
FÜR BANDSCHLEIFMASCHINEN
■ Halten Sie Ihr Gerät mit beiden Händen fest.
■ Halten Sie das Stromkabel vom laufenden
Schleifband fern.
■ Halten Sie Ihre Hände von den rotierenden Elementen
fern.
■ Legen Sie Ihre Schleifmaschine nicht ab, solange das
Band noch läuft. Dies kann zu Verletzungen führen
und/oder die Schleifmaschine beschädigen.
■ Dieses Gerät darf nur zum Schleifen von trockenen
Flächen verwendet werden.
■ Verwenden Sie Ihre Schleifmaschine nicht, wenn das
Schleifband abgenutzt oder gerissen ist.
■ Wenn das zu bearbeitende Teil zu leicht ist, fixieren
Sie es mit einem Schraubstock.
■ Schalten Sie Ihre Schleifmaschine ein, bevor Sie sie
am Werkstück ansetzen.
■ Ihre Schleifmaschine darf das Werkstück nicht mehr
berühren, wenn Sie sie anhalten.
MERKMALE
EBS-9576V EBS-1310V
Stromversorgung 230 V 50 Hz 230 V 50 Hz
Leistung 950 W 1350 W
Leerlauf-
geschwindigkeit 240-400 m/min 240-400 m/min
Format des
Schleifbands 76x533 mm 100x610 mm
Nettogewicht 5,0 kg 6,4 kg
Prüfen Sie das Typenschild des Geräts, denn die
Spannung kann je nach Land unterschiedlich sein.
BESCHREIBUNG
1. Griff vorne
2. Schleifband
3. Entspannungshebel
4. Griff hinten
5. Auffangsack
6. Absaugdüse
7. Einschaltverriegelungsknopf
8. Schalter
9. Knopf zum Festklemmen des Schleifbands
10. Drehzahlregler
11. Rolle vorne
12. Rolle hinten
13. Einstellschraube
14. Einspannrille
STANDARDZUBEHÖR
Auffangsack, Schleifband.
OPTIONALES ZUBEHÖR
Schraubzwinge, Schleifrahmen.
ANWENDUNGEN
(Verwenden Sie Ihre Schleifmaschine nur für die unten
aufgeführten Anwendungen):
1. Schleifen von Holz.
2. Schleifen von rostigen Flächen und Polieren von
Metallen.
LÄRMBELASTUNG
Der Lärm (oder Schalldruckpegel) am Arbeitsplatz kann
über 85 dB(A) liegen. In diesem Fall muss der Benutzer
geeignete Maßnahmen zur Schallisolierung treffen und
einen Gehörschutz tragen.
961067431-01_EBS-9576V&EBS-1310V_EU.indd 7961067431-01_EBS-9576V&EBS-1310V_EU.indd 7 2010.4.21 11:32:23 AM2010.4.21 11:32:23 AM

8
Deutsch
DE
GB ES IT NL PT DK SE FI NO RU PL CZ HU RO LV LT EE HR SI SK GR TR
FR
EIN-/AUS-SCHALTER (ABB. 1)
Zum Ein- oder Ausschalten des Geräts drücken Sie auf
den Ein-/Aus-Schalter (8).
Um Ihre Schleifmaschine im Dauerbetrieb zu verwenden,
drücken Sie den Sperrknopf auf die Position "Betrieb" (7)
während Sie den Ein-/Aus-Schalter drücken. Um diese
Funktion wieder zu entsperren, drücken Sie erneut auf
den Ein-/Aus-Schalter.
Die Bandlaufgeschwindigkeit kann mit dem
Drehzahlregler (10) zwischen 240 und 400 m/Min.
eingestellt werden (nur EBS-9576V / EBS-1310V).
(A
= Mindestgeschwindigkeit / F = Höchstgeschwindigkeit)
AUFFANGSACK (ABB. 2)
Beim Schleifen von Holz empfehlen wir Ihnen die
Verwendung des Auffangsacks (5).
Trotz des großen Volumens dieses Sacks, muss er
regelmäßig geleert werden.
Zur Komplettreinigung des Sacks öffnen Sie ihn mit Hilfe
des Reißverschlusses.
WARNUNG!
Beim Schleifen von Metall darf der Auffangsack
nicht verwendet werden: die entstehenden
Funken können den Sack entzünden.
AUSWECHSELN DES SCHLEIFBANDES
(ABB. 3 BIS 5)
WARNUNG
VERGEWISSERN SIE SICH VOR DEM
ENTFERNEN UND EINSETZEN EINES
SCHLEIFBANDES, DASS DER NETZSTECKER
DER SCHLEIFMASHINE ABGEZOGEN IST.
■ Legen Sie die Schleifmaschine auf die Seite und
ziehen Sie am Hebel (3), um die Rolle zu entfernen,
bevor Sie das Band entspannen (Abb. 3).
■ Ziehen Sie am Band, um es zu entfernen.
Wenn das Band durch Ziehen am Hebel nicht
ausreichend entspannt werden kann, müssen Sie den
Knopf zum Festklemmen des Schleifbandes (9) (Abb.
4) lösen.
■ Setzen Sie ein neues Schleifband ein.
ANMERKUNG!
Vergewissern Sie sich, dass der Pfeil auf der
Innenseite des Bandes in dieselbe Richtung zeigt wie
der Pfeil auf der Schleifmaschine.
■ Drücken Sie den Hebel wieder in seine
Ausgangsposition zurück (Abb. 5).
WARNUNG!
Achten Sie darauf, dass Sie Ihre Finger nicht
einklemmen.
EINSPANNEN DES SCHLEIFBANDES (ABB. 6)
Ein korrekt eingespanntes Schleifband gewährleistet eine
optimale Lebensdauer.
Stellen Sie die Schleifmaschine auf den Kopf und halten
Sie sie mit einer Hand gut fest. Schalten Sie sie ein und
beachten Sie die Ausrichtung des Schleifbandes.
Schalten Sie die Maschine wieder aus und spannen Sie
das Schleifband ein, indem Sie den Knopf zum
Einspannen so lange drehen, bis der Rand des
Schleifbandes mit den Enden der Rolle vorne und hinten
ausgerichtet ist.
WARNUNG!
Vergewissern Sie sich, dass das Schleifband
nicht am Gehäuse der Schleifmaschine scheuert.
VERWENDUNG (ABB. 7)
ACHTEN SIE DARAUF, DASS SIE DIE
BELÜFTUNGSSCHLITZE NICHT ABDECKEN, UM EIN
KORREKTES ABKÜHLEN DES MOTORS ZU
GEWÄHRLEISTEN.
VERGEWISSERN SIE SICH, DASS DAS WERKSTÜCK
KEINE NÄGEL ODER ANDEREN FREMDKÖRPER
ENTHÄLT, DIE DAS SCHLEIFBAND ZERREISSEN
KÖNNEN.
Halten Sie Ihr Gerät mit beiden Händen fest. Schalten
Sie Ihre Schleifmaschine ein und warten Sie bis das
Schleifband seine Höchstgeschwindigkeit erreicht hat.
Setzen Sie die Schleifmaschine anschließend an der
Fläche des Werkstücks an und schleifen Sie durch
Ausführen von Hin-und Herbewegungen. Verwenden Sie
Ihr Gerät nur auf der vorgesehenen Leistungsstufe: durch
das Gewicht der Schleifmaschine wird ein ausreichender
Druck ausgeübt. Ein zu hoher Druck wirkt sich negativ
auf die Schleifwirkung des Schleifbandes aus, ermöglicht
kein regelmäßiges Schleifen und führt zu einer vorzeitigen
Abnutzung des Schleifbandes und der Maschine.
Entfernen Sie die Maschine stets vom Werkstück, bevor
Sie sie ausschalten.
SCHRAUBZWINGE
(Optionales Zubehör)
Mit der Schraubzwinge kann die Maschine fixiert werden,
wenn diese als festes Gerät verwendet wird.
961067431-01_EBS-9576V&EBS-1310V_EU.indd 8961067431-01_EBS-9576V&EBS-1310V_EU.indd 8 2010.4.21 11:32:23 AM2010.4.21 11:32:23 AM

9
Deutsch
DE
GB ES IT NL PT DK SE FI NO RU PL CZ HU RO LV LT EE HR SI SK GR TR
FR
MOUTAGE UND EINSTELLUNG DES
SCHLEIFRAHMENS (ABB. 8)
Setzen Sie die Schleifmaschine auf den Schleifrahmen
und befestigen Sie diesen, indem Sie die vier Schlitze in
die Spannnuten (14) einfügen.
Zum Entfernen des Schleifrahmens, senken Sie diesen
ab, indem Sie die Einstellschraube nach links drehen.
Um den Schleifrahmen anzuheben und so die Schleiftiefe
zu erhöhen, drehen Sie die Schraube nach rechts.
Diese Spannschraube ermöglicht es, die Schleifwirkung
des Schleifbandes präzise einzustellen (13).
WARTUNG
Vergewissern Sie sich nach der Verwendung, dass Ihr
Gerät in einwandfreiem Zustand ist.
Es empfiehlt sich, Ihr Gerät mindestens einmal pro Jahr
zu einem autorisierten Ryobi-Kundendienst zu bringen,
um es komplett zu schmieren und zu reinigen.
NEHMEN SIE KEINE EINSTELLUNG VOR, WÄHREND
DER MOTOR IN BETRIEB IST.
ACHTEN SIE DARAUF, DAS STROMKABEL STETS ZU
ENTFERNEN, BEVOR SIE DIE ZUBEHÖRTEILE ODER
DIE VERSCHLEISSTEILE AUSWECHSELN
(SÄGEBLATT, EINSATZSTÜCK, GLASPAPIER USW.)
UND BEVOR SIE DAS GERÄT SCHMIEREN ODER
HANDHABEN.
WARNUNG!
Um eine maximale Sicherheit und Zuverlässigkeit
zu gewährleisten, müssen alle Reparaturen von
einem autorisierten Ryobi-Kundendienst
durchgeführt werden.
UMWELTSCHUTZ
Rohstoffe dürfen nicht in den Abfall geworfen
werden, sondern müssen dem
Recyclingsystem zugeführt werden. Trennen
Sie Ihre Abfälle und entsorgen Sie
abgenutzte Geräte, Zubehör und Ver-
packungen über die entsprechenden
Recycling-Container.
SYMBOLE
Die folgenden Symbole können auf Ihrem Gerät oder im
vorliegenden Bedienungshandbuch abgebildet sein.
Machen Sie sich vor der Verwendung Ihres Geräts mit
deren Bedeutung vertraut.
V...................................................................................Volt
Hz..............................................................................Hertz
.................................................................Wechselstrom
W.................................................................................Watt
U/min.......................................................Leerlaufdrehzahl
min
-1
.....Anzahl Umdrehungen oder Bewegungen pro Minute
....................................................
Sicherheitswarnung
.........................................................
CE-Konformität
......................................................Schutzisolierung
................Lesen Sie die Bedienungsanleitung durch
Recyceln Sie die Roh-stoffe anstatt sie in den
Hausmüll zu geben. Aus Umweltschutzgründen
müssen das Gerät, die Zubehörteile und die
Verpackungen getrennt entsorgt werden.
961067431-01_EBS-9576V&EBS-1310V_EU.indd 9961067431-01_EBS-9576V&EBS-1310V_EU.indd 9 2010.4.21 11:32:23 AM2010.4.21 11:32:23 AM

10
Español
ES
GB IT NL PT DK SE FI NO RU PL CZ HU RO LV LT EE HR SI SK GR TRFR
DE
INSTRUCCIONES GENERALES DE
SEGURIDAD
ADVERTENCIA
Algunas veces, el polvo resultante de las
operaciones de lijado, aserrado, esmerilado,
taladrado y otras actividades de la construcción,
contienen productos químicos que pueden ser
cancerígenos y provocar anomalías congénitas o
problemas de fertilidad. A continuación indicamos
algunos ejemplos de estos productos químicos:
- el plomo, en las pinturas a base de plomo,
- la sílice cristalizada, en algunos cementos,
ladrillos y productos de albañilería, y
- el arsénico y el cromo, presentes en algunas
maderas tratadas químicamente.
Los riesgos derivados de estos productos varían
en función de la frecuencia de este tipo de
trabajos. Para reducir su exposición a estas
sustancias químicas, trabaje en un entorno
bien ventilado, con material de seguridad
homologado como, por ejemplo, mascarillas
antipolvo específicamente diseñadas para filtrar
partículas microscópicas.
CONSIGNAS DE SEGURIDAD ESPECÍFICAS
PARA LIJADORAS DE BANDA
■ Sujete la máquina firmemente con ambas manos.
■ Mantenga el cable de alimentación lejos de la banda
abrasiva cuando está en movimiento.
■ Mantenga las manos alejadas de los elementos
rotativos.
■ No apoye la lijadora si la banda todavía está en
movimiento. Podría herirse y/o dañar la lijadora.
■ Esta herramienta sólo puede utilizarse para lijar
superficies secas.
■ No utilice la lijadora si la banda abrasiva está gastada
o desgarrada.
■ Si la pieza trabajada es demasiado ligera, sosténgala
con un tornillo de banco.
■ Ponga la lijadora en marcha antes de que esté en
contacto con la pieza trabajada.
■ Para detenerla, debe previamente separar la lijadora
de la pieza trabajada.
CARACTERÍSTICAS
EBS-9576V EBS-1310V
Alimentación
eléctrica 230 V
50 Hz 230 V 50 Hz
Potencia 950 W 1350 W
Velocidad de la
banda sin carga 240-400 m/min 240-400 m/min
Dimensiones de
la banda abrasiva 76x533 mm 100x610 mm
Peso neto 5,0 kg 6,4 kg
Consulte la placa con las características del producto,
ya que la tensión puede ser diferente en función del
lugar en el que se utilice la herramienta.
DESCRIPCIÓN
1. Asa delantera
2. Banda abrasiva
3. Palanca para aflojar la tensión de la banda
4. Asa trasera
5. Saco para el polvo
6. Boquilla de aspiración
7. Botón de bloqueo en posición "marcha"
8. Gatillo
9. Rueda para centrar la banda
10. Variador de velocidad
11. Cilindro delantero
12. Cilindro trasero
13. Tornillo de ajuste
14. Ranura de bloqueo
ACCESORIOS ESTÁNDARES
Saco para el polvo, banda abrasiva.
ACCESORIOS OPCIONALES
Cárcel, guía para lijar.
APLICACIONES
Utilice la lijadora únicamente para las aplicaciones que
se indican a continuación:
1. Para lijar madera.
2. Para lijar superficies oxidadas y pulir metales.
EXPOSICIÓN AL RUIDO
El ruido (o nivel de presión acústica) en el lugar de
trabajo puede superar los 85 dB(A). En este caso, el
usuario debe necesariamente instalar un dispositivo de
aislamiento acústico y utilizar elementos de protección
auditiva.
961067431-01_EBS-9576V&EBS-1310V_EU.indd 10961067431-01_EBS-9576V&EBS-1310V_EU.indd 10 2010.4.21 11:32:24 AM2010.4.21 11:32:24 AM

11
Español
ES
GB IT NL PT DK SE FI NO RU PL CZ HU RO LV LT EE HR SI SK GR TRFR
DE
GATILLO (FIG. 1)
Para poner en marcha o parar la herramienta, presione o
suelte el gatillo (8).
Para que la lijadora funcione de modo continuo, pulse el
botón de bloqueo en posición "marcha" (7) y presione el
gatillo al mismo tiempo. Para desbloquear esta función,
presione nuevamente el gatillo.
Puede ajustar la velocidad de la banda de 240 a 400 m/
min, con el variador de velocidad (10) (EBS-9576V /
EBS-1310V únicamente).
(A = velocidad mínima / F = velocidad máxima)
SACO PARA EL POLVO (FIG. 2)
Le recomendamos que utilice el saco para el polvo (5)
cuando lije madera.
A pesar de que el saco tiene una gran capacidad, debe
vaciarlo con regularidad.
Para vaciar completamente el saco, abra la cremallera.
¡ADVERTENCIA!
No utilice el saco para el polvo cuando deba pulir
metales: las chispas podrían incendiarle.
CAMBIAR LA BANDA ABRASIVA (FIG. 3 A 5)
¡ADVERTENCIA!
CERCIÓRESE DE QUE LA LIJADORA ESTÉ
DESENCHUFADA CUANDO RETIRE Y VUELVA
A COLOCAR UNA BANDA ABRASIVA.
■ Coloque la lijadora sobre el lado y tire de la palanca
(3) para retraer el cilindro delantero y soltar la banda
(fig. 3).
■ Tire de la banda para retirarla.
Si tirar de la palanca no bastara para aflojar
suficientemente la banda, afloje la rueda para centrar
la banda (9) (fig. 4).
■ Coloque una nueva banda abrasiva.
OBSERVACIÓN:
Controle que la flecha impresa en la parte interior de
la banda de lija esté orientada en la misma dirección
que la de la lijadora.
■ Vuelva a colocar la palanca en su posición inicial (fig.
5).
¡ADVERTENCIA!
Preste atención para no cogerse los dedos
durante la operación.
CENTRAR LA BANDA DE LIJA (FIG. 6)
Si la banda está correctamente centrada tendrá mayor
vida útil.
Coloque la lijadora hacia arriba y sosténgala firmemente
con una mano, póngala en marcha y observe la
alineación de la banda de lija.
Pare la máquina y alinee la banda con la rueda para
centrar la banda hasta que el borde de la misma esté
perfectamente alineado con los extremos de los cilindros
delantero y trasero.
¡ADVERTENCIA!
Cerciórese de que la banda no frote el cárter de
la máquina.
UTILIZACIÓN (FIG. 7)
NO CUBRE LAS RANURAS DE VENTILACIÓN PARA
QUE EL MOTOR SE VENTILE CORRECTAMENTE.
CONTROLE QUE LA PIEZA TRABAJADA NO TENGA
CLAVOS NI OTROS OBJETOS QUE PUDIERAN
ROMPER LA BANDA.
Sujete la máquina firmemente con ambas manos. Ponga
la lijadora en marcha y espere a que la banda de lija
haya alcanzado su máxima velocidad. Apoye suavemente
la lijadora en la superficie de la pieza trabajada y
comience a lijar con un movimiento de vaivén. No fuerce
nunca la máquina: el peso de la lijadora produce una
presión suficiente. Una presión excesiva perjudica la
acción abrasiva de la banda, produce un lijado irregular y
un desgaste prematuro de la banda y de la máquina.
Retire la máquina de la pieza trabajada antes de parar el
motor.
CÁRCEL
(Accesorio opcional)
La cárcel permite mantener la herramienta en su lugar
cuando se la emplea como herramienta fija.
MONTAJE Y AJUSTE DE LA GUÍA PARA LIJAR
(FIG. 8)
Coloque la lijadora en la guía para lijar y fíjela colocando
las cuatro ranuras en las ranuras de bloqueo (14).
Para retirar la guía para lijar, bájela haciendo girar el
tornillo de ajuste hacia la izquierda. Para levantar la guía
para lijar y aumentar así la profundidad de lijado, gire el
tornillo hacia la derecha.
Este tornillo de ajuste le permite ajustar con precisión la
acción abrasiva de la banda (13).
961067431-01_EBS-9576V&EBS-1310V_EU.indd 11961067431-01_EBS-9576V&EBS-1310V_EU.indd 11 2010.4.21 11:32:24 AM2010.4.21 11:32:24 AM

12
Español
ES
GB IT NL PT DK SE FI NO RU PL CZ HU RO LV LT EE HR SI SK GR TRFR
DE
MANTENIMIENTO
Después de utilizar la máquina, cerciórese de que se
encuentre en perfecto estado de marcha.
Le recomendamos que lleve la máquina al menos una
vez al año a un Centro de Servicio Habilitado Ryobi para
una lubricación y una limpieza completas.
NO HAGA NINGÚN AJUSTE CUANDO EL MOTOR
ESTÉ EN MARCHA.
DESENCHUFE SIEMPRE EL CABLE DE
ALIMENTACIÓN ANTES DE CAMBIAR LOS DE
GASTADAS (BROCA, ETC.) Y ANTES DE LUBRICAR O
MANIPULAR LA HERRAMIENTA.
¡ADVERTENCIA!
Para una seguridad y fiabilidad óptimas, todas
las reparaciones deben realizarse en un Centro
de Servicio Habilitado Ryobi.
PROTECCIÓN DEL MEDIOAMBIENTE
Recicle las materias primas en lugar de
tirarlas. Para respetar el medioambiente,
separe los residuos y deposite la herramienta
usada, los accesorios y los envases en
contenedores especiales o entréguelos a los
organismos encargados del reciclado.
SÍMBOLOS
Los siguientes símbolos pueden figurar en la herramienta o
en el manual de uso. Conozca su significado antes de
utilizar la máquina.
V...................................................................................Voltios
Hz..............................................................................Hertzios
..................................................................Corriente alterna
W...................................................................................Vatios
n
o............................................................. Velocidad sin carga
min
-1
.......Número de revoluciones o movimientos por minuto
...................................................Alerta de seguridad
................................................Conformidad con CE
.........................................................Doble aislamiento
...............................Lea atentamente el manual de uso
....................Recicle las materias primas en lugar de
tirarlas a la basura doméstica. Para proteger el
medio ambiente, debe separar la herramienta, los
accesorios y los embalajes.
961067431-01_EBS-9576V&EBS-1310V_EU.indd 12961067431-01_EBS-9576V&EBS-1310V_EU.indd 12 2010.4.21 11:32:25 AM2010.4.21 11:32:25 AM

13
Italiano
IT
GB NL PT DK SE FI NO RU PL CZ HU RO LV LT EE HR SI SK GR TRFR DE
ES
NORME DI SICUREZZA GENERALI
AVVERTENZA
Alcune polveri che si formano durante le
operazioni di levigatura, segatura, molatura,
foratura ed altre attività nel campo dell'edilizia
contengono prodotti chimici che potrebbero
essere cancerogeni e provocare anomalie
congenite o problemi di fertilità. Ecco alcuni
esempi di questi prodotti chimici:
- il piombo nelle vernici a base di piombo;
- la silice cristallizzata che si trova in alcuni
cementi, mattoni ed altri prodotti di muratura;
- l'arsenico e il cromo che si trovano in alcuni
legni trattati chimicamente.
I rischi connessi a questi prodotti variano in
funzione della frequenza di questo tipo di lavori.
Per ridurre i rischi di esposizione a queste
sostanze chimiche, lavorare in un ambiente ben
aerato con attrezzature di sicurezza omologate,
quali le maschere antipolvere specificatamente
concepite per filtrare le particelle microscopiche.
NORME DI SICUREZZA SPECIFICHE DELLA
LEVIGATRICI A NASTRO
■ Tenere l'apparecchio saldamente con entrambe le
mani.
■ Tenere il cavo d’alimentazione lontano dal nastro
adesivo che scorre.
■ Tenere le mani lontano dagli elementi in rotazione.
■ Non adagiare mai la levigatrice su un piano mentre il
nastro è ancora in movimento. Ciò potrebbe provocare
gravi ferite e/o danneggiare la levigatrice.
■ Utilizzare il presente apparecchio solo per la levigatura
di superfici asciutte.
■ Non utilizzare la levigatrice nel caso in cui il nastro
adesivo sia consumato o strappato.
■ Se il pezzo da lavorare è troppo leggero, bloccarlo
mediante una staffa.
■ Avviare la levigatrice prima di applicarla sul pezzo da
lavorare.
■ Dopo averla arrestata, la levigatrice non deve più
essere a contatto con il pezzo da lavorare.
CARATTERISTICHE
EBS-9576V EBS-1310V
Alimentazione 230 V 50 Hz 230 V 50 Hz
Potenza 950 W 1350 W
Velocità a vuoto 240-400 m/min 240-400 m/min
Formato del
nastro abrasivo 76x533 mm 100x610 mm
Peso netto 5,0 kg 6,4 kg
Verificare la piastrina di identificazione poiché la
tensione potrebbe variare in funzione del luogo in cui
viene utilizzato il prodotto.
DESCRIZIONE
1. Impugnatura anteriore
2. Nastro abrasivo
3. Leva di rilascio della tensione
4. Impugnatura posteriore
5. Sacco per la polvere
6. Ugello di aspirazione
7. Pulsante di bloccaggio in posizione "avvio"
8. Grilletto
9. Rotellina per la registrazione del nastro
10. Variatore della velocità
11. Rullo anteriore
12. Rullo posteriore
13. Vite di regolazione
14. Scanalature di bloccaggio
ACCESSORI STANDARD
Sacco per la polvere, nastro abrasivo.
ACCESSORI IN OPZIONE
Ganascia, telaio di levigatura.
APPLICAZIONI
Utilizzare la levigatrice solo per le applicazioni qui di
seguito citate:
1. Levigatura di legno.
2. Levigatura di superfici arrugginite e lucidatura di
metalli.
ESPOSIZIONE AL RUMORE
Il rumore (o livello di pressione acustica) sul luogo di
lavoro può superare gli 85 dB(A). In questo caso, l’utente
deve prendere le necessarie precauzioni di isolamento
acustico ed indossare delle protezioni per l’udito.
961067431-01_EBS-9576V&EBS-1310V_EU.indd 13961067431-01_EBS-9576V&EBS-1310V_EU.indd 13 2010.4.21 11:32:25 AM2010.4.21 11:32:25 AM

14
Italiano
IT
GB NL PT DK SE FI NO RU PL CZ HU RO LV LT EE HR SI SK GR TRFR DE
ES
INTERRUTTORE (FIG. 1)
Per avviare o arrestare l’apparecchio, premere o
rilasciare il grilletto (8).
Per fare in modo che la levigatrice lavori in modo
continuo, premere il pulsante di bloccaggio e collocarlo in
posizione "avvio" (7) tenendo contemporaneamente
premuto il grilletto. Per sbloccare questa funzione
premere nuovamente il grilletto.
Per regolare la velocità di scorrimento del nastro tra 240
e 400 m/min utilizzare il variatore di velocità (10) (solo
modello EBS-9576V / EBS-1310V).
(A = velocità minima / F = velocità massima)
SACCO PER LA POLVERE (FIG. 2)
Quando si effettuano operazioni di levigatura nel legno si
consiglia di utilizzare il sacco per la polvere (5).
Malgrado la grande capienza del sacco, si consiglia di
svuotarlo regolarmente.
Per effettuare una pulizia completa del sacco, aprirlo
mediante la cerniera a lampo.
AVVERTENZA!
Non utilizzare il sacco per la polvere quando si
levigano superfici metalliche: le scintille prodotte
rischierebbero di provocare un incendio.
SOSTITUZIONE DEL NASTRO ABRASIVO (FIG.
DALLA 3 ALLA 5)
AVVERTENZA!
QUANDO SI PROCEDE AL RITIRO ED ALLA
SOSTITUZIONE DEL NASTRO ABRASIVO,
ACCERTARSI CHE IL CAVO DI
ALIMENTAZIONE DELLA LEVIGATRICE SIA
STACCATO.
■ Adagiare la levigatrice su un lato e tirare la leva (3)
per ritrarre il rullo anteriore ed allentare la tensione del
nastro (fig. 3).
■ Tirare il nastro per estrarlo.
Se tirando la leva non si riesce ad allentare
sufficientemente la tensione del nastro, svitare la
rotellina per la registrazione (9) (fig. 4).
■ Installare un nuovo nastro abrasivo.
NOTA:
Accertarsi che la freccia disegnata all’interno del
nastro sia orientata nella stessa direzione della
freccia che figura sulla levigatrice.
■ Riportare la leva nella posizione iniziale (fig. 5).
AVVERTENZA!
Fare attenzione che, durante l’operazione, le dita
non rimangano impigliate.
REGISTRAZIONE DEL NASTRO (FIG. 6)
Un nastro regolato in modo corretto dura più a lungo.
Capovolgere la levigatrice e tenerla saldamente con una
mano, quindi avviarla e verificare l’allineamento del
nastro.
Successivamente arrestare l’apparecchio e regolare il
nastro ruotando la rotellina per la registrazione in modo
tale che il bordo del nastro sia correttamente allineato
con le estremità dei rulli anteriore e posteriore.
AVVERTENZA!
Accertarsi che il nastro non si strofini contro il
carter dell’apparecchio.
UTILIZZAZIONE (FIG. 7)
FARE ATTENZIONE A NON COPRIRE LE APERTURE
DI AERAZIONE ONDE CONSENTIRE UN ADEGUATO
RAFFREDDAMENTO DEL MOTORE.
ACCERTARSI CHE IL PEZZO DA LAVORARE NON
PRESENTI CHIODI O ALTRI ELEMENTI CHE
POTREBBERO DANNEGGIARE IL NASTRO.
Tenere l'apparecchio saldamente con entrambe le mani.
Avviare la levigatrice ed attendere che il nastro raggiunga
la massima velocità di scorrimento. Quindi adagiare
delicatamente la levigatrice sul pezzo da lavorare ed
effettuare dei passaggi avanti ed indietro. Non forzare
l’apparecchio: il peso della levigatrice esercita una
pressione sufficiente. Una pressione eccessiva ostacola
l’azione abrasiva del nastro, non consente una levigatura
regolare e provoca un’usura precoce del nastro e
dell’apparecchio. Prima di arrestarla, allontanare sempre
la levigatrice dal pezzo da lavorare.
GANASCIA
(Accessorio in opzione)
Grazie alla ganascia l’apparecchio, bloccato, viene
utilizzato come apparecchio fisso.
961067431-01_EBS-9576V&EBS-1310V_EU.indd 14961067431-01_EBS-9576V&EBS-1310V_EU.indd 14 2010.4.21 11:32:26 AM2010.4.21 11:32:26 AM

15
Italiano
IT
GB NL PT DK SE FI NO RU PL CZ HU RO LV LT EE HR SI SK GR TRFR DE
ES
MONTAGGIO E REGOLAZIONE DEL QUADRO
DI LEVIGATURA (FIG. 8)
Installare la levigatrice sul telaio di levigatura e fissarlo
collocando le quattro fessure nelle scanalature di
bloccaggio (14).
Per togliere il telaio di levigatura, abbassarlo ruotando la
vite di regolazione verso sinistra. Per sollevare il telaio di
levigatura ed aumentare quindi la profondità di levigatura,
ruotare la vite verso destra.
Tale vite di regolazione, consente di regolare con
precisione l’azione abrasiva del nastro (13).
MANUTENZIONE
Dopo ogni utilizzazione, verificare sempre lo stato
dell’apparecchio.
Si consiglia di portare l’apparecchio almeno una volta
all’anno presso un Centro di Assistenza Autorizzato
Ryobi per una completa lubrificazione e pulitura.
NON EFFETTUARE ALCUN TIPO DI REGOLAZIONE
QUANDO L’APPARECCHIO È IN FUNZIONE.
STACCARE SEMPRE IL CAVO D’ALIMENTAZIONE
PRIMA DI PROCEDERE AL CAMBIO DEGLI
ACCESSORI, DEI PEZZI CONSUMATI (LAMA, PUNTA,
CARTA DI VETRO, ECC.) O PRIMA DI LUBRIFICARE O
MANEGGIARE L’APPARECCHIO.
AVVERTENZA!
Per maggiore sicurezza ed affidabilità, effettuare
tutte le riparazioni presso un Centro di Assistenza
Autorizzato Ryobi.
TUTELA DELL'AMBIENTE
Si raccomanda di riciclare le materie prime
anziché gettarle come rifiuti. A garanzia della
tutela dell'ambiente, si raccomanda di
effettuare la raccolta differenziata dei rifiuti e
di depositare l'apparecchio usato, gli
accessori e l'imballaggio in appositi
contenitori o di portarli presso un centro
autorizzato al loro riciclaggio.
SIMBOLI
I simboli seguenti possono apparire sull'apparecchio oppure
all'interno del presente manuale d'uso. Prima di utilizzare
l'apparecchio, assicurarsi di conoscerne il significato.
V...........................................................................................Volt
Hz..................................................................................... Hertz
...................................................................Corrente alternata
W.........................................................................................Watt
n
o.......................................................................Velocità a vuoto
min
-1
.............................Numero di giri o di movimenti al minuto
..................................................Allarme di sicurezza
.........................................................Conformità CE
..........................................................Doppio isolamento
.................................................Leggere il manuale d'uso
...........................Riciclare le materie prime anziché
gettarle tra i rifiuti domestici. Per tutelare l'ambiente,
l'apparecchio, gli accessori e gli imballaggi devono
essere smaltiti separatamente.
961067431-01_EBS-9576V&EBS-1310V_EU.indd 15961067431-01_EBS-9576V&EBS-1310V_EU.indd 15 2010.4.21 11:32:26 AM2010.4.21 11:32:26 AM

16
Nederlands
NL
GB PT DK SE FI NO RU PL CZ HU RO LV LT EE HR SI SK GR TRFR DE ES
IT
ALGEMENE VEILIGHEIDSVOORSCHRIFTEN
WAARSCHUWING
Bepaalde soorten stof veroorzaakt door schuren,
zagen, slijpen, boren of andere bouwactiviteiten
bevatten chemische stoffen die
kankerverwekkend kunnen zijn en afwijkingen bij
de geboorte of vruchtbaarheidsproblemen
kunnen veroorzaken. Voorbeelden van dit soort
chemische stoffen zijn:
- lood, in verfproducten op loodbasis,
- gekristalliseerd silicium, dat voorkomt in
bakstenen, cement en andere
metselwerkproducten, en
- arsenicum en chroom die te vinden zijn in
bepaalde chemisch behandelde houtproducten.
De aan deze producten verbonden gevaren
hangen af van hoe vaak ermee wordt gewerkt.
Om blootstelling aan dergelijke chemische stoffen
te beperken dient u in een goed geventileerde
ruimte te werken en te zijn uitgerust met
goedgekeurde beschermingsmiddelen, zoals
stofmaskers die speciaal ontworpen zijn om
microscopisch kleine deeltjes te filteren.
SPECIFIEKE VEILIGHEIDSVOORSCHRIFTEN
VOOR BANDSCHUURMACHINES
■ Houd de machine stevig met twee handen vast.
■ Houd het netsnoer uit de buurt van de draaiende
schuurband.
■ Houd uw handen uit de buurt van de draaiende
onderdelen.
■ Leg de machine nergens op als de band nog steeds
draait. Hierdoor zou u verwondingen kunnen oplopen
en/of de machine kunnen beschadigen.
■ Gebruik de machine alleen voor het schuren van
droge oppervlakken.
■ Gebruik de machine niet als de schuurband versleten
of ingescheurd is.
■ Als het werkstuk erg licht is, dient u het vast te zetten
in een bankschroef.
SPECIFIEKE VEILIGHEIDSVOORSCHRIFTEN
VOOR BANDSCHUURMACHINES
■ Zet de machine vast aan voordat u het tegen het
werkstuk drukt.
■ Uw machine mag niet meer met het werkstuk in
aanraking zijn als u de machine stopzet.
TECHNISCHE KENMERKEN
EBS-9576V EBS-1310V
Voeding 230 V
50 Hz 230 V 50 Hz
Vermogen 950 W 1350 W
Bandsnelheid bij nullast 240 - 400 m/min 240 - 400 m/min
Afmetingen schuurband 76 x 533 mm 100 x 610 mm
Nettogewicht 5,0 kg 6,4 kg
Controleer het typeplaatje van het product, want de
spanning kan verschillen al naar gelang het land
waar het product wordt gebruikt.
OVERZICHT
1. Voorhandgreep
2. Schuurband
3. Bandontspanningshendel
4. Hoofdhandgreep
5. Stofzak
6. Afzuigmondstuk
7. Schakelaarvergrendeling in AAN-stand
8. Schakelaar
9. Instelknop voor de baanloop
10. Snelheidsregelaar
11. Voorste rol
12. Achterste rol
13. Stelschroef
14. Geleidesleuf
STANDAARD ACCESSOIRES
Stofzak, schuurband.
OPTIONELE ACCESSOIRES
Schroefklem, schuurframe.
TOEPASSINGEN
Gebruik uw schuurmachine uitsluitend voor de hieronder
vermelde toepassingen:
1. Schuren van hout.
2. Schuren van verroeste vlakken en polijsten van
metalen.
961067431-01_EBS-9576V&EBS-1310V_EU.indd 16961067431-01_EBS-9576V&EBS-1310V_EU.indd 16 2010.4.21 11:32:26 AM2010.4.21 11:32:26 AM
Pagina se încarcă...
Pagina se încarcă...
Pagina se încarcă...
Pagina se încarcă...
Pagina se încarcă...
Pagina se încarcă...
Pagina se încarcă...
Pagina se încarcă...
Pagina se încarcă...
Pagina se încarcă...
Pagina se încarcă...
Pagina se încarcă...
Pagina se încarcă...
Pagina se încarcă...
Pagina se încarcă...
Pagina se încarcă...
Pagina se încarcă...
Pagina se încarcă...
Pagina se încarcă...
Pagina se încarcă...
Pagina se încarcă...
Pagina se încarcă...
Pagina se încarcă...
Pagina se încarcă...
Pagina se încarcă...
Pagina se încarcă...
Pagina se încarcă...
Pagina se încarcă...
Pagina se încarcă...
Pagina se încarcă...
Pagina se încarcă...
Pagina se încarcă...
Pagina se încarcă...
Pagina se încarcă...
Pagina se încarcă...
Pagina se încarcă...
Pagina se încarcă...
Pagina se încarcă...
Pagina se încarcă...
Pagina se încarcă...
Pagina se încarcă...
Pagina se încarcă...
Pagina se încarcă...
Pagina se încarcă...
Pagina se încarcă...
Pagina se încarcă...
Pagina se încarcă...
Pagina se încarcă...
Pagina se încarcă...
Pagina se încarcă...
Pagina se încarcă...
Pagina se încarcă...
Pagina se încarcă...
Pagina se încarcă...
Pagina se încarcă...
Pagina se încarcă...
Pagina se încarcă...
Pagina se încarcă...
Pagina se încarcă...
Pagina se încarcă...
Pagina se încarcă...
Pagina se încarcă...
Pagina se încarcă...
Pagina se încarcă...
Pagina se încarcă...
Pagina se încarcă...
Pagina se încarcă...
Pagina se încarcă...
-
 1
1
-
 2
2
-
 3
3
-
 4
4
-
 5
5
-
 6
6
-
 7
7
-
 8
8
-
 9
9
-
 10
10
-
 11
11
-
 12
12
-
 13
13
-
 14
14
-
 15
15
-
 16
16
-
 17
17
-
 18
18
-
 19
19
-
 20
20
-
 21
21
-
 22
22
-
 23
23
-
 24
24
-
 25
25
-
 26
26
-
 27
27
-
 28
28
-
 29
29
-
 30
30
-
 31
31
-
 32
32
-
 33
33
-
 34
34
-
 35
35
-
 36
36
-
 37
37
-
 38
38
-
 39
39
-
 40
40
-
 41
41
-
 42
42
-
 43
43
-
 44
44
-
 45
45
-
 46
46
-
 47
47
-
 48
48
-
 49
49
-
 50
50
-
 51
51
-
 52
52
-
 53
53
-
 54
54
-
 55
55
-
 56
56
-
 57
57
-
 58
58
-
 59
59
-
 60
60
-
 61
61
-
 62
62
-
 63
63
-
 64
64
-
 65
65
-
 66
66
-
 67
67
-
 68
68
-
 69
69
-
 70
70
-
 71
71
-
 72
72
-
 73
73
-
 74
74
-
 75
75
-
 76
76
-
 77
77
-
 78
78
-
 79
79
-
 80
80
-
 81
81
-
 82
82
-
 83
83
-
 84
84
-
 85
85
-
 86
86
-
 87
87
-
 88
88


Ryobi EBS9576VFHG Manualul proprietarului
- Categorie
- Șlefuitoare cu putere
- Tip
- Manualul proprietarului
- Acest manual este potrivit și pentru
în alte limbi
- slovenčina: Ryobi EBS9576VFHG Návod na obsluhu
Lucrări înrudite
-
Ryobi EBS750 Manual de utilizare
-
Ryobi EBS8021V Manual de utilizare
-
Ryobi ROS300A Manualul proprietarului
-
Ryobi EBS800 Manualul proprietarului
-
-
-
-
-
Ryobi EPS80RS Manualul proprietarului
-