
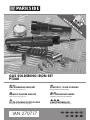
IAN 270717
GAS SOLDERING IRON SET
PT360
GASLÖTKOLBEN-SET
Bedienungs- und Sicherheitshinweise
GAS SOLDERING IRON SET
Operation and Safety Notes
ΣΕΤ - ΚΟΛΛΗΤΗΡΙ ΑΕΡΙΟΥ
Υποδείξεις χειρισμού και ασφάλειας
KOMPLET PLINSKE LEMILICE
Upute ua uporabu i sigurnost
КОМПЛЕКТ - ГАЗОВ ПОЯЛНИК
Експлоатация и безопасност
SET DE CIOCAN DE LIPIT CU GAZ
Instrucţiuni de operare şi de siguranţă

GB / CY Operation and Safety Notes Page 5
HR Upute o uporabi i sigurnosti stranica 18
RO Instrucţiuni de operare şi de siguranţă Pagina 32
BG
Експлоатация и безопасност Страница 46
GR / CY
Υποδείξεις χειρισμού και ασφάλειας Σελίδα 60
DE / AT / CH Bedienungs- und Sicherheitshinweise Seite 74

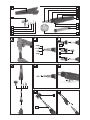
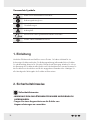
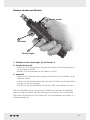
A
G
H
D
1
2
2
1
/
2
F
E
B
4
1
15
5
2
3
1
/
2
15
16
13
14
12
11
6
7
8
9
C
10

04
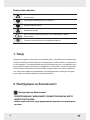
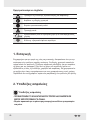
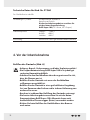
Important!
Please read these operating instructions carefully to familiarise yourself
with the product. Keep these instructions for future reference. In case the
user changes, the operating instructions must also be passed on to the new
user.
Table of contents
Symbols used ..........................................................................................................................................................................................05
1. Introduction
......................................................................................................................................... 05
2. Safety instructions
.......................................................................................................................... 05
Safety instructions
...............................................................................................................................................................................05
Scope of use
............................................................................................................................................................................................07
3. Technical specifications
................................................................................................................ 08
Contents
.......................................................................................................................................................................................................08
Features
........................................................................................................................................................................................................08
Technical specifications for mod. No. PT 360
..........................................................................................................09
4. Before using the tool
..................................................................................................................... 09
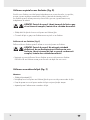
Fill the gas tank (Figure A)
..........................................................................................................................................................09
5. Operation / use
................................................................................................................................ 10
Assembly of attachments(Figure B)
......................................................................................................................................10
Use as soldering gun (Figure C)
............................................................................................................................................10
Use as hot air gun
................................................................................................................................................................................11
Use as blowing torch(Figure F)
................................................................................................................................................11
Igniting and extinguishing the flame
...................................................................................................................................12
Shutting down the device safely (Figure G)
................................................................................................................13
Protective cap (Figure H)
.............................................................................................................................................................. 13
Storage conditions
.............................................................................................................................................................................13
Cleaning
...................................................................................................................................................................................................... 13
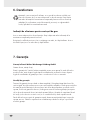
6. Disposal
..................................................................................................................................................14
Instructions for disposal of the gas cartridge
.............................................................................................................. 14
7. Warranty
...............................................................................................................................................14

05
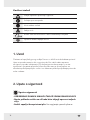
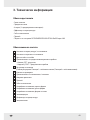
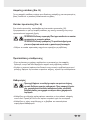
Follow the warning and safety instructions!
Read the operating
Wear eye protection.
Caution hot!
= may only be used outside or in well ventilated rooms
Danger: Highly inflammable aerosol
Symbols used
Congratulations on the purchase of your new device. You have chose a high quality quality
product with this purchase. These operating instructions are part of this product. They contain
important instructions for safety, use and disposal of the product. Please familiarise yourself
with all operating and safety instructions before using the product. Use the product only as
described and for the said range of applications. If the product is passed on to a third party,
please provide all documents to the third party along with the product.
1. Introduction
- WARNING! PLEASE KEEP THE GAS SOLDERING IRON SET AWAY
FROM THE REACH OF CHILDREN.
- Wear eye protection to avoid the risk of eye injuries.
Safety instructions
2. Safety instructions

06
- Contains flammable gas under pressure. - Take care not to heat the
refillable gas tank. Do not expose gas soldering iron to temperatures exceeding
50°C / 120°F or to prolonged sunlight. Otherwise there is risk of disintegration
or explosion.
- Do not make any changes to the gas soldering iron! The soldering
iron may not be modified in any way. Factory settings may
not be altered. - Only replacement parts recommended by the
manufacturer may be used. It can be dangerous to modify or adjust the gas
soldering iron, to remove factory fitted parts or to use replacement parts other
than those recommended by the manufacturer.
- Read the refilling instructions before you refill the soldering iron.
Refilling the soldering iron incorrectly can lead to serious accidents.
- ever pierce the gas tank or expose it to fire. Otherwise there is risk of
disintegration or explosion.
- To avoid the risk of damage to the soldering iron protect the gas
soldering iron from impact and do not allow it to fall on to the floor
- never use a gas soldering iron which shows signs of damage.
- If gas escapes from the system (smell of gas), take the system
outdoors immediately to a well-ventilated location away from
sources of ignition where the leak can be safely detected and
repaired. Carry out the leak test in the open only. Do not try to
detect leaks using a flame, use a gas leak detector spray or soapy
water. There is danger of fire or explosion in case of of a leak. - Contact the
manufacturer or retailer in case of a leak.
- Work in a fire resistant environment on in the open. Otherwise there is
danger of fire, explosion or suffocation.
- The soldering iron may not be used in an environment where
flammable fumes, flammable liquids or explosive materials are
present. Otherwise there is risk of disintegration or explosion.
- THE TORCH MUST NOT BE IGNITED NEAR THE FACE, HANDS,
CLOTHING OR INFLAMMABLE MATERIAL AND DO NOT DIRECT THE
FLAME TOWARDS PERSONS. Otherwise there is danger of burning. Maintain
a safe distance of min. 0.5 m on the side from all objects, as well as a min.
distance of 1 m from objects over the device.
- THE AIR VENTS ON THE SOLDERING ATTACHMENT GIVE OFF HOT
AIR. ENSURE THAT THE TORCH IS PLACED ON THE INTEGRATED TOOL
HOLDER EVEN DURING SHORT WORK BREAKS, TO AVOID IGNITING
THE TABLE SURFACE OR OTHER OBJECTS. DO NOT DIRECT THE HOT
AIR FLOW TOWARDS YOUR EYES, FACE, BODY OR OTHER PERSONS.
Otherwise there is danger of burning.

07
- Do not inhale the welding/ soldering fumes, as they can be poisonous.
- Be aware that the actual size of the flame can be longer than it
appears to be. The flame may hardly be visible under certain light conditions -
danger of burning!
- The burner nozzle and the catalyst adapter become extremely
hot during operation and remain so after the torch has been
extinguished. Take care to protect yourself from accidental burns.
- Ensure that the flame is extinguished completely after use and wait
till the soldering iron has cooled completely before storing the iron.
Otherwise there is danger of burning.
Scope of use
This gas soldering iron set is designed for soft soldering electrical wires and circuit boards,
removing or drying paint and forming plastic. It is also suitable for shrink-fitting and softening
and removing adhesives.
The soldering iron set may be used for only in accordance with its intended purpose. Any
other use is forbidden. The manufacturer cannot be held responsible for damage or injury
caused by use the machine for other than its intended purpose.
It may be used only for attachments appropriate for the gas soldering iron set. Non-
observance of the safety, assembly and operating instructions while operating the machine
counts as misuse.
Persons operating the gas soldering iron and undertaking maintenance activities must be
familiar with them and informed of the possible dangers. Any applicable health and safety
regulations must also be followed.
Any other applicable local and national legislation must also be followed. The gas soldering
iron set may not be modified. The manufacturer can accept no responsibility for damage or
injury caused by modifications to the set.
The gas soldering iron set has not been designed for professional, trade or industrial use, but
for private users in the hobby and DIY sector.
Any other use of the product is expressly forbidden and counts is misuse.

08
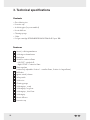
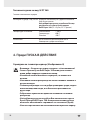
Features
Contents
3. Technical specications
Hot air/ soldering attachment
Soldering torch attachment
Knurled nut
Switch for continuous flame
• Left "OFF“: switched off;
• Right "CONT“: Continuous flame
Flame regulator
(continuously adjustable. Position 1 = smallest flame, Position 4 = largest flame)
Refill valve
Ignition switch/columns
Safety switch
Solder wire
Cleaning sponge
Soldering tips , round
Soldering tips, long form
Soldering tips , chisel form
Soldering tip
Hot air deflector
Protective cap
3
1
4
2
5
6
7
8
9
14
15
16
12
13
11
10
• Gas soldering iron
• Protective cap
• 4 soldering tips (1x pre-assembled)
• Hot air deflector
• Cleaning sponge
• Solder
• Fuel gas cartridge ROTHENBERGER INDUSTRIAL Rofill Super 100

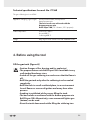
09
Appliance category / type of gas: Direct pressure butane; direct pressure
butane-propane-mix
The best results are achieved with the
butane-propane mix
Rofill Super 100 (75 % butane, 25 % propane).
Flame temperature: Gas torch 1.300°C
Hot air 600°C
Soldering 450°C
Usage: may only be used outside or in well ventilated rooms
The gas soldering iron is not filled.
Technical specifications for mod. No. PT 360
- Caution- Danger of fire, burning and/or explosion!
- The propane-butane mix Rofill Super 100 is available in any
well-stocked hardware store.
- Switch off the gas soldering iron and ensure that the flame is
off.
- Refill the gas tank only after the soldering iron has cooled
completely.
- Refill the tank in a well ventilated place, in an environment
free of flames or sources of ignition and away from other
persons.
- Smoking is prohibited while you are filling the tank.
- The best results are achieved with the butane-propane mix
Rofill Super 100. Alternatively, even commercial lighter gas
(butane) can be used.
- Direct the torch downwards while filling the soldering iron.
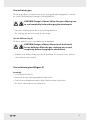
Fill the gas tank (Figure A)
4. Before using the tool

10
• Place the nozzle of the gas canister at the refill valve (6) of the gas soldering gun and
press it .
• Draw the nozzle of the gas canister out of the refill valve of the system as soon as the gas
begins to overflow out. OVERFILLING THE TANK WILL CAUSE THE FLAME TO
SPIT.
• Wait a few minutes before igniting the torch to allow the gas to stabilise.
CAUTION: Accessible parts may become very hot.
Keep small children away from the device.
Assembly of attachments(Figure B)
One hot air attachment (1), one torch attachment (2), four soldering tips (11-14) and one hot
air deflector are included in the contents, To fit the various attachments
proceed as described on the following pages.
5. Operation / use
CAUTION! Danger of burns! Allow the gas soldering iron
to cool completely before changing the attachments.
Use as soldering gun (Figure C)
The gas soldering gun is provided with the blow torch attachment, hot air/soldering
attachment and with a soldering tip can can be used as soldering gun.
• 4 soldering tips are included in the contents
• Choose the most suitable tip for your application and screw this firmly into the threaded
hole in the hot air / soldering attachment.. The pre-assembled soldering tip should be
removed beforehand as required.

11
• Push the hot air deflector firmly on the hot air attachment. The mounted hot air deflector
can now be turned as required.
Hot air deflector (Fig. E)
The hot air deflector can be used with the hot air attachment.
Use as blowing torch(Figure F)
Assembly
• Loosen the knurled nut (3)
• Remove the hot air/soldering attachment from the torch
• Fix the blow torch attachment with the help of the knurled nut on the device
• The device can now be used as a blow torch
CAUTION! Danger of burns! Never touch the heated
hot air deflector Allow the gas soldering iron to cool
completely before changing the attachments.
CAUTION! Danger of burns! Allow the gas soldering iron
to cool completely before changing the attachments.
Use as hot air gun
The hot air gun function is ideal for removing or drying paint and forming plastic. It can also
be used for shrink fitting and softening or removing adhesive.
• Detach the soldering tip from the hot air/soldering attachment
• The soldering gun can now be used as a hot air gun

12
Igniting the flame
Continuous flame
Regulating the flame
2
1
3
1. Push the flame regulator (5) to position 4
2. Periodic operation
• Keep the safety switch (8) pressed and draw the ignition switch (7) to ignite the flame.
• Release the ignition switch to extinguish the flame.
3. Continuous operation
• Keep the safety switch (8) pressed and draw the ignition switch (7) to ignite the flame.
• Slide the continuous operation switch (4) to the in position CONT to lock the ignition
switch in the drawn position.
• Slide the continuous flame switch into the OFF position to extinguish the flame.
An irregular flame can be generated or gas can escape in fluid form If the gas soldering iron
is cold or has just been refilled. This is normal and does not indicate a fault. The flame will
stabilise once the device warms up (approx. 1-2 minutes).
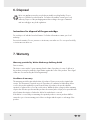
Igniting and extinguishing the flame

13
Slide the protective cap firmly on the locking nut.
• Clean the device with a soft, slightly damp cloth if required. Ensure that no moisture enters
the device.
• Clean the soldering tips with the help of the cleaning sponge included in the contents.
The contents include a protective cap (16) Use the protective cap to safely rest the hot device
and to prevent mechanical hazards.
Protective cap (Figure H)
Cleaning
Storage conditions
Shutting down the device safely (Figure G)
A stand is integrated in the ignition switch to rest the device safely. Always use the tool rest
when putting the item down.
• If the burner is not to be used over longer periods, keep it in a safe, cool, dry and well-
ventilated place out of the reach of children.
• Store the device in the storage box intended for it, when possible. However, allow it to
cool completely before storage.
CAUTION! Danger of fire! The protective cap must not be
fitted when the flame is ignited.
CAUTION! Danger of burns! The metal attachments
become extremely hot during normal operation.
Caution! Allow the gas soldering iron to cool completely
before cleaning. To avoid damage, do not use
aggressive cleaning material, metal brushes or sharp
objects such as knives, etc.

14
Worn out appliances must be recycled at a suitable recycling facility. Do not
dispose of with the household waste. For further information contact your local
authority. Dispose of the packaging material according to the type of material
and accordingly to any local regulations.
Instructions for disposal of the gas cartridge
Do not dispose of with the household waste. For further information contact your local
authority.
Pressurised container. Do not puncture or incinerate, even after use. Do not open forcefully
or incinerate even after use.
6. Disposal
Warranty provided by Walter Werkzeuge Salzburg GmbH
Dear customer,
This device comes with a 3 year warranty from the date of purchase. In case of defects in
the product you may be entitled to legal claims against the seller of the product. These legal
claims are not restricted by the following warranty.
Conditions of warranty
The warranty period begins with the date of purchase. Please preserve the original sales
receipt. This document is required as proof of purchase. If a material or fabrication defect
occur in this prodict within three years from the date of purchase, the product shall be
repaired or replaced free of cost at our discretion. Within the three year period the warranty
requires the defective product and the purchase document (sales receipt) to be provided with
a brief written description of where the defect lies and when it occurred.
If the defect is covered by our warranty, the repaired product or a new product shall be
returned to you. A new warranty period does not begin with the repair or exchange of the
product.
7. Warranty

15
Warranty period and legal claims based on defects
The warranty period is not extended by the warranty. This also applies to replaced and
repaired parts. Any damages and defects that may exist at the time of purchase must be
notified immediately after removal from packaging. Any repairs arising after the expiry of the
warranty period are chargeable.
Scope of the warranty
The device has been manufactured according to strict quality guidelines and tested diligently
before delivery. The warranty applies to material or fabrication defects. This warranty does
not cover product parts that are subject to normal wear and tear and therefore can be
considered as parts subject to wear and tear or for the damage to fragile parts, e.g switch,
batteries or those made of glass.
This warranty is void if the product is damaged, not used or maintained properly. All the
instructions provided in the operating manual must be followed exactly for proper use of
the product. The purpose of use and actions which are advised or warned against must
necessarily be avoided.
The product is intended solely for private use and not for professional use. The warranty is
void in case of misuse or improper handling, use of force and changes that have not been
carried out by our authorised service centre.
Processing a warranty case
To ensure quick processing of your issue, please follow the below instructions:
• Please be ready with the sales receipt and the product number (e.g. IAN 12345) as proof
or purchase for all queries.
• You can refer the product number from the type label, , an engraving, on the cover sheet
of your operating instructions (below left) or as sticker on the back or lower side.
• If functional or other defects occur, first call or email the following service department.
• You can then send a product recorded as defective postage free along the the sales
receipt and information about where the defect lies and when it has occurred, to the
service centre address provided to you.
This and many other manuals, product videos and software can be downloaded at www.
lidl-service.com

16
Service
Walter Tools (GB) Ltd.
E-Mail: service-uk@walter-werkzeuge.com
Tel.: 00800 925 837 88
IAN 270717
ROTHENBERGER Hellas S.A.
E-Mail: [email protected]
Tel.: +30 210 94 02 049
IAN 270717
Supplier:
Please note that the following address is not a service centre address. Please contact the
above-mentioned service centre first.
Walter Werkzeuge Salzburg GmbH
Gewerbeparkstraße 9
5081 Anif
Austria

17
Važno:
Pozorno pročitajte upute za uporabu kako biste se dobro upoznali s
uređajem. Pažljivo sačuvajte ovaj dokument za kasniju uporabu. U slučaju
promjene vlasništva, ova uputa također mora biti uručena.
Sadržaj
Korišteni simboli .................................................................................................................................................................................... 18
1. Uvod
..........................................................................................................................................................18
2. Upute o sigurnosti
...........................................................................................................................18
Upute o sigurnosti
............................................................................................................................................................................... 18
Primjena sukladno propisima
....................................................................................................................................................20
3. Tehničke informacije
......................................................................................................................21
Opseg isporuke
....................................................................................................................................................................................21
Nazivi dijelova
......................................................................................................................................................................................21
Tehnički podaci za mod. Br. PT 360
..................................................................................................................................22
4. Prije UPORABE
.................................................................................................................................. 22
Punjenje plinskog spremnika (sl. A)
.....................................................................................................................................22
5. Puštanje u rad / uporba
............................................................................................................. 23
Montaža nastavaka (sl. B)
..........................................................................................................................................................23
Korištenje kao lemilica (sl. C)
...................................................................................................................................................23
Korištenje kao pištolj na vrući zrak (sl. D)
.....................................................................................................................24
Korištenje kao plamenik lemilice (sl. F)
............................................................................................................................24
Paljenje i gašenje plamena
........................................................................................................................................................25
Sigurno isključivanje (sl. G)
........................................................................................................................................................26
Zaštitna kapa (sl. H)
..........................................................................................................................................................................26
Uvjeti skladištenja
...............................................................................................................................................................................26
Čišćenje
........................................................................................................................................................................................................26
6. Zbrinjavanje u otpad
.................................................................................................................... 27
Napomene za zbrinjavanje plinskog uloška
..............................................................................................................27
7. Jamstvo
.................................................................................................................................................. 27

18
Poštujte napomene upozorenja i sigurnosti!
Pročitajte upute za uporabu
Nosite zaštitne naočale
Pažnja, vruće
Koristite samo na otvorenom ili u dobro ventiliranim prostorijama
Opasnost: iznimno zapaljivi aerosol
Korišteni simboli
Čestitamo na kupnji Vašeg novog uređaja. Time ste se odlučili za visokokvalitetan proizvod.
Upute za uporabu sastavni su dio ovog proizvoda. One sadrže važne napomene
za sigurnost, uporabu i zbrinjavanje. Prije korištenja proizvoda upoznajte se sa svim
sigurnosnim i operativnim propisima. Proizvod koristite samo na opisani način te na
navedenim područjima primjene. uručite i sve dokumente prilikom proslijeđivanja proizvoda
trećim osobama.
1. Uvod
- UPOZORENJE! PLINSKU LEMILICU ČUVAJTE IZVAN DOHVATA DJECE.
- Nosite prikladnu zaštitu za oči kako biste izbjegli opasnost ozljede
očiju.
- Sadrži zapaljivi komprimirani plin. Ne zagrijavajte spremnik plina za
Upute o sigurnosti
2. Upute o sigurnosti

19
dopunjavanje. Plamenik ne izlažite temperaturama iznad 50°C / 120°F i ne
izlažite ga dugo sunčevom zračenju. U protivnom postoji opasnost od prsnuća ili
eksplozije.
- Ne provodite nikakve izmjene na plinskoj lemilici! Ne mijenjajte
originalnu izvedbu i tvornička podešavanja uređaja. Koristite
samo rezervne dijelove od proizvođača. Svaka promjena podešavanja
ili izvedbe plamenika i lemila, kao i demontaža dijelova ili uporaba dijelova koji
nisu preporučeni može biti opasna.
- Prije dopunjavanja pročitajte upute o dopunjavanju. Nestručan
postupak dopunjavanja može izazvati teške nesreće.
- Ne bušite otvore u spremniku plina i ne izlažite ga vatri. U protivnom
postoji opasnost od prsnuća ili eksplozije.
- Pazite da plinska lemilica ne padne na tlo jer se time uređaj može oštetiti
- Ne koristite plinske lemilice koje su oštećene.
- Ako iz uređaja iscuri plin (ako osjetite miris plina), odmah ga
iznesite na otvoreno, na dobro prozračeno mjesto daleko od
izvora plamena, gdje ćete moći potražiti i ispraviti propuštanje.
Nepropusnost uređaja provjeravajte isključivo na otvorenom.
Mjesto propuštanja ne tražite plamenom, nego isključivo otopinom
sapunice! U slučaju propuštanja postoji opasnost od požara ili eksplozije. U
slučaju propuštanja obratite se prodavaču ili proizvođaču.
- Uvijek radite u nezapaljivom i dobro prozračenom okruženju. U
protivnom postoji opasnost od požara, eksplozije i gušenja.
- Plamenik ne koristite u okruženju s gorivim parama, zapaljivim
tekućinama ili eksplozivnim materijalima. U protivnom postoji opasnost
od požara ili eksplozije.
- PLINSKU LEMILICU NE PALITE U BLIZINI LICA, RUKU, ODJEĆE
ILI ZAPALJIVIH TVARI I NE USMJERAVAJTE PLAMEN U LJUDE. U
protivnom postoji opasnost od opeklina. Održavajte bočna sigurna rastojanja
od najmanje 0,5 m od svih objekata, te minimalno rastojanje od 1 prema
predmetima koji se nalaze iznad uređaja.
- KROZ PROREZE ZA ISPUH ZRAKA LEMILICE IZLAZI VRUĆI ZRAK.
PLINSKU LEMILICU OBAVEZNO POSTAVITE NA INTEGRIRANI
STALAK, ČAK I KOD KRAĆIH STANKI U RADU, KAKO BISTE
SPRIJEČILI DA SE ZAPALI POVRŠINA STOLA ILI DRUGI PREDMETI.
OTVORE ZA ISPUH ZRAKA NE USMJERAVAJTE U OČI, LICE ILI DRUGE
OSOBE. U protivnom postoji opasnost od opeklina.
- Ne udišite pare od zavarivanja/lemljenja, jer su možebitno otrovne.
- Imajte u vidu da stvarni plamen može biti veći nego što se čini. U
određenim svjetlosnim uvjetima plamen može postati gotovo nevidljiv - opasnost
od opeklina!

20
- Sapnica plamenika i otvori za ispuh vrućeg zraka tijekom i nakon
rada postaju iznimno vrući. Zaštitite se od nehotičnih opeklina.
- Uvjerite se da je nakon uporabe plamen potpuno ugašen i
pričekajte dok se lemilica potpuno ne ohladi prije skladištenja iste.
U protivnom postoji opasnost od požara.
Primjena sukladno propisima
Ovaj komplet za plinsku lemilicu je pogodan za meko lemljenje električnih kabela i pločica,
za uklanjanje ili sušenje boja i lakova ili za oblikovanje plastičnih dijelova. Osim toga,
proizvod je namijenjen za smanjenje folija i omekšavanje i uklanjanje ljepila.
Plinska lemilica smije se koristiti samo namjenski kao što je navedeno. Svaka drugačija
uporaba nije dopuštena! Za štete ili ozljeđivanja bilo koje vrste koja pri tom nastanu jamči
korisnik stroja.
Smije se koristiti samo pribor prikladan za plinsku lemilicu. Sastavni dio namjenske uporabe
također je pridržavanje sigurnosnih napomena kao i uputa za montažu i rad u uputama za
uporabu.
Osobe koje rukuju plinskom lemilicom i održavaju je, moraju se s njima upoznati i biti
podučene o eventualnim opasnostima. Zbog toga se treba točno pridržavati propisa za
sprječavanje nesreća.
Treba se pridržavati i općih pravila u radno-medicinskim i sigurnosno-tehničkim područjima.
Promjene izvršene na plinskoj lemilici kao i štete koje su njima uzrokovane isključene su iz
proizvođačevog jamstva.
Plinska lemilica nije konstruirana za komercijalnu, zanatsku ili industrijsku primjenu već za
privatne korisnike kao hobi ili učini-sam.
Sve ostale primjene isključene su i tretiraju se kao neprimjerena uporaba.
Pagina se încarcă...
Pagina se încarcă...
Pagina se încarcă...
Pagina se încarcă...
Pagina se încarcă...
Pagina se încarcă...
Pagina se încarcă...
Pagina se încarcă...
Pagina se încarcă...
Pagina se încarcă...
Pagina se încarcă...
Pagina se încarcă...
Pagina se încarcă...
Pagina se încarcă...
Pagina se încarcă...
Pagina se încarcă...
Pagina se încarcă...
Pagina se încarcă...
Pagina se încarcă...
Pagina se încarcă...
Pagina se încarcă...
Pagina se încarcă...
Pagina se încarcă...
Pagina se încarcă...
Pagina se încarcă...
Pagina se încarcă...
Pagina se încarcă...
Pagina se încarcă...
Pagina se încarcă...
Pagina se încarcă...
Pagina se încarcă...
Pagina se încarcă...
Pagina se încarcă...
Pagina se încarcă...
Pagina se încarcă...
Pagina se încarcă...
Pagina se încarcă...
Pagina se încarcă...
Pagina se încarcă...
Pagina se încarcă...
Pagina se încarcă...
Pagina se încarcă...
Pagina se încarcă...
Pagina se încarcă...
Pagina se încarcă...
Pagina se încarcă...
Pagina se încarcă...
Pagina se încarcă...
Pagina se încarcă...
Pagina se încarcă...
Pagina se încarcă...
Pagina se încarcă...
Pagina se încarcă...
Pagina se încarcă...
Pagina se încarcă...
Pagina se încarcă...
Pagina se încarcă...
Pagina se încarcă...
Pagina se încarcă...
Pagina se încarcă...
Pagina se încarcă...
Pagina se încarcă...
Pagina se încarcă...
Pagina se încarcă...
Pagina se încarcă...
Pagina se încarcă...
Pagina se încarcă...
Pagina se încarcă...
-
 1
1
-
 2
2
-
 3
3
-
 4
4
-
 5
5
-
 6
6
-
 7
7
-
 8
8
-
 9
9
-
 10
10
-
 11
11
-
 12
12
-
 13
13
-
 14
14
-
 15
15
-
 16
16
-
 17
17
-
 18
18
-
 19
19
-
 20
20
-
 21
21
-
 22
22
-
 23
23
-
 24
24
-
 25
25
-
 26
26
-
 27
27
-
 28
28
-
 29
29
-
 30
30
-
 31
31
-
 32
32
-
 33
33
-
 34
34
-
 35
35
-
 36
36
-
 37
37
-
 38
38
-
 39
39
-
 40
40
-
 41
41
-
 42
42
-
 43
43
-
 44
44
-
 45
45
-
 46
46
-
 47
47
-
 48
48
-
 49
49
-
 50
50
-
 51
51
-
 52
52
-
 53
53
-
 54
54
-
 55
55
-
 56
56
-
 57
57
-
 58
58
-
 59
59
-
 60
60
-
 61
61
-
 62
62
-
 63
63
-
 64
64
-
 65
65
-
 66
66
-
 67
67
-
 68
68
-
 69
69
-
 70
70
-
 71
71
-
 72
72
-
 73
73
-
 74
74
-
 75
75
-
 76
76
-
 77
77
-
 78
78
-
 79
79
-
 80
80
-
 81
81
-
 82
82
-
 83
83
-
 84
84
-
 85
85
-
 86
86
-
 87
87
-
 88
88


în alte limbi
- Deutsch: Parkside PT360
Lucrări înrudite
Alte documente
-
EINHELL Heißluftpistole TE-HA 2000 E Manual de utilizare
-
Powerplus POWX1384 Manualul proprietarului
-
Powerplus POWX1382 Manualul proprietarului
-
Rothenberger TURBOPROP Manual de utilizare
-
Ferm HAM1014 Manual de utilizare
-
Somogyi FPL 80W Electric Soldering Iron Manual de utilizare
-
Dremel 2200 VERSAFLAME Operating/Safety Instructions Manual
-
-
-
Weller 05C Manualul proprietarului