


empty page before TOC

English 6
Azərbaycanca 20
Čeština 35
Dansk 50
Deutsch 65
Eesti 83
Español 98
Français 114
Hrvatski 130
Italiano 145
Latviešu 161
Lietuviškai 176
Magyar 191
Nederlands 207
Norsk 223
O'zbek 238
Polski 254
Português 271
Română 287
Shqip 303
Slovenščina 318
Slovensky 333
Srpski 348
Suomi 363
Svenska 378
Türkmençe 393
Ελληνικά 409
Български 426
Кыргызча 442
Македонски 458
Русский 474
Тоҷикӣ 491
Українська 507
Қазақша 523
Հայերեն 539
ქართული ენა 556
תירבע 573

English
6English
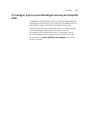
Important safety information
Only use the product for its intended purpose. Read this
important information carefully before you use the
product and its batteries and accessories, and save it for
future reference. Misuse can lead to hazards or serious
injuries.
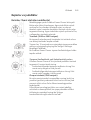
Warnings
- Keep the charger away from water.
- After cleaning, make sure the charger is completely
dry before you connect it to the wall socket.
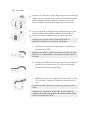
- This appliance can be used by children and persons
with reduced physical, sensory or mental capabilities
or lack of experience and knowledge if they have
been given supervision or instruction concerning use
of the appliance in a safe way and understand the
hazards involved. Cleaning and user maintenance
shall not be made by children without supervision.
- Children shall not play with the appliance.
- Only use original Philips accessories or consumables.
Only use charger provided with the product. If
supplied, only use the original USB cable and USB
power supply unit.
- Do not charge the product outdoors or near heated
surfaces.
- Do not clean any part of the product in the
dishwasher.
- To avoid physical injury, do not fill the reservoir with
hot water. Do not put foreign objects in the reservoir.
- The maximum altitude of use is 4500 meters.
- This product has only been designed for cleaning
teeth and gums.
- Do not use it for any other purpose (for e.g. eyes, nose
and ears).
- Stop using the appliance and consult your
dentist/doctor if excessive bleeding occurs after use, if
bleeding continues to occur after 1 week of use or if
you experience discomfort or pain.
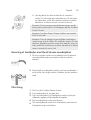
- If you have had oral or gum surgery in the previous 2
months, consult your dentist before you use this
appliance.

7
English
- If you have a pacemaker or other implanted device,
contact your doctor or the manufacturer of the
implanted device prior to use.
- If you have medical concerns, consult your doctor
before you use this appliance.
- This appliance is a personal care device and is not
intended for use on multiple patients in a dental
practice or institution.
- Charge and use the product at a temperature
between 5 °C and 40 °C (41 °F and 104 °F).
Battery safety instructions
- This appliance contains batteries that are only to be
removed by skilled persons
- Only use the product for its intended purpose. Read
this information carefully before you use the product
and its batteries and accessories, and save it for future
reference. Misuse can lead to hazards or serious
injuries. Accessories supplied may vary for different
products.
- Only use original Philips accessories and consumables.
Only use detachable supply unit WAAxxxx.
- Keep product and batteries away from fire and do not
expose them to direct sunlight or high temperatures.
- If the product becomes abnormally hot or smelly,
changes color or if charging takes longer than usual,
stop using and charging the product and contact
Philips.
- Do not place products and their batteries in
microwave ovens or on induction cookers.
- Do not open, modify, pierce, damage or dismantle the
product or battery to prevent batteries from heating
up or releasing toxic or hazardous substances. Do not
short-circuit, overcharge or reverse charge batteries.
- This appliance contains batteries that are non-
replaceable. When the battery is at end of life, the
appliance shall be properly disposed of, see section on
recycling.

8English
- To avoid accidental short-circuiting of batteries after
removal, do not let battery terminals come into
contact with metal object (e.g. coins, hairpins, rings).
Do not wrap batteries in aluminium foil. Tape battery
terminals or put batteries in a plastic bag before you
discard them.
Storage and transportation conditions
Temperature -10°C to 60°C (14°F to 140°F).
Electromagnetic fields (EMF)
This Philips appliance complies with all applicable
standards and regulations regarding exposure to
electromagnetic fields.
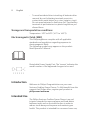
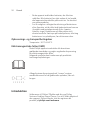
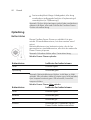
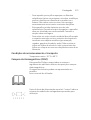
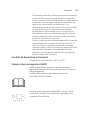
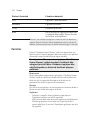
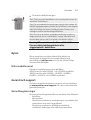
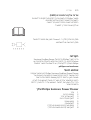
The following symbols may appear on the product:
Read Operator’s Manual.
Detachable Power Supply Part:The "xxxxxx" indicates the
model number of the approved chargers to be used.
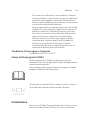
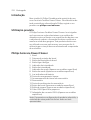
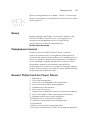
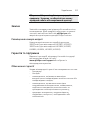
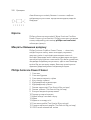
Introduction
Welcome to Philips! Congratulations on your new
Sonicare Cordless Power Flosser. To fully benefit from the
support that Philips offers, register your product at
philips.com/welcome.
Intended Use
The Philips Sonicare Cordless Power Flosser is an oral
irrigator intended to remove plaque and food debris
between teeth and on the tooth surface in order to
reduce tooth decay and improve and maintain gum
health. This product is intended for consumer home use,

9
English
normally used at least once a day. Use by children should
be with adult supervision.
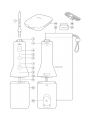
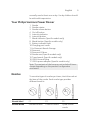
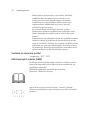
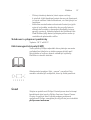
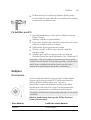
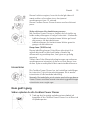
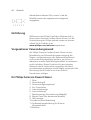
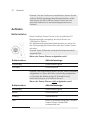
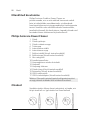
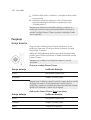
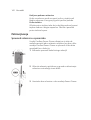
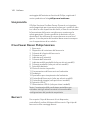
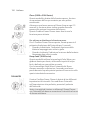
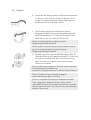
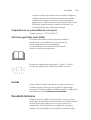
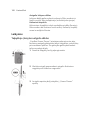
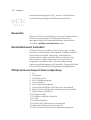
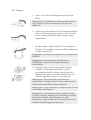
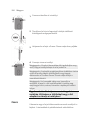
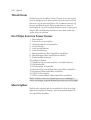
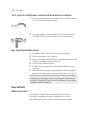
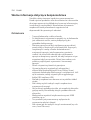
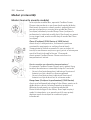
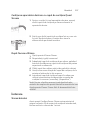
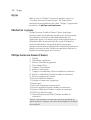
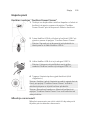
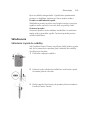
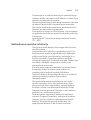
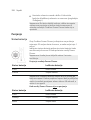
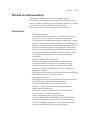
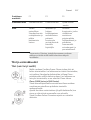
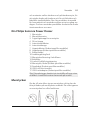
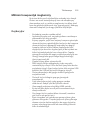
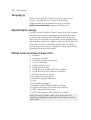
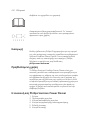
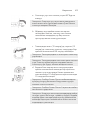
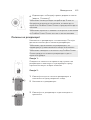
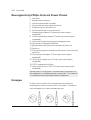
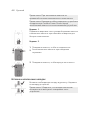
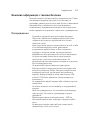
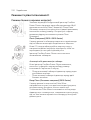
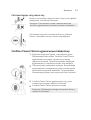
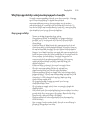
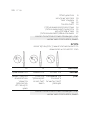
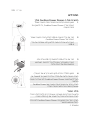
Your Philips Sonicare Power Flosser
1 Nozzle
2 Nozzle rotator
3 Nozzle release button
4 On/off button
5 Intensity indicator
6 Intensity button
7 Mode indicator (Specific models only)
8 Mode button (Specific models only)
9 Battery indicator light
10 Charging port/cover
11 In-Reservoir Nozzle Storage
12 Reservoir
13 Reservoir fill door
14 Nozzle case (Specific models only)
15 Travel pouch (Specific models only)
16 USB-A to small plug
17 USB-A power adapter (Specific models only)
Note: The contents of the box may not include all items
shown depending on the product configuration
purchased.
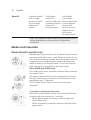
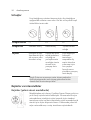
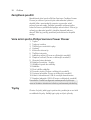
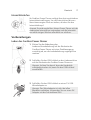
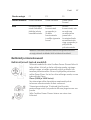
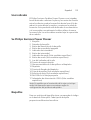
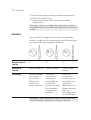
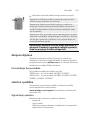
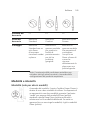
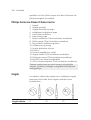
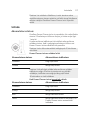
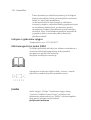
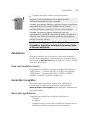
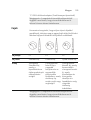
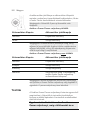
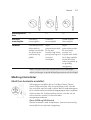
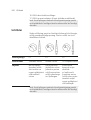
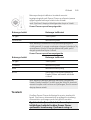
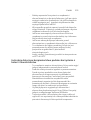
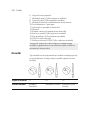
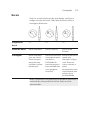
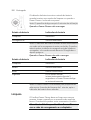
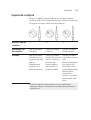
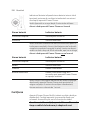
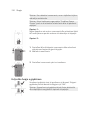
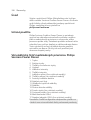
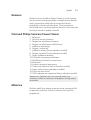
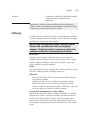
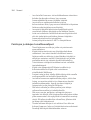
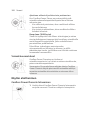
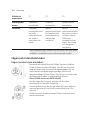
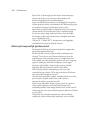
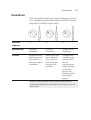
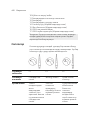
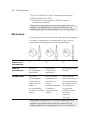
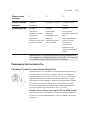
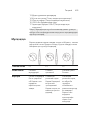
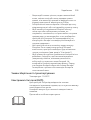
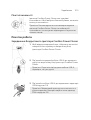
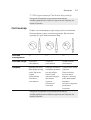
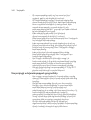
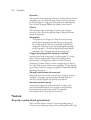
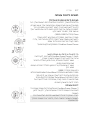
Nozzles
To see what type of nozzles you have, check the code at
the base of the nozzle. Each nozzle type provides
different benefits.
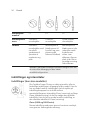
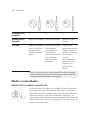
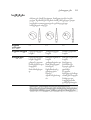
Nozzle label F1 F2 F3
Nozzle Name Standard nozzle Comfort nozzle Quad Stream
nozzle

10 English
Benefit Standard nozzle
with a single
stream of water
for removing
debris and
plaque.
Soft rubber
nozzle for
comfort and ease
of positioning for
those with
sensitive gums.
Soft rubber
nozzle that
directs water into
a cross-shaped
stream that
gently removes
plaque for an
effortlessly
thorough clean.
Note: The contents of the box may not include all items
shown depending on the product configuration
purchased.
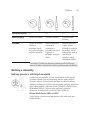
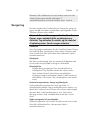
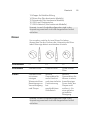
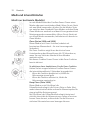
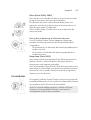
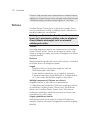
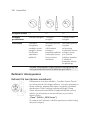
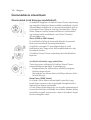
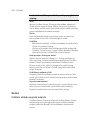
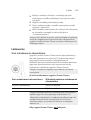
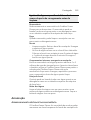
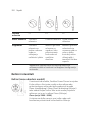
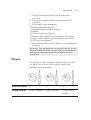
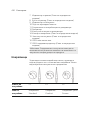
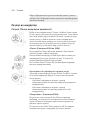
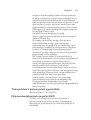
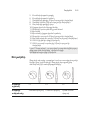
Modes and intensities
Modes (Specific models only)
Depending on your model, your Cordless Power Flosser is
equipped with either one or two different modes. If you
have a device with two modes, press the mode button to
toggle between standard clean mode and deep clean
mode to select your desired mode. If you have a device
with one mode, it is already in the clean mode.
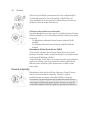
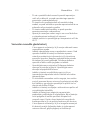
Clean (2000 and 3000 Series)
This mode, with pacer, provides constant water pressure
for a great clean.
The pacer indicates when you are supposed to move to
the next section of your mouth via a short pause in the
waterflow every 15 seconds.
This Cordless Power Flosser comes with the pacer
activated.
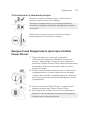
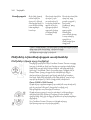
To activate or deactivate the pacer
With the Cordless Power Flosser off, press and hold the
intensity selection button for 3 seconds.
- When deactivated, the battery indicator light will
flash amber once
- When activated, the battery indicator light will flash
green twice

11
English
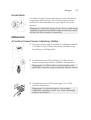
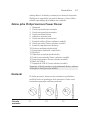
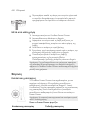
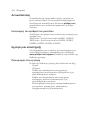
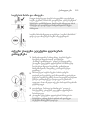
Deep clean (3000 Series)
This mode utilizes Pulse Wave technology, to guide you
tooth by tooth, using strong and gentle pulses of water
for a thorough clean.
With Pulse Wave technology the flow of the water
increases and decreases in intensity, providing a brief
pause during which you can move the nozzle to the next
space between your teeth.
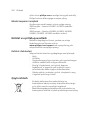
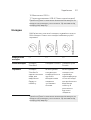
Intensities
Your Cordless Power Flosser comes with three different
intensity settings. To change the intensity to the setting
you prefer, press the intensity button.
Note: It is recommended to start using this Power Flosser
on the lowest intensity and increase the intensity over the
course of a few weeks.
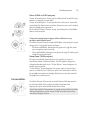
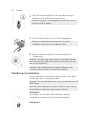
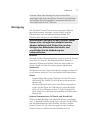
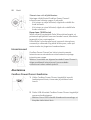
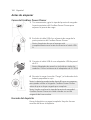
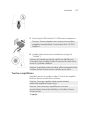
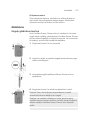
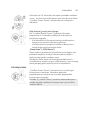
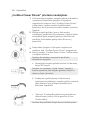
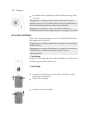
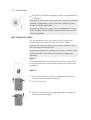
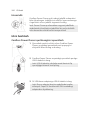
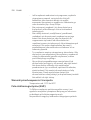
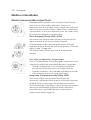
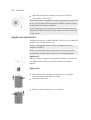
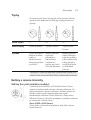
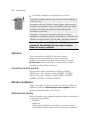
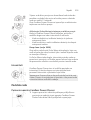
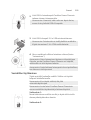
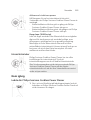
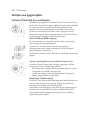
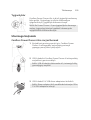
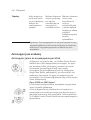
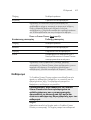
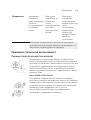
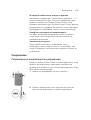
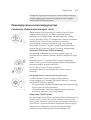
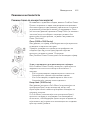
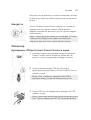
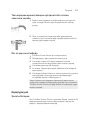
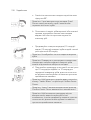
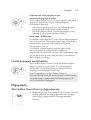
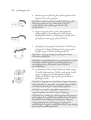
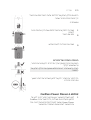
Getting Started
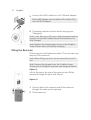
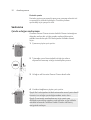
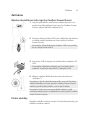
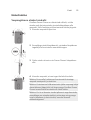
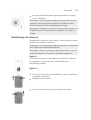
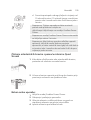
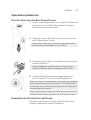
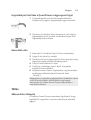
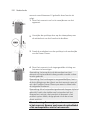
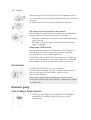
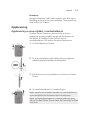
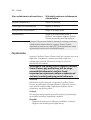
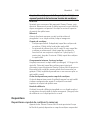
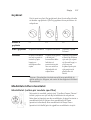
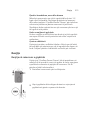
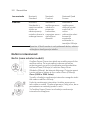
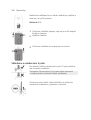
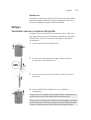
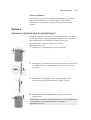
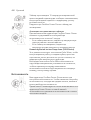
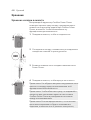
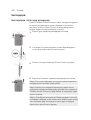
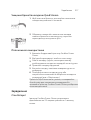
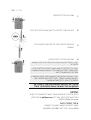
Charging your Cordless Power Flosser
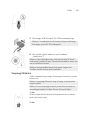
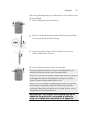
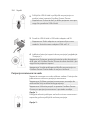
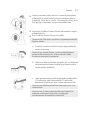
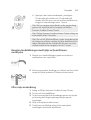
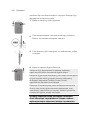
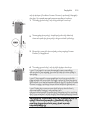
1Gently pull and rotate the charging port cover on the
back of the Cordless Power Flosser to expose the
charging port .
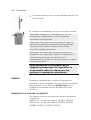
2Plug the USB-A cable into the charging port on the
back of the Cordless Power Flosser.
Note: Make sure the handle is completely dry before
you connect the USB-A cable.

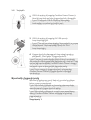
12 English
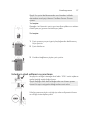
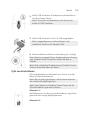
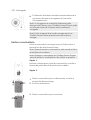
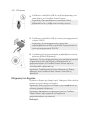
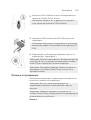
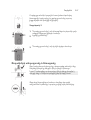
3Connect the USB-A cable into a 5V USB wall adapter.
Note: Wall adapter not included in all models. Only
use a 5V IPX4 adapter.
4The battery indicator flashes while charging (see
'Charging').
Note: It can take up to 8 hours to fully charge the battery,
but you can use the Cordless Power Flosser before it is
fully charged.
Note: Replace the charging port cover on the Cordless
Power Flosser when not actively charging.
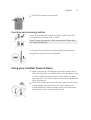
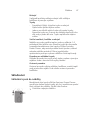
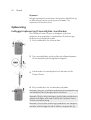
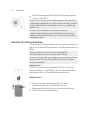
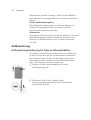
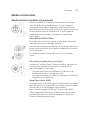
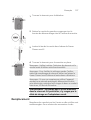
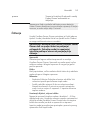
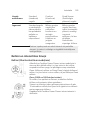
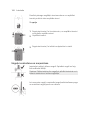
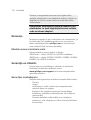
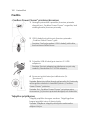
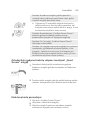
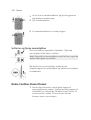
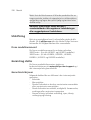
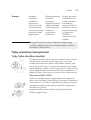
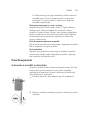
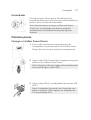
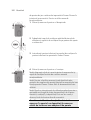
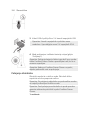
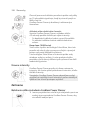
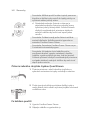
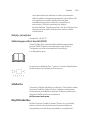
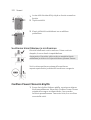
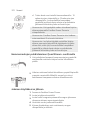
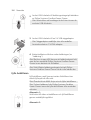
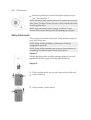
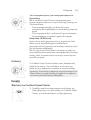
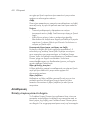
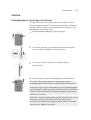
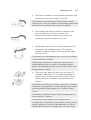
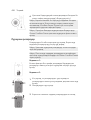
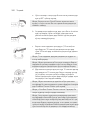
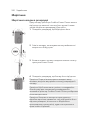
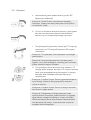
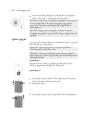
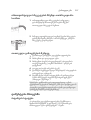
Filling the Reservoir
Fill the reservoir with lukewarm water. There are two easy
ways to fill the reservoir.
Note: When filling reservoir, do not exceed the max fill
line.
Note: Remove the charger from the Cordless Power
Flosser prior to filling the reservoir and using the device.
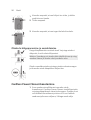
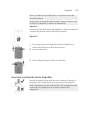
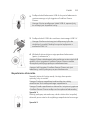
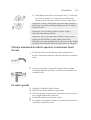
Option 1:
Lift the flip top to the side of the reservoir and fill the
reservoir through the quick side fill port.
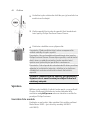
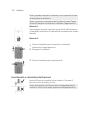
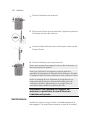
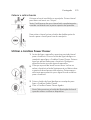
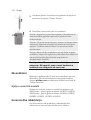
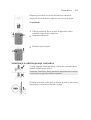
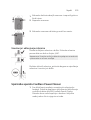
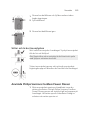
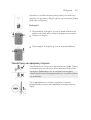
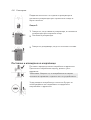
Option 2:
1Twist to detach the reservoir and fill the reservoir
through the wide mouth opening.
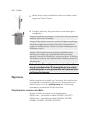
2Fill the reservoir.

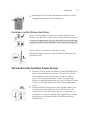
13
English
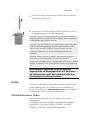
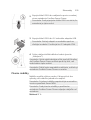
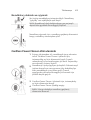
3Twist the reservoir to reattach.
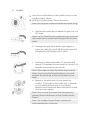
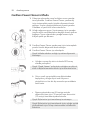
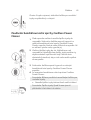
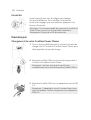
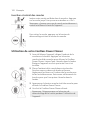
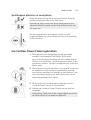
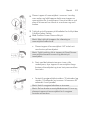
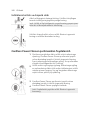
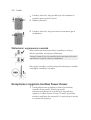
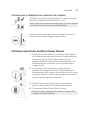
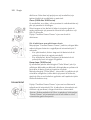
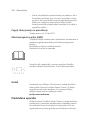
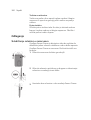
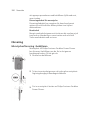
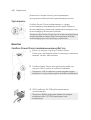
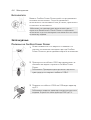
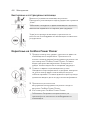
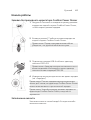
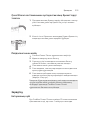
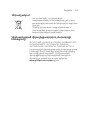
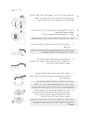
Inserting and removing nozzles
Insert your preferred nozzle into the handle. Press the
nozzle down until you hear a "click".
Note: Ensure the nozzle is fully inserted and flush with
the top of the device.
To remove the nozzle, press the nozzle release button
and pull the nozzle from the handle.
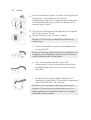
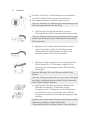
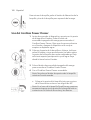
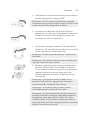
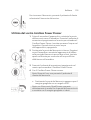
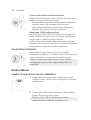
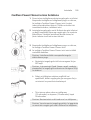
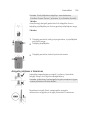
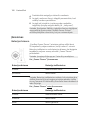
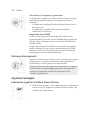
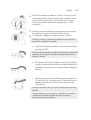
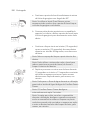
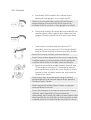
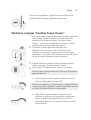
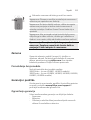
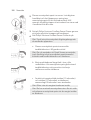
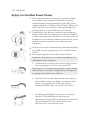
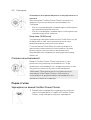
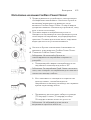
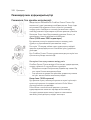
Using your Cordless Power Flosser
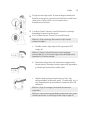
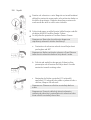
1Before turning on the device, point the nozzle tip at
the sink. Press the on/off button on the handle to turn
on the Cordless Power Flosser. Allow water to spray
into the sink. Turn off the device once water dispenses
from the device.
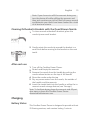
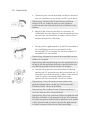
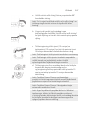
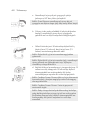
2Place the nozzle tip in your mouth. Lean over the sink
and partially close your lips over the nozzle tip to
avoid splashing. Leave enough space to allow water
to flow from your mouth into the sink.

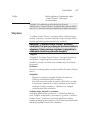
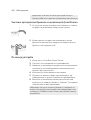
14 English
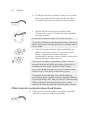
3Press the on/off button on the handle to turn on the
Cordless Power Flosser.
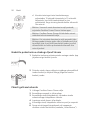
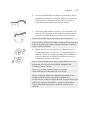
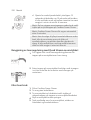
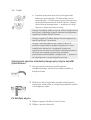
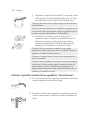
4With the Cordless Power Flosser turned on:
Note: Do not press nozzle release button while using.
a Position the nozzle tip just above the gum line at a
90° angle.
Note: For the Quad Stream nozzle press gently so that
the nozzle tip is in contact with the gum line and the
teeth.
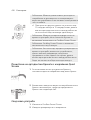
b Starting from your back teeth in your upper or
lower jaw, slide the nozzle tip along the gum line
and pause briefly between each tooth.
c Continue to clean both inside (15 seconds) and
outside (15 seconds) of your teeth for a total of 30
seconds in one arch of your mouth.
Note: Remember to clean the insides of your teeth.
Note: You can use the Nozzle Rotator to turn and
position the nozzle tip to clean the insides of your
teeth.
d Repeat in the other arch of your mouth for
another 15 seconds on the inside and 15 seconds
on the outside until all spaces around and
between your teeth have been cleaned for a total
of at least one minute.
Note: You can stop the water flow during use by
pressing the on/off button on the Cordless Power
Flosser.
Note: The Cordless Power Flosser switches off
automatically after 2 minutes.

15
English
Note: If you choose to refill the reservoir during use,
turn the device off while refilling the reservoir and
then pick up where you left off until all spaces around
and between your teeth have been cleaned for a total
of at least one minute.
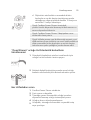
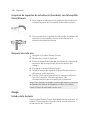
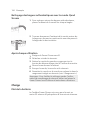
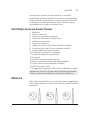
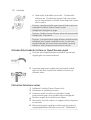
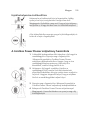
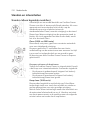
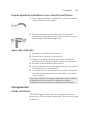
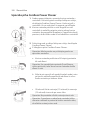
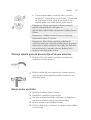
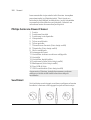
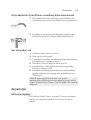
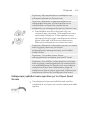
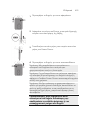
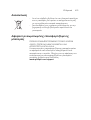
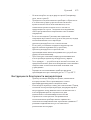
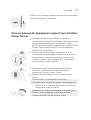
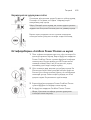
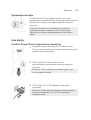
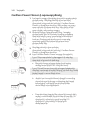
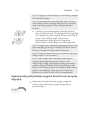
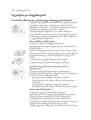
Cleaning Orthodontic Brackets with the Quad Stream Nozzle
1To clean around orthodontic brackets, place the
nozzle tip over each bracket.
2Gently rotate the nozzle tip around the bracket in a
small circle before moving to the bracket on the next
tooth.
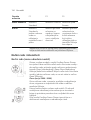
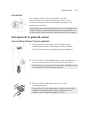
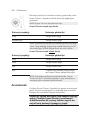
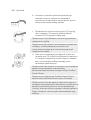
After each use
1Turn off the Cordless Power Flosser.
2Detach and Empty the reservoir
3Remove the nozzle from the handle by pushing the
nozzle release button on the top of the handle
4Rinse the nozzle under the tap
5Dry any excess water from the nozzle, the outside of
the handle, and the reservoir
6Insert the nozzle back into the handle or utilize the in-
reservoir nozzle storage feature (see 'Storage').
Note: To facilitate drying, keep the reservoir side fill port
door open or leave the Cordless Power Flosser
disassembled between uses.
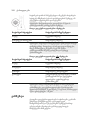
Charging
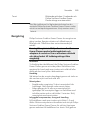
Battery Status
This Cordless Power Flosser is designed to provide at least
25 flossing sessions, each session lasting 1 minute.

16 English
The battery indicator shows the battery status when you
complete the flossing session, or when you pause the
Power Flosser.
Note: The device will shut off after 2 minutes of use.
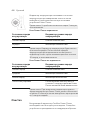
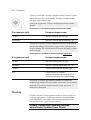
When the Power Flosser is charging
Battery status Battery indicator
Full Solid green
Charging Flashing green
Note: The battery indicator will flash until fully charged.
When it becomes fully charged while plugged in, the
light will turn solid green for 30 seconds and then it will
turn off
When the Power Flosser is not charging
Battery status Battery indicator
Full Solid green
Medium Flashing green
Low Flashing amber
Empty Flashing amber for 5 seconds and the
Power Flosser turns off automatically
Note: When the low battery indicator appears, the Power
Flosser is designed to provide at least 3 flossing sessions,
each session lasting 1 minute.
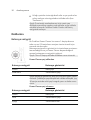
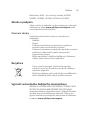
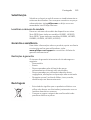
Cleaning
The Cordless Power Flosser needs to be cleaned once a
week. Clean the device and the accessories as follows.
Accessories may vary by model.
Warning: Do not clean the Cordless Power Flosser
while the charging cord and adapter are attached.
Unplug the device and close the charging port
cover before cleaning.

17
English
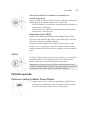
Reservoir
Gently remove the reservoir from the Cordless Power
Flosser by twisting. The reservoir can be hand washed
with warm water and mild soap or cleaned in the top
rack of the dishwasher.
Handle
When necessary, you can clean the handle by wiping
with a soft cloth and mild soap.
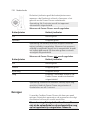
Nozzles
- Regular cleaning: Remove the nozzle from the handle.
Rinse the tip under warm water.
- Every few months, or if your nozzle becomes clogged:
Soak the nozzle in a container of 2 parts water and 1
part vinegar for 5 minutes. Rinse the nozzle with
warm water.
Internal components, hose and handle
Fill the reservoir with warm water and add 1-2
tablespoons of white vinegar. Point the nozzle at the sink
and turn on the Cordless Power Flosser to run the
solution through the Cordless Power Flosser until the
reservoir is empty. Rinse by repeating with a full reservoir
of clean warm water.
Nozzle Storage Case
The storage case can be hand washed in warm water
with mild soap or cleaned in the top rack of the
dishwasher.
Travel pouch
Clean the travel pouch by wiping with a soft cloth and a
mixture of warm water with mild soap. Wipe the travel
pouch with cloth to dry.
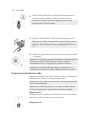
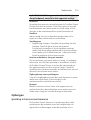
Storage
In-Reservoir Nozzle Storage
Your Cordless Power Flosser is designed such that you
can store one nozzle suspended from the bottom of the
Cordless Power Flosser handle into the reservoir. To use
this functionality:

18 English
1Twist reservoir to detach.
2Remove the nozzle by pressing the nozzle eject
button on the back of the handle.
3Insert bottom of nozzle into the bottom of the Power
Flosser.
4Twist the reservoir to reattach.
Note: Be sure to dry the inside of the reservoir and the
nozzle prior to using this functionality.
Note: To facilitate drying, keep the reservoir side fill port
door open or leave the Cordless Power Flosser
disassembled between uses.
Note: If you are not going to use the product for an
extended period of time, unplug it from the electrical
outlet, clean it and store it in a cool and dry place away
from direct sunlight.
Warning: Do not place other items in the
reservoir. In particular, do not store the charging
cord or wall adapter in the reservoir
Replacement
Replace nozzles every 6 months or immediately when
damaged. To buy accessories or spare parts, visit
philips.com or go to your local Philips Sonicare dealer.

19
English
Locating the model number
Look on the box for the model number of your device.
2000 Series - (for all HX3801, HX3822 models)
3000 Series - (for all HX3804, HX3805, HX3806, HX3824,
HX3825, HX3826 models)
Warranty and support
For product information, support and online user
instructions, please visit: www.philips.com/support or
read the international warranty leaflet.
Warranty restrictions
The terms of the international warranty do not cover the
following:
- Reservoir
- Nozzles
- Damage caused by use of unauthorized replacement
parts or unauthorized nozzles
- Damage caused by misuse, abuse, neglect, alterations
or unauthorized repair
- Normal wear and tear, including chips, scratches,
abrasions, discoloration or fading
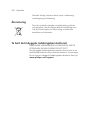
Recycling
- This symbol means that electrical products and
batteries shall not be disposed of with normal
household waste.
- Follow your country’s rules for the separate collection
of electrical products and batteries.
Removal of built-in rechargeable battery
CONTAINS LITIHIUM-ION RECHARGEBALE CELL. MUST BE
RECYCLED OR DISPOSED OF PROPERLY.
The built-in rechargeable battery must be removed by a
qualified professional when the product is discarded.
Instructions for removal of built-in rechargeable batteries
can be found on www.philips.com/support.

Azərbaycanca
20 Azərbaycanca
Təhlükəsizliklə bağlı vacib məlumat
Məhsulu yalnız təyinatı üzrə istifadə edin. Məhsulu və
onun batareya, aksesuarlarını istifadə etməzdən əvvəl bu
vacib məlumatları diqqətlə oxuyun və gələcəkdə istinad
etmək üçün saxlayın. Yanlış istifadə təhlükələrə və ya
ciddi xəsarətlərə səbəb ola bilər.
Xəbərdarlıqlar
- Doldurma qabını sudan uzaqda saxlayın.
- Təmizlədikdən sonra doldurma qabını rozetkaya
taxmazdan əvvəl tamamilə quruduğuna əmin olun.
- Bu cihaz uşaqlar və fiziki, hissiyyat və ya əqli
qabiliyyətləri zəif olan, yaxud cihazın istifadəsi ilə bağlı
təcrübə və biliyi olmayan insanlar tərəfindən o zaman
istifadə oluna bilər ki, onlara cihazın təhlükəsiz
istifadəsinə dair təlimat verilib və ya təhlükəsiz
istifadəni təmin etmək üçün nəzarət altında olacaqlar,
yaxud əlaqədar təhlükələr barədə
məlumatlandırılıblar. Nəzarət olmadan uşaqlara
təmizlik və ya istifadəçi baxımını həyata keçirmək
icazəsi verilməməlidir.
- Uşaqlar cihazla oynamamalıdırlar.
- Yalnız orijinal Philips aksesuarları və ya sərfiyyat
materiallarından istifadə edin.Yalnız məhsulla birlikdə
verilən şarj cihazını istifadə edin. Təmin edilibsə, yalnız
orijinal USB kabelindən və USB enerji təchizatından
istifadə edin.
- Məhsulu çöldə və ya isti səthlərin yaxınlığında şarj
etməyin.
- Məhsulun hər hansı hissəsini qabyuyan maşında
təmizləməyin.
- Fiziki xəsarətin qarşısını almaq üçün çəni isti su ilə
doldurmayın. Çənin içinə yad əşyalar qoymayın.
- Maksimum istifadə hündürlüyü 4500 metrdir.
- Bu məhsul yalnız dişləri və diş ətinin kənarlarını
təmizləmək üçün hazırlanıb.
- Hər hansı digər məqsəd üçün (məsələn, göz, burun və
qulaqlar üçün) ondan istifadə etməyin.
Pagina se încarcă...
Pagina se încarcă...
Pagina se încarcă...
Pagina se încarcă...
Pagina se încarcă...
Pagina se încarcă...
Pagina se încarcă...
Pagina se încarcă...
Pagina se încarcă...
Pagina se încarcă...
Pagina se încarcă...
Pagina se încarcă...
Pagina se încarcă...
Pagina se încarcă...
Pagina se încarcă...
Pagina se încarcă...
Pagina se încarcă...
Pagina se încarcă...
Pagina se încarcă...
Pagina se încarcă...
Pagina se încarcă...
Pagina se încarcă...
Pagina se încarcă...
Pagina se încarcă...
Pagina se încarcă...
Pagina se încarcă...
Pagina se încarcă...
Pagina se încarcă...
Pagina se încarcă...
Pagina se încarcă...
Pagina se încarcă...
Pagina se încarcă...
Pagina se încarcă...
Pagina se încarcă...
Pagina se încarcă...
Pagina se încarcă...
Pagina se încarcă...
Pagina se încarcă...
Pagina se încarcă...
Pagina se încarcă...
Pagina se încarcă...
Pagina se încarcă...
Pagina se încarcă...
Pagina se încarcă...
Pagina se încarcă...
Pagina se încarcă...
Pagina se încarcă...
Pagina se încarcă...
Pagina se încarcă...
Pagina se încarcă...
Pagina se încarcă...
Pagina se încarcă...
Pagina se încarcă...
Pagina se încarcă...
Pagina se încarcă...
Pagina se încarcă...
Pagina se încarcă...
Pagina se încarcă...
Pagina se încarcă...
Pagina se încarcă...
Pagina se încarcă...
Pagina se încarcă...
Pagina se încarcă...
Pagina se încarcă...
Pagina se încarcă...
Pagina se încarcă...
Pagina se încarcă...
Pagina se încarcă...
Pagina se încarcă...
Pagina se încarcă...
Pagina se încarcă...
Pagina se încarcă...
Pagina se încarcă...
Pagina se încarcă...
Pagina se încarcă...
Pagina se încarcă...
Pagina se încarcă...
Pagina se încarcă...
Pagina se încarcă...
Pagina se încarcă...
Pagina se încarcă...
Pagina se încarcă...
Pagina se încarcă...
Pagina se încarcă...
Pagina se încarcă...
Pagina se încarcă...
Pagina se încarcă...
Pagina se încarcă...
Pagina se încarcă...
Pagina se încarcă...
Pagina se încarcă...
Pagina se încarcă...
Pagina se încarcă...
Pagina se încarcă...
Pagina se încarcă...
Pagina se încarcă...
Pagina se încarcă...
Pagina se încarcă...
Pagina se încarcă...
Pagina se încarcă...
Pagina se încarcă...
Pagina se încarcă...
Pagina se încarcă...
Pagina se încarcă...
Pagina se încarcă...
Pagina se încarcă...
Pagina se încarcă...
Pagina se încarcă...
Pagina se încarcă...
Pagina se încarcă...
Pagina se încarcă...
Pagina se încarcă...
Pagina se încarcă...
Pagina se încarcă...
Pagina se încarcă...
Pagina se încarcă...
Pagina se încarcă...
Pagina se încarcă...
Pagina se încarcă...
Pagina se încarcă...
Pagina se încarcă...
Pagina se încarcă...
Pagina se încarcă...
Pagina se încarcă...
Pagina se încarcă...
Pagina se încarcă...
Pagina se încarcă...
Pagina se încarcă...
Pagina se încarcă...
Pagina se încarcă...
Pagina se încarcă...
Pagina se încarcă...
Pagina se încarcă...
Pagina se încarcă...
Pagina se încarcă...
Pagina se încarcă...
Pagina se încarcă...
Pagina se încarcă...
Pagina se încarcă...
Pagina se încarcă...
Pagina se încarcă...
Pagina se încarcă...
Pagina se încarcă...
Pagina se încarcă...
Pagina se încarcă...
Pagina se încarcă...
Pagina se încarcă...
Pagina se încarcă...
Pagina se încarcă...
Pagina se încarcă...
Pagina se încarcă...
Pagina se încarcă...
Pagina se încarcă...
Pagina se încarcă...
Pagina se încarcă...
Pagina se încarcă...
Pagina se încarcă...
Pagina se încarcă...
Pagina se încarcă...
Pagina se încarcă...
Pagina se încarcă...
Pagina se încarcă...
Pagina se încarcă...
Pagina se încarcă...
Pagina se încarcă...
Pagina se încarcă...
Pagina se încarcă...
Pagina se încarcă...
Pagina se încarcă...
Pagina se încarcă...
Pagina se încarcă...
Pagina se încarcă...
Pagina se încarcă...
Pagina se încarcă...
Pagina se încarcă...
Pagina se încarcă...
Pagina se încarcă...
Pagina se încarcă...
Pagina se încarcă...
Pagina se încarcă...
Pagina se încarcă...
Pagina se încarcă...
Pagina se încarcă...
Pagina se încarcă...
Pagina se încarcă...
Pagina se încarcă...
Pagina se încarcă...
Pagina se încarcă...
Pagina se încarcă...
Pagina se încarcă...
Pagina se încarcă...
Pagina se încarcă...
Pagina se încarcă...
Pagina se încarcă...
Pagina se încarcă...
Pagina se încarcă...
Pagina se încarcă...
Pagina se încarcă...
Pagina se încarcă...
Pagina se încarcă...
Pagina se încarcă...
Pagina se încarcă...
Pagina se încarcă...
Pagina se încarcă...
Pagina se încarcă...
Pagina se încarcă...
Pagina se încarcă...
Pagina se încarcă...
Pagina se încarcă...
Pagina se încarcă...
Pagina se încarcă...
Pagina se încarcă...
Pagina se încarcă...
Pagina se încarcă...
Pagina se încarcă...
Pagina se încarcă...
Pagina se încarcă...
Pagina se încarcă...
Pagina se încarcă...
Pagina se încarcă...
Pagina se încarcă...
Pagina se încarcă...
Pagina se încarcă...
Pagina se încarcă...
Pagina se încarcă...
Pagina se încarcă...
Pagina se încarcă...
Pagina se încarcă...
Pagina se încarcă...
Pagina se încarcă...
Pagina se încarcă...
Pagina se încarcă...
Pagina se încarcă...
Pagina se încarcă...
Pagina se încarcă...
Pagina se încarcă...
Pagina se încarcă...
Pagina se încarcă...
Pagina se încarcă...
Pagina se încarcă...
Pagina se încarcă...
Pagina se încarcă...
Pagina se încarcă...
Pagina se încarcă...
Pagina se încarcă...
Pagina se încarcă...
Pagina se încarcă...
Pagina se încarcă...
Pagina se încarcă...
Pagina se încarcă...
Pagina se încarcă...
Pagina se încarcă...
Pagina se încarcă...
Pagina se încarcă...
Pagina se încarcă...
Pagina se încarcă...
Pagina se încarcă...
Pagina se încarcă...
Pagina se încarcă...
Pagina se încarcă...
Pagina se încarcă...
Pagina se încarcă...
Pagina se încarcă...
Pagina se încarcă...
Pagina se încarcă...
Pagina se încarcă...
Pagina se încarcă...
Pagina se încarcă...
Pagina se încarcă...
Pagina se încarcă...
Pagina se încarcă...
Pagina se încarcă...
Pagina se încarcă...
Pagina se încarcă...
Pagina se încarcă...
Pagina se încarcă...
Pagina se încarcă...
Pagina se încarcă...
Pagina se încarcă...
Pagina se încarcă...
Pagina se încarcă...
Pagina se încarcă...
Pagina se încarcă...
Pagina se încarcă...
Pagina se încarcă...
Pagina se încarcă...
Pagina se încarcă...
Pagina se încarcă...
Pagina se încarcă...
Pagina se încarcă...
Pagina se încarcă...
Pagina se încarcă...
Pagina se încarcă...
Pagina se încarcă...
Pagina se încarcă...
Pagina se încarcă...
Pagina se încarcă...
Pagina se încarcă...
Pagina se încarcă...
Pagina se încarcă...
Pagina se încarcă...
Pagina se încarcă...
Pagina se încarcă...
Pagina se încarcă...
Pagina se încarcă...
Pagina se încarcă...
Pagina se încarcă...
Pagina se încarcă...
Pagina se încarcă...
Pagina se încarcă...
Pagina se încarcă...
Pagina se încarcă...
Pagina se încarcă...
Pagina se încarcă...
Pagina se încarcă...
Pagina se încarcă...
Pagina se încarcă...
Pagina se încarcă...
Pagina se încarcă...
Pagina se încarcă...
Pagina se încarcă...
Pagina se încarcă...
Pagina se încarcă...
Pagina se încarcă...
Pagina se încarcă...
Pagina se încarcă...
Pagina se încarcă...
Pagina se încarcă...
Pagina se încarcă...
Pagina se încarcă...
Pagina se încarcă...
Pagina se încarcă...
Pagina se încarcă...
Pagina se încarcă...
Pagina se încarcă...
Pagina se încarcă...
Pagina se încarcă...
Pagina se încarcă...
Pagina se încarcă...
Pagina se încarcă...
Pagina se încarcă...
Pagina se încarcă...
Pagina se încarcă...
Pagina se încarcă...
Pagina se încarcă...
Pagina se încarcă...
Pagina se încarcă...
Pagina se încarcă...
Pagina se încarcă...
Pagina se încarcă...
Pagina se încarcă...
Pagina se încarcă...
Pagina se încarcă...
Pagina se încarcă...
Pagina se încarcă...
Pagina se încarcă...
Pagina se încarcă...
Pagina se încarcă...
Pagina se încarcă...
Pagina se încarcă...
Pagina se încarcă...
Pagina se încarcă...
Pagina se încarcă...
Pagina se încarcă...
Pagina se încarcă...
Pagina se încarcă...
Pagina se încarcă...
Pagina se încarcă...
Pagina se încarcă...
Pagina se încarcă...
Pagina se încarcă...
Pagina se încarcă...
Pagina se încarcă...
Pagina se încarcă...
Pagina se încarcă...
Pagina se încarcă...
Pagina se încarcă...
Pagina se încarcă...
Pagina se încarcă...
Pagina se încarcă...
Pagina se încarcă...
Pagina se încarcă...
Pagina se încarcă...
Pagina se încarcă...
Pagina se încarcă...
Pagina se încarcă...
Pagina se încarcă...
Pagina se încarcă...
Pagina se încarcă...
Pagina se încarcă...
Pagina se încarcă...
Pagina se încarcă...
Pagina se încarcă...
Pagina se încarcă...
Pagina se încarcă...
Pagina se încarcă...
Pagina se încarcă...
Pagina se încarcă...
Pagina se încarcă...
Pagina se încarcă...
Pagina se încarcă...
Pagina se încarcă...
Pagina se încarcă...
Pagina se încarcă...
Pagina se încarcă...
Pagina se încarcă...
Pagina se încarcă...
Pagina se încarcă...
Pagina se încarcă...
Pagina se încarcă...
Pagina se încarcă...
Pagina se încarcă...
Pagina se încarcă...
Pagina se încarcă...
Pagina se încarcă...
Pagina se încarcă...
Pagina se încarcă...
Pagina se încarcă...
Pagina se încarcă...
Pagina se încarcă...
Pagina se încarcă...
Pagina se încarcă...
Pagina se încarcă...
Pagina se încarcă...
Pagina se încarcă...
Pagina se încarcă...
Pagina se încarcă...
Pagina se încarcă...
Pagina se încarcă...
Pagina se încarcă...
Pagina se încarcă...
Pagina se încarcă...
Pagina se încarcă...
Pagina se încarcă...
Pagina se încarcă...
Pagina se încarcă...
Pagina se încarcă...
Pagina se încarcă...
Pagina se încarcă...
Pagina se încarcă...
Pagina se încarcă...
Pagina se încarcă...
Pagina se încarcă...
Pagina se încarcă...
Pagina se încarcă...
Pagina se încarcă...
Pagina se încarcă...
Pagina se încarcă...
Pagina se încarcă...
Pagina se încarcă...
Pagina se încarcă...
Pagina se încarcă...
Pagina se încarcă...
Pagina se încarcă...
Pagina se încarcă...
Pagina se încarcă...
Pagina se încarcă...
Pagina se încarcă...
Pagina se încarcă...
Pagina se încarcă...
Pagina se încarcă...
Pagina se încarcă...
Pagina se încarcă...
Pagina se încarcă...
Pagina se încarcă...
Pagina se încarcă...
Pagina se încarcă...
Pagina se încarcă...
Pagina se încarcă...
Pagina se încarcă...
Pagina se încarcă...
Pagina se încarcă...
Pagina se încarcă...
Pagina se încarcă...
Pagina se încarcă...
Pagina se încarcă...
Pagina se încarcă...
Pagina se încarcă...
Pagina se încarcă...
Pagina se încarcă...
Pagina se încarcă...
Pagina se încarcă...
Pagina se încarcă...
Pagina se încarcă...
Pagina se încarcă...
Pagina se încarcă...
Pagina se încarcă...
Pagina se încarcă...
Pagina se încarcă...
Pagina se încarcă...
Pagina se încarcă...
Pagina se încarcă...
Pagina se încarcă...
Pagina se încarcă...
Pagina se încarcă...
Pagina se încarcă...
Pagina se încarcă...
Pagina se încarcă...
Pagina se încarcă...
Pagina se încarcă...
Pagina se încarcă...
Pagina se încarcă...
Pagina se încarcă...
Pagina se încarcă...
Pagina se încarcă...
Pagina se încarcă...
Pagina se încarcă...
Pagina se încarcă...
Pagina se încarcă...
Pagina se încarcă...
Pagina se încarcă...
Pagina se încarcă...
Pagina se încarcă...
Pagina se încarcă...
Pagina se încarcă...
Pagina se încarcă...
Pagina se încarcă...
Pagina se încarcă...
Pagina se încarcă...
Pagina se încarcă...
Pagina se încarcă...
Pagina se încarcă...
Pagina se încarcă...
Pagina se încarcă...
Pagina se încarcă...
Pagina se încarcă...
Pagina se încarcă...
Pagina se încarcă...
Pagina se încarcă...
Pagina se încarcă...
Pagina se încarcă...
Pagina se încarcă...
Pagina se încarcă...
Pagina se încarcă...
Pagina se încarcă...
Pagina se încarcă...
Pagina se încarcă...
Pagina se încarcă...
Pagina se încarcă...
Pagina se încarcă...
Pagina se încarcă...
Pagina se încarcă...
Pagina se încarcă...
Pagina se încarcă...
Pagina se încarcă...
Pagina se încarcă...
Pagina se încarcă...
Pagina se încarcă...
Pagina se încarcă...
Pagina se încarcă...
Pagina se încarcă...
Pagina se încarcă...
Pagina se încarcă...
Pagina se încarcă...
Pagina se încarcă...
Pagina se încarcă...
Pagina se încarcă...
Pagina se încarcă...
Pagina se încarcă...
Pagina se încarcă...
Pagina se încarcă...
Pagina se încarcă...
Pagina se încarcă...
Pagina se încarcă...
Pagina se încarcă...
Pagina se încarcă...
Pagina se încarcă...
Pagina se încarcă...
-
 1
1
-
 2
2
-
 3
3
-
 4
4
-
 5
5
-
 6
6
-
 7
7
-
 8
8
-
 9
9
-
 10
10
-
 11
11
-
 12
12
-
 13
13
-
 14
14
-
 15
15
-
 16
16
-
 17
17
-
 18
18
-
 19
19
-
 20
20
-
 21
21
-
 22
22
-
 23
23
-
 24
24
-
 25
25
-
 26
26
-
 27
27
-
 28
28
-
 29
29
-
 30
30
-
 31
31
-
 32
32
-
 33
33
-
 34
34
-
 35
35
-
 36
36
-
 37
37
-
 38
38
-
 39
39
-
 40
40
-
 41
41
-
 42
42
-
 43
43
-
 44
44
-
 45
45
-
 46
46
-
 47
47
-
 48
48
-
 49
49
-
 50
50
-
 51
51
-
 52
52
-
 53
53
-
 54
54
-
 55
55
-
 56
56
-
 57
57
-
 58
58
-
 59
59
-
 60
60
-
 61
61
-
 62
62
-
 63
63
-
 64
64
-
 65
65
-
 66
66
-
 67
67
-
 68
68
-
 69
69
-
 70
70
-
 71
71
-
 72
72
-
 73
73
-
 74
74
-
 75
75
-
 76
76
-
 77
77
-
 78
78
-
 79
79
-
 80
80
-
 81
81
-
 82
82
-
 83
83
-
 84
84
-
 85
85
-
 86
86
-
 87
87
-
 88
88
-
 89
89
-
 90
90
-
 91
91
-
 92
92
-
 93
93
-
 94
94
-
 95
95
-
 96
96
-
 97
97
-
 98
98
-
 99
99
-
 100
100
-
 101
101
-
 102
102
-
 103
103
-
 104
104
-
 105
105
-
 106
106
-
 107
107
-
 108
108
-
 109
109
-
 110
110
-
 111
111
-
 112
112
-
 113
113
-
 114
114
-
 115
115
-
 116
116
-
 117
117
-
 118
118
-
 119
119
-
 120
120
-
 121
121
-
 122
122
-
 123
123
-
 124
124
-
 125
125
-
 126
126
-
 127
127
-
 128
128
-
 129
129
-
 130
130
-
 131
131
-
 132
132
-
 133
133
-
 134
134
-
 135
135
-
 136
136
-
 137
137
-
 138
138
-
 139
139
-
 140
140
-
 141
141
-
 142
142
-
 143
143
-
 144
144
-
 145
145
-
 146
146
-
 147
147
-
 148
148
-
 149
149
-
 150
150
-
 151
151
-
 152
152
-
 153
153
-
 154
154
-
 155
155
-
 156
156
-
 157
157
-
 158
158
-
 159
159
-
 160
160
-
 161
161
-
 162
162
-
 163
163
-
 164
164
-
 165
165
-
 166
166
-
 167
167
-
 168
168
-
 169
169
-
 170
170
-
 171
171
-
 172
172
-
 173
173
-
 174
174
-
 175
175
-
 176
176
-
 177
177
-
 178
178
-
 179
179
-
 180
180
-
 181
181
-
 182
182
-
 183
183
-
 184
184
-
 185
185
-
 186
186
-
 187
187
-
 188
188
-
 189
189
-
 190
190
-
 191
191
-
 192
192
-
 193
193
-
 194
194
-
 195
195
-
 196
196
-
 197
197
-
 198
198
-
 199
199
-
 200
200
-
 201
201
-
 202
202
-
 203
203
-
 204
204
-
 205
205
-
 206
206
-
 207
207
-
 208
208
-
 209
209
-
 210
210
-
 211
211
-
 212
212
-
 213
213
-
 214
214
-
 215
215
-
 216
216
-
 217
217
-
 218
218
-
 219
219
-
 220
220
-
 221
221
-
 222
222
-
 223
223
-
 224
224
-
 225
225
-
 226
226
-
 227
227
-
 228
228
-
 229
229
-
 230
230
-
 231
231
-
 232
232
-
 233
233
-
 234
234
-
 235
235
-
 236
236
-
 237
237
-
 238
238
-
 239
239
-
 240
240
-
 241
241
-
 242
242
-
 243
243
-
 244
244
-
 245
245
-
 246
246
-
 247
247
-
 248
248
-
 249
249
-
 250
250
-
 251
251
-
 252
252
-
 253
253
-
 254
254
-
 255
255
-
 256
256
-
 257
257
-
 258
258
-
 259
259
-
 260
260
-
 261
261
-
 262
262
-
 263
263
-
 264
264
-
 265
265
-
 266
266
-
 267
267
-
 268
268
-
 269
269
-
 270
270
-
 271
271
-
 272
272
-
 273
273
-
 274
274
-
 275
275
-
 276
276
-
 277
277
-
 278
278
-
 279
279
-
 280
280
-
 281
281
-
 282
282
-
 283
283
-
 284
284
-
 285
285
-
 286
286
-
 287
287
-
 288
288
-
 289
289
-
 290
290
-
 291
291
-
 292
292
-
 293
293
-
 294
294
-
 295
295
-
 296
296
-
 297
297
-
 298
298
-
 299
299
-
 300
300
-
 301
301
-
 302
302
-
 303
303
-
 304
304
-
 305
305
-
 306
306
-
 307
307
-
 308
308
-
 309
309
-
 310
310
-
 311
311
-
 312
312
-
 313
313
-
 314
314
-
 315
315
-
 316
316
-
 317
317
-
 318
318
-
 319
319
-
 320
320
-
 321
321
-
 322
322
-
 323
323
-
 324
324
-
 325
325
-
 326
326
-
 327
327
-
 328
328
-
 329
329
-
 330
330
-
 331
331
-
 332
332
-
 333
333
-
 334
334
-
 335
335
-
 336
336
-
 337
337
-
 338
338
-
 339
339
-
 340
340
-
 341
341
-
 342
342
-
 343
343
-
 344
344
-
 345
345
-
 346
346
-
 347
347
-
 348
348
-
 349
349
-
 350
350
-
 351
351
-
 352
352
-
 353
353
-
 354
354
-
 355
355
-
 356
356
-
 357
357
-
 358
358
-
 359
359
-
 360
360
-
 361
361
-
 362
362
-
 363
363
-
 364
364
-
 365
365
-
 366
366
-
 367
367
-
 368
368
-
 369
369
-
 370
370
-
 371
371
-
 372
372
-
 373
373
-
 374
374
-
 375
375
-
 376
376
-
 377
377
-
 378
378
-
 379
379
-
 380
380
-
 381
381
-
 382
382
-
 383
383
-
 384
384
-
 385
385
-
 386
386
-
 387
387
-
 388
388
-
 389
389
-
 390
390
-
 391
391
-
 392
392
-
 393
393
-
 394
394
-
 395
395
-
 396
396
-
 397
397
-
 398
398
-
 399
399
-
 400
400
-
 401
401
-
 402
402
-
 403
403
-
 404
404
-
 405
405
-
 406
406
-
 407
407
-
 408
408
-
 409
409
-
 410
410
-
 411
411
-
 412
412
-
 413
413
-
 414
414
-
 415
415
-
 416
416
-
 417
417
-
 418
418
-
 419
419
-
 420
420
-
 421
421
-
 422
422
-
 423
423
-
 424
424
-
 425
425
-
 426
426
-
 427
427
-
 428
428
-
 429
429
-
 430
430
-
 431
431
-
 432
432
-
 433
433
-
 434
434
-
 435
435
-
 436
436
-
 437
437
-
 438
438
-
 439
439
-
 440
440
-
 441
441
-
 442
442
-
 443
443
-
 444
444
-
 445
445
-
 446
446
-
 447
447
-
 448
448
-
 449
449
-
 450
450
-
 451
451
-
 452
452
-
 453
453
-
 454
454
-
 455
455
-
 456
456
-
 457
457
-
 458
458
-
 459
459
-
 460
460
-
 461
461
-
 462
462
-
 463
463
-
 464
464
-
 465
465
-
 466
466
-
 467
467
-
 468
468
-
 469
469
-
 470
470
-
 471
471
-
 472
472
-
 473
473
-
 474
474
-
 475
475
-
 476
476
-
 477
477
-
 478
478
-
 479
479
-
 480
480
-
 481
481
-
 482
482
-
 483
483
-
 484
484
-
 485
485
-
 486
486
-
 487
487
-
 488
488
-
 489
489
-
 490
490
-
 491
491
-
 492
492
-
 493
493
-
 494
494
-
 495
495
-
 496
496
-
 497
497
-
 498
498
-
 499
499
-
 500
500
-
 501
501
-
 502
502
-
 503
503
-
 504
504
-
 505
505
-
 506
506
-
 507
507
-
 508
508
-
 509
509
-
 510
510
-
 511
511
-
 512
512
-
 513
513
-
 514
514
-
 515
515
-
 516
516
-
 517
517
-
 518
518
-
 519
519
-
 520
520
-
 521
521
-
 522
522
-
 523
523
-
 524
524
-
 525
525
-
 526
526
-
 527
527
-
 528
528
-
 529
529
-
 530
530
-
 531
531
-
 532
532
-
 533
533
-
 534
534
-
 535
535
-
 536
536
-
 537
537
-
 538
538
-
 539
539
-
 540
540
-
 541
541
-
 542
542
-
 543
543
-
 544
544
-
 545
545
-
 546
546
-
 547
547
-
 548
548
-
 549
549
-
 550
550
-
 551
551
-
 552
552
-
 553
553
-
 554
554
-
 555
555
-
 556
556
-
 557
557
-
 558
558
-
 559
559
-
 560
560
-
 561
561
-
 562
562
-
 563
563
-
 564
564
-
 565
565
-
 566
566
-
 567
567
-
 568
568
-
 569
569
-
 570
570
-
 571
571
-
 572
572
-
 573
573
-
 574
574
-
 575
575
-
 576
576
-
 577
577
-
 578
578
-
 579
579
-
 580
580
-
 581
581
-
 582
582
-
 583
583
-
 584
584
-
 585
585
-
 586
586
-
 587
587
-
 588
588


Sonicare HX3806/33 Manual de utilizare
- Tip
- Manual de utilizare
- Acest manual este potrivit și pentru
Lucrări înrudite
Alte documente
-
Philips GCA2100/20 Informații importante
-
Saeco HX3866/41 Manual de utilizare
-
-
-
-
Lenovo Moto G5S Read me
-
Lenovo Moto G5 Plus Read me
-
Motorola MOTO Z2 Play Read me
-
HOTPOINT/ARISTON HTR 8202I BX O3 Manualul utilizatorului
-