Grundig GQN1233XN KOMBISKAP Manualul proprietarului
- Tip
- Manualul proprietarului

GQN1112X-GQN1232X-GQN1233XN
EN/DA/SV
57 5333 0000/AP- 1/3-EN-DA-SV
Refrigerator
User Manual
Køleskab
Brugervejledning
Kylskåp
Bruksanvisning


1
DK
SV
NO
FIN
RO
CZ
SK
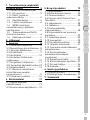
Contents
1. Important instructions for
safety and environment 3
1.1 General safety .....................3
1.1.1 HC warning..........................6
1.1.2 For products with a water
dispenser ......................................7
1.2 Intended use........................7
1.3 Children's safety .................7
1.4 Compliance with WEEE
Directive and Disposing of the
Waste Product: ............................8
1.5 Compliance with RoHS
Directive: .......................................8
1.6 Package information...........8
2. Your Freezer 9
3. Installation 10
3.1 Right place for installation ...10
3.2 Attaching the plastic wedges 10
3.3 Adjusting the stands .............10
3.4 Power connection .................11
3.5 Water connection .................11
3.6 Connecting water hose to the
product ........................................12
3.7 Connecting to water mains ..12
3.8. For products using water
carboy .........................................13
3.9 Water filter ............................14
3.9.1.Fixing external filter on the
wall (Optional) .............................14
3.9.2.Internal filter ......................16
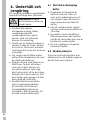
4. Preparation 18
4.1 What to do for energy
saving ..........................................18
4.2 First Use ................................19
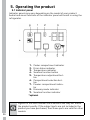
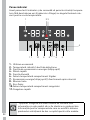
5. Operating the product 20
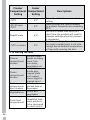
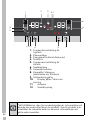
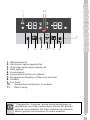
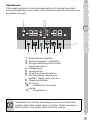
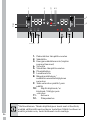
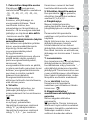
5.1 Indicator panel ......................20
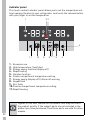
Indicator panel ............................22
5.2 Zero degree compartment ...28
5.3 Vegetable bin .....................28
5.4 Blue light/ Vitamin Care
Technology ..................................28
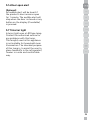
5.5 Description and cleaning of
odour filter ..................................29
5.6 Telescopic drawer ................30
5.7 Ionizer ..................................30
5.8 Ice container ........................30
5.9 Movable middle section .......31
5.10 Ice box .................................31
5.11 Ice maker ............................31
5.12 controlled crisper ..............32
(FreSHelf) ....................................32
5.13 Freezing fresh food .............33
5.14 Deep freezer details ...........33
5.15 Placing the food ..................34
5.16 Door open alert ..................35
5.17 Interior light ........................35
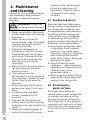
6. Maintenance and cleaning 36
6.1 Avoiding bad odours..........36
6.2 Protecting the plastic
surfaces .....................................36
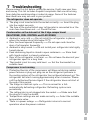
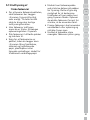
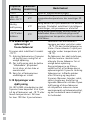
7 Troubleshooting 37

2
Please read this manual first!
Dear Customer,
We hope that your product, which has been produced in modern plants
and checked under the most meticulous quality control procedures, will
provide you an effective service
For this, we recommend you to carefully read the entire manual of your
product before using it and keep it at hand for future references.
The user manual will help you use the product in a fast and safe way.
Will help you use your appliance in a fast and safe way.
Read the manual before installing and operating your product.
Follow the instructions, especially those for safety.
Keep the manual in an easily accessible place as you may need it later.
Besides, read also the other documents provided with your product.
Please note that this manual may be valid for other models as well.
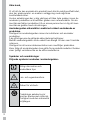
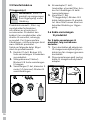
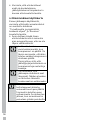
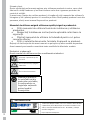
Symbols and their descriptions
This instruction manual contains the following symbols:
CImportant information
or useful usage tips.
AWarning against
dangerous conditions
for life and property.
BWarning against
electric voltage.
Packaging materials
of the product are
manufactured from
recyclable materials
in accordance with our
National Environment
Regulations.
A
A
A
C
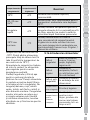
SUPPLIER’S NAME MODEL IDENTIFIER (*)
INFORMATION
C
.The model information as stored in the product data base
can be reached by entering following website and searching
for your model identifier (*) found on energy label.
https://eprel.ec.europa.eu/

3
DK
SV
NO
FIN
RO
CZ
SK
1. Important instructions for safety and
environment
This section contains safety instructions that will help protect from
risk of personal injury or property damage. Failure to follow these
instructions shall void any warranty.
1.1 General safety
• This product can be used by children at and above 8 years old
and by persons whose physical, sensory or mental capabilities
were not fully developed or who lack experience and knowledge
provided that they are supervised or trained on the safe usage
of the product and the risks it brings out. Children must not
play with the product. Cleaning and maintenance works should
not be performed by children unless they are supervised by
someone.
• Unplug the product if a failure occurs while it is in use.
• If the product has a failure, it should not be operated unless it
is repaired by the Authorised Service Agent. There is the risk of
electric shock!
• Connect the product to a grounded outlet protected by a
fuse complying with the values in the rating plate. Have the
grounding installation made by a qualified electrician. Our
company shall not be liable for any damages that will arise
when the product is used without grounding in accordance with
the local regulations.
• Unplug the product when not in use.
• Never wash the product by spreading or pouring water onto it!
There is the risk of electric shock!
• Never touch the plug with wet hands! Never unplug by pulling
on the cable, always pull out by grabbing the plug.
• It is recommended to clean the tip of the plug regularly with a
dry cloth.

4
• Do not plug the refrigerator if the wall outlet is loose.
• Never connect your refrigerator to electricity-saving systems.
Such systems are harmful for the product.
• Unplug the product during installation, maintenance, cleaning
and repairing procedures.
• Always have the installation and repairing procedures carried
out by the Authorised Service Agent. Manufacturer shall not be
held liable for damages that may arise from procedures carried
out by unauthorised persons.
• Do not eat cone ice cream and ice cubes immediately after you
take them out of the freezer compartment! This may cause
frostbite in your mouth!
• Do not touch frozen food by hand! They may stick to your hand!
• Do not put bottled and canned liquid beverages in the freezer
compartment. They may burst!
• Never use steam and steam assisted cleaning materials to clean
or defrost the refrigerator. Steam will cause short circuit or
electric shock since it would get into contact with the electrical
parts in the refrigerator!
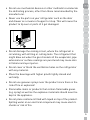
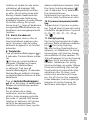
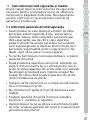
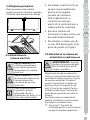
• The product shall never be used while the compartment which
is located at the top or back of your product and in which
electronic boards are available (electronic board box cover) (1) is
open.
1
1

5
DK
SV
NO
FIN
RO
CZ
SK
• Do not use mechanical devices or other methods to accelerate
the defrosting process, other than those recommended by the
manufacturer.
• Never use the parts on your refrigerator such as the door
and drawer as a means of support or step. This will cause the
product to tip over or parts of it get damaged.
• Do not damage the cooling circuit, where the refrigerant is
circulating, with drilling or cutting tools. The refrigerant that
might blow out when the gas channels of the evaporator, pipe
extensions or surface coatings are punctured may cause skin
irritations and eye injuries.
• Do not cover or block the ventilation holes on the refrigerator
with any material.
• Place the beverage with higher proofs tightly closed and
vertically.
• Do not use gaseous sprays near the product since there is the
risk of fire or explosion!
• Flammable items or products that contain flammable gases
(e.g. spray) as well as the explosive materials should never be
kept in the appliance.
• Do not place containers filled with liquid on top of the product.
Spilling water on an electrical component may cause electric
shocks or risk of fire.

6
• Do not store products (vaccines, heat-sensitive medicines,
scientific materials and etc.) that require a precise temperature
control in the refrigerator.
• If you will not operate the product for a long period of time,
unplug and unload the food in it.
• If the product is equipped with blue light, do not look at the blue
light with optical tools.
• Exposing the product to rain, snow, sun and wind is dangerous
with respect to electrical safety.
• In products with mechanical control (thermostat), wait
for minimum 5 minutes to plug in the product again after
unplugging it.
• Do not overload the product. It may fall when the door is opened,
and cause injury or damage. Similar problems may occur in
case of putting things on top of the product.
• 8's door is equipped with a handle, do not pull by the handle
when changing the place of the product. Handle may get loose.
• Pay attention not to have your hand or any part of your body get
caught by the moving parts inside the product.
1.1.1 HC warning
• If the product is equipped with a cooling system containing
R600a gas, pay attention not to damage the cooling system and
piping during usage and transportation. This gas is flammable.
If the cooling system is damaged, keep the product away from
potential sources that can cause the system catch a fire and
ventilate the room in which the unit is placed immediately.
CIf the product is equipped with a cooling system containing
R134a gas, ignore this warning.

7
DK
SV
NO
FIN
RO
CZ
SK
CYou can learn the gas used in production of your product on the
rating plate located on the left inner part of it.
AWARNING: Never dispose the product in fire.
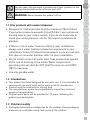
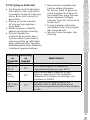
1.1.2 For products with a water dispenser
• Pressure for cold water inlet shall be maximum 90 psi (8 bar).
If your water pressure exceeds 6.2 psi (5.5 bar), use a pressure
limiting valve in your mains system. If you do not know how to
check your water pressure, ask for the help of a professional
plumber.
• If there is risk of water hammer effect in your installation,
always use a water hammer prevention equipment in your
installation. Consult Professional plumbers is you are not sure
that there is no water hammer effect in your installation.
• Do not install on the hot water inlet. Take precautions against
of the risk of freezing of the hoses. Water temperature
operating interval shall be 33°F (0.6°C) minimum and 100°F
(38°C) maximum.
• Use only potable water.
1.2 Intended use
• This product has been designed for domestic use. It is not suitable for
commercial use and it must not be used out of its intended use.
• Product must be used only for storing food.
• The manufacturer waives any responsibility arisen from incorrect
usage or transportation.
• Original spare parts will be provided for 10 years, following the
product purchasing date.
1.3 Children's safety
• Packaging materials are dangerous for the children. Keep packaging
materials in a safe place away from reach of the children.

8
• Electrical products are dangerous for the children. Keep children
away from the product when it is in use.
• If the product's door is equipped with a lock, keep the keys away from
reach of children.
1.4 Compliance with WEEE Directive and
Disposing of the Waste Product:
This product complies with EU WEEE Directive (2012/19/EU).
This product bears a classification symbol for waste electrical
and electronic equipment (WEEE).This product has been
manufactured with high quality parts and materials which can
be reused and are suitable for recycling. Do not dispose of the
waste product with normal domestic and other wastes at the
end of its service life. Take it to the collection center for the
recycling of electrical and electronic equipment. Please consult your
local authorities to learn about these collection centers.
1.5 Compliance with RoHS Directive:
The product you have purchased complies with EU RoHS Directive
(2011/65/EU). It does not contain harmful and prohibited materials
specified in the Directive.
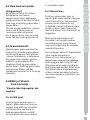
1.6 Package information
Packaging materials of the product are manufactured from recyclable
materials in accordance with our National Environment Regulations.
Do not dispose of the packaging materials together with the domestic
or other wastes. Take them to the packaging material collection points
designated by the local authorities.

9
DK
SV
NO
FIN
RO
CZ
SK
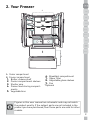
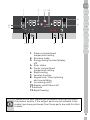
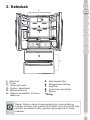
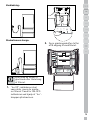
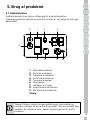
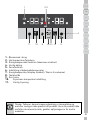
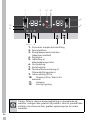
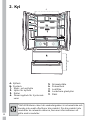
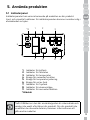
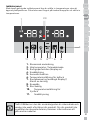
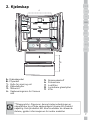
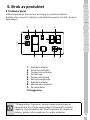
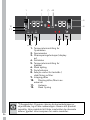
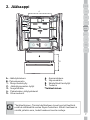
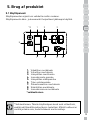
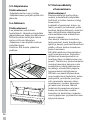
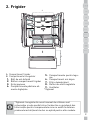
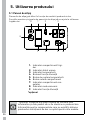
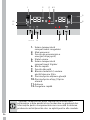
2. Your Freezer
C
Figures in this user manual are schematic and may not match
the product exactly. If the subject parts are not included in the
product you have purchased, then those parts are valid for other
models.
A- Cooler compartment
B- Freezer compartment
1. Butter-cheese shelf
2. Cooler compartment shelves
3. Shelter wire
4. Frozen food storing compart-
ments
5. Vegetable bins
*1
*3
*2
*5
*6
7
*8
9
4
A
B
6. Breakfast compartment
7. Odour filter
8. Adjustable glass shelves
9. Fan
*Optional

10
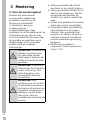
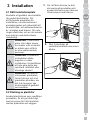
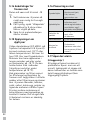
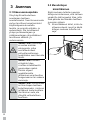
3. Installation
3.1 Right place for installation
Contact the Authorized Service for
the product's installation. To ready
the product for installation, see the
information in the user guide and
make sure the electric and water
utilities are as required. If not,
call an electrician and plumber to
arrange the utilities as necessary.
B
WARNING: The
manufacturer assumes
no responsibility for
any damage caused by
the work carried out by
unauthorized persons.
B
WARNING: The
product’s power cable
must be unplugged
during installation.
Failure to do so may
result in death or
serious injuries!
A
WARNING: If the door
span is too narrow
for the product to
pass, remove the door
and turn the product
sideways; if this does
not work, contact the
authorized service.
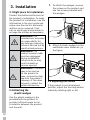
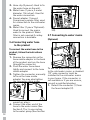
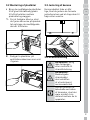
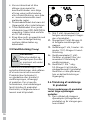
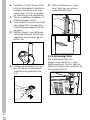
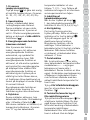
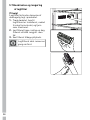
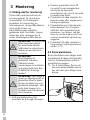
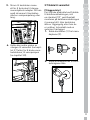
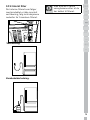
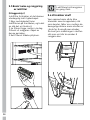
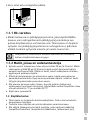
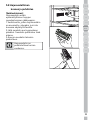
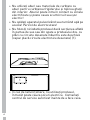
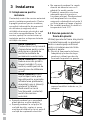
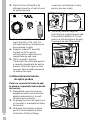
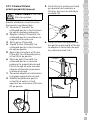
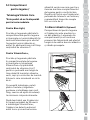
3.2 Attaching the
plastic wedges
Use the plastic wedges in the
provided with the product to
provide sufficient space for air
circulation between the product
and the wall.
1. To attach the wedges, remove
the screws on the product and
use the screws provided with
the wedges.
2. Attach 2 plastic wedges on the
ventilation cover shown as j in
the figure.
3.3 Adjusting the stands
If the product is not in balanced
position, adjust the front adjustable
stands by rotating right or left.

11
DK
SV
NO
FIN
RO
CZ
SK
• Do not use multi-group plug
with or without extension cable
between the wall socket and the
refrigerator.
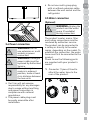
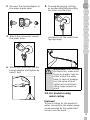
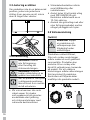
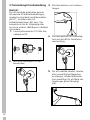
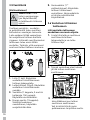
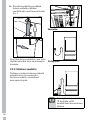
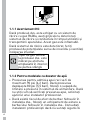
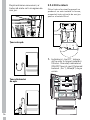
3.5 Water connection
(Optional)
AWARNING: Unplug the
product and the water
pump (if available)
during connection.
The product’s water mains, filter
and carboy connections must be
rendered by authorizer service.
The product can be connected to
a carboy or directly to the water
mains, depending on the model. To
establish the connection, the water
hose must first be connected to the
product.
Check to see the following parts
are supplied with your product’s
model:
1. Connector (1 piece): Used to
attach the water hose to the
rear of the product.
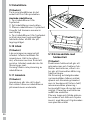
3.4 Power connection
AWARNING: Do not
use extension or multi
sockets in power
connection.
BWARNING: Damaged
power cable must be
replaced by Authorized
Service.
C
When placing two
coolers in adjacent
position, leave at least
4 cm distance between
the two units.
• Our firm will not assume
responsibility for any damages
due to usage without earthing
and power connection in
compliance with national
regulations.
• The power cable plug must
be easily accessible after
installation.
3
1
4
2
*5

12
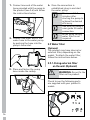
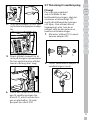
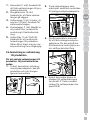
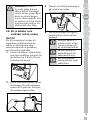
2. Hose clip (3 pieces): Used to fix
the water hose on the wall.
3. Water hose (1 piece, 5 meter
diameter 1/4 inches): Used for
the water connection.
4. Faucet adapter (1 piece):
Comprises a porous filter, used
for connection to the cold water
mains.
5. Water filter (1 piece *Optional):
Used to connect the mains
water to the product. Water
filter is not required if carboy
connection is available.
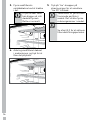
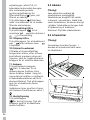
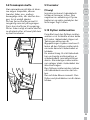
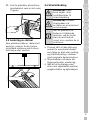
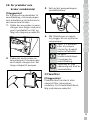
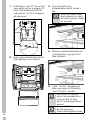
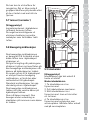
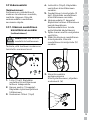
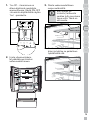
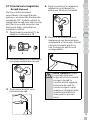
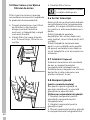
3.6 Connecting water hose
to the product
To connect the water hose to the
product, follow the instructions
below.
1. Remove the connector on the
hose nozzle adaptor in the back
of the product and run the hose
through the connector.
2. Push the water hose down
tightly and connect to the hose
nozzle adaptor.
3. Tighten the connector manually
to fix on the hose nozzle
adaptor. You may also tighten
the connector using a pipe
3.8).
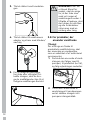
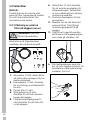
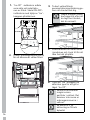
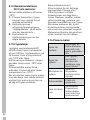
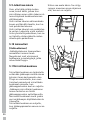
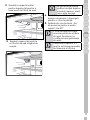
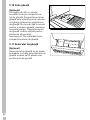
3.7 Connecting to water mains
(Optional)
To use the product by connecting
to the cold water mains, a standard
1/2” valve connector must be
installed to the cold water mains
in your home. If the connector is
not available or if you are unsure,
consult a qualified plumber.
1. Detach the connector (1) from
the faucet adaptor (2).
wrench or pliers.
4. Connect the other end of the
hose to the water mains (See
Section 3.7) or, to use carboy,
to the water pump (See Section

13
DK
SV
NO
FIN
RO
CZ
SK
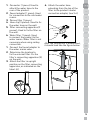
2. Connect the faucet adaptor to
the water mains valve.
1
23 1
2
3
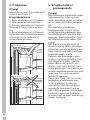
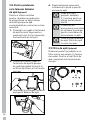
3. Attach the connector around
the water hose.
5. To avoid damaging, shifting
or accidentally disconnecting
the hose, use the clips
provided to fix the water hose
appropriately.
AWARNING: After turning
the faucet on, make sure
there is no water leak on
either end of the water
hose. In case of leakage,
turn the valve off and
tighten all connections
using a pipe wrench or
pliers.
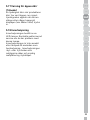
3.8. For products using
water carboy
(Optional)
To use a carboy for the product’s
water connection, the water pump
recommended by the authorized
service must be used.
4. Attach the connector into the
faucet adaptor and tighten by
hand / tool.

14
1. Connect one end of the water
hose provided with the pump to
the product (see 3.6) and follow
the instructions below.
2. Connect the other end of the
water hose to the water pump
by pushing the hose into the
pump’s hose inlet.
3. Place and fasten the pump
hose inside the carboy.
4. Once the connection is
established, plug in and start
the water pump.
CPlease wait 2-3
minutes after
starting the pump to
achieve the desired
efficiency.
CSee also the pump’s
user guide for water
connection.
CWhen using carboy,
water filter is not
required.
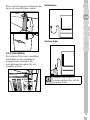
3.9 Water filter
(Optional)
The product may have internal or
external filter, depending on the
model. To attach the water filter,
follow the instructions below.
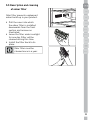
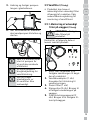
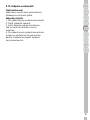
3.9.1.Fixing external filter
on the wall (Optional)
AWARNING: Do not fix the
filter on the product.
Check to see the following parts
are supplied with your product’s
model:
123
4
5
6

15
DK
SV
NO
FIN
RO
CZ
SK
1. Connector (1 piece): Used to
attach the water hose to the
rear of the product.
2. Faucet adapter (1 piece): Used
for connection to the cold water
mains.
3. Porous filter (1 piece)
4. Hose clip (3 pieces): Used to fix
the water hose on the wall.
5. Filter connecting apparatus (2
pieces): Used to fix the filter on
the wall.
6. Water filter (1 piece): Used
to connect the product to the
water mains. Water filter is not
necessary when using carboy
connection.
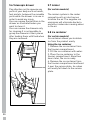
1. Connect the faucet adaptor to
the water mains valve.
2. Determine the location to
fix the external filter. Fix the
filter’s connecting apparatus (5)
on the wall.
3. Attach the filter in upright
position on the filter connecting
apparatus, as indicated on the
label. (6)
4. Attach the water hose
extending from the top of the
filter to the product’s water
connection adaptor, (see 3.6.)
After the connection is established,
it should look like the figure below.

16
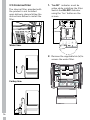
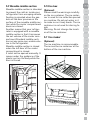
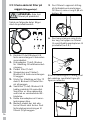
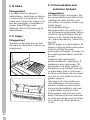
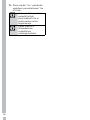
3.9.2.Internal filter
The internal filter provided with
the product is not installed
upon delivery; please follow the
instructions below to install the
filter.
Water line:
Carboy line:
1. “Ice Off” indicator must be
active while installing the filter.
Switch the ON-OFF indicator
using the “Ice” button on the
screen.
2. Remove the vegetable bin (a) to
access the water filter.
a a

17
DK
SV
NO
FIN
RO
CZ
SK
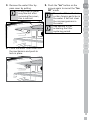
3. Remove the water filter by-
pass cover by pulling.
CA few drops of water
may flow out after
removing the cover;
this is normal.
4. Place the water filter cover into
the mechanism and push to
lock in place.
5. Push the “Ice” button on the
screen again to cancel the “Ice
Off” mode.
CThe water filter will clear
certain foreign particles in
the water. It will not clear
the microorganisms in
the water.
CSee section 5.2 for
activating the filter
replacing period.

18
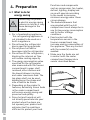
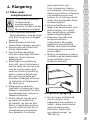
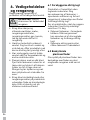
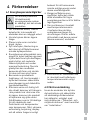
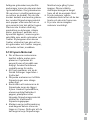
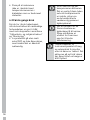
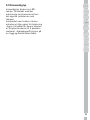
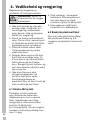
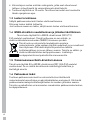
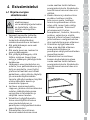
4. Preparation
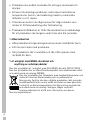
4.1 What to do for
energy saving
A
Connecting the product
to electric energy saving
systems is risky as it may
cause damage on the
product.
• For a freestanding appliance;
‘this refrigerating appliance is
not intended to be used as a
built-in appliance.
• Do not keep the refrigerator
doors open for long periods.
• Do not place hot food or
beverages into the refrigerator.
• Do not overfill the refrigerator;
blocking the internal air flow
will reduce cooling capacity.
• The energy consumption value
specified for the refrigerator
was measured with the freezer
compartment’s upper shelf
removed, other shelves and
the lowest drawers in place
and under maximum load. The
top glass shelf can be used,
depending on the shape and
size of food to be frozen.
• Depending on the product’s
features; defrosting frozen foods
in the cooler compartment
will ensure energy saving and
preserve food quality.
• Since hot and humid air will
not directly penetrate into your
product when the doors are
not opened, your product will
optimize itself in conditions
sufficient to protect your food.
Functions and components
such as compressor, fan, heater,
defrost, lighting, display and
so on will operate according
to the needs to consume
minimum energy under these
circumstances.
• The baskets/drawers that
are provided with the chill
compartment must always be in
use for low energy consumption
and for better storage
conditions.
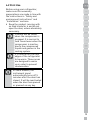
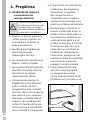
• Food contact with the
temperature sensor in the
freezer compartment may
increase energy consumption of
the appliance. Thus any contact
with the sensor(s) must be
avoided.
• Make sure the foods are not
in contact with the cooler
compartment temperature
sensor described below.
Pagina se încarcă...
Pagina se încarcă...
Pagina se încarcă...
Pagina se încarcă...
Pagina se încarcă...
Pagina se încarcă...
Pagina se încarcă...
Pagina se încarcă...
Pagina se încarcă...
Pagina se încarcă...
Pagina se încarcă...
Pagina se încarcă...
Pagina se încarcă...
Pagina se încarcă...
Pagina se încarcă...
Pagina se încarcă...
Pagina se încarcă...
Pagina se încarcă...
Pagina se încarcă...
Pagina se încarcă...
Pagina se încarcă...
Pagina se încarcă...
Pagina se încarcă...
Pagina se încarcă...
Pagina se încarcă...
Pagina se încarcă...
Pagina se încarcă...
Pagina se încarcă...
Pagina se încarcă...
Pagina se încarcă...
Pagina se încarcă...
Pagina se încarcă...
Pagina se încarcă...
Pagina se încarcă...
Pagina se încarcă...
Pagina se încarcă...
Pagina se încarcă...
Pagina se încarcă...
Pagina se încarcă...
Pagina se încarcă...
Pagina se încarcă...
Pagina se încarcă...
Pagina se încarcă...
Pagina se încarcă...
Pagina se încarcă...
Pagina se încarcă...
Pagina se încarcă...
Pagina se încarcă...
Pagina se încarcă...
Pagina se încarcă...
Pagina se încarcă...
Pagina se încarcă...
Pagina se încarcă...
Pagina se încarcă...
Pagina se încarcă...
Pagina se încarcă...
Pagina se încarcă...
Pagina se încarcă...
Pagina se încarcă...
Pagina se încarcă...
Pagina se încarcă...
Pagina se încarcă...
Pagina se încarcă...
Pagina se încarcă...
Pagina se încarcă...
Pagina se încarcă...
Pagina se încarcă...
Pagina se încarcă...
Pagina se încarcă...
Pagina se încarcă...
Pagina se încarcă...
Pagina se încarcă...
Pagina se încarcă...
Pagina se încarcă...
Pagina se încarcă...
Pagina se încarcă...
Pagina se încarcă...
Pagina se încarcă...
Pagina se încarcă...
Pagina se încarcă...
Pagina se încarcă...
Pagina se încarcă...
Pagina se încarcă...
Pagina se încarcă...
Pagina se încarcă...
Pagina se încarcă...
Pagina se încarcă...
Pagina se încarcă...
Pagina se încarcă...
Pagina se încarcă...
Pagina se încarcă...
Pagina se încarcă...
Pagina se încarcă...
Pagina se încarcă...
Pagina se încarcă...
Pagina se încarcă...
Pagina se încarcă...
Pagina se încarcă...
Pagina se încarcă...
Pagina se încarcă...
Pagina se încarcă...
Pagina se încarcă...
Pagina se încarcă...
Pagina se încarcă...
Pagina se încarcă...
Pagina se încarcă...
Pagina se încarcă...
Pagina se încarcă...
Pagina se încarcă...
Pagina se încarcă...
Pagina se încarcă...
Pagina se încarcă...
Pagina se încarcă...
Pagina se încarcă...
Pagina se încarcă...
Pagina se încarcă...
Pagina se încarcă...
Pagina se încarcă...
Pagina se încarcă...
Pagina se încarcă...
Pagina se încarcă...
Pagina se încarcă...
Pagina se încarcă...
Pagina se încarcă...
Pagina se încarcă...
Pagina se încarcă...
Pagina se încarcă...
Pagina se încarcă...
Pagina se încarcă...
Pagina se încarcă...
Pagina se încarcă...
Pagina se încarcă...
Pagina se încarcă...
Pagina se încarcă...
Pagina se încarcă...
Pagina se încarcă...
Pagina se încarcă...
Pagina se încarcă...
Pagina se încarcă...
Pagina se încarcă...
Pagina se încarcă...
Pagina se încarcă...
Pagina se încarcă...
Pagina se încarcă...
Pagina se încarcă...
Pagina se încarcă...
Pagina se încarcă...
Pagina se încarcă...
Pagina se încarcă...
Pagina se încarcă...
Pagina se încarcă...
Pagina se încarcă...
Pagina se încarcă...
Pagina se încarcă...
Pagina se încarcă...
Pagina se încarcă...
Pagina se încarcă...
Pagina se încarcă...
Pagina se încarcă...
Pagina se încarcă...
Pagina se încarcă...
Pagina se încarcă...
Pagina se încarcă...
Pagina se încarcă...
Pagina se încarcă...
Pagina se încarcă...
Pagina se încarcă...
Pagina se încarcă...
Pagina se încarcă...
Pagina se încarcă...
Pagina se încarcă...
Pagina se încarcă...
Pagina se încarcă...
Pagina se încarcă...
Pagina se încarcă...
Pagina se încarcă...
Pagina se încarcă...
Pagina se încarcă...
Pagina se încarcă...
Pagina se încarcă...
Pagina se încarcă...
Pagina se încarcă...
Pagina se încarcă...
Pagina se încarcă...
Pagina se încarcă...
Pagina se încarcă...
Pagina se încarcă...
Pagina se încarcă...
Pagina se încarcă...
Pagina se încarcă...
Pagina se încarcă...
Pagina se încarcă...
Pagina se încarcă...
Pagina se încarcă...
Pagina se încarcă...
Pagina se încarcă...
Pagina se încarcă...
Pagina se încarcă...
Pagina se încarcă...
Pagina se încarcă...
Pagina se încarcă...
Pagina se încarcă...
Pagina se încarcă...
Pagina se încarcă...
Pagina se încarcă...
Pagina se încarcă...
Pagina se încarcă...
Pagina se încarcă...
Pagina se încarcă...
Pagina se încarcă...
Pagina se încarcă...
Pagina se încarcă...
Pagina se încarcă...
Pagina se încarcă...
Pagina se încarcă...
Pagina se încarcă...
Pagina se încarcă...
Pagina se încarcă...
Pagina se încarcă...
Pagina se încarcă...
Pagina se încarcă...
Pagina se încarcă...
Pagina se încarcă...
Pagina se încarcă...
Pagina se încarcă...
Pagina se încarcă...
Pagina se încarcă...
Pagina se încarcă...
Pagina se încarcă...
Pagina se încarcă...
Pagina se încarcă...
Pagina se încarcă...
Pagina se încarcă...
Pagina se încarcă...
Pagina se încarcă...
Pagina se încarcă...
Pagina se încarcă...
Pagina se încarcă...
-
 1
1
-
 2
2
-
 3
3
-
 4
4
-
 5
5
-
 6
6
-
 7
7
-
 8
8
-
 9
9
-
 10
10
-
 11
11
-
 12
12
-
 13
13
-
 14
14
-
 15
15
-
 16
16
-
 17
17
-
 18
18
-
 19
19
-
 20
20
-
 21
21
-
 22
22
-
 23
23
-
 24
24
-
 25
25
-
 26
26
-
 27
27
-
 28
28
-
 29
29
-
 30
30
-
 31
31
-
 32
32
-
 33
33
-
 34
34
-
 35
35
-
 36
36
-
 37
37
-
 38
38
-
 39
39
-
 40
40
-
 41
41
-
 42
42
-
 43
43
-
 44
44
-
 45
45
-
 46
46
-
 47
47
-
 48
48
-
 49
49
-
 50
50
-
 51
51
-
 52
52
-
 53
53
-
 54
54
-
 55
55
-
 56
56
-
 57
57
-
 58
58
-
 59
59
-
 60
60
-
 61
61
-
 62
62
-
 63
63
-
 64
64
-
 65
65
-
 66
66
-
 67
67
-
 68
68
-
 69
69
-
 70
70
-
 71
71
-
 72
72
-
 73
73
-
 74
74
-
 75
75
-
 76
76
-
 77
77
-
 78
78
-
 79
79
-
 80
80
-
 81
81
-
 82
82
-
 83
83
-
 84
84
-
 85
85
-
 86
86
-
 87
87
-
 88
88
-
 89
89
-
 90
90
-
 91
91
-
 92
92
-
 93
93
-
 94
94
-
 95
95
-
 96
96
-
 97
97
-
 98
98
-
 99
99
-
 100
100
-
 101
101
-
 102
102
-
 103
103
-
 104
104
-
 105
105
-
 106
106
-
 107
107
-
 108
108
-
 109
109
-
 110
110
-
 111
111
-
 112
112
-
 113
113
-
 114
114
-
 115
115
-
 116
116
-
 117
117
-
 118
118
-
 119
119
-
 120
120
-
 121
121
-
 122
122
-
 123
123
-
 124
124
-
 125
125
-
 126
126
-
 127
127
-
 128
128
-
 129
129
-
 130
130
-
 131
131
-
 132
132
-
 133
133
-
 134
134
-
 135
135
-
 136
136
-
 137
137
-
 138
138
-
 139
139
-
 140
140
-
 141
141
-
 142
142
-
 143
143
-
 144
144
-
 145
145
-
 146
146
-
 147
147
-
 148
148
-
 149
149
-
 150
150
-
 151
151
-
 152
152
-
 153
153
-
 154
154
-
 155
155
-
 156
156
-
 157
157
-
 158
158
-
 159
159
-
 160
160
-
 161
161
-
 162
162
-
 163
163
-
 164
164
-
 165
165
-
 166
166
-
 167
167
-
 168
168
-
 169
169
-
 170
170
-
 171
171
-
 172
172
-
 173
173
-
 174
174
-
 175
175
-
 176
176
-
 177
177
-
 178
178
-
 179
179
-
 180
180
-
 181
181
-
 182
182
-
 183
183
-
 184
184
-
 185
185
-
 186
186
-
 187
187
-
 188
188
-
 189
189
-
 190
190
-
 191
191
-
 192
192
-
 193
193
-
 194
194
-
 195
195
-
 196
196
-
 197
197
-
 198
198
-
 199
199
-
 200
200
-
 201
201
-
 202
202
-
 203
203
-
 204
204
-
 205
205
-
 206
206
-
 207
207
-
 208
208
-
 209
209
-
 210
210
-
 211
211
-
 212
212
-
 213
213
-
 214
214
-
 215
215
-
 216
216
-
 217
217
-
 218
218
-
 219
219
-
 220
220
-
 221
221
-
 222
222
-
 223
223
-
 224
224
-
 225
225
-
 226
226
-
 227
227
-
 228
228
-
 229
229
-
 230
230
-
 231
231
-
 232
232
-
 233
233
-
 234
234
-
 235
235
-
 236
236
-
 237
237
-
 238
238
-
 239
239
-
 240
240
-
 241
241
-
 242
242
-
 243
243
-
 244
244
-
 245
245
-
 246
246
-
 247
247
-
 248
248
-
 249
249
-
 250
250
-
 251
251
-
 252
252
-
 253
253
-
 254
254
-
 255
255
-
 256
256
-
 257
257
-
 258
258


Grundig GQN1233XN KOMBISKAP Manualul proprietarului
- Tip
- Manualul proprietarului
în alte limbi
Lucrări înrudite
Alte documente
-
Teka POLAR NFE3 620 X Manual de utilizare
-
Teka POLAR NFE3 650 X Manual de utilizare
-
Beko GN141632ZXBRN Fridge Freezer Manual de utilizare
-
 Myria MY1009 Manual de utilizare
-
-
LG GC-P227STFA Manual de utilizare
-
Beko B1RCNA344W Manual de utilizare
-
LG GR-L227YVQA Manualul proprietarului
-
