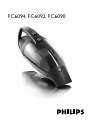
Philips FC6092/01 Manual de utilizare
- Categorie
- Aspiratoare portabile
- Tip
- Manual de utilizare
Acest manual este potrivit și pentru

FC6094, FC6092, FC6090

2

33
1

4

FC6094, FC6092, FC6090
ENGLISH 6
14
23
31
39
47
55
64
71
79
87
95
104
112
120
128

6
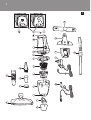
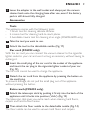
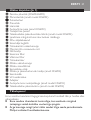
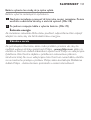
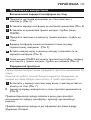
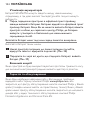
General description (Fig. 1)
A Bendable crevice tool (FC6092/6090)
B Floor nozzle (FC6094 only)
C Cleaning brush
D Crevice tool
E Brush tool
F Socket for car cord (FC6092 only)
G Contact points
H Connection for telescopic stick (FC6094 only)
I Charging light with battery-low indication
J Exhaust air openings
K On/off slide
L Dust compartment release button
M Motor inlet grille
N Filter holder
O Innerlter
P Outerlter
Q Dust compartment
R Nozzle release button
S Nozzle insert
T Detachable nozzle
U Nozzle & stick holder (FC6094 only)
V Wall mounting bracket
W W. Charging base
X Adapter
Y Car cord with car plug (FC6092 only)
Z Telescopic stick (FC6094 only)
Important
Read these instructions for use carefully before using the appliance and
save them for future reference.
Check if the voltage indicated on the appliance corresponds to the
local mains voltage before you connect the appliance.
Do not use the appliance if it is damaged in any way. Take it to an
authorised Philips service centre for repair.
,
,
ENGLISH

If the adapter or charging base is damaged, always have it replaced
by one of the original type to avoid a hazard.
FC6092 only: if the car cord or car plug is damaged, stop using the
car cord and have it replaced by one of the original type.
Never suck up water or any other liquid. Never suck up ashes until
they are cold.
Never immerse the vacuum cleaner, the adapter or the charging
base in water.
Remove the adapter from the wall socket before cleaning the
charging base.
Only charge the vacuum cleaner with the adapter and charging
base supplied. During charging, the adapter will feel warm to the
touch. This is normal.
Always switch the vacuum cleaner off after use.
Keep the appliance out of the reach of children.
The voltage on the contact points in the charging base is low (max.
30 volts) and therefore not dangerous.
Never block the exhaust air openings during vacuuming.
Switch the appliance off when recharging it.
To avoid the risk of electric shock, be careful when drilling holes in
the wall to attach the wall mounting bracket, especially close to a
wall socket.
Always use the appliance with the lter unit.
Always use the appliance with the nozzle insert in place.
Noise levels:
FC6090: Lc = 78 dB [A]
FC6092: Lc = 79 dB [A]
FC6094: Lc = 80 dB [A]
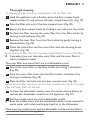
Preparing for use
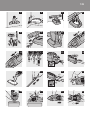
1 Screw the wall mounting bracket to the wall with the screws
supplied with the appliance. (Fig. 2)
2 Attach the charging base to the wall mounting bracket. (Fig. 3)
,
,
,
,
,
,
,
,
,
,
,
,
,
,
,
-
-
-
ENGLISH 7

3 Attach the nozzle & stick holder to the wall mounting bracket
(FC6094 only).
4 Screw the nozzle & stick holder to the wall with the screws
supplied with the appliance.
5 You can also place the charging base on a level and horizontal
surface. (Fig. 4)
6 Slide the brush tool onto the crevice tool and place them in the
charging base. (Fig. 5)
7 FC6094 only: insert the telescopic stick and the oor nozzle into
the nozzle & stick holder (‘click’). (Fig. 6)
Chargetheapplianceforatleast18hoursbeforeyouuseitfortherst
time.
When the charging light starts blinking during operation, the battery pack
is running low and needs to be recharged.
1 Insert the small plug into the charging base and insert the adapter
into the wall socket. (Fig. 7)
The charging light will go on to indicate that the appliance is
charging. (Fig. 8)
Note:The charging light will stay on as long as the appliance is placed on the
charging base and the adapter is in the wall socket.
Note:The charging light does not give any information about the charge level
of the built-in battery pack.
1
Push the on/off slide forwards to switch the appliance on. (Fig. 9)
2 Push the on/off slide backwards to switch the appliance off.
(Fig. 10)
,
ENGLISH8

3 Leave the adapter in the wall socket and always put the vacuum
cleaner back onto the charging base after use, even if the battery
pack is still almost fully charged.
This appliance comes with the following tools:
1. brush tool for cleaning delicate surfaces
2. crevice tool for cleaning hard-to-reach places
3. bendable crevice tool for cleaning at an angle (FC6092/6090 only)
1 Take the tool you want to use.
2 Attach the tool to the detachable nozzle. (Fig. 11)
Car cord (FC6092 only)
With the car cord you can connect the vacuum cleaner to the cigarette
lighter socket in your car and use it as long as necessary without having to
recharge it.
1 Insert the small plug of the car cord in the socket of the appliance
and insert the car plug in the cigarette lighter socket of your car.
(Fig. 12)
The car cord cannot be used to charge the appliance.
2 Detach the car cord from the appliance by pressing the button on
the small plug.
To prevent damage, do not pull the small plug out of the appliance
without pressing the button.
1 Attach the telescopic stick by pushing it rmly into the back of the
appliance until it locks into position (‘click’). (Fig. 13)
Thetelescopicstickgivesyouextrareachwhencleaninghardoors,
carpets and hard-to-reach areas.
2 Then attach the oor nozzle to the detachable nozzle. (Fig. 14)
Theoornozzlecanbeusedtovacuumhardoorsandcarpets.
-
-
-
ENGLISH 9

Theoornozzleisequippedwithauffcollectorthatremoveshairor
uff.
Note:Pass the uff collector gently over the hairs or uff to be removed. The
hairs or uff will be worked loose from the surface, collected and then sucked
up.
3 Adjust the stick to the length you nd most comfortable during
vacuum cleaning by pushing the ring downwards and pulling the
upper part of the stick upwards. (Fig. 15)
4 To detach the telescopic stick, press the release button on the
back of the vacuum cleaner and pull the stick out of the appliance.
(Fig. 16)
Cleaning
Always remove the adapter from the wall socket before cleaning the
charging base.
Never immerse the vacuum cleaner, the adapter or the charging base in
water.
1 Clean the charging base and the appliance with a damp cloth.
Makesureyouemptythedustcompartmentandcleanthelters
regularly.
Weadviseyoutocleantheltersevery2to4weekstomaintainoptimal
suction performance.
Quick cleaning
Toquicklyemptythedustcompartment:
1 Remove the detachable nozzle by pressing the nozzle release
button. (Fig. 17)
2 Shake the contents of the dust compartment out into a dustbin.
(Fig. 18)
ENGLISH10

Tothoroughlycleanthedustcompartmentandthelterunit:
1 Hold the appliance over a dustbin, press the dust compartment
release button (1) and remove the dust compartment (2). (Fig. 19)
2 Take the lter unit out of the dust compartment. (Fig. 20)
3 Empty the dust compartment by shaking it out with your free hand.
4 To clean the lter, remove the outer lter from the lter holder by
turning it anticlockwise. (Fig. 21)
5 Remove the inner lter from the lter holder by gently turning it
anticlockwise. (Fig. 22)
6 Clean the inner lter and the outer lter with the cleaning brush
supplied. (Fig. 23)
Brushtheinnerlterfromthetopdownwardsalongtheribsofthelter.
If necessary, you can clean the outer lter and the inner lter in
cold or lukewarm water.
The inner lter and outer lter are not dishwasher-proof.
7 Attach the inner lter to the lter holder by turning it clockwise.
(Fig. 24)
8 Place the outer lter back onto the lter holder and fasten it by
turning it clockwise. (Fig. 25)
9 Place the lter unit back into the dust compartment. (Fig. 26)
Neverputthelterunitbackintothedustcompartmentwhentheouter
lterandinnerlterarestillwet.
10 To clean the detachable nozzle, press the nozzle release button to
remove the detachable nozzle from the appliance. (Fig. 17)
11 Pull the nozzle insert out of the detachable nozzle.
Both the nozzle insert and the detachable nozzle can be cleaned in
warm water with some washing-up liquid or in the dishwasher.
Make sure the nozzle insert and the detachable nozzle are dry before
you reattach them to the appliance.
,
,
ENGLISH 11

12 Reattach the dust compartment to the body of the vacuum cleaner
(‘click’).
Replacement
Replace the inner lter if it can no longer be cleaned properly
(usually after having been cleaned about 50 times).
1 Take the lter unit out of the dust compartment. (Fig. 20)
2 Remove the outer lter from the lter holder by turning it
anticlockwise. (Fig. 21)
3 Remove the inner lter from the lter holder by gently turning it
anticlockwise. (Fig. 22)
4 Attach a new inner lter to the lter holder. (Fig. 24)
5 Reattach the outer lter to the lter holder. (Fig. 25)
New inner lters can be obtained at Philips service centres.
Environment
Do not throw the appliance away with the normal household waste
at the end of its life, but hand it in at an ofcial collection point for
recycling. By doing this you will help to preserve the environment.
(Fig. 27)
NiCd/NiMH batteries can be harmful to the environment and may
explodeifexposedtohightemperaturesorre.
Always remove the battery pack before handing the appliance in at
an ofcial collection point. Dispose of the battery pack at an ofcial
collection point for batteries. If you have trouble removing the
battery pack, you can also take the appliance to a Philips service
centre, which will remove the battery pack for you and will dispose
of it in an environmentally safe way.
Only remove the battery pack if it is completely empty.
Remove the battery pack in the following way.
,
,
,
,
ENGLISH12

1 Let the appliance run until it stops, loosen and remove the screws
and open the vacuum cleaner. (Fig. 28)
2 Cut the connecting wires one by one and remove the battery pack.
(Fig. 29)
Saving energy
If you are not going to use the appliance for a longer period of time, we
advise you to remove the adapter from the wall socket to save energy.
Guarantee & service
If you need information or if you have a problem, please visit the Philips
website at
www.philips.com or contact the Philips Customer Care
Centreinyourcountry(youwillnditsphonenumberintheworldwide
guaranteeleaet).IfthereisnoCustomerCareCentreinyourcountry,
turn to your local Philips dealer or contact the Service Department of
Philips Domestic Appliances and Personal Care BV.
ENGLISH 13

14
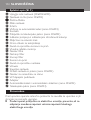
A Сгъваемтесеннакрайник(FC6092/6090)
B Накрайникзапод(самозаFC6094)
C Четказапочистване
D Тесеннакрайник
E Четка
F Гнездозаавтомобиленкабел(самозаFC6092)
G Контактнипластини
H Свързващогнездозателескопа(самозаFC6094)
I Индикаторзазарежданесиндикациязаизтощенабатерия
J Отворизаизходящвъздух
K Плъзгачвключване/изключване
L Бутонзаотваряненаотделениетозапрах
M Решетканавходанаелектромотора
N Държачнафилтъра
O Вътрешенфилтър
P Външенфилтър
Q Отделениезапрах
R Бутонзаосвобождаваненанакрайника
S Муфазанакрайника
T Разглобяемнакрайник
U Държачзанакрайницитеителескопа(самозаFC6094)
V Конзолазамонтираненастена
W W.Зареждащаоснова
X Адаптер
Y Автомобиленкабелсъссъединителзаавтомобил(самоза
FC6094)
Z Телескопичнатръба(самозаFC6094)
Предидаизползватеуреда,прочететевнимателнотова
ръководствозаексплоатацияигозапазетезасправкавбъдеще.
Преди да свържете уреда към мрежата, проверете дали
посоченото върху уреда напрежение отговаря на
напрежението на местната електрическа мрежа.
,

Не използвайте уреда, ако има някаква повреда. Дайте го за
ремонт в упълномощен сервизен център на Philips.
С оглед на предотвратяване на злополука, ако адаптерът или
зареждащата основа са повредени, винаги ги заменяйте само с
оригинални такива.
Само за FC6092: Ако е повреден автомобилният кабел или
съединителят за автомобил, не използвайте повече кабела и го
заменете с друг от същия тип.
Никога не всмуквайте вода или друга течност. Не всмуквайте
пепел, преди да е изстинала.
Не потапяйте във вода прахосмукачката, адаптера или
зареждащата основа.
Изваждайте адаптера от мрежовия контакт, преди да
почиствате зареждащата основа.
Зареждайте прахосмукачката само с влизащите в доставения
комплект адаптер и зареждаща основа. По време на
зареждането адаптерът е топъл на пипане. Това е нормално.
Винаги изключвайте прахосмукачката след употреба.
Дръжте уреда извън обсега на деца.
Напрежението на контактните пластини в зарядното
устройство е ниско (макс. 30 V) и затова не е опасно.
Никога не закривайте отворите за изходящ въздух при работа
на прахосмукачката.
Изключвайте уреда при зареждане.
За да избегнете опасност от електрически удар, внимавайте
при пробиване на дупки в стената за закачането на скобата за
стенен монтаж, особено в близост до контакт.
Използвайте уреда винаги с филтърния комплект.
Използвайте уреда винаги с поставена муфа за накрайника.
Ниво на шума:
FC6090: Lc = 78 dB [A]
FC6092: Lc = 79 dB [A]
FC6094: Lc = 80 dB [A]
,
,
,
,
,
,
,
,
,
,
,
,
,
,
,
,
-
-
-
15

1 Завинтете скобата за стенен монтаж на стената с приложените
към уреда винтове. (фиг. 2)
2 Закрепете зареждащата основа към скобата за стенен монтаж.
(фиг. 3)
3 Закрепете държача за накрайниците и телескопичната тръба
към скобата за стенен монтаж (само FC6094).
4 Завинтете държача за накрайниците и телескопичната тръба
към стената с приложените към уреда винтове.
5 Можете също да поставите зареждащата основа и върху
хоризонтална и равна повърхност. (фиг. 4)
6 Нахлузете накрайника с четка върху тесния накрайник и ги
поставете в зареждащата основа. (фиг. 5)
7 Само за FC6094: Вмъкнете телескопичната тръба и накрайника
за под в държача за накрайниците и телескопичната тръба
(с щракване). (фиг. 6)
Оставетеуредадасезареждавпродължениенапоне18часа,преди
дагоизползватезапръвпът.
Когатоповременаработаиндикаторътзазарежданезапочнеда
мига,акумулаторнатабатерияеизтощенаиенеобходимодабъде
заредена.
1 Включете малкия щепсел в зареждащата основа и включете
адаптера в контакта. (фиг. 7)
Индикаторът ще светне, за да покаже, че уредът се зарежда.
(фиг. 8)
Забележка:Индикаторът за зареждане ще свети, докато уредът е
поставен върху зареждащата основа и адаптерът е включен в
мрежовия контакт.
,
16

Забележка:Индикаторът за зареждане не дава никакви показания за
нивото на зареждане на вградените батерии.
1
Преместете плъзгача за включване напред, за да включите
уреда. (фиг. 9)
2 Преместете плъзгача за включване назад, за да изключите уреда.
(фиг. 10)
3 Оставете адаптера в контакта и веднага след всяка употреба
поставяйте прахосмукачката обратно върху зареждащата
основа, дори батериите да са още почти напълно заредени.
Тозиуредсепредлагасъсследнитеинструменти:
1.накрайниксчетка-започистваненаделикатниповърхности
2.тесеннакрайникзапочистваненатруднодостъпниместа
3.сгъваемтесеннакрайникзапочистванеподъгъл(самоза
FC6092/6090)
1 Вземете необходимия накрайник.
2 Прикрепете инструмента към разглобяемия накрайник. (фиг. 11)
Савтомобилниякабелможетедавключитепрахосмукачкатав
гнездотозазапалкатанаколатасиидаяизползватебез
необходимостотпрезареждане.
1 Включете малкия щепсел на автомобилния кабел в гнездото на
уреда, а съединителят за автомобил - в гнездото за запалката на
колата ви. (фиг. 12)
Автомобилнияткабелнеможедасеизползвазазарежданена
уреда.
2 Изключете автомобилния кабел от уреда с натискане на бутона
на малкия щепсел.
-
-
-
17

Задаизбегнетеповреди,неиздърпвайтемалкиящепселотуреда
безнатисканенабутона.
1 Монтирайте телескопичната тръба със силно натискане към
задната част на уреда, докато се захване на мястото си (с
щракване). (фиг. 13)
Телескопичнататръбавидавадопълнителенобхватнадействиепри
почистваненатвърдиподовиповърхности,килимии
труднодостъпниместа.
2 След това прикрепете накрайника за под към разглобяемия
накрайник. (фиг. 14)
Накрайникътзаподможедасеизползвазапочистваненатвърди
подовиповърхностиикилимиспрахосмукачката.
Накрайникътзаподимаприспособлениезакосми,скоетосе
почистваткосмиимъх.
Забележка:Прекарайте леко приспособлението за косми над космите
или мъха, които трябва да се съберат. Те ще се отделят от
повърхността, ще се съберат и след това ще бъдат засмукани.
3 Нагласете телескопичната тръба на най-удобната ви дължина за
работа с прахосмукачката чрез натискане на пръстена надолу и
издърпване на горната част на телескопичната тръба нагоре.
(фиг. 15)
4 За да откачите телескопичната тръба, натиснете бутона за
освобождаване отзад на прахосмукачката и издърпайте
удължителя от уреда. (фиг. 16)
Винаги изваждайте адаптера от мрежовия контакт, преди да
почиствате зареждащата основа.
Не потапяйте във вода прахосмукачката, адаптера или зареждащата
основа.
1 Почиствайте зареждащата основа и уреда с мокра кърпа.
18

Погрижетесередовнодаизпразватеотделениетозапрахида
почистватефилтрите.
Препоръчвамевидапочистватефилтритенавсеки2до4седмицис
огледнаподдържаненаоптималнасиланазасмукване.
Забързоизпразваненаотделениетозапрах:
1 Откачете разглобяемия накрайник с натискане на бутона за
освобождаване. (фиг. 17)
2 Изтръскайте съдържанието на отделението за прах в кофа за
отпадъци. (фиг. 18)
Запълнопочистваненаотделениетозапрахифилтърниякомплект:
1 Като държите уреда над кофа за смет, натиснете бутона за
освобождаване на отделението за прах (1) и откачете
отделението за прах (2). (фиг. 19)
2 Издърпайте филтърния комплект от отделението за прах.
(фиг. 20)
3 Изпразнете отделението за прах, като го изтръскате със
свободната си ръка.
4 За да почистите филтъра, свалете външния филтър от държача,
като го завъртите обратно на часовниковата стрелка. (фиг. 21)
5 Свалете вътрешния филтър от държача, като го завъртите
внимателно обратно на часовниковата стрелка. (фиг. 22)
6 Почиствайте вътрешния и външния филтри с приложената
четка. (фиг. 23)
Изчеткайтевътрешнияфилтъротгоренадолупопротежениена
ребратанафилтъра.
Ако е необходимо, можете да измиете външния филтър и
вътрешния филтър със студена или хладка вода.
,
19

Вътрешният и външният филтри не са устойчиви на миене в
съдомиялна машина.
7 Закрепете вътрешния филтър към държача със завъртане по
часовниковата стрелка. (фиг. 24)
8 Поставете отново външния филтър върху държача и го
затегнете със завъртане по часовниковата стрелка. (фиг. 25)
9 Сложете филтърния комплект на мястото му в отделението за
прах. (фиг. 26)
Непоставяйтефилтърниякомплектвотделениетозапрах,ако
външниятиливътрешниятфилтъревсеощевлажен.
10 За почистване на разглобяемия накрайник натиснете бутона за
освобождаване на накрайника, за да откачите разглобяемия
накрайник от уреда. (фиг. 17)
11 Извадете муфата за накрайника от разглобяемия накрайник.
Муфата за накрайника и разглобяемият накрайник могат да
бъдат почиствани в топла вода с малко препарат за миене или в
съдомиялна машина.
Проверете дали муфата за накрайника и разглобяемият накрайник
са сухи, преди отново да ги монтирате към уреда.
12 Монтирайте отново отделението за прах към тялото на
прахосмукачката (с щракване).
Сменете вътрешния филтър, ако вече не може да се изчиства
добре (обикновено след като е почистван около 50 пъти).
1 Издърпайте филтърния комплект от отделението за прах.
(фиг. 20)
2 Свалете външния филтър от държача чрез завъртане обратно на
часовниковата стрелка. (фиг. 21)
3 Свалете вътрешния филтър от държача, като го завъртите
внимателно обратно на часовниковата стрелка. (фиг. 22)
,
,
20
Pagina se încarcă...
Pagina se încarcă...
Pagina se încarcă...
Pagina se încarcă...
Pagina se încarcă...
Pagina se încarcă...
Pagina se încarcă...
Pagina se încarcă...
Pagina se încarcă...
Pagina se încarcă...
Pagina se încarcă...
Pagina se încarcă...
Pagina se încarcă...
Pagina se încarcă...
Pagina se încarcă...
Pagina se încarcă...
Pagina se încarcă...
Pagina se încarcă...
Pagina se încarcă...
Pagina se încarcă...
Pagina se încarcă...
Pagina se încarcă...
Pagina se încarcă...
Pagina se încarcă...
Pagina se încarcă...
Pagina se încarcă...
Pagina se încarcă...
Pagina se încarcă...
Pagina se încarcă...
Pagina se încarcă...
Pagina se încarcă...
Pagina se încarcă...
Pagina se încarcă...
Pagina se încarcă...
Pagina se încarcă...
Pagina se încarcă...
Pagina se încarcă...
Pagina se încarcă...
Pagina se încarcă...
Pagina se încarcă...
Pagina se încarcă...
Pagina se încarcă...
Pagina se încarcă...
Pagina se încarcă...
Pagina se încarcă...
Pagina se încarcă...
Pagina se încarcă...
Pagina se încarcă...
Pagina se încarcă...
Pagina se încarcă...
Pagina se încarcă...
Pagina se încarcă...
Pagina se încarcă...
Pagina se încarcă...
Pagina se încarcă...
Pagina se încarcă...
Pagina se încarcă...
Pagina se încarcă...
Pagina se încarcă...
Pagina se încarcă...
Pagina se încarcă...
Pagina se încarcă...
Pagina se încarcă...
Pagina se încarcă...
Pagina se încarcă...
Pagina se încarcă...
Pagina se încarcă...
Pagina se încarcă...
Pagina se încarcă...
Pagina se încarcă...
Pagina se încarcă...
Pagina se încarcă...
Pagina se încarcă...
Pagina se încarcă...
Pagina se încarcă...
Pagina se încarcă...
Pagina se încarcă...
Pagina se încarcă...
Pagina se încarcă...
Pagina se încarcă...
Pagina se încarcă...
Pagina se încarcă...
Pagina se încarcă...
Pagina se încarcă...
Pagina se încarcă...
Pagina se încarcă...
Pagina se încarcă...
Pagina se încarcă...
Pagina se încarcă...
Pagina se încarcă...
Pagina se încarcă...
Pagina se încarcă...
Pagina se încarcă...
Pagina se încarcă...
Pagina se încarcă...
Pagina se încarcă...
Pagina se încarcă...
Pagina se încarcă...
Pagina se încarcă...
Pagina se încarcă...
Pagina se încarcă...
Pagina se încarcă...
Pagina se încarcă...
Pagina se încarcă...
Pagina se încarcă...
Pagina se încarcă...
Pagina se încarcă...
Pagina se încarcă...
Pagina se încarcă...
Pagina se încarcă...
Pagina se încarcă...
Pagina se încarcă...
Pagina se încarcă...
Pagina se încarcă...
Pagina se încarcă...
Pagina se încarcă...
Pagina se încarcă...
Pagina se încarcă...
Pagina se încarcă...
Pagina se încarcă...
-
 1
1
-
 2
2
-
 3
3
-
 4
4
-
 5
5
-
 6
6
-
 7
7
-
 8
8
-
 9
9
-
 10
10
-
 11
11
-
 12
12
-
 13
13
-
 14
14
-
 15
15
-
 16
16
-
 17
17
-
 18
18
-
 19
19
-
 20
20
-
 21
21
-
 22
22
-
 23
23
-
 24
24
-
 25
25
-
 26
26
-
 27
27
-
 28
28
-
 29
29
-
 30
30
-
 31
31
-
 32
32
-
 33
33
-
 34
34
-
 35
35
-
 36
36
-
 37
37
-
 38
38
-
 39
39
-
 40
40
-
 41
41
-
 42
42
-
 43
43
-
 44
44
-
 45
45
-
 46
46
-
 47
47
-
 48
48
-
 49
49
-
 50
50
-
 51
51
-
 52
52
-
 53
53
-
 54
54
-
 55
55
-
 56
56
-
 57
57
-
 58
58
-
 59
59
-
 60
60
-
 61
61
-
 62
62
-
 63
63
-
 64
64
-
 65
65
-
 66
66
-
 67
67
-
 68
68
-
 69
69
-
 70
70
-
 71
71
-
 72
72
-
 73
73
-
 74
74
-
 75
75
-
 76
76
-
 77
77
-
 78
78
-
 79
79
-
 80
80
-
 81
81
-
 82
82
-
 83
83
-
 84
84
-
 85
85
-
 86
86
-
 87
87
-
 88
88
-
 89
89
-
 90
90
-
 91
91
-
 92
92
-
 93
93
-
 94
94
-
 95
95
-
 96
96
-
 97
97
-
 98
98
-
 99
99
-
 100
100
-
 101
101
-
 102
102
-
 103
103
-
 104
104
-
 105
105
-
 106
106
-
 107
107
-
 108
108
-
 109
109
-
 110
110
-
 111
111
-
 112
112
-
 113
113
-
 114
114
-
 115
115
-
 116
116
-
 117
117
-
 118
118
-
 119
119
-
 120
120
-
 121
121
-
 122
122
-
 123
123
-
 124
124
-
 125
125
-
 126
126
-
 127
127
-
 128
128
-
 129
129
-
 130
130
-
 131
131
-
 132
132
-
 133
133
-
 134
134
-
 135
135
-
 136
136
-
 137
137
-
 138
138
-
 139
139
-
 140
140


Philips FC6092/01 Manual de utilizare
- Categorie
- Aspiratoare portabile
- Tip
- Manual de utilizare
- Acest manual este potrivit și pentru
în alte limbi
- slovenčina: Philips FC6092/01 Používateľská príručka
Lucrări înrudite
-
Philips FC6161/94 Manual de utilizare
-
Philips FC6091 Manual de utilizare
-
Philips FC6055/01 Manual de utilizare
-
-
Philips FC6150/01R1 Informații importante
-
Philips FC6149/01 Manual de utilizare
-
Philips FC6144/01 Manual de utilizare
-
Philips FC6148/01 Manual de utilizare
-
Philips FC6054/01 Manual de utilizare
-
Philips FC6132 Manual de utilizare