
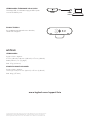
BRIO ULTRA HD PRO
BUSINESS WEBCAM
Complete Setup Guide

CONTENTS
English . . . . . . . . . . . . . . . . .3
Deutsch . . . . . . . . . . . . . . . .9
Français . . . . . . . . . . . . . . . 15
Italiano . . . . . . . . . . . . . . . . 21
Español . . . . . . . . . . . . . . . . 27
Português . . . . . . . . . . . . . . 33
Nederlands . . . . . . . . . . . . . .39
Svenska. . . . . . . . . . . . . . . .45
Dansk. . . . . . . . . . . . . . . . . 51
Norsk . . . . . . . . . . . . . . . . . 57
Suomi. . . . . . . . . . . . . . . . .63
Ελληνικά. . . . . . . . . . . . . . . .69
По-русски . . . . . . . . . . . . . . . 75
Po polsku . . . . . . . . . . . . . . . 81
Magyar . . . . . . . . . . . . . . . . 87
Česká verze. . . . . . . . . . . . . .93
Slovenčina . . . . . . . . . . . . . . 99
Українська. . . . . . . . . . . . . . 105
Eesti . . . . . . . . . . . . . . . . . 111
Latviski . . . . . . . . . . . . . . . . 117
Lietuvių . . . . . . . . . . . . . . . .123
Български . . . . . . . . . . . . . . .129
Hrvatski . . . . . . . . . . . . . . .135
Srpski . . . . . . . . . . . . . . . . .141
Slovenščina. . . . . . . . . . . . . .147
Română . . . . . . . . . . . . . . .153
Türkçe . . . . . . . . . . . . . . . .159
165 . . . . . . . . . . . . . . . . .
171 . . . . . . . . . . . . . . . .

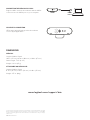
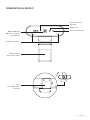
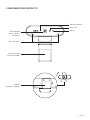
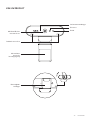
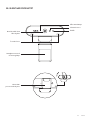
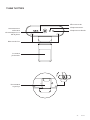
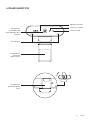
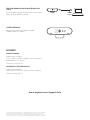
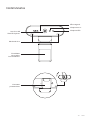
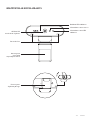
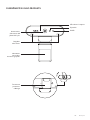
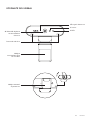
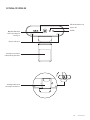
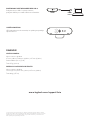
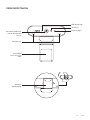
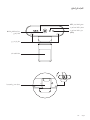
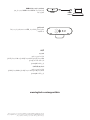
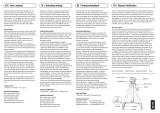
KNOW YOUR PRODUCT
Autofocus 4K
UltraHD lens
Dual microphone
Detachable
universal
mountingclip
Attachable
privacy shutter
IR sensor
IR LED
LED activity light
3 English

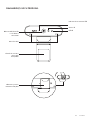
Detachable USB-A cable
(USB 2.0 or 3.0)
Type C compatible
Travel bag
Tripod thread*
* Tripod not included
4 English

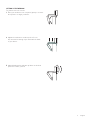
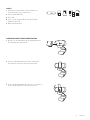
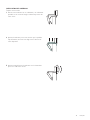
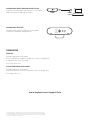
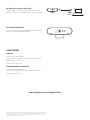
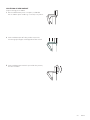
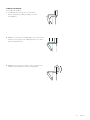
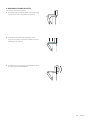
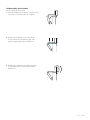
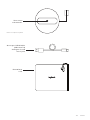
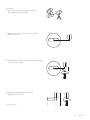
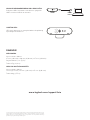
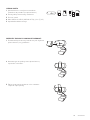
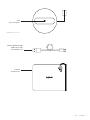
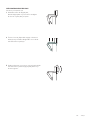
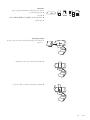
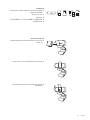
ATTACH THE PRIVACY SHUTTER
1 Attach the privacy shutter over the lens
onthewebcam as shown.
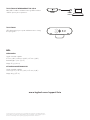
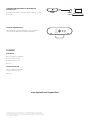
WHAT’S IN THE BOX
1 Webcam with detachable universal mounting clip
(onwebcam)
2 External privacy shutter
3 Carrying case
4 7.2 ft (2.2 m) USB-A to USB-C cable (USB 2.0 or 3.0)
5 User documentation
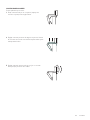
2 Snap it onto the front of the webcam,
directlyoverthe center.
3 Manually adjust the privacy shutter to open
orcloseas desired.
5 English

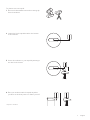
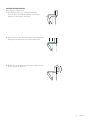
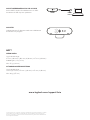
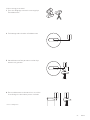
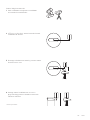
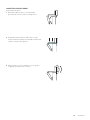
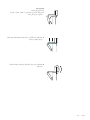
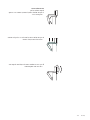
SETTING UP THE WEBCAM
For placement on a monitor
1 Place your webcam on a computer, laptop or monitor
at a position or angle you desire.
2 Adjust the webcam to make sure the foot on
theuniversal mounting clip is ush with the back
ofyour device.
3 Manually adjust the webcam up/down to the best
position to frame yourself.
6 English

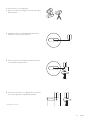
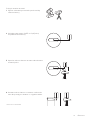
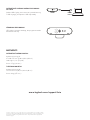
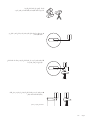
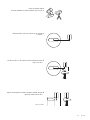
For placement on a tripod*
1 Remove the detachable universal mounting clip
fromthe webcam.
2 Locate the ¼ inch tripod thread on the bottom
ofthewebcam.
3 Secure the webcam on your tripod by twisting it
intothe ¼ inch thread.
4 Place your webcam with the tripod anywhere
youdesire to the best position to frame yourself.
* Tripod not included
7 English

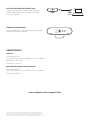
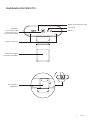
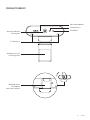
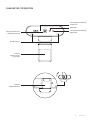
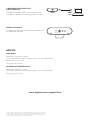
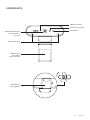
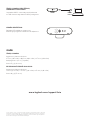
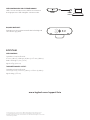
USB 2.0
USB 3.0
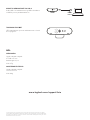
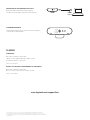
CONNECTING THE WEBCAM VIA USBA
Plug the USB-C end into the webcam and the USB-A
connector into the USB-A port on your computer.
SUCCESSFUL CONNECTION
LED activity light will light up when the webcam
isinuseby an application.
WEBCAM:
Height x Width x Depth:
1.06 in (27 mm) x 4.02 in (102 mm) x 1.04 in (27 mm)
Cable Length: 7.2 ft (2.2 m)
Weight: 2.22 oz (63 g)
ATTACHABLE MOUNTING CLIP:
Height x Width x Depth:
0.75 in (19 mm) x 1.42 in (36 mm) x 2.48 in (63 mm)
Weight: 1.55 oz (44 g)
DIMENSIONS
www.logitech.com/support/brio
© 2020 Logitech, Logi and the Logitech Logo are trademarks or registered trademarks of Logitech
Europe S.A. and/or its aliates in the U.S. and other countries. Logitech assumes noresponsibility
for any errors that may appear in thismanual. Information contained herein issubject to change
without notice.
WEB-621-001905.002

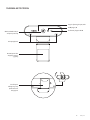
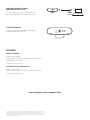
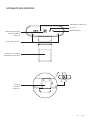
PRODUKT AUF EINEN BLICK
Autofokus-Objektiv
in 4K Ultra HD
Duales Mikrofon
Abnehmbare
Universalklemme
für die Montage
Externe
Abdeckblende
IR-Sensor
IR-LED
Betriebs-LED
9 Deutsch

Abnehmbares USB-A-Kabel
(USB2.0 oder 3.0)
Kompatibel mit USB-C
Transportetui
Stativ-Gewinde*
* Stativ nicht im Lieferumfang enthalten
10 Deutsch

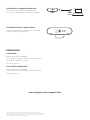
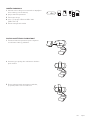
ANBRINGEN DER EXTERNEN ABDECKBLENDE
1 Bringen Sie die Abdeckblende wie abgebildet über
dem Objektiv der Webcam an.
INHALT
1 Webcam mit abnehmbarer Universalklemme
fürdieMontage (an der Webcam)
2 Externe Abdeckblende
3 Reise-Etui
4 2,2m (7,2 ft) langes USB-A-zu-USB-C-Kabel
(USB2.0oder 3.0)
5 Bedienungsanleitung
2 Lassen Sie die Abdeckblende an der Vorderseite
derWebcam einrasten, direkt über der Mitte.
3 Stellen Sie die Abdeckblende manuell so ein, dass sie
jenach Bedarf geönet oder geschlossen ist.
11 Deutsch

EINRICHTEN DER WEBCAM
Befestigung am Bildschirm
1 Die Webcam lässt sich in jeder gewünschten
Position und in beliebigem Winkel am Computer,
Notebookoder Monitor anbringen.
2 Passen Sie sie so an, dass der Fuß der Universalklemme
bündig mit der Rückseite Ihres Geräts abschließt.
3 Richten Sie die Webcam manuell höher oder tiefer aus,
bis Sie optimal im Bild sind.
12 Deutsch

Befestigung auf einem Stativ*
1 Entfernen Sie die Universalklemme für die Montage
von der Webcam.
2 Suchen Sie das ¼-Zoll-Stativgewinde auf
derUnterseite der Webcam.
3 Schrauben Sie die Webcam auf das Gewinde,
umsiezu befestigen.
4 Platzieren Sie die Webcam mit dem Stativ an
derfürSie optimalen Position.
* Stativ nicht im Lieferumfang enthalten
13 Deutsch

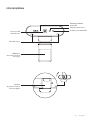
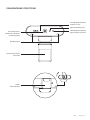
USB 2.0
USB 3.0
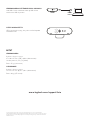
ANSCHLIESSEN DER WEBCAM ÜBER USBA
Verbinden Sie den USB-C-Stecker mit der Webcam
undden USB-A-Stecker mit dem USB-A-Anschluss
anIhrem Computer.
VERBINDUNG ERFOLGREICH
Wenn die Webcam von einer Anwendung genutzt wird,
leuchtet die Aktivitäts-LED auf.
WEBCAM:
Höhe x Breite x Tiefe:
27mm (1,06 Zoll) x 102mm (4,02 Zoll) x 27mm (1,04 Zoll)
Kabellänge: 2,2m (7,2 ft)
Gewicht: 63 g (2,22 oz)
ABNEHMBARE KLEMME FÜR DIE MONTAGE:
Höhe x Breite x Tiefe:
19mm (0,75 Zoll) x 36mm (1,42 Zoll) x 63mm (2,48 Zoll)
Gewicht: 44 g (1,55 oz)
ABMESSUNGEN
www.logitech.com/support/brio
© 2020 Logitech, Logi und das Logitech Logo sind Marken oder eingetragene Marken von
Logitech Europe S.A. und/oder deren Tochtergesellschaften in den USA und anderen Ländern.
Logitechübernimmt keine Haftung für etwaige Fehler in dieser Bedienungsanleitung.
Diehiervorliegenden Informationen können ohne vorherige Benachrichtigung geändert werden.

PRÉSENTATION DU PRODUIT
Objectif 4K Ultra
HD et mise au point
automatique
Double microphone
Clip de xation
universel amovible
Volet
de condentialité
amovible
Capteur IR
Témoin lumineux IR
Témoin lumineux
d’activité
15 Français

Câble USB-A détachable
(USB2.0 ou 3.0)
Compatible type C
Pochette
detransport
Filetage
dutrépied*
* Trépied non inclus
16 Français

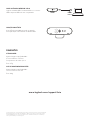
FIXATION DU VOLET DE CONFIDENTIALITÉ
1 Rattachez le volet de condentialité au-dessus
del’objectif sur la webcam, comme illustré.
CONTENU
1 Webcam avec clip de xation universel amovible
(surla webcam)
2 Volet de condentialité externe
3 Étui de transport
4 Câble USB-A vers USB-C de 2,2 m (7,2 pieds)
(USB2.0ou 3.0)
5 Documentation utilisateur
2 Fixez-le à l’avant de la webcam, directement sur
lecentre.
3 Ajustez manuellement le volet de condentialité
pourl’ouvrir et le fermer à votre convenance.
17 Français

INSTALLATION DE LA WEBCAM
Fixation sur un écran
1 Placez votre webcam sur un ordinateur, un ordinateur
portable ou un écran à l’angle ou dans la position de
votre choix.
2 Ajustez la webcam pour vous assurer que le pied du
clip de xation universel est aligné avec l’arrière de
votre dispositif.
3 Ajustez manuellement la webcam vers le haut/bas
pour vous cadrer au mieux.
18 Français

Fixation sur un trépied*
1 Retirez le clip de xation universel amovible de
lawebcam.
2 Recherchez le letage du trépied de ¼ pouce sous
lawebcam.
3 Sécurisez la webcam sur le trépied en la vissant sur
leletage ¼ pouce.
4 Placez votre webcam sur le trépied selon
votreconvenance dans la meilleure position
pourvouscadrer.
* Trépied non inclus
19 Français

USB 2.0
USB 3.0
CONNEXION DE LA WEBCAM VIA USBA
Branchez l’extrémité du câble USB-C à la webcam,
etleconnecteur USB-A sur le port USB-A de
votreordinateur.
CONNEXION RÉUSSIE
Le témoin lumineux d’activité s’allumera lorsque
lawebcam est utilisée par une application.
WEBCAM:
Hauteur x largeur x profondeur:
27mm (1,06pouce) x 102mm (4,02pouces) x 27mm (1,04pouce)
Longueur du câble: 2,2m (7,2pieds)
Poids: 63g (2,22onces)
CLIP DE FIXATION AMOVIBLE
Hauteur x largeur x profondeur:
19mm (0,75pouce) x 36mm (1,42pouce) x 63mm (2,48pouces)
Poids: 44g (1,55once)
DIMENSIONS
www.logitech.com/support/brio
© 2020 Logitech, Logi et le logo Logitech sont des marques commerciales ou déposées de Logitech
Europe S.A. et/ou de ses sociétés aliées aux États-Unis et dans d'autres pays. Logitech décline
toute responsabilité en cas d'erreurs susceptibles de s'être glissées dans le présent manuel.
Lesinformations énoncées dans ce document peuvent faire l'objet de modications sans préavis.
Pagina se încarcă...
Pagina se încarcă...
Pagina se încarcă...
Pagina se încarcă...
Pagina se încarcă...
Pagina se încarcă...
Pagina se încarcă...
Pagina se încarcă...
Pagina se încarcă...
Pagina se încarcă...
Pagina se încarcă...
Pagina se încarcă...
Pagina se încarcă...
Pagina se încarcă...
Pagina se încarcă...
Pagina se încarcă...
Pagina se încarcă...
Pagina se încarcă...
Pagina se încarcă...
Pagina se încarcă...
Pagina se încarcă...
Pagina se încarcă...
Pagina se încarcă...
Pagina se încarcă...
Pagina se încarcă...
Pagina se încarcă...
Pagina se încarcă...
Pagina se încarcă...
Pagina se încarcă...
Pagina se încarcă...
Pagina se încarcă...
Pagina se încarcă...
Pagina se încarcă...
Pagina se încarcă...
Pagina se încarcă...
Pagina se încarcă...
Pagina se încarcă...
Pagina se încarcă...
Pagina se încarcă...
Pagina se încarcă...
Pagina se încarcă...
Pagina se încarcă...
Pagina se încarcă...
Pagina se încarcă...
Pagina se încarcă...
Pagina se încarcă...
Pagina se încarcă...
Pagina se încarcă...
Pagina se încarcă...
Pagina se încarcă...
Pagina se încarcă...
Pagina se încarcă...
Pagina se încarcă...
Pagina se încarcă...
Pagina se încarcă...
Pagina se încarcă...
Pagina se încarcă...
Pagina se încarcă...
Pagina se încarcă...
Pagina se încarcă...
Pagina se încarcă...
Pagina se încarcă...
Pagina se încarcă...
Pagina se încarcă...
Pagina se încarcă...
Pagina se încarcă...
Pagina se încarcă...
Pagina se încarcă...
Pagina se încarcă...
Pagina se încarcă...
Pagina se încarcă...
Pagina se încarcă...
Pagina se încarcă...
Pagina se încarcă...
Pagina se încarcă...
Pagina se încarcă...
Pagina se încarcă...
Pagina se încarcă...
Pagina se încarcă...
Pagina se încarcă...
Pagina se încarcă...
Pagina se încarcă...
Pagina se încarcă...
Pagina se încarcă...
Pagina se încarcă...
Pagina se încarcă...
Pagina se încarcă...
Pagina se încarcă...
Pagina se încarcă...
Pagina se încarcă...
Pagina se încarcă...
Pagina se încarcă...
Pagina se încarcă...
Pagina se încarcă...
Pagina se încarcă...
Pagina se încarcă...
Pagina se încarcă...
Pagina se încarcă...
Pagina se încarcă...
Pagina se încarcă...
Pagina se încarcă...
Pagina se încarcă...
Pagina se încarcă...
Pagina se încarcă...
Pagina se încarcă...
Pagina se încarcă...
Pagina se încarcă...
Pagina se încarcă...
Pagina se încarcă...
Pagina se încarcă...
Pagina se încarcă...
Pagina se încarcă...
Pagina se încarcă...
Pagina se încarcă...
Pagina se încarcă...
Pagina se încarcă...
Pagina se încarcă...
Pagina se încarcă...
Pagina se încarcă...
Pagina se încarcă...
Pagina se încarcă...
Pagina se încarcă...
Pagina se încarcă...
Pagina se încarcă...
Pagina se încarcă...
Pagina se încarcă...
Pagina se încarcă...
Pagina se încarcă...
Pagina se încarcă...
Pagina se încarcă...
Pagina se încarcă...
Pagina se încarcă...
Pagina se încarcă...
Pagina se încarcă...
Pagina se încarcă...
Pagina se încarcă...
Pagina se încarcă...
Pagina se încarcă...
Pagina se încarcă...
Pagina se încarcă...
Pagina se încarcă...
Pagina se încarcă...
Pagina se încarcă...
Pagina se încarcă...
Pagina se încarcă...
Pagina se încarcă...
Pagina se încarcă...
Pagina se încarcă...
Pagina se încarcă...
Pagina se încarcă...
Pagina se încarcă...
Pagina se încarcă...
Pagina se încarcă...
Pagina se încarcă...
Pagina se încarcă...
Pagina se încarcă...
-
 1
1
-
 2
2
-
 3
3
-
 4
4
-
 5
5
-
 6
6
-
 7
7
-
 8
8
-
 9
9
-
 10
10
-
 11
11
-
 12
12
-
 13
13
-
 14
14
-
 15
15
-
 16
16
-
 17
17
-
 18
18
-
 19
19
-
 20
20
-
 21
21
-
 22
22
-
 23
23
-
 24
24
-
 25
25
-
 26
26
-
 27
27
-
 28
28
-
 29
29
-
 30
30
-
 31
31
-
 32
32
-
 33
33
-
 34
34
-
 35
35
-
 36
36
-
 37
37
-
 38
38
-
 39
39
-
 40
40
-
 41
41
-
 42
42
-
 43
43
-
 44
44
-
 45
45
-
 46
46
-
 47
47
-
 48
48
-
 49
49
-
 50
50
-
 51
51
-
 52
52
-
 53
53
-
 54
54
-
 55
55
-
 56
56
-
 57
57
-
 58
58
-
 59
59
-
 60
60
-
 61
61
-
 62
62
-
 63
63
-
 64
64
-
 65
65
-
 66
66
-
 67
67
-
 68
68
-
 69
69
-
 70
70
-
 71
71
-
 72
72
-
 73
73
-
 74
74
-
 75
75
-
 76
76
-
 77
77
-
 78
78
-
 79
79
-
 80
80
-
 81
81
-
 82
82
-
 83
83
-
 84
84
-
 85
85
-
 86
86
-
 87
87
-
 88
88
-
 89
89
-
 90
90
-
 91
91
-
 92
92
-
 93
93
-
 94
94
-
 95
95
-
 96
96
-
 97
97
-
 98
98
-
 99
99
-
 100
100
-
 101
101
-
 102
102
-
 103
103
-
 104
104
-
 105
105
-
 106
106
-
 107
107
-
 108
108
-
 109
109
-
 110
110
-
 111
111
-
 112
112
-
 113
113
-
 114
114
-
 115
115
-
 116
116
-
 117
117
-
 118
118
-
 119
119
-
 120
120
-
 121
121
-
 122
122
-
 123
123
-
 124
124
-
 125
125
-
 126
126
-
 127
127
-
 128
128
-
 129
129
-
 130
130
-
 131
131
-
 132
132
-
 133
133
-
 134
134
-
 135
135
-
 136
136
-
 137
137
-
 138
138
-
 139
139
-
 140
140
-
 141
141
-
 142
142
-
 143
143
-
 144
144
-
 145
145
-
 146
146
-
 147
147
-
 148
148
-
 149
149
-
 150
150
-
 151
151
-
 152
152
-
 153
153
-
 154
154
-
 155
155
-
 156
156
-
 157
157
-
 158
158
-
 159
159
-
 160
160
-
 161
161
-
 162
162
-
 163
163
-
 164
164
-
 165
165
-
 166
166
-
 167
167
-
 168
168
-
 169
169
-
 170
170
-
 171
171
-
 172
172
-
 173
173
-
 174
174
-
 175
175
-
 176
176


Logitech Brio Ultra HD Pro Business Webcam Manual de utilizare
- Tip
- Manual de utilizare
- Acest manual este potrivit și pentru
în alte limbi
Lucrări înrudite
-
Logitech C925e Business Webcam Manual de utilizare
-
Logitech C922 Manualul utilizatorului
-
Logitech C920X Pro Manualul utilizatorului
-
-
-
-
-
-
-
Alte documente
-
DeLOCK 96400 Manual de utilizare
-
Hama C-650 Face Tracking Webcam Manual de utilizare
-
 MACLEAN MC-164 Tripod Stand Manual de utilizare
-
Acme Made CA04 Manual de utilizare
-
Targus ASF133WEU Manualul proprietarului
-
Targus Privacy Screen 17 Widescreen Manual de utilizare
-
