Philips HU4801/01 Manual de utilizare
- Categorie
- Umidificatoare
- Tip
- Manual de utilizare

HU4801
EN User manual 1
CS Příručka pro uživatele 11
HU Felhasználói kézikönyv 21
PL Instrukcja obsługi 33
RO Manual de utilizare 46
SK Príručka užívateľa 59
Register your product and get support at
www.philips.com/welcome
Always there to help you
Question?
Contact
Philips
Specifications are subject to change without notice
© 2015 Koninklijke Philips N.V.
All rights reserved.
4241 210 83781

User manual
Warranty
A
B
C
D
E
F G
1
2
MAX
3 4
O
F
F
H
I
G
H
L
O
W
5
O
F
F
H
I
G
H
L
O
W
6
O
F
F
H
I
G
H
L
O
W
7 8
9
Tap water
1 hour
10
11 12 13
14

1
EN
English
Contents
1 Important 2
Safety 2
2 Your humidier 5
What's in the box 5
3 Getting started 5
Prepare for humidication 5
4 Using the humidier 6
Switch the humidier on and o 6
Water level 6
Rell water 6
5 Cleaning your humidier 7
Clean the body of the humidier 7
Clean the water tank 7
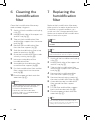
6 Cleaning the humidication
lter 8
7 Replacing the
humidication lter 8
8 Troubleshooting 9
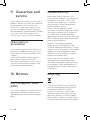
9 Guarantee and service 10
Order parts or accessories 10
10 Notices 10
Electromagnetic elds (EMF) 10
Compliance with EMF 10
Recycling 10

2
EN
1 Important
Safety
Read this user manual carefully before
you use the humidier, and save it for
future reference.
Danger
• Do not spray any
ammable materials such
as insecticides or fragrance
around the humidier.
• The water in the water tank
is not suitable for drinking.
Do not drink this water
and do not use it to feed
animals or to water plants.
When you empty the water
tank, pour the water down
the drain.
Warning
• Check if the voltage
indicated on the bottom of
the humidier corresponds
to the local power voltage
before you connect the
humidier.
• If the power cord is
damaged, you must have
it replaced by Philips, a
service center authorized
by Philips, or similarly
qualied persons in order
to avoid a hazard.
• Do not use the humidier
if the plug, the power cord,
or the humidier itself is
damaged.
• This appliance can be
used by children aged
from 8 years and above
and persons with reduced
physical, sensory or
mental capabilities or
lack of experience and
knowledge if they have
been given supervision or
instruction concerning use
of the appliance in a safe
way and understand the
hazards involved. Cleaning
and maintenance shall
not be made by children
without supervision.
• This appliance is not a
toy. Children should be
supervised to ensure that
they do not play with the
humidier.
• Do not block the air inlet
and outlet, e.g. by placing
items on the air outlet or in
front of the air inlet.

3
EN
English
Caution
• If the power socket used to
power the humidier has
poor connections, the plug
of the humidier becomes
hot. Make sure that you
plug the humidier into a
properly connected power
socket.
• Always place and use
the humidier on a dry,
stable, level, and horizontal
surface.
• Do not place anything on
top of the humidier and
do not sit on the humidier.
• Make sure that the
humidier is well
assembled/connected
every time after you clean
it or after you remove
the upper cover and/
or water tank for relling.
The humidier must be
properly assembled to
deliver a good and safe
performance.
• Only use the original
Philips lter specially
intended for this humidier.
Do not use any other lter.
• Avoid knocking against the
humidier (the air inlet and
outlet in particular) with
hard objects.
• Do not insert your ngers
or objects into the air
outlet or the air inlet to
prevent physical injury
or malfunctioning of the
humidier.
• Do not use this humidier
when you have used
indoor smoke-type insect
repellents or in places
with oily residues, burning
incense, or chemical
fumes.
• Do not use the humidier
near gas appliances,
heating devices or
replaces.
• Always unplug the
humidier after use and
before you clean it.
• Do not ll water from the
air outlets on top of the
humidier.
• Place the humidier
properly to prevent
children from knocking it
over.

4
EN
• When the humidier is
not used for a long time,
bacteria and mold may
grow on the lters. Check
the lters before you start
using the humidier again.
If the lter is very dirty with
dark spots, replace it (see
chapter ‘Replacing the
humidication lter’).
• Do not wash the lter in a
washing machine or dish
washer, otherwise the lter
will be deformed.
• The humidier is only
intended for household
use under normal
operating conditions.
• Clean the water tank and
humidication lter every
week to keep it clean.
• Only ll the water tank with
cold tap water. Do not use
ground water or hot water.
• Do not put any substance
other than water in the
water tank. Do not add
fragrance or chemical
substance into the water.
Use only water (tap,
puried, mineral, any sort
of potable water).
• If you do not use the
humidier for a long time,
clean the water tank and
dry the humidication lter.
• If you need to move the
humidier, disconnect the
humidier from the power
supply rst. Then empty
the water tank, and carry
the humidier horizontally.

5
EN
English
2 Your humidifier
Congratulations on your purchase, and
welcome to Philips!
To fully benet from the support that
Philips oers, register your product at
www.philips.com/welcome.
The Philips humidier brings fresh,
humidied air to your house for the
health of your family.
It oers you advanced evaporation
system with NanoCloud technology,
using a special humidication lter
which adds H2O molecules to the dry
air, and produces healthy humid air
without formation of water mist. Its
humidication lter retains bacteria,
calcium and other particles from the
water. It delivers only pure humidied
air in your home. No more dry air
in the winter season or from the air
conditioning.
Read this user manual carefully before
you install and use the humidier. Save
it for future reference.
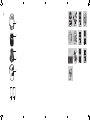
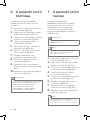
What's in the box
Check and identify the contents of your
package (g a):
A Upper unit
B Humidication lter (HU4102)
C Filter support
D Float
E Water tank
F User manual
G Warranty
3 Getting started
Prepare for
humidication
1
Hold by both sides of the upper unit
and lift it up (g b).
2 Fill the water tank with cold tap
water until water reaches the
maximum water level indication
(g c).
3 Place the upper unit back onto the
water tank (g d).

6
EN
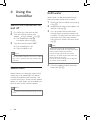
4 Using the
humidifier
Switch the humidier on
and o
1
Put the plug in the wall socket.
2 Turn the control knob to low
speed
or high speed (g e).
» The speed light and the
humidier are on (g f).
3 Turn the control knob to OFF.
» The speed light is o.
» The humidier is o.
Note
• The humidier releases very ne invisible
mist, so it is normal that you cannot see
the mist.
Water level
When there is not enough water in the
water tank, the speed light will be o
and the humidier stops working. The
control knob stays at the chosen speed.
When you rell water, the humidier will
resume work at the chosen speed.
Note
•
It is normal to nd some water left in the
tank.
Rell water
Water level can be observed through
the transparent water tank window.
1 Switch o the humidier and unplug
it (g g).
2 Hold by both sides of the upper unit
and lift it up (g b).
3 You can observe the water level
through the transparent water tank
window. Fill the water tank with cold
tap water until the water reaches
the maximum water indication level
(g c).
Note
• When lling water, do not exceed the
maximum water level, or water might leak
from the drain hole and air inlets.
• Do not shake the water tank when
moving it, or water might leak from the
drain hole and air inlets.
• Do not ll water through the air outlets
on top of the humidier.
4 Place the upper unit back onto the
water tank (g d).

7
EN
English
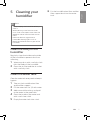
5 Cleaning your
humidifier
Note
•
Always unplug the humidier before you
clean it.
• When pouring water from the water
tank, make sure to pour water from the
opposite side of the drain hole and air
inlets.
• Never use abrasive, aggressive, or
ammable cleaning agents such as
bleach or alcohol to clean any part of the
humidier.
Clean the body of the
humidier
Regularly clean the inside and outside
of the humidier to prevent dust from
collecting.
1 Wipe away dust with a soft dry cloth
from the body of the humidier.
2 Clean the air inlet and the air outlet
with a soft dry cloth.
Clean the water tank
Clean the water tank every week to keep it
hygienic.
1 Take out the humidication lter
and the lter support.
2 Fill the water tank for 1/3 with water.
3 Add some mild washing-up liquid
to the water in the water tank.
4 Clean the inside of the water tank
with a soft clean cloth.
5 Empty the water tank into a sink.
6 Put the humidication lter and the
lter support back into the water
tank.

8
EN
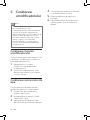
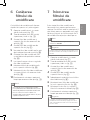
6 Cleaning the
humidification
filter
Clean the humidication lter every
week to keep it hygienic.
1 Switch o the humidier and unplug
it (g g).
2 Hold by both sides of the upper unit
and lift it up (g b).
3 Take out the humidication lter
and the lter support from the water
tank (g h).
4 Remove the humidication lter
from the lter support (g i).
5 Soak the humidication lter in tap
water for one hour (g j).
6 Rinse the humidication lter under
a slowly running tap (g k).
7 Let excess water drip o the
humidication lter.
8 Assemble the humidication lter
round the lter support (g l).
9 Put the humidication lter and the
lter support back into the water
tank (g m).
10 Place the upper unit back onto the
water tank (g d).
Note
• Do not squeeze or wring the lter. This
might damage the lter and impact
humidication performance.
• Do not dry the lter under direct
sunlight, unless it is assembled back
onto the lter support
7 Replacing the
humidification
filter
Replace the humidication lter every
three months for optimal performance.
If the lter is in good condition, you
could use it for a longer period of time.
Make sure to replace the humidication
lter at least once a year.
Note
•
Use only Philips original humidication lter
HU4102.
Tip
•
Register your product at www.philips.com for
further information on how to replace your lter.
1 Switch o the humidier and unplug
it (g g).
2 Hold by both sides of the upper unit
and lift it up (g b).
3 Take out the humidication lter
and the lter support from the water
tank (g h).
4 Remove the humidication lter
from the lter support (g i).
5 Remove the packaging material of
the new humidication lter (g n).
6 Assemble the new humidication
lter around the lter support
(g l).
7 Put the lter and the lter support
back into the water tank (g m).
8 Place the upper unit back onto the
water tank (g d).
Tip
•
You can easily nd more information about
how to replace the lter in our web page or by
calling our Consumer Care Center.

9
EN
English
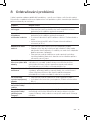
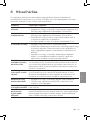
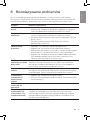
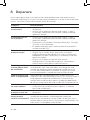
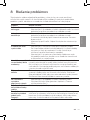
8 Troubleshooting
This chapter summarizes the most common problems you could encounter with the
humidier. If you are unable to solve the problem with the information below, contact
the Consumer Care Center in your country.
Problem Possible solution
The humidier does
not work.
• Make sure that there is power supply to the humidier.
• Make sure that the water tank is lled with water and the
upper unit is placed properly onto the water tank.
There is no air
humidication.
• Make sure that the water tank is lled with water and the
upper unit is placed properly onto the water tank.
• Your room might have too much ventilation. Please close
doors and windows.
• Your room size is too big. The recommended room size is
25m
2
.
The water tank
leaks.
• Make sure that the humidier is not overlled with water.
• Make sure that the humidier is well assembled/connected
every time after you clean it or after you remove the upper
unit and/or water tank for relling.
• Make sure that the water tank is properly placed. If the
problem persists, contact the Consumer Care Center in your
country.
There are some
white deposits on
the humidication
lter.
The white deposits are called scale and they consist of
minerals from the water. Scale on the humidication lter
aects the humidifying performance, however it does not harm
your health. Please follow the cleaning instructions in the user
manual.
The lter turns
yellowish after some
time.
The yellow deposits is a natural eect of the wick material,
and it has no impact on humidication performance. Clean the
humidication lter frequently to remove the scale, and replace
the humidication lter every three month.
There is unpleasant
smell coming out
from the humidier.
• Make sure that the water tank is lled with water.
• Clean the humidication lter (see chapter ‘Cleaning the
humidication lter’).
No air comes out of
the air outlet.
Plug the humidier into the power supply and switch on.
I do not see visible
mist coming out of
the humidier. Is it
working?
When mist is very ne, it is invisible. This humidier has a
NanoCloud humidication technology, which produces healthy
humid air from the outlet area without formation of water mist.
Therefore, you cannot see the mist.

10
EN
Compliance with EMF
Koninklijke Philips Electronics N.V.
manufactures and sells many products
targeted at consumers, which, like
any electronic apparatus, in general
have the ability to emit and receive
electromagnetic signals.
One of Philips’ leading Business
Principles is to take all necessary health
and safety measures for our products,
to comply with all applicable legal
requirements and to stay well within the
EMF standards applicable at the time of
producing the products.
Philips is committed to develop,
produce and market products that
cause no adverse health eects. Philips
conrms that if its products are handled
properly for their intended use, they
are safe to use according to scientic
evidence available today.
Philips plays an active role in the
development of international EMF
and safety standards, enabling Philips
to anticipate further developments in
standardization for early integration in
its products.
Recycling
This symbol means that this product
shall not be disposed of with normal
household waste (2012/19/EU).
Follow your country’s rules for the
separate collection of electrical and
electronic products. Correct disposal
helps prevent negative consequences
for the environment and human health.
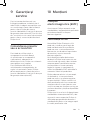
9 Guarantee and
service
If you need information or if you have a
problem, please visit the Philips website
at www.philips.com or contact the
Philips Consumer Care Center in your
country (you nd its phone number in
the worldwide guarantee leaet). If there
is no Consumer Care Centre in your
country, go to your local Philips dealer.
Order parts or
accessories
If you have to replace a part or want to
purchase an additional part, go to your
Philips dealer or visit www.philips.com/
support.
If you have problems obtaining the
parts, please contact the Philips
Consumer Care Center in your country
(you will nd its phone number in the
worldwide guarantee leaet).
10 Notices
Electromagnetic elds
(EMF)
This Philips appliance complies with all
applicable standards and regulations
regarding exposure to electromagnetic
elds.

11
CS
Čeština
Obsah
1 Důležité 13
Bezpečnost 13
2 Váš zvlhčovač 16
Obsah balení 16
3 Začínáme 16
Příprava na zvlhčování 16
4 Použití zvlhčovače 17
Zapnutí a vypnutí zvlhčovače 17
Hladina vody 17
Doplnění vody 17
5 Čištění zvlhčovače 18
Čištění tělesa zvlhčovače 18
Čištění nádržky na vodu 18
6 Výměna zvlhčovacího ltru 18
7 Výměna zvlhčovacího ltru 19
8 Odstraňování problémů 20
9 Záruka a servis 21
Objednání dílů nebo doplňků 21
10 Upozornění 21
Elektromagnetická pole (EMP) 21
Soulad se standardy EMP 21
Recyklace 22

12
CS
1 Důležité
Bezpečnost
Před použitím zvlhčovače si pečlivě
přečtěte tuto uživatelskou příručku a
uschovejte ji pro budoucí použití.
Nebezpečí
• Kolem zvlhčovače
nerozstřikujte žádné
hořlavé látky, jako jsou
například insekticidy nebo
parfémy.
• Voda v nádržce není
vhodná k pití. Tuto vodu
nepijte a nepoužívejte
ji k napájení zvířat ani
k zalévání rostlin. Při
vyprazdňování nádržky
vylévejte vodu do odpadu.
Varování
• Před zapojením zvlhčovače
zkontrolujte, zda napětí
uvedené na spodní části
zvlhčovače odpovídá
napětí místní rozvodné sítě.
• Pokud by byl poškozen
napájecí kabel, musí jeho
výměnu provést společnost
Philips, autorizovaný servis
společnosti Philips nebo
obdobně kvalikovaní
pracovníci, aby se předešlo
možnému nebezpečí.
• Pokud objevíte závadu
na zástrčce, napájecím
kabelu nebo samotném
zvlhčovači, nepoužívejte
ho.
• Děti od 8 let věku a osoby
s omezenými fyzickými,
smyslovými nebo
duševními schopnostmi
nebo nedostatkem
zkušeností a znalostí
mohou tento přístroj
používat v případě, že jsou
pod dohledem nebo byly
poučeny o bezpečném
používání přístroje a
chápou rizika, která mohou
hrozit. Čištění a údržbu
nesmí provádět děti bez
dozoru.
• Tento přístroj není hračka.
Dohlédněte na to, aby si se
zvlhčovačem nehrály děti.
• Vyvarujte se zablokování
vstupu a výstupu vzduchu,
např. umístěním předmětů
na výstup vzduchu nebo
před vstup vzduchu.

13
CS
Čeština
Upozornění
• Pokud je v zásuvce použité
k napájení zvlhčovače
špatný kontakt, začne
se zástrčka zvlhčovače
přehřívat. Dbejte na to,
abyste zvlhčovač zapojili
do řádně instalované síťové
zásuvky.
• Zvlhčovač vždy umísťujte
a používejte na suchém,
stabilním, vyrovnaném a
vodorovném povrchu.
• Na zvlhčovač nic
nepokládejte a nesedejte
si na něj.
• Dbejte na to, aby byl
zvlhčovač po každém
čištění nebo odstranění
horního krytu či nádržky
na vodu kvůli doplnění
dobře sestaven a připojen.
Pro zajištění dobrého a
bezpečného výkonu, je
nutné zvlhčovač správně
sestavit.
• Používejte pouze originální
ltr značky Philips
určený přímo pro tento
zvlhčovač. Žádný jiný ltr
nepoužívejte.
• Dbejte na to, abyste do
zvlhčovače (zejména do
vstupu a výstupu vzduchu)
nenaráželi žádnými tvrdými
předměty.
• Aby se zabránilo úrazu
nebo závadě zvlhčovače,
nestrkejte do výstupu či
vstupu vzduchu prsty ani
předměty.
• Nepoužívejte tento
zvlhčovač, pokud jste
použili repelent proti
hmyzu kouřového typu
pro vnitřní prostory nebo
na místech se zbytky
oleje, zapálenou vonnou
tyčinkou nebo chemickými
výpary.
• Nepoužívejte zvlhčovač
v blízkosti plynových
zařízení, topných zařízení
nebo krbů.
• Po použití a před čištěním
zvlhčovač vždy odpojte.
• Nedoplňujte vodu
z výstupů vzduchu na horní
straně zvlhčovače.

14
CS
• Zvlhčovač řádně umístěte,
aby ho nemohly převrátit
děti.
• Pokud se zvlhčovač
dlouhou dobu nepoužívá,
může ve ltrech dojít
k množení bakterií či
plísně. Zkontrolujte ltry,
než začnete zvlhčovač
znovu používat. Pokud je
ltr velmi špinavý a jsou
na něm tmavé skvrny,
vyměňte ho (viz kapitola
„Výměna zvlhčovacího
ltru“).
• Neumývejte ltr v pračce
nebo myčce, došlo by
k jeho deformaci.
• Zvlhčovač je určen pouze
pro domácí použití za
běžných provozních
podmínek.
• Udržujte nádržku na vodu
a zvlhčovací ltr čisté a
čistěte je každý týden.
• Nádržku na vodu
plňte pouze studenou
kohoutkovou vodou.
Nepoužívejte podzemní
nebo horkou vodu.
• Nedávejte do nádržky
jinou látku než vodu.
Nepřidávejte do vody
parfémy nebo chemické
látky. Používejte pouze
vodu (kohoutkovou,
čištěnou, minerální,
libovolný druh pitné vody).
• Pokud zvlhčovač dlouhou
dobu nepoužíváte,
vyčistěte nádržku na vodu
a vysušte zvlhčovací ltr.
• Pokud potřebujete
zvlhčovač přesunout,
odpojte ho nejprve
od napájení. Potom
vyprázdněte nádržku
na vodu a zvlhčovač
přenášejte ve vodorovné
poloze.

15
CS
Čeština
2 Váš zvlhčovač
Gratulujeme k nákupu a vítáme vás
mezi uživateli výrobků společnosti
Philips!
Chcete-li plně využívat výhod, které
nabízí podpora společnosti Philips,
zaregistrujte svůj výrobek na adrese
www.Philips.com/welcome.
Zvlhčovač Philips přináší do vašeho
domu čerstvý a zvlhčený vzduch a
zajišťuje tak zdraví vaší rodiny.
Nabízí pokročilý odpařovací systém
s technologií NanoCloud: používá
speciální zvlhčovací ltr, který suchý
vzduch doplňuje o molekuly H2O a
produkuje tak zdravý vlhký vzduch, aniž
by vytvářel vodní opar. Jeho zvlhčovací
ltr zachytává bakterie, vápník a jiné
částečky ve vodě. Do vašeho domova
tak přináší pouze čistý, zvlhčený vzduch.
Už žádný suchý vzduch v zimě nebo
z klimatizace.
Před použitím zvlhčovače si pozorně
přečtěte tuto uživatelskou příručku.
Uschovejte ji pro budoucí použití.
Obsah balení
Zkontrolujte a identikujte obsah balení
(obrázek a):
A Horní jednotka
B Zvlhčovací ltr (HU4102)
C Držák ltru
D Plovák
E Nádržka na vodu
F Uživatelská příručka
G Záruka
3 Začínáme
Příprava na zvlhčování
1
Uchopte horní jednotku z obou
stran a zvedněte ji (obrázek b).
2 Naplňte nádržku studenou
kohoutkovou vodou, dokud hladina
nedosáhne ke značce maximální
hladiny vody (obrázek c).
3 Umístěte horní jednotku zpět na
nádržku na vodu (obrázek d).

16
CS
4 Použití
zvlhčovače
Zapnutí a vypnutí
zvlhčovače
1
Zasuňte zástrčku do síťové zásuvky.
2 Otočte ovladač na nízkou rychlost
nebo vysokou rychlost
(obrázek e).
» Kontrolka rychlosti a zvlhčovače
je zapnutá (obrázek f).
3 Otočte ovládací knoík do polohy
OFF.
» Kontrolka rychlosti je vypnutá.
» Zvlhčovač je vypnutý.
Poznámka
•
Zvlhčovač uvolňuje velmi jemný
neviditelný opar, takže je normální, že
žádný opar nevidíte.
Hladina vody
Když v nádržce není dostatek vody,
bude kontrolka rychlosti vypnutá a
zvlhčovač přestane pracovat. Ovládací
knoík zůstane na zvolené rychlosti.
Při doplnění vody zvlhčovač obnoví
činnost vybranou rychlostí.
Poznámka
•
Je normální, že se v nádržce nachází
trochu zbylé vody.
Doplnění vody
Hladinu vody je možné sledovat přes
průhledné okno nádržky.
1 Vypněte zvlhčovač a odpojte jej ze
sítě (obrázek g).
2 Uchopte horní jednotku z obou
stran a zvedněte ji (obrázek b).
3 Hladinu vody můžete sledovat
průhledným okénkem nádržky na
vodu. Naplňte nádržku studenou
kohoutkovou vodou, dokud hladina
nedosáhne ke značce maximální
hladiny vody (obr. c).
Poznámka
• Při plnění vodou nepřekračujte
maximální hladinu vody, z vypouštěcího
otvoru a vstupů vzduchu by mohla
vytéct voda.
• Při přesunování nádržkou s vodou
netřeste, z vypouštěcího otvoru a vstupů
vzduchu by mohla vytéct voda.
• Nedoplňujte vodu prostřednictvím
výstupů vzduchu na horní straně
zvlhčovače.
4 Umístěte horní jednotku zpět na
nádržku na vodu (obrázek d).

17
CS
Čeština
5 Čištění
zvlhčovače
Poznámka
• Před čištěním zvlhčovač vždy odpojte
ze sítě.
• Při vylévání vody z nádržky dbejte na
to, abyste vodu vylévali na opačné
straně, než je vypouštěcí otvor a vstupy
vzduchu.
• K čištění žádné části zvlhčovače nikdy
nepoužívejte abrazivní, agresivní
nebo hořlavé čisticí prostředky, jako je
například bělidlo nebo alkohol.
Čištění tělesa zvlhčovače
Těleso zvlhčovače pravidelně čistěte
zevnitř i zvenku, aby se na něm
neusazoval prach.
1 Suchým měkkým hadříkem otřete
prach z tělesa zvlhčovače.
2 Vstup a výstup vzduchu vyčistěte
suchým měkkým hadříkem.
Čištění nádržky na vodu
Čistěte nádržku na vodu každý týden,
aby zůstala hygienicky čistá.
1 Vyndejte zvlhčovací ltr a držák
ltru.
2 Naplňte nádržku z 1/3 vodou.
3 Do vody v nádržce přidejte jemný
kapalný prostředek na nádobí.
4 Vyčistěte vnitřní povrch nádržky na
vodu čistým měkkým hadříkem.
5 Nádržku na vodu vylijte do odpadu.
6 Vraťte zvlhčovací ltr a držák na něj
zpět do nádržky na vodu.
6 Výměna
zvlhčovacího
filtru
Čistěte zvlhčovací ltr na vodu každý
týden, aby zůstala hygienicky čistá.
1 Vypněte zvlhčovač a odpojte jej ze
sítě (obrázek g).
2 Uchopte horní jednotku z obou
stran a zvedněte ji (obrázek b).
3 Vyndejte zvlhčovací ltr a držák na
něj z nádržky na vodu (obrázek h).
4 Vyndejte zvlhčovací ltr z držáku
ltru (obrázek i).
5 Zvlhčovací ltr na jednu hodinu
namočte v kohoutkové vodě
(obrázek j).
6 Propláchněte zvlhčovací ltr pod
pomalu tekoucí vodou z kohoutku
(obrázek k).
7 Přebytečnou vodu nechte ze
zvlhčovacího ltru odkapat.
8 Nasaďte zvlhčovací ltr na držák
ltru (obrázek l).
9 Vraťte zvlhčovací ltr a držák na
něj zpět do nádržky na vodu
(obrázek m).
10 Umístěte horní jednotku zpět na
nádržku na vodu (obrázek d).
Poznámka
•
Filtr při čištění nemačkejte ani
neždímejte. Filtr by se mohl poškodit
a došlo by k narušení zvlhčovacího
výkonu.
• Filtr nesušte na přímém slunečním
světle, pokud jste ho nenasadili zpět do
držáku ltru.

18
CS
7 Výměna
zvlhčovacího
filtru
Optimálního výkonu dosáhnete, když
budete zvlhčovací ltr vyměňovat každé
tři měsíce. Jestliže je ltr v dobrém stavu,
je možné ho používat i delší dobu.
Dbejte na to, aby se zvlhčovací ltr
měnil alespoň jednou ročně.
Poznámka
•
Používejte pouze originální zvlhčovací ltr
Philips HU4102.
Upozornění
•
Další informace o výměně ltru získáte po
registraci svého výrobku na webu
www.philips.com.
1 Vypněte zvlhčovač a odpojte jej ze
sítě (obrázek g).
2 Uchopte horní jednotku z obou
stran a zvedněte ji (obrázek b).
3 Vyndejte zvlhčovací ltr a držák na
něj z nádržky na vodu (obrázek h).
4 Vyndejte zvlhčovací ltr z držáku
ltru (obrázek i).
5 Sundejte z nového zvlhčovacího
ltru obalový materiál (obrázek n).
6 Nasaďte nový zvlhčovací ltr na
držák ltru (obrázek l).
7 Vraťte ltr a držák na něj zpět do
nádržky na vodu (obrázek m).
8 Umístěte horní jednotku zpět na
nádržku na vodu (obrázek d).
Upozornění
•
Další informace o výměně ltru získáte na naší
webové stránce nebo po telefonu v našem
středisku péče o zákazníky.
Pagina se încarcă...
Pagina se încarcă...
Pagina se încarcă...
Pagina se încarcă...
Pagina se încarcă...
Pagina se încarcă...
Pagina se încarcă...
Pagina se încarcă...
Pagina se încarcă...
Pagina se încarcă...
Pagina se încarcă...
Pagina se încarcă...
Pagina se încarcă...
Pagina se încarcă...
Pagina se încarcă...
Pagina se încarcă...
Pagina se încarcă...
Pagina se încarcă...
Pagina se încarcă...
Pagina se încarcă...
Pagina se încarcă...
Pagina se încarcă...
Pagina se încarcă...
Pagina se încarcă...
Pagina se încarcă...
Pagina se încarcă...
Pagina se încarcă...
Pagina se încarcă...
Pagina se încarcă...
Pagina se încarcă...
Pagina se încarcă...
Pagina se încarcă...
Pagina se încarcă...
Pagina se încarcă...
Pagina se încarcă...
Pagina se încarcă...
Pagina se încarcă...
Pagina se încarcă...
Pagina se încarcă...
Pagina se încarcă...
Pagina se încarcă...
Pagina se încarcă...
Pagina se încarcă...
Pagina se încarcă...
Pagina se încarcă...
Pagina se încarcă...
-
 1
1
-
 2
2
-
 3
3
-
 4
4
-
 5
5
-
 6
6
-
 7
7
-
 8
8
-
 9
9
-
 10
10
-
 11
11
-
 12
12
-
 13
13
-
 14
14
-
 15
15
-
 16
16
-
 17
17
-
 18
18
-
 19
19
-
 20
20
-
 21
21
-
 22
22
-
 23
23
-
 24
24
-
 25
25
-
 26
26
-
 27
27
-
 28
28
-
 29
29
-
 30
30
-
 31
31
-
 32
32
-
 33
33
-
 34
34
-
 35
35
-
 36
36
-
 37
37
-
 38
38
-
 39
39
-
 40
40
-
 41
41
-
 42
42
-
 43
43
-
 44
44
-
 45
45
-
 46
46
-
 47
47
-
 48
48
-
 49
49
-
 50
50
-
 51
51
-
 52
52
-
 53
53
-
 54
54
-
 55
55
-
 56
56
-
 57
57
-
 58
58
-
 59
59
-
 60
60
-
 61
61
-
 62
62
-
 63
63
-
 64
64
-
 65
65
-
 66
66


Philips HU4801/01 Manual de utilizare
- Categorie
- Umidificatoare
- Tip
- Manual de utilizare
în alte limbi
- slovenčina: Philips HU4801/01 Používateľská príručka
- polski: Philips HU4801/01 Instrukcja obsługi
Lucrări înrudite
-
Philips HU4803/01 Manual de utilizare
-
-
Philips HU4816/10R1 Manual de utilizare
-
Philips HU4816/10 Manual de utilizare
-
Philips HU4816 Manual de utilizare
-
Philips HU4706/11 Manual de utilizare
-
-
-
-
Philips AC2729 Manual de utilizare
Alte documente
-
Zelmer ZAH11000 (Nawilżacz AH1001) Manual de utilizare
-
Vicks VUL520E1V1 Manual de utilizare
-
Zelmer ZAH15000 (Nawilżacz AH1500) Manual de utilizare
-
-
Concept DF101X Manual de utilizare
-
Meaco MeacoMist Deluxe Manual de utilizare
-
Meaco MeacoMist Standard Manual de utilizare