
B
E
G
H
I
J
F
D
A
C
OUTLINE
K
L
M
N
R
S
Q
P
T
O
1
2
2
EN User manual 1
CS Příručka pro uživatele 17
HU Felhasználói kézikönyv 33
PL Instrukcja obsługi 51
RO Manual de utilizare 69
SK Príručka užívateľa 87
UK Посібник користувача 105
© 2016 Koninklijke Philips N.V.
All rights reserved.
4241 210 93171
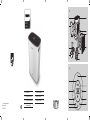
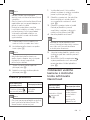
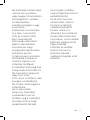
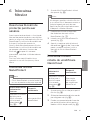
HU5930
HU5931

3S
1
3S
HU5931
3S
HU5930
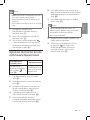
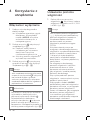
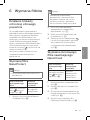
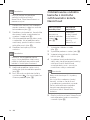
Water : Vinegar
1:1
1 hour
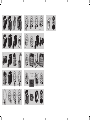
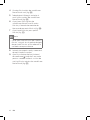
23 24 25 26
27 28 29
30
31 32 33 34
35 36 37
38
39
40 41
42
1
1
1
11
1
3S
HU5930
3S
HU5931
3 4 5 6
10
98
7
11 12 13 14
2221
20
19
18
171615
43 44

1EN
English
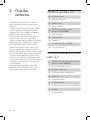
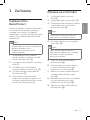
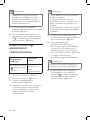
Contents
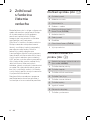
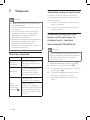
1 Important 2
Safety 2
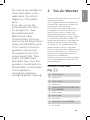
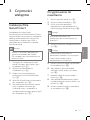
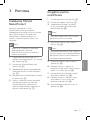
2 You Air Washer 5
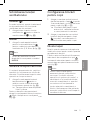
Product overview (g. a) 5
Controls Overview (g. b) 6
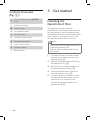
3 Get started 6
Installing the NanoProtect
lter 6
Preparing for humidication 7
4 Use the appliance 7
Switching on and o 7
Setting the humidity level 8
Changing the fan speed 8
Setting the timer 8
Setting the child lock 9
Water level 9
5 Cleaning 9
Cleaning schedule 9
Cleaning the body of the
appliance 10
Cleaning the water tank,
water tray and NanoCloud
rotary humidication wick 10
Cleaning the pre-lter 10
Descaling the NanoCloud
rotary humidication wick 11
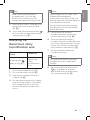
6 Replace the lter and wick 12
Understanding the healthy
air protect lock 12
Replacing the NanoProtect
lter 12
Replacing the NanoCloud
rotary humidication wick 12
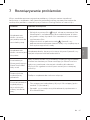
7 Troubleshooting 14
8 Guarantee and service 16
Order parts or accessories 16
9 Notices 16
Electromagnetic elds (EMF) 16
Recycling 16

2
EN
1 Important
Safety
Read this user manual carefully before
you use the appliance, and save it for
future reference.
Danger
• Do not let water or any
other liquid or flammable
detergent enter the
appliance to avoid electric
shock and/or a fire
hazard.
• Do not clean the
appliance with water,
any other liquid, or a
(flammable) detergent to
avoid electric shock and/
or a fire hazard.
• Do not spray any
flammable materials
such as insecticides or
fragrance around the
appliance.
• The water in the water
tank is not suitable for
drinking. Do not drink this
water and do not use it to
feed animals or to water
plants. When you empty
the water tank, pour the
water down the drain.
Warning
• Check if the voltage
indicated on the bottom
indicated at the rear of the
appliance corresponds to
the local power voltage
before you connect the
appliance.
• If the power cord is
damaged, you must have
it replaced by Philips, a
service center authorized
by Philips, or similarly
qualified persons in order
to avoid a hazard.
• Do not use the appliance
if the plug, the power
cord, or the appliance
itself is damaged.
• This appliance can be
used by children aged
from 8 years and above
and persons with reduced
physical, sensory or
mental capabilities or
lack of experience and
knowledge if they have
been given supervision or
instruction concerning use
of the appliance in a safe
way and understand the
hazards involved.

3EN
English
• Cleaning and user
maintenance shall not be
made by children without
supervision.
• Children should be
supervised to ensure that
they do not play with the
appliance.
• Do not block the air inlet
and outlet, e.g. by placing
items on the air outlet or
in front of the air inlet.
Caution
• This appliance is not
a substitute for proper
ventilation, regular
vacuum cleaning, or use
of an extractor hood or
fan while cooking.
• If the power socket used
to power the appliance
has poor connections,
the plug of the appliance
becomes hot. Make
sure that you plug the
appliance into a properly
connected power socket.
• Always place and use the
appliance on a dry, stable,
level, and horizontal
surface.
• Leave at least 20cm free
space behind and on both
sides of the appliance
and leave at least 30cm
free space above the
appliance.
• Do not place anything
on top of the appliance
and do not sit on the
appliance.
• Do not place the
appliance directly below
an air conditioner to
prevent condensation
from dripping onto the
appliance.
• Make sure all filters
are properly installed
before you switch on the
appliance.
• Only use the original
Philips filters specially
intended for this
appliance. Do not use any
other filters.
• Avoid knocking against
the appliance (the air inlet
and outlet in particular)
with hard objects.
• Always lift or move
the appliance by both
handles at the sides of the
appliance.

4
EN
• Do not insert your fingers
or objects into the air
outlet or the air inlet to
prevent physical injury
or malfunctioning of the
appliance.
• Do not use this appliance
when you have used
indoor smoke-type insect
repellents or in places
with oily residues, burning
incense, or chemical
fumes.
• Do not use the appliance
near gas appliances,
heating devices or
fireplaces.
• Always unplug the
appliance after use
and before filling water,
cleaning, or carrying out
other maintenance.
• Do not use the appliance
in a room with major
temperature changes,
as this may cause
condensation inside the
appliance.
• To prevent interference,
place the appliance
at least 2m away from
electrical appliances that
use airborne radio waves
such as TVs, radios, and
radio-controlled clocks.
• When the appliance is
not used for a long time,
bacteria may grow on the
filters. Check the filters
after a long period of
disuse. If the filters are
very dirty, replace them
(see the chapter "Replace
the filters").
• The appliance is only
intended for household
use under normal
operating conditions.
• Do not use the appliance
in wet surroundings or in
surroundings with high
ambient temperatures,
such as the bathroom,
toilet, or kitchen.
• The appliance does
not remove carbon
monoxide (CO) or
radon (Rn). It cannot be
used a safety device in
case of accidents with
combustion processes
and hazardous chemicals.
• Clean the water tank
every day to keep it clean.
• Only fill the water tank
with cold tap water. Do
not use ground water or
hot water.

5EN
English
• Do not put any substance
other than water in the
water tank. Do not put
fragrance in the water
tank.
• If you do not use the
humidification function
for a long time, clean
the water tank and
NanoCloud rotary
humidification wick tray,
and air dry the NanoCloud
rotary humidification wick.
• If you need to move the
appliance, disconnect
the appliance from the
power supply first. Then
empty the water tank
and water tray. Carry the
appliance horizontally by
the handles on both sides
of the appliance.
• Unplug the appliance
during filling and cleaning.
2 You Air Washer
Congratulations on your purchase, and
welcome to Philips!
To fully benefit from the support that
Philips offers, register your product at
www.Philips.com/welcome.
The Philips Air Washer brings fresh,
humidified air to your house for the
health of your family. It offers you
advanced evaporation system with
NanoCloud technology, using a special
humidification filter which adds H2O
molecules to the dry air, and produces
healthy humid air without formation
of water mist. Its humidification filter
retains bacteria, calcium and other
particles from the water. It delivers only
pure humidified air in your home. No
more dry air in the winter season or
from the air conditioning.
Read this user manual carefully before
you use the appliance, and save it for
future reference.
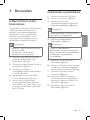
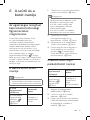
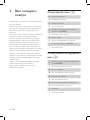
Product overview
(fig. a)
A Control panel
B Water tank
C Wick support
D Water tray
E
NanoCloud rotary humidification
wick (FY5156)
F Wick wheel
G Back panel
H Pre-filter
I NanoProtect filter (FY1114)
J Air outlet

6
EN
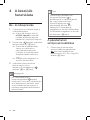
Controls Overview
(fig. b)
K
Air humidity light ring (HU5931
only)
L Child lock button
M Timer button
N Fan speed button
O On/off button
P Humidity level button
Q Temperature button
R Light on/off button
S Display Screen
T Reset button
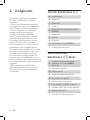
3 Get started
Installing the
NanoProtect filter
The appliance comes with the
NanoProtect filter fitted inside. Remove
the packaging of the filter before using
the appliance. Remove the NanoProtect
filter, unpack it, and place it back into
the appliance described as follows:
Note
• Make sure that the side with the tag
is pointing towards you.
• The pre-filter is fitted inside of the
back panel.
1 Pull the top part of the back panel
towards you to release it from the
appliance (fig. c).
2 Remove the NanoProtect filter from
the appliance (fig. d).
3 Remove all packaging materials of
the NanoProtect filter (fig. e).
4 Place the NanoProtect filter back
into the appliance (fig. f).
5 To reattach the back panel, mount
the panel onto the bottom of the
appliance first, and then push
the top of the panel against the
appliance (fig. g).

7EN
English
Preparing for
humidification
1 Pull out the water tank (fig. h).
2 Pull out the water tray (fig. i).
3 Remove all packaging material
of the NanoCloud rotary
humidification wick (fig. j).
Note
• The humidification wick has been
assembled on the wick wheel upon
purchase.
4 Place the wick wheel on the wick
support (fig. k).
Note
• When placing the wick wheel on the
wick support, make sure that the
projections on the wick wheel falls
into the corresponding grooves.
5 Place the water tray back into the
appliance (fig. l).
6 Turn the top cap of the water
tank anti-clockwise to unscrew it
(fig. m).
7 Fill the water tank with cold tap
water (fig. n).
8 Turn the top cap clockwise to tightly
lock it onto the water tank (fig. o).
9 Place the water tank back into the
appliance (fig. p).
4 Use the
appliance
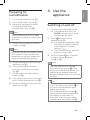
Switching on and off
1 Put the plug in the power socket.
» The appliance sounds. For
HU5931, all lights go on once
and then go out again.
2 Touch to switch on the
appliance (fig. q).
» The appliance operates under
the auto fan speed by default,
and the default humidity
setting is " ".
» The current humidity level will
display on the screen.
3 Touch and hold for 3 seconds
to switch off the appliance
(fig. r & s).
Note
• After the appliance is switched
off by the on/off button , if the
plug is still in the power socket, the
appliance will operate under the
previous settings when it is switched
on again.
Tip
• Touch the light on/off button to
turn on or off the indicator lights
and display screen.
• Touch the temperature button
once and the current temperature
will display on the screen for
3 seconds. After that the current
humidity level will display (fig. t).

8
EN
Setting the humidity
level
1 Touch the humidity button
repeatedly to set the desired air
humidity to 40%, 50% or 60%
(fig. u).
Note
• When the humidity level " " is
chosen, the humidity light ring will
be off. The appliance will keep
humidifying the room until the
ambient humidity level reaches
70%RH.
• In the auto mode, the appliance will
operate under fan speed 1 when the
target humidity level is reached. In
the manual fan speed mode, the
appliance will continue to operate
under the chosen fan speed.
• When the target humidity level is
reached, the wick wheel will stop
rotating. It will start rotating again
when the humidity drops below the
target level.
• If you want to increase the humidity
level quickly, you can select a
higher fan speed.
• For HU5931, the air humidity light
ring indicates whether the target
humidity level is reached. It lights
up blue when the humidity level is
reached and red when the ambient
humidity is below the preset setting.
Changing the fan speed
Auto ( )
In auto mode, the appliance selects
the fan speed in accordance with the
ambient air humidity.
1 Touch the fan speed button to
select auto ( ) (fig. v).
Manual
1 Touch the fan speed button
repeatedly to select the desired fan
speed (1, 2, 3 or 4) (fig. w).
Note
• Fan speed 4 is available for HU5931
only.
Setting the timer
With the timer, you can let the
appliance operate for a set number of
hours. When the set time has elapsed,
the appliance will automatically switch
off.
1 Touch the timer button
repeatedly to choose the number
of hours you want the appliance to
operate (fig. x).
» The timer is available from 1 to
8 hours.
To deactivate the timer function, touch
the timer button repeatedly until
displays on the screen (fig. y).

9EN
English
Setting the child lock
1 Touch and hold the child lock
button for 3 seconds to activate
child lock (fig. z & {).
» When the child lock is on,
all the other buttons are not
responsive.
2 Touch and hold the child lock
button for 3 seconds again to
deactivate child lock.
Water level
The water level in the water tank is
visible through the water level window
on the water tank.
When there is not enough water in
the water tank, the water refill light
flashes to indicate that you have to refill
the water tank (fig. |).
Note
• When there is no water in the
water tank, the wick wheel will stop
rotating. In the auto mode, the
appliance will operate under fan
speed 1. In the manual fan speed
mode, the appliance will continue
to operate under the chosen fan
speed. When the water tank is
refilled with water, the wick wheel
will start rotating again.
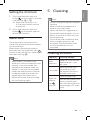
5 Cleaning
Note
• Always unplug the appliance before
cleaning.
• Never immerse the appliance in
water or any other liquid.
• Never use abrasive, aggressive, or
flammable cleaning agents such as
bleach or alcohol to clean any part
of the appliance.
• Only the pre-filter and NanoCloud
rotary humidification wick are
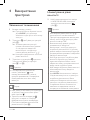
washable. The NanoProtect filter
is not washable nor vacuum
cleanable.
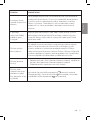
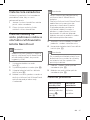
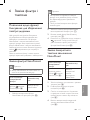
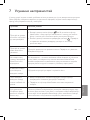
Cleaning schedule
Frequency Cleaning method
When
necessary
Wipe the surface of the
appliance with a soft
dry cloth.
Every week
Rinse the water tank,
the water tray and
the NanoCloud rotary
humidification wick.
When the
cleaning
icon
lights up
Clean the pre-filter.
Descale the NanoCloud
rotary humidification
wick with the water and
white vinegar (5% acetic
acid).

10
EN
5 Wipe the outside of the water tank
and water tray dry.
6 Place the wick wheel on the wick
support (fig. k).
Note
• When placing the wick wheel on the
wick support, make sure that the
projections on the wick wheel falls
into the corresponding grooves.
7 Place the water tray back into the
appliance (fig. l).
8 Place the water tank back into the
appliance (fig. p).
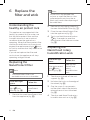
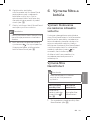
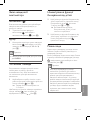
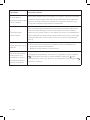
Cleaning the pre-filter
Filter alert light
status
Follow this
Cleaning light
goes on
(fig. )
Clean the pre-
filter
Note
• Only the pre-filter and NanoCloud
rotary humidification wick are
washable. The NanoProtect filter is
not washable.
1 Pull the top part of the back panel
towards you to release it from the
appliance (fig. c).
2 To remove the pre-filter, press the
two clips down and pull the filter
towards you (fig. €).
3 Wash the pre-filter under a running
tap. If the pre-filter is very dirty, use
a soft brush to brush away the dust
(fig. ).
4 Air dry the pre-filter.
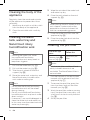
Cleaning the body of the
appliance
Regularly clean the inside and outside
of the appliance to prevent dust from
collecting.
1 Wipe away dust with a soft dry cloth
from the body of the appliance.
2 Clean the air outlet with a soft dry
cloth.
Cleaning the water
tank, water tray and
NanoCloud rotary
humidification wick
Note
• Cleaning the water tank, water
tray and NanoCloud rotary
humidification wick every week to
keep them hygienic.
1 Pull out the water tank (fig. h).
2 Pull out the water tray (fig. }).
3 Take the wick wheel off the wick
support (fig. ~).
4 Rinse the water tank, water tray and
NanoCloud rotary humidification
wick under a running tap.
Note
• Do not take the NanoCloud rotary
humidification wick off the wheel
during cleaning.
• Do not scrub the NanoCloud rotary
humidification wick or place it under
direct sunlight.
• If necessary, use a mild detergent to
clean the water tank and water tray.
In this case, rinse the water tank and
water tray thoroughly.

11EN
English
Note
• Make sure that the pre-filter is
completely dry. If it is still wet,
bacteria may multiply in it and
shorten the lifetime of the pre-filter.
5 After the pre-filter is completely dry,
place it back into the back panel
(fig. ‚).
6 Touch and hold the reset button
for 3 seconds to reset the pre-filter
cleaning time (fig. ƒ).
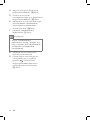
Descaling the
NanoCloud rotary
humidification wick
Filter alert light
status
Follow this
Cleaning light
goes on (fig. )
Descale the
NanoCloud
rotary
humidification
wick
1 Pull out the water tank (fig. h).
2 Pull out the water tray (fig. }).
3 Take the wick wheel off the wick
support (fig. ~).
4 Mix the white vinegar with an equal
amount of tap water in a container
that is large enough to soak the
NanoCloud rotary humidification
wick in.
Note
• White vinegar has 5% acetic acid.
• If there are white deposits
(limescale) on the filter, make sure
that the side with the white deposits
is immersed in the water.
• Do not take the NanoCloud rotary
humidification wick off the wheel
during descaling.
5 Let the NanoCloud rotary
humidification wick soak in the
solution for one hour (fig. „).
6 Rinse the NanoCloud rotary
humidification wick under the tap to
rinse away vinegar residues. During
rinsing, turn the wick so that both
front and back are rinsed (fig. …).
7 Air dry the NanoCloud rotary
humidification wick.
Note
• Do not put the NanoCloud rotary
humidification wick under direct
sunlight.
8 Touch and hold the reset button
for 3 seconds to reset the
NanoCloud rotary humidification
wick cleaning time (fig. ƒ).

12
EN
Note
• Do not touch the pleated filter
surface, or smell the filter as it has
collected pollutants from the air.
• Wash your hands after disposing of
the used filters.
2 Remove all packaging material of
the new NanoProtect filter (fig. e).
3 Place the new NanoProtect filter
into the appliance (fig. f).
4 Touch and hold the reset button
for 3 seconds to reset the
NanoProtect filter lifetime counter
(fig. ƒ).
Replacing the
NanoCloud rotary
humidification wick
Filter alert light
status
Follow this
Filter replacement
light starts
flashing (fig. †)
Replace the
NanoCloud
rotary
humidification
wick
1 Take the wick wheel off the wick
support (fig. ~).
2 Unfasten the locks on the edge of
the wheel (fig. ˆ).
3 Grip the snap-fit components
on the other side of the plate to
release the wick from the wheel
(fig. ‰).
4 Take the used NanoCloud rotary
humidification wick out (fig. Š).
6 Replace the
filter and wick
Understanding the
healthy air protect lock
This appliance is equipped with the
healthy air protect lock to make sure
that the Nano protect filter and the
humidification wick are in optimal
condition when the appliance is
operating. When the Nano protect filter
and the humidification wick are almost
expired, the replacement light starts
to flash to indicate that they need to be
replaced.
If you do not replace the filter and
wick in time, the appliance will stop
operating and get locked.
Replacing the
NanoProtect filter
Note
• The NanoProtect filter is not
washable nor vacuum cleanable.
Filter alert light
status
Follow this
Filter replacement
light starts
flashing (fig. †)
Replace the
NanoProtect
filter
1 Remove the used NanoProtect filter
from the appliance (fig. ‡).

13EN
English
5 Remove all packaging material
of the new NanoCloud rotary
humidification wick (fig. ‹).
6 Place the new NanoCloud rotary
humidification wick in the wick
wheel, and then fasten the locks on
the wick wheel (fig. Œ).
7 Place the wick wheel on the wick
support (fig. k).
Note
• When placing the wick wheel on the
wick support, make sure that the
projections on the wick wheel falls
into the corresponding grooves.
8 Place the water tray and water tank
back into the appliance.
9 Touch and hold the reset button
for 3 seconds to reset the
NanoCloud rotary humidification
wick lifetime counter (fig. ƒ).

14
EN
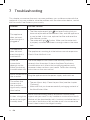
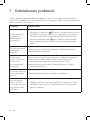
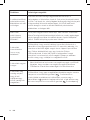
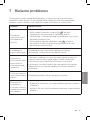
7 Troubleshooting
This chapter summarizes the most common problems you could encounter with the
appliance. If you are unable to solve the problem with the information below, contact
the Consumer Care Center in your country.
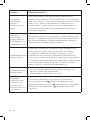
Problem Possible solution
The appliance
does not work
even though it is
plugged in.
• The filter replacement light has been flashing but you
have not replaced the NanoProtect filter, and the appliance
is now locked. In this case, replace the filter and reset the
filter lifetime counter.
• The water refill light flashes. Make sure the water tank
is properly installed and there is enough water in the water
tank.
The appliance
does not work
even though it is
switched on.
The appliance is working but the buttons are not responsive.
Check if the child lock is on.
There are
some white
deposits on the
NanoCloud rotary
humidification wick.
The white deposits are called scale and they consist of
minerals from the water. Scale on the NanoCloud rotary
humidification wick affects the humidifying performance,
however it does not harm your health. Follow the cleaning
instructions in the user manual.
No air comes out of
the air outlet.
Plug the appliance into the power supply and switch on.
The airflow that
comes out of
the air outlet is
significantly weaker
than before.
• The pre-filter is dirty. Clean the pre-filter (see the chapter
"Cleaning").
• Make sure that you have removed all packaging material of
the NanoProtect filter.
It takes a long time
to reach the target
humidity level.
NanoCloud technology evenly distributes invisible water
vapour into your room. In dry conditions moisture from the Air
Washer will be absorbed by walls, furniture, and other items in
your room. Ventilation of dry outside air will also increase the
time it takes to reach the target humidity.

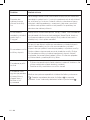
15EN
English
Problem Possible solution
I do not see water
vapor coming out
of the appliance. Is
it working?
When mist is very fine, it is invisible. The appliance has a
NanoCloud humidification technology, which produces healthy
humid air from the outlet area without formation of water mist.
Therefore, you cannot see the mist.
The appliance
produces a strange
smell.
The first few times you use the appliance, it may produce
a plastic smell. This is normal. However, if the appliance
produces a burnt smell, contact your Philips dealer or an
authorized Philips service centre. The appliance may also
produce an unpleasant smell when one of the filters is dirty. In
this case, clean or replace the filter concerned.
The appliance is
extra loud.
• You have not removed all packaging material of the filters.
Make sure that you have removed all packaging material.
• Change the fan speed to lower fan speed level.
The appliance still
indicates that I
need to replace a
filter, but I already
did.
Perhaps you did not touch and hold the reset button
correctly. Plug in the appliance, touch to switch on the
appliance, and touch and hold the reset button for
3 seconds.

16
EN
Compliance with EMF
Koninklijke Philips N.V. manufactures
and sells many products targeted at
consumers, which, like any electronic
apparatus, in general have the ability
to emit and receive electromagnetic
signals.
One of Philips' leading Business
Principles is to take all necessary health
and safety measures for our products,
to comply with all applicable legal
requirements and to stay well within the
EMF standards applicable at the time of
producing the products.
Philips is committed to develop,
produce and market products that
cause no adverse health effects. Philips
confirms that if its products are handled
properly for their intended use, they
are safe to use according to scientific
evidence available today.
Philips plays an active role in the
development of international EMF
and safety standards, enabling Philips
to anticipate further developments in
standardization for early integration in
its products.
Recycling
This symbol means that this product
shall not be disposed of with normal
household waste (2012/19/EU).
Follow your country’s rules for the
separate collection of electrical and
electronic products. Correct disposal
helps prevent negative consequences
for the environment and human health.
8 Guarantee and
service
If you need information or if you have a
problem, please visit the Philips website
at www.philips.com or contact the
Philips Consumer Care Center in your
country (you find its phone number
in the worldwide guarantee leaflet). If
there is no Consumer Care Centre in
your country, go to your local Philips
dealer.
Order parts or
accessories
If you have to replace a part or want to
purchase an additional part, go to your
Philips dealer or visit www.philips.com/
support.
If you have problems obtaining the
parts, please contact the Philips
Consumer Care Center in your country
(you can find its phone number in the
worldwide guarantee leaflet).
9 Notices
Electromagnetic fields
(EMF)
This Philips appliance complies with all
applicable standards and regulations
regarding exposure to electromagnetic
fields.

17
CS
Čeština
Obsah
1 Důležité 18
Bezpečnost 18
2 Čistička vzduchu 22
Přehled výrobku (obr. a) 22
Přehled ovládacích prvků
(obr. b) 22
3 Začínáme 23
Instalace ltru NanoProtect 23
Příprava na zvlhčování 23
4 Použití přístroje 24
Zapnutí a vypnutí 24
Nastavení úrovně vlhkosti 24
Změna rychlosti ventilátoru 25
Nastavení časovače 25
Nastavení dětské pojistky 25
Hladina vody 25
5 Čištění 26
Plán čištění 26
Čištění těla přístroje 26
Čištění nádržky na vodu,
tácku na vodu a otočného
knotu zvlhčovače
NanoCloud 26
Čištění předltru 27
Odstranění vodního
kamene z otočného knotu
zvlhčovače NanoCloud 27
6 Výměna ltru a knotu 28
Jak funguje zámek ochrany
zdravého vzduchu 28
Výměna ltru NanoProtect 28
Výměna otočného knotu
zvlhčovače NanoCloud 29
7 Odstraňování problémů 30
8 Záruka a servis 32
Objednání dílů nebo
doplňků 32
9 Upozornění 32
Elektromagnetická pole
(EMP) 32
Recyklace 32

18
CS
1 Důležité
Bezpečnost
Před použitím přístroje si pozorně
přečtěte tuto uživatelskou příručku a
uschovejte ji pro budoucí použití.
Nebezpečí
• Zamezte proniknutí
vody, jiné kapaliny nebo
hořlavého čisticího
prostředku do přístroje.
Předejdete tak úrazu
elektrickým proudem a/
nebo požáru.
• Přístroj nečistěte vodou,
jakoukoli jinou tekutinou
ani (hořlavým) čisticím
prostředkem. Předejdete
tak úrazu elektrickým
proudem a/nebo požáru.
• Kolem přístroje
nerozstřikujte žádné
hořlavé látky, jako jsou
například insekticidy nebo
parfémy.
• Voda v nádržce není
vhodná k pití. Tuto vodu
nepijte a nepoužívejte
ji k napájení zvířat ani
k zalévání rostlin. Při
vyprazdňování nádržky
vylévejte vodu do
odpadu.
Varování
• Před zapojením přístroje
zkontrolujte, zda napětí
uvedené na spodní
nebo zadní části přístroje
odpovídá napětí místní
rozvodné sítě.
• Pokud by byl poškozen
napájecí kabel, musí
jeho výměnu provést
společnost Philips,
autorizovaný servis
společnosti Philips nebo
obdobně kvalikovaní
pracovníci, aby se
předešlo možnému
nebezpečí.
• Pokud byste zjistili závadu
na zástrčce, na napájecím
kabelu nebo přímo na
přístroji, přístroj dále
nepoužívejte.
• Děti od 8 let věku a osoby
s omezenými fyzickými,
smyslovými nebo
duševními schopnostmi
nebo nedostatkem
zkušeností a znalostí
mohou tento přístroj
používat v případě, že jsou
pod dohledem nebo byly
poučeny o bezpečném
používání přístroje a
chápou rizika, která
mohou hrozit.
Pagina se încarcă...
Pagina se încarcă...
Pagina se încarcă...
Pagina se încarcă...
Pagina se încarcă...
Pagina se încarcă...
Pagina se încarcă...
Pagina se încarcă...
Pagina se încarcă...
Pagina se încarcă...
Pagina se încarcă...
Pagina se încarcă...
Pagina se încarcă...
Pagina se încarcă...
Pagina se încarcă...
Pagina se încarcă...
Pagina se încarcă...
Pagina se încarcă...
Pagina se încarcă...
Pagina se încarcă...
Pagina se încarcă...
Pagina se încarcă...
Pagina se încarcă...
Pagina se încarcă...
Pagina se încarcă...
Pagina se încarcă...
Pagina se încarcă...
Pagina se încarcă...
Pagina se încarcă...
Pagina se încarcă...
Pagina se încarcă...
Pagina se încarcă...
Pagina se încarcă...
Pagina se încarcă...
Pagina se încarcă...
Pagina se încarcă...
Pagina se încarcă...
Pagina se încarcă...
Pagina se încarcă...
Pagina se încarcă...
Pagina se încarcă...
Pagina se încarcă...
Pagina se încarcă...
Pagina se încarcă...
Pagina se încarcă...
Pagina se încarcă...
Pagina se încarcă...
Pagina se încarcă...
Pagina se încarcă...
Pagina se încarcă...
Pagina se încarcă...
Pagina se încarcă...
Pagina se încarcă...
Pagina se încarcă...
Pagina se încarcă...
Pagina se încarcă...
Pagina se încarcă...
Pagina se încarcă...
Pagina se încarcă...
Pagina se încarcă...
Pagina se încarcă...
Pagina se încarcă...
Pagina se încarcă...
Pagina se încarcă...
Pagina se încarcă...
Pagina se încarcă...
Pagina se încarcă...
Pagina se încarcă...
Pagina se încarcă...
Pagina se încarcă...
Pagina se încarcă...
Pagina se încarcă...
Pagina se încarcă...
Pagina se încarcă...
Pagina se încarcă...
Pagina se încarcă...
Pagina se încarcă...
Pagina se încarcă...
Pagina se încarcă...
Pagina se încarcă...
Pagina se încarcă...
Pagina se încarcă...
Pagina se încarcă...
Pagina se încarcă...
Pagina se încarcă...
Pagina se încarcă...
Pagina se încarcă...
Pagina se încarcă...
Pagina se încarcă...
Pagina se încarcă...
Pagina se încarcă...
Pagina se încarcă...
Pagina se încarcă...
Pagina se încarcă...
Pagina se încarcă...
Pagina se încarcă...
Pagina se încarcă...
Pagina se încarcă...
Pagina se încarcă...
Pagina se încarcă...
Pagina se încarcă...
Pagina se încarcă...
Pagina se încarcă...
Pagina se încarcă...
Pagina se încarcă...
Pagina se încarcă...
-
 1
1
-
 2
2
-
 3
3
-
 4
4
-
 5
5
-
 6
6
-
 7
7
-
 8
8
-
 9
9
-
 10
10
-
 11
11
-
 12
12
-
 13
13
-
 14
14
-
 15
15
-
 16
16
-
 17
17
-
 18
18
-
 19
19
-
 20
20
-
 21
21
-
 22
22
-
 23
23
-
 24
24
-
 25
25
-
 26
26
-
 27
27
-
 28
28
-
 29
29
-
 30
30
-
 31
31
-
 32
32
-
 33
33
-
 34
34
-
 35
35
-
 36
36
-
 37
37
-
 38
38
-
 39
39
-
 40
40
-
 41
41
-
 42
42
-
 43
43
-
 44
44
-
 45
45
-
 46
46
-
 47
47
-
 48
48
-
 49
49
-
 50
50
-
 51
51
-
 52
52
-
 53
53
-
 54
54
-
 55
55
-
 56
56
-
 57
57
-
 58
58
-
 59
59
-
 60
60
-
 61
61
-
 62
62
-
 63
63
-
 64
64
-
 65
65
-
 66
66
-
 67
67
-
 68
68
-
 69
69
-
 70
70
-
 71
71
-
 72
72
-
 73
73
-
 74
74
-
 75
75
-
 76
76
-
 77
77
-
 78
78
-
 79
79
-
 80
80
-
 81
81
-
 82
82
-
 83
83
-
 84
84
-
 85
85
-
 86
86
-
 87
87
-
 88
88
-
 89
89
-
 90
90
-
 91
91
-
 92
92
-
 93
93
-
 94
94
-
 95
95
-
 96
96
-
 97
97
-
 98
98
-
 99
99
-
 100
100
-
 101
101
-
 102
102
-
 103
103
-
 104
104
-
 105
105
-
 106
106
-
 107
107
-
 108
108
-
 109
109
-
 110
110
-
 111
111
-
 112
112
-
 113
113
-
 114
114
-
 115
115
-
 116
116
-
 117
117
-
 118
118
-
 119
119
-
 120
120
-
 121
121
-
 122
122
-
 123
123
-
 124
124
-
 125
125
-
 126
126


Philips HU5931/10 Manual de utilizare
- Tip
- Manual de utilizare
- Acest manual este potrivit și pentru
în alte limbi
- slovenčina: Philips HU5931/10 Používateľská príručka
- polski: Philips HU5931/10 Instrukcja obsługi
Lucrări înrudite
-
Philips AC2729/50 Manual de utilizare
-
-
Philips AC2729 Manual de utilizare
-
-
-
-
-
Philips HU4801/01 Manual de utilizare
-
Philips HU4803/01 Manual de utilizare
-