
ENGLISH
Tiếng Việt
Please read this manual carefully before operating
your set and retain it for future reference.
CEILING CASSETTE - 1WAY
OWNER’S MANUAL
AIR
CONDITIONER
www.lg.com
Copyright © 2020 LG Electronics Inc. All Rights Reserved.
MFL67798212
Rev.00_062620
*MFL67798212*

2 Indoor Unit
Table of contents
3 SAFETY PRECAUTIONS
7 PRIOR TO OPERATION
7 Preparing for Operation
7 Usage
7 Cleaning and Maintenance
7 Service
8 PART DESCRIPTION
8 Operation Indicator Lamp
9 Name and Function of Wireless Remote Controller
10 Name and function of wired remote controller(Accessory)
11 INSTALLATION INSTRUCTIONS
11 How to insert the Batteries
11 Wireless Remote Controller Maintenance
11 Operating Method
12 Installer Setting - Setting Address of Central Control
12 Installer Setting - Checking Address of Central Control
13 Installer Setting -How to enter installer setting mode
14 Installer Setting - Installer Setting Code Table
15 OWNER'S INSTRUCTION
15 Cooling Mode - Standard Operation
15 Cooling Mode - Power Cooling
16 Auto Operation Mode
17 Dehumidification Mode
18 Heating Mode
19 Fan Mode
20 TEMPERATURE SETTING/ROOM TEMPERATURE CHECKING
21 AIRFLOW SETTING
21 Up/Down Airflow Direction Control (Optional)
21 Left/Right Airflow Direction Control (Optional)
22 SUB FUNCTION
22 Auto Clean (Optional)
22 LCD Luminosity Control (Optional)
22 Celsius/Fahrenheit Switching
23 Individual vane angle control (Optional)
24 TIMER
24 Setting the Current Time
24 Sleep Timer Setting
24 On Timer Setting
25 Off Timer Setting
25 To cancel the Timer Setting
26 OPERATING INSTRUCTIONS
26 Forced Operation
26 Auto Restart Function
27 MAINTENANCE AND SERVICE
28 When the air conditioner is not going to be used for a long time.
28 Operation Tips
29 Before you call for service...
TABLE OF CONTENTS

Owner’s Manual 3
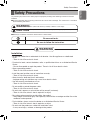
Safety Precautions
ENGLISH
To prevent injury to the user or other people and property damage, the following instructions must be
followed.
n Incorrect operation due to ignoring instruction will cause harm or damage. The seriousness is classified
by the following indications.
This symbol indicates the possibility of death or serious injury.
This symbol indicates the possibility of injury or damage to properties only.
n Meanings of symbols used in this manual are as shown below.
Be sure not to do.
Be sure to follow the instruction.
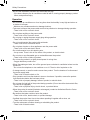
Installation
• Do not use a defective or underrated circuit breaker. Use this appliance on a dedicated
circuit.
- There is risk of fire or electric shock.
• For electrical work, contact the dealer, seller, a qualified electrician, or an Authorized Service
Center.
- Do not disassemble or repair the product. There is risk of fire or electric shock.
• Always ground the product.
- There is risk of fire or electric shock.
• Install the panel and the cover of control box securely.
- There is risk of fire or electric shock.
• Always install a dedicated circuit and breaker.
- Improper wiring or installation may cause fire or electric shock.
• Use the correctly rated breaker or fuse.
- There is risk of fire or electric shock.
• Do not modify or extend the power cable.
- There is risk of fire or electric shock.
• Do not install, remove, or re-install the unit by yourself (customer).
- There is risk of fire, electric shock, explosion, or injury.
• Be cautious when unpacking and installing the product.
- Sharp edges could cause injury. Be especially careful of the case edges and the fins on the
condenser and evaporator.
• For installation, always contact the dealer or an Authorized Service Center.
- There is risk of fire, electric shock, explosion, or injury.
• Do not install the product on a defective installation stand.
- It may cause injury, accident, or damage to the product.
WARNING
CAUTION
!
!
WARNING
!
Safety Precautions

4 Indoor Unit
Safety Precautions
• Be sure the installation area does not deteriorate with age.
- If the base collapses, the air conditioner could fall with it, causing property damage, product
failure, and personal injury.
Operation
• Do not let the air conditioner run for a long time when the humidity is very high and a door or
a window is left open.
- Moisture may condense and wet or damage furniture.
• Take care to ensure that power cable could not be pulled out or damaged during operation.
- There is risk of fire or electric shock.
• Do not place anything on the power cable.
- There is risk of fire or electric shock.
• Do not plug or unplug the power supply plug during operation.
- There is risk of fire or electric shock.
• Do not touch(operate) the product with wet hands.
- There is risk of fire or electrical shock.
• Do not place a heater or other appliances near the power cable.
- There is risk of fire and electric shock.
• Do not allow water to run into electric parts.
- It may cause There is risk of fire, failure of the product, or electric shock.
• Do not store or use flammable gas or combustibles near the product.
- There is risk of fire or failure of product.
• Do not use the product in a tightly closed space for a long time.
- Oxygen deficiency could occur.
• When flammable gas leaks, turn off the gas and open a window for ventilation before turn the
product on.
- Do not use the telephone or turn switches on or off. There is risk of explosion or fire
• If strange sounds, or smell or smoke comes from product. Turn the breaker off or disconnect
the power supply cable.
- There is risk of electric shock or fire.
• Stop operation and close the window in storm or hurricane. If possible, remove the product
from the window before the hurricane arrives.
- There is risk of property damage, failure of product, or electric shock.
• Do not open the inlet grill of the product during operation. (Do not touch the electrostatic filter,
if the unit is so equipped.)
- There is risk of physical injury, electric shock, or product failure.
• When the product is soaked (flooded or submerged), contact an Authorized Service Center.
- There is risk of fire or electric shock.
• Be cautious that water could not enter the product.
- There is risk of fire, electric shock, or product damage.
• Ventilate the product from time to time when operating it together with a stove, etc.
- There is risk of fire or electric shock.
• Turn the main power off when cleaning or maintaining the product.
- There is risk of electric shock.

Owner’s Manual 5
Safety Precautions
ENGLISH
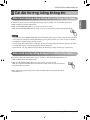
• When the product is not be used for a long time, disconnect the power supply plug or turn off
the breaker.
- There is risk of product damage or failure, or unintended operation.
• Take care to ensure that nobody could step on or fall onto the outdoor unit.
- This could result in personal injury and product damage.
Installation
• Always check for gas (refrigerant) leakage after installation or repair of product.
- Low refrigerant levels may cause failure of product.
• Install the drain hose to ensure that water is drained away properly.
- A bad connection may cause water leakage.
• Keep level even when installing the product.
- To avoid vibration or water leakage.
• Do not install the product where the noise or hot air from the outdoor unit could damage the
neighborhoods.
- It may cause a problem for your neighbors.
• Use two or more people to lift and transport the product.
- Avoid personal injury.
• Do not install the product where it will be exposed to sea wind (salt spray) directly.
- It may cause corrosion on the product. Corrosion, particularly on the condenser and evaporator fins,
could cause product malfunction or inefficient operation.
• If anyone other than a licensed professional installs, repairs, or alters LGElectronics air conditioning
products, the warranty is voided.
- All costs associated with repair are then the full responsibility of the owner.
Operation
• Do not expose the skin directly to cool air for long periods of time. (Don't sit in the draft.)
- This could harm to your health.
• Do not use the product for special purposes, such as preserving foods, works of art, etc. It is a consumer
air conditioner, not a precision refrigeration system.
- There is risk of damage or loss of property.
• Do not block the inlet or outlet of air flow.
- It may cause product failure.
• Use a soft cloth to clean. Do not use harsh detergents, solvents, etc.
- There is risk of fire, electric shock, or damage to the plastic parts of the product.
• Do not touch the metal parts of the product when removing the air filter. They are very sharp!
- There is risk of personal injury.
• Do not step on or put anything on the product. (outdoor units)
- There is risk of personal injury and failure of product.
• Always insert the filter securely. Clean the filter every two weeks or more often if necessary.
- A dirty filter reduces the efficiency of the air conditioner and could cause product malfunction or
damage.(Grill Type)
• Do not insert hands or other objects through the air inlet or outlet while the product is operated.
- There are sharp and moving parts that could cause personal injury.
CAUTION
!
• Do not install the unit in potentially explosive atmospheres.

6 Indoor Unit
Safety Precautions
• Do not drink the water drained from the product.
- It is not sanitary and could cause serious health issues.
• Use a firm stool or ladder when cleaning or maintaining the product.
- Be careful and avoid personal injury.
• Replace the all batteries in the remote control with new ones of the same type. Do not mix old and new
batteries or different types of batteries.
- There is risk of fire or explosion
• Do not recharge or disassemble the batteries. Do not dispose of batteries in a fire.
- They may burn or explode.
• If the liquid from the batteries gets onto your skin or clothes, wash it well with clean water. Do not use the
remote if the batteries have leaked.
- The chemicals in batteries could cause burns or other health hazards.
• If you eat the liquid from the batteries, brush your teeth and see doctor. Do not use the remote if the
batteries have leaked.
- The chemicals in batteries could cause burns or other health hazards.
• This appliance is not intended for use by persons (including children) with reduced physical, sensory or
mental capabilities or lack of experience and knowledge, unless they have been given supervision or
instruction concerning use of the appliance by a person responsible for their safety.
- Children should be supervised to ensure that they do not play with the appliance.

Owner’s Manual 7
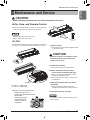
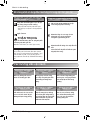
Prior to Operation
ENGLISH
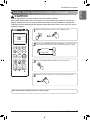
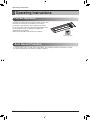
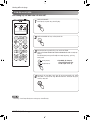
1. Contact an installation specialist for installation.
2. Use a dedicated circuit.
1. Being exposed to direct airflow for an extended period of time could be hazardous to your health.
Do not expose occupants, pets, or plants to direct airflow for extended periods of time.
2. Due to the possibility of oxygen deficiency, ventilate the room when used together with stoves or
other heating devices.
3. Do not use this air conditioner for non-specified special purposes (e.g. preserving precision
devices, food, pets, plants, and art objects). Such usage could damage the items.
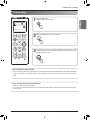
1. Do not touch the metal parts of the unit when removing the filter. Injuries can occur when handling
sharp metal edges.
2. Do not use water to clean inside the air conditioner. Exposure to water can destroy the insulation,
leading to possible electric shock.
3. When cleaning the unit, first make sure that the power and breaker are turned off. The fan rotates
at a very high speed during operation. There is a possibility of injury if the unit’s power is
accidentally triggered on while cleaning inner parts of the unit.
For repair and maintenance, contact your authorized service dealer.
Service
Cleaning and Maintenance
Usage
Preparing for Operation
Prior to Operation

8 Indoor Unit
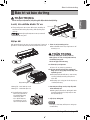
Part Description
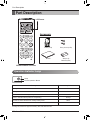
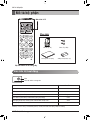
Wireless Remote Controller
LCD Screen
(3 s)
˚C / ˚F (5 s)
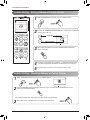
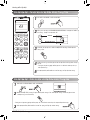
Accessory
Holder(1 EA) Fixing Screw (2 EA)
Manual AAA(1.5 V)
Batteries(2 EA)
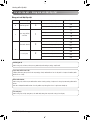
Operation Indicator Lamp
Lamp
Forced operation Button
Description Lamp Color
Cooling mode Green
Heating mode Green
Time to clean filter in cooling/heating Mode Yellowish Green
Time to clean filter when product is not operating Orange
Hot start or defrost mode before starting heating mode Green
When reservation set on Yellowish Green
*Cooling only model not support to Heating, Hot start, Defrost mode.
Part Description

Owner’s Manual 9
Part Description
ENGLISH
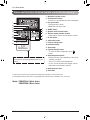
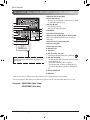
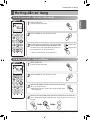
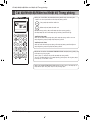
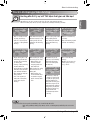
Name and Function of Wireless Remote Controller
(3 s)
˚C / ˚F (5 s)
Cooling Mode
Auto Mode or Auto Changeover
Dehumidification mode
Heating Mode
Fan Mode
•
Cooling Model( ), Heat Pump Model( )
Operation Mode
2
3
4
1
5
9
7
6
8
10
12
13
14
15
17
16
11
1. VANE ANGLE Button
Used to set each vane angle.
2. FUNCTION SETTING Button
Used to set or clear Auto Clean, Smart Clean,
Electric heater or Individual vane angle control.
3. ON/OFF Button
Used to turn on/off the unit.
4. JET COOL Button
Speed cooling operates super high fan speed.
5. LEFT/RIGHT AIRFLOW Button (OPTIONAL)
Used to set the desired left/right(horizontal)
airflow direction.
6. UP/DOWN AIRFLOW Button
Used to stop or start louver movement and set
the desired up/down airflow direction.
7. ON TIMER Button
Used to set the time of starting operation.
8. SLEEP TIMER Button
Used to set the time of sleeping operation.
9. SET / CLEAR Button
Used to set/clear the timer. Used to set the
current time(if it input for 3 seconds.)
10. PLASMA Button (OPTIONAL)
Used to start or stop the plasma-purification
function.
11. ROOM TEMPERATURE SETTING Button
Used to select the room temperature.
12. OPERATION MODE SELECTION Button
Used to select the operation mode.
13. INDOOR FAN SPEED SELECTION Button
Used to select fan speed in four steps low,
medium, high and chaos.
14. ROOM TEMPERATURE CHECKING Button
Used to check the room temperature.
15. OFF TIMER Button
Used to set the time of stopping operation.
16. TIMER SETTING(Up/Down)/LIGHT Button
Used to set the timer. Used to adjust the
brightness.(if it is not time adjust mode)
17. RESET Button
Used to reset the remote controller.

10 Indoor Unit
Part Description
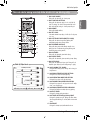
Name and function of wired remote controller(Accessory)
1
4
5
10
11
8
7
9
2
3
6
13
12
14
15
Please attach the inform label inside of the door.
Please choose proper language depend on your
country.
※ Some functions may not be operated and displayed depending on the product type.
※ It will display strange value to the room temperature if wired remote controller is not connected.
Model : PREMTB001 (White Color)
PREMTBB01 (Black Color)
1. Operation indication screen
2. Set temperature button
•
It will set not room temperature but outlet air temperature.
3. Fan speed button
• Fan Speed have 3 Steps.
• Middle and Low step is same
4. ON/OFF button
5. Opration mode selection button
6. Wireless remote controller receiver
• Some products don't receive the wireless signals.
7. Air flow button
8. Subfunction button
9. Function setting button
10. Ventilation button
11. Reservation
12. Up,down,left,right button
• To check the indoor temperature, press
button.
13. Room temperature button
• Displays only the room temperature of the remote
controller perception.
• There is no control of room temperature.
• In case of fresh air intake unit, displays only the
temperature around remote controller.
14. Setting/Cancel button
15. Exit button

Owner’s Manual 11
Installation Instructions
ENGLISH
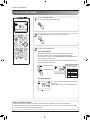
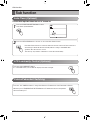
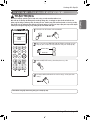
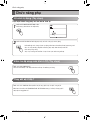
1. Choose a suitable place where its safe & easy
to reach.
2. Fix the holder to wall etc with the supplied
screws firmly.
3. Slide the remote controller inside the holder.
1. Remote controller should never be exposed to
direct sunlight.
2. Signal transmitter & receiver should always be
clean for proper communication. Use a soft
cloth to clean them.
3. In case some other appliances also get
operated with remote control, change their
position or consult your serviceman.
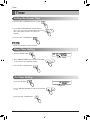
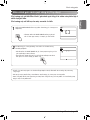
1. The signal receiver is inside the unit.
2.
Aim the remote controller towards the unit to operate
it. There should not be any blockage in between.
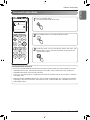
1. Remove the battery cover by pulling it according to the arrow
direction.
2. Insert new batteries making sure that the (+) and (-) of battery are
installed correctly.
3. Reattach the cover by sliding it back into position.
1. Always use/replace both batteries of same type.
2. If the system is not to be used for a long time, remove the
batteries to save their working life.
3. If the display screen of remote controller starts, fading replace
both of the batteries.
Operating Method
Wireless Remote Controller Maintenance
How to insert the Batteries
Installation Instructions

12 Indoor Unit
Installation Instructions
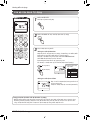
Installer Setting - Checking Address of Central Control
(3 s)
˚C / ˚F (5 s)
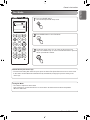
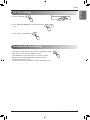
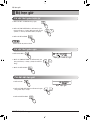
With the MODE button pressed, press the RESET button.
1
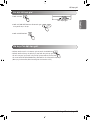
When FUNCTION button pressed, press RESET button
1
Press the ON/OFF button toward the indoor unit 1 time, and the indoor unit will display the set
address in the display window.
- The address display time and method can differ by the indoor unit type.
2
Reset the remote controller to use the general operation mode.
3
By using the TEMPERATURE SETTING button, set the indoor unit address.
- Setting range : 00 ~ FF
2
After setting the address, press the ON/OFF button toward the
indoor unit 1 time.
3
The indoor unit will display the set address to complete the address setting.
- The address display time and method can differ by the indoor uint type.
Reset the remote controller to use the general operation mode.
4
5
Group No.
Indoor Unit No.
Installer Setting - Setting Address of Central Control

Owner’s Manual 13
Installation Instructions
ENGLISH
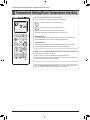
Installer Setting -How to enter installer setting mode
(3 s)
˚C / ˚F (5 s)
When JET COOL button pressed, press RESET button
1
By using the TEMPERATURE SETTING button, set function code
and setting value. (Please refer the Installer Setting Code Table.)
2
CAUTION
Installer setting mode is to set the detail function of the remote controller.
If the installer setting mode is not set correctly, it can cause problems to the product, user injury or
property damage. This must be set by an certificated installer, and any installation or change that is
carried out by a non-certificated person should be responsible for the results. In this case, free service
cannot be provided.
!
Function Code
Setting Code
Press the ON/OFF button toward the indoor unit 1 time.
3
Reset the remote controller to use the general operation mode.
4
Refer to the Installer Setting Code Table on the next page.

14 Indoor Unit
Installation Instructions
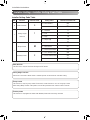
Installer Setting - Installer Setting Code Table
No. Function Function Code Setting Value Remote Controller LCD
0 Mode Override
0 : Set to Master
1 : Set to Slave
1 : Standard
1
2 : Low
3 : High
4 : Super High
0 : Set to Master
Group Control 1 : Set to Slave
2 : Check Master/Slave
3 :
Set to Auxiliary heater
Auxiliary heater 4 :
Cancel Auxiliary heater
2 :
Check Auxiliary heater Installation
Installer Setting Code Table
0
1
2
Ceiling Height
Selection
Mode Override
This Function is only for Non-Auto Changeover H/P model.
Ceiling Height Selection
Indoor unit connected to wired remote controller operate as wired remote controller setting.
Group Control
This function is only for group control. Please don’t set this function in case of non-group control.
After setting Group Control of the product, turn off the power then turn it back on after 1 minute.
Auxiliary heater
This function is only applied to models with Auxiliary Heater function being activated.
2
22
00
01
11
12
13
14
20
21
22
23
24
25
2

Owner’s Manual 15
ENGLISH
Owner's Instruction
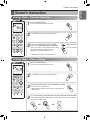
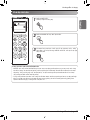
Press the ON/OFF button.
The unit will respond with beep sound.
1
Press MODE button to select Cooling Mode.
2
To lower the temperature
To raise the temperature
Set the desired temperature by pressing TEMP
button. Press ROOM TEMPERATURE CHECKING
button to check the room temperature. When setting
the desired temperature is higher than room
temperature, cooling wind isn’t blow out.
h Setting Temp. Range : 18~30 °C(64~86 °F)
3
(3 s)
˚C / ˚F (5 s)
(3 s)
˚C / ˚F (5 s)
Press the ON/OFF button.
The unit will respond with beep sound.
1
Press MODE button to select Cooling Mode.
2
Press the JET COOL button. The unit will operate in super
high fan speed in cooling mode.
h Wall mounted models operate power cooling mode for
30 minutes.
3
To cancel the Power cooling Mode press the Jet Cool button or the fan button
or the room temperature setting button again and the unit will operate in high
fan speed in cooling mode.
4
or or
Cooling Mode - Power Cooling
Cooling Mode - Standard Operation
Owner's Instruction

16 Indoor Unit
Owner's Instruction
Auto Operation Mode
(3 s)
˚C / ˚F (5 s)
Press the ON/OFF button.
The unit will respond with beep sound.
1
Press MODE button to select Auto Operation Mode.
2
During Auto Operation Mode
• If the system is not operating as desired, manually switch to another mode. The system will not
automatically switch from the cooling mode to the heating mode, or from heating to cooling, then you must
set the mode and the desired temperature again.
Set the desired temperature.
<For Cooling Model>
The temperature and fan speed are automatically set by the
electronic controls based on the actual room temperature.
If you feel hot or cold, press TEMPERATURE SETTING buttons for
more cooling or heating effect.
You cannot switch the indoor fan speed. It has already been set by
the Auto Operation Mode rule.
You can set desired temperature and indoor
fan speed.
Setting Temp. Range : 18~30 °C(64~86 °F)
<For Heating Model>
3
Code Feel
2 Cold
1 Slightly cool
0 Neutral
-1 Slightly warm
-2 Warm
❈ Please select the code
depend on your feeling.
To lower the temperature
To raise the temperature

Owner’s Manual 17
ENGLISH
Owner's Instruction
Dehumidification Mode
(3 s)
˚C / ˚F (5 s)
Press the ON/OFF button.
The unit will respond with beep sound.
1
Press MODE button to select Dehumidification Mode.
2
Set the fan speed. You can select the fan speed in four steps - low,
medium, high, or chaos. Each time the button is pressed, the fan
speed mode is shifted.
3
During Dehumidification Mode
• If you select the dehumidification mode on the operation selection button, the indoor unit starts to run the
dehumidification function, automatically setting the room temp. and air volume to the best condition for
dehumidification based on the sensed room temp.
In this case, the setting temp. is not displayed in the Remote Controller and you are not able to control the
room temp. either.
• During the healthy dehumidification function, the air volume is automatically set according to the algorithm
responding to the current room temp. and makes the room condition healthy and comfortable even in the
high humidity season.

18 Indoor Unit
Owner's Instruction
Set the desired temperature by pressing TEMP button.
Press ROOM TEMPERATURE CHECKING button to check the room
temperature.
When setting the desired temperature is lower than room
temperature, heating wind isn’t blow out.
3
Set the fan speed again. You can select the fan speed in four
steps–low, medium, high, or chaos. Each time the button is pressed,
the fan speed mode is shifted.
4
Press the ON/OFF button.
The unit will respond with beep sound.
1
Press MODE button to select Heating Mode.
2
Heating Mode
This Function is only for H/P model.
(3 s)
˚C / ˚F (5 s)
To lower the temperature
To raise the temperature
h Setting Temp. Range in
Heating Mode : 16~30 °C
(60 °F~86 °F)
• The feature may be changed according to the type of model.

Owner’s Manual 19
ENGLISH
Owner's Instruction
Fan Mode
(3 s)
˚C / ˚F (5 s)
Set the fan speed again. You can select the fan speed in four
steps–low, medium, high, or chaos. Each time the button is pressed,
the fan speed mode is shifted.
3
Press the ON/OFF button.
The unit will respond with beep sound.
1
Press MODE button to select Fan Mode.
2
Natural Wind by the chaos Logic
• For more fresh feeling than other fan speed, press the Indoor Fan Speed Selector and set to chaos mode.
In this mode, the wind blows like natural breeze by automatically changing fan speed according to the
chaos logic.
During Fan Mode
• The outdoor compressor doesn't work.
Have a function to circulate the indoor as it sends out the air that doesn't have much temperature
difference with indoor.

20 Indoor Unit
Temperature Setting/Room Temperature checking
(3 s)
˚C / ˚F (5 s)
We can simply adjust the desired temperature
• Press the buttons to adjust the desired temperature
: Increase Temp. per one time pressing
: Decrease Temp. per one time pressing
Room temp: Indicate the current room temperature
Set temp: Indicate the temperature that user want to set
<Cooling Mode>
The cooling mode doesn't work if desired temperature is higher than
room temperature Please lower the desired temperature
<Heating Mode>
The heating mode doesn't work if desired temperature is lower than
room temperature Please increase the desired temperature
Whenever press ROOM TEMPERATURE button, the room temperature
will be displayed within 5 seconds.
After 5 seconds, it turns to display the desired temperature.
Because of location of remote controller, the real room temperature and
the this displayed value can be different.
Press ROOM TEMPERATURE button for 5 seconds, temperature unit
change Celsius to Fahrenheit or Fahrenheit to Celsius.
Temperature Setting/Room Temperature checking
Pagina se încarcă...
Pagina se încarcă...
Pagina se încarcă...
Pagina se încarcă...
Pagina se încarcă...
Pagina se încarcă...
Pagina se încarcă...
Pagina se încarcă...
Pagina se încarcă...
Pagina se încarcă...
Pagina se încarcă...
Pagina se încarcă...
Pagina se încarcă...
Pagina se încarcă...
Pagina se încarcă...
Pagina se încarcă...
Pagina se încarcă...
Pagina se încarcă...
Pagina se încarcă...
Pagina se încarcă...
Pagina se încarcă...
Pagina se încarcă...
Pagina se încarcă...
Pagina se încarcă...
Pagina se încarcă...
Pagina se încarcă...
Pagina se încarcă...
Pagina se încarcă...
Pagina se încarcă...
Pagina se încarcă...
Pagina se încarcă...
Pagina se încarcă...
Pagina se încarcă...
Pagina se încarcă...
Pagina se încarcă...
Pagina se încarcă...
Pagina se încarcă...
Pagina se încarcă...
Pagina se încarcă...
Pagina se încarcă...
-
 1
1
-
 2
2
-
 3
3
-
 4
4
-
 5
5
-
 6
6
-
 7
7
-
 8
8
-
 9
9
-
 10
10
-
 11
11
-
 12
12
-
 13
13
-
 14
14
-
 15
15
-
 16
16
-
 17
17
-
 18
18
-
 19
19
-
 20
20
-
 21
21
-
 22
22
-
 23
23
-
 24
24
-
 25
25
-
 26
26
-
 27
27
-
 28
28
-
 29
29
-
 30
30
-
 31
31
-
 32
32
-
 33
33
-
 34
34
-
 35
35
-
 36
36
-
 37
37
-
 38
38
-
 39
39
-
 40
40
-
 41
41
-
 42
42
-
 43
43
-
 44
44
-
 45
45
-
 46
46
-
 47
47
-
 48
48
-
 49
49
-
 50
50
-
 51
51
-
 52
52
-
 53
53
-
 54
54
-
 55
55
-
 56
56
-
 57
57
-
 58
58
-
 59
59
-
 60
60


LG AMNQ09GTUA0 Manual de utilizare
- Tip
- Manual de utilizare
- Acest manual este potrivit și pentru
în alte limbi
- English: LG AMNQ09GTUA0 User manual
Lucrări înrudite
-
LG Ceiling-Floor-Convertible Manual de utilizare
-
LG UV48H.NL1 Manualul proprietarului
-
LG MC12AHV.NE1 Manual de utilizare
-
LG MV12AH Manual de utilizare
-
LG UB36 Manual de utilizare
-
LG ARNU48GTMC2.ENWALEU Manual de utilizare
-
LG ARNU24GTLC2.ENWALEU Manualul proprietarului
-
LG ARNU12GVEA2.ENWALEU Manual de utilizare
-
LG ARNU24GCFA2 Manual de utilizare
-
LG ARNU96GB8Z2.ENWALEU Manual de utilizare
Alte documente
-
Whirlpool AMD 018 Manualul utilizatorului
-
Whirlpool AMD 054 Manualul utilizatorului
-
Samsung RS552NRUASL Manual de utilizare
-
Carrier 42QHC009DS Manualul proprietarului
-
Tesla TM36AF21-1232IA Split-type Air Conditioning Manual de utilizare
-
Tesla TM52AF21-1832IAW Manual de utilizare
-
Carrier CA007U Manualul proprietarului
-
Sharp AY-XP9RMR / AE-X9RMR / AY-XP12RMR / AE-X12RMR Manual de utilizare
-
Samsung SC4580 Manual de utilizare
-
SIGURO SGR-FC-H350W Manual de utilizare