
*2048745*
2048745
DD ST-HCL
Bedienungsanleitung de
Operating instructions en
Mode d’emploi fr
Istruzioni d’uso it
Manual de instrucciones es
Manual de instruções pt
Gebruiksaanwijzing nl
Brugsanvisning da
Bruksanvisning sv
Bruksanvisning no
Käyttöohje
Οδηγιεςχρησεως el
Használati utasítás hu
Instrukcjaobsługi pl
Инструкцияпозксплуатации ru
Návod k obsluze cs
Návod na obsluhu sk
Upute za uporabu hr
Navodila za uporabo sl
Ръководствозаобслужване bg
Instrucţiunideutilizare ro
KulllanmaTalimatı tr
ar
Lietošanaspamācība lv
Instrukcija lt
Kasutusjuhend et
Інструкціязексплуатації uk
Пайдаланубойыншабасшылы
қ kk
ja
ko
zh
cn
Printed: 03.12.2015 | Doc-Nr: PUB / 5136527 / 000 / 01

ꨍ
ꨏ
ꨒ
ꨎ
ꨐ
ꨑ
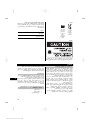
1
Printed: 03.12.2015 | Doc-Nr: PUB / 5136527 / 000 / 01

²FP
2
3
Printed: 03.12.2015 | Doc-Nr: PUB / 5136527 / 000 / 01

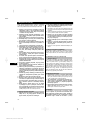
ORIGINAL BEDIENUNGSANLEITUNG
DD-ST HCL Bohrmittenanzeigelaser
Lesen Sie die Bedienungsanleitung vor Inbe-
triebnahme unbedingt durch.
Bewahren Sie diese Bedienungsanleitung im-
mer beim Gerät auf.
Geben Sie das Gerät nur mit Bedienungsanlei-
tung an andere Personen weiter.
Inhaltsverzeichnis Seite
1 Allgemeine Hinweise 1
2 Beschreibung 2
3 Zubehör, Verbrauchsmaterial 3
4 Technische Daten 3
5 Sicherheitshinweise 4
6 Inbetriebnahme 5
7 Bedienung 5
8 Pflege und Instandhaltung 6
9 Fehlersuche 6
10 Entsorgung 6
11 Herstellergewährleistung Geräte 7
12 EG-Konformitätserklärung (Original) 7
1 Die Zahlen verweisen auf Abbildungen. Die Abbildun-
gen finden Sie am Anfang der Bedienungsanleitung.
Im Text dieser Bedienungsanleitung bezeichnet "das Ge-
rät" immer den Bohrmittenanzeigelaser DD‑ST HCL.
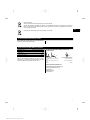
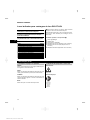
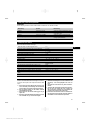
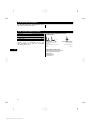
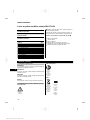
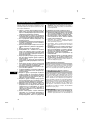
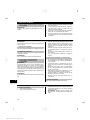
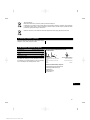
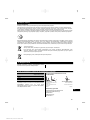
Bedienungselemente und Gerätebauteile 1
@
Ein/ Aus‑Taste
;
Lasereinheit
=
Adapterverriegelung
%
Adapter DD‑ST 120 (als Zubehör erhältlich)
&
Adapter DD‑ST 150‑U/160 (als Zubehör erhältlich)
(
Adapter DD‑HD 30 (als Zubehör erhältlich)
1 Allgemeine Hinweise
1.1 Signalwörter und ihre Bedeutung
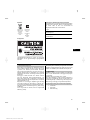
GEFAHR
Für eine unmittelbar drohende Gefahr, die zu schweren
Körperverletzungen oder zum Tod führt.
WARNUNG
Für eine möglicherweise gefährliche Situation, die zu
schweren Körperverletzungen oder zum Tod führen kann.
VORSICHT
Für eine möglicherweise gefährliche Situation, die zu
leichten Körperverletzungen oder zu Sachschaden führen
könnte.
HINWEIS
Für Anwendungshinweise und andere nützliche Informa-
tionen.
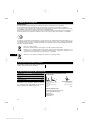
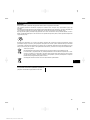
1.2 Erläuterung der Piktogramme und weitere
Hinweise
Warnzeichen
Warnung vor
allgemeiner
Gefahr
Gebotszeichen
Vor
Benutzung
Bedienungs-
anleitung
lesen
de
1
Printed: 03.12.2015 | Doc-Nr: PUB / 5136527 / 000 / 01

Symbole
Geräte und
Batterien
dürfen nicht
über den
Müll entsorgt
werden.
Laserstrah-
lung
Nicht in den
Strahl
blicken
Laser-
klasse 2
gemäss
EN 60825-
1:2007
Am Gerät
Laserwellenlänge 620-690 nm. Unter den oben genann-
ten Bedingungen ist die durchschnittliche Ausgangsleis-
tung 0,95 mW.
Ort der Identifizierungsdetails auf dem Gerät
Die Typenbezeichnung und die Serienkennzeichnung
sind auf dem Typenschild Ihres Gerätes angebracht.
Übertragen Sie diese Angaben in Ihre Bedienungsan-
leitung und beziehen Sie sich bei Anfragen an unsere
Vertretung oder Servicestelle immer auf diese Angaben.
Typ:
Generation: 01
Serien Nr.:
2Beschreibung
2.1 Bestimmungsgemässe Verwendung
Der DD-ST HCL ist ein Kreuzlaser welcher in Verbin-
dung mit den Bohrständern DD‑HD 30, DD‑ST 150‑U,
DD‑ST 160 und DD‑ST 120 zur Anwendung kommt. Auf-
gesetzt auf den jeweiligen Bohrständer ermöglicht der
Bohrmittenanzeigelaser die schnelle und exakte Bestim-
mung des Mittelpunktes einer zu erstellenden Kernboh-
rung. Der DD-ST HCL zeigt auch bei Schrägbohrungen
die Bohrmitte richtig an.
Der DD‑ST HCL mussimmer, abhängig vom verwendeten
Bohrständer inVerbindung mit dem entsprechendenHilti-
Kernbohrgerät, in Kombination mit einem der folgenden
Adapter verwendet werden: Adapter DD‑HD 30, Adapter
DD‑ST 150‑U/160 oder Adapter DD‑ST 120.
Der im Adapter integrierte Magnet ermöglicht eine einfa-
che Montage und Demontage und fixiert den Bohrmitten-
anzeigelaser an der Führungsschiene des Bohrständers.
Befolgen Sie die Angaben zu Betrieb, Pflege und Instand-
haltung in der Bedienungsanleitung.
Benutzen Sie, um Verletzungsgefahren zu vermeiden, nur
Original Hilti Zubehör und Werkzeuge.
Manipulationen oder Veränderungen am Gerät sind nicht
erlaubt.
Vom Gerät und seinen Hilfsmitteln können Gefahren aus-
gehen, wenn sie von unausgebildetem Personal unsach-
gemäss behandelt oder nicht bestimmungsgemäss ver-
wendet werden.
2.2 Merkmale
Das Gerät verfügt über einen Kreuzlaser mit einer Reich-
weite von ca. 1 m. Die Reichweite ist abhängig von der
Umgebungshelligkeit.
Das Gerät schaltet nach 1 Minute selbstständig ab.
Ein Austausch der Batterien ist nicht vorgesehen. Das
Gerät ist auf eine Betriebsdauer von 150 Stunden bei
20°C/68°F ausgelegt. Bei einer Einschaltdauer von 1 Mi-
nute / Bohrung sind somit, abhängig von der Umge-
bungstemperatur, ca. 9.000 Anzeigen möglich.
2.3 Lieferumfang Bohrmittenanzeigelaser
1 Lasereinheit
1 Gerätetasche
1 Bedienungsanleitung
de
2
Printed: 03.12.2015 | Doc-Nr: PUB / 5136527 / 000 / 01

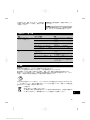
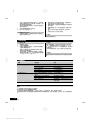
3 Zubehör, Verbrauchsmaterial
HINWEIS
DieaufgeführtenAdaptergewährleistendierichtigeDistanzzwischenBohrmittenanzeigelaser und jeweiligem Bohr-
ständer.
Bezeichnung Kurzzeichen Beschreibung
Adapter DD‑ST HCL A‑120 zu verwenden mit Bohrständer
DD‑ST 120
Adapter DD‑ST HCL A‑150/160 zu verwenden mit Bohrständer
DD‑ST 150‑U bzw. DD‑ST 160
Adapter DD‑ST HCL A‑HD30 zu verwenden mit Bohrständer
DD‑HD 30
Lasersichtbrille PUA 60 Erhöht die Sichtbarkeit des Laser-
strahls bei schwierigen Lichtverhält-
nissen.
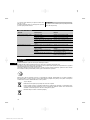
4 Technische Daten
Technische Änderungen vorbehalten!
Reichweite Linien und Kreuzpunkt ca. 1 m
Genauigkeit bei 200 mm Abstand zum Untergrund ± 1 mm
Laserklasse 2
Liniendicke bei 250 mm Abstand zum Untergrund 1…1,5 mm
Automatische Selbstabschaltung ca. 1 min
Stromversorgung 4 AA-Zellen
Betriebsdauer bei Temperatur +20°C ca. 150 h
Betriebstemperatur -10…+40 °C (+14...+104°F)
Lagertemperatur -20…+60 °C (-4...+140°F)
Staub‑ und Spritzwasserschutz IP 53
nach IEC 60529
Gewicht Lasereinheit mit Adapter DD‑ST HCL A‑120 400 g
Gewicht Lasereinheit mit Adapter DD‑ST HCL
A‑150/160
460 g
Gewicht Lasereinheit mit Adapter DD‑ST HCL A‑HD30 570 g
Abmessungen Lasereinheit mit Adapter DD‑ST 120
(LxBxH)
146 mm x 51 mm x 97 mm
Abmessungen Lasereinheit mit Adapter DD‑ST 150‑U/
160 (LxBxH)
158 mm x 52 mm x 99 mm
Abmessungen Lasereinheit mit Adapter DD‑HD 30
(LxBxH)
215 mm x 99 mm x 112 mm
de
3
Printed: 03.12.2015 | Doc-Nr: PUB / 5136527 / 000 / 01

5 Sicherheitshinweise
Neben den sicherheitstechnischen Hinweisen in den
einzelnen Kapiteln dieser Bedienungsanleitung sind fol-
gende Bestimmungen jederzeit strikt zu beachten.
a) Vom Gerät und seinen Hilfsmitteln können Ge-
fahren ausgehen, wenn sie von unausgebildetem
Personal unsachgemäss behandelt oder nicht be-
stimmungsgemäss verwendet werden.
b) Benutzen Sie, umVerletzungsgefahren zu vermei-
den, nur original Hilti Zubehör und Zusatzgeräte.
c) Manipulationen oder Veränderungen am Gerät
sind nicht erlaubt.
d) Beachten Sie die Angaben zu Betrieb, Pflege und
Instandhaltung in der Bedienungsanleitung.
e) Machen Sie keine Sicherheitseinrichtungen un-
wirksam und entfernen Sie keine Hinweis- und
Warnschilder.
f) Halten Sie Kinder von Lasergeräten fern.
g) Berücksichtigen Sie Umgebungseinflüsse. Setzen
Sie das Gerät nicht Niederschlägen aus, benutzen
Sie es nicht in feuchter oder nasser Umgebung.
Benutzen Sie das Gerät nicht, wo Brand- oder
Explosionsgefahr besteht.
h)
Überprüfen Sie das Gerät vordemGebrauch. Falls
das Gerät beschädigt ist, lassen Sie es durch eine
Hilti-Servicestelle reparieren.
i) Nach einem Sturz oder anderen mechanischen
Einwirkungen müssen Sie die Genauigkeit des
Geräts überprüfen.
j) Wenn das Gerät aus grosser Kälte in eine wär-
mere Umgebung gebracht wird oder umgekehrt,
sollten Sie das Gerät vor dem Gebrauch akklima-
tisieren lassen.
k) Stellen Sie bei der Verwendung mit Adaptern si-
cher, dass das Gerät richtig aufgesetzt ist.
l) Um Fehlmessungen zu vermeiden, müssen Sie
die Laseraustrittsfenster sauber halten.
m) Obwohl das Gerät für den harten Baustellenein-
satz konzipiert ist, sollten Sie es, wie andere op-
tische und elektrische Geräte (Feldstecher, Brille,
Fotoapparat) sorgfältig behandeln.
n) Obwohl das Gerät gegen den Eintritt von Feuch-
tigkeit geschützt ist, sollten Sie das Gerät vor dem
Verstauen in dem Transportbehälter trockenwi-
schen.
o) Vermeiden sie den direkten Blick in den Laser-
strahl
p) Die Lasersichtbrille ist keine Laserschutzbrille
und schützt die Augen nicht vor Laserstrahlung.
Die Brille darf wegen Ihrer Einschränkung der
Farbsicht nicht im öffentlichen Strassenverkehr
benutzt werden und ist kein Ersatz für eine Son-
nenbrille.
q) Seien Sie aufmerksam, achten Sie darauf, was
Sie tun, und gehen Sie mit Vernunft an die Ar-
beit mit dem Gerät. Benutzen Sie das Gerät nicht,
wenn Sie müde sind oder unter dem Einfluss von
Drogen, Alkohol oder Medikamenten stehen. Ein
Moment der Unachtsamkeit beim Gebrauch des Ge-
räts kann zu ernsthaften Verletzungen führen.
5.1 Sachgemässe Einrichtung der Arbeitsplätze
a) Sichern Sie den Arbeitsbereich ab und achten
Sie beim Aufstellen des Geräts darauf, dass der
Strahl nicht gegen andere Personen oder gegen
Sie selbst gerichtet wird.
b) Vermeiden Sie, bei Arbeiten auf Leitern, eine ab-
normale Körperhaltung. Sorgen Sie für sicheren
Stand und halten Sie jederzeit das Gleichgewicht.
c) Anzeigen durch Glasscheiben oder andere Objekte
oder Verwendung eines falschen Adapters können
das Resultat verfälschen.
d) Reflektion auf Glasflächen oder anderen spiegelnden
Flächen können die Ergebnisse verfälschen.
e) Achten Sie darauf, dass das Gerät richtig an
der Führungsschiene des Bohrständers befes-
tigt ist (entfernen Sie ggf. Schmutz wie zum Bei-
spiel Bohrschlamm von der Führungsschiene des
Bohrständers).
f) Verwenden Sie das Gerät nur innerhalb der defi-
nierten Einsatzgrenzen.
g) Werden mehrere Laser im Arbeitsbereich einge-
setzt, stellen Sie sicher, dass Sie die Strahlen
ihres Gerätes nicht mit anderen vertauschen.
h) Das Gerät darf nicht in der Nähe von medizinischen
Geräten eingesetzt werden.
5.2 Elektromagnetische Verträglichkeit
Obwohl das Gerät die strengen Anforderungen der ein-
schlägigen Richtlinien erfüllt, kann Hilti die Möglichkeit
nicht ausschliessen, dass das Gerät durch starke Strah-
lung gestört wird, was zu einer Fehloperation führen
kann.
5.3 Laserklassifizierung für Geräte der
Laser-Klasse 2/ class II
Je nach Verkaufsversion entspricht das Gerät der Laser-
klasse 2 nach IEC60825-3:2007 / EN60825-3:2007 und
Class II nach CFR 21 § 1040 (FDA). Diese Geräte dür-
fen ohne weitere Schutzmassnahme eingesetzt werden.
Das Auge ist bei zufälligem, kurzzeitigem Hineinsehen in
die Laserstrahlung durch den Lidschlussreflex geschützt.
Dieser Lidschutzreflex kann jedoch durch Medikamente,
Alkohol oder Drogen beeinträchtigt werden. Trotzdem
sollte man, wie auch bei der Sonne, nicht direkt in die
Lichtquelle hineinsehen. Laserstrahl nicht gegen Perso-
nen richten.
5.4 Elektrisch
a) Demontieren Sie nicht das Gerät, um die Batte-
rien aufzuladen. Die Batterien dieses Gerätes sind
für die gesamte Gerätelebensdauer ausgelegt. Ein
selbstständiger Austausch der Batterien durch den
Anwender ist nicht vorgesehen.
b) Um Umweltschäden zu vermeiden, müssen Sie
das Gerät gemäss den jeweilig gültigen landes-
spezifischen Richtlinien entsorgen. Sprechen Sie
im Zweifelsfall den Hersteller an.
de
4
Printed: 03.12.2015 | Doc-Nr: PUB / 5136527 / 000 / 01

c)
Überhitzen Sie die Batterien nicht und setzen Sie
sie nicht einem Feuer aus. Die Batterien können ex-
plodieren oder es können toxische Stoffe freigesetzt
werden.
5.5 Flüssigkeiten
Bei falscher Anwendung kann Flüssigkeit aus Batte-
rie/Akku austreten. Vermeiden Sie den Kontakt damit.
Bei zufälligem Kontakt mit Wasser abspülen. Kommt
die Flüssigkeit in die Augen, spülen Sie diese mit viel
Wasser aus und nehmen Sie zusätzlich ärztliche Hilfe
in Anspruch. Austretende Flüssigkeit kann zu Hautrei-
zungen oder Verbrennungen führen.
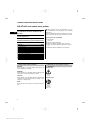
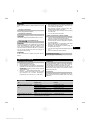
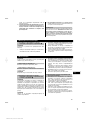
6 Inbetriebnahme
6.1 Bohrmittenanzeigelaser zusammenbauen und
auseinanderbauen 2
HINWEIS
Die Adapter sind als Zubehör erhältlich (siehe Kapitel 3).
1. Wählen Sie den geeigneten Adapter entsprechend
dem von Ihnen verwendeten Bohrständer aus.
2. Verbinden Sie die Lasereinheit DD‑ST HCL mit dem
Adapter, indem Sie die Lasereinheit auf den Adapter
aufstecken bis ein hörbarer Klick vernehmbar ist.
3. Prüfen Sie vor Verwendung des Bohrmittenanzei-
gelasers, dass beide Laschen sauber eingerastet
sind.
4. Zum Entfernen des Adapters drücken Sie die beid-
seitigen Laschen leicht zusammen und ziehen die
Lasereinheit vom Adapter ab.
7 Bedienung
HINWEIS
Um die höchste Genauigkeit zu erreichen, projizieren Sie
die Linie auf eine ebene Fläche.
7.1 Laserstrahl einschalten
Drücken Sie die Ein/ Aus-Taste einmal.
7.2 Laserstrahl ausschalten
Im eingeschalteten Zustand die Ein/ Aus-Taste einmal
drücken.
HINWEIS
Die Lasereinheitschaltet sich nach1Minute selbstständig
aus.
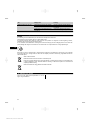
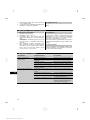
7.3 Bohrmittenanzeigelaser am Bohrständer
befestigen und einschalten 3
HINWEIS
Zur optimalen Nutzung des Bohrmittenanzeigelasers
sollte der Abstand vom Bohrmittenanzeigelaser zum
Untergrund zwischen 20 und 40 cm betragen. Um den
Bohrmittenanzeigelaser zu befestigen, müssen Sie
ggf. den Schlitten in die obere Position fahren bzw.
die am Gerät befestigte Bohrkrone entfernen (siehe
Bedienungsanleitung des Gerätes).
HINWEIS
Vergewissern Sie sich, dass Sie den zum Bohrständer
passenden Adapter verwenden.
1. Setzen Sie den Bohrmittenanzeigelaser auf die Füh-
rungsschiene des Bohrständers auf und überzeugen
Sie sich von dessen ebener Auflage (entfernen sie
ggf. Schmutz wie z.B. Bohrschlamm von der Füh-
rungsschiene).
Der im Adapter integrierte Magnet fixiert den
Bohrmittenanzeigelaser an der Führungsschiene
des Bohrständers.
2. Achten Sie darauf, dass der Laser in Richtung des
zu bohrenden Untergrundes zeigt.
3. Drücken Sie die Ein/ Aus-Taste einmal.
7.4 Bohrständer auf Mittelpunkt der Bohrung
ausrichten
1. Lösen Sie, falls der Bohrständer bereits befestigt
wurde, die Befestigung des Bohrständers leicht
(siehe Bedienungsanleitung des Bohrgerätes).
2. Richten Sie den Bohrständer am Untergrund aus,
so dass der projizierte Kreuzlaser dem Mittelpunkt
der zu erstellenden Bohrung entspricht.
3. Befestigen Sie den Bohrständer wieder und verge-
wissern Sie sich von dessensicheremHalt(siehe
Bedienungsanleitung des Bohrgerätes).
4. Prüfen Sie die Lage des projizierten Kreuzlasers
nach der Befestigung des Bohrständers nochmals.
5. Drücken Sie die Ein/Aus-Taste so lange bis der
Laserstrahl nicht mehr sichtbar ist.
6. Entfernen Sie den Bohrmittenanzeigelaser vom
Bohrständer.
7.5 Bohrung erstellen
Siehe Bedienungsanleitung des Bohrgerätes
de
5
Printed: 03.12.2015 | Doc-Nr: PUB / 5136527 / 000 / 01

8 Pflege und Instandhaltung
8.1 Reinigen und trocknen
1. Staub von Linsen wegblasen.
2. Glas nicht mit den Fingern berühren.
3. Nur mit sauberen und weichen Lappen reinigen;
wenn nötig mit reinem Alkohol oder etwas Wasser
befeuchten.
HINWEIS Keine anderen Flüssigkeiten verwenden,
da diese die Kunststoffteile angreifen können.
4. Temparaturgrenzwerte bei der Lagerung Ihrer Aus-
rüstung beachten, speziell im Winter / Sommer,
wenn Sie Ihre Ausrüstung im Fahrzeug-Innenraum
aufbewahren (‑20 °C bis +60 °C/ -4 °F bis 140 °F).
8.2 Lagern
Nass gewordene Geräte auspacken. Geräte, Transport-
behälter und Zubehör abtrocknen (bei höchstens +60 °C
/ 140 °F) und reinigen. Ausrüstung erst wieder einpacken,
wenn sie völlig trocken ist, anschliessend trocken lagern.
Führen Sie nach längerer Lagerung oder längerem Trans-
port Ihrer Ausrüstung vor Gebrauch eine Kontrolle durch.
8.3 Transportieren
VerwendenSiefürdenTransportoderVersandIhrerAus-
rüstung entweder die Hilti Verpackung oder eine gleich-
wertige Verpackung.
9 Fehlersuche
Fehler
Mögliche Ursache
Behebung
Das Gerät lässt sich nicht ein-
schalten./ Laserstrahlen funktio-
nieren nicht.
Batterie leer. Hilti Service kontaktieren.
Ein‑/ Ausschalter defekt. Hilti Service kontaktieren.
Schaden am Gerät. Hilti Service kontaktieren.
Temperatur zu hoch oder zu tief Gerät abkühlen bzw. erwärmen las-
sen
Laserquelle oder Lasersteuerung de-
fekt.
Hilti Service kontaktieren.
Bohrungsmitte wird nicht richtig
angezeigt.
Kalibrierung der Laserdiode wurde
zum Beispiel durch Sturz verstellt.
Hilti Service kontaktieren.
Verschmutze Führungsschiene oder
Adapter.
Führungsschiene und/ oder Adapter
reinigen.
Falschen Adapter ausgewählt und
montiert.
Verwenden Sie den zum Bohrständer
passenden Adapter.
Verwendung eines Distanzstücks am
Bohrständer
Bei Verwendung eines Distanzstücks
ist die Anzeige mittels Bohrmittenan-
zeigelaser fehlerhaft.
10 Entsorgung
WARNUNG
Bei unsachgemässem Entsorgen der Ausrüstung können folgende Ereignisse eintreten:
Beim Verbrennen von Kunststoffteilen entstehen giftige Abgase, an denen Personen erkranken können.
Batterien können explodieren und dabei Vergiftungen, Verbrennungen, Verätzungen oder Umweltverschmutzung
verursachen, wenn sie beschädigt oder stark erwärmt werden.
Bei leichtfertigem Entsorgen ermöglichen Sie unberechtigten Personen, die Ausrüstung sachwidrig zu verwenden.
Dabei können Sie sich und Dritte schwer verletzen sowie die Umwelt verschmutzen.
Hilti-Geräte sind zu einem hohen Anteil aus wiederverwertbaren Materialien hergestellt. Voraussetzung für eine
Wiederverwertung ist eine sachgemässe Stofftrennung. In vielen Ländern ist Hilti bereits eingerichtet, Ihr Altgerät zur
Verwertung zurückzunehmen. Fragen Sie den Hilti Kundenservice oder Ihren Verkaufsberater.
de
6
Printed: 03.12.2015 | Doc-Nr: PUB / 5136527 / 000 / 01

Nur für EU Länder
Werfen Sie elektronische Messgeräte nicht in den Hausmüll!
Gemäss Europäischer Richtlinie über Elektro- und Elektronik-Altgeräte und Umsetzung in nationales
Recht müssen verbrauchte Elektrogeräte getrennt gesammelt und einer umweltgerechten Wiederver-
wertung zugeführt werden.
Entsorgen Sie die Batterien nach den nationalen Vorschriften.
11 Herstellergewährleistung Geräte
BittewendenSiesichbeiFragenzudenGarantiebedin-
gungen an Ihren lokalen HILTI Partner.
12 EG-Konformitätserklärung (Original)
Bezeichnung: Bohrmittenanzeigelaser
Typenbezeichnung: DD-ST HCL
Generation: 01
Konstruktionsjahr: 2012
Wir erklären in alleiniger Verantwortung, dass dieses Pro-
dukt mit den folgenden Richtlinien und Normen über-
einstimmt: bis 19. April 2016: 2004/108/EG, ab 20. April
2016: 2014/30/EU, 2011/65/EU, EN ISO 12100.
Hilti Aktiengesellschaft, Feldkircherstrasse 100,
FL‑9494 Schaan
Paolo Luccini Johannes Wilfried Huber
Head of BA Quality and Process Mana-
gement
Senior Vice President
Business Area Electric Tools & Acces-
sories
Business Unit Diamond
06/2015 06/2015
Technische Dokumentation bei:
Hilti Entwicklungsgesellschaft mbH
Zulassung Elektrowerkzeuge
Hiltistrasse 6
86916 Kaufering
Deutschland
de
7
Printed: 03.12.2015 | Doc-Nr: PUB / 5136527 / 000 / 01

ORIGINAL OPERATING INSTRUCTIONS
DD-ST HCL hole center laser pointer
It is essential that the operating instructions
are read before the tool is operated for the
first time.
Always keep these operating instructions to-
gether with the tool.
Ensure that the operating instructions are
with the tool when it is given to other persons.
Contents Page
1 General information 8
2Description 9
3 Accessories, consumables 10
4 Technical data 10
5 Safety instructions 10
6Beforeuse 12
7 Operation 12
8 Care and maintenance 13
9 Troubleshooting 13
10 Disposal 13
11 Manufacturer’s warranty - tools 14
12 EC declaration of conformity (original) 14
1 These numbers refer to the illustrations. You can
find the illustrations at the beginning of the operating
instructions.
In these operating instructions, the designation “the tool”
always refers to the DD‑ST HCL hole center laser pointer.
Operating controls and parts 1
@
On/off button
;
Laser unit
=
Adapter locking mechanism
%
DD‑ST 120 adapter (available as an accessory)
&
DD‑ST 150-U/160 adapter (available as an access-
ory)
(
DD‑HD 30 adapter (available as an accessory)
1 General information
1.1 Safety notices and their meaning
DANGER
Draws attention to imminent danger that will lead to
seriousbodilyinjuryorfatality.
WARNING
Draws attention to a potentially dangerous situation that
could lead to serious personal injury or fatality.
CAUTION
Draws attention to a potentially dangerous situation that
could lead to slight personal injury or damage to the
equipment or other property.
NOTE
Draws attention to an instruction or other useful informa-
tion.
1.2 Explanation of the pictograms and other
information
Warning signs
General
warning
Obligation signs
Read the
operating
instructions
before use.
en
8
Printed: 03.12.2015 | Doc-Nr: PUB / 5136527 / 000 / 01

Symbols
Disposal of
power tools
or
appliances
and batteries
together with
household
waste is not
permissible.
Laser
radiation
Do not look
into the
beam.
Laser Class
2in
accordance
with
EN 60825-
1:2007
On the tool
Laser wavelength 620-690 nm. Under the conditions
stated above, mean output power is 0.95 mW.
Location of identification data on the tool
The type designation and serial number can be found on
thetypeidentificationplateonthetool.Makeanoteof
this data in your operating instructions and always refer
to it when making an enquiry to your Hilti representative
or service department.
Type:
Generation: 01
Serial no.:
2 Description
2.1 Use of the product as directed
The DD-ST HCL is a cross laser that is used in conjunc-
tion with the DD‑HD 30, DD‑ST 150‑U, DD‑ST 160 and
DD‑ST 120 drill stands. When mounted on the corres-
ponding drill stand, the hole center laser pointer makes it
possible to quickly determine the exact center of a hole
to be drilled with the core drilling system. The DD-ST HCL
indicates the hole center correctly even when drilling at
an angle.
Dependingonthe Hilti core drillingmachine and drill stand
used, the DD‑ST HCL must always be used in conjunction
with one of the following adapters: DD‑HD 30 adapter,
DD‑ST 150‑U/160 adapter or DD‑ST 120 adapter.
The magnet incorporated in the adapter makes it easy
to mount the hole center laser pointer on the drill stand
guide rail and to remove it after use.
Observe the information printed in the operating instruc-
tions concerning operation, care and maintenance.
To avoid the risk of injury, use only genuine Hilti tools and
accessories.
Modification of the tool is not permissible.
The tool and its ancillary equipment may present hazards
when used incorrectly by untrained personnel or when
used not as directed.
2.2 Features
The tool features a cross laser with a range of approx. 1
m. The range depends on the brightness of ambient light.
The tool switches itself off after 1 minute.
No provision has been made for battery replacement.
The tool is designed to achieve a battery life of 150 hours
at 20°C/68°F. If switched on for 1 minute per hole drilled,
approx. 9,000 hole center indications are thus possible,
depending on the ambient temperature.
2.3 Items supplied
1Laserunit
1 Soft pouch
1 Operating instructions
en
9
Printed: 03.12.2015 | Doc-Nr: PUB / 5136527 / 000 / 01

3 Accessories, consumables
NOTE
The adapters listed ensure the right distance between the hole center laser pointer and the drill stand used.
Designation
Short designation
Description
Adapter DD‑ST HCL A‑120 For use with the DD‑ST 120 drill stand
Adapter DD‑ST HCL A‑150/160 For use with the DD‑ST 150‑U or
DD‑ST 160 drill stands
Adapter DD‑ST HCL A‑HD30 For use with the DD‑HD 30 drill stand
Laser visibility glasses PUA 60 For improved laser beam visibility un-
der difficult lighting conditions.
4 Technical data
Right of technical changes reserved.
Approx. range of the lines and intersection point 1 m
Accuracy at a distance of 200 mm from the base ma-
terial
±1mm
Laser class 2
Line width at a distance of 250 mm from the base ma-
terial
1…1.5 mm
Automatic power-off after approx. 1 min
Power supply 4 AA batteries
Battery life at a temperature of +20 °C 150 h
Operating temperature range -10…+40°C (+14...+104°F)
Storage temperature -20…+60°C (-4...+140°F)
Protection against dust and water spray IP 53
As perIEC 60529
Weight of the laser unit with DD‑ST HCL A‑120 adapter 400 g
Weight of the laser unit with DD‑ST HCL A-150/160
adapter
460 g
Weight of the laser unit with DD‑ST HCL A-HD30 ad-
apter
570 g
Dimensions of the laser unit with DD‑ST 120 adapter
(LxWxH)
146 mm x 51 mm x 97 mm
Dimensions of the laser unit with DD‑ST 150-U/ 160
adapter (LxWxH)
158 mm x 52 mm x 99 mm
Dimensions of the laser unit with DD‑HD 30 adapter
(LxWxH)
215 mm x 99 mm x 112 mm
5 Safety instructions
In addition to the information relevant to safety given in
each of the sections of these operating instructions, the
following points must be strictly observed at all times.
a) The tool and its ancillary equipment may present
hazards when used incorrectly by untrained per-
sonnel or when used not as directed.
b) To avoid the risk of injury, use only genuine Hilti
accessories and additional equipment.
c) Modification of the tool is not permissible.
d) Observe the information printed in the operat-
ing instructions concerning operation, care and
maintenance.
e) Do not render safety devices ineffective and do
not remove information and warning notices.
f) Keep laser tools out of reach of children.
g) Take the influences of the surrounding area into
account. Do not expose the tool to rain or snow
en
10
Printed: 03.12.2015 | Doc-Nr: PUB / 5136527 / 000 / 01

and do not use it in damp or wet conditions. Do
notusethetoolwherethereisariskoffireor
explosion.
h) Check the condition of the tool before use. If the
tool is found to be damaged, have it repaired at a
Hilti service center.
i) The user must check the accuracy of the tool
after it has been dropped or subjected to other
mechanical stresses.
j) When the tool is brought into a warm environment
from very cold conditions, or vice-versa, allow it
to become acclimatized before use.
k) If mounting on an adapter, check that the tool is
fitted correctly.
l) Keep the laser exit aperture clean to avoid meas-
urement errors.
m) Although the tool is designed for the tough condi-
tions of jobsiteuse, as with other optical and elec-
tronic instruments (e.g. binoculars, spectacles,
cameras) it should be treated with care.
n) Although the tool is protected to prevent entry
of dampness, it should be wiped dry each time
before being put away in its transport container.
o) Avoid looking directly into the laser beam.
p) The laser visibility glasses are not laser protec-
tion glasses and do not protect the eyes against
laser beams. As these glasses restrict color vis-
ion, wearing them while driving a vehicle on a
public road is not permissible. They are also no
substitute for sunglasses.
q) Stayalert, watch what you are doingandusecom-
mon sense when operating the machine. Don’t
use the machine when you are tired or under the
influence of drugs, alcohol or medication. Amo-
ment of inattention while operating machines may
result in serious personal injury.
5.1 Proper organization of the work area
a) Implement suitable safety measures in the area
in which you are working and take care to avoid
directing the beam towards other persons or to-
wards yourself when setting up the tool.
b) Avoid unfavorable body positions when working
from ladders. Make sure you work from a safe
stance and stay in balance at all times.
c) The result obtainedmaybe distorted if the laser beam
passes through a pane of glass or other objects, or if
the wrong adapter is used.
d) Reflection of the laser beam from glass or other
reflective surfaces may cause errors or incorrect res-
ults.
e) Check that the tool is correctly attached to the
guide rail of the drill stand (remove dirt or foreign
matter such as drilling slurry from the guide rail).
f) Use the tool only within its specified limits.
g) If several laser tools are used in the same working
area, care must be taken to avoid confusing the
beams.
h) Do not use the tool in the proximity of medical instru-
ments.
5.2 Electromagnetic compatibility
Although the tool complies with the strict requirements
of the applicable directives, Hilti cannot entirely rule out
the possibility of the tool being subject to interference
caused by powerful electromagnetic radiation, leading to
incorrect operation.
5.3 Laser classification for Laser Class 2 / Class II
appliances
Depending on the version purchased, the tool complies
with Laser Class 2 in accordance with IEC825-3:2007 /
EN60825-3:2007 and Class II in accordance with CFR
21 § 1040 (FDA). This tool may be used without need
for further protective measures. The eyelid closure reflex
protects the eyes when a person looks into the beam
unintentionally for a brief moment. This eyelid closure
reflex, however, may be negatively affected bymedicines,
alcohol or drugs. Nevertheless, as with the sun, one
should not look directly into sources of bright light. Do
not direct the laser beam toward persons.
5.4 Electrical
a) Do not disassemble the tool in order to attempt
to charge the batteries. The batteries in the tool are
designed to last for the life of the tool. No provision
has been made for battery replacement by the user.
b) To avoid pollution of the environment, the tool
must be disposed of in accordance with the cur-
rently applicable national regulations. Consult the
manufacturer if you are unsure of how to proceed.
c) Do not allow the batteries to overheat and do not
expose them to fire. The batteries may explode or
release toxic substances.
5.5 Liquids
Under abusive conditions, liquid may leak from the bat-
tery. Avoid contact. If contact accidentally occurs,
flush with water. In the event of the liquid coming into
contact with the eyes, rinse the eyes with plenty of
water and consult a doctor. Liquid ejected from the
battery may cause irritation or burns.
en
11
Printed: 03.12.2015 | Doc-Nr: PUB / 5136527 / 000 / 01

6Beforeuse
6.1 Assembling and dismantling the hole center
laser pointer 2
NOTE
The adapters are available as accessories (see section
3).
1. Select the adapter that is suitable for the drill stand
you are using.
2. Fit the DD‑ST HCL laser unit to the adapter by
pressing it onto the adapter until it is heard to
engage with a click.
3. Check that both catches have engaged securely
before using the hole center laser pointer.
4. To remove the adapter, press the catches on each
side together slightly and pull the laser unit away
from the adapter.
7Operation
NOTE
To achieve maximum accuracy, project the line onto an
even surface.
7.1 Switching the laser beam on
Press the on/off button once.
7.2 Switching the laser beam off
If the beam is already switched on, press the on / off
button once.
NOTE
The laser unit switches itself off automatically after 1
minute.
7.3 Attach the hole center laser pointer to the drill
stand and switch it on. 3
NOTE
For optimum use, the hole center laser pointer should
be positioned at a distance of between 20 and 40 cm
from the working surface. In order to attach the hole
center laser pointer you may have to move the carriage
to its highest position on the guide rail or remove the
core bit from the machine (please refer to the operating
instructions for the drilling machine).
NOTE
Check to ensure that you are using the right adapter for
the drill stand.
1. Mount the hole center laser pointer on the guide rail
of the drill stand and check that it lies flat against
the rail (if necessary, clean the rail to remove dirt or
foreign matter such as drilling slurry).
The magnet incorporated in the adapter holds the
hole center laser pointer in place on the guide rail of
the drill stand.
2. Check to ensure that the laser points toward the
working surface.
3. Press the on/off button once.
7.4 Aligning the drill stand with the hole center
1. If the drill stand has already been secured, slightly
slacken the means by which it is fastened (please
refer to the operating instructions for the drilling
machine).
2. Adjust the position of the drill stand relative to the
surface on which it is standing until the projected
laser cross coincides with the center of the position
at which the hole is to be drilled.
3. Refasten the drill stand and check to ensure that it
holds securely (please refer to the operating instruc-
tions for the drilling machine).
4. After refastening the drill stand, check the position
of the projected laser cross once again.
5. Press the on / off button to switch the laser beam
off (beam no longer visible).
6.
Remove the hole center laser pointer from the drill
stand.
7.5 Drilling the hole
Please refer to the operating instructions for the drilling
machine.
en
12
Printed: 03.12.2015 | Doc-Nr: PUB / 5136527 / 000 / 01

8 Care and maintenance
8.1 Cleaning and drying
1. Blow dust off the lenses.
2. Donottouchtheglasswiththefingers.
3. Useonly a clean, soft cloth forcleaning. If necessary,
moisten the cloth slightly with pure alcohol or a little
water.
NOTE Do not use any other liquids as these may
damage the plastic components.
4. Observe the temperature limits when storing your
equipment. This is particularly important in winter
/summeriftheequipmentiskeptinsideamotor
vehicle (-20°C to +60°C / -4°F to 140°F).
8.2 Storage
Remove the tool from its case if it has become wet.
The tool, its carrying case and accessories should be
cleaned and dried (at maximum +60°C / 140°F). Repack
the equipment only once it has dried completely and then
store it in a dry place.
Check the equipment before it is used after a long period
of storage or transportation.
8.3 Transport
Use the Hilti packaging or packaging of equivalent quality
fortransportingorshippingyourequipment.
9 Troubleshooting
Fault Possible cause Remedy
The tool can’t be switched on /
no laser beam.
The battery is exhausted. Contact Hilti Service.
The on / off switch is defective. Contact Hilti Service.
A fault has occurred in the tool. Contact Hilti Service.
The temperature is too high or too
low.
Allow the tool to cool down or warm
up.
The laser source or laser control unit
is faulty.
Contact Hilti Service.
The hole center is not correctly
indicated.
The laser diode is out of alignment
as a result of a hard impact (e.g. was
dropped).
Contact Hilti Service.
Dirt or foreign matter on the guide rail
or adapter.
Clean the guide rail and / or adapter.
The wrong adapter has been selected
and used.
Use the right adapter for the drill
stand.
A spacer is fitted to the drill stand. The hole center indicated by the laser
is incorrect if a spacer is used.
10 Disposal
WARNING
Improper disposal of the equipment may have serious consequences:
The burning of plastic components generates toxic fumes which may present a health hazard.
Batteries may explode if damaged or exposed to very high temperatures, causing poisoning, burns, acid burns or
environmental pollution.
Careless disposal may permit unauthorized and improper use of the equipment. This may result in serious personal
injury, injury to third parties and pollution of the environment.
Most of the materials from which Hilti tools or appliances are manufactured can be recycled. The materials must
be correctly separated before they can be recycled. In many countries, Hilti has already made arrangements for
taking back old tools and appliances for recycling. Ask Hilti customer service or your Hilti representative for further
information.
en
13
Printed: 03.12.2015 | Doc-Nr: PUB / 5136527 / 000 / 01

For EC countries only
Do not dispose of electronic measuring tools or appliances together with household waste.
In observance of the European Directive on waste electrical and electronic equipment and its imple-
mentation in accordance with national law, electrical appliances that have reached the end of their life
must be collected separately and returned to an environmentally compatible recycling facility.
Dispose of the batteries in accordance with national regulations.
11 Manufacturer’s warranty - tools
Please contact your local Hilti representative if you have
questions about the warranty conditions.
12 EC declaration of conformity (original)
Designation: Hole center laser pointer
Type: DD-ST HCL
Generation: 01
Year of design: 2012
We declare, on our sole responsibility, that this product
complies with the following directives and standards:
until 19th April 2016: 2004/108/EC, from 20th April 2016:
2014/30/EU, 2011/65/EU, EN ISO 12100.
Hilti Corporation, Feldkircherstrasse 100,
FL‑9494 Schaan
Paolo Luccini Johannes Wilfried Huber
Head of BA Quality and Process Man-
agement
Senior Vice President
Business Area Electric Tools & Ac-
cessories
Business Unit Diamond
06/2015 06/2015
Technical documentation filed at:
Hilti Entwicklungsgesellschaft mbH
Zulassung Elektrowerkzeuge
Hiltistrasse 6
86916 Kaufering
Deutschland
en
14
Printed: 03.12.2015 | Doc-Nr: PUB / 5136527 / 000 / 01

NOTICE ORIGINALE
DD-ST HCL Laser d'indication du centre de forage
Avantdemettrel'appareilenmarche,lireim-
pérativement son mode d'emploi et bien res-
pecter les consignes.
Le présent mode d'emploi doit toujours ac-
compagner l'appareil.
Ne pas prêter ou céder l'appareil à un autre
utilisateur sans lui fournir le mode d'emploi.
Sommaire Page
1 Consignes générales 15
2Description 16
3 Accessoires, consommables 17
4 Caractéristiques techniques 17
5 Consignes de sécurité 18
6 Mise en service 19
7Utilisation 19
8 Nettoyage et entretien 20
9 Guide de dépannage 20
10 Recyclage 21
11 Garantie constructeur des appareils 21
12 Déclaration de conformité CE (original) 21
1 Les numéros renvoient aux illustrations. Les illustra-
tions se trouvent au début de la notice d'utilisation.
Dans le présent mode d'emploi, «l'appareil» désigne tou-
jours le laser d'indication du centre de forageDD‑STHCL.
Organesdecommandeetélémentsdel'appareil1
@
Touche Marche / Arrêt
;
Unité laser
=
Verrouillage de l'adaptateur
%
Adaptateur DD‑ST 120 (disponible en tant qu'ac-
cessoire)
&
Adaptateur DD‑ST 150‑U/160 (disponible en tant
qu'accessoire)
(
Adaptateur DD‑HD 30 (disponible en tant qu'acces-
soire)
1 Consignes générales
1.1 Termes signalant un danger et leur signification
DANGER
Pour un danger imminent qui peut entraîner de graves
blessures corporelles ou la mort.
AVERTISSEMENT
Pour attirer l'attention sur une situation pouvant présen-
ter des dangers susceptibles d'entraîner des blessures
corporelles graves ou la mort.
ATTENTION
Pour attirer l'attention sur une situation pouvant présen-
ter des dangers susceptibles d'entraîner des blessures
corporelles légères ou des dégâts matériels.
REMARQUE
Pour des conseils d'utilisation et autres informations
utiles.
1.2 Explication des pictogrammes et autres
symboles d'avertissement
Symboles d'avertissement
Avertisse-
ment danger
général
Symboles d'obligation
Lire le mode
d'emploi
avant
d'utiliser
l'appareil
fr
15
Printed: 03.12.2015 | Doc-Nr: PUB / 5136527 / 000 / 01

Symboles
Les appareils
et les
piles/batteries
ne doivent
pas être
éliminés
avec les
ordures
ménagères.
Rayonne-
ment
laser
Ne pas
regarder
directement
dans le
faisceau
Laser de
classe 2
conformé-
ment à
EN 60825-
1:2007
Sur l'appareil
Longueur d'onde de laser de 620 à 690 nm. Dans
les conditions citées ci-dessus, la puissance de sortie
moyenne est de 0,95 mW.
Identification de l'appareil
La désignation du modèle et le numéro de série se
trouvent sur la plaque signalétique de l'appareil. Inscrire
cesrenseignementsdanslemoded'emploiettoujours
s'y référer pour communiquer avec notre représentant ou
agence Hilti.
Type :
Génération : 01
N° de série :
2 Description
2.1 Utilisation conforme à l'usage prévu
Le DD-ST HCL est unlaser en croix utilisé en combinaison
avec les colonnes de forage DD‑HD 30, DD‑ST 150‑U,
DD‑ST 160 et DD‑ST 120. Monté sur la colonne de forage
appropriée, le laser d'indication du centre de forage
permet de déterminer de manière rapide et exacte le
point central d'un carottage devant être effectué. Le DD-
ST HCL est également capable d'indiquer avec précision
le point central dans le cas de forages biais.
Le DD‑ST HCL doit toujours être utilisé avec la carotteuse
Hilti correspondante selon la colonne de forage utilisée,
en combinaison avec l'un des adaptateurs suivants :
Adaptateur DD‑HD 30, adaptateur DD‑ST 150‑U/160 ou
adaptateur DD‑ST 120.
L'aimant intégré à l'adaptateur permet un montage et
un démontage aisé, et maintient le laser d'indication du
centre de forage sur le rail de guidage de la colonne de
forage.
Bien respecter les consignes concernant l'utilisation, le
nettoyage et l'entretien de l'appareil qui figurent dans le
présent mode d'emploi.
Pour éviter tout risque de blessure, utiliser uniquement
les accessoires et outils Hilti d'origine.
Toute manipulation ou modification de l'appareil est in-
terdite.
L'appareil et ses accessoires peuvent s'avérer dangereux
s'ils sont utilisés de manière incorrecte par un personnel
non qualifié ou de manière non conforme à l'usage prévu.
2.2 Caractéristiques
L'appareil dispose d'un laser en croix d'une portée de
1 m environ. La portée varie selon la luminosité ambiante.
L'appareil s'arrête spontanément au bout d'1 minute.
Il est n'est pas prévu de remplacer lesbatteries.L'appareil
est conçu pour une durée d'utilisation de 150 heures à
fr
16
Printed: 03.12.2015 | Doc-Nr: PUB / 5136527 / 000 / 01

20 °C/68 °F. Compte tenu d'une durée de mise en marche
de1minute/perçageetenfonctiondelatempérature
ambiante, env. 9.000 indications sont possibles.
2.3 Éléments du laser d'indication du centre de
forage livrés
1Unitélaser
1Houssedetransport
1Moded'emploi
3 Accessoires, consommables
REMARQUE
L'adaptateur présenté assure que la distance est correcte entre le laser d'indication du centre de centre du forage et
la colonne de forage correspondante.
Désignation Symbole
Description
Adaptateur DD‑ST HCL A‑120 à utiliser avec la colonne de forage
DD‑ST 120
Adaptateur DD‑ST HCL A‑150/160 à utiliser avec la colonne de forage
DD‑ST 150‑U ou DD‑ST 160
Adaptateur DD‑ST HCL A‑HD30 à utiliser avec la colonne de forage
DD‑HD 30
Lunettes de visée PUA 60
Accroît la sécurité du faisceau laser
dans des conditions de luminosité
difficiles.
4 Caractéristiques techniques
Sous réserve de modifications techniques !
Portée lignes et point d'intersection env. 1 m
Précision à une distance de 200 mm du matériau sup-
port
±1mm
Classe laser 2
Épaisseur de ligne à une distance de 250 mm du maté-
riau support
1…1,5 mm
Arrêt automatique env.
1min
Alimentation électrique 4 cellules AA
Autonomie de fonctionnement à une température de
+20 °C env.
150 h
Température de service -10…+40 °C (+14...+104°F)
Température de stockage -20…+60 °C (-4...+140°F)
Protection antipoussière et contre les projections d'eau IP 53
Selon IEC 60529
Poids de l'unité laser avec adaptateur DD‑ST
HCL A‑120
400 g
Poids de l'unité laser avec adaptateur DD‑ST HCL
A‑150/160
460 g
Poids de l'unité laser avec adaptateur DD‑ST
HCL A‑HD30
570 g
Dimensions de l'unité laser avec adaptateur DD‑ST 120
(LxBxH)
146 mm x 51 mm x 97 mm
fr
17
Printed: 03.12.2015 | Doc-Nr: PUB / 5136527 / 000 / 01
Pagina se încarcă...
Pagina se încarcă...
Pagina se încarcă...
Pagina se încarcă...
Pagina se încarcă...
Pagina se încarcă...
Pagina se încarcă...
Pagina se încarcă...
Pagina se încarcă...
Pagina se încarcă...
Pagina se încarcă...
Pagina se încarcă...
Pagina se încarcă...
Pagina se încarcă...
Pagina se încarcă...
Pagina se încarcă...
Pagina se încarcă...
Pagina se încarcă...
Pagina se încarcă...
Pagina se încarcă...
Pagina se încarcă...
Pagina se încarcă...
Pagina se încarcă...
Pagina se încarcă...
Pagina se încarcă...
Pagina se încarcă...
Pagina se încarcă...
Pagina se încarcă...
Pagina se încarcă...
Pagina se încarcă...
Pagina se încarcă...
Pagina se încarcă...
Pagina se încarcă...
Pagina se încarcă...
Pagina se încarcă...
Pagina se încarcă...
Pagina se încarcă...
Pagina se încarcă...
Pagina se încarcă...
Pagina se încarcă...
Pagina se încarcă...
Pagina se încarcă...
Pagina se încarcă...
Pagina se încarcă...
Pagina se încarcă...
Pagina se încarcă...
Pagina se încarcă...
Pagina se încarcă...
Pagina se încarcă...
Pagina se încarcă...
Pagina se încarcă...
Pagina se încarcă...
Pagina se încarcă...
Pagina se încarcă...
Pagina se încarcă...
Pagina se încarcă...
Pagina se încarcă...
Pagina se încarcă...
Pagina se încarcă...
Pagina se încarcă...
Pagina se încarcă...
Pagina se încarcă...
Pagina se încarcă...
Pagina se încarcă...
Pagina se încarcă...
Pagina se încarcă...
Pagina se încarcă...
Pagina se încarcă...
Pagina se încarcă...
Pagina se încarcă...
Pagina se încarcă...
Pagina se încarcă...
Pagina se încarcă...
Pagina se încarcă...
Pagina se încarcă...
Pagina se încarcă...
Pagina se încarcă...
Pagina se încarcă...
Pagina se încarcă...
Pagina se încarcă...
Pagina se încarcă...
Pagina se încarcă...
Pagina se încarcă...
Pagina se încarcă...
Pagina se încarcă...
Pagina se încarcă...
Pagina se încarcă...
Pagina se încarcă...
Pagina se încarcă...
Pagina se încarcă...
Pagina se încarcă...
Pagina se încarcă...
Pagina se încarcă...
Pagina se încarcă...
Pagina se încarcă...
Pagina se încarcă...
Pagina se încarcă...
Pagina se încarcă...
Pagina se încarcă...
Pagina se încarcă...
Pagina se încarcă...
Pagina se încarcă...
Pagina se încarcă...
Pagina se încarcă...
Pagina se încarcă...
Pagina se încarcă...
Pagina se încarcă...
Pagina se încarcă...
Pagina se încarcă...
Pagina se încarcă...
Pagina se încarcă...
Pagina se încarcă...
Pagina se încarcă...
Pagina se încarcă...
Pagina se încarcă...
Pagina se încarcă...
Pagina se încarcă...
Pagina se încarcă...
Pagina se încarcă...
Pagina se încarcă...
Pagina se încarcă...
Pagina se încarcă...
Pagina se încarcă...
Pagina se încarcă...
Pagina se încarcă...
Pagina se încarcă...
Pagina se încarcă...
Pagina se încarcă...
Pagina se încarcă...
Pagina se încarcă...
Pagina se încarcă...
Pagina se încarcă...
Pagina se încarcă...
Pagina se încarcă...
Pagina se încarcă...
Pagina se încarcă...
Pagina se încarcă...
Pagina se încarcă...
Pagina se încarcă...
Pagina se încarcă...
Pagina se încarcă...
Pagina se încarcă...
Pagina se încarcă...
Pagina se încarcă...
Pagina se încarcă...
Pagina se încarcă...
Pagina se încarcă...
Pagina se încarcă...
Pagina se încarcă...
Pagina se încarcă...
Pagina se încarcă...
Pagina se încarcă...
Pagina se încarcă...
Pagina se încarcă...
Pagina se încarcă...
Pagina se încarcă...
Pagina se încarcă...
Pagina se încarcă...
Pagina se încarcă...
Pagina se încarcă...
Pagina se încarcă...
Pagina se încarcă...
Pagina se încarcă...
Pagina se încarcă...
Pagina se încarcă...
Pagina se încarcă...
Pagina se încarcă...
Pagina se încarcă...
Pagina se încarcă...
Pagina se încarcă...
Pagina se încarcă...
Pagina se încarcă...
Pagina se încarcă...
Pagina se încarcă...
Pagina se încarcă...
Pagina se încarcă...
Pagina se încarcă...
Pagina se încarcă...
Pagina se încarcă...
Pagina se încarcă...
Pagina se încarcă...
Pagina se încarcă...
Pagina se încarcă...
Pagina se încarcă...
Pagina se încarcă...
Pagina se încarcă...
Pagina se încarcă...
Pagina se încarcă...
Pagina se încarcă...
Pagina se încarcă...
Pagina se încarcă...
Pagina se încarcă...
Pagina se încarcă...
Pagina se încarcă...
Pagina se încarcă...
Pagina se încarcă...
Pagina se încarcă...
Pagina se încarcă...
Pagina se încarcă...
Pagina se încarcă...
Pagina se încarcă...
Pagina se încarcă...
Pagina se încarcă...
Pagina se încarcă...
Pagina se încarcă...
Pagina se încarcă...
Pagina se încarcă...
Pagina se încarcă...
Pagina se încarcă...
-
 1
1
-
 2
2
-
 3
3
-
 4
4
-
 5
5
-
 6
6
-
 7
7
-
 8
8
-
 9
9
-
 10
10
-
 11
11
-
 12
12
-
 13
13
-
 14
14
-
 15
15
-
 16
16
-
 17
17
-
 18
18
-
 19
19
-
 20
20
-
 21
21
-
 22
22
-
 23
23
-
 24
24
-
 25
25
-
 26
26
-
 27
27
-
 28
28
-
 29
29
-
 30
30
-
 31
31
-
 32
32
-
 33
33
-
 34
34
-
 35
35
-
 36
36
-
 37
37
-
 38
38
-
 39
39
-
 40
40
-
 41
41
-
 42
42
-
 43
43
-
 44
44
-
 45
45
-
 46
46
-
 47
47
-
 48
48
-
 49
49
-
 50
50
-
 51
51
-
 52
52
-
 53
53
-
 54
54
-
 55
55
-
 56
56
-
 57
57
-
 58
58
-
 59
59
-
 60
60
-
 61
61
-
 62
62
-
 63
63
-
 64
64
-
 65
65
-
 66
66
-
 67
67
-
 68
68
-
 69
69
-
 70
70
-
 71
71
-
 72
72
-
 73
73
-
 74
74
-
 75
75
-
 76
76
-
 77
77
-
 78
78
-
 79
79
-
 80
80
-
 81
81
-
 82
82
-
 83
83
-
 84
84
-
 85
85
-
 86
86
-
 87
87
-
 88
88
-
 89
89
-
 90
90
-
 91
91
-
 92
92
-
 93
93
-
 94
94
-
 95
95
-
 96
96
-
 97
97
-
 98
98
-
 99
99
-
 100
100
-
 101
101
-
 102
102
-
 103
103
-
 104
104
-
 105
105
-
 106
106
-
 107
107
-
 108
108
-
 109
109
-
 110
110
-
 111
111
-
 112
112
-
 113
113
-
 114
114
-
 115
115
-
 116
116
-
 117
117
-
 118
118
-
 119
119
-
 120
120
-
 121
121
-
 122
122
-
 123
123
-
 124
124
-
 125
125
-
 126
126
-
 127
127
-
 128
128
-
 129
129
-
 130
130
-
 131
131
-
 132
132
-
 133
133
-
 134
134
-
 135
135
-
 136
136
-
 137
137
-
 138
138
-
 139
139
-
 140
140
-
 141
141
-
 142
142
-
 143
143
-
 144
144
-
 145
145
-
 146
146
-
 147
147
-
 148
148
-
 149
149
-
 150
150
-
 151
151
-
 152
152
-
 153
153
-
 154
154
-
 155
155
-
 156
156
-
 157
157
-
 158
158
-
 159
159
-
 160
160
-
 161
161
-
 162
162
-
 163
163
-
 164
164
-
 165
165
-
 166
166
-
 167
167
-
 168
168
-
 169
169
-
 170
170
-
 171
171
-
 172
172
-
 173
173
-
 174
174
-
 175
175
-
 176
176
-
 177
177
-
 178
178
-
 179
179
-
 180
180
-
 181
181
-
 182
182
-
 183
183
-
 184
184
-
 185
185
-
 186
186
-
 187
187
-
 188
188
-
 189
189
-
 190
190
-
 191
191
-
 192
192
-
 193
193
-
 194
194
-
 195
195
-
 196
196
-
 197
197
-
 198
198
-
 199
199
-
 200
200
-
 201
201
-
 202
202
-
 203
203
-
 204
204
-
 205
205
-
 206
206
-
 207
207
-
 208
208
-
 209
209
-
 210
210
-
 211
211
-
 212
212
-
 213
213
-
 214
214
-
 215
215
-
 216
216
-
 217
217
-
 218
218
-
 219
219
-
 220
220
-
 221
221
-
 222
222
-
 223
223
-
 224
224
-
 225
225
-
 226
226
-
 227
227
-
 228
228
-
 229
229


Lucrări înrudite
-
Hilti DD-ST-HCL Instrucțiuni de utilizare
-
Hilti DD 120 Instrucțiuni de utilizare
-
Hilti DD 160 Instrucțiuni de utilizare
-
Hilti DD 350-CA Instrucțiuni de utilizare
-
Hilti DD 500-CA Instrucțiuni de utilizare
-
-
-
Hilti DD AF-CA Instrucțiuni de utilizare
-
Hilti PRI 36 Instrucțiuni de utilizare
-