
Original Instruction Manual
Originalnipriročniknavodil
Manualiorigjinalipërdorimit
Оригиналноръководствозаексплоатация
Originalnipriručniksuputama
Оригиналноупатствозаупотреба
Manualdeinstrucţiunioriginal
Оригиналниприручниксаупутствима
Оригинальноеруководствопоэксплуатации
Оригінальніінструкціїзексплуатації
EY2650H
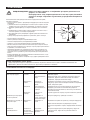
WARNING:
Read this instruction manual carefully before putting the Telescopic Petrol Pole Saw into operation and strictly observe the safety regulations!
Save instruction manual for future reference.
OPOZORILO:
Pred uporabo teleskopskega bencinskega višinskega obrezovalnika skrbno preberite ta navodila za uporabo in dosledno upoštevajte
predpise za varnost!
Navodila za uporabo shranite za prihodnjo uporabo.
PARALAJMËRIM:
Lexojeni këtë manual përdorimi me kujdes përpara se ta vini Sharrën me shufër teleskopike me benzinë në punë dhe vëzhgoni me kujdes
rregulloret e sigurisë!
Manualin e përdorimit ruajeni për referime të mëvonshme.
ПРЕДУПРЕЖДЕНИЕ:
Прочететевнимателнонастоящатаинструкциязаработа,предидаизползватебензиновиятрионстелескопиченпрътзапърви
път,истрогоспазвайтеправилатазабезопасност!
Запазетеръководствотозабъдещисправки.
UPOZORENJE:
Pročitajteovajprirucniksuputamazauporabupažljivoprijepuštanjateleskopskemotornepileupogonistrogosepridržavajtesigurnosnih
propisa!
Spremiteprirucniksuputamazauporabuzabudućuuporabu.
ПРЕДУПРЕДУВАЊЕ:
Предпрватаупотребанабензинскатапиланателескопскарачка,внимателнопрочитајтегооваупатствозаупотребаипочитувајте
гистрогобезбедноснитепрописи!
Зачувајтегоупатствотозакористењезаиднипотреби.
AVERTISMENT:
Citiţicuatenţieacestmanualdeinstrucţiuniînaintedeapuneînfuncţiuneferăstrăultelescopicpebenzinăşirespectaţicustricteţe
reglementărileprivindsiguranţa!
Păstraţimanualuldeinstrucţiunipentruconsultăriulterioare.
УПОЗОРЕЊЕ:
Препуштањаурадбензинскетелескопскетестерепажљивопрочитајтеовајприручниксаупутствимаистрогосепридржавајте
безбедноснихпрописа!
Сачувајтеприручниксаупутствимазабудућуреференцу.
ПРЕДОСТЕРЕЖЕНИЕ:
Внимательноознакомьтесьсданнымруководством,преждечемприступатькэксплуатациибензиновойцепнойпилына
телескопическойштанге,истрогособлюдайтеправилатехникибезопасности!
Сохранитеинструкциюпоэксплуатациидлядальнейшегоиспользования.
УВАГА:
Уважнопрочитайтецюінструкціюзексплуатаціїпередвикористаннямбензиновоїтелескопічноїпилкидляживоплотутастрого
дотримуйтесяправилбезпеки!
Збережітьцюінструкціюзексплуатації,вонаможезнадобитисяВамумайбутньому.

2
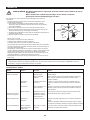
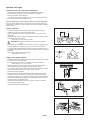
Thank you very much for purchasing the MAKITA Telescopic Petrol Pole Saw.
We are pleased to recommend to you the MAKITA Telescopic Petrol Pole
Saw which is the result of a long development programme and many years of
knowledge and experience.
Please read this booklet which refers in detail to the various points that will
demonstrate its outstanding performance. This will assist you to obtain the best
possible result from your MAKITA Telescopic Petrol Pole Saw.
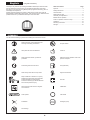
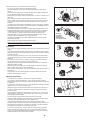
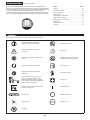
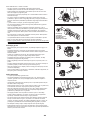
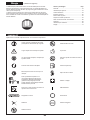
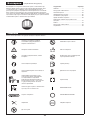
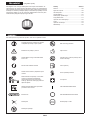
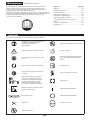
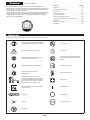
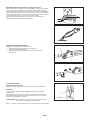
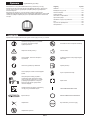
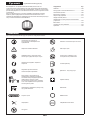
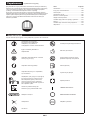
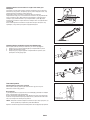
You will note the following symbols when reading the instructions manual.
Read instruction manual and follow the
warnings and safety precautions!
Noopename!
Take particular care and attention! Chain oil.
Wearprotectivehelmet,eyeandear
protection.
Keep the area of operation clear of all
persons and pets!
Protective gloves must be worn! Fuel (Gasoline)
Wear sturdy boots with non-slip soles. Engine-manual start
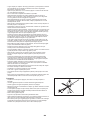
Keep a distance of at least 15 m (50 ft)
between the equipment and bystanders
and/or electrical line (including any
branches contacting it). Risk of electrical
shock and/or personal injury.
First Aid
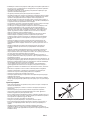
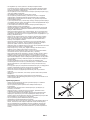
Never hold the pole saw at an angle of
more than 60°.
ON/START
Chain speed. OFF/STOP
Forbidden! Emergency stop
No smoking!
SYMBOLS
English
(Original instructions)
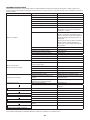
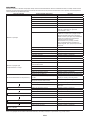
TableofContents Page
Symbols .........................................................................2
Safety instructions .........................................................3
Technical data................................................................9
Designation of parts.....................................................10
Assembly and adjustment ...........................................11
Before start of operation ..............................................14
Points in operation and how to stop ............................16
Operation .....................................................................18
Servicing instructions...................................................18
Storage ........................................................................24

3
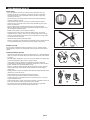
Generalinstructions
Toensurecorrectoperation,userhastoreadthisinstructionmanualto -
makehimselffamiliarwiththehandlingoftheequipment.Usersinsufciently
informed will risk danger to themselves as well as others due to improper
handling.
It is recommended only to lend the equipment to people who have proven to -
be experienced with equipment.
Always hand over the instruction manual.
First users should ask the dealer for basic instructions to familiarize oneself -
with the handling of an engine powered cutter.
Children and young persons aged under 18 years must not be allowed to -
operate the equipment. Persons over the age of 16 years may however use
the device for the purpose of being trained only whilst under supervision of a
qualiedtrainer.
Use the equipment with the utmost care and attention. -
Operate the equipment only if you are in good physical condition. Perform all -
work calmly and carefully. The user has to accept liability for others.
Neverusetheequipmentafterconsumptionofalcoholordrugs,oriffeeling -
tired or ill.
Never attempt to modify the equipment. -
National regulations may restrict of the use of the equipment. Follow the -
regulations about handling of pole saws and chain saws in your country.
Intendeduseofthemachine
This equipment is designed only for the purpose of pruning branches and limbs
less than 15 cm in diameter. Never use the equipment for the other purpose.
Abusing the equipment may cause serious injury.
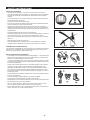
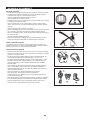
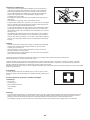
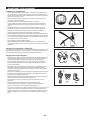
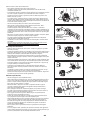
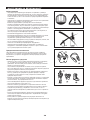
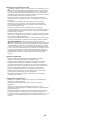
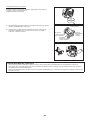
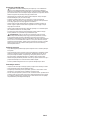
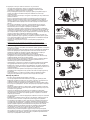
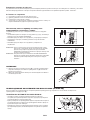
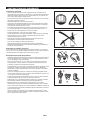
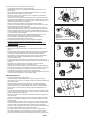
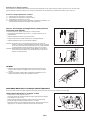
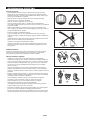
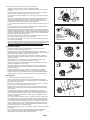
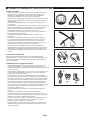
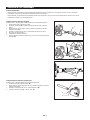
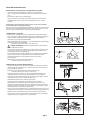
Personalprotectiveequipment
Theclothingwornshouldbefunctionalandappropriate,i.e.itshouldbetight -
ttingbutnotcausehindrance.Donotweareitherjewelryorclothingwhich
could become entangled with bushes or shrubs.
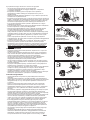
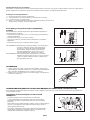
Inordertoavoideitherhead,eye,handorfootinjuriesaswellastoprotect -
your hearing the following protective equipment and protective clothing must
be used during operation.
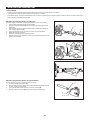
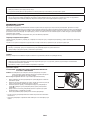
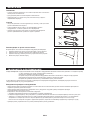
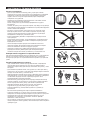
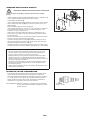
Always wear a helmet where there is a risk of falling objects. The protective -
helmet (1) is to be checked at regular intervals for damage and is to be
replaced at the latest after 5 years. Use only approved protective helmets.
The visor (2) of the helmet (or alternatively goggles) protects the face from -
yingdebrisandstones.Duringoperationalwaysweargoggles,oravisorto
prevent eye injuries.
Wear adequate noise protection equipment to avoid hearing impairment (ear -
muffs(3),earplugsetc.).
Theworkoveralls(4)protectagainstyingstonesanddebris. -
We strongly recommend that the user wears work overalls.
Special gloves (5) made of thick leather are part of the prescribed equipment -
and must always be worn during operation.
Whenusingtheequipment,alwayswearsturdyshoes(6)withanonslip -
sole. This protects against injuries and ensures a good footing.
Whenhandlingthesawchainoradjustingthechaintension,wearprotective -
gloves. Saw chain can cut bare hands severely.
SAFETY INSTRUCTIONS

4
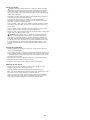
Workareasafety
- Danger: Keep the pole saw at least 15 m away from electric lines and
communication cables (including any branches contacting them). Touching
or approaching high-voltage lines with the pole saw can result in death or
serious injury. Watch power lines and electrical fences around the work area
before starting operation.
Operate the pole saw under good visibility and daylight conditions only. Do -
not operate the pole saw in darkness or fog.
Start and operate the engine only outdoors in a well ventilated area. -
Operationinaconnedorpoorlyventilatedareacanresultindeathdueto
suffocation or carbon monoxide poisoning.
Duringoperation,neverstandonanunstableorslipperysurfaceorasteep -
slope.Duringthecoldseason,bewareoficeandsnowandalwaysensure
secure footing.
Duringoperation,keepbystandersoranimalsatleast15mawayfromthe -
pole saw. Stop the engine as soon as someone approaches.
Beforeoperation,examinetheworkareaforwirefences,walls,orothersolid -
objects. They can damage the saw chain.
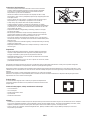
- WARNING: Use of this product can create dust containing chemicals
which may cause respiratory or other illnesses. Some examples of these
chemicalsarecompoundsfoundinpesticides,insecticides,fertilizersand
herbicides.Yourriskfromtheseexposuresvaries,dependingonhowoften
you do this type of work. To reduce your exposure to these chemicals: work
inawellventilatedarea,andworkwithapprovedsafetyequipment,such
asthosedustmasksthatarespeciallydesignedtolteroutmicroscopic
particles.
Puttingintooperation
Beforeassemblingoradjustingtheequipment,switchofftheengineand -
remove the spark plug cap.
Beforestartingtheengine,inspecttheequipmentfordamages,loosescrews/ -
nuts or improper assembly. Sharpen blunt saw chain. If the saw chain is bent
ordamaged,replaceit.Checkallcontrolleversandswitchesforeasyaction.
Clean and dry the handles.
Never attempt to start the engine if the equipment is damaged or not fully -
assembled. Otherwise serious injury may result.
Adjustthechaintensionproperly.Rellthechainoil,ifnecessary. -
Startinguptheengine
Pleasemakesurethattherearenochildrenorotherpeople,alsopay -
attention to any animals in the working vicinity.
Wear the personal protective equipment before starting the engine. -
Makesurethattheattachmentisattachedinplace,thecontrolleverforeasy -
action and check for proper functioning of the lock-off lever.
Ifthesawchainmovesatidle,stoptheengineandadjusttheidlespeed -
down. Ask authorized service center for adjustment if in doubt. Check for
clean and dry handles and test the function of the start/stop switch.

5
Start the engine only in accordance with the instructions.
Do not use any other methods for starting the engine! -
Placetheequipmentonrmground.Maintaingoodbalanceandsecure -
footing.
Whenpullingthestarterknob,holdtheequipmentrmlyagainsttheground -
by your left hand. Never step on the drive shaft.
Beforestartingtheengine,makesurethatthereisnopersonoranimalinthe -
work area.
Whenstartingtheengine,keepthesawchainandguidebarclearofyour -
bodyandotherobject,includingtheground.Thesawchainmaymovewhen
starting and may cause serious injury or damage to the saw chain and/or
property.
The engine is to be switched off immediately in case of any engine problems. -
Shouldthesawchainhitstonesorotherhardobjects,immediatelyswitchoff -
the engine and inspect the equipment.
Operate the equipment only with the shoulder strap attached which is to be -
suitably adjusted before putting the equipment into operation. It is essential
to adjust the shoulder strap according to the user size to prevent fatigue
occurring during use. Never hold the cutter with one hand during use.
Withtheenginerunningonlyatidle,attachtheshoulderharness.During -
operation,keeptheequipmentonyourrightsidermly.
All protective installations and guards supplied with the machine must be -
used during operation.
Neveroperatetheenginewithfaultyexhaustmufer. -
Exceptincaseofemergency,neverdroporcasttheequipmenttotheground -
or this may severely damage the equipment.
Refuelling
Shutofftheengineduringrefuelling,keepawayfromopenamesanddonot -
smoke.
Avoid skin contact with mineral oil products. Do not inhale fuel vapor. Always -
wear protective gloves during refuelling. Change and clean protective clothing
at regular intervals.
Take care not to spill either fuel or oil in order to prevent soil contamination -
(environmental protection). Clean the equipment immediately after fuel has
been spilt.
Avoid any fuel contact with your clothing. Change your clothing instantly if -
fuelhasbeenspiltonit(topreventclothingcatchingre).
Inspect the fuel cap at regular intervals making sure that it can be securely -
fastened and does not leak.
Carefully tighten the fuel tank cap. Change location to start the engine (at -
least 3 meters away from the place of refuelling).
Never refuel in closed rooms. Fuel vapors accumulate at ground level (risk of -
explosions).
Only transport and store fuel in approved containers. Make sure the fuel -
stored is not accessible to children.
Methodofoperation
Intheeventofanemergency,switchofftheengineimmediately. -
Ifyoufeelanyunusualcondition(e.g.noise,vibration)duringoperation, -
switch off the engine. Do not use the equipment until the cause is recognized
and solved.
The saw chain continues to move for a short period after releasing the throttle -
trigger. Don’t rush to contact the saw chain.
Holdthefrontgripwiththelefthandandthereargripwiththerighthand,no -
matteryouarerighthanderorlefthander.Wrapyourngersandthumbs
around the grips.
Never attempt to operate the equipment with one hand. Loss of control may -
resultinseriousorfatalinjury.Toreducetheriskofinjury,keepyourhands
and feet away from the blades.
Do not overreach. Keep proper footing and balance at all times. -
Watchforhiddenobstaclessuchastreestumps,rootsandditchestoavoid -
stumbling. Clear fallen branches and other objects away.
Iftheequipmentgetsheavyimpactorfall,checktheconditionbefore -
continuing work. Check the fuel system for fuel leakage and the controls and
safetydevicesformalfunction.Ifthereisanydamageordoubt,askMakita
authorized service center for the inspection and repair.
Do not touch the gear case. The gear case becomes hot during operation. -
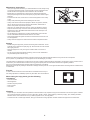
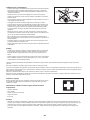
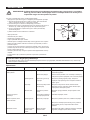
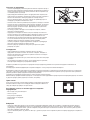
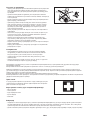
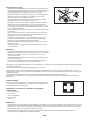
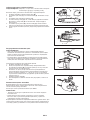
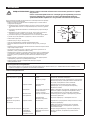
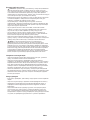
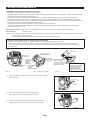
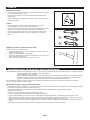
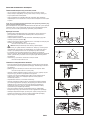
Whenyouleavetheequipment,evenifitisashorttime,alwaysstopthe -
engine. The equipment unattended with the engine running may be used by
unauthorized person and cause serious accident.
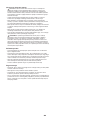
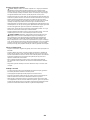
•Resting
•Transport
•Refuelling
•Maintenance
•Toolreplacement
3 meters

6
Pay attention to the environment. Avoid unnecessary throttle operation for -
less pollution and noise emissions. Adjust the carburetor correctly.
Duringorafteroperation,donotputthehotequipmentontodrygrassor -
combustible materials.
Do not hold your right hand above shoulder height. -
Duringoperation,neverhitthesawchainagainsthardobstaclessuchstones -
andnails.Takeparticularcarewhencuttingbranchesnexttowalls,wire
fences or the like.
Ifbranchesgetcaughtinthesawchain,alwaysstoptheengineandremove -
the spark plug cap. Otherwise unintentional start may cause serious injury.
Ifthesawchainbecomesclogged,alwaysstoptheengineandremovethe -
spark plug cap before cleaning.
Accelerating the engine with the saw chain blocked increases the load and -
will damage the engine and/or clutch.
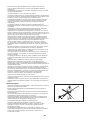
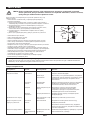
Beforecuttinglimbs,keepanescapeareaawayfromthefallinglimb.First, -
clear obstructs such as limbs and branches from the work area. Move all
tools and goods from the escape area to another safe place.
Beforecuttingbranchesandlimbs,checkthefallingdirectionofthem, -
consideringtheconditionofbranchesandlimbs,adjoiningtrees,wind
direction,etc.Payfullattentiontothefallingdirection,andthereboundofthe
branch,whichhittheground.
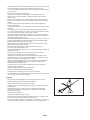
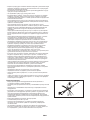
Never hold the pole saw at an angle of more than 60°. Otherwise falling -
objects can hit the operator and cause serious injury. Never stand underneath
the limb being cut.
Payattentiontobrokenorbentbranches.Theymaybouncebackincutting, -
causing unexpected injury.
Beforecuttinglimbsthatyouintendtocut,removebranchesandleaves -
around them. Otherwise the saw may be caught by them.
Topreventthesawfrombeingcaughtinthekerf,donotreleasethethrottle -
lever before pulling the saw out of the kerf.
Ifthesawchainisboundinthekerf,immediatelystoptheengine,carefully -
move the branch to open the kerf and release the saw.
Avoid kickback (rotational reactive force towards the operator). To prevent -
kickback,neverusetheguidebarnoseorperformapenetratingcut.Always
beware of the position of the guide bar nose.
Check the chain tension frequently. When checking or adjusting the chain -
tension,stoptheengineandremovethesparkplugcap.Ifthetensionis
loose,tightenit.
Operate the equipment with as little noise and contamination as possible. In -
particular check the correct setting of the carburetor.
Never stand on a ladder and run the equipment. -
Never climb up into trees to perform cutting operation. -
Wait until the chain reaches its full working speed before cutting. -
Take a rest to prevent loss of control caused by fatigue. We recommend to -
take a 10 to 20-minute rest every hour.
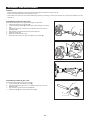
Transport
Beforetransportingtheequipment,switchofftheengineandremovethe -
spark plug cap.
Alwaysttheguidebarcoverduringtransportation. -
Always use the tool protection included with the equipment. -
Carryitinahorizontalpositionbyholdingtheshaft.Keepthehotmufer -
away from your body.
Whentransportingtheequipmentinavehicle,properlysecureittoavoid -
turnover. Otherwise fuel spillage and damage to the equipment and other
baggage may result.
Shut off the engine during transport. -
Ensure that the fuel tank is completely empty. -
Whenunloadingtheequipmentfromthetruck,neverdroptheenginetothe -
ground or this may severely damage the fuel tank.
Remember to lift the entire equipment from the ground when moving the -
equipment. Dragging the fuel tank is highly dangerous and will cause damage
andleakageoffuel,possiblycausingre.

7
Maintenanceinstructions
Haveyourequipmentservicedbyourauthorizedservicecenter,alwaysusing -
only genuine replacement parts. Incorrect repair and poor maintenance can
shorten the life of the equipment and increase the risk of accidents.
Beforedoinganymaintenanceorrepairworkorcleaningtheequipment, -
always stop the engine and remove the spark plug cap. Wait until the engine
gets cold.
Toreducetheriskofre,neverserviceorstoretheequipmentinthevicinity -
ofre.
Always wear protective gloves when handling the saw chain. -
Alwayscleandustanddirtofftheequipment.Neverusegasoline,benzine, -
thinner,alcoholorthelikeforthepurpose.Discoloration,deformationor
cracks of the plastic components may result.
Aftereachuse,tightenallscrewsandnuts,exceptforadjustmentscrews. -
Keep the saw chain sharp. If the saw chain has become blunt and cutting -
performanceispoor,askMakitaauthorizedservicecentertosharpenitor
replace it with new one.
Do not attempt any maintenance or repair not described in this instruction -
manual. Ask Makita authorized service center for such work.
Clean the equipment at regular intervals and check that all screws and nuts -
are well tightened.
Always store the equipment in locked rooms and with an emptied fuel tank. -
Storage
Beforestoringtheequipment,performfullcleaningandmaintenance.Fitthe -
guide bar cover. Remove the spark plug cap. Drain the fuel and chain oil after
the engine gets cold.
Store the equipment in a dry and high or locked location out of reach of -
children.
Donotproptheequipmentagainstsomething,suchasawall.Otherwiseit -
may fall suddenly and cause an injury.
Observe the relevant accident prevention instructions issued by the relevant trade associations and by the insurance companies.
Donotperformanymodicationsontheequipmentasthiswillendangeryoursafety.
The performance of maintenance or repair work by the user is limited to those activities as described in the instruction manual. All other work is
to be done by an Authorized Service Center. Use only genuine spare parts and accessories released and supplied by MAKITA.
Use of non-approved accessories and tools means increased risk of accidents.
MAKITAwillnotacceptanyliabilityforaccidentsordamagecausedbytheuseofnonapprovedattachmentsandxingdevicesofattachments,
or accessories.
Vibration
People with poor circulation who are exposed to excessive vibration may experience injury to blood vessels or the nervous system. Vibration -
maycausethefollowingsymptomstooccurinthengers,handsorwrists:“Fallingasleep”(numbness),tingling,pain,stabbingsensation,
alterationofskincolororoftheskin.Ifanyofthesesymptomsoccur,seeaphysician!
Toreducetheriskof“whitengerdisease”,keepyourhandswarmduringoperationandwellmaintaintheequipmentandaccessories. -
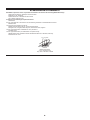
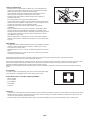
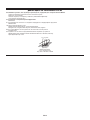
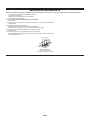
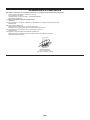
Firstaid
Incaseofaccidentmakesurethatarstaidboxisavailableinthevicinityof
thecuttingoperations.Immediatelyreplaceanyitemtakenfromtherstaidbox.
Whenaskingforhelp,pleasegivethefollowing
information:
Place of accident -
What happened -
Number of injured persons -
Kind of injuries -
Your name -

8
EC DECLARATION OF CONFORMITY
WeMakitaCorporationastheresponsiblemanufacturerdeclarethatthefollowingMakitaMachine(s):
Designation of Machine: Telescopic Petrol Pole Saw
Model No./ Type: EY2650H
Specications:see“TECHNICALDATA”table
are of series production and
ConformstothefollowingEuropeanDirectives:
2006/42/EC
And are manufactured in accordance with the following standards or standardised documents:
EN/ISO11680
The technical documentation is kept by:
MakitaInternationalEuropeLtd.,TechnicalDepartment,
MichiganDrive,Tongwell,MiltonKeynes,BucksMK158JD,England
TheECTypeExaminationCerticateNo.asapolesawis:
4813008.13001
The EC-Type Examination per 2006/42/EC was performed by:
DEKRATestingandCerticationGmbHEnderstraße92b01277Dresden,Germany
IdenticationNo.2140
31. 10. 2013
Tomoyasu Kato
Director
Makita Corporation
3118,Sumiyoshicho,
Anjo,Aichi,4468502,JAPAN

9
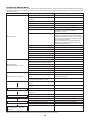
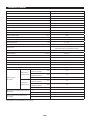
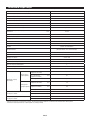
TECHNICAL DATA
Model EY2650H
Dimension: L x W x H mm 2,7203,920x223x240
Weight kg 7.2
Fuel tank volume cm
3
600
Chain oil tank volume cm
3
120
Engine displacement cm
3
25.4
Max. chain speed m/s 21.0
Maximum engine performance 0.77kWat7,000min
-1
Enginespeedatrecommendedmax,spindlespeed min
-1
10,000
Idling speed min
-1
3,000
Clutch engagement speed min
-1
4,400
Carburetor Diaphragm type
Spark plug Type NGK CMR4A
Electrode gap mm 0.70.8
Fuel Automobile gasoline (petrol)
Engine oil
APIgradeSFclassorhigher,SAE10W30oil
(automobile 4-stroke engine oil)
Cutting length mm 255
Guide bar length mm (inch) 255(10”)
Saw chain 91VXL-39E
Chain pitch inch 3/8”
Chain gauge mm (inch) 1.3(0.05”)
Number of sprocket teeth 7
Chain oil Makita genuine chain oil
Chain oil pump Plunger pump (Self lubricating type)
VibrationperISO22867
Right grip
(rear grip)
a
hv eq
(Shaft in
shortest position)
m/s² 5.3
a
hv eq
(Shaft in
longest position)
m/s² 6.1
Uncertainty K m/s² 2.0
Left grip
(front grip)
a
hv eq
(Shaft in
shortest position)
m/s² 7.2
a
hv eq
(Shaft in
longest position)
m/s² 8.6
Uncertainty K m/s² 2.0
Sound pressure level average per ISO 22868
L
PA eq
dBA 89.5
Uncertainty K dBA 2.5
Sound power level average per ISO 22868
L
WA eq
dBA 107.3
Uncertainty K dBA 2.5
•Duetoourcontinuingprogramofresearchanddevelopment,thespecicationshereinaresubjecttochangewithoutnotice.
•Specicationsmaydifferfromcountrytocountry.

10
20
21
18
14
19
17
15
16
1
2
3
4
5
6
7
8
9
10
13
11
12
EY2650H
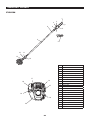
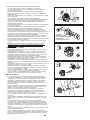
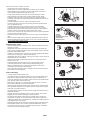
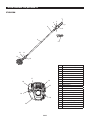
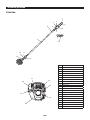
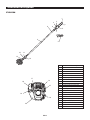
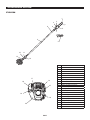
DESIGNATION OF PARTS
GB DESIGNATION OF PARTS
1 Saw chain
2 Guide bar
3 Oil tank
4 Oil tank cap
5 Bar holder
6 Gear case
7 Knob
8 Telescopic shaft
9 Front grip
10 Throttle lever
11 Lock-off lever
12 Rear grip
13 Control cable
14 Exhaustmufer
15 Exhaust pipe
16 Oil cap
17 Starter knob
18 Air cleaner
19 Fuel tank cap
20 Fuel tank
21 Guide bar cover

11
ASSEMBLY AND ADJUSTMENT
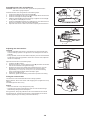
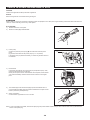
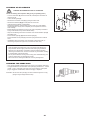
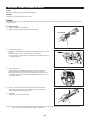
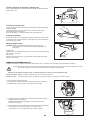
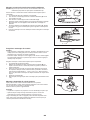
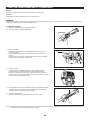
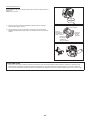
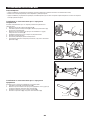
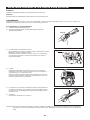
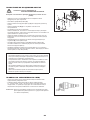
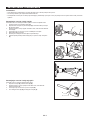
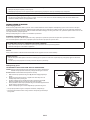
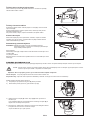
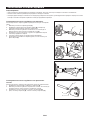
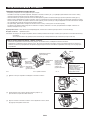
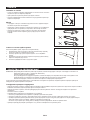
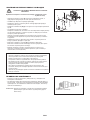
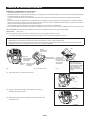
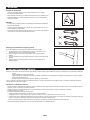
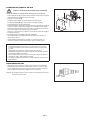
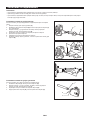
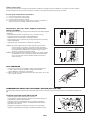
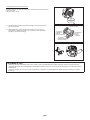
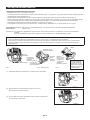
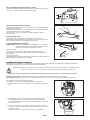
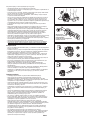
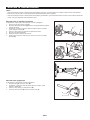
Assemblingshaftandclutchcase
Assemble the shaft with the rear grip and the engine unit as follows:
1. Insert the shaft through the rear grip (A).
2. Loosen two fastening bolts (B) and remove the center bolt (C)on the clutch
case.
3.Inserttheshaftintotheclutchcase.Ifitisdifculttofullyinsert,turnthe
spline (D) a little.
4. Align the hole on the shaft with the hole of the center bolt.
5. Tighten the center bolt.
6. Tighten two fastening bolts evenly.
7. Adjustthepositionofthereargrip,thentightenitbytwobolts(E).
Assemblingshaftandgearcase
Assemble the shaft with the gear case as follows:
1. Loosen the bolt (A). And remove the bolt (B).
2.Inserttheshaftintothegearcase.Ifitisdifculttofullyinsertit,turnthe
spline (C) a little.
3. Align the hole on the shaft with the bolt (B)hole.
4. Tighten the bolt (B)rstandthentightenthebolt(A).
A
D
B
C
E
A
B
C
WARNING:
Beforeassembling,adjustingorchecking,switchofftheengineandremovethesparkplugcap.•
Always wear protective gloves when handling saw chain.•
Waituntilthesawchaincoolsdownbeforeassembling,adjustingorchecking.Thesawchainbecomeveryhotduringtheoperation,andmay•
cause burn.

12
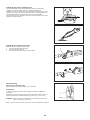
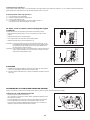
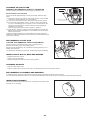
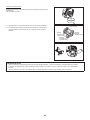
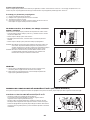
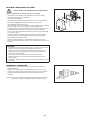
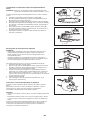
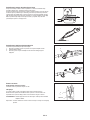
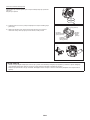
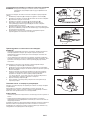
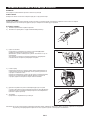
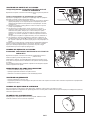
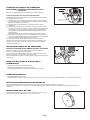
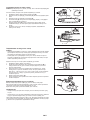
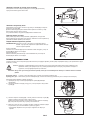
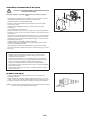
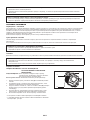
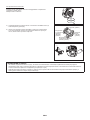
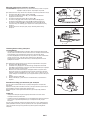
Adjustingthechaintension
CAUTION:
Keep the applicable chain tension. Loose tension can cause the saw chain •
to come off during operation. Too tight tension can damage the saw chain or
guide bar.
Duringoperation,checkthechaintensionfrequently.Thesawchainstretches•
andbecomeslooseduringoperation.Whenuseanewsawchain,adjustthe
tension more frequently.
Adjust the chain tension as the following steps.
1. Loose the nut (A) a half turn.
2. Hold the bar nose up. Turn the tensioning screw (B) clockwise until the saw
chaintstheundersideoftheguidebarsnugly.
3. Grasp the saw chain in the middle of the guide bar and lift up. The gap
between the guide bar and the tie strap of the saw chain should be
approximately34mm(0.118”0.157”).Ifitisnot,turnthetensioning
screw counterclockwise slightly and do the step 2 again.
4. Tighten the nut (A) securely.
5. Ifnecessary,tightenthetensioningscrewalittletopreventitfromfalling.
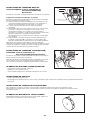
Fillingthechainoiltank
The saw chain must be lubricated with chain oil during operation.
Beforeoperation,llthechainoiltank.Aftersupplyingtheoil,tightentheoilcap
securely.
Use Makita genuine chain oil only.
NOTICE:
Never use waste oil. It may damage the oil pump.•
Avoiddustyenvironmentwhenllingthechainoil.Dustandotherforeign•
materials may damage the oil feed system.
Duringoperation,alwayspayattentiontotheoillevel.Rellthetankiftheoil
level becomes low. The tank becomes empty in approximately 40 minutes of
operation (depending on the setting of the chain lubrication).
A
B
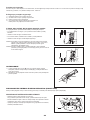
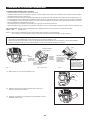
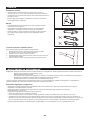
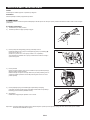
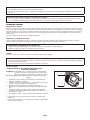
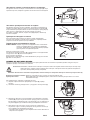
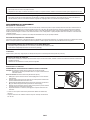
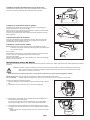
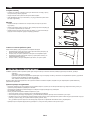
Assemblingsawchainandguidebar
CAUTION: Makesurethatthesawchain,guidebarandsprocketmatch
each other in gauge and pitch.
Assemble the saw chain and guide bar as the following steps.
1. Loosen the nut (A) and remove the bar holder (B).
2. Fit the saw chain (C) into the groove of guide bar (D). Start at the bar nose.
3. Fit the saw chain (C) onto the sprocket (E).
4. Install the guide bar (D) so that the tensioning nut (F)tsintothehole(G)
on the guide bar. Holes (H) are not used.
5. Fit the bar holder (B) and tighten the nut (A) securely. Then loose the nut a
half turn as a provision of the chain tension adjustment.
6. Adjustthechaintension.Refertothesection“Adjustingthechaintension.”
A
B
C
D
E
F
G
H
F

13
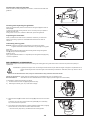
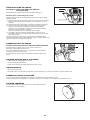
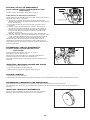
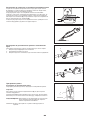
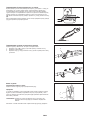
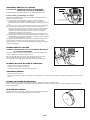
Adjustingthechainoilfeedingrate
The chain-oil feeding rate is adjustable in three steps. According to the
operation,forexamplecuttinghardlimbs,adjustthefeedingrate.
Toadjustthechainoilfeedingrate,useaatbladedscrewdriver.Pushinthe
adjustingscrewandturnit.Toincreasefeedingrate,turntheadjustingscrew
counterclockwise (A).Toreducefeedingrate,turnitclockwise(B).
Afteradjustingthechainoilfeedingrate,checkthefeedingratebydrivingthe
equipment at medium speed.
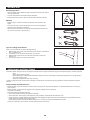
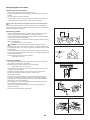
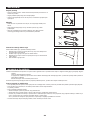
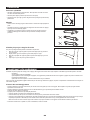
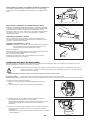
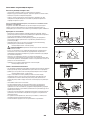
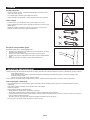
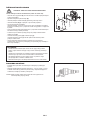
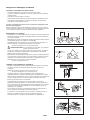
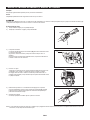
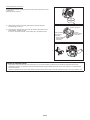
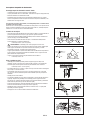
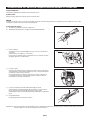
Adjustingthelengthofpolesaw
Adjust the length of the pole saw as follows:
1. Turn the knob (A) counterclockwise.
2. Adjust the length of the pole.
3. Turn the knob clockwise to fasten the gear head.
Shoulderstrap
Adjustingtheshoulderstrap
Adjust the strap to the suitable length for your operation.
Detachment
Incaseofemergency,pushthenotches(A)atbothsides,anddetachthe
equipment.
Be extremely careful to maintain control of the equipment at this time. Do not
allowtheequipmenttobedeectedtowardyouoranyoneinyourvicinity.
WARNING: Failure to maintain complete control of the machine at all could
result in serious injury or DEATH.
Note:Insomecountries,shoulderstrapdoesnothavethisdetachmentfunction.
A
B
A
Hanger
A

14
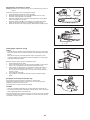
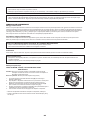
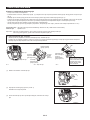
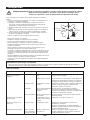
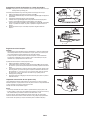
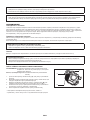
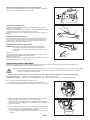
Inspectionandrellofengineoil
Performthefollowingprocedure,withtheenginecooleddown. -
Settheenginelevel,removeoilcap(Fig.1),andchecktoseewhetherornotthereisoilintherangebetweentheupperlimitandlowerlimit -
marks of the oil pipe (Fig. 2).
Topupwithoiltoupperlimitmarkifoilisinsufcient(oillevelisclosetolowerlimitmark)(Fig.3). -
Theareasurroundingtheexternalmarksistransparent,sotheamountofoilinsidecanbecheckedwithouthavingtoremovetheoilcap. -
However,ifoilpipebecomesextremelydirty,visibilitymaybelost,andoillevelwillhavetobecheckedagainststeppedsectiononinsideof
oil pipe.
Forreference,theoilrelltimeisabout10h(every10refuellings). -
Iftheoilchangesincolorormixeswithdirt,replaceitwithnewone.(Fortheintervalandmethodofreplacement,refertoP19)
Recommendedoil:SAE10W30oilofAPIClassication,ClassSForhigher(4strokeengineforautomobile)
Oilvolume: Approx. 0.08L
Note:Iftheengineisnotkeptupright,oilmaygointoaroundtheengine,andmayberelledexcessively.
Iftheoilislledabovethelimit,theoilmaybecontaminatedormaycatchrewithwhitesmoke.
Point1inReplacementofoil:“Oilcap”
Removedustordirtneartheoilrellport,anddetachtheoilcap. -
Keepthedetachedoilcapfreeofsandordust.Otherwise,anysandordustadheringtotheoilcapmaycauseirregularoilcirculationor -
wearontheengineparts,whichwillresultintroubles.
Fig. 1
Fig. 2 Oil pipe Fig. 3
BEFORE START OF OPERATION
(1) Keeptheenginelevel,anddetachtheoilcap.
(2) Fill with oil to upper limit mark. (see Fig. 3)
Useoilbottlewhenlling.
(3) Securelytightentheoilcap.Insufcienttighteningmaycauseoilleakage.
Oil cap
Oil pipe
Internal stepped
section (upper
limit)
External mark
(lower limit)
Internal stepped
section (lower
limit)
External mark
(upper limit)
Oil
Top up with oil until
oil level reaches
internal stepped
section (upper
limit).
The area between the
external upper and lower
limitsistransparent,so
oil level can be checked
externally against these
marks.

15
REFUELLING
Handlingoffuel
Itisnecessarytohandlefuelwithutmostcare.Fuelmaycontainsubstancessimilartosolvents.Refuellingmustbeperformedinasufciently
ventilatedroomorintheopenair.Neverinhalefuelvapor,andkeepfuelawayfromyou.Ifyoutouchfuelrepeatedlyorforalongtime,the
skinbecomesdry,whichmaycauseskindiseaseorallergy.Iffuelentersintotheeye,cleantheeyewithfreshwater.Ifyoureyeremainsstill
irritated,consultyourdoctor.
Do not perform refuelling in the dusk or on unstable surface.
Storageperiodoffuel
Fuelshouldbeusedupwithinaperiodof4weeks,evenifitiskeptinaspecialcontainerinawellventilatedshade.
Ifaspecialcontainerisnotusedorifthecontainerisnotcovered,fuelmaydeteriorateinoneday.
STORAGEOFMACHINEANDREFILLTANK
Keep the machine and tank at a cool place free from direct sunshine. -
Never keep the fuel in the cabin or trunk. -
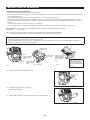
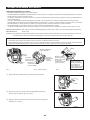
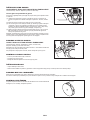
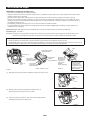
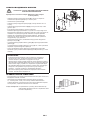
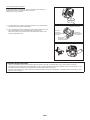
Refuelling
WARNING:INFLAMMABLESSTRICTLYPROHIBITED
CAUTION:Do not forget to close the fuel tank cap after refuelling. Never start
the engine with the fuel tank cap opened.
Gasolineused:Automobile gasoline (unleaded gasoline)
1. Loosen the fuel tank cap (A) a little to avoid the fuel spilling.
2. Detach the fuel tank cap. And tilt the engine so that the refuel port faces
upwards.
3. Refuel carefully with discharging air from the fuel tank (B). (Do not refuel
over the fuel upper limit (C).)
4. Wipe well the periphery of the fuel tank cap to prevent foreign matter from
entering into the fuel tank.
5. Afterrefuelling,securelytightenthefueltankcap.
Ifthereisanyawordamageonthetankcap,replaceit.•
The tank cap wears out in course of time. Replace it every two to three years.•
A
C
B
Fuel
The engine is a four-stroke engine. Be sure to use an automobile gasoline (regular gasoline or premium gasoline).
Pointsforfuel
Neveruseagasolinemixturewhichcontainsengineoil.Otherwise,itwillcauseexcessivecarbonaccumulationormechanicaltroubles. -
Use of deteriorated oil will cause irregular startup. -
Note
Do not replace oil with the engine in a tilted position.•
Fillingwithoilwhileengineistiltedleadstooverllingwhichcausesoilcontaminationand/orwhitesmoke.•
Point2inReplacementofoil:“Ifoilspillsout”
Ifoilspillsoutbetweenthefueltankandenginemainunit,theoilissuckedintothroughthecoolingairintakeport,whichwillcontaminate -
the engine. Be sure to wipe out spilt oil before start of operation.

16
CAUTION:
Observe the applicable accident prevention regulations!
NOTICE:
Remove the guide bar cover before starting the engine.
STARTING
Move at least 3 m away from the place of refuelling. Place the equipment on a clean piece of ground taking care that the attachment does not
come into contact with the ground or any other objects.
A:Coldstart
1) Setthismachineonaatspace.
2) Set the I-O switch (A) to OPERATION.
OPERATION
POINTS IN OPERATION AND HOW TO STOP
STOP
A
C
D
3) Primer pump
Continue to push the primer pump (B) until fuel enters into the primer
pump.
(Ingeneral,fuelentersintotheprimerpumpby7to10pushes.)
Iftheprimerpumpispushedexcessively,anexcessofgasolinereturnsto
the fuel tank.
B
4) Recoil starter
Pullthestartknobgentlyuntilitishardtopull(compressionpoint).Then,
returnthestartknob,andpullitstrongly.
Neverpulltheropetothefull.Oncethestartknobispulled,neverrelease
your hand immediately. Hold the start knob until it returns to its original
point.
5) The handle equips with lock-off lever (C) to prevent accidental start. To
pull the throttle lever (D),graspthehandletoreleasethelock(thelockoff
button is pressed by hand pressure).
6) Warm-up operation
Continue warm-up operation for 2 to 3 minutes.
Note:Incaseofexcessivefuelintake,removethesparkplugandpullthestarterhandleslowlytoremoveexcessfuel.Also,drytheelectrode
section of the spark plug.

17
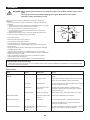
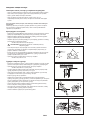
At times, such as winter, when starting the engine
is difcult
Operate choke lever with the following procedure when starting engine.
Afterimplementingstartupsteps1)to3),setchokelevertotheCLOSE•
position.
Implement startup step 4) and start engine.•
Onceenginestarts,setchokelevertotheOPENposition.•
Implement startup step 5) and complete warm up.•
CAUTION: Ifabang(explosivesound)isheardandtheenginestops,orthe
juststartedenginestallsbeforethechokeleverisoperated,return
thechokelevertotheOPENposition,andpullthestarterknoba
few times again to start the engine.
CAUTION: IfthechokeleverisleftintheCLOSEposition,andthestarterknob
merelypulledrepeatedly,toomuchfuelwillbesuckedin,andthe
enginewillbecomedifculttostart.
OPEN
CLOSE
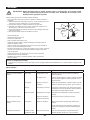
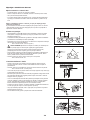
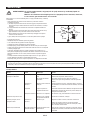
ADJUSTMENT OF LOW-SPEED ROTATION (IDLING)
Whenitisnecessarytoadjustthelowspeedrotation(idling),performitbythecarburetoradjustingscrew(A).
CHECKUPOFLOWSPEEDROTATION
Setthelowspeedrotationto3,000min -
-1
.
Ifitisnecessarytochangetherotationspeed,regulatetheadjustingscrew,
with Phillips screwdriver.
Turntheadjustingscrewtotheright,andtheenginerotationwillincrease. -
Turntheadjustingscrewtotheleft,andtheenginerotationwilldrop.
The carburetor is generally adjusted before shipment. If it is necessary to -
readjustit,pleasecontactAuthorizedServiceCenter.
A
STOPPING
1) Release the throttle lever (B)fully,andwhentheenginerpmhaslowered,
set the I-O switch(A) to STOP the engine will now stop.
2) Be aware that the attachment may not stop immediately and allow it to slow
down fully.
STOP
A
B
Cautionduringoperation:
Ifthethrottleleverisopenedfullyinanoloadoperation,theenginerotationisincreasedto10,000min
-1
or more. Never operate the engine at a
higherspeedthanrequiredandatanapproximatespeedof6,0008,500min
-1
.
B:Startupafterwarmupoperation
1) Push the primer pump repeatedly.
2) Keep the throttle lever at the idling position.
3) Pull the recoil starter strongly.
4) Ifitisdifculttostarttheengine,openthethrottlebyabout1/3.
Pay attention to the attachment which may rotate.

18
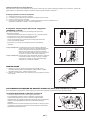
OPERATION
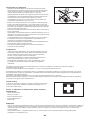
Standingposition
Stand on stable surface. Make the angle of the pole saw become 60° against •
the horizontal ground.
Cutlowerbranchesrstsothatthebranchesfalleasier.•
Always keep escape route in case a cut branch falls towards the operator.•
Method
Starttheengine,andpullthethrottleuntilthesawchainreachesitsfull•
speed.
Pressthesawchainontothebranchlightly.Donotforcetheequipment,•
otherwise it may damage the equipment.
Never use the tip of the bar for cutting. Otherwise dangerous kickback may •
occur,anditmayresultinpersonalinjury.
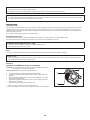
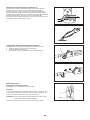
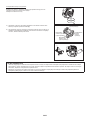
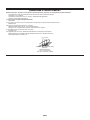
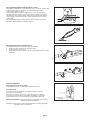
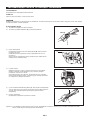
Tipsforcuttingthickbranch
Whenyoucutathickbranch,usethefollowingmethod.
1. Make a small notch on the under side of the branch where is a bit distance
from you intend to cut.
2. Cut the branch from the upper side of where you notched.
3. Make another small notch on the under side of the branch where you
intend to cut.
4. Cut where you intend to cut from the upper side.
1
2
3
4
CAUTION: Beforedoinganyworkontheequipment,alwaysstoptheengineandpulltheplugcapoffthesparkplug(see“checkingthespark
plug”).
Always wear protective gloves!
Wheninspectingormaintainingtheequipment,alwaysputitdown.Assemblingoradjustingtheequipmentinanuprightposition
may result in serious injury.
Always put the guide bar cover when servicing.
Toensurealongservicelifeandtoavoidanydamagetotheequipment,thefollowingservicingoperationsshouldbeperformedatregular
intervals.
Dailycheckupandmaintenance
Beforeoperation,checkthemachineforloosescrewsormissingparts.Payparticularattentiontoaspeciedattachmentformountingin -
place securely.
Beforeoperation,alwayscheckforcloggingofthecoolingairpassageandthecylinderns. -
Clean them if necessary.
Perform the following work daily after use: -
• Cleantheequipmentexternallyandinspectfordamage.
• Cleantheairlter.Whenworkingunderextremelydustyconditions,cleanthelterseveraltimesaday.
• Checkthatthereissufcientdifferencebetweenidlingandengagementspeedtoensurethattheattachmentisatastandstillwhilethe
engine is idling (if necessary reduce idling speed).
Ifunderidlingconditionsthetoolshouldstillcontinuetorun,consultyournearestAuthorizedServiceAgent.
CheckthefunctioningoftheIOswitch,thelockoffleverandthecontrollever. -
SERVICING INSTRUCTIONS

19
REPLACEMENT OF ENGINE OIL
Deteriorated engine oil will shorten the life of the sliding and rotating parts to a great extent. Be sure to check the period and quantity of
replacement.
ATTENTION:Ingeneral,theenginemainunitandengineoilstillremainhotjustaftertheengineisstopped.Inreplacementofoil,
conrmthattheenginemainunitandengineoilaresufcientlycooleddown.Otherwise,theremayremainariskof
scald.
Note:Iftheoillledabovethelimit,itmaybecontaminatedormaycatchrewithwhitesmoke.
Intervalofreplacement: Initially,after20operatinghours,andsubsequentlyevery50operatinghours
Recommendedoil: SAE10W30oilofAPIClassicationSFClassorhigher(4strokeengineoilforautomobile)
Inreplacement,performthefollowingprocedure.
1)Conrmthatthefueltankcap(A) is tightened securely.
2)Placelargecontainer(pan,etc.)underdrainhole(C).
A
B
B
3) Remove drain bolt(E) and then remove oil cap (B) to drain out oil from drain
hole.
Atthistime,besurenottomislaydrainbolt’sgasket(D),ortomakedirty
any of the removed components.
4) Oncealltheoilhasbeendrained,combinegasketanddrainbolt,andtightly
securedrainbolt,sothatitwillnotloosenandcauseleaks.
* Use cloth to fully wipe off any oil attached to bolt and equipment.
E
D
C
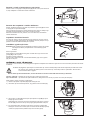
Cleaningandinspectingtheguidebar
Clean the guide bar daily. Remove saw dust from the groove (A) and chain-oil
feed port (B).
Toavoidonesidewearoftheguidebar,turnitovereverytimeyoureplaceor
sharpen the saw chain.
Ifthegrooveisworn,bent,crackedordeformed,replacetheguidebar.
Inspectingthesawchain
Whenyoufeelthesawchainisworn,deformed,crackedoryouneedmore
effortforthecutting,replaceitoraskMakitaauthorizedservicecenterto
sharpen it.
Lubricatingmovingparts
NOTICE: Follow the instruction of the frequency and amount of grease
supplied.Otherwiseinsufcientlubricationmaydamagemovingparts.
Gear case:
Remove the grease plug (A)andlllithiumbasegreasethroughthegrease
hole (B) every 25 hours of operation.
Guide bar nose:
Apply grease (Shell Alvania No. 2 or equivalent) from the grease hole (C) every
10 hours of operation.
B
A
B
A
B
C
Cleaningthechainoilfeedport
Clean the chain-oil feed port (A)daily.Toaccessit,removethebarholderand
guide bar.
A

20
5) Settheenginelevel,andgraduallylluptoupperlimitmark(F) with new
oil.
6) Afterlling,tightlysecureoilcap,sothatitwillnotloosenandcauseleaks.
Ifoilcapisnottightlysecured,itmayleak.
F
Internal stepped
section (upper
limit)
External mark
(lower limit)
Internal stepped
section (lower
limit)
External mark
(upper limit)
POINTS ON OIL
Neverdiscardreplacedengineoilingarbage,earthorsewageditch.Disposalofoilisregulatedbylaw.Indisposal,alwaysfollowthe -
relevantlawsandregulations.Foranypointsremainingunknown,contactAuthorizedServiceAgent.
Oil will deteriorate even when it is kept unused. Perform inspection and replacement at regular intervals (replace with new oil every -
6 months).
Alternative draining method
Removeoilcap,tilttheequipmenttowardoilllerhole,anddrainoutoil.
Collect oil in container.
Pagina se încarcă...
Pagina se încarcă...
Pagina se încarcă...
Pagina se încarcă...
Pagina se încarcă...
Pagina se încarcă...
Pagina se încarcă...
Pagina se încarcă...
Pagina se încarcă...
Pagina se încarcă...
Pagina se încarcă...
Pagina se încarcă...
Pagina se încarcă...
Pagina se încarcă...
Pagina se încarcă...
Pagina se încarcă...
Pagina se încarcă...
Pagina se încarcă...
Pagina se încarcă...
Pagina se încarcă...
Pagina se încarcă...
Pagina se încarcă...
Pagina se încarcă...
Pagina se încarcă...
Pagina se încarcă...
Pagina se încarcă...
Pagina se încarcă...
Pagina se încarcă...
Pagina se încarcă...
Pagina se încarcă...
Pagina se încarcă...
Pagina se încarcă...
Pagina se încarcă...
Pagina se încarcă...
Pagina se încarcă...
Pagina se încarcă...
Pagina se încarcă...
Pagina se încarcă...
Pagina se încarcă...
Pagina se încarcă...
Pagina se încarcă...
Pagina se încarcă...
Pagina se încarcă...
Pagina se încarcă...
Pagina se încarcă...
Pagina se încarcă...
Pagina se încarcă...
Pagina se încarcă...
Pagina se încarcă...
Pagina se încarcă...
Pagina se încarcă...
Pagina se încarcă...
Pagina se încarcă...
Pagina se încarcă...
Pagina se încarcă...
Pagina se încarcă...
Pagina se încarcă...
Pagina se încarcă...
Pagina se încarcă...
Pagina se încarcă...
Pagina se încarcă...
Pagina se încarcă...
Pagina se încarcă...
Pagina se încarcă...
Pagina se încarcă...
Pagina se încarcă...
Pagina se încarcă...
Pagina se încarcă...
Pagina se încarcă...
Pagina se încarcă...
Pagina se încarcă...
Pagina se încarcă...
Pagina se încarcă...
Pagina se încarcă...
Pagina se încarcă...
Pagina se încarcă...
Pagina se încarcă...
Pagina se încarcă...
Pagina se încarcă...
Pagina se încarcă...
Pagina se încarcă...
Pagina se încarcă...
Pagina se încarcă...
Pagina se încarcă...
Pagina se încarcă...
Pagina se încarcă...
Pagina se încarcă...
Pagina se încarcă...
Pagina se încarcă...
Pagina se încarcă...
Pagina se încarcă...
Pagina se încarcă...
Pagina se încarcă...
Pagina se încarcă...
Pagina se încarcă...
Pagina se încarcă...
Pagina se încarcă...
Pagina se încarcă...
Pagina se încarcă...
Pagina se încarcă...
Pagina se încarcă...
Pagina se încarcă...
Pagina se încarcă...
Pagina se încarcă...
Pagina se încarcă...
Pagina se încarcă...
Pagina se încarcă...
Pagina se încarcă...
Pagina se încarcă...
Pagina se încarcă...
Pagina se încarcă...
Pagina se încarcă...
Pagina se încarcă...
Pagina se încarcă...
Pagina se încarcă...
Pagina se încarcă...
Pagina se încarcă...
Pagina se încarcă...
Pagina se încarcă...
Pagina se încarcă...
Pagina se încarcă...
Pagina se încarcă...
Pagina se încarcă...
Pagina se încarcă...
Pagina se încarcă...
Pagina se încarcă...
Pagina se încarcă...
Pagina se încarcă...
Pagina se încarcă...
Pagina se încarcă...
Pagina se încarcă...
Pagina se încarcă...
Pagina se încarcă...
Pagina se încarcă...
Pagina se încarcă...
Pagina se încarcă...
Pagina se încarcă...
Pagina se încarcă...
Pagina se încarcă...
Pagina se încarcă...
Pagina se încarcă...
Pagina se încarcă...
Pagina se încarcă...
Pagina se încarcă...
Pagina se încarcă...
Pagina se încarcă...
Pagina se încarcă...
Pagina se încarcă...
Pagina se încarcă...
Pagina se încarcă...
Pagina se încarcă...
Pagina se încarcă...
Pagina se încarcă...
Pagina se încarcă...
Pagina se încarcă...
Pagina se încarcă...
Pagina se încarcă...
Pagina se încarcă...
Pagina se încarcă...
Pagina se încarcă...
Pagina se încarcă...
Pagina se încarcă...
Pagina se încarcă...
Pagina se încarcă...
Pagina se încarcă...
Pagina se încarcă...
Pagina se încarcă...
Pagina se încarcă...
Pagina se încarcă...
Pagina se încarcă...
Pagina se încarcă...
Pagina se încarcă...
Pagina se încarcă...
Pagina se încarcă...
Pagina se încarcă...
Pagina se încarcă...
Pagina se încarcă...
Pagina se încarcă...
Pagina se încarcă...
Pagina se încarcă...
Pagina se încarcă...
Pagina se încarcă...
Pagina se încarcă...
Pagina se încarcă...
Pagina se încarcă...
Pagina se încarcă...
Pagina se încarcă...
Pagina se încarcă...
Pagina se încarcă...
Pagina se încarcă...
Pagina se încarcă...
Pagina se încarcă...
Pagina se încarcă...
Pagina se încarcă...
Pagina se încarcă...
Pagina se încarcă...
Pagina se încarcă...
Pagina se încarcă...
Pagina se încarcă...
Pagina se încarcă...
Pagina se încarcă...
Pagina se încarcă...
Pagina se încarcă...
Pagina se încarcă...
Pagina se încarcă...
Pagina se încarcă...
Pagina se încarcă...
Pagina se încarcă...
Pagina se încarcă...
Pagina se încarcă...
Pagina se încarcă...
Pagina se încarcă...
Pagina se încarcă...
Pagina se încarcă...
Pagina se încarcă...
Pagina se încarcă...
Pagina se încarcă...
Pagina se încarcă...
Pagina se încarcă...
Pagina se încarcă...
Pagina se încarcă...
Pagina se încarcă...
Pagina se încarcă...
Pagina se încarcă...
Pagina se încarcă...
Pagina se încarcă...
Pagina se încarcă...
Pagina se încarcă...
Pagina se încarcă...
Pagina se încarcă...
Pagina se încarcă...
Pagina se încarcă...
-
 1
1
-
 2
2
-
 3
3
-
 4
4
-
 5
5
-
 6
6
-
 7
7
-
 8
8
-
 9
9
-
 10
10
-
 11
11
-
 12
12
-
 13
13
-
 14
14
-
 15
15
-
 16
16
-
 17
17
-
 18
18
-
 19
19
-
 20
20
-
 21
21
-
 22
22
-
 23
23
-
 24
24
-
 25
25
-
 26
26
-
 27
27
-
 28
28
-
 29
29
-
 30
30
-
 31
31
-
 32
32
-
 33
33
-
 34
34
-
 35
35
-
 36
36
-
 37
37
-
 38
38
-
 39
39
-
 40
40
-
 41
41
-
 42
42
-
 43
43
-
 44
44
-
 45
45
-
 46
46
-
 47
47
-
 48
48
-
 49
49
-
 50
50
-
 51
51
-
 52
52
-
 53
53
-
 54
54
-
 55
55
-
 56
56
-
 57
57
-
 58
58
-
 59
59
-
 60
60
-
 61
61
-
 62
62
-
 63
63
-
 64
64
-
 65
65
-
 66
66
-
 67
67
-
 68
68
-
 69
69
-
 70
70
-
 71
71
-
 72
72
-
 73
73
-
 74
74
-
 75
75
-
 76
76
-
 77
77
-
 78
78
-
 79
79
-
 80
80
-
 81
81
-
 82
82
-
 83
83
-
 84
84
-
 85
85
-
 86
86
-
 87
87
-
 88
88
-
 89
89
-
 90
90
-
 91
91
-
 92
92
-
 93
93
-
 94
94
-
 95
95
-
 96
96
-
 97
97
-
 98
98
-
 99
99
-
 100
100
-
 101
101
-
 102
102
-
 103
103
-
 104
104
-
 105
105
-
 106
106
-
 107
107
-
 108
108
-
 109
109
-
 110
110
-
 111
111
-
 112
112
-
 113
113
-
 114
114
-
 115
115
-
 116
116
-
 117
117
-
 118
118
-
 119
119
-
 120
120
-
 121
121
-
 122
122
-
 123
123
-
 124
124
-
 125
125
-
 126
126
-
 127
127
-
 128
128
-
 129
129
-
 130
130
-
 131
131
-
 132
132
-
 133
133
-
 134
134
-
 135
135
-
 136
136
-
 137
137
-
 138
138
-
 139
139
-
 140
140
-
 141
141
-
 142
142
-
 143
143
-
 144
144
-
 145
145
-
 146
146
-
 147
147
-
 148
148
-
 149
149
-
 150
150
-
 151
151
-
 152
152
-
 153
153
-
 154
154
-
 155
155
-
 156
156
-
 157
157
-
 158
158
-
 159
159
-
 160
160
-
 161
161
-
 162
162
-
 163
163
-
 164
164
-
 165
165
-
 166
166
-
 167
167
-
 168
168
-
 169
169
-
 170
170
-
 171
171
-
 172
172
-
 173
173
-
 174
174
-
 175
175
-
 176
176
-
 177
177
-
 178
178
-
 179
179
-
 180
180
-
 181
181
-
 182
182
-
 183
183
-
 184
184
-
 185
185
-
 186
186
-
 187
187
-
 188
188
-
 189
189
-
 190
190
-
 191
191
-
 192
192
-
 193
193
-
 194
194
-
 195
195
-
 196
196
-
 197
197
-
 198
198
-
 199
199
-
 200
200
-
 201
201
-
 202
202
-
 203
203
-
 204
204
-
 205
205
-
 206
206
-
 207
207
-
 208
208
-
 209
209
-
 210
210
-
 211
211
-
 212
212
-
 213
213
-
 214
214
-
 215
215
-
 216
216
-
 217
217
-
 218
218
-
 219
219
-
 220
220
-
 221
221
-
 222
222
-
 223
223
-
 224
224
-
 225
225
-
 226
226
-
 227
227
-
 228
228
-
 229
229
-
 230
230
-
 231
231
-
 232
232
-
 233
233
-
 234
234
-
 235
235
-
 236
236
-
 237
237
-
 238
238
-
 239
239
-
 240
240
-
 241
241
-
 242
242
-
 243
243
-
 244
244
-
 245
245
-
 246
246
-
 247
247
-
 248
248
-
 249
249
-
 250
250
-
 251
251
-
 252
252


Lucrări înrudite
Alte documente
-
Hitachi CS 33EDTP Handling Instructions Manual
-
Alpina Garden AC38 Instrucțiuni de utilizare
-
Hikoki TCS 33EB Manual de utilizare
-
McCulloch CS 450 Elite Manualul proprietarului
-
-
Hitachi CS 33EDT Handling Instructions Manual
-
Ikra PCS 5046 Manualul proprietarului
-
EINHELL GC-MM 52 I AS Manual de utilizare
-
Shimano CN-NX10 Service Instructions
-
ATIKA KSH 600.... Manualul proprietarului