
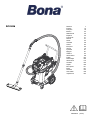
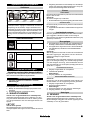
DCS 50 M
59800240 (12/21)
Deutsch 7
English 12
Français 18
Italiano 24
Nederlands 30
Español 35
Português 41
Dansk 47
Norsk 53
Svenska 58
Suomi 64
Ελληνικά 69
Türkçe 75
Русский 81
Magyar 87
Čeština 93
Slovenščina 98
Polski 104
Româneşte 109
Slovenčina 115
Hrvatski 120
Srpski 126
Български 131
Eesti 137
Latviešu 143
Lietuviškai 148
Українська 154


11
2
3
5
8
1316
18
23 22
21
26
19
7
101114 12
20
24
34
9
33
36
6
25
35
35
32
4
15
31
2830 29 27
17
39
41
38
40
37
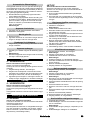
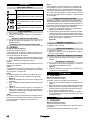
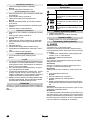
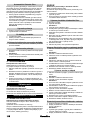
A

1
2
3
“Click”
2x
4
5
1
2
1
1
B

C D
1.
2.
E F
1.
3.
2.
G
2.
1.
H
I
2.
1.
J

“Click”
K L
2.
1.
M N
O
3.
1.
2.
1.
2.
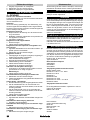
P
ü
û
Q

Deutsch 7
Inhalt
Allgemeine Hinweise
Lesen Sie vor der ersten Benutzung des
Geräts diese Originalbetriebsanleitung
und die beiliegenden Sicherheitshinwei-
se Nr. 59562490 (ab Ausgabe 07/19). Handeln Sie da-
nach.
Bewahren Sie beide Hefte für späteren Gebrauch oder
für Nachbesitzer auf.
●Bei Nichtbeachtung der Betriebsanleitung und der
Sicherheitshinweise können Schäden am Gerät und
Gefahren für den Bediener und andere Personen
entstehen.
●Bei Transportschaden sofort Händler informieren.
●Prüfen Sie beim Auspacken den Packungsinhalt auf
fehlendes Zubehör oder Beschädigungen.
Umweltschutz
Die Verpackungsmaterialien sind recyclebar. Bit-
te Verpackungen umweltgerecht entsorgen.
Elektrische und elektronische Geräte enthalten
wertvolle recyclebare Materialien und oft Be-
standteile wie Batterien, Akkus oder Öl, die bei
falschem Umgang oder falscher Entsorgung eine
potentielle Gefahr für die menschliche Gesundheit und
die Umwelt darstellen können. Für den ordnungsgemä-
ßen Betrieb des Geräts sind diese Bestandteile jedoch
notwendig. Mit diesem Symbol gekennzeichnete Gerä-
te dürfen nicht mit dem Hausmüll entsorgt werden.
Bestimmungsgemäße Verwendung
●Dieser Sauger ist zur Nass- und Trockenreinigung
von Boden- und Wandflächen bestimmt.
●Das Gerät ist zur Absaugung trockener, nicht brenn-
barer, gesundheitsschädlicher Stäube an Maschi-
nen und Geräten; Staubklasse M nach EN 60335-2-
69 geeignet. Einschränkung: Es dürfen keine krebs-
erzeugende Stoffe, außer Holzspäne, aufgesaugt
werden.
●Dieses Gerät ist für den gewerblichen Gebrauch ge-
eignet, z. B. in Hotels, Schulen, Krankenhäusern,
Fabriken, Läden, Büros und Vermietergeschäften.
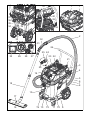
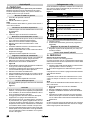
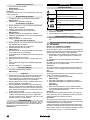
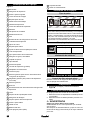
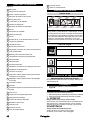
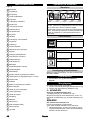
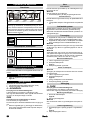
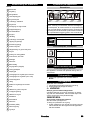
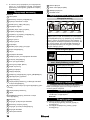
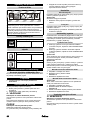
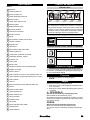
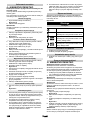
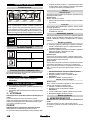
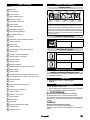
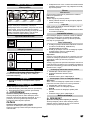
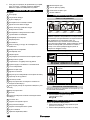
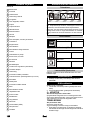
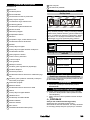
Gerätebeschreibung
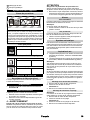
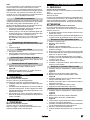
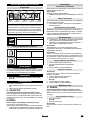
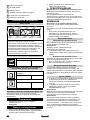
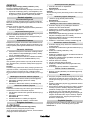
Abbildung A
1Elektroden
2Saugschlauch
3Schlauchhaken
4Verriegelung des Schubbügels
5Fugendüse
6Luftaustritt, Arbeitsluft
7Saugkopf
8Verriegelung des Saugkopfs
9Griffmulde
10 Schmutzbehälter
11 Lenkrolle
12 Handgriff
13 Lufteintritt, Motor-Kühlluft
14 Saugstutzen
15 Verschlussstopfen
16 Bodendüse
17 Höhenverstellung der Bodendüse
18 Saugrohr
19 Anschlag für Werkzeugkoffer
20 Gummimuffe, schraubbar
21 Befestigungsöse
22 Filterabdeckung
23 Tragegriff
24 Saugkraftregler (stufenlos)
25 Werkzeugadapter
26 Schubbügel
27 Drehschalter für Saugschlauchquerschnitt
28 Drehregler für Saugleistung (min-max)
29 Drehschalter
30 Steckdose
31 Skala des Saugschlauchquerschnitts
32 Krümmer
33 Halter für Bodendüse
34 Ablassschlauch
35 Halter für Saugrohr
36 Kabelhaken
37 Netzkabel
38 Filterrahmen
39 Flachfaltenfilter (PES)
40 Filterabreinigung
41 Typenschild
Allgemeine Hinweise ........................................... 7
Umweltschutz ...................................................... 7
Bestimmungsgemäße Verwendung .................... 7
Gerätebeschreibung............................................ 7
Symbole auf dem Gerät ...................................... 8
Sicherheitseinrichtungen ..................................... 8
Vorbereitung ........................................................ 8
Inbetriebnahme ................................................... 8
Bedienung ........................................................... 9
Transport ............................................................. 10
Lagerung ............................................................. 10
Pflege und Wartung............................................. 10
Hilfe bei Störungen.............................................. 11
Entsorgung.......................................................... 11
Garantie............................................................... 11
Zubehör und Ersatzteile ...................................... 11
EU-Konformitätserklärung ................................... 11
Technische Daten................................................ 12

8 Deutsch
Symbole auf dem Gerät
Staubklasse
Flachfaltenfilter
Vliesfiltertüte, Entsorgungsbeutel
Sicherheitseinrichtungen
Überwachung des Flachfaltenfilters
Bei Betrieb des Geräts ohne Flachfaltenfilter, schaltet
dieses automatisch ab.
Vorbereitung
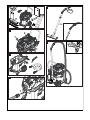
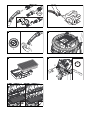
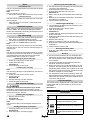
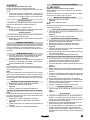
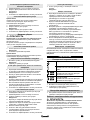
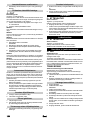
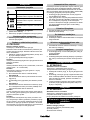
1. Gerät auspacken und Zubehör montieren.
Abbildung B
Inbetriebnahme
Das Gerät erlaubt 2 Betriebsarten:
1 Industriestaubsaugerbetrieb (Steckdose nicht be-
legt)
2 Entstauberbetrieb (Steckdose belegt)
몇WARNUNG
Gefahr durch gesundheitsschädlichen Staub
Atemwegserkrankungen durch Einatmen von Staub.
Saugen Sie nicht ohne Filterelement, da sonst eine Ge-
sundheitsgefährdung durch erhöhten Feinstaubausstoß
auftritt.
ACHTUNG
Gefahr durch Feinstaubeintritt
Beschädigungsgefahr des Saugmotors.
Entfernen Sie beim Saugen niemals den Flachfaltenfil-
ter.
1. Saugschlauch anschließen und je nach Betriebsart
mit Aufsaugdüse versehen oder an das stauberzeu-
gende Gerät anschließen.
Hupe
Intervallton
Die Hupe ertönt (Intervallton), wenn die Luftgeschwin-
digkeit unter 20 m/s absinkt.
Hinweis
Die Hupe reagiert auf Unterdruck.
1. Drehschalter auf richtigen Saugschlauchquerschnitt
stellen.
Dauerton
Die Hupe ertönt (Dauerton), wenn der Kühlluftfilter ver-
stopft ist.
1. Gerät abkühlen lassen. Kühlluftfilter reinigen/wech-
seln.
Anti-Statik-System
Durch den geerdeten Anschlussstutzen werden stati-
sche Aufladungen abgeleitet. Dadurch werden Funken-
bildung und Stromstöße mit elektrisch leitendem
Zubehör (im Lieferumfang) verhindert.
Trockensaugen
●Das Gerät ist mit einer Vliesfiltertüte mit Verschluss-
lasche ausgerüstet, Bestellnummer AS3669074800
(5 Stück).
●Das Gerät ist mit einem Entsorgungsbeutel mit Ka-
belbinder ausgerüstet, Bestellnummer
AS3669076640 (5 Stück).
Hinweis
Mit diesem Gerät können alle Arten von Stäuben bis
Staubklasse M aufgesaugt werden. Die Verwendung ei-
nes Staubsammelbeutels ist gesetzlich vorgeschrieben.
Hinweis
Das Gerät ist als Industriestaubsauger zum Aufsaugen
und als Entstauber für ortsveränderlichen Betrieb zum
Absaugen von trockenen, nicht brennbaren Stäuben mit
Arbeitsplatzgrenzwerten (AGW) größer gleich 0,1 mg/
m3 geeignet.
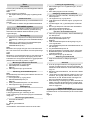
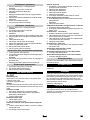
Vliesfiltertüte einbauen
1. Saugkopf entriegeln und abnehmen.
2. Vliesfiltertüte aufstecken.
Abbildung C
3. Saugkopf aufsetzen und verriegeln.
Entsorgungsbeutel einbauen
Hinweis
Die Öffnung des Entsorgungsbeutels muss vollständig
über den Absatz des Saugstutzens gezogen werden.
1. Saugkopf entriegeln und abnehmen.
2. Entsorgungsbeutel aufstecken.
Abbildung D
3. Entsorgungsbeutel über Behälter stülpen.
4. Saugkopf aufsetzen und verriegeln.
Nasssaugen
GEFAHR
Gefahr durch gesundheitsschädlichen Staub
Atemwegserkrankungen durch Einatmen von Staub.
Beim Nasssaugen dürfen keine gesundheitsschädli-
chen Stäube aufgenommen werden.
WARNUNG: Dieses Gerät enthält gesundheitsgefährli-
che Stäube. Entleerung und Wartung, einschließlich
der Entfernung des Staubbeutels, dürfen nur von sach-
kundigen Personen vorgenommen werden, die geeig-
nete Schutzausrüstung tragen. Nicht einschalten,
bevor das komplette Filtersystem installiert ist und die
Funktion der Volumenstromkontrolle überprüft wurde.
Flachfaltenfilter (PES)
Bestellnummer AS3628893350
Vliesfiltertüte
Bestellnummer AS3669074800
Entsorgungsbeutel
Bestellnummer AS3669076640
!
M
M

Deutsch 9
Gummilippen einbauen
1. Bürstenstreifen ausbauen.
Abbildung E
2. Gummilippen einbauen.
Hinweis
Die strukturierte Seite der Gummilippen muss nach au-
ßen zeigen.
Sauganschluss verschließen
1. Verschlussstopfen passgenau in Sauganschluss
einsetzen.
Abbildung F
2. Verschlussstopfen bis zum Anschlag einschieben.
Vliesfiltertüte entfernen
●Beim Aufsaugen von Nassschmutz muss immer die
Vliesfiltertüte entfernt werden.
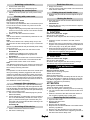
1. Saugkopf entriegeln und abnehmen.
2. Vliesfiltertüte nach hinten herausziehen.
Abbildung G
3. Verschlusslasche einklappen und Vliesfiltertüte
dicht verschließen.
4. Gebrauchte Vliesfiltertüte gemäß den gesetzlichen
Bestimmungen entsorgen.
5. Saugkopf aufsetzen und verriegeln.
Entsorgungsbeutel entfernen
●Beim Aufsaugen von Nassschmutz muss immer der
Entsorgungsbeutel entfernt werden.
1. Saugkopf entriegeln und abnehmen.
2. Entsorgungsbeutel hochstülpen.
Abbildung H
3. Öffnung des Entsorgungsbeutels über den Saug-
stutzen nach hinten herausziehen.
4. Entsorgungsbeutel mit Kabelbinder unterhalb der
Öffnung dicht verschließen.
5. Entsorgungsbeutel herausnehmen.
6. Behälter innen mit einem feuchten Tuch reinigen.
7. Entsorgungsbeutel gemäß den gesetzlichen Be-
stimmungen entsorgen.
8. Saugkopf aufsetzen und verriegeln.
Schmutzwasser ablassen
1. Schmutzwasser über Ablassschlauch ablassen.
Abbildung I
Allgemein
●Beim Aufsaugen von Nassschmutz mit der Fugen-
düse, beziehungsweise wenn überwiegend Wasser
aus einem Behälter aufgesaugt wird, empfiehlt es
sich, die Funktion “Automatische Filterabreinigung”
abzuschalten.
●Bei Erreichen des max. Flüssigkeitsstands schaltet
das Gerät automatisch ab.
●Bei nicht leitenden Flüssigkeiten (zum Beispiel
Bohremulsion, Öle und Fette) wird das Gerät bei
vollem Behälter nicht abgeschaltet. Der Füllstand
muss ständig überprüft und der Behälter rechtzeitig
entleert werden.
●Nach Beendigung des Nasssaugens: Flachfaltenfil-
ter mit der Filterabreinigung abreinigen. Elektroden
mit einer Bürste reinigen. Behälter mit einem feuch-
ten Tuch reinigen und trocknen.
Clipverbindung
Der Saugschlauch ist mit einem Clip-System ausgestat-
tet. Alle Zubehörteile mit Nennweite 35 mm können an-
geschlossen werden.
Abbildung J
Bedienung
Drehschalter
Gerät einschalten
1. Netzstecker einstecken.
2. Drehschalter auf gewünschtes Programm stellen.
Saugleistung einstellen
1. Saugleistung (min-max) am Drehregler einstellen.
Arbeiten mit Elektrowerkzeugen
GEFAHR
Gefahr eines Stromschlags
Verletzungs- und Beschädigungsgefahr.
Die Steckdose ist nur zum direkten Anschluss von Elek-
trowerkzeugen an den Sauger bestimmt. Jeder andere
Gebrauch der Steckdose ist nicht zulässig.
1. Netzstecker des Elektrowerkzeugs am Sauger ein-
stecken. Sauger befindet sich im Standby-Modus.
2. Gerät am Drehschalter einschalten.
Hinweis
Der Sauger wird automatisch mit dem Elektrowerkzeug
ein- und ausgeschaltet.
Hinweis
Der Sauger hat eine Anlaufverzögerung bis zu 0,5 Se-
kunden und eine Nachlaufzeit von bis zu 15 Sekunden.
Hinweis
Leistungsanschlusswert der Elektrowerkzeuge, siehe
Technische Daten.
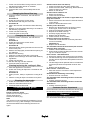
3. Krümmer am Saugschlauch entfernen.
Abbildung K
4. Werkzeugadapter an Saugschlauch montieren.
5. Werkzeugadapter an Elektrowerkzeug anschließen.
Abbildung L
6. Mindestvolumenstrom am Drehschalter für Saug-
schlauchquerschnitt einstellen. Die Skala zeigt den
Saugschlauchquerschnitt an.
Hinweis
Die verschiedenen Saugschlauchquerschnitte sind not-
wendig, um eine Anpassung an die Anschlussquer-
schnitte der Bearbeitungsgeräte zu ermöglichen.
Hinweis
Für den Betrieb als Entstauber für ortsveränderlichen
Betrieb (Bearbeitungsgerät am Sauger eingesteckt)
muss die eingebaute Überwachung auf das ange-
schlossene Bearbeitungsgerät (Stauberzeuger) abge-
stimmt werden. Das heißt, dass bei einer
Unterschreitung des zur Absaugung notwendigen Min-
destvolumenstroms von 20 m/s der Benutzer gewarnt
werden muss.
Gerät AUS
Gerät EIN
Automatische Filterabreinigung: AUS
Gerät EIN
Automatische Filterabreinigung: maxi-
maler Intervall
Gerät EIN
Automatische Filterabreinigung: minima-
ler Intervall

10 Deutsch
Automatische Filterabreinigung
Das Gerät verfügt über eine spezielle Filterabreinigung,
besonders wirksam bei feinem Staub. Dabei wird der
Flachfaltenfilter alle 15 Sekunden (AUTO MAX) bzw. al-
le 60 Sekunden (AUTO MIN) durch einen Luftstoß auto-
matisch gereinigt (pulsierendes Geräusch).
1. Drehschalter auf gewünschtes Programm stellen
(AUTO MIN-AUTO MAX).
2. Powerabreinigung (bei besonders starker Ver-
schmutzung des Flachfaltenfilters): Drehschalter
auf Programm 2 stellen, Saugrohr bzw. Krümmer
mit der Hand verschließen und automatische Filter-
abreinigung abwarten (alle 15 Sekunden).
Abbildung M
Gerät ausschalten
1. Gerät am Drehschalter ausschalten.
2. Netzstecker ziehen.
Nach jedem Betrieb
1. Behälter entleeren.
2. Gerät innen und außen durch Absaugen und Abwi-
schen mit einem feuchten Tuch reinigen.
Schubbügel ein-/ausklappen
1. Verriegelung des Schubbügels lösen und Schubbü-
gel verstellen.
Gerät aufbewahren
1. Saugschlauch und Netzkabel entsprechend Abbil-
dung aufbewahren.
Abbildung N
2. Gerät in einem trockenen Raum abstellen und vor
unbefugter Benutzung sichern.
Transport
몇VORSICHT
Nichtbeachtung des Gewichts
Verletzungs- und Beschädigungsgefahr
Beachten Sie beim Transport das Gewicht des Geräts.
1. Sauganschluss verschließen, siehe Nasssaugen.
2. Saugrohr mit Bodendüse aus der Halterung neh-
men. Gerät zum Tragen am Tragegriff und am
Saugrohr fassen, nicht am Schubbügel.
3. Gerät beim Transport in Fahrzeugen nach den je-
weils geltenden Richtlinien gegen Rutschen und
Kippen sichern.
Lagerung
몇VORSICHT
Nichtbeachtung des Gewichts
Verletzungs- und Beschädigungsgefahr
Beachten Sie bei der Lagerung das Gewicht des Ge-
räts.
Das Gerät darf nur in Innenräumen gelagert werden.
Pflege und Wartung
GEFAHR
Gefahr eines Stromschlags
Verletzungen durch Berühren von stromführenden Tei-
len
Schalten Sie das Gerät aus.
Ziehen Sie den Netzstecker.
Staubbeseitigende Maschinen sind Sicherheitseinrich-
tungen zur Verhütung oder Beseitigung von Gefahren
im Sinne von DGUV Vorschrift 1 (Deutsche Unfallverhü-
tungsvorschrift, Grundsätze der Prävention).
ACHTUNG
Silikonhaltige Pflegemittel
Kunststoffteile können angegriffen werden.
Verwenden Sie keine silikonhaltigen Pflegemittel zum
Reinigen.
●Einfache Wartungs- und Pflegearbeiten können Sie
selbst durchführen.
●Die Geräteoberfläche und die Behälterinnenseite
regelmäßig mit einem feuchten Tuch reinigen.
Flachfaltenfilter wechseln
1. Filterabdeckung öffnen.
2. Filterrahmen herausnehmen.
Abbildung O
3. Flachfaltenfilter herausnehmen.
4. Gebrauchten Flachfaltenfilter gemäß den gesetzli-
chen Bestimmungen entsorgen.
5. Angefallenen Schmutz auf der Reinluftseite entfer-
nen.
6. Filterrahmen sowie Auflagefläche des Filterrah-
mens mit einem feuchten Tuch reinigen.
7. Neuen Flachfaltenfilter einsetzen. Beim Einsetzen
darauf achten, dass der Flachfaltenfilter allseitig
bündig anliegt.
8. Filterrahmen einsetzen.
9. Filterabdeckung schließen, muss hörbar einrasten.
Vliesfiltertüte wechseln
1. Sauganschluss verschließen, siehe Nasssaugen.
Abbildung F
2. Saugkopf entriegeln und abnehmen.
3. Vliesfiltertüte nach hinten herausziehen.
Abbildung G
4. Verschlusslasche einklappen und Vliesfiltertüte
dicht verschließen.
5. Gebrauchte Vliesfiltertüte gemäß den gesetzlichen
Bestimmungen entsorgen.
6. Neue Vliesfiltertüte aufstecken.
7. Saugkopf aufsetzen und verriegeln.
Entsorgungsbeutel wechseln
1. Sauganschluss verschließen, siehe Nasssaugen.
Abbildung F
2. Saugkopf entriegeln und abnehmen.
3. Entsorgungsbeutel hochstülpen.
Abbildung H
4. Öffnung des Entsorgungsbeutels über den Saug-
stutzen nach hinten herausziehen.
5. Entsorgungsbeutel mit Kabelbinder unterhalb der
Öffnung dicht verschließen.
6. Entsorgungsbeutel herausnehmen.
7. Behälter innen mit einem feuchten Tuch reinigen.
8. Entsorgungsbeutel gemäß den gesetzlichen Be-
stimmungen entsorgen.
9. Neuen Entsorgungsbeutel aufstecken.
10. Entsorgungsbeutel über Behälter stülpen.
11. Saugkopf aufsetzen und verriegeln.
Kühlluftfilter reinigen/wechseln
1. Gerät abkühlen lassen.
2. Kühlluftklappen mit Schraubendreher entriegeln
und herausschwenken.
Abbildung P
3. Kühlluftfilter reinigen (absaugen, auswaschen) oder
wechseln.
4. Kühlluftklappen einklappen und einrasten.

Deutsch 11
Elektroden reinigen
1. Saugkopf entriegeln und abnehmen.
2. Elektroden mit einer Bürste reinigen.
3. Saugkopf aufsetzen und verriegeln.
Hilfe bei Störungen
GEFAHR
Gefahr eines Stromschlags
Verletzungen durch Berühren von stromführenden Tei-
len
Schalten Sie das Gerät aus.
Ziehen Sie den Netzstecker.
Hinweis
Tritt eine Störung (z. B. Filterbruch) auf, muss das Gerät
sofort abgeschaltet werden. Vor erneuter Inbetriebnah-
me muss die Störung beseitigt werden.
Saugturbine läuft nicht
1. Steckdose und Sicherung der Stromversorgung prü-
fen.
2. Netzkabel, Netzstecker, Elektroden und Steckdose
des Geräts prüfen.
3. Gerät einschalten.
Saugturbine schaltet ab
1. Behälter entleeren.
2. Flachfaltenfilter einsetzen.
Saugturbine läuft nach Behälterentleerung nicht
wieder an
1. Gerät ausschalten und 5 Sekunden warten. Gerät
wieder einschalten.
2. Elektroden mit einer Bürste reinigen.
Saugkraft lässt nach
1. Verstopfungen aus Saugdüse, Saugrohr, Saug-
schlauch oder Flachfaltenfilter entfernen.
2. Gefüllte Vliesfiltertüte wechseln.
3. Gefüllten Entsorgungsbeutel wechseln.
4. Filterabdeckung richtig einrasten.
5. Flachfaltenfilter wechseln.
6. Ablassschlauch auf Dichtheit prüfen.
Staubaustritt beim Saugen
1. Korrekte Einbaulage des Flachfaltenfilters prüfen/
korrigieren.
Abbildung Q
2. Flachfaltenfilter wechseln.
Abschaltautomatik (Nasssaugen) spricht nicht an
1. Elektroden mit einer Bürste reinigen.
2. Füllstand bei elektrisch nicht leitender Flüssigkeit
ständig kontrollieren.
Hupe ertönt - Intervallton
1. Drehschalter auf richtigen Saugschlauchquerschnitt
stellen.
2. Bei gefüllter Vliesfiltertüte und Unterschreitung des
Mindestvolumenstroms muss diese gewechselt
werden.
3. Bei gefülltem Entsorgungsbeutel und Unterschrei-
tung des Mindestvolumenstroms muss dieser ge-
wechselt werden.
4. Flachfaltenfilter wechseln.
Hupe ertönt - Dauerton
1. Gerät abkühlen lassen. Kühlluftfilter reinigen/wech-
seln.
Automatische Filterabreinigung arbeitet nicht
1. Saugschlauch nicht angeschlossen.
Automatische Filterabreinigung lässt sich nicht ab-
schalten
1. Kundendienst benachrichtigen.
Automatische Filterabreinigung lässt sich nicht ein-
schalten
1. Kundendienst benachrichtigen.
Kundendienst
Kann die Störung nicht behoben werden, muss das Ge-
rät vom Kundendienst überprüft werden.
Entsorgung
Das Gerät ist gemäß den gesetzlichen Bestimmungen
am Ende der Lebensdauer zu entsorgen.
Garantie
In jedem Land gelten die von unserer zuständigen Ver-
triebsgesellschaft herausgegebenen Garantiebedin-
gungen. Etwaige Störungen an Ihrem Gerät beseitigen
wir innerhalb der Garantiefrist kostenlos, sofern ein Ma-
terial- oder Herstellungsfehler die Ursache sein sollte.
Im Garantiefall wenden Sie sich bitte mit Kaufbeleg an
Ihren Händler oder die nächste autorisierte Kunden-
dienststelle.
(Adresse siehe Rückseite)
Zubehör und Ersatzteile
Nur Original-Zubehör und Original-Ersatzteile verwen-
den, sie bieten die Gewähr für einen sicheren und stö-
rungsfreien Betrieb des Geräts.
Informationen über Zubehör und Ersatzteile finden Sie
unter www.bona.com.
EU-Konformitätserklärung
Hiermit erklären wir, dass die nachfolgend bezeichnete
Maschine aufgrund ihrer Konzipierung und Bauart so-
wie in der von uns in Verkehr gebrachten Ausführung
den einschlägigen grundlegenden Sicherheits- und Ge-
sundheitsanforderungen der EU-Richtlinien entspricht.
Bei einer nicht mit uns abgestimmten Änderung der Ma-
schine verliert diese Erklärung ihre Gültigkeit.
Produkt: Nass- und Trockensauger
Typ: DCS 50 M
Einschlägige EU-Richtlinien
2006/42/EG
2011/65/EU
2014/30/EU
Angewandte harmonisierte Normen
EN IEC 63000: 2018
EN 55014-1: 2017 + A11: 2020
EN 55014-2: 2015
EN 60335-1
EN 60335-2-69
EN 61000-3-2: 2014
EN 61000-3-3: 2013 + A1: 2019
EN 62233: 2008
Angewandte nationale Normen
-
Der Unterzeichnende handelt im Auftrag und mit Voll-
macht der Geschäftsführung.
Malmö 2021-12-20
Dan Fredheim
COO & SVP Global Sourcing

12 English
Bona AB
Murmansgatan 130
Box 210 74
S-200 21 Malmö
Sweden
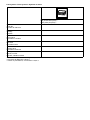
Technische Daten
Technische Änderungen vorbehalten.
Contents
General notes
Read these original instructions and the
enclosed safety instructions number
59562490 (issue 07/19 onward) before
using the device for the first time. Act in accordance with
them.
Keep both books for future reference or for future own-
ers.
●If the operating instructions and safety instructions
are not observed, the device can be damaged and
dangers could arise for users and other persons.
●Notify the dealer immediately in the case of shipping
damage.
●Check the package contents when unpacking for
missing accessories or for damage.
Environmental protection
The packing materials can be recycled. Please
dispose of packaging in accordance with the en-
vironmental regulations.
Electrical and electronic appliances contain valu-
able, recyclable materials and often components
such as batteries, rechargeable batteries or oil,
which - if handled or disposed of incorrectly - can
pose a potential threat to human health and the environ-
ment. However, these components are required for the
correct operation of the appliance. Appliances marked
by this symbol are not allowed to be disposed of togeth-
er with the household rubbish.
Intended use
●This vacuum cleaner is intended for the wet and dry
cleaning of floor and wall surfaces.
●This device is suitable for vacuuming dry, non-flam-
mable dusts that are harmful to health from ma-
chines and devices; dust class M as per EN 60335-
2-69. Restrictions: No carcinogenic substances ex-
cept for wood chips may be vacuumed.
●This device is suitable for commercial use, e.g. in
hotels, schools, hospitals, factories, shops, offices,
and rental companies.
DCS 50
M
Elektrischer Anschluss
Netzspannung V 220-240
Phase ~ 1
Netzfrequenz Hz 50-60
Schutzart IPX4
Schutzklasse I
Nennleistung W 1200
Maximale Leistung W 1380
Leistungsanschlusswert Geräte-
steckdose (EU)
W 100-
2200
Leistungsdaten Gerät
Behälterinhalt l 51
Füllmenge Flüssigkeit l 35
Luftmenge (max.) m3/h 140
Unterdruck (max.) kPa
(mbar)
23,0
(230)
Maße und Gewichte
Typisches Betriebsgewicht kg 19,0
Länge x Breite x Höhe mm 640 x
370 x
1045
Filterfläche Flachfaltenfilter m20,6
Durchmesser Saugschlauch mm 35
Länge Saugschlauch m 5,0
Ermittelte Werte gemäß EN 60335-2-69
Schalldruckpegel LpA dB(A) 68
Unsicherheit KpA dB(A) 2
Hand-Arm-Vibrationswert m/s2<2,5
Unsicherheit K m/s20,2
Netzkabel
Typ Netzkabel mm2H07RN-
F 3x1,5
Teilenummer (EU) 6.650-
665.0
Kabellänge m 7,5
General notes...................................................... 12
Environmental protection .................................... 12
Intended use ....................................................... 12
Device description............................................... 13
Symbols on the device ........................................ 13
Safety devices..................................................... 13
Preparation.......................................................... 13
Initial startup........................................................ 13
Operation ............................................................ 14
Transport............................................................. 15
Storage................................................................ 15
Care and service................................................. 15
Troubleshooting guide......................................... 16
Disposal .............................................................. 16
Warranty.............................................................. 17
Accessories and spare parts............................... 17
EU Declaration of Conformity.............................. 17
Technical data ..................................................... 17

English 13
Device description
Illustration A
1Electrodes
2Suction hose
3Hose hook
4Push handle lock
5Crevice nozzle
6Air exit, working air
7Suction head
8Suction head lock
9Recessed grip
10 Dirt receptacle
11 Steering roller
12 Handle
13 Air inlet, motor cooling air
14 Suction hose port
15 Plugs
16 Floor nozzle
17 Floor nozzle height adjustment
18 Suction pipe
19 Tool box end stop
20 Rubber sleeve, screwable
21 Fastening eyelet
22 Filter cover
23 Carrying handle
24 Suction control (variable)
25 Tool adapter
26 Push handle
27 Hose cross section turn switch
28 Turn switch for suction power (min-max)
29 Turn switch
30 Socket
31 Hose cross-section scale
32 Angle piece
33 Floor nozzle holder
34 Drain hose
35 Suction pipe holder
36 Cable hooks
37 Mains cable
38 Filter frame
39 Flat fold filter (PES)
40 Filter dedusting
41 Type plate
Symbols on the device
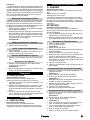
Dust class
Flat fold filter
Fleece filter bag, dust bag
Safety devices
Monitoring of the flat fold filter
The device automatically switches off when operated
without a flat fold filter.
Preparation
1. Unpack the device and install the accessories.
Illustration B
Initial startup
The device has 2 operating modes:
1 Industrial vacuum cleaner operation (power socket
not used)
2 Dust removal operation (power socket used)
몇WARNING
Danger from dust that is harmful to your health
Respiratory sicknesses through inhalation of dust.
Do not vacuum without correctly installed filter ele-
ments, otherwise a danger to health from increased fine
dust emission is present.
ATTENTION
Danger due to fine dust entering
Risk of damage to the suction motor.
Never remove the flat fold filter when vacuuming.
1. Connect the suction hose and attach a suction noz-
zle or connect to the dust generating device, de-
pending on the operating mode.
WARNING: This device contains dusts that are harmful
to your health. Emptying and maintenance, including
removal of the dust bag, may only be performed by ap-
propriately trained personnel wearing suitable personal
protective equipment. Do not switch on until the entire
filter system has been installed and the volume flow
control functionality has been checked.
Flat fold filter (PES)
Order number AS3628893350
Fleece filter bag
Order number AS3669074800
Dust bag
Order number AS3669076640
!
M
M

14 English
Horn
Intermittent tone
The horn sounds (intermittent tone) when the air speed
drops below 20 m/s.
Note
The horn reacts to a vacuum.
1. Set the turn switch to the correct hose cross-section.
Continuous tone
The horn sounds (continuous tone) when the cooling air
filter is clogged.
1. Allow the device to cool down. Clean/replace the
cooling air filter.
Anti-static system
Static charges are discharged through the earthed con-
nection nozzles. This prevents sparking and electric
shocks with electrically conducting accessories (includ-
ed in the scope of delivery).
Dry vacuuming
●The device is fitted with a fleece filter bag with lock
latch, order no. AS3669074800 (5 pieces).
●The device is equipped with a dust bag with cable
ties, order no. AS3669076640 (5 pieces).
Note
All types of dust up to dust class M can be vacuumed
with this device. The use of a dust collection bag is re-
quired by law.
Note
The device is suitable for industrial extraction and a dust
removal device for mobile operation for vacuuming dry,
non-inflammable dusts with workplace limit values
(AGW) greater than or equal to 0.1 mg/m3.
Installing the fleece filter bag
1. Unlock and remove the suction head.
2. Fit the fleece filter bag.
Illustration C
3. Fit and lock the suction head.
Installing the dust bag
Note
The dust bag opening must be pulled fully over the suc-
tion hose port.
1. Unlock and remove the suction head.
2. Fit the dust bag.
Illustration D
3. Pull the dust bag over the container.
4. Fit and lock the suction head.
Wet vacuum cleaning
DANGER
Danger from dust that is harmful to your health
Respiratory sicknesses through inhalation of dust.
No dusts harmful to health may be vacuumed when per-
forming wet vacuum cleaning.
Installing the squeegees
1. Remove the brush strip.
Illustration E
2. Install the squeegees.
Note
The structured side of the squeegees must face out-
wards.
Closing the suction connection
1. Fit a plug exactly into the suction connection.
Illustration F
2. Push the plugs in until they engage.
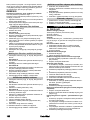
Removing the fleece filter bag
●The fleece filter bag must always be removed when
vacuuming wet substances.
1. Unlock and remove the suction head.
2. Pull the fleece filter bag out to the rear.
Illustration G
3. Fold in the lock latch and seal the fleece filter bag
tight.
4. Dispose of the used fleece filter bag in accordance
with statutory regulations.
5. Fit and lock the suction head.
Removing the dust bag
●The dust bag must always be removed when vacu-
uming wet substances.
1. Unlock and remove the suction head.
2. Fold up the dust bag.
Illustration H
3. Pull the dust bag opening towards the rear over the
suction hose port.
4. Seal the dust bag tightly underneath the opening us-
ing cable ties.
5. Remove the dust bag.
6. Clean the container inside with a moist cloth.
7. Dispose of the dust bag in accordance with statutory
regulations.
8. Fit and lock the suction head.
Draining the waste water
1. Drain the waste water via the drain hose.
Illustration I
General
●We recommend switching off the "Automatic filter
dedusting" function when vacuuming wet dirt with
the crevice nozzle or when sucking mainly water out
of a container.
●The device switches off automatically when the
maximum fluid level is reached.
●When vacuuming non-conductive liquids (e.g. drill
emulsion, oils and grease) the device does not au-
tomatically switch off when the container is full. The
filling level must be continuously monitored and the
container emptied on a timely basis.
●On completion of wet vacuum cleaning: Clean the
flat fold filter using the dedusting function. Clean the
electrodes with a brush. Clean the container with a
moist cloth and dry it off.
Clip connection
The suction hose is equipped with a clip system. All ac-
cessory parts with a nominal width of 35 mm can be
connected.
Illustration J
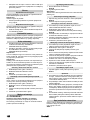
Operation
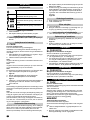
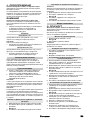
Turn switch
Device OFF
Device ON
Automatic filter dedusting: OFF
Device ON
Automatic filter dedusting: maximum in-
terval
Device ON
Automatic filter dedusting: minimum in-
terval

English 15
Switching on the device
1. Connect the mains plug.
2. Set the turn switch to the desired program.
Adjusting the suction power
1. Adjust the suction power (min-max) via the rotary
control.
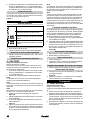
Working with power tools
DANGER
Danger of electric shock
Risk of injury and damage.
The socket is only intended for direct connection of pow-
er tools to the vacuum cleaner. Any other use of the
socket is prohibited.
1. Plug the mains plug of the power tool into the power
socket on the vacuum cleaner. The vacuum cleaner
is in Standby mode.
2. Switch on the device at the turn switch.
Note
The vacuum cleaner is automatically switched on and
off with the power tool.
Note
The vacuum cleaner has a startup delay of up to 0.5
seconds and an after-running time of up to 15 seconds.
Note
See the Technical data for the permissible power rating
of the power tool.
3. Remove the angle piece from the suction hose.
Illustration K
4. Install the tool adapter on the suction hose.
5. Connect the tool adapter to the power tool.
Illustration L
6. Set the minimum volume flow on the turn switch for
suction hose cross section. The scale shows the
suction hose suction hose cross section.
Note
The different suction hose cross sections are necessary
in order to adapt to the different connection cross sec-
tions of the processing machines.
Note
For operation as a dust removal device for mobile oper-
ation (processing machine plugged into the vacuum
cleaner) the integrated monitoring system must be ad-
justed to suit the connected processing machine (dust
generator). This means that the user must be warned
when the flow rate drops below the minimum value 20
m/s needed for correct vacuuming.
Automatic filter dedusting
The device is equipped with a special filter dedusting
function, which is particularly effective against fine dust.
The flat fold filter is automatically cleaned every 15 sec-
onds (AUTO MAX) or every 60 seconds (AUTO MIN) by
a blast of air (pulsing noise).
1. Set the turn switch to the desired program (AUTO
MIN-AUTO MAX).
2. Power dedusting (for particularly severe contamina-
tion of the flat fold filter): Set the turn switch to pro-
gram 2, seal the suction pipe or bender with your
hand and wait for the automatic filter cleaning to fin-
ish (lasts 15 seconds).
Illustration M
Switching off the device
1. Switch off the device at the turn switch.
2. Pull out the mains plug.
Each time after use
1. Empty the container.
2. Vacuum off the inside and outside of the device and
clean with a moist cloth.
Folding the push handle in/out
1. Release the push handle lock and adjust the push
handle.
Storing the device
1. Store the suction hose and mains cable as shown in
the illustration.
Illustration N
2. Store the device in a dry room and secure it against
unauthorised use.
Transport
몇CAUTION
Failure to observe the weight
Risk of injury and damage
Be aware of the weight of the device during transporta-
tion.
1. Close the suction connection, see wet vacuum
cleaning.
2. Remove the suction hose with floor nozzle from the
support. Carry the device by the carrying handle and
the suction pipe, not by the push handle.
3. When transporting the device in vehicles, secure it
to prevent it from slipping or overturning in accord-
ance with the respective valid guidelines.
Storage
몇CAUTION
Failure to observe the weight
Risk of injury and damage
Be aware of the weight of the device during storage.
The device may only be operated indoors.
Care and service
DANGER
Danger of electric shock
Injuries due to touching live parts
Switch off the device.
Remove the mains plug.
Dust extraction machines are safety devices for the pre-
vention or elimination of hazards according to the Ger-
man DGUV regulation 1 (German accident prevention
regulation, principles of prevention).
ATTENTION
Care agents containing silicone
These can attach plastic components.
Do not use care agents containing silicone for cleaning.
●You can perform basic maintenance and care work
yourself.
●Clean the surface of the device and the interior of
the container regularly with a moist cloth.
Replacing the flat fold filter
1. Open the filter cover.
2. Remove the filter frame.
Illustration O
3. Remove the flat fold filter.
4. Dispose of the used flat fold filter in accordance with
statutory regulations.
5. Remove any dirt deposits from the clean air side.
6. Clean the filter frame and the supporting surface of
the filter frame with a damp cloth.

16 English
7. Fit the new flat fold filter. During insertion, ensure
that the flat fold filter is flush on all sides.
8. Insert the filter frame.
9. Close the filter cover until it audibly latches into
place.
Changing the fleece filter bag
1. Close the suction connection, see wet vacuum
cleaning.
Illustration F
2. Unlock and remove the suction head.
3. Pull the fleece filter bag out to the rear.
Illustration G
4. Fold in the lock latch and seal the fleece filter bag
tight.
5. Dispose of the used fleece filter bag in accordance
with statutory regulations.
6. Fit the new fleece filter bag.
7. Fit and lock the suction head.
Changing the dust bag
1. Close the suction connection, see wet vacuum
cleaning.
Illustration F
2. Unlock and remove the suction head.
3. Fold up the dust bag.
Illustration H
4. Pull the dust bag opening towards the rear over the
suction hose port.
5. Seal the dust bag tightly underneath the opening us-
ing cable ties.
6. Remove the dust bag.
7. Clean the container inside with a moist cloth.
8. Dispose of the dust bag in accordance with statutory
regulations.
9. Fit the new dust bag.
10. Pull the dust bag over the container.
11. Fit and lock the suction head.
Cleaning/replacing the cooling air filter
1. Allow the appliance to cool down.
2. Unlock the cooling air flaps with a screwdriver and
fold them out.
Illustration P
3. Clean (vacuum, wash) or replace the cooling air fil-
ter.
4. Fold the cooling air flaps in and latch it into place.
Cleaning the electrodes
1. Unlock and remove the suction head.
2. Clean the electrodes with a brush.
3. Fit and lock the suction head.
Troubleshooting guide
DANGER
Danger of electric shock
Injuries due to touching live parts
Switch off the device.
Remove the mains plug.
Note
The device must be switched off immediately if a mal-
function occurs (e.g. filter breakage). The malfunction
must be eliminated before switching the device on
again.
Suction turbine does not start up
1. Check the socket and the power supply fuse.
2. Check the mains cable, mains plug, electrodes and
power socket on the device.
3. Switch on the device.
Suction turbine switches off
1. Empty the container.
2. Fit the new flat fold filter.
Suction turbine does not switch on again after emp-
tying the container
1. Switch off the device and wait for 5 seconds. Switch
on the device.
2. Clean the electrodes with a brush.
Suction power decreases
1. Remove any blockages from the suction nozzle,
suction pipe, suction hose or flat fold filter.
2. Change the filled fleece filter bag.
3. Dispose of the filled dust bag.
4. Correctly engage the filter cover.
5. Replace the flat fold filter.
6. Check the drain hose for leaks.
Escaping dust when vacuuming
1. Check that the flat fold filter is correctly fitted and
correct if necessary.
Illustration Q
2. Replace the flat fold filter.
The automatic switch-off mechanism (wet vacuum
cleaning) does not trigger
1. Clean the electrodes with a brush.
2. Continuously monitor the filling level when vacuum-
ing non-conductive liquids.
Horn sounds - intermittent tone
1. Set the turn switch to the correct hose cross-section.
2. The fleece filter bag must be replaced when it is full
and the air flow drops below the specified minimum
flow rate.
3. The dust bag must be replaced when it is full and the
air flow drops below the specified minimum flow
rate.
4. Replace the flat fold filter.
Horn sounds - continuous tone
1. Allow the device to cool down. Clean/replace the
cooling air filter.
Automatic filter dedusting not working
1. Suction hose not connected.
The automatic filter dedusting function cannot be
switched off
1. Contact Customer Service.
The automatic filter dedusting function cannot be
switched on
1. Contact Customer Service.
Customer Service department
If the malfunction cannot be corrected, the device must
be checked by the Customer Service department.
Disposal
At the end of its service life, the device is to be disposed
of in accordance with statutory regulations.

English 17
Warranty
The warranty conditions issued by our relevant sales
company apply in all countries. We shall remedy possi-
ble malfunctions on your appliance within the warranty
period free of cost, provided that a material or manufac-
turing defect is the cause. In a warranty case, please
contact your dealer (with the purchase receipt) or the
next authorised customer service site.
(See overleaf for the address)
Accessories and spare parts
Only use original accessories and original spare parts.
They ensure that the appliance will run safely and fault-
free.
Information on accessories and spare parts can be
found at www.bona.com.
EU Declaration of Conformity
We hereby declare that the machine described below
complies with the relevant basic safety and health re-
quirements in the EU Directives, both in its basic design
and construction as well as in the version placed in cir-
culation by us. This declaration is invalidated by any
changes made to the machine that are not approved by
us.
Product: Wet/dry vacuum cleaner
Type: DCS 50 M
Currently applicable EU Directives
2006/42/EC
2011/65/EU
2014/30/EU
Harmonised standards used
EN IEC 63000: 2018
EN 55014-1: 2017 + A11: 2020
EN 55014-2: 2015
EN 60335-1
EN 60335-2-69
EN 61000-3-2: 2014
EN 61000-3-3: 2013 + A1: 2019
EN 62233: 2008
National standards used
-
The signatory acts on behalf of and with the authority of
the company management.
Malmö 2021-12-20
Dan Fredheim
COO & SVP Global Sourcing
Bona AB
Murmansgatan 130
Box 210 74
S-200 21 Malmö
Sweden
Technical data
Subject to technical modifications.
DCS 50
M
Electrical connection
Mains voltage V 220-240
Phase ~ 1
Power frequency Hz 50-60
Degree of protection IPX4
Protection class I
Nominal power W 1200
Maximum power W 1380
Power rating of the device socket
(EU)
W100-
2200
Device performance data
Tank content l 51
Fluid filling quantity l 35
Air quantity (max.) m3/h 140
Vacuum (max.) kPa
(mbar)
23,0
(230)
Dimensions and weights
Typical operating weight kg 19,0
Length x width x height mm 640 x
370 x
1045
Filter area of the flat fold filter m20,6
Diameter of the suction hose mm 35
Length of the suction hose m 5,0
Determined values in acc. with EN 60335-2-69
Sound pressure level LpA dB(A) 68
Uncertainty KpA dB(A) 2
Hand-arm vibration value m/s2<2,5
Uncertainty K m/s20,2
Mains cable
Power cord type mm2H07RN-
F 3x1,5
Part number (EU) 6.650-
665.0
Cable length m 7,5

18 Français
Contenu
Remarques générales
Veuillez lire le manuel d'instructions ori-
ginal de l'appareil et les consignes de
sécurité n° 59562490 (à partir de la sor-
tie 07/19) jointes avant la première utilisation de votre
appareil. Suivre ces instructions.
Conservez les deux manuels pour une utilisation ulté-
rieure ou pour le propriétaire suivant.
●Le non-respect du manuel d'utilisation et des
consignes de sécurité peut entraîner des dom-
mages sur l’appareil et des dangers pour l’opérateur
et d’autres personnes.
●Informer immédiatement le vendeur en cas de dom-
mage dû au transport.
●Vérifiez le contenu de l'emballage lors du déballage,
qu’il ne manque pas d’accessoires et qu’il n’y a pas
de dommage.
Protection de l'environnement
Les matériaux d'emballage sont recyclables.
Veuillez éliminer les emballages dans le respect
de l’environnement.
Les appareils électriques et électroniques
contiennent des matériaux précieux recyclables
et souvent des composants tels que des piles,
batteries ou de l’huile représentant un danger po-
tentiel pour la santé humaine et l'environnement, s'ils ne
sont pas manipulés ou éliminés correctement. Ces
composants sont cependant nécessaires pour le fonc-
tionnement correct de l'appareil. Les appareils marqués
par ce symbole ne doivent pas être jetés dans les or-
dures ménagères.
Utilisation conforme
●Cet aspirateur est destiné au nettoyage humide et à
sec de surfaces de sols et murales.
●L’appareil est destiné à l’aspiration de poussières
sèches, non inflammables, nocives sur les ma-
chines et appareils ; classe de poussières M selon
EN 60335-2-69. Restriction : l'aspiration de ma-
tières cancérigènes, excepté les copeaux de bois,
n'est pas autorisée.
●Cet appareil est adapté à une utilisation profession-
nelle, p. ex. dans les hôtels, écoles, hôpitaux,
usines, magasins, bureaux et loueurs.
Description de l'appareil
Illustration A
1Electrodes
2Tuyau d'aspiration
3Crochet de fixation du tuyau
4Verrouillage du guidon
5Suceur fentes
6Évacuation, air de travail
7Tête d’aspiration
8Verrouillage de la tête d'aspiration
9Poignée encastrée
10 Collecteur d'impuretés
11 Roue directionnelle
12 Poignée
13 Entrée d'air, air de refroidissement du moteur
14 Tubulure d'aspiration
15 Bouchon de fermeture
16 Buse pour sol
17 Réglage en hauteur de la buse pour sol
18 Tube d'aspiration
19 Butée pour la caisse à outils
20 Manchon en caoutchouc, vissable
21 Œillet de fixation
22 Cache de filtre
23 Poignée de transport
24 Régulateur d'aspiration (stepless)
25 Adaptateur d’outil
26 Guidon
27 Commutateur rotatif de la section du tube d'aspira-
tion
28 Bouton rotatif pour la puissance d'aspiration (min-
max)
29 Bouton rotatif
30 Prise de courant
31 Échelle graduée de la section du tube d'aspiration
32 Coude
33 Support pour buse de sol
34 Flexible de vidange
35 Support pour tube d'aspiration
36 Crochet de câble
37 Câble secteur
38 Cadre de filtre
39 Filtre plat plissé (PES)
Remarques générales......................................... 18
Protection de l'environnement ............................. 18
Utilisation conforme............................................. 18
Description de l'appareil ...................................... 18
Symboles sur l'appareil ....................................... 19
Dispositifs de sécurité ......................................... 19
Préparation.......................................................... 19
Mise en service ................................................... 19
Commande.......................................................... 20
Transport ............................................................. 21
Stockage ............................................................. 21
Entretien et maintenance .................................... 21
Dépannage en cas de défaut .............................. 22
Élimination........................................................... 22
Garantie............................................................... 22
Accessoires et pièces de rechange..................... 22
Déclaration de conformité UE ............................. 23
Caractéristiques techniques................................ 23

Français 19
40 Nettoyage de filtre
41 Plaque signalétique
Symboles sur l'appareil
Classe de poussières
Filtre plat plissé
Filtre en feutre, sachet de recyclage
Dispositifs de sécurité
Surveillance du filtre plat plissé
Lorsque l’appareil fonctionne sans filtre plat plissé, il
s’arrête automatiquement.
Préparation
1. Déballez l'appareil et assemblez les accessoires.
Illustration B
Mise en service
L'appareil permet 2 modes de fonctionnement :
1 Mode de fonctionnement Aspirateur industriel (prise
de courant non occupée)
2 Mode de fonctionnement dépoussièreur (prise de
courant occupée)
몇AVERTISSEMENT
Danger dû à de la poussière nocive pour la santé
Maladies respiratoires dues à l'inhalation de poussière.
Ne pas aspirer sans élément filtre pour éviter un risque
pour la santé dû à une émission de poussières fines.
ATTENTION
Danger dû à la pénétration de poussière fine
Risque d'endommagement du moteur thermique.
Ne jamais enlever le filtre plat plissé lors de l'aspiration.
1. Raccorder le tuyau d'aspiration et le doter, selon le
mode de fonctionnement, de la buse d’aspiration ou
le raccorder à l’appareil générant de la poussière.
Klaxon
Son intermittent
Le klaxon retentit (son intermittent) lorsque la vitesse de
l'air descend en-dessous de 20 m/s.
Remarque
Le klaxon réagit à la dépression.
1. Placer le bouton rotatif sur la section de tuyau d'as-
piration correcte.
Son permanent
Le klaxon retentit (son permanent) lorsque le filtre de
l’air de refroidissement est colmaté.
1. Laisser refroidir l'appareil. Nettoyer/remplacer le
filtre de l’air de refroidissement.
Système anti-statique
Les tubulures de raccordement mises à la terre per-
mettent d'évacuer les charges statiques. Ainsi, la forma-
tion d'étincelles et les surtensions sur les accessoires
conductibles électriquement (dans l'étendue de livrai-
son) sont évitées.
Aspiration à sec
●L’appareil est équipé d’un sac filtrant en feutre avec
languette de fermeture, référence AS3669074800
(5 pièces).
●L’appareil est équipé d’un sachet de recyclage avec
serre-câble, référence AS3669076640 (5 pièces).
Remarque
Cet appareil permet d'aspirer toutes sortes de pous-
sières jusqu'à la classe de poussières M. L'utilisation
d'un sachet de récupération de la poussière est pres-
crite par la loi.
Remarque
En tant qu'aspirateur industriel, l'appareil est approprié
pour aspirer, et en tant que dépoussiéreur pour travailler
de manière mobile pour aspirer des poussières sèches
non inflammables dont les valeurs limites d’exposition
professionnelles (AGW) sont supérieures ou égales à
0,1 mg/m3.
Montage d'un sac de filtre en feutre
1. Déverrouiller et retirer la tête d'aspiration.
2. Insérer le sac de filtre en feutre.
Illustration C
3. Monter et verrouiller la tête d'aspiration.
Montage du sachet de recyclage
Remarque
L'ouverture du sachet de recyclage doit être complète-
ment enfilée sur le talon de la tubulure d'aspiration.
1. Déverrouiller et retirer la tête d'aspiration.
2. Insérer le sachet de recyclage.
Illustration D
3. Passer le sachet de recyclage sur le réservoir.
4. Monter et verrouiller la tête d'aspiration.
AVERTISSEMENT : Cette appareil contient des pous-
sières nocives pour la santé. Le vidage et la mainte-
nance, y compris la dépose du sac à poussières, sont
du ressort exclusif de personnes compétentes, portant
un équipement de protection approprié. Ne pas mettre
sous tension avant que le système filtrant complet soit
installé et que le fonctionnement du contrôle du débit
volumétrique ait été contrôlé.
Filtre plat plissé (PES)
Référence AS3628893350
Sac du filtre en feutre
Référence AS3669074800
Sachet de recyclage
Référence AS3669076640
!
M
M

20 Français
Aspiration de l'eau
DANGER
Danger dû à de la poussière nocive pour la santé
Maladies respiratoires dues à l'inhalation de poussière.
Lors de l'aspiration d'eau, ne pas aspirer de poussières
nocives pour la santé.
Montage des lèvres en caoutchouc
1. Démonter les brosses.
Illustration E
2. Monter les lèvres en caoutchouc.
Remarque
Le côté structuré des lèvres en caoutchouc doit être di-
rigé vers l'extérieur.
Obturation du connecteur de flexible d'aspiration
1. Mettre le bouchon en place dans le connecteur pour
flexible d'aspiration en l'ajustant avec précision.
Illustration F
2. Insérer le bouchon jusqu'en butée.
Dépose du sac du filtre en feutre
●Retirer toujours le sac du filtre en feutre pour aspirer
des salissures mouillées.
1. Déverrouiller et retirer la tête d'aspiration.
2. Sortir le sac du filtre en feutre par l'arrière.
Illustration G
3. Rabattre la languette de fermeture et fermer le sac
du filtre en feutre hermétiquement.
4. Éliminer le sac du filtre en feutre usagé conformé-
ment aux dispositions légales.
5. Monter et verrouiller la tête d'aspiration.
Retrait du sachet de recyclage
●Retirer toujours le sachet de recyclage pour aspirer
des salissures mouillées.
1. Déverrouiller et retirer la tête d'aspiration.
2. Lever le sachet de recyclage.
Illustration H
3. Sortir l’ouverture du sachet de recyclage vers l’ar-
rière, au-dessus de la tubulure d’aspiration.
4. Fermer hermétiquement le sachet de recyclage
avec un serre-câble sous l’ouverture.
5. Sortir le sachet de recyclage.
6. Nettoyer le réservoir avec un chiffon humide.
7. Éliminer le sachet de recyclage usagé conformé-
ment aux dispositions légales.
8. Monter et verrouiller la tête d'aspiration.
Vidange de l'eau sale
1. Vider l'eau sale par le flexible de vidange.
Illustration I
Généralités
●Lors de l'aspiration de salissures mouillées avec le
suceur à fentes, ou lorsque de l'eau est principale-
ment aspirée hors d'un réservoir, il est conseillé de
désactiver la fonction « Nettoyage automatique du
filtre ».
●L'appareil se désactive automatiquement lorsque le
niveau du liquide max. est atteint.
●Dans le cas de liquides non conducteurs (p. ex.
émulsion de bore, huile et graisses), l'appareil n'est
pas désactivé lorsque le réservoir est plein. Le ni-
veau de remplissage doit être contrôlé en continu et
le réservoir vidé à temps.
●Lorsque l'aspiration humide est terminée : nettoyer
le filtre plat plissé avec le nettoyage du filtre. Net-
toyer les électrodes avec une brosse. Nettoyer le ré-
servoir avec un chiffon humide et sécher.
Jonction clipsée
Le tuyau d'aspiration est équipé d'un système de clip.
Toutes les pièces d'accessoires d'un diamètre nominal
de 35 mm peuvent être raccordées.
Illustration J
Commande
Commutateur rotatif
Démarrer l'appareil
1. Brancher la fiche secteur.
2. Placer le bouton rotatif sur le programme souhaité.
Réglage de la puissance d'aspiration
1. Régler de la puissance d'aspiration (min-max) sur le
bouton rotatif.
Travaux avec des outils électriques
DANGER
Risque d'électrocution
Risque de blessures et d'endommagement.
La prise de courant est prévue pour raccorder des outils
électriques directement à l'aspirateur. Toute autre utili-
sation de la prise électrique n'est pas autorisée.
1. Brancher la fiche secteur de l'outil électrique sur
l'aspirateur. L'aspirateur est en mode Stand-by.
2. Mettre l’appareil sous tension avec le bouton rotatif.
Remarque
L'aspirateur est mis automatiquement sous et hors ten-
sion avec l'outil électrique.
Remarque
L'aspirateur a une temporisation de démarrage de 0,5 s
et un temps d'inertie de 15 s.
Remarque
La valeur de raccordement des outils électriques est in-
diquée dans les caractéristiques techniques.
3. Retirer le coude sur le tuyau d'aspiration.
Illustration K
4. Monter l’adaptateur d’outil sur le tuyau d’aspiration.
5. Raccorder l’adaptateur d’outil à l'outil électrique.
Illustration L
6. Régler le débit volumique minimal sur le bouton ro-
tatif en fonction de la section du tuyau d’aspiration.
L'échelle graduée indique la section du tube d'aspi-
ration.
Remarque
Les différentes sections de tuyau sont nécessaires afin
de permettre une adaptation aux sections de raccorde-
ment des appareils de traitement.
Appareil à l’arrêt
Appareil en marche
Nettoyage du filtre automatique : ARRET
Appareil en marche
Nettoyage du filtre automatique : inter-
valle maximal
Appareil en marche
Nettoyage du filtre automatique : inter-
valle minimal
Pagina se încarcă...
Pagina se încarcă...
Pagina se încarcă...
Pagina se încarcă...
Pagina se încarcă...
Pagina se încarcă...
Pagina se încarcă...
Pagina se încarcă...
Pagina se încarcă...
Pagina se încarcă...
Pagina se încarcă...
Pagina se încarcă...
Pagina se încarcă...
Pagina se încarcă...
Pagina se încarcă...
Pagina se încarcă...
Pagina se încarcă...
Pagina se încarcă...
Pagina se încarcă...
Pagina se încarcă...
Pagina se încarcă...
Pagina se încarcă...
Pagina se încarcă...
Pagina se încarcă...
Pagina se încarcă...
Pagina se încarcă...
Pagina se încarcă...
Pagina se încarcă...
Pagina se încarcă...
Pagina se încarcă...
Pagina se încarcă...
Pagina se încarcă...
Pagina se încarcă...
Pagina se încarcă...
Pagina se încarcă...
Pagina se încarcă...
Pagina se încarcă...
Pagina se încarcă...
Pagina se încarcă...
Pagina se încarcă...
Pagina se încarcă...
Pagina se încarcă...
Pagina se încarcă...
Pagina se încarcă...
Pagina se încarcă...
Pagina se încarcă...
Pagina se încarcă...
Pagina se încarcă...
Pagina se încarcă...
Pagina se încarcă...
Pagina se încarcă...
Pagina se încarcă...
Pagina se încarcă...
Pagina se încarcă...
Pagina se încarcă...
Pagina se încarcă...
Pagina se încarcă...
Pagina se încarcă...
Pagina se încarcă...
Pagina se încarcă...
Pagina se încarcă...
Pagina se încarcă...
Pagina se încarcă...
Pagina se încarcă...
Pagina se încarcă...
Pagina se încarcă...
Pagina se încarcă...
Pagina se încarcă...
Pagina se încarcă...
Pagina se încarcă...
Pagina se încarcă...
Pagina se încarcă...
Pagina se încarcă...
Pagina se încarcă...
Pagina se încarcă...
Pagina se încarcă...
Pagina se încarcă...
Pagina se încarcă...
Pagina se încarcă...
Pagina se încarcă...
Pagina se încarcă...
Pagina se încarcă...
Pagina se încarcă...
Pagina se încarcă...
Pagina se încarcă...
Pagina se încarcă...
Pagina se încarcă...
Pagina se încarcă...
Pagina se încarcă...
Pagina se încarcă...
Pagina se încarcă...
Pagina se încarcă...
Pagina se încarcă...
Pagina se încarcă...
Pagina se încarcă...
Pagina se încarcă...
Pagina se încarcă...
Pagina se încarcă...
Pagina se încarcă...
Pagina se încarcă...
Pagina se încarcă...
Pagina se încarcă...
Pagina se încarcă...
Pagina se încarcă...
Pagina se încarcă...
Pagina se încarcă...
Pagina se încarcă...
Pagina se încarcă...
Pagina se încarcă...
Pagina se încarcă...
Pagina se încarcă...
Pagina se încarcă...
Pagina se încarcă...
Pagina se încarcă...
Pagina se încarcă...
Pagina se încarcă...
Pagina se încarcă...
Pagina se încarcă...
Pagina se încarcă...
Pagina se încarcă...
Pagina se încarcă...
Pagina se încarcă...
Pagina se încarcă...
Pagina se încarcă...
Pagina se încarcă...
Pagina se încarcă...
Pagina se încarcă...
Pagina se încarcă...
Pagina se încarcă...
Pagina se încarcă...
Pagina se încarcă...
Pagina se încarcă...
Pagina se încarcă...
Pagina se încarcă...
Pagina se încarcă...
Pagina se încarcă...
Pagina se încarcă...
Pagina se încarcă...
Pagina se încarcă...
Pagina se încarcă...
Pagina se încarcă...
Pagina se încarcă...
Pagina se încarcă...
Pagina se încarcă...
-
 1
1
-
 2
2
-
 3
3
-
 4
4
-
 5
5
-
 6
6
-
 7
7
-
 8
8
-
 9
9
-
 10
10
-
 11
11
-
 12
12
-
 13
13
-
 14
14
-
 15
15
-
 16
16
-
 17
17
-
 18
18
-
 19
19
-
 20
20
-
 21
21
-
 22
22
-
 23
23
-
 24
24
-
 25
25
-
 26
26
-
 27
27
-
 28
28
-
 29
29
-
 30
30
-
 31
31
-
 32
32
-
 33
33
-
 34
34
-
 35
35
-
 36
36
-
 37
37
-
 38
38
-
 39
39
-
 40
40
-
 41
41
-
 42
42
-
 43
43
-
 44
44
-
 45
45
-
 46
46
-
 47
47
-
 48
48
-
 49
49
-
 50
50
-
 51
51
-
 52
52
-
 53
53
-
 54
54
-
 55
55
-
 56
56
-
 57
57
-
 58
58
-
 59
59
-
 60
60
-
 61
61
-
 62
62
-
 63
63
-
 64
64
-
 65
65
-
 66
66
-
 67
67
-
 68
68
-
 69
69
-
 70
70
-
 71
71
-
 72
72
-
 73
73
-
 74
74
-
 75
75
-
 76
76
-
 77
77
-
 78
78
-
 79
79
-
 80
80
-
 81
81
-
 82
82
-
 83
83
-
 84
84
-
 85
85
-
 86
86
-
 87
87
-
 88
88
-
 89
89
-
 90
90
-
 91
91
-
 92
92
-
 93
93
-
 94
94
-
 95
95
-
 96
96
-
 97
97
-
 98
98
-
 99
99
-
 100
100
-
 101
101
-
 102
102
-
 103
103
-
 104
104
-
 105
105
-
 106
106
-
 107
107
-
 108
108
-
 109
109
-
 110
110
-
 111
111
-
 112
112
-
 113
113
-
 114
114
-
 115
115
-
 116
116
-
 117
117
-
 118
118
-
 119
119
-
 120
120
-
 121
121
-
 122
122
-
 123
123
-
 124
124
-
 125
125
-
 126
126
-
 127
127
-
 128
128
-
 129
129
-
 130
130
-
 131
131
-
 132
132
-
 133
133
-
 134
134
-
 135
135
-
 136
136
-
 137
137
-
 138
138
-
 139
139
-
 140
140
-
 141
141
-
 142
142
-
 143
143
-
 144
144
-
 145
145
-
 146
146
-
 147
147
-
 148
148
-
 149
149
-
 150
150
-
 151
151
-
 152
152
-
 153
153
-
 154
154
-
 155
155
-
 156
156
-
 157
157
-
 158
158
-
 159
159
-
 160
160
-
 161
161
-
 162
162
-
 163
163
-
 164
164


Alte documente
-
Kärcher NT 30-1 Tact L Manual de utilizare
-
-
Flex VC 35 L MC Manual de utilizare
-
-
-
-
-
-
Milwaukee AS-30 LAC Manual de utilizare
-
Kärcher KRCHER IVM 40 Vacuum Cleaner Manual de utilizare