Makita UP100D Manual de utilizare
- Categorie
- Unelte electrice
- Tip
- Manual de utilizare

UP100D
EN Cordless Pruning Shears INSTRUCTION MANUAL 7
SL Akumulatorske škarje za
obrezovanje NAVODILA ZA UPORABO 15
SQ Gërshërë krasitëse, me bateri MANUALI I PËRDORIMIT 24
BG Акумулаторни овощарски
ножици РЪКОВОДСТВО ЗА
ЕКСПЛОАТАЦИЯ 33
HR Bežične škare za obrezivanje PRIRUČNIK S UPUTAMA 43
МК Безжични ножици за
кастрење УПАТСТВО ЗА УПОТРЕБА 52
SR Акумулаторске маказе за
орезивање УПУТСТВО ЗА УПОТРЕБУ 62
RO Foarfecă de grădină fără r MANUAL DE INSTRUCŢIUNI 71
UK Акумуляторні ножиці для
підрізання гілок ІНСТРУКЦІЯ З
ЕКСПЛУАТАЦІЇ 80
RU Аккумуляторный секатор РУКОВОДСТВО ПО
ЭКСПЛУАТАЦИИ 90

2
1
1
2
34
56
Fig.1
1
23
Fig.2
1
2
Fig.3
1
2
Fig.4
1
2
Fig.5
1
2
Fig.6
13
2
Fig.7
1
2
Fig.8

3
1
Fig.9
1
Fig.10
1
2
3
4
Fig.11
1
3
2
4
Fig.12
1
Fig.13
1
Fig.14
1
2
Fig.15
1
Fig.16

4
Fig.17
1
Fig.18
Fig.19
Fig.20
Fig.21
Fig.22
Fig.23
1
Fig.24

5
Fig.25
1
Fig.26
1
Fig.27
1
Fig.28
Fig.29
1
Fig.30
1
2
Fig.31
1
Fig.32

6
12
Fig.33
1
Fig.34

7ENGLISH
ENGLISH (Original instructions)
SPECIFICATIONS
Model: UP100D
Max. cutting capacity 25 mm
Overall length
(Without battery) 259 mm
Rated voltage D.C. 10.8 V - 12 V max
Net weight *1 0.68 kg
*2 0.89 - 1.1 kg
• Duetoourcontinuingprogramofresearchanddevelopment,thespecicationshereinaresubjecttochange
without notice.
• Specicationsmaydierfromcountrytocountry.
*1: Weight without the battery and holster.
*2:Thelightestandheaviestcombinationofweight,accordingtoEPTA-Procedure01/2014.Theweightmaydier
depending on the attachment(s), including the battery cartridge(s).
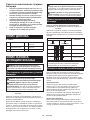
Applicable battery cartridge and charger
Battery cartridge BL1016 / BL1021B / BL1041B
Charger DC10SA / DC10SB / DC10WC / DC10WD / DC18RE
• Some of the battery cartridges and chargers listed above may not be available depending on your region of
residence.
WARNING: Only use the battery cartridges and chargers listed above. Use of any other battery cartridges
andchargersmaycauseinjuryand/orre.
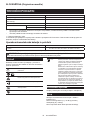
Symbols
The followings show the symbols which may be used
for the equipment. Be sure that you understand their
meaning before use.
Take particular care and attention.
Read instruction manual.
Danger;beawareofthrownobjects.
Keep bystanders away.
DANGER - Keep hands away from blade.
Do not expose to moisture.
Ni-MH
Li-ion Only for EU countries
Due to the presence of hazardous com-
ponents in the equipment, waste electrical
and electronic equipment, accumulators
and batteries may have a negative impact
on the environment and human health.
Do not dispose of electrical and electronic
appliances or batteries with household
waste!
In accordance with the European Directive
on waste electrical and electronic equip-
ment and on accumulators and batteries
and waste accumulators and batteries,
as well as their adaptation to national law,
waste electrical equipment, batteries and
accumulators should be stored separately
and delivered to a separate collection point
for municipal waste, operating in accor-
dance with the regulations on environmen-
tal protection.
This is indicated by the symbol of the
crossed-out wheeled bin placed on the
equipment.
Intended use
The tool is intended for pruning twigs or branches.
Noise
The typical A-weighted noise level determined accord-
ing to EN62841-4-5:
Sound pressure level (LpA) : 70 dB(A) or less
Uncertainty (K) : 3 dB (A)
The noise level under working may exceed 80 dB (A).

8ENGLISH
NOTE:
The declared noise emission value(s) has been
measured in accordance with a standard test method
and may be used for comparing one tool with another.
NOTE:
The declared noise emission value(s) may
also be used in a preliminary assessment of exposure.
WARNING: Wear ear protection.
WARNING: The noise emission during actual
use of the power tool can dier from the declared
value(s) depending on the ways in which the
tool is used especially what kind of workpiece is
processed.
WARNING: Be sure to identify safety mea-
sures to protect the operator that are based on an
estimation of exposure in the actual conditions of
use (taking account of all parts of the operating
cycle such as the times when the tool is switched
o and when it is running idle in addition to the
trigger time).
Vibration
The vibration total value (tri-axial vector sum) deter-
mined according to EN62841-4-5:
Vibration emission (ah) : 2.5 m/s2 or less
Uncertainty (K) : 1.5 m/s2
NOTE: The declared vibration total value(s) has been
measured in accordance with a standard test method
and may be used for comparing one tool with another.
NOTE: The declared vibration total value(s) may also
be used in a preliminary assessment of exposure.
WARNING: The vibration emission during
actual use of the power tool can dier from the
declared value(s) depending on the ways in which
the tool is used especially what kind of workpiece
is processed.
WARNING: Be sure to identify safety mea-
sures to protect the operator that are based on an
estimation of exposure in the actual conditions of
use (taking account of all parts of the operating
cycle such as the times when the tool is switched
o and when it is running idle in addition to the
trigger time).
Declarations of Conformity
For European countries only
The Declarations of conformity are included in Annex A
to this instruction manual.
SAFETY WARNINGS
General power tool safety warnings
WARNING Read all safety warnings, instruc-
tions, illustrations and specications provided with
this power tool. Failure to follow all instructions listed
belowmayresultinelectricshock,reand/orserious
injury.
Save all warnings and instruc-
tions for future reference.
The term "power tool" in the warnings refers to your
mains-operated (corded) power tool or battery-operated
(cordless) power tool.
Pruning shears safety warnings
1. Do not use the pruning shear in bad weather
conditions, especially when there is a risk of
lightning. This decreases the risk of being struck
by lightning.
2. Keep all power cords and cables away from
cutting area. Power cords or cables may be
hidden and can be accidentally cut by the blade.
3. Hold the pruning shear by insulated gripping
surfaces only, because the blade may contact
hidden wiring. Blades contacting a "live" wire
may make exposed metal parts of the pruning
shear "live" and could give the operator an electric
shock.
4. Keep all parts of the body away from the blade.
Do not remove cut material or hold material to
be cut when blades are moving.
5. When clearing jammed material or servicing
the pruning shear, make sure the power switch
is o and the battery pack is removed or dis-
connected. Unexpected actuation of the pruning
shearwhileclearingjammedmaterialorservicing
mayresultinseriouspersonalinjury.
6. Carry the pruning shear by the handle with the
blade stopped and taking care not to operate
the power switch. Proper carrying of the pruning
shear will decrease the risk of inadvertent starting
andresultantpersonalinjuryfromtheblades.
7. Check the hedges and bushes for foreign
objects, such as wire fences or hidden wiring
before operating the tool.
8. Hold the tool rmly when using the tool.
9. The tool is intended to be used by the operator
at ground level. Do not use the tool on ladders
or any other unstable support.
Additional Safety Instructions
1. Use personal protective equipment. Always
wear eye protection. Protective equipment such
as a dust mask, non-skid safety shoes, hard hat or
hearing protection used for appropriate conditions
willreducepersonalinjuries.
2. This tool is for pruning branches. Do not use it
foranyjobexceptthatforwhichitisintended.
3. Never allow children, persons with reduced
physical, sensory or mental capabilities or
lack of experience and knowledge or people
unfamiliar with these instructions to use the
tool. Local regulations may restrict the age of
the operator.
4. Children should be supervised to ensure that
they do not play with the appliance.
5. Never operate the tool while people, especially
children, or pets are nearby.
6. Do not overreach and keep balance at all
times. Always be sure of footing on slopes and to
walk, never run.

9ENGLISH
7. Do not touch moving hazardous parts before
the tool is disconnected from the mains and/or
the battery pack is removed from the tool.
8. Always wear substantial footwear and long
trousers while operating the tool.
9. Disconnect the supply and/or remove the
battery pack from the tool:
• whenever the tool is left by the user,
• before clearing a blockage,
• before checking, cleaning or working on the
tool,
• afterstrikingaforeignobjecttoinspectthe
tool for damage,
• if the tool starts to vibrate abnormally, for
immediately check.
10. Never operate the tool with defective guards
or shields, or without safety devices, or if the
cord is damaged or worn.
11. Avoid using the tool in bad weather conditions
especially when there is a risk of lightning.
12. Don’t use the tool or perform battery charging
operations in the rain.
13. Don’t leave the tool in rain or wet locations.
14. Be careful not to catch foreign matter between
the shear blades.Iftheshearbladesarejammed
withforeignmatter,immediatelyswitchothetool
and disconnect the battery from the tool. Then
remove the foreign matter from the shear blades.
15. Never hold the branch you are pruning with
your free hand. Keep your free hand away from
the cutting area. Never touch the shear blades,
they are very sharp and you may cut yourself.
16. Don’t force the tool to make it cut. You could
slipandinjureyourselforcutsomethingelse
unintentionally.
17.
Avoid cutting electrical wires that may be hidden.
18. Always check the shear blades carefully
before operation.
19. Handle the shear blades with extreme care to
prevent cuts or injury from the shear blades.
20. Disconnect the battery from the tool after each
use and before attempting to perform inspec-
tion or maintenance.
21. When not in use, always keep the tool in its
holster.
Battery tool use and care
1. Avoid dangerous environment. Don't use the
tool in damp or wet locations or expose it to
rain. Water entering the tool will increase the
risk of electric shock.
2. Recharge only with the charger specied by
the manufacturer. A charger that is suitable for
onetypeofbatterypackmaycreateariskofre
when used with another battery pack.
3. Use power tools only with specically desig-
nated battery packs. Use of any other battery
packsmaycreateariskofinjuryandre.
4. When battery pack is not in use, keep it away
from other metal objects, like paper clips,
coins, keys, nails, screws or other small metal
objects, that can make a connection from one
terminal to another. Shorting the battery termi-
nalstogethermaycauseburnsorare.
5. Under abusive conditions, liquid may be
ejected from the battery; avoid contact. If con-
tact accidentally occurs, ush with water. If
liquid contacts eyes, additionally seek medical
help.Liquidejectedfromthebatterymaycause
irritation or burns.
6. Do not dispose of the battery(ies) in a re. The
cell may explode. Check with local codes for
possible special disposal instructions.
7. Do not open or mutilate the battery(ies).
Released electrolyte is corrosive and may
cause damage to the eyes or skin. It may be
toxic if swallowed.
8.
Do not charge battery in rain, or in wet locations.
Service
1.
Have your power tool serviced by a qualied repair
person using only identical replacement parts. This
will ensure that the safety of the power tool is maintained.
2. Follow instruction for lubricating and chang-
ing accessories.
3. Keep handles dry, clean and free from oil and
grease.
WARNING: DO NOT let comfort or familiarity
with product (gained from repeated use) replace
strict adherence to safety rules for the subject
product. MISUSE or failure to follow the safety
rules stated in this instruction manual may cause
serious personal injury.
SAVE THESE INSTRUCTIONS.
WARNING: DO NOT let comfort or familiarity
with product (gained from repeated use) replace
strict adherence to safety rules for the subject
product. MISUSE or failure to follow the safety
rules stated in this instruction manual may cause
serious personal injury.
Important safety instructions for
battery cartridge
1.
Before using battery cartridge, read all instruc-
tions and cautionary markings on (1) battery char-
ger, (2) battery, and (3) product using battery.
2. Do not disassemble or tamper with the battery
cartridge.Itmayresultinare,excessiveheat,
or explosion.
3. If operating time has become excessively
shorter, stop operating immediately. It may
result in a risk of overheating, possible burns
and even an explosion.
4. If electrolyte gets into your eyes, rinse them
out with clear water and seek medical atten-
tion right away. It may result in loss of your
eyesight.
5. Do not short the battery cartridge:
(1) Do not touch the terminals with any con-
ductive material.
(2) Avoid storing battery cartridge in a con-
tainer with other metal objects such as
nails, coins, etc.
(3) Do not expose battery cartridge to water
or rain.

10 ENGLISH
A battery short can cause a large current
ow, overheating, possible burns and even a
breakdown.
6. Do not store and use the tool and battery car-
tridge in locations where the temperature may
reach or exceed 50 °C (122 °F).
7. Do not incinerate the battery cartridge even if
it is severely damaged or is completely worn
out. The battery cartridge can explode in a re.
8. Do not nail, cut, crush, throw, drop the battery
cartridge, or hit against a hard object to the
battery cartridge. Such conduct may result in a
re,excessiveheat,orexplosion.
9. Do not use a damaged battery.
10. The contained lithium-ion batteries are subject
to the Dangerous Goods Legislation require-
ments.
For commercial transports e.g. by third parties,
forwarding agents, special requirement on pack-
aging and labeling must be observed.
For preparation of the item being shipped, consult-
ing an expert for hazardous material is required.
Please also observe possibly more detailed
national regulations.
Tapeormaskoopencontactsandpackupthe
battery in such a manner that it cannot move
around in the packaging.
11. When disposing the battery cartridge, remove
it from the tool and dispose of it in a safe
place. Follow your local regulations relating to
disposal of battery.
12. Use the batteries only with the products
specied by Makita. Installing the batteries to
non-compliantproductsmayresultinare,exces-
sive heat, explosion, or leak of electrolyte.
13. If the tool is not used for a long period of time,
the battery must be removed from the tool.
14. During and after use, the battery cartridge may
take on heat which can cause burns or low
temperature burns. Pay attention to the han-
dling of hot battery cartridges.
15. Do not touch the terminal of the tool imme-
diately after use as it may get hot enough to
cause burns.
16. Do not allow chips, dust, or soil stuck into the
terminals, holes, and grooves of the battery
cartridge.Itmaycauseheating,catchingre,
burst and malfunction of the tool or battery car-
tridge,resultinginburnsorpersonalinjury.
17. Unless the tool supports the use near
high-voltage electrical power lines, do not use
the battery cartridge near high-voltage electri-
cal power lines. It may result in a malfunction or
breakdown of the tool or battery cartridge.
18. Keep the battery away from children.
SAVE THESE INSTRUCTIONS.
CAUTION: Only use genuine Makita batteries.
Use of non-genuine Makita batteries, or batteries that
have been altered, may result in the battery bursting
causingres,personalinjuryanddamage.Itwill
also void the Makita warranty for the Makita tool and
charger.
Tips for maintaining maximum
battery life
1.
Charge the battery cartridge before completely dis-
charged. Always stop tool operation and charge the
battery cartridge when you notice less tool power.
2.
Never recharge a fully charged battery cartridge.
Overcharging shortens the battery service life.
3.
Charge the battery cartridge with room tempera-
ture at 10 °C - 40 °C (50 °F - 104 °F). Let a hot
battery cartridge cool down before charging it.
4. When not using the battery cartridge, remove
it from the tool or the charger.
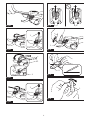
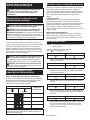
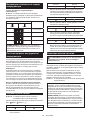
PARTS DESCRIPTION
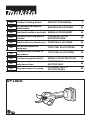
►Fig.1
1Shear blade 2Indicator lamp
3Angleadjustment
button 4Main power button
5Battery cartridge 6Switch trigger
FUNCTIONAL DESCRIPTION
CAUTION: Always be sure that the tool is
switched o and the battery cartridge is removed
before adjusting or checking function on the tool.
Installing or removing battery
cartridge
CAUTION: Always switch o the tool before
installing or removing of the battery cartridge.
CAUTION: Hold the tool and the battery car-
tridge rmly when installing or removing battery
cartridge. Failure to hold the tool and the battery
cartridgermlymaycausethemtoslipoyourhands
and result in damage to the tool and battery cartridge
andapersonalinjury.
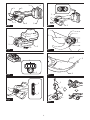
►Fig.2: 1. Red indicator 2. Button 3. Battery cartridge
To remove the battery cartridge, slide it from the tool
while sliding the button on the front of the cartridge.
To install the battery cartridge, align the tongue on the
battery cartridge with the groove in the housing and slip
it into place. Insert it all the way until it locks in place
with a little click. If you can see the red indicator as
showninthegure,itisnotlockedcompletely.
CAUTION: Always install the battery cartridge
fully until the red indicator cannot be seen. If not,
itmayaccidentallyfalloutofthetool,causinginjuryto
you or someone around you.
CAUTION: Do not install the battery cartridge
forcibly. If the cartridge does not slide in easily, it is
not being inserted correctly.

11 ENGLISH
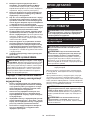
Indicating the remaining battery
capacity
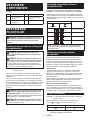
Only for battery cartridges with the indicator
►Fig.3: 1. Indicator lamps 2. Check button
Press the check button on the battery cartridge to indi-
cate the remaining battery capacity. The indicator lamps
light up for a few seconds.
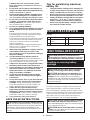
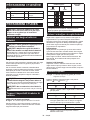
Indicator lamps Remaining
capacity
Lighted O
75% to 100%
50% to 75%
25% to 50%
0% to 25%
NOTE: Depending on the conditions of use and the
ambienttemperature,theindicationmaydierslightly
from the actual capacity.
Tool / battery protection system
The tool is equipped with a tool/battery protection sys-
tem.Thissystemautomaticallycutsopowertothe
motor to extend tool and battery life. The tool will auto-
matically stop during operation if the tool or battery is
placed under one of the following conditions:
Overloaded:
The tool is operated in a manner that causes it to draw
an abnormally high current. In this situation, turn the
tooloandstoptheapplicationthatcausedthetoolto
become overloaded. Then turn the tool on to restart.
If the tool does not start, the battery is overheated. In this
situation, let the battery cool before turning the tool on again.
Low battery voltage:
The remaining battery capacity is too low and the tool
will not operate. If you turn the tool on, the motor runs
again but stops soon. In this situation, remove and
recharge the battery.
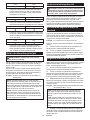
Indicator lamps
►Fig.4:
1. Indicator lamp (green) 2. Indicator lamp (red)
The meaning of indicator lamps is as follows:
(On: O: Blinking: )
Green Red
• Green lamp lights up: the tool is turned on and
ready to operate.
Green Red
• Green lamp is blinking: the tool is turned on and in
the standby mode. To return to the normal mode,
pull the switch trigger twice.
Green Red
• Red lamp is blinking: the remaining battery capac-
ity is low.
Green Red
• Green lamp and red lamp light up: the tool or
battery is overheated, or the tool is overloaded, or
the battery runs out.
Green Red
• Red lamp lights up: An abnormality has occurred.
Turnothetool,andthenbackon.Iftheabnor-
mality persists, ask your local authorized service
center for repair.
Main power button
WARNING: Always turn o the tool when not
in use.
To turn on the tool, press and hold the main power
button. The tool starts up in the standby mode and the
green indicator lamp blinks in green.
Toturnothetool,pullandholdtheswitchtriggermore
than 3 seconds to close the shear blades, then release
the switch trigger, and then press the main power
button.
►Fig.5: 1. Main power button 2. Switch trigger
NOTE: This tool shifts to the standby mode when the
switch trigger is not pulled for a certain period after
the tool is turned on. When the green indicator lamp
is blinking, pull the switch trigger twice to return to the
normal mode.
NOTE:Thistoolemploystheautopower-ofunction.
To avoid unintentional start up, the tool automatically
shuts down when the switch trigger is not pulled for a
certain period after the tool is turned on.
Switch action
CAUTION: Before installing the battery car-
tridge into the tool, always check to see that the
switch trigger actuates properly and returns to
the "OFF" position when released.
Turn on the tool, and pull the switch trigger twice to
open the upper shear blade. The green indicator lamp
lights up in green. When you pull the switch trigger, the
upper shear blade closes, and when you release the
switch trigger, the upper shear blade opens.

12 ENGLISH
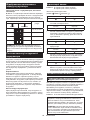
Switching the shear blade angle
The opening angle of the shear blades can be set in two
levels. You can switch the opening angle between fully
open and half-open according to the branches to be cut.
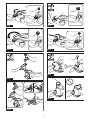
►Fig.6: 1. Fully open 2. Half-open
To switch the opening angle, follow the steps below.
1. Turn on the tool and pull the switch trigger twice to
open the shear blades.
2. While pulling the switch trigger fully, press and
holdtheangleadjustmentbuttonuntilthegreenindica-
tor lamp blinks twice.
Cutting depth adjustment
Aftergrindingorreplacingtheshearblade,adjustthe
cuttingdepth.Toadjustthecuttingdepth,followthe
steps below.
1. Turn on the tool and pull the switch trigger twice to
open the shear blades.
2. While pulling the switch trigger fully, press and
holdtheangleadjustmentbuttonforafewsecondsuntil
the green indicator lamp blinks fast.
3. Adjustthecuttingdepthbypullingtheswitch
trigger repeatedly so that the overlap of the tips of the
upper and lower shear blades is 1 to 3 mm.
►Fig.7: (1) Upper shear blade (2) Lower shear blade
(3) 1 - 3 mm
NOTE: The upper blade returns to the shallowest
position when you pull the switch trigger after the
upper blade reaches the deepest position.
NOTE:Ifthetoolisoverloadedwhileadjustingthe
cuttingdepthadjustment,thegreenlampblinksand
redlamplightsup.Inthiscase,turnothetool,then
removethecauseoftheoverload,andthenadjustthe
cutting depth again.
4. Pressandholdtheangleadjustmentbuttonto
completetheadjustment.Thegreenindicatorlamp
stops blinking, and lights up.
ASSEMBLY
CAUTION: Always be sure that the tool is
switched o and the battery cartridge is removed
before carrying out any work on the tool.
CAUTION: When replacing the shear blades,
always wear gloves so that your hands do not
directly contact the blades.
Removing or installing the shear blades
1. Loosen the bolts with the hex wrench, then slide
the cover slightly and remove the bolts and cover, and
then turn over the tool.
►Fig.8: 1. Bolt 2. Cover
2. Loosen the bolt with the hex wrench, and then
remove it.
►Fig.9: 1. Bolt
NOTICE: Do not loosen the nut before loosening
the bolt. Otherwise, the nut may be damaged.
3. Loosen the nut with the box wrench, and then
remove it.
►Fig.10: 1. Nut
4. Turn over the tool, and then remove the bolt, blade
holder, upper shear blade, and lower shear blade in
order.
►Fig.11: 1. Bolt 2. Blade holder 3. Upper shear blade
4. Lower shear blade
5. Attach the lower shear blade, upper shear blade,
blade holder, and bolt to the tool in order.
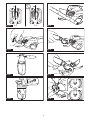
►Fig.12: 1. Bolt 2. Blade holder 3. Upper shear blade
4. Lower shear blade
NOTICE: When attaching the upper shear blade,
make sure that the upper shear blade is placed in
the direction shown in the gure.
6. Turn over the tool, and then attach the nut to the
tool and tighten it manually.
►Fig.13: 1. Nut
NOTICE: The recommended tightening torque is
approximately 0.5 N•m.
7. Attach the bolt to the tool and tighten it with the
hex wrench.
►Fig.14: 1. Bolt
8. Turn over the tool, then attach the cover to the
tool, and then tighten the bolts with the hex wrench.
►Fig.15: 1. Bolt 2. Cover
NOTICE: Tighten the bolts with the hex wrench
in the upright position as shown in the gure.
Tightening the bolts too much may damage the bolts.
►Fig.16: 1. Hex wrench
After installing the shear blades, check the clearance
ofshearbladesbyconrmingthefollowingpoints.If
theclearanceisnotproper,adjustitbyreferringtothe
sectionforadjustmentforshearbladesclearance.
• Check that there is no gap between the upper
shear blade and lower shear blade.
►Fig.17
• Check that the upper shear blade moves approxi-
mately 3 mm toward the lower shear blade.
►Fig.18: 1. Upper shear blade
After installing the shear blades, apply oil to the shear
blades by referring to the section for shear blade
maintenance.
Afterinstallingtheshearblades,adjustthecutting
depth by referring to the section for cutting depth
adjustment.

13 ENGLISH
OPERATION
CAUTION: Always hold the tool rmly. And
keep rm footing.
CAUTION: Do not put any of your body parts
near the shear blades during operation.
CAUTION: Before use, inspect if the shear
blades, blade bolts or other parts are not worn or
damaged. Replace worn or damaged parts for safe
operation.
NOTICE:
If the shear blades are stuck in a branch
during operation, do not twist the tool. Release
the switch trigger and turn o the tool, and then
pull the shear blades straight out slowly from the
branch. Otherwise the shear blades may be damaged.
NOTICE:
In case you cut too thick branch or
something too hard, the overload protection works
and the tool stops. In this case, release the switch
trigger and turn o the tool, and then pull the shear
blades straight out slowly from the branch.
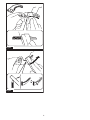
Using the holster
Pass the belt through the opening of the holster as
showninthegure,andthenputontheholster.
►Fig.19
Insertthetoolintotheholster.Youcanxthetoolwith
the strap. Before inserting the tool into the holster, close
the upper shear blade by pulling the switch trigger more
than3seconds,andturnothetool.
►Fig.20
Pruning operation
►Fig.21
Maintain your proper footing and balance at all times
and cut branches one by one. The maximum thickness
of branches which can be cut with the tool is approxi-
mately 25 mm.
MAINTENANCE
CAUTION: Always be sure that the tool is
switched o and the battery cartridge is removed
before attempting to perform inspection or
maintenance.
CAUTION: Wear safety gloves when handling
the shear blade. Otherwise it may result in personal
injury.
NOTICE: Never use gasoline, benzine, thinner,
alcohol or the like. Discoloration, deformation or
cracks may result.
To maintain product SAFETY and RELIABILITY,
repairs,anyothermaintenanceoradjustmentshould
be performed by Makita Authorized or Factory Service
Centers, always using Makita replacement parts.
Shear blade maintenance
NOTICE: Failure to perform blade maintenance
may cause excessive blade friction and shorten
the operating time per battery charge.
Before the operation or once per hour during operation,
apply low-viscosity oil (machine oil, or spray-type lubri-
cating oil) to the shear blades.
►Fig.22
►Fig.23
Apply oil through the lubrication hole by pressing the
hole with the tip of the oil bottle.
►Fig.24: 1. Lubrication hole
After the operation, remove dust from the shear blades
withawiredbrush,wipethemowithaclothandthen
apply low-viscosity oil (machine oil, or spray-type lubri-
cating oil) to the shear blades.
►Fig.25
Adjustment for shear blades
clearance
NOTICE: Adjust the clearance of shear blades
properly. Too loose clearance may result in dull
cut, and too tight blade clearance may result in
overload for the motor and short running time of
the tool.
Adjusttheclearanceofshearbladesasfollows:
1. Loosen the bolt with the hex wrench, and then
remove it.
►Fig.26: 1. Bolt
NOTICE: Do not loosen the nut before loosening
the bolt. Otherwise, the nut may be damaged.
2. Loosen the nut with the box wrench, and then
tighten it manually.
►Fig.27: 1. Nut
NOTICE: The recommended tightening torque is
approximately 0.5 N•m.
3. Attach the bolt to the tool and tighten it with the
hex wrench.
►Fig.28: 1. Bolt
4. Check that there is no gap between the upper
shear blade and lower shear blade.
►Fig.29
Check that the upper shear blade moves approximately
3 mm toward the lower shear blade.
►Fig.30: 1. Upper shear blade
Grinding the shear blades
NOTE: When grinding the shear blades, adding water
to the grinding stone will make the grinding smoother.
Afterthegrinding,besuretowipeotheshear
blades with a dry cloth.
Turnothetoolandremovethebatterycartridge,and
remove the shear blades from the tool.

14 ENGLISH
Upper shear blade
1. Grind the upper shear blade with the grinding
stoneasshowninthegure.
►Fig.31: 1. Upper shear blade 2. Grinding stone
2. Remove the burrs from the back side of the shear
blade by lightly applying the grinding stone to the shear
blade.
►Fig.32: 1. Grinding stone
NOTICE: When sharpening the back side of
shear blade, lightly apply the grinding stone,
and do not sharpen the shear blade too much.
Otherwise, the clearance may become too much, or
the life of shear blade may be shortened.
• Afterinstallingtheshearblades,adjusttheclear-
ance of shear blades by referring to the section for
adjustmentforshearbladesclearance.
• After installing the shear blades, apply oil to the
shear blades by referring to the section for shear
blade maintenance.
• Afterinstallingtheshearblades,adjustthecutting
depth by referring to the section for cutting depth
adjustment.
Lower shear blade
1. Grind the lower shear blade with the grinding
stone in the direction of the arrow as shown in the
gure.
►Fig.33: 1. Grinding stone 2. Lower shear blade
2. Remove the burrs from the back side of the shear
blade by lightly applying the grinding stone to the shear
blade.
►Fig.34: 1. Grinding stone
NOTICE: When sharpening the back side of
shear blade, lightly apply the grinding stone,
and do not sharpen the shear blade too much.
Otherwise, the clearance may become too much, or
the life of shear blade may be shortened.
• Afterinstallingtheshearblades,adjusttheclear-
ance of shear blades by referring to the section for
adjustmentforshearbladesclearance.
• After installing the shear blades, apply oil to the
shear blades by referring to the section for shear
blade maintenance.
• Afterinstallingtheshearblades,adjustthecutting
depth by referring to the section for cutting depth
adjustment.
TROUBLESHOOTING
Beforeaskingforrepairs,conductyourowninspectionrst.Ifyoundaproblemthatisnotexplainedinthemanual,
do not attempt to dismantle the tool. Instead, ask Makita Authorized Service Centers, always using Makita replace-
ment parts for repairs.
State of abnormality Probable cause (malfunction) Remedy
The shear blade does not move even
after pulling the switch trigger. The battery is low. Charge the battery.
Thetoolisturnedo. Turn on the tool.
Switch trigger defect. Stop using the tool immediately, and ask your local
authorized service center for repair.
The shear blades are stuck on the
branch. The branch is too thick or too hard. Releasetheswitchtriggerandturnothetool.
Then pull the shear blades straight out slowly from
the branch.
The cut is not smooth. The shear blades are dull. Sharpentheshearblades,andadjusttheblade
clearance,andperformcuttingdepthadjustment.
The shear blades are worn out. Replace the shear blades.
OPTIONAL ACCESSORIES
CAUTION: These accessories or attachments
are recommended for use with your Makita tool
specied in this manual. The use of any other
accessories or attachments might present a risk of
injurytopersons.Onlyuseaccessoryorattachment
for its stated purpose.
If you need any assistance for more details regard-
ing these accessories, ask your local Makita Service
Center.
• Upper shear blade
• Lower shear blade
• Grinding stone
• Makita genuine battery and charger
NOTE: Some items in the list may be included in the
tool package as standard accessories. They may
dierfromcountrytocountry.

15 SLOVENŠČINA
SLOVENŠČINA (Originalna navodila)
TEHNIČNI PODATKI
Model: UP100D
Največjazmogljivostrezanja 25 mm
Celotnadolžina
(Brezbaterije) 259 mm
Nazivna napetost D.C. 10,8 V – 12 V
Netoteža *1 0,68 kg
*2 0,89 – 1,1 kg
• Kernenehnoopravljamoraziskaveinrazvijamosvojeizdelke,selahkotehničnipodatkivtemdokumentu
spremenijobrezobvestila.
• Tehničnipodatkiselahkorazlikujejooddržavedodržave.
*1:Težabrezbaterijeintoka.
*2:KombinacijanajmanjšeinnajvečjeteževskladuspostopkomEPTA01/2014.Težaselahkorazlikujegledena
priključke,vključnozakumulatorskobaterijo.
Uporabna akumulatorska baterija in polnilnik
Baterijskivložek BL1016 / BL1021B / BL1041B
Polnilnik DC10SA / DC10SB / DC10WC / DC10WD / DC18RE
• Nekaterezgorajnavedeneakumulatorskebaterijeinpolnilnikimordavvašidržaviprebivališčanisonavoljo.
OPOZORILO: Uporabljajte le zgoraj navedene akumulatorske baterije in polnilnike. Uporaba drugih
akumulatorskihbaterijinpolnilnikovlahkopovzročitelesnepoškodbein/alipožar.
Simboli
Naslednjisimboliselahkouporabljajovpovezavis
strojem.Preduporaboizdelkaseobveznoseznanitez
njihovimpomenom.
Potrebnajeposebnapozornostin
previdnost.
Preberite navodila za uporabo.
Nevarnost;paziteseletečihpredmetov.
Nedovoliteosebam,dasepribližajo.
NEVARNOST–zrokaminesegajtev
območjerezila.
Neizpostavljajtevlagi.
Ni-MH
Li-ion SamozadržaveEU
Zaradi prisotnosti nevarnih komponent v
opremiimajolahkouporabljenaelektrična
inelektronskaoprema,akumulatorjiin
baterijenegativenvplivnaokoljeinzdravje
ljudi.
Električnihinelektronskihnapravalibaterij
neodlagajtemedgospodinjskeodpadke!
Skladno z evropsko Direktivo o odpadni
električniinelektronskiopremi,oakumula-
torjihinbaterijahterodpadnihakumulator-
jihinbaterijahternjenouporabovdržavnih
zakonihmoraterabljenoelektričnoin
elektronskoopremo,baterijeinakumula-
torjezbiratiločenoterdostavitinaposebno
zbiralno mesto za komunalne odpadke, ki
delujeskladnospredpisizazaščitookolja.
Tonakazujesimbolprečrtanegasmetnjaka
skolesi,kijenatisnjennaopremi.
Predvidena uporaba
Orodjejenamenjenozarezanjevečjihinmanjšihvej.
Hrup
ObičajnaA-ovrednotenaravenhrupavskladuz
EN62841-4-5:
Ravenzvočnegatlaka(LpA):70dB(A)alimanj
Odstopanje(K):3dB(A)
Nivohrupameddelomlahkopreseže80dB(A).

16 SLOVENŠČINA
OPOMBA:Navedenevrednostioddajanjahrupaso
bileizmerjenevskladusstandardnimimetodami
testiranjainselahkouporabljajozaprimerjavoorodij.
OPOMBA:Navedenevrednostioddajanjahrupa
selahkouporabljajotudipripredhodnioceni
izpostavljenosti.
OPOZORILO: Uporabljajte zaščito za sluh.
OPOZORILO: Oddajanje hrupa med dejansko
uporabo električnega orodja se lahko razlikuje od
navedenih vrednosti, odvisno od načina uporabe
orodja in predvsem vrste obdelovanca.
OPOZORILO: Upravljavec mora za lastno
zaščito poznati varnostne ukrepe, ki temeljijo
na oceni izpostavljenosti v dejanskih pogojih
uporabe (poleg časa proženja je treba upoštevati
celoten delovni cikel, vključno s časom, ko je
orodje izklopljeno, in časom, ko deluje v prostem
teku).
Vibracije
Skupnevrednostivibracij(vektorskavsotatrehosi)v
skladu z EN62841-4-5:
Emisijevibracij(ah): 2,5 m/s2alimanj
Odstopanje(K):1,5m/s2
OPOMBA:Navedeneskupnevrednostioddajanja
vibracijsobileizmerjenevskladusstandardnimi
metodamitestiranjainselahkouporabljajozaprimer-
javoorodij.
OPOMBA:Navedeneskupnevrednostioddajanja
vibracijselahkouporabljajotudipripredhodnioceni
izpostavljenosti.
OPOZORILO: Oddajanje vibracij med
dejansko uporabo električnega orodja se lahko
razlikuje od navedenih vrednosti, odvisno
od načina uporabe orodja in predvsem vrste
obdelovanca.
OPOZORILO: Upravljavec mora za lastno
zaščito poznati varnostne ukrepe, ki temeljijo
na oceni izpostavljenosti v dejanskih pogojih
uporabe (poleg časa proženja je treba upoštevati
celoten delovni cikel, vključno s časom, ko je
orodje izklopljeno, in časom, ko deluje v prostem
teku).
Izjave o skladnosti
Samo za evropske države
IzjaveoskladnostisovključenevdodatkuAtehnavodil
za uporabo.
VARNOSTNA
OPOZORILA
Splošna varnostna opozorila za
električno orodje
OPOZORILO Preberite vsa varnostna opozorila
ter navodila s slikami in tehničnimi podatki, ki so
priloženi temu električnemu orodju.Obneupošteva-
njuspodajnavedenihnavodilobstajanevarnostelek-
tričnegaudara,požarain/alihudihtelesnihpoškodb.
Shranite vsa opozorila in navo-
dila za poznejšo uporabo.
Izraz„električnoorodje“vopozorilihsenanašanavaše
električnoorodje(skablom)alibaterijskoelektrično
orodje(brezkabla).
Varnostna opozorila za škarje za
obrezovanje
1. Škarij za obrezovanje ne uporabljajte ob sla-
bem vremenu, še posebej, kadar bliska. S tem
zmanjšatetveganje,davvasudaristrela.
2. Ne približujte napajalnih kablov območju
rezanja.Napajalnikablisolahkoskritiinjihlahko
rezilonenamernoprereže.
3. Škarje za obrezovanje držite samo na izoliranih
držalnih površinah, saj lahko rezilo prereže
skrito električno napeljavo. Ob stiku rezila z
vodnikipodnapetostjolahkodobijonapetostvsi
neizoliranikovinskideliškarijzaobrezovanje,
zaradičesarlahkouporabnikutrpielektričniudar.
4. Ne približujte delov telesa rezilu. Ne odstra-
njujte odrezanega materiala in ne držite
materiala, ki ga boste rezali, kadar se rezila
premikajo.
5. Pri odstranjevanju zagozdenega materiala ali
servisiranju škarij za obrezovanje poskrbite
za to, da je stikalo za vklop/izklop izključeno
in da je akumulatorska baterija odstranjena
ali odklopljena.Nepričakovanzagonškarijza
obrezovanjemedodstranjevanjemzagozdenega
materialaaliservisiranjemlahkopovzročihude
telesnepoškodbe.
6. Škarje za obrezovanje prenašajte z ročajem in
ustavljenim rezilom, pri tem pa pazite, da ne
pritisnete stikala za vklop/izklop. S pravilnim
prenašanjemškarijzaobrezovanjezmanjšate
tveganjezanenamerenzagon,kilahkopovzroči
telesnepoškodbezaradirezil.
7. Pred uporabo orodja preverite, da v živi meji
in grmičevju ni tujkov, kot so žične ograje ali
skrite žice.
8. Med uporabo trdno držite orodje.
9. Orodje je namenjeno uporabi na tleh. Orodja
ne uporabljajte na lestvah ali drugih nestabil-
nih oporah.

17 SLOVENŠČINA
Dodatna varnostna navodila
1. Uporabljajte osebno zaščitno opremo. Vedno
uporabljajte zaščito za oči.Uporabazašči-
tneopreme(npr.protiprašnamaska,nedrseči
zaščitničevlji,trdopokrivaloalizaščitazasluh)v
primernihpogojihbozmanjšalamožnosttelesnih
poškodb.
2. To orodje je namenjeno za obrezovanje vej. Ne
uporabljajtegazanobenoopravilorazentisto,za
katerojenamenjeno.
3. Nikoli ne dovolite uporabe orodja otrokom,
osebam z zmanjšanimi zičnimi, čutilnimi ali
psihičnimi sposobnostmi ter s pomanjkanjem
izkušenj in znanja ter osebam, ki niso sez-
nanjene s temi navodili za uporabo orodja.
Lokalni predpisi morda omejujejo starost
uporabnika naprave.
4. Otroke nadzorujte in jim preprečite igranje z
napravo.
5. Nikoli ne uporabljajte orodja v bližini ljudi,
zlasti otrok ali hišnih ljubljenčkov.
6. Ne segajte z orodjem predaleč stran in vedno
ohranjajte ravnotežje.Nanagnjenihpovršinah
moratevednobitipozorni,dastojitetrdnonatleh.
Meduporaboorodjanetecite,temvečhodite.
7. Ne dotikajte se premikajočih se nevarnih delov,
dokler orodja ne izklopite iz električne vtičnice
in/ali odstranite akumulatorsko baterijo.
8. Pri delu z orodjem vedno nosite kakovostno
obutev in dolge hlače.
9. Izključite napajanje in/ali odstranite akumula-
torsko baterijo z orodja:
• kadarkoliodložiteorodjezadaljčasa,
• preden odstranite oviro,
• predpregledom,čiščenjemalidelinaorodju,
• potrčenjuobtujke,dapreverite,aliseorodje
nipoškodovalo,
• česezačneorodjeneobičajnotresti(takoj
preglejte).
10. Orodja nikoli ne upravljajte, če so varovala ali
ščitniki okvarjeni, ali brez varnostnih naprav
oz. če je kabel poškodovan ali obrabljen.
11. Orodja ne uporabljajte ob slabem vremenu,
zlasti ob nevihti, ko obstaja nevarnost udara
strele.
12. Na dežju orodja ne uporabljajte in ne polnite
baterij.
13. Orodja ne puščajte na dežju ali mokrih mestih.
14. Pazite, da se med rezila ne zagozdijo tujki.Če
semedrezilazagozdijotujki,takojizklopiteorodje
inodstranitebaterijozorodja.Natoodstranite
tujekzrezil.
15. Veje, ki jo obrezujete, nikoli ne držite s prosto
roko.Sprostorokonesegajtevobmočjerezanja.
Nikolisenedotikajterezil,kersozeloostrainse
lahkoporežete.
16. Orodja ne poskušajte s silo pripraviti do tega,
da bi rezalo.Lahkovamzdrsneinsepoškodujete
alinehoteporežetekajdrugega.
17. Pazite, da ne prerežete električnih kablov, ki so
lahko skriti.
18. Pred uporabo vedno temeljito preverite rezila.
19. Z rezili ravnajte izjemno previdno, da prepre-
čite vreznine ali poškodbe, ki jih lahko povzro-
čijo rezila.
20. Po vsaki uporabi in pred izvajanjem pregleda
ali vzdrževanja odstranite baterijo z orodja.
21. Kadar orodja ne uporabljate, ga vedno hranite
v toku.
Uporaba akumulatorskega orodja in ravnanje z njim
1. Izogibajte se nevarnemu okolju. Orodja ne
uporabljajte na vlažnih ali mokrih mestih in
ga ne izpostavljajte dežju. Voda, ki prodre v
orodje, bo povečala nevarnost električnega
udara.
2. Orodje polnite samo s polnilnikom, ki ga je
določil proizvajalec.Polnilnik,kijeprimerenza
enovrstoakumulatorskihbaterij,lahkopomeni
nevarnostpožara,čegauporabljatezdrugimi
akumulatorskimibaterijami.
3. Električno orodje uporabljajte le s posebej
označenimi akumulatorskimi baterijami.
Uporabadrugihakumulatorskihbaterijlahko
pomeninevarnosttelesnihpoškodbinpožara.
4. Ko akumulatorske baterije ne uporabljate,
je ne hranite ob kovinskih predmetih, kot so
sponke za papir, kovanci, ključi, žeblji, vijaki ali
drugi manjši kovinski predmeti, ki lahko pov-
zročijo stik med priključkoma. Kratek stik aku-
mulatorskihpriključkovlahkopovzročiopeklineali
požar.
5. V neprimernih pogojih lahko iz akumulatorja
uhaja tekočina; izogibajte se stiku. Če pride do
nenamernega stika, sperite z vodo. Če pride
tekočina v stik z očmi, takoj poiščite zdrav-
niško pomoč.Tekočinaizakumulatorjalahko
povzročidraženjealiopekline.
6. Akumulatorja/-ev ni dovoljeno metati v ogenj.
Celica lahko eksplodira. Preverite lokalne
predpise glede morebitnih posebnih navodil za
odstranjevanje.
7. Ne odpirajte ali spreminjajte akumulatorja/-
-ev. Sproščeni elektrolit je koroziven in lahko
povzroči poškodbe oči ali kože. Pri zaužitju je
lahko strupen.
8. Akumulatorja ne polnite v dežju ali na mokrih
mestih.
Servis
1. Električno orodje lahko servisira samo
usposobljen serviser, ki uporablja ustrezne
nadomestne dele.Takobozagotovljenavarnost
električnegaorodja.
2. Sledite navodilom za mazanje in menjavo
pripomočkov.
3. Ročaji morajo biti suhi, čisti in brez olja ter
masti.
OPOZORILO: NE dovolite, da bi zaradi udob-
nejšega dela ali znanja o uporabi izdelka (prido-
bljenega z večkratno uporabo) opustili strogo
upoštevanje varnostnih zahtev v okviru pravilne
uporabe orodja. ZLORABA ali neupoštevanje var-
nostnih zahtev v teh navodilih za uporabo lahko
povzroči resne telesne poškodbe.
SHRANITE TA NAVODILA.

18 SLOVENŠČINA
OPOZORILO: NE dovolite, da bi zaradi udob-
nejšega dela ali znanja o uporabi izdelka (prido-
bljenega z večkratno uporabo) opustili strogo
upoštevanje varnostnih zahtev v okviru pravilne
uporabe orodja. ZLORABA ali neupoštevanje var-
nostnih zahtev v teh navodilih za uporabo lahko
povzroči resne telesne poškodbe.
Pomembna varnostna navodila za
akumulatorsko baterijo
1. Pred uporabo baterijskega vložka preberite
vsa navodila in opozorilne oznake na (1) pol-
nilniku akumulatorja, (2) akumulatorju in (3)
izdelku, ki uporablja akumulator.
2. Ne razstavljajte ali spreminjajte akumulatorske
baterije.Stemlahkopovzročitepožar,preko-
mernovročinoalieksplozijo.
3. Če se je čas delovanja občutno skrajšal, takoj
prenehajte uporabljati orodje. V nasprotnem
primeru lahko pride do pregretja, morebitnih
opeklin in celo eksplozije.
4. Če pride elektrolit v stik z očmi, jih sperite s
čisto vodo in takoj poiščite zdravniško pomoč.
Posledica je lahko izguba vida.
5. Ne povzročite kratkega stika baterijskega
vložka:
(1) Ne dotikajte se priključkov s kakršnim
koli prevodnim materialom.
(2) Izogibajte se shranjevanju baterijskega
vložka v vsebniku z drugimi kovinskimi
predmeti kot so žeblji, kovanci itn.
(3) Ne izpostavljajte baterijskega vložka vodi
ali dežju.
Kratek stik akumulatorja lahko povzroči velik
električni tok, pregrevanje, morebitne opekline
in celo okvaro.
6. Ne shranjujte in uporabljajte orodja in akumu-
latorske baterije na mestih, kjer lahko tempera-
tura doseže ali preseže 50 °C (122 °F).
7. Ne sežigajte baterijskega vložka, tudi če je
hudo poškodovan ali v celoti izpraznjen.
Baterijski vložek lahko v ognju eksplodira.
8. Ne pribijajte, režite, drobite, mečite, spuščajte
akumulatorske baterije oziroma ne udarjajte
z akumulatorsko baterijo po trdem predmetu.
Takšnoravnanjelahkopovzročipožar,preko-
mernovročinoalieksplozijo.
9. Ne uporabljajte poškodovanih akumulatorjev.
10. Priložene litij-ionske baterije ustrezajo zahte-
vam zakonodaje v zvezi z nevarnim blagom.
Zakomercialneprevoze,npr.tiste,kijihopravljajo
tretjestrankeincarinskiposredniki,jetrebaupo-
števatiposebnezahtevevzvezizembalažoin
označevanjem.
Medpostopkompripravenaodpremoizdelkaseje
trebaposvetovatisstrokovnjakomzanevarnesnovi.Pri
temupoštevajtetudipodrobnejšenacionalnepredpise.
Odprtestikeoblepitezlepilnimtrakomalijihdru-
gačezaščitite,baterijopazapakirajtetako,dasev
embalažinemorepremikati.
11. Ko odstranjujete akumulatorsko baterijo, jo
vzemite iz orodja in varno zavrzite. Upoštevajte
lokalne uredbe glede odlaganja baterije.
12. Baterije uporabljajte le z izdelki, ki jih določi
Makita.Čenamestitebaterijevneskladneizdelke,
lahkopridedopožara,pregrevanja,eksplozijeali
puščanjaelektrolita.
13. Če orodja dlje časa ne uporabljate, morate iz
njega odstraniti baterijo.
14. Med uporabo in po uporabi lahko akumu-
latorska baterija postane vroča in povzroči
opekline. Z vročimi akumulatorskimi baterijami
ravnajte pazljivo.
15. Ne dotikajte se priključka orodja takoj po upo-
rabi, ker se lahko dovolj segreje, da povzroči
opekline.
16. Ne dovolite, da bi se v priključke, odprtine in
utore akumulatorske baterije zlepili ostružki,
prah ali zemlja.Tolahkopovzročipregrevanje,
požar,razpočenjeinokvaroorodjaaliakumula-
torskebaterijeterprivededoopeklinalidrugih
telesnihpoškodb.
17. Razen če orodje podpira uporabo v bližini
visokonapetostnih električnih vodov, akumula-
torske baterije ne uporabljajte v bližini visoko-
napetostnih električnih vodov.Takšnauporaba
lahkopovzročimotnjevdelovanjualiokvaro
orodjaoziromaakumulatorskebaterije.
18. Baterijo hranite izven dosega otrok.
SHRANITE TA NAVODILA.
POZOR: Uporabljajte le originalne baterije
Makita.ČeuporabljateneoriginalnebaterijeMakita
alibaterije,kisobilespremenjene,lahkopridedo
eksplozijebaterijeinposledičnodopožara,telesnih
poškodbalimaterialneškode.Stakšnouporabo
bostetudirazveljaviligarancijoMakitazaorodjein
polnilnik Makita.
Nasveti za ohranjanje največje
zmogljivosti akumulatorja
1. Napolnite baterijski vložek, preden se v celoti
izprazni. Ko opazite, da ima orodje manjšo
moč, vedno ustavite delovanje orodja in napol-
nite baterijski vložek.
2. Nikoli znova ne polnite popolnoma napol-
njenega baterijskega vložka. Prenapolnjenje
skrajša življenjsko dobo akumulatorja.
3. Baterijski vložek s sobno temperaturo pol-
nite pri temperaturi okolja od 10 °C do 40 °C.
Počakajte, da se vroč baterijski vložek pred
polnjenjem ohladi.
4. Ko akumulatorske baterije ne uporabljate, jo
odstranite iz orodja ali polnilnika.
OPIS DELOV
►Sl.1
1Rezilo 2Indikatorskalučka
3Gumbzaprilagajanje
kota 4Glavni gumb za vklop/
izklop
5Akumulatorskabaterija 6Sprožilec

19 SLOVENŠČINA
OPIS DELOVANJA
POZOR: Pred nastavljanjem ali preizkusom
delovanja orodja se prepričajte, ali je orodje
izključeno in ali je akumulatorska baterija
odstranjena.
Nameščanje ali odstranjevanje
akumulatorske baterije
POZOR: Vedno izklopite orodje, preden name-
stite ali odstranite akumulatorsko baterijo.
POZOR: Kadar nameščate ali odstranjujete
akumulatorsko baterijo, trdno držite orodje in
akumulatorsko baterijo.Čeorodjainakumulatorske
baterijenedržitetrdno,selahkozgodi,davamzdr-
snetaizrok,posledicapajelahkopoškodbaorodjain
akumulatorskebaterijetertelesnapoškodba.
►Sl.2: 1.Rdečiindikator2. Gumb 3.Baterijskivložek
Čeželiteodstranitiakumulatorskobaterijo,jopotisniteiz
orodja,pritempapomikajtegumbnasprednjistranivložka.
Akumulatorskobaterijovstavitetako,daporavnate
jezičeknabaterijizutoromnaohišjuinjopotisnetev
ležišče.Potisnitejodokonca,dasezaskoči.Čevidite
rdečiindikator,kotjeprikazanonasliki,seakumulator-
skabaterijaniustreznozaskočila.
POZOR:
Vedno namestite akumulatorsko bate-
rijo tako, da rdeči indikator ni več viden.Četega
neupoštevate,lahkobaterijanepričakovanopadeiz
orodjainpoškodujevasaliosebevneposrednibližini.
POZOR: Ne nameščajte akumulatorske bate-
rije s silo.Česeakumulatorskabaterijanezaskoči
zlahka,nipravilnovstavljena.
Prikazuje preostalo raven
napolnjenosti akumulatorja
Samo za akumulatorske baterije z indikatorjem
►Sl.3: 1.Indikatorskelučke2.Gumbzapreverjanje
Pritisnitegumbzapreverjanjenabaterijskemvložku,
dapreveriteravennapolnjenostiakumulatorja.
Indikatorskelučkenakratkozasvetijo.
Indikatorske lučke Prikaz pre-
ostale ravni
napolnjenosti
Sveti Ne sveti
od 75% do 100%
od 50% do 75%
od 25% do 50%
od 0% do 25%
OPOMBA:Odvisnoodpogojevuporabeinokoljske
temperatureseoznačbalahkonekolikorazlikujeod
dejanskenapolnjenosti.
Zaščitni sistem orodja/akumulatorja
Orodjejeopremljenozzaščitnimsistemomzaorodje/
akumulator.Sistemsamodejnoprekinenapajanje
orodja,dapodaljšaživljenjskodoboorodjainakumula-
torja.Orodjesesamodejnozaustavimeddelovanjem,
čeorodjealiakumulatordelujetapodnaslednjimi
pogoji:
Preobremenjeno:
Orodjedelujenanačin,zaradikateregaprihajado
neobičajnovisokegatoka.Vtemprimeruizklopite
orodjeinprekinitedelo,kijepovzročilopreobremenitev
orodja.Natovklopiteorodje,dagaznovazaženete.
Česeorodjenevklopi,jeakumulatorpregret.Vtem
primeru pustite, da se akumulator ohladi, preden znova
vklopiteorodje.
Nizka napetost akumulatorja:
Napolnjenostakumulatorjajeprenizka,zatoorodjene
deluje.Čevklopiteorodje,semotorzažene,vendar
kmalu tudi zaustavi. V tem primeru odstranite in napol-
nite akumulator.
Indikatorske lučke
►Sl.4: 1.Indikatorskalučka(zelena)2. Indikatorska
lučka(rdeča)
Pomenindikatorskihlučkjenaslednji:
(Sveti: Ne sveti: Utripa: )
Zelena Rdeča
• Zelenalučkazasveti:orodjejevklopljenoinprip-
ravljenonauporabo.
Zelena Rdeča
• Zelenalučkautripa:orodjejevklopljenoinvstanju
pripravljenosti.Zavrnitevnaobičajninačindvak-
ratpritisnitesprožilec.
Zelena Rdeča
• Rdečalučkautripa:preostalazmogljivostbaterije
jenizka.
Zelena Rdeča
• Zelenainrdečalučkazasvetita:orodjealibaterija
jepregreta,orodjejepreobremenjenoalibaterija
jeprazna.
Zelena Rdeča
• Rdečalučkazasveti:prišlojedookvare.Izklopite
inznovavklopiteorodje.Četežavenimogoče
odpraviti, se za popravilo obrnite na lokalni poo-
blaščeniservisnicenter.

20 SLOVENŠČINA
Glavni gumb za vklop/izklop
OPOZORILO: Kadar orodja ne uporabljate, ga
vedno izklopite.
Zavkloporodjapridržiteglavnigumbzavklop/izklop.
Orodjesezaženevnačinupripravljenostiinzelena
indikatorskalučkautripazeleno.
Zaizkloporodjapritisniteinzadržitesprožilecvečkot
3sekunde,dazapreterezila,natospustitesprožilecin
pritisnite glavni gumb za vklop/izklop.
►Sl.5: 1. Glavni gumb za vklop/izklop 2.Sprožilec
OPOMBA:Čejeorodjevklopljenoinsprožilcanepri-
tisnetenekajčasa,seorodjepreklopivnačinpriprav-
ljenosti.Kozelenaindikatorskalučkautripa,dvakrat
pritisnitesprožileczavrnitevnaobičajninačin.
OPOMBA:Toorodjeuporabljafunkcijosamodejnega
izklopa.Čejeorodjevklopljenoinsprožilcanepri-
tisnetenekajčasa,seorodjesamodejnoizklopi,da
preprečinenamerenzagon.
Delovanje stikala
POZOR: Preden vstavite akumulatorsko
baterijo v orodje, se vedno prepričajte, da stikalo
deluje brezhibno in se vrača v položaj za izklop
(OFF), ko ga spustite.
Vklopiteorodjeindvakratpritisnitesprožilec,daodprete
zgornjereziloškarij.Zelenaindikatorskalučkazasveti
zeleno.Kopritisnetesprožilec,sezgornjereziloškarijzapre
inkospustitesprožilec,sezgornjereziloškarijodpre.
Nastavitev kota rezila škarij
Kotodpiranjarezilškarijlahkoprilagoditenadve
stopnji.Kotodpiranjalahkoprilagoditenapopolnoma
odprtiinpolodprtigledenaveje,kijihbosterezali.
►Sl.6: 1. Popolnoma odprti 2. Pol odprti
Čeželiteprilagoditikotodpiranja,upoštevajtespodnje
korake.
1. Vklopiteorodjeindvakratpritisnitesprožilec,da
odpreterezilaškarij.
2. Medpopolnimpotegomsprožilcapritisnitein
držitegumbzaprilagajanjekota,dazelenaindikatorska
lučkadvakratutripne.
Prilagajanje globine reza
Pobrušenjualizamenjavirezilaškarijprilagoditeglo-
binoreza.Čeželiteprilagoditiglobinoreza,upoštevajte
spodnjekorake.
1. Vklopiteorodjeindvakratpritisnitesprožilec,da
odpreterezilaškarij.
2. Medpopolnimpotegomsprožilcapritisnitein
držitegumbzaprilagajanjekotanekajsekund,da
zelenaindikatorskalučkahitroutripa.
3. Globinorezaprilagoditesponovljivimpritiskanjem
sprožilca,dajeprekrivanjekoniczgornjegainspo-
dnjegarezilaškarijod1do3mm.
►Sl.7: (1)Zgornjereziloškarij(2)Spodnjerezilo
škarij(3) 1 – 3 mm
OPOMBA:Kozgornjerezilodoseženajglobljipoložaj
inpritisnetesprožilec,sezgornjerezilovrnevnajplit-
kejšipoložaj.
OPOMBA:Čejeorodjemedprilagajanjemglobine
rezapreobremenjeno,zelenalučkautripainrdeča
lučkazasveti.Vtemprimeruizklopiteorodje,odstra-
nite vzrok preobremenitve in nato znova prilagodite
globino reza.
4. Pritisniteinzadržitegumbzaprilagajanjekota,da
dokončateprilagajanje.Zelenalučkaprenehautripatiin
zasveti.
MONTAŽA
POZOR: Pred vsako izvedbo dela na orodju se
prepričajte, da je le to izključeno in da je akumula-
torska baterija odstranjena.
POZOR: Pri menjavi rezil vedno nosite roka-
vice, tako da se dlani neposredno ne dotikajo
rezil.
Odstranjevanje ali nameščanje
rezila škarij
1. Popustitevijakezimbusnimključem,natoneko-
likopotisnitepokrovterodstranitevijakeinpokrov,nato
paobrniteorodje.
►Sl.8: 1.Vijak2. Pokrov
2.Zimbusnimključemodvijtevijakingaodstranite.
►Sl.9: 1.Vijak
OBVESTILO: Najprej odvijte vijak in šele nato
matico. V nasprotnem primeru se lahko matica
poškoduje.
3.Scevnimključemodvijtematicoinjoodstranite.
►Sl.10: 1. Matica
4. Obrniteorodjeterpovrstiodstranitevijak,držalo
rezila,zgornjereziloškarijinspodnjereziloškarij.
►Sl.11: 1.Vijak2.Držalorezila3.Zgornjerezilo
škarij4.Spodnjereziloškarij
5. Naorodjepovrstipritrditespodnjereziloškarij,
zgornjereziloškarij,držalorezilainvijak.
►Sl.12: 1.Vijak2.Držalorezila3.Zgornjerezilo
škarij4.Spodnjereziloškarij
OBVESTILO: Med nameščanjem zgornjega
rezila škarij se prepričajte, da je zgornje rezilo
škarij nameščeno v smeri, kot je prikazano na
sliki.
6. Obrniteorodjeinnatopritrditematiconaorodjeter
joročnoprivijte.
►Sl.13: 1. Matica
OBVESTILO: Priporočen zatezni navor je okoli
0,5 N•m.
7. Pritrditevijaknaorodjeingazatesnitezimbusnim
ključem.
►Sl.14: 1.Vijak
Pagina se încarcă...
Pagina se încarcă...
Pagina se încarcă...
Pagina se încarcă...
Pagina se încarcă...
Pagina se încarcă...
Pagina se încarcă...
Pagina se încarcă...
Pagina se încarcă...
Pagina se încarcă...
Pagina se încarcă...
Pagina se încarcă...
Pagina se încarcă...
Pagina se încarcă...
Pagina se încarcă...
Pagina se încarcă...
Pagina se încarcă...
Pagina se încarcă...
Pagina se încarcă...
Pagina se încarcă...
Pagina se încarcă...
Pagina se încarcă...
Pagina se încarcă...
Pagina se încarcă...
Pagina se încarcă...
Pagina se încarcă...
Pagina se încarcă...
Pagina se încarcă...
Pagina se încarcă...
Pagina se încarcă...
Pagina se încarcă...
Pagina se încarcă...
Pagina se încarcă...
Pagina se încarcă...
Pagina se încarcă...
Pagina se încarcă...
Pagina se încarcă...
Pagina se încarcă...
Pagina se încarcă...
Pagina se încarcă...
Pagina se încarcă...
Pagina se încarcă...
Pagina se încarcă...
Pagina se încarcă...
Pagina se încarcă...
Pagina se încarcă...
Pagina se încarcă...
Pagina se încarcă...
Pagina se încarcă...
Pagina se încarcă...
Pagina se încarcă...
Pagina se încarcă...
Pagina se încarcă...
Pagina se încarcă...
Pagina se încarcă...
Pagina se încarcă...
Pagina se încarcă...
Pagina se încarcă...
Pagina se încarcă...
Pagina se încarcă...
Pagina se încarcă...
Pagina se încarcă...
Pagina se încarcă...
Pagina se încarcă...
Pagina se încarcă...
Pagina se încarcă...
Pagina se încarcă...
Pagina se încarcă...
Pagina se încarcă...
Pagina se încarcă...
Pagina se încarcă...
Pagina se încarcă...
Pagina se încarcă...
Pagina se încarcă...
Pagina se încarcă...
Pagina se încarcă...
Pagina se încarcă...
Pagina se încarcă...
Pagina se încarcă...
Pagina se încarcă...
-
 1
1
-
 2
2
-
 3
3
-
 4
4
-
 5
5
-
 6
6
-
 7
7
-
 8
8
-
 9
9
-
 10
10
-
 11
11
-
 12
12
-
 13
13
-
 14
14
-
 15
15
-
 16
16
-
 17
17
-
 18
18
-
 19
19
-
 20
20
-
 21
21
-
 22
22
-
 23
23
-
 24
24
-
 25
25
-
 26
26
-
 27
27
-
 28
28
-
 29
29
-
 30
30
-
 31
31
-
 32
32
-
 33
33
-
 34
34
-
 35
35
-
 36
36
-
 37
37
-
 38
38
-
 39
39
-
 40
40
-
 41
41
-
 42
42
-
 43
43
-
 44
44
-
 45
45
-
 46
46
-
 47
47
-
 48
48
-
 49
49
-
 50
50
-
 51
51
-
 52
52
-
 53
53
-
 54
54
-
 55
55
-
 56
56
-
 57
57
-
 58
58
-
 59
59
-
 60
60
-
 61
61
-
 62
62
-
 63
63
-
 64
64
-
 65
65
-
 66
66
-
 67
67
-
 68
68
-
 69
69
-
 70
70
-
 71
71
-
 72
72
-
 73
73
-
 74
74
-
 75
75
-
 76
76
-
 77
77
-
 78
78
-
 79
79
-
 80
80
-
 81
81
-
 82
82
-
 83
83
-
 84
84
-
 85
85
-
 86
86
-
 87
87
-
 88
88
-
 89
89
-
 90
90
-
 91
91
-
 92
92
-
 93
93
-
 94
94
-
 95
95
-
 96
96
-
 97
97
-
 98
98
-
 99
99
-
 100
100


Makita UP100D Manual de utilizare
- Categorie
- Unelte electrice
- Tip
- Manual de utilizare
Lucrări înrudite
-
Makita DUP361 Manual de utilizare
-
Makita DUN600L Manual de utilizare
-
Makita UH014 Manual de utilizare
-
Makita DUH502 Manual de utilizare
-
Makita DUH604S Manual de utilizare
-
Makita UH004G Manual de utilizare
-
Makita UH013G Manual de utilizare
-
Makita DUH601Z Manual de utilizare
-
Makita DUM166 Manual de utilizare