Inventor EP-ST22 Vacuum Cleaner Manual de utilizare
- Categorie
- Aspiratoare
- Tip
- Manual de utilizare

1ΕΝ
• USER’S MANUAL
• ΕΓΧΕΙΡΙΔΙΟ ΧΡΗΣΗΣ
• MANUAL UTILIZATORULUI
• BEDIENUNGSANLEITUNG
• MANUEL D’UTILISATEUR
• MANUALE DELL’ UTENTE
• MANUAL DEL PROPIETARIO
ENGLISH | ΕΛΛΗΝΙΚΑ | ROMANA | DEUTSCH |
FRANÇAIS | ITALIANO | ESPAÑOL
VACUUM CLEANER
MODEL:
EP-ST22


LANGUAGES
ENGLISH ..............................................................................................................................4
ΕΛΛΗΝΙΚΑ ..........................................................................................................................14
ROMANA ...........................................................................................................................24
DEUTSCH ...........................................................................................................................34
FRANÇAIS ..........................................................................................................................44
ITALIANO ........................................................................................................................... 54
ESPAÑOL ...........................................................................................................................64

4ΕΝ
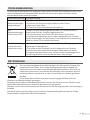
• If the supply cord is damaged, it must be replaced by the manufacturer, an appointed
service agent or qualied professionals in order to avoid possible hazard.
• This appliance can be used by children aged from 8 years and above and by persons with
reduced physical, sensory or mental capabilities or lack of experience and knowledge,
only if they are under supervision or have been given instructions concerning the safe use
of the appliance and have understood the hazards involved.
• Cleaning and maintenance shall not be made by children without supervision.
• Children should not play with the appliance.
• The appliance is only to be used with the power supply unit provided with the appliance.
• The appliance must only be supplied at safety extra low voltage corresponding to the
marking on the appliance.
• If the batteries are damaged, they must be replaced by the manufacturer, an appointed
service agent or qualied professionals in order to avoid any hazard.
• The plug must be removed from the socket-outlet before cleaning or maintaining the
appliance.
• Please keep the vacuum cleaner in laid down position when storing. The vacuum cleaner
can’t stand by itself, please put it to the base stand after use.
• When you pause using the vacuum cleaner, please put it to the base stand or leave it in
laid down position.
• Before charging, read the instructions.
• For indoor use only, do not expose to rain.
• Disconnect the supply before making or breaking the connections to the battery.
• Beware of the risk of being caught in hair and loose clothing.
• The charger must not be used if the enclosure is damaged because this will cause hazard
of electric shock.
• Damaged batteries must be replaced with new batteries of the same type provided by the
manufacturer.
• The battery charger is designed for charging the rechargeable battery provided by
manufacturer.
• Do not use any other charger to recharge the battery provided by manufacturer and do
not try recharge other types of battery with this charger.
• Also do not try to charge non-rechargeable batteries with this charger.
• Before charging, check whether the voltage specied on the marking label corresponds to
the mains voltage.
• During charging, the appliance must be placed at well-ventilated area.
• Keep the charger away from all sources of heat.
• Do not insert any item through the ventilation slots on the charger.
• Do not expose the charger to rain, snow or any other environment of high humidity.
• Do not immerse the appliance in water.
• When separating the charger from the socket, pull the body of the plug rather than the
supply cord; this will avoid hazard.
SAFETY INSTRUCTIONS

5ΕΝ
OPERATION
• Stop using the appliance in cases of drop, impact with a heavy object, other means of
damage etc. If it occurs, get the charger repaired by our service agent.
• Do not disassemble the battery charger by yourself to avoid re hazard or electric shock.
• Please remove the plug from the socket before cleaning or maintaining the charger.
• WARNING: Explosive gases. Prevent ames and sparks. Provide adequate ventilation
during charging
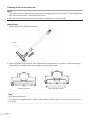
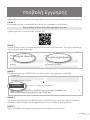
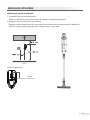
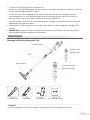
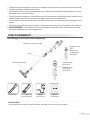
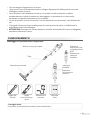
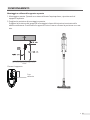
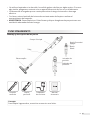
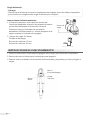
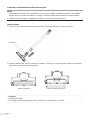
Crevice
Nozzle
Sofa
Brush
Adapter Manual
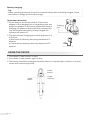
Motorized brush
Tube
Body
Power
button
Mode
indicator
Mode
button
Power
volume
Indicator
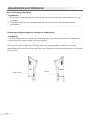
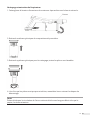
Assembly and parts description
Upholstery
Nozzel Adaptor ManualCrevice
Nozzle
Tip:
When cleaning places dicult to reach, please assemble the accessories on tube.

6ΕΝ
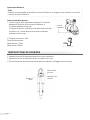
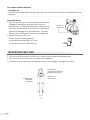
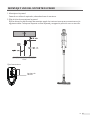
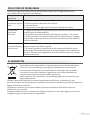
Battery charging
Tip:
When operating the device for the rst time the battery will not be fully charged. Please
remember to charge up before rst usage.
Operation instruction
1.Put the body on horizontal surface. Connect the
adaptor to the charging port on the battery pack and
plug in the adaptor to the socket. When the battery is
charging, the power indicator will blink continuously.
One minute after the battery is fully charged, the
indicator will switch o.
2. The approximate charging time of this appliance is 4
to 6 hours.
In Max mode the battery autonomy reaches the 15
minutes.
In Low mode the battery autonomy reaches the 30
minutes.
USING THE DEVICE
1. Press down ”Power button” to start
2. Press down “Power button” again to stop
3. The battery should be recharged only when there is one power light indicator on the led
screen and continuously blinks.
Charging
port
Crevice
Nozzle
Sofa
Brush
Adapter Manual
Power
indicator
Mode
button
Power
button

7ΕΝ
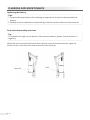
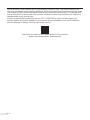
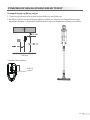
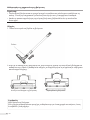
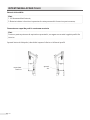
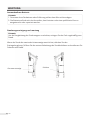
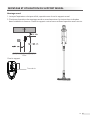
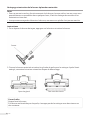
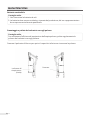
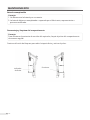
WALL MOUNT ASSEMBLY AND USAGE
Wall mount assembly
1. When not using the cleaner, please store the cleaner on mount.
2. Choose the mount assembly location based on the instructions shown on the table below.
Place the mount against the wall and secure the position with a screw.
Screw
Hole
Floor
Fix the mount

8ΕΝ
CLEANING AND MAINTENANCE
Replacing the Battery
Tips:
1. People without professional knowledge or experience should not disassemble the
battery.
2. Battery must be replaced and repaired by professional after-sales service personnel.
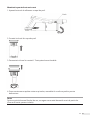
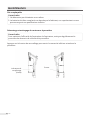
Dust tank disassembly and clean
Tip:
To maintain the high suction power of the vacuum cleaner, please clean the dust in it
regularly.
When the dust has reached the max line indicator press the release button, open the
bottom cover of the dust tank and remove the dirt and dust.
Max Line Push

9ΕΝ
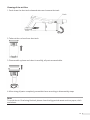
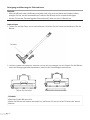
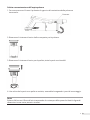
Cleaning of the air lter
1. Push down the dust tank release button and remove the tank.
2. Take out the cyclone from dust tank.
3. Disassemble cyclone and clean it carefully, all parts are washable.
4. After airing all parts completely, assemble them according to disassembly steps
Push
Note:
To avoid the air ow being blocked, please clean the big particle waste such as paper, cloth
and others.

10 ΕΝ
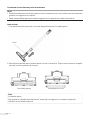
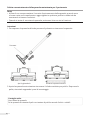
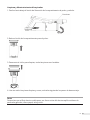
Cleaning of the motorized brush
Note:
• The roller brush and wheels may be easily entangled with hair and dust. To avoid aecting
their normal operation, maintain them clean.
• When disassemble and main brush, please make sure it’s not working.
Instructions
1. Push button and take o the brush.
2. Open the gland of the brush, then take out the roller brush and clean it. After cleaning it
completely, assemble them according to disassembly steps.
Tips:
Don’t wash the brush.
If the brush is tangled by hair, please clean it with a sharp object such as a pair of scissors
or a knife.
Push
Open the gland Take out roller brush

11ΕΝ
TROUBLESHOOTING
Please pay attention to the below prior to contacting an authorized service agent:
Problem Possible Solution
The stick vacuum
is not cleaning
well
1. Empty the dust tank
2. Remove excess dust from the lters
3. Wash the lters
4. Check for blockages
The stick vacuum
has stopped or
won’t work
1. Charge the vacuum (check the mains socket works and the switch is
turned on)
2.It might be blocked. Check solutions 1 to 4 above
3. Product self-protection activated. Switch o the vacuum and leave
the motor to cool for an hour then try using again
The brush motor
overheatand stop
work
1. The oor head is blocked, refer to the ‘’Cleaning of the motorized
brush’’ section of this manual.
2. The roller brush motor has become overheated due to heavy
loading. This might be due to extended use on a long pile carpet or
loose rug. Leave the vacuum to cool for an hour then use it again.
As a responsible retailer, we urge you to follow the correct disposal of
the appliance and all its packaging materials, helping conserve natural
resources and ensuring that it is recycled in such a manner that protects the
environment.
The disposal of this device should be in accordance with local laws and
regulations.
This device must be disposed separately from other domestic waste, as it
contains electronic components.
Contact your local recycling facility to learn more about disposal and recycling.
There are several alternative solutions for disposal:
A) Your local municipality has established free collection systems for electronic waste.
B) Your local retailer upon purchase of a new product.
C) The manufacturer may accept the old appliance for disposal.
D) Old appliances sometimes contain valuable resources for scrap metal dealers.
DISPOSAL

12 ΕΝ
All the pictures in the manual are for explanatory purposes only. The actual shape of the
unit you purchased may be slightly dierent, but the operations and functions are the same.
The company may not be held responsible for any misprinted information. The design and
the specications of the product for reasons, such as product improvement, are subject to
change without any prior notice.
Please consult with the manufacturer at +30 211 300 3300 or with the Sales agency for
further details. Any future updates to the manual will be uploaded to the service website,
and it is advised to always check for the latest version.
Scan here to download the latest version of this manual.
www.inventorappliances.com/manuals

13ΕΝ
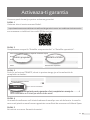
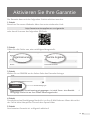
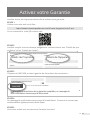
Activate your Warranty
l Visit our web site and activate your warranty via the below link or by
scanning the QR code
https://www.inventorairconditioner.com/warranty-inventor
l Fill all the elds as shown below
þ
once the warranty submission has been completed a conrmation message will be
sent to your email
Full Name*
Address*
Postal Code*
Phone Number*
E-mail*
Unit Type*
Serial Number of the unit*
Date of Purchase*
Invoice Number*
Additional Details
Subscribe to Inventor's Newsletter
Owner details Unit details
To activate the warranty card, please ll in the following elds
* Required eld
With the current warranty card you accept the terms and conditions.
SEND
Follow the next quick steps to activate your warranty:
STEP 1
Visit our website via the link:
https://www.inventorappliances.com/warranty-card
or by scanning the QR code, as follows:
STEP 2
Fill in the obligatory fields as requested in the “Owner’s details” and “Unit’s details”:
STEP 4
Wait for the confirmation email you will receive at the email address you have filled
in - please also check your spam folder.
STEP 5
Inventor warranty is now valid!
STEP 3
Click SEND button at the end of the submission form:
þ
once the warranty submission has been completed a conrmation
message will be sent to your email
Activate your Warranty
l Visit our web site and activate your warranty via the below link or by
scanning the QR code
https://www.inventorairconditioner.com/warranty-inventor
l Fill all the elds as shown below
þ
once the warranty submission has been completed a conrmation message will be
sent to your email
Full Name*
Address*
Postal Code*
Phone Number*
E-mail*
Unit Type*
Serial Number of the unit*
Date of Purchase*
Invoice Number*
Additional Details
Subscribe to Inventor's Newsletter
Owner details Unit details
To activate the warranty card, please ll in the following elds
* Required eld
With the current warranty card you accept
the terms and conditions.
SEND
Activate your Warranty
l Visit our web site and activate your warranty via the below link or by
scanning the QR code
https://www.inventorairconditioner.com/warranty-inventor
l Fill all the elds as shown below
þ
once the warranty submission has been completed a conrmation message will be
sent to your email
Full Name*
Address*
Postal Code*
Phone Number*
E-mail*
Unit Type*
Serial Number of the unit*
Date of Purchase*
Invoice Number*
Additional Details
Subscribe to Inventor's Newsletter
Owner details Unit details
To activate the warranty card, please ll in the following elds
* Required eld
With the current warranty card you accept the terms and conditions.
SEND
Activate your Warranty

14 GR
• Εάν το καλώδιο τροφοδοσίας είναι κατεστραμμένο, πρέπει να αντικατασταθεί από τον
κατασκευαστή, έναν εξουσιοδοτημένο αντιπρόσωπο ή εξειδικευμένους επαγγελματίες,
προκειμένου να αποφευχθούν πιθανοί κίνδυνοι.
• Αυτή η συσκευή μπορεί να χρησιμοποιηθεί από παιδιά ηλικίας από 8 ετών και άνω και από
άτομα με μειωμένη σωματική, αισθητηριακή ή διανοητική ικανότητα ή έλλειψη εμπειρίας
και γνώσης, μόνο εάν βρίσκονται υπό επίβλεψη ή τους έχουν δοθεί οδηγίες σχετικά με την
ασφαλή χρήση της συσκευής και έχουν κατανοήσει τους σχετικούς κινδύνους.
• Ο καθαρισμός και η συντήρηση δεν πρέπει να γίνονται από παιδιά χωρίς εποπτεία.
• Τα παιδιά δεν πρέπει να παίζουν με τη συσκευή.
• Η συσκευή πρέπει να χρησιμοποιείται μόνο με την παρεχόμενη μονάδα τροφοδοσίας.
• Η συσκευή πρέπει να παρέχεται μόνο με ασφάλεια πολύ χαμηλής τάσης, ανάλογη με αυτή
που αναγράφεται στη σήμανση της συσκευής.
• Εάν οι μπαταρίες έχουν υποστεί ζημιά, πρέπει να αντικατασταθούν από τον
κατασκευαστή, έναν εξουσιοδοτημένο αντιπρόσωπο ή εξειδικευμένους επαγγελματίες,
προκειμένου να αποφευχθεί ο κίνδυνος.
• Το βύσμα πρέπει να αφαιρεθεί από την πρίζα πριν από τον καθαρισμό ή τη συντήρηση της
συσκευής.
• Κατά την αποθήκευση, διατηρήστε την ηλεκτρική σκούπα σε χαμηλή θέση. Η ηλεκτρική
σκούπα δεν μπορεί να σταθεί μόνη της, παρακαλώ τοποθετήστε τη στη βάση μετά τη
χρήση.
• Όταν σταματάτε για λίγο να χρησιμοποιείτε την ηλεκτρική σκούπα, τοποθετήστε την στη
βάση ή αφήστε την σε ξαπλωμένη θέση
• Πριν από τη φόρτιση, διαβάστε τις οδηγίες.
• Μόνο για εσωτερική χρήση, μην εκθέτετε σε βροχή.
• Αποσυνδέστε την παροχή πριν πραγματοποιήσετε ή διακόψετε τις συνδέσεις με την
μπαταρία.
• Προσέξτε τον κίνδυνο να πιάσετε μαλλιά και χαλαρά ρούχα.
• Ο φορτιστής δεν πρέπει να χρησιμοποιείται εάν το περίβλημα έχει υποστεί ζημιά, διότι
αυτό θα προκαλέσει κίνδυνο ηλεκτροπληξίας.
• Οι κατεστραμμένες μπαταρίες πρέπει να αντικατασταθούν με νέες μπαταρίες του ίδιου
τύπου που παρέχονται από τον κατασκευαστή.
• Ο φορτιστής μπαταρίας έχει σχεδιαστεί για τη φόρτιση της συγκεκριμένης
επαναφορτιζόμενης μπαταρίας που παρέχεται από τον κατασκευαστή.
• Μην χρησιμοποιείτε άλλο φορτιστή για να επαναφορτίσετε την μπαταρία που παρέχεται
από τον κατασκευαστή και μην προσπαθήσετε να επαναφορτίσετε άλλους τύπους
μπαταριών με αυτόν τον φορτιστή.
• Επίσης, μην προσπαθήσετε να φορτίσετε μη επαναφορτιζόμενες μπαταρίες με αυτόν τον
φορτιστή.
• Πριν από τη φόρτιση, ελέγξτε εάν η τάση που καθορίζεται στην ετικέτα σήμανσης
αντιστοιχεί στην τάση δικτύου.
• Κατά τη φόρτιση, η συσκευή πρέπει να τοποθετηθεί σε καλά αεριζόμενο χώρο.
• Κρατήστε το φορτιστή μακριά από όλες τις πηγές θερμότητας.
• Μην εισάγετε κανένα αντικείμενο μέσω των εγκοπών εξαερισμού στο φορτιστή.
• Μην εκθέτετε το φορτιστή σε βροχή, χιόνι ή οποιοδήποτε άλλο περιβάλλον με υψηλή
υγρασία.
ΣΗΜΑΝΤΙΚΕΣ ΟΔΗΓΙΕΣ ΑΣΦΑΛΕΙΑΣ

15GR
ΛΕΙΤΟΥΡΓΙΑ
• Μην βυθίζετε τη συσκευή σε νερό.
• Κατά το διαχωρισμό του φορτιστή από την πρίζα, τραβήξτε το σώμα του φις και όχι το
καλώδιο τροφοδοσίας. Αυτό θα αποφύγει τον κίνδυνο.
• Σταματήστε να χρησιμοποιείτε τη συσκευή σε περιπτώσεις πτώσης, κρούσης με βαρύ
αντικείμενο, άλλων μέσων ζημιάς κ.λπ. Εάν συμβεί, επισκευάστε το φορτιστή από τον
αντιπρόσωπό μας.
• Μην αποσυναρμολογείτε μόνοι σας το φορτιστή μπαταρίας για να αποφύγετε τον κίνδυνο
πυρκαγιάς ή ηλεκτροπληξίας.
• Αφαιρέστε το φις από την πρίζα πριν από τον καθαρισμό ή τη συντήρηση του φορτιστή.
• ΠΡΟΕΙΔΟΠΟΙΗΣΗ: Εκρηκτικά αέρια. Αποτρέψτε τις φλόγες και τους σπινθήρες. Παρέχετε
επαρκή αερισμό κατά τη φόρτιση.
Crevice
Nozzle
Sofa
Brush
Adapter Manual
Μηχανοκίνητη βούρτσα
Σωλήνας
Σώμα
Πλήκτρο
on/o
Ένδειξη
λειτουργίας
Πλήκτρο
λειτουργίας
Ένδειξη
έντασης
ισχύος
Συναρμολόγηση και περιγραφή εξαρτημάτων
Πέλμα
επίπλων Φορτιστής Εγχειρίδιο
χρήσης
Ακροφύσιο
εσοχών
Σημείωση:
Όταν καθαρίζετε μέρη που είναι δύσκολο να φτάσετε, συναρμολογήστε τα αξεσουάρ
στο σωλήνα.

16 GR
Φόρτιση μπαταρίας
Σημείωση:
Κατά τη λειτουργία της συσκευής για πρώτη φορά, η μπαταρία δεν θα έχει φορτιστεί
πλήρως. Μην ξεχάσετε να φορτίσετε πριν από την πρώτη χρήση.
Οδηγίες λειτουργίας
1. Βάλτε το σώμα της σκούπας σε επίπεδη επιφάνεια.
Συνδέστε τον προσαρμογέα στη θύρα φόρτισης
της μπαταρίας και συνδέστε τον προσαρμογέα
στην πρίζα. Όταν η μπαταρία φορτίζεται, η ένδειξη
ισχύος θα αναβοσβήνει συνεχώς. Ένα λεπτό μετά
την πλήρη φόρτιση της μπαταρίας, η ένδειξη θα
σβήσει.
2. Ο κατά προσέγγιση χρόνος φόρτισης αυτής της
συσκευής είναι 4 έως 6 ώρες.
Στη λειτουργία Max η αυτονομία της μπαταρίας
φτάνει τα 15 λεπτά.
Σε χαμηλή λειτουργία η αυτονομία της μπαταρίας
φτάνει τα 30 λεπτά.
ΛΕΙΤΟΥΡΓΏΝΤΑΣ ΤΗ ΣΥΣΚΕΥΗ
1. Πιέστε προς τα κάτω το κουμπί λειτουργίας για να ξεκινήσετε
2. Πατήστε ξανά το κουμπί λειτουργίας για να σταματήσετε
3. Η μπαταρία πρέπει να επαναφορτίζεται μόνο όταν έχει απομείνει μόνο μια ένδειξη
φωτεινής ισχύος στην οθόνη LED και αναβοσβήνει συνεχώς.
Θύρα
φόρτισης
Crevice
Nozzle
Sofa
Brush
Adapter Manual
Ένδειξη
λειτουργίας
Πλήκτρο
λειτουργίας
Πλήκτρο
on/o

17GR
ΣΥΝΑΡΜΟΛΟΓΗΣΗ ΚΑΙ ΧΡΗΣΗΣ ΒΑΣΗΣ ΤΟΙΧΟΥ
Συναρμολόγηση της βάσης τοίχου
1. Όταν δεν χρησιμοποιείτε τη σκούπα, φυλάξτε την στη βάση της.
2. Επιλέξτε τη θέση συναρμολόγησης βάσης με βάση τις οδηγίες που εμφανίζονται στον
παρακάτω πίνακα. Τοποθετήστε τη βάση στον τοίχο και ασφαλίστε τη θέση με μια βίδα.
Βιδωτή
τρύπα
Πάτωμα
Τοποθετείστε τη βάση

18 GR
ΚΑΘΑΡΙΣΜΟΣ ΚΑΙ ΣΥΝΤΗΡΗΣΗ
Αντικατάσταση μπαταρίας
Συμβουλές::
1. Άτομα χωρίς επαγγελματική γνώση ή εμπειρία δεν πρέπει να αποσυναρμολογούν την
μπαταρία.
2. Η μπαταρία πρέπει να αντικατασταθεί και να επισκευαστεί από επαγγελματικό
προσωπικό.
Αποσυναρμολόγηση δοχείου σκόνης και καθαρισμός
Συμβουλή:
Για να διατηρήσετε την υψηλή ισχύ αναρρόφησης της ηλεκτρικής σκούπας, καθαρίστε
τακτικά τη σκόνη που μπορεί να συγκεντρωθεί.
Όταν η σκόνη έχει φτάσει στην ένδειξη μέγιστης γραμμής (MAX), πατήστε το κουμπί
απελευθέρωσης, ανοίξτε το κάτω κάλυμμα της δεξαμενής σκόνης και αφαιρέστε τη βρωμιά
και τη σκόνη.
Σημείο max Πιέστε

19GR
Καθαρισμός του φίλτρου αέρα
1. Πιέστε προς τα κάτω το πλήκτρο απελευθέρωσης του κάδου και αφιαρέσετε τον.
2. Βγάλτε τον κυκλώνα από τη δεξαμενή σκόνης.
3. Αποσυναρμολογήστε τον κυκλώνα και καθαρίστε τον προσεκτικά, όλα τα μέρη μπορούν
να πλυθούν.
4. Αφού αερίσετε πλήρως όλα τα μέρη, συναρμολογήστε τα σύμφωνα με τα βήματα
αποσυναρμολόγησης
Πιέστε
Σημείωση:
Για να αποφύγετε τη φραγή της ροής του αέρα, καθαρίστε τα μεγάλα σωματίδια όπως χαρτί,
πανί και άλλα.

20 GR
Καθαρισμός της μηχανοκίνητης βούρτσας
Σημείωση:
• Η κυλινδρική βούρτσα και οι τροχοί μπορεί να μπλέκονται εύκολα με τα μαλλιά και τη
σκόνη. Για να μην επηρεαστεί η κανονική λειτουργία τους, διατηρήστε τα καθαρά.
• Κατά την αποσυναρμολόγηση της κύριας βούρτσας, βεβαιωθείτε ότι η σκούπα δεν
λειτουργεί.
Οδηγίες
1. Πιέστε το κουμπί και βγάλτε τη βούρτσα.
2. Ανοίξτε το κάλυμμα της βούρτσας και, στη συνέχεια, βγάλτε την κυλινδρική βούρτσα και
καθαρίστε την. Αφού τη καθαρίσετε πλήρως, συναρμολογήστε τη σύμφωνα με τα βήματα
αποσυναρμολόγησης.
Συμβουλή:
Μην πλένετε τη βούρτσα.
Εάν η βούρτσα μπερδεύεται με τρίχες, καθαρίστε την με ένα αιχμηρό αντικείμενο, όπως
ένα ψαλίδι ή ένα μαχαίρι.
Πιέστε
Ανοίξτε το κάλυμμα της βούρτσας Αφαιρέστε τη βούρτσα
Pagina se încarcă...
Pagina se încarcă...
Pagina se încarcă...
Pagina se încarcă...
Pagina se încarcă...
Pagina se încarcă...
Pagina se încarcă...
Pagina se încarcă...
Pagina se încarcă...
Pagina se încarcă...
Pagina se încarcă...
Pagina se încarcă...
Pagina se încarcă...
Pagina se încarcă...
Pagina se încarcă...
Pagina se încarcă...
Pagina se încarcă...
Pagina se încarcă...
Pagina se încarcă...
Pagina se încarcă...
Pagina se încarcă...
Pagina se încarcă...
Pagina se încarcă...
Pagina se încarcă...
Pagina se încarcă...
Pagina se încarcă...
Pagina se încarcă...
Pagina se încarcă...
Pagina se încarcă...
Pagina se încarcă...
Pagina se încarcă...
Pagina se încarcă...
Pagina se încarcă...
Pagina se încarcă...
Pagina se încarcă...
Pagina se încarcă...
Pagina se încarcă...
Pagina se încarcă...
Pagina se încarcă...
Pagina se încarcă...
Pagina se încarcă...
Pagina se încarcă...
Pagina se încarcă...
Pagina se încarcă...
Pagina se încarcă...
Pagina se încarcă...
Pagina se încarcă...
Pagina se încarcă...
Pagina se încarcă...
Pagina se încarcă...
Pagina se încarcă...
Pagina se încarcă...
Pagina se încarcă...
Pagina se încarcă...
Pagina se încarcă...
Pagina se încarcă...
-
 1
1
-
 2
2
-
 3
3
-
 4
4
-
 5
5
-
 6
6
-
 7
7
-
 8
8
-
 9
9
-
 10
10
-
 11
11
-
 12
12
-
 13
13
-
 14
14
-
 15
15
-
 16
16
-
 17
17
-
 18
18
-
 19
19
-
 20
20
-
 21
21
-
 22
22
-
 23
23
-
 24
24
-
 25
25
-
 26
26
-
 27
27
-
 28
28
-
 29
29
-
 30
30
-
 31
31
-
 32
32
-
 33
33
-
 34
34
-
 35
35
-
 36
36
-
 37
37
-
 38
38
-
 39
39
-
 40
40
-
 41
41
-
 42
42
-
 43
43
-
 44
44
-
 45
45
-
 46
46
-
 47
47
-
 48
48
-
 49
49
-
 50
50
-
 51
51
-
 52
52
-
 53
53
-
 54
54
-
 55
55
-
 56
56
-
 57
57
-
 58
58
-
 59
59
-
 60
60
-
 61
61
-
 62
62
-
 63
63
-
 64
64
-
 65
65
-
 66
66
-
 67
67
-
 68
68
-
 69
69
-
 70
70
-
 71
71
-
 72
72
-
 73
73
-
 74
74
-
 75
75
-
 76
76


Inventor EP-ST22 Vacuum Cleaner Manual de utilizare
- Categorie
- Aspiratoare
- Tip
- Manual de utilizare
în alte limbi
Lucrări înrudite


Alte documente
-
Beko VRT94929VV Manual de utilizare
-
-
Hisense RVCL144AB Manual de utilizare
-
Silvercrest SAB 4.8 A2 Operating Instructions Manual
-
Philips FC6168/01 Informații importante
-
RAIDER Pro RDP-SDWCH20 Manual de utilizare
-
BorMann BBC1520 Manual de utilizare
-
Samsung VS15A6032R5 Manual de utilizare
-
-
Philips FC6163/02 Informații importante