Well PIGEON Ghid de instalare
- Tip
- Ghid de instalare

Installation and Operating Manual
2-Wire Audio Intercom
Model: PIGEON
Preorder NO: ADPK-PIGEON-WL

Features ...................................... 1
Package Contents ......................... 1
Safety Instruction .......................... 1
System Installation ....................... 2
Technical Specifications ................ 4
Troubleshooting ...........................
4
CONTENTS

Features
Package Contents
Safety Instruction
• Keep the indoor unit away from high temperatures, such as near an oven or in
direct sunlight, and high humidity, such as bathrooms and greenhouses.
• Do not place it near magnetic field and electric devices.
• Do not expose to direct sunlight, mount in a place protected from precipitation.
• Do not subject either the indoor or outdoor units to sudden shocks, such as being
struck or dropped.
• Never attempt to disassemble the device, leave repair to a professional.
• Disconnect supply voltage if the device is left unused for a longer period of time.
Caution
1. To prevent damage, the unit should be fastened on the wall according to instruction.
2. Power plug as disconnecting device should be kept easy to operate.
• Used as duplex doorphone as well as inner intercom.
• Clear intercom without noise.
• The talking distance is less than 150m.
• 2 wires for connecting all the units.
• Electronic-lock release function.
• The outdoor unit meets IP44 water-proof standards.
• Three different chimes for option.
• Indoor
• Outdoor
• 1 x Adapter
4 x Screws
• 4 x Silicone
Cap

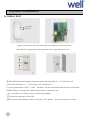
A.
Indoor Unit
①Drill proper holes in the wall according to the distance on the back shell of
the indoor unit, plug up the screw holes with silicone caps and then screws..
.
②Use RVV4×0.3mm² cables. Connect the wiring terminals L1, L2 of indoor unit
with wiring terminals 1 、2 of outdoor unit respectively.
The wiring terminals"LOCK+ , GND" of indoor unit are connected with electric lock through
RVV2X1.0mm². Сonnect the Power output plug to the power jack
of indoor unit. Please refer to the wiring diagram.
③ Hang the headset on the wall.
④Plug the power adapter into the sockets of AC power, then the system can work.
System Installation
UNLOCK
MELODY

Fixați unitatea la o înălțime între 1,4 și 1,7 m de la sol (în funcție de efectul camerei),
evitând lumina directă a
soarelui.
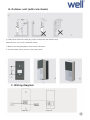
B.
Outdoor unit (with rain shade)
②.
Drill proper holes in the wall, plug up the screw holes with silicone caps.
Fasten the rain cover on the wall with screws.
③.
Refer to the wiring diagram to do the wire connection.
④.
Fix the outdoor unit on the rain cover with screws.
C.
Wiring diagram
Blocare
Outdor unit
Indor unit

Waste electrical and electronic equipment are a special waste category, collection,
storage, transport, treatment and recycling are important because they can avoid
environmental pollution and are harmful to health. Submitting waste electrical and
electronic equipment to special collection centers makes the waste to be recycled properly
and protecting the environment. Do not forget! Each electric appliance that arrives at the
landfill, the field, pollutes the environment!
Importer & distributor:
SC VITACOM ELECTRONICS SRL
CIF: RO 214527
Tel. 0264-438401*
sales@vitacom.ro, www.vitacom.ro
Input Voltage
AC100~240V 50/60Hz
Adapter Output
DC12V 1A
Power Consumption
Static state <1 W Working state <2 W
Audio Anti-distortion Power
<20mW
Frequency Response
1K~5KHz
Operating Temperature
-20℃~+50℃
Relative Humidity
10%~90% RH
Outline Size : mm(outdoor unit)
L115 x W47 x H30mm
Problem
Solutions
No sound or hard to hear
the visitor
• Make sure the doorphone handsets are plugged into
the doorphone intercom.
• Make sure the doorphones are connected to the power
supply and the power supply is switched on.
• Make sure the indoor units are properly connected to the
outdoor unit. And the wires are connected to the correct
terminals.
• Make sure the connecting wires from the indoor units
are properly connected to the terminal block
The door is not unlocked
when you press the door
unlock button
• Make sure the wiring to the electronic lock is wired
correctly and that the wires are properly attached.
Technical Specifications
Troubleshooting
-
 1
1
-
 2
2
-
 3
3
-
 4
4
-
 5
5
-
 6
6


Well PIGEON Ghid de instalare
- Tip
- Ghid de instalare
în alte limbi
- English: Well PIGEON Installation guide
Alte documente
-
Samsung AC140KXADGH/EU Manualul utilizatorului
-
Daikin VAM250FC Ghid de instalare
-
Daikin FTXM71M + RXM71M Manualul proprietarului
-
Samsung AC071JXSCEH/EU Manual de utilizare
-
Samsung AC100KX4DKH/EU Manualul utilizatorului
-
Samsung AC100RXADKG/EU Manual de utilizare
-
Samsung MIM-H04NDZ Manual de utilizare
-
-
-