STEINEL RS PRO R10 basic SC neutralweiß Manual de utilizare
- Tip
- Manual de utilizare


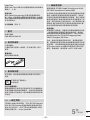
Textteil beachten!
Follow written instructions!
Suivre les instructions ci-après !
Tekstpassage in acht nemen!
Seguire attentamente le istruzioni!
¡Obsérvese la información textual!
Siga as instruções escritas
Följ den skriftliga montageinstruktionen.
Følg de skriftlige instruktioner!
Huomioi tekstiosa!
Se tekstdelen!
Τηρείτε γραπτές οδηγίες!
Yazılı talimatlara uyunuz!
A szöveges utasításokat tartsa meg!
Dodržujte písemné pokyny!
Dodržiavajte písomné informácie!
Postępować zgodnie zinstrukcją!
Respectai instruciunile următoare!
Upoštevajte besedilo!
Pridržavajte se uputa!
Järgige tekstiosa!
Atsižvelgti į rašytines instrukcijas!
Pievērsiet uzmanību teksta daļai!
Прочетете инструкциите!
遵守文字说明要求!
Соблюдать текстовую инструкцию!
...
– 2 –
3.1
3.2
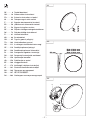
R20: Ø 350 mm
R30: Ø 420 mm
R10: Ø 300 mm
55 mm
3.3
C
E
AB
E
D
L
– 3 –
3.4
3.5
R30: 350 mm
R20: 300 mm
R30: 350 mm
R20: 300 mm
55 mm
3.6 4
C
E
AB
D
E
4.1
L N
L N
L N
L N L N
I
O
5
5.1
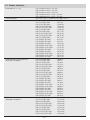
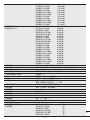
DE . . . . . 8
GB . . . . 16
FR . . . . 24
NL . . . . 33
IT . . . . . 41
ES . . . . 50
PT . . . . 58
SE . . . . 66
DK . . . . 74
FI . . . . . 81
NO . . . . 88
GR . . . . 95
TR . . . 103
HU . . . 111
CZ . . . 119
SK . . . 126
PL . . . 133
RO . . . 142
SI . . . . 150
HR . . . 158
EE . . . 166
LT . . . . 173
LV . . . . 181
BG . . . 189
CN . . . 197
RU . . . 204
– 2 –

– 3 –
3.4
3.5
R30: 350 mm
R20: 300 mm
R30: 350 mm
R20: 300 mm
55 mm
3.6 4
C
E
AB
D
E
4.1
L N
L N
L N
L N L N
I
O
5
5.1
– 3 –

– 4 –
5.2
5.3
Ø 6
5.4
5.5
5.6
N
L
5.7 6
DC: L = +
N = –
– 4 –

– 5 –
6.1
D
10 m
D
D
D
D
D
– 5 –

6.2
R10 PLUS SC NW
R10 PLUS SC WW
R10 BASIC SC NW
R10 BASIC SC WW
R20 PLUS SC NW
R20 PLUS SC WW
R20 BASIC SC NW
R20 BASIC SC WW
R20 PLUS Q SC NW
R20 PLUS Q SC WW
R20 BASIC Q SC NW
R20 BASIC Q SC WW
R30 PLUS SC WW
R30 BASIC SC NW
R30 BASIC SC WW
R30 PLUS Q SC NW
R30 PLUS Q SC WW
R30 BASIC Q SC NW
R30 BASIC Q SC WW
– 6 –

6.2
R10 PLUS SC NW
R10 PLUS SC WW
R10 BASIC SC NW
R10 BASIC SC WW
R20 PLUS SC NW
R20 PLUS SC WW
R20 BASIC SC NW
R20 BASIC SC WW
R20 PLUS Q SC NW
R20 PLUS Q SC WW
R20 BASIC Q SC NW
R20 BASIC Q SC WW
R30 PLUS SC WW
R30 BASIC SC NW
R30 BASIC SC WW
R30 PLUS Q SC NW
R30 PLUS Q SC WW
R30 BASIC Q SC NW
R30 BASIC Q SC WW
– 7 –

DE
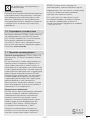
1. Zu diesem Dokument
Bitte sorgfältig lesen und aufbewahren!
– Urheberrechtlich geschützt. Nachdruck, auch
auszugsweise, nur mit unserer Genehmigung.
– Änderungen, die dem technischen Fortschritt
dienen, vorbehalten.
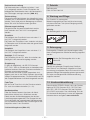
Symbolerklärung
!
Warnung vor Gefahren!
... Verweis auf Textstellen im Dokument.
2. Allgemeine Sicherheitshinweise
!
Vor allen Arbeiten am Gerät die
Spannungszufuhr unterbrechen!
Bei der Montage muss die anzuschließende elekt-
rische Leitung spannungsfrei sein. Daher als Erstes
Strom abschalten und Spannungsfreiheit mit einem
Spannungsprüfer überprüfen.
• Bei der Installation der Sensorleuchte handelt es
sich um eine Arbeit an der Netzspannung.
Sie muss daher fachgerecht nach den landes-
üblichen Installationsvorschriften und Anschluss-
bedingungen durchgeführt werden. (z. B.
DE-VDE 0100, AT-ÖVE/ÖNORME8001-1,
CH-SEV1000)
• Nur Original-Ersatzteile verwenden.
• Reparaturen dürfen nur durch Fachwerkstätten
durchgeführt werden.
• Die Lichtquelle dieser Leuchte ist nicht ersetzbar;
falls die Lichtquelle ersetzt werden muss (z.B.
am Ende ihrer Lebensdauer), ist die komplette
Leuchte zu ersetzen.
3. RS PRO Connect R10 /
RS PRO Connect R20 /
RS PRO Connect R30
Bestimmungsgemäßer Gebrauch
– Sensor-Innenleuchte mit aktivem Bewegungs-
melder zur Montage in Innenräumen
– mit Notlicht nachrüstbar
Hinweis:
Bitte sorgen Sie bei der Installation dafür, dass
ein Abstand von min. 3 m zu WLAN Router oder
Access Points eingehalten wird.
Der integrierte HF-Sensor sendet hochfrequente
elektromagnetische Wellen (5,8GHz) aus und emp-
fängt deren Echo. Bei der kleinsten Bewegung im
Erfassungsbereich der Leuchte wird die Echoverän-
derung vom Sensor wahrgenommen.
Ein Microprozessor löst dann den Schaltbefehl
„Licht einschalten“ aus. Eine Erfassung durch Türen,
Glasscheiben oder dünne Wände ist möglich.
Hinweis:
Die Hochfrequenzleistung des HF-Sensors beträgt
ca. 1 mW – das ist nur ein 1.000stel der Sendeleis-
tung eines Handys oder einer Microwelle.
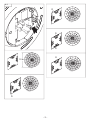
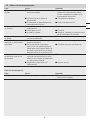
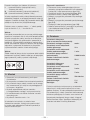
Lieferumfang rund (Abb. 3.1)
Sensorleuchte
3 Abstandhalter
2 Steckblenden
Produktmaße rund (Abb. 3.2)
Geräteübersicht rund (Abb. 3.3)
A Leuchtengehäuse
B Wandhalter
C Anschlussklemme
D Steckblenden
E Rastungen für Steckblenden
Lieferumfang eckig (Abb. 3.4)
Sensorleuchte
3 Abstandhalter
2 Steckblenden
Produktmaße eckig (Abb. 3.5)
Geräteübersicht eckig (Abb. 3.6)
A Leuchtengehäuse
B Wandhalter
C Anschlussklemme
D Steckblenden
E Rastungen für Steckblenden
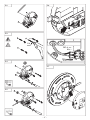
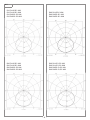
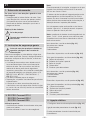
4. Elektrischer Anschluss
• Stromversorgung abschalten (Abb.4.1)
Anschluss Netzzuleitung (Abb.4.1)
Die Netzzuleitung besteht aus einem 3-adrigen
Kabel:
L = Phase (meistens schwarz, braun oder grau)
N = Neutralleiter (meistens blau)
PE = Schutzleiter (grün / gelb)
– 8 –

Im Zweifel müssen Sie die Leitungen mit einem
Spannungsprüfer identifizieren; anschließend wieder
spannungsfrei schalten. Phase (L) und Neutralleiter
(N) werden an der Anschlussklemme angeschlossen.
Für den DC-Betrieb wird an der Klemme L „+“ und
an der Klemme N „–“ angeschlossen.
Wichtig:
Ein Vertauschen der Anschlüsse führt im Gerät oder
Ihrem Sicherungskasten später zum Kurzschluss. In
diesem Fall müssen nochmals die einzelnen Kabel
identifiziert und neu verbunden werden. In die Netz-
zuleitung kann selbstverständlich ein Netzschalter
zum Ein- und Ausschalten installiert sein (bei Ver-
wendung ohne Notlichtmodul).
Wichtig:
Die Lichtquelle dieser Leuchte ist nicht austausch-
bar; falls die Lichtquelle ersetzt werden muss (z.B.
am Ende ihrer Lebensdauer), ist die komplette
Leuchte zu ersetzen.
5. Montage
• Alle Bauteile auf Beschädigung prüfen.
• Bei Schäden das Produkt nicht in Betrieb nehmen.
• Bei der Montage der Leuchte ist darauf zu
achten, dass sie erschütterungsfrei befestigt wird.
• Geeigneten Montageort auswählen unter Berück-
sichtigung der Reichweite und Bewegungs-
erfassung.
• Die Lüftungsschlitze dürfen nach der Montage
nicht abgedeckt sein.
• Montagehöhe max. 4 m.
Abhängig von der Montageart, Montagehöhe und
Umgebung kann die Erfassungsreichweite von
dem in den Technischen Daten angegebenen Wert
abweichen.
Montageschritte
• Sicherungsschrauben lösen (kein komplettes
Entfernen der Sicherungsschrauben notwendig)
und Leuchtengehäuse abnehmen (Abb.5.1)
• Bohrlöcher anzeichnen (Abb.5.2)
• Löcher bohren und Dübel einsetzen (Abb.5.3)
• Montage bei Zuleitung Aufputz (Abb.5.4)
• Montage bei Zuleitung Unterputz (Abb.5.5)
• Anschlusskabel anschließen (Abb.5.6)
• Leuchtengehäuse aufsetzen und Sicherungs-
schrauben festziehen (Abb.5.7)
• Stromversorgung einschalten
6. Funktion
Werkseinstellungen (Auslieferungszustand)
Reichweiteneinstellung: max.
Zeiteinstellung Hauptlicht: 10 sek.
Zeiteinstellung Grundlicht: 1 min.
Dämmerungseinstellung: 2.000 Lux
Grundlicht Dimmlevel: 50%
Werkseinstellungen
Reichweiteneinstellung: 10 m
Zeiteinstellung Hauptlicht: 3 min.
Zeiteinstellung Grundlicht: 5 min.
Dämmerungseinstellung: 500 Lux
Grundlicht Dimmlevel: 5%
Backlight: ON
Die Sensorfunktion ist in der Werkseinstellung
aktiviert, damit die Leuchte direkt betriebsbereit
ist. Um das Produkt in den Referenzmodus zu
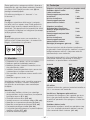
versetzen, ist die technische Dokumentation unter:
www.steinel.de aufzurufen.
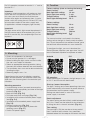
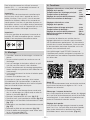
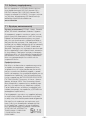
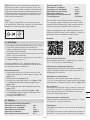
Für die Konfiguration der Leuchte muss die Steinel
Connect App aus Ihrem AppStore herunter-
geladen werden. Es ist ein Bluetooth-fähiges
Smartphone oder Tablet erforderlich.
Android iOS
DC-Betrieb
Im Betrieb mit Gleichspannung wird die Lichtleis-
tung auf 100% gesetzt und der Sensor deaktiviert.
Start-Up / Spannungsunterbrechung
Beim Trennen der Netzspannung werden die
Einstellungen sowie der aktuelle Betriebszustand
der Leuchte gespeichert. Liegt die Netzspannung
wieder an, werden diese wiederhergestellt.
– 9 –
DE

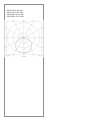
Reichweiteneinstellung
Die Reichweite kann stufenlos zwischen 1 und
10m eingestellt werden. Durch Einstecken der
beiliegenden Steckblenden kann die Reichweite in
vier Richtungen verringert werden. (Abb.6.1)
Zeiteinstellung
Die gewünschte Leuchtdauer des Hauptlichts kann
stufenlos von 5Sekunden bis 60Minuten eingestellt
werden. Durch jede erfasste Bewegung vor Ablauf
dieser Zeit wird die Zeituhr erneut gestartet.
Dämmerungseinstellung
Die gewünschte Ansprechschwelle der Leuchte
kann stufenlos von 2 bis 2.000Lux eingestellt
werden.
Grundlicht
Die Helligkeit des Grundlichts kann zwischen 1%
und 100% eingestellt werden.
Die Dauer des Grundlichts kann stufenlos zwischen
10Sekunden und 30Minuten oder die ganze Nacht
eingestellt werden.
Hauptlicht
Die Helligkeit des Hauptlichts kann zwischen 1%
und 100% eingestellt werden.
Backlight (PLUS Variante)
Die Einstellung für das Ein- oder Ausschalten des
Backlights kann manuell festgelegt werden.
Gruppierung
Es gibt die Möglichkeit, die RS PRO Connect
R10/R20/R30 als Einzelleuchte zu betreiben oder
mehrere Leuchten über eine Funkkommunikation in
Gruppen zusammenzuschalten.
Alle Leuchten die einer Gruppe zugeordnet sind,
agieren nach den in der Steinel Connect App einge-
stellten Gruppenparametern. Die Reichweite kann für
alle Gruppenteilnehmer individuell eingestellt werden.
Fade Time
Mit der Fade Time lässt sich die Dimmkurve beim
Ein- und Ausschalten einstellen (1s – 3s).
Nachbarfunktion
Über die Steinel Connect App kann die Nach-
barfunktion aktiviert bzw. deaktiviert werden.
Dabei werden die Nachbargruppen der aktiven
Leuchtengruppe zugeordnet. Die Gruppe hört auf
Einschaltsignale der zugeordneten Nachbargruppe
und schaltet entsprechend der Einstellungen in das
Hauptlicht oder in das Grundlicht.
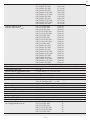
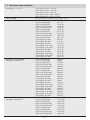
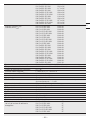
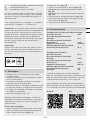
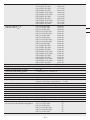
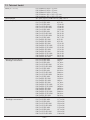
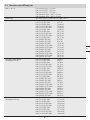
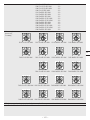
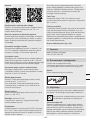
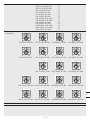
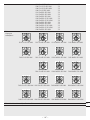
Lichtverteilungskurve (Abb. 6.2)
7. Zubehör
Notlichtmodul
EAN 4007841064143
8. Wartung und Pflege
Das Produkt ist wartungsfrei.
Beleuchtungsgehäuse kann bei Verschmutzung
mit einem feuchten Tuch (ohne Reinigungsmittel)
gesäubert werden.
Wichtig:
Das Betriebsgerät ist nicht austauschbar.
9. Entsorgung
Elektrogeräte, Zubehör und Verpackungen sollen
einer umweltgerechten Wiederverwertung zugeführt
werden.
Werfen Sie Elektrogeräte nicht in den
Hausmüll!
Nur für EU-Länder:
Gemäß der geltenden Europäischen Richtlinie
über Elektro- und Elektronik-Altgeräte und ihrer
Umsetzung in nationales Recht müssen nicht mehr
gebrauchsfähige Elektrogeräte getrennt gesammelt
und einer umweltgerechten Wiederverwertung
zugeführt werden.
10. Konformitätserklärung
Hiermit erklärt STEINEL GmbH, dass der Funkan-
lagentyp RSPROConnectR10/ RSPROCon-
nectR20/ RSPROConnectR30 der Richtlinie
2014/53/EU entspricht. Der vollständige Text der
EU-Konformitätserklärung ist unter der folgenden
Internetadresse verfügbar: www.steinel.de
– 10 –

11. Herstellergarantie
Herstellergarantie der STEINEL GmbH, Dieselstra-
ße 80-84, 33442 Herzebrock-Clarholz
Alle STEINEL-Produkte erfüllen höchste Qualitätsan-
sprüche. Aus diesem Grund leisten wir als Hersteller
Ihnen als Kunde gerne eine Garantie gemäß den
nachstehenden Bedingungen:
Die Garantie umfasst die Freiheit von Mängeln, die
nachweislich auf einem Material- oder Herstellungs-
fehler beruhen und uns unverzüglich nach Fest-
stellung und innerhalb der Garantiezeit gemeldet
werden. Die Garantie erstreckt sich auf sämtliche
STEINEL Professional-Produkte, die in Deutschland
gekauft und verwendet werden.
Unsere Garantieleistungen für Verbraucher
Die nachstehenden Regelungen gelten für Verbrau-
cher. Verbraucher ist jede natürliche Person ist, die
bei Abschluss des Kaufes weder in Ausübung ihrer
gewerblichen noch ihrer selbständigen beruflichen
Tätigkeit handelt.
Sie haben die Wahl, ob wir die Garantieleistung
durch kostenlose Reparatur, kostenlosen Austausch
(ggf. durch ein gleich- oder höherwertiges Nachfol-
gemodell) oder Erstellung einer Gutschrift leisten.
Die Garantiezeit für Ihr erworbenes STEINEL
Professional-Produkt beträgt bei Sensoren, Strahlern,
Außen- und Innenleuchten 5Jahre jeweils ab Kauf-
datum des Produkts.
Wir tragen die Transportkosten, jedoch nicht die
Transportrisiken der Rücksendung.
Unsere Garantieleistungen für Unternehmer
Die nachstehenden Regelungen gelten für Un-
ternehmer. Unternehmer ist eine natürliche oder
juristische Person oder eine rechtsfähige Personen-
gesellschaft ist, die bei Abschluss des Kaufes in
Ausübung ihrer gewerblichen oder selbständigen
beruflichen Tätigkeit handelt.
Wir haben die Wahl, ob wir die Garantieleistung
durch kostenlose Behebung der Mängel, kos-
tenlosen Austausch (ggf. durch eine gleich- oder
höherwertiges Nachfolgemodell) oder Erstellung
einer Gutschrift leisten.
Die Garantiezeit für Ihr erworbenes STEINEL
Professional-Produkt beträgt bei Sensoren, Strah-
lern, Außen- und Innenleuchten 5Jahre jeweils ab
Kaufdatum des Produkts.
Im Rahmen der Garantieleistung tragen wir nicht
Ihre zum Zwecke der Nacherfüllung erforderlichen
Aufwendungen und nicht Ihre Aufwendungen für
den Ausbau des mangelhaften Produkts und den
Einbau eines Austauschprodukts.
Gesetzliche Mängelrechte, Unentgeltlichkeit
Die hier beschriebenen Leistungen gelten zusätz-
lich zu den gesetzlichen Gewährleistungsansprü-
chen – einschließlich besonderer Schutzbestim-
mungen für Verbraucher – und beschränken oder
ersetzen diese nicht. Die Inanspruchnahme Ihrer
gesetzlichen Rechte bei Mängeln ist unentgeltlich.
Ausnahmen von der Garantie
Ausdrücklich ausgenommen von dieser Garantie
sind alle auswechselbaren Leuchtmittel.
Darüber hinaus ist die Garantie ausgeschlossen:
–bei einem gebrauchsbedingten oder sonstigen
natürlichen Verschleiß von Produktteilen oder
Mängeln am STEINEL Professional-Produkt, die
auf gebrauchsbedingtem oder sonstigem natürli-
chen Verschleiß zurückzuführen sind,
–bei nicht bestimmungs- oder unsachgemäßem
Gebrauch des Produkts oder Missachtung der
Bedienungshinweise,
–wenn An- und Umbauten bzw. sonstige Modifika-
tionen an dem Produkt eigenmächtig vorgenom-
men wurden oder Mängel auf die Verwendung
von Zubehör-, Ergänzungs- oder Ersatzteilen
zurückzuführen sind, die keine STEINEL-Original-
teile sind,
–wenn Wartung und Pflege der Produkte nicht
entsprechend der Bedienungsanleitung erfolgt
sind,
–wenn Anbau- und Installation nicht gemäß den
Installationsvorschriften von STEINEL ausgeführt
wurden,
– bei Transportschäden oder -verlusten.
Geltung deutschen Rechts
Es gilt deutsches Recht unter Ausschluss des Über-
einkommens der Vereinten Nationen über Verträge
über den internationalen Warenkauf (CISG).
Geltendmachung
Wenn Sie die Garantie in Anspruch nehmen wollen,
senden Sie Ihr Produkt bitte vollständig mit dem
Original-Kaufbeleg, der die Angabe des Kaufda-
tums und der Produktbezeichnung enthalten muss,
an Ihren Händler oder direkt an uns, die STEINEL
GmbH – Reklamationsabteilung – , Dieselstraße
80-84, 33442 Herzebrock-Clarholz (AT: STEINEL
Austria GmbH – Hirschstettnerstraße 19/G/1/1, AT-
1220 Wien, CH: PUAG AG, Oberebenestrasse 51,
CH-5620 Bremgarten). Wir empfehlen Ihnen daher,
Ihren Kaufbeleg bis zum Ablauf der Garantiezeit
sorgfältig aufzubewahren.
HERSTELLER
1
3
JAHR
DEU
GARANTIE
5
HERSTELLER
GARANTIE
HERSTELLER
GARANTIE
– 11 –
DE

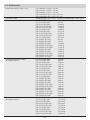
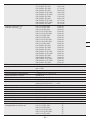
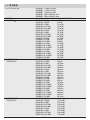
Abmessungen (L×B×H): R10 rund: Ø 300×55mm
R20 rund: Ø 350×55mm
R30 rund: Ø 420×55mm
R20 eckig: 300×300×55mm
R30 eckig: 350×350×55mm
Netzspannung AC: 220 – 240 V, 50/60 Hz DC: 186 – 250 V
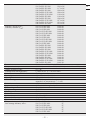
Leistungsaufnahme (Pon): R10 PLUS SC NW:
R10 PLUS SC WW:
R20 PLUS SC NW:
R20 PLUS Q SC NW:
R20 PLUS Q SC WW:
R20 PLUS SC WW:
R30 PLUS SC NW:
R30 PLUS Q SC NW:
R30 PLUS Q SC WW:
R30 PLUS SC WW:
R10 BASIC SC NW:
R10 BASIC SC WW:
R20 BASIC SC NW:
R20 BASIC Q SC NW:
R20 BASIC Q SC WW:
R20 BASIC SC WW:
R30 BASIC SC NW:
R30 BASIC Q SC NW:
R30 BASIC Q SC WW:
R30 BASIC SC WW:
8,50W
8,50W
15,86W
15,86W
15,86W
15,86W
23,70W
23,90W
23,90W
23,70W
8,50W
8,50W
15,30W
15,30W
15,40 W
15,30W
23,39W
23,40W
23,30W
23,22W
Lichtstrom mit Haube
„Backlight ausgeschaltet“: R10 PLUS SC NW:
R10 PLUS SC WW:
R20 PLUS SC NW:
R20 PLUS Q SC NW:
R20 PLUS Q SC WW:
R20 PLUS SC WW:
R30 PLUS SC NW:
R30 PLUS Q SC NW:
R30 PLUS Q SC WW:
R30 PLUS SC WW:
R10 BASIC SC NW:
R10 BASIC SC WW:
R20 BASIC SC NW:
R20 BASIC Q SC NW:
R20 BASIC Q SC WW:
R20 BASIC SC WW:
R30 BASIC SC NW:
R30 BASIC Q SC NW:
R30 BASIC Q SC WW:
R30 BASIC SC WW:
1053lm
992lm
1976lm
1970lm
1826lm
1823lm
3019lm
2964lm
2813lm
2813lm
1053lm
992lm
1976lm
1970lm
1826lm
1823lm
3019lm
2964lm
2813lm
2813lm
Ezienz mit Haube
„Backlight ausgeschaltet“: R10 PLUS SC NW:
R10 PLUS SC WW:
R20 PLUS SC NW:
R20 PLUS Q SC NW:
R20 PLUS Q SC WW:
R20 PLUS SC WW:
R30 PLUS SC NW:
R30 PLUS Q SC NW:
R30 PLUS Q SC WW:
124lm/W
117lm/W
125lm/W
124lm/W
115lm/W
115lm/W
127lm/W
124lm/W
118lm/W
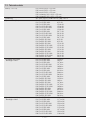
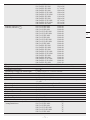
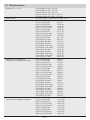
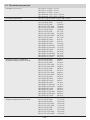
12. Technische Daten
– 12 –

R30 PLUS SC WW:
R10 BASIC SC NW:
R10 BASIC SC WW:
R20 BASIC SC NW:
R20 BASIC Q SC NW:
R20 BASIC Q SC WW:
R20 BASIC SC WW:
R30 BASIC SC NW:
R30 BASIC Q SC NW:
R30 BASIC Q SC WW:
R30 BASIC SC WW:
119lm/W
124lm/W
117lm/W
129lm/W
129lm/W
119lm/W
119lm/W
129lm/W
127lm/W
121lm/W
121lm/W
Standby Sensor (Psb) /
Standby Netzwerk (Pnet): R10 PLUS SC NW:
R10 PLUS SC WW:
R20 PLUS SC NW:
R20 PLUS Q SC NW:
R20 PLUS Q SC WW:
R20 PLUS SC WW:
R30 PLUS SC NW:
R30 PLUS Q SC NW:
R30 PLUS Q SC WW:
R30 PLUS SC WW:
R10 BASIC SC NW:
R10 BASIC SC WW:
R20 BASIC SC NW:
R20 BASIC Q SC NW:
R20 BASIC Q SC WW:
R20 BASIC SC WW:
R30 BASIC SC NW:
R30 BASIC Q SC NW:
R30 BASIC Q SC WW:
R30 BASIC SC WW:
0,308W
0,308W
0,308W
0,308W
0,308W
0,308W
0,308W
0,308W
0,308W
0,308W
0,306W
0,306W
0,306W
0,306W
0,306W
0,306W
0,306W
0,306W
0,306W
0,302W
Leistungsfaktor: R10 0,89 / R20 0,91 / R30 0,93
Farbtemperatur Leuchtmittel 3.000K (warmweiß=WW)/4.000K (neutralweiß=NW)
Farbwiedergabeindex: Ra=82
Mittlere Bemessungslebensdauer: L70B50 bei 25°C: >60.000Std.
Farbkonsistenz SDCM: Anfangswert: 3
Grundlicht einstellbar von 1 – 100%
Hauptlicht einstellbar von 1 – 100%
HF-Technik 5,8GHz (reagiert temperaturunabhängig auf
kleinste Bewegungen) / <1mW
Erfassungsreichweite 1 – 10m Durchmesser, stufenlos einstellbar
Erfassungswinkel 360° mit 160° Önungswinkel
Zeiteinstellung 5 s – 60min
Dämmerungseinstellung 2 – 2.000Lux
Schutzart IP40
Schutzklasse II
Umgebungstemperatur -20°C bis +40°C
Frequenz Bluetooth 2,4 – 2,48GHz
Sendeleistung Bluetooth 5dBm/3mW
Dieses Produkt enthält eine Lichquelle
der Energieezienzklasse: R10 PLUS SC NW:
R10 PLUS SC WW:
R20 PLUS SC NW:
R20 PLUS Q SC NW:
R20 PLUS Q SC WW:
R20 PLUS SC WW:
„D“
„D“
„D“
„D“
„D“
„D“
– 13 –
DE

R30 PLUS SC NW:
R30 PLUS Q SC NW:
R30 PLUS Q SC WW:
R30 PLUS SC WW:
R10 BASIC SC NW:
R10 BASIC SC WW:
R20 BASIC SC NW:
R20 BASIC Q SC NW:
R20 BASIC Q SC WW:
R20 BASIC SC WW:
R30 BASIC SC NW:
R30 BASIC Q SC NW:
R30 BASIC Q SC WW:
R30 BASIC SC WW:
„D“
„D“
„D“
„D“
„D“
„D“
„D“
„D“
„D“
„D“
„D“
„C“
„C“
„D“
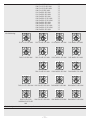
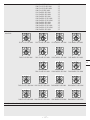
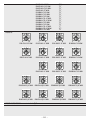
Lichtstärke-
verteilung:
LumEdit
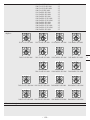
202101200639_R10 4000K mit heller Haube_HW von 2361_5.0x5.0
Polardiagramm
28.06.21 / 10:35 1/1
100
200
300
90°90°
180°
0° 30°30°
150°150°
60°
120°
60°
120°
cd / 1000 lm
072C / 09C081C / 0C
LumEdit
202101200639_R10 4000K mit heller Haube_HW von 2361_5.0x5.0
Polardiagramm
28.06.21 / 10:35 1/1
100
200
300
90°90°
180°
0° 30°30°
150°150°
60°
120°
60°
120°
cd / 1000 lm
072C / 09C081C / 0C
LumEdit
202101200639_R10 4000K mit heller Haube_HW von 2361_5.0x5.0
Polardiagramm
28.06.21 / 10:35 1/1
100
200
300
90°90°
180°
0° 30°30°
150°150°
60°
120°
60°
120°
cd / 1000 lm
072C / 09C081C / 0C
LumEdit
202101200639_R10 4000K mit heller Haube_HW von 2361_5.0x5.0
Polardiagramm
28.06.21 / 10:35 1/1
100
200
300
90°90°
180°
0° 30°30°
150°150°
60°
120°
60°
120°
cd / 1000 lm
072C / 09C081C / 0C
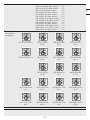
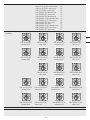
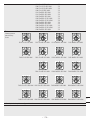
R10 PLUS SC NW R10 PLUS SC WW R10 BASIC SC NW R10 BASIC SC WW
LumEdit
202101110607_R20 4000K Zulassung Wallenhorst mit neuer Macr
Polardiagramm
28.06.21 / 10:38 1/1
100
200
300
90°90°
180°
0° 30°30°
150°150°
60°
120°
60°
120°
cd / 1000 lm
072C / 09C081C / 0C
LumEdit
202101110607_R20 4000K Zulassung Wallenhorst mit neuer Macr
Polardiagramm
28.06.21 / 10:38 1/1
100
200
300
90°90°
180°
0° 30°30°
150°150°
60°
120°
60°
120°
cd / 1000 lm
072C / 09C081C / 0C
LumEdit
202101110607_R20 4000K Zulassung Wallenhorst mit neuer Macr
Polardiagramm
28.06.21 / 10:38 1/1
100
200
300
90°90°
180°
0° 30°30°
150°150°
60°
120°
60°
120°
cd / 1000 lm
072C / 09C081C / 0C
LumEdit
202101110607_R20 4000K Zulassung Wallenhorst mit neuer Macr
Polardiagramm
28.06.21 / 10:38 1/1
100
200
300
90°90°
180°
0° 30°30°
150°150°
60°
120°
60°
120°
cd / 1000 lm
072C / 09C081C / 0C
R20 PLUS SC NW R20 PLUS SC WW R20 BASIC SC NW R20 BASIC SC WW
LumEdit 201812171006_R30_WW_mit_Haube_2540_5.0x5.0 Polardiagramm
28.06.21 / 16:26 1/1
100
200
300
90°90°
180°
0° 30°30°
150°150°
60°
120°
60°
120°
cd / 1000 lm
072C / 09C081C / 0C
LumEdit 201812171006_R30_WW_mit_Haube_2540_5.0x5.0 Polardiagramm
28.06.21 / 16:26 1/1
100
200
300
90°90°
180°
0° 30°30°
150°150°
60°
120°
60°
120°
cd / 1000 lm
072C / 09C081C / 0C
LumEdit 201812171006_R30_WW_mit_Haube_2540_5.0x5.0 Polardiagramm
28.06.21 / 16:26 1/1
100
200
300
90°90°
180°
0° 30°30°
150°150°
60°
120°
60°
120°
cd / 1000 lm
072C / 09C081C / 0C
R30 PLUS SC WW R30 BASIC SC NW R30 BASIC SC WW
LumEdit 202104061040_R20_Q_Plus_NW_#11_mit_Haube_5.0x5.0Polardiagramm
28.06.21 / 10:28 1/1
100
200
300
90°90°
180°
0° 30°30°
150°150°
60°
120°
60°
120°
cd / 1000 lm
072C / 09C081C / 0C
LumEdit 202104061040_R20_Q_Plus_NW_#11_mit_Haube_5.0x5.0Polardiagramm
28.06.21 / 10:28 1/1
100
200
300
90°90°
180°
0° 30°30°
150°150°
60°
120°
60°
120°
cd / 1000 lm
072C / 09C081C / 0C
LumEdit 202104061040_R20_Q_Plus_NW_#11_mit_Haube_5.0x5.0Polardiagramm
28.06.21 / 10:28 1/1
100
200
300
90°90°
180°
0° 30°30°
150°150°
60°
120°
60°
120°
cd / 1000 lm
072C / 09C081C / 0C
LumEdit 202104061040_R20_Q_Plus_NW_#11_mit_Haube_5.0x5.0Polardiagramm
28.06.21 / 10:28 1/1
100
200
300
90°90°
180°
0° 30°30°
150°150°
60°
120°
60°
120°
cd / 1000 lm
072C / 09C081C / 0C
R20 PLUS Q SC NW R20 PLUS Q SC WW R20 BASIC Q SC NW R20 BASIC Q SC WW
LumEdit 202104071203_R30_Q_Plus_NW_#13_mit_Haube_5.0x5.0Polardiagramm
28.06.21 / 10:40 1/1
100
200
300
90°90°
180°
0° 30°30°
150°150°
60°
120°
60°
120°
cd / 1000 lm
072C / 09C081C / 0C
LumEdit 202104071203_R30_Q_Plus_NW_#13_mit_Haube_5.0x5.0Polardiagramm
28.06.21 / 10:40 1/1
100
200
300
90°90°
180°
0° 30°30°
150°150°
60°
120°
60°
120°
cd / 1000 lm
072C / 09C081C / 0C
LumEdit 202104071203_R30_Q_Plus_NW_#13_mit_Haube_5.0x5.0Polardiagramm
28.06.21 / 10:40 1/1
100
200
300
90°90°
180°
0° 30°30°
150°150°
60°
120°
60°
120°
cd / 1000 lm
072C / 09C081C / 0C
LumEdit 202104071203_R30_Q_Plus_NW_#13_mit_Haube_5.0x5.0Polardiagramm
28.06.21 / 10:40 1/1
100
200
300
90°90°
180°
0° 30°30°
150°150°
60°
120°
60°
120°
cd / 1000 lm
072C / 09C081C / 0C
R30 PLUS Q SC NW R30 PLUS Q SC WW R30 BASIC Q SC NW R30 BASIC Q SC WW
Vollständige technische Informationen sind zu finden unter www.steinel.de
– 14 –

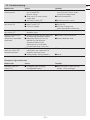
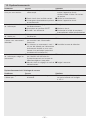
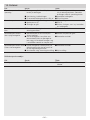
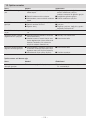
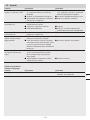
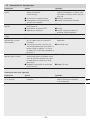
Störung Ursache Abhilfe
Sensorleuchte ohne
Spannung ■Sicherung hat ausgelöst,
nicht eingeschaltet,
Leitung unterbrochen
■Kurzschluss in der Netzzuleitung
■Eventuell vorhandener Netzschalter
aus
■Sicherung einschalten, tauschen,
Netz schalter einschalten, Lei tung
überprüfen mit Spannungsprüfer
■Anschlüsse überprüfen
■Netzschalter einschalten
Sensorleuchte schaltet
nicht ein ■Dämmerungseinstellung falsch
gewählt
■Netzschalter AUS
■Sicherung hat ausgelöst
■neu einstellen
■einschalten
■Sicherung einschalten, tauschen,
evtl. Anschluss überprüfen
Sensorleuchte schaltet
nicht aus ■dauernde Bewegung im Erfassungs-
bereich ■Bereich kontrollieren
Sensorleuchte schaltet
ohne erkennbare
Bewegung ein
■Sensorleuchte nicht bewegungs-
sicher montiert
■Bewegung lag vor, wurde jedoch
vom Beobachter nicht erkannt
(Bewegung hinter Wand, Bewegung
eines kleinen Objektes in unmittelba-
rer Leuchtennähe etc.)
■Gehäuse fest montieren
■Bereich kontrollieren
Sensorleuchte schaltet
trotz Bewegung nicht ein ■schnelle Bewegungen werden zur
Störungsmini mierung unterdrückt
oder Erfassungsbereich zu klein
eingestellt
■Dämmerungseinstellung falsch
gewählt
■Bereich kontrollieren
■neu einstellen
Betriebsstörung Notlicht
Störung Ursache Abhilfe
Backlight schaltet
nicht ein ■Notlicht lädt Akku ■warten bis zu 24 h, bis Akku voll
geladen ist
13. Betriebsstörungen
– 15 –
DE

GB
1. About this document
Please read carefully and keep in a safe place.
– Under copyright. Reproduction either in whole or
in part only with our consent.
– Subject to change in the interest of technical
progress.
Symbols
!
Hazard warning!
...
Reference to other information in the
document.
2. General safety precautions
!
Disconnect the power supply before
attempting any work on the unit.
During installation, the electric power cable being
connected must not be live. Therefore, switch o
the power first and use a voltage tester to make
sure the wiring is o-circuit.
• Installing the sensor-switched light involves work
on the mains supply voltage. This work must
therefore be carried out professionally in accord-
ance with national wiring regulations and elec-
trical operating conditions. (e.g. DE-VDE 0100,
AT-ÖVE/ÖNORME8001-1, CH-SEV1000)
• Only use genuine replacement parts.
• Repairs may only be made by specialist work-
shops.
• The light source of this light cannot be replaced.
If the light source needs to be replaced (e.g. at
the end of its service life), the complete light must
be replaced.
3. RS PRO Connect R10 /
RS PRO Connect R20 /
RS PRO Connect R30
Proper use
– Sensor-switched indoor light with active motion
detector for installing indoors.
– Can be retrofitted with emergency light
Note:
When installing, please always allow a distance of
at least 3 m to Wi-Fi routers or access points.
The integrated HF sensor emits high-frequency
electromagnetic waves (5.8 GHz) and receives their
echo. The change in echo caused by the slightest
movement within the light's detection zone is
detected by the sensor.
A microprocessor then issues the switch command
“switch light ON”. Detection is possible through
doors, panes of glass or thin walls.
Note:
The high-frequency power of the HF sensor is approx.
1 mW – that is 1,000 times less than the transmission
power of a mobile phone or microwave oven.
Package contents, round (Fig. 3.1)
Sensor-switched light
3 spacers
2 slot-in shrouds
Product dimensions, round (Fig.3.2)
Product components, round (Fig.3.3)
A Light enclosure
B Wall mount
C Connecting terminal
D Slot-in shrouds
E Catches for slot-in shrouds
Package contents, square (Fig.3.4)
Sensor-switched light
3 spacers
2 slot-in shrouds
Product dimensions, square (Fig.3.5)
Product components, square (Fig.3.6)
A Light enclosure
B Wall mount
C Connecting terminal
D Slot-in shrouds
E Catches for slot-in shrouds
4. Electrical connection
• Switch OFF power supply (Fig.4.1)
Connecting the mains power supply lead (Fig.4.1)
The supply lead is a three-core cable:
L = phase conductor (usually black, brown or grey)
N = neutral conductor (usually blue)
PE = protective-earth conductor (green / yellow)
If you are in any doubt, identify the conductors
using a voltage tester; then disconnect from the
power supply again. Connect phase (L) and neutral
conductor (N) to the terminal.
– 16 –

For DC operation, connect to terminal L “+” and to
terminal N “–”.
Important:
Incorrectly wired connections will produce a short
circuit later on in the product or your fuse box. In
this case, you must identify the individual con-
ductors once again and reconnect them. A mains
power switch for turning the unit ON and OFF may
of course be installed in the mains supply lead
(in applications without emergency light module).
Important:
The light source of this light cannot be replaced. If
the light source needs to be replaced (e.g. at the
end of its service life), the complete light must be
replaced.
5. Mounting
• Check all components for damage.
• Do not use the product if it is damaged.
• When installing the light, make sure the installa-
tion site is not subject to vibration.
• Select an appropriate mounting location, taking
the reach and motion detection into consideration.
• The ventilation slots must not be obstructed after
installing the light.
• Mounting height: max. 4 m.
Depending on the type of installation, mounting
height and environment, the detection reach may
dier from the distance given in the technical spe-
cifications.
Mounting procedure
• Undo retaining screws (no need to remove the
retaining screws completely) and take o the light
enclosure (Fig.5.1)
• Mark drill holes (Fig.5.2)
• Drill holes and insert wall plugs (Fig.5.3)
• Installation with surface-mounted power supply
lead (Fig.5.4)
• Installation with concealed power supply lead
(Fig.5.5)
• Connect conductors (Fig.5.6)
• Fit light enclosure and screw in place with
retaining screws (Fig.5.7)
• Switch ON power supply
6. Function
Factory settings (state on leaving the factory)
Reach setting: max.
Main light time setting: 10 sec.
Basic light time setting: 1 min.
Twilight setting: 2,000 lux
Basic light dimming level: 50%
Factory settings
Reach setting: 10 m
Main light time setting: 3 min.
Basic light time setting: 5 min.
Twilight setting: 500 lux
Basic light dimming level: 5%
Backlight: ON
The sensor function is activated in the factory
setting so that the light is directly ready for opera-
tion. To put the product into reference mode, go to
the technical documentation at: www.steinel.de.
To configure the light, you must download the
Steinel Connect App from your app store. You will
need a Bluetooth-capable smartphone or tablet.
Android iOS
DC operation
When operating on DC power, the light output is set
to 100% and the sensor deactivated.
Start-up / power interruption
The light's settings and current operating status are
saved automatically in the event of power failure or
disconnection from the power supply.
Settings are reactivated as soon as the mains
power supply is restored.
Reach adjustment
The reach setting can be infinitely varied between 1
and 10 m. Reach can be reduced in four directions
by fitting the slot-in shrouds included. (Fig.6.1)
Time setting
The main light's ON time can be set to any period
from 5seconds to 60minutes. Any movement
detected before this time elapses will restart the timer.
– 17 –
GB

Twilight setting
The chosen response threshold can be infinitely
varied from 2 to 2,000lux.
Basic light level
The brightness of the basic light level setting can be
varied between 1% and 100%.
The period for which the basic light level stays ON
for can be infinitely varied between 10 seconds and
30 minutes, or set to remain ON all night.
Main light level
The brightness of the main light level setting can be
varied between 1% and 100%.
Backlight (PLUS version)
The setting for switching the backlight ON or OFF
can be selected manually.
Grouping
The RS PRO Connect R10 / R20 / R30 can be op-
erated as a single light or interconnected with several
lights by wireless communication to form a group.
All lights belonging to a group operate in line with
the group parameters set in the Steinel Connect
app. Reach can be set individually for all lights in
the lighting group.
Fade Time
Fade Time can be used to set the rate of dimming
on switching the light ON and OFF (1 s – 3 s).
Neighbouring-light function
The neighbouring-light function can be activated
and deactivated via the Steinel Connect App. This
function assigns the neighbouring groups to the
active lighting group. The active group responds
to activation signals from the neighbouring group
assigned to it and switches to main light or basic
light as defined in the settings.
Light distribution curve (Fig.6.2)
7. Accessories
Emergency light module
EAN 4007841064143
8. Maintenance and care
The product requires no maintenance.
The light enclosure can be cleaned with a damp
cloth (without detergents) if dirty.
Important:
The control gear cannot be replaced.
9. Disposal
Electrical and electronic equipment, accessories
and packaging must be recycled in an environmen-
tally compatible manner.
Do not dispose of electrical and electronic
equipment as domestic waste.
EU countries only:
Under the current European Directive on Waste
Electrical and Electronic Equipment and its imple-
mentation in national law, electrical and electronic
equipment no longer suitable for use must be col-
lected separately and recycled in an environmentally
compatible manner.
10. Declaration of Conformity
Hereby, STEINEL GmbH declares that the
radio equipment type RSPROConnectR10/
RSPROConnectR20/ RSPROConnectR30 is in
compliance with Directive 2014/53/EU. The full text
of the EU declaration of conformity is available at
the following internet address: www.steinel.de
– 18 –

11. Manufacturer's Warranty
Manufacturer’s warranty of STEINEL GmbH,
Diesel strasse 80-84, DE-33442 Herzebrock-Clar-
holz, Germany
All STEINEL products meet the highest quality
standards. For this reason, we, the manufacturer,
are pleased to provide you, the customer, with a
warranty under the following terms and conditions:
The warranty covers the absence of deficiencies
which are proven to be the result of a material
defect or fault in manufacturing and which are
reported to us immediately after detection and
within the warranty period. The warranty shall cover
all STEINEL Professional products sold and used in
Germany.
Our warranty cover for consumers
The provisions below apply to consumers. A consu-
mer is any natural person who, on entering into the
purchase transaction, neither acts in exercising their
commercial nor their self-employed activity.
You can opt for warranty cover in the form of
repair or replacement which will be provided free
of charge (if applicable, in the form of a successor
model of the same or higher quality) or in the form
of a credit note.
In the case of sensors, floodlights, outdoor and
indoor lights, the warranty period for the STEINEL
Professional product you have purchased is 5
years in each case from the date on which the
product was purchased.
We shall bear the shipping costs but not the trans-
port risks involved in return shipment.
Our warranty cover for entrepreneurs
The provisions below apply to entrepreneurs. Ent-
repreneur is a natural or legal person or partnership
with legal personality who or which, on entering into
the purchase transaction, acts in exercising their or
its commercial or self-employed activity.
We have the option of providing warranty cover by
rectifying deficiencies free of charge, replacing a
product free of charge (if applicable, in the form of
a successor model of the same or higher quality) or
by issuing a credit note.
In the case of sensors, floodlights, outdoor and
indoor lights, the warranty period for the STEINEL
Professional product you have purchased is 5
years in each case from the date on which the
product was purchased.
Within the scope of warranty cover, we shall not
bear your expenses accruing from subsequent
fulfillment nor shall we bear your expenses for
removing the defective product and installing a
replacement product.
Statutory rights accruing from defects, gratui-
tousness
The warranty cover described here shall be
applicable in addition to the statutory rights of
warranty– including special consumer protection
provisions– and shall not restrict or replace them.
Exercising your statutory rights in the event of
defects is gratuitous.
Exemptions from the warranty
All replaceable lamps are expressly excluded from
this warranty.
–In addition to this, the warranty shall not cover:
–any wear resulting from use or any other natural
wear of product parts or any deficiencies in the
STEINEL Professional product that are attributab-
le to wear caused by use or other natural wear,
–any improper or non-intended use of the product
or any failure to observe the operating instruc-
tions,
–any unauthorised additions, alterations or other
modifications to the product or any deficiencies
attributable to the use of accessory,
–supplementary or replacement parts which are
not genuine STEINEL parts,
–any maintenance or care of products that is not
carried out in accordance with the operating
instructions,
–any attachment or installation that is not in ac-
cordance with STEINEL’s installation instructions,
– any damage or loss occurring in transit.
Application of German law
The warranty shall be governed by German law ex-
cluding the United Nations Convention concerning
the International Sale of Goods (CISG).
Making claims
If you wish to make a warranty claim, please send
your product complete and carriage paid with the
original receipt of purchase, which must show the
date of purchase and product designation, either to
your retailer or directly to us at STEINEL (UK) Ltd. –
25 Manasty Road, Axis Park, Orton Southgate, GB-
Peterborough Cambs PE2 6UP United Kingdom.
For this reason, we recommend that you keep your
receipt of purchase in a safe place until the warranty
period expires.
MANUFACTURER'S
1
3
5
YEAR
GB
WARRANTY
MANUFACTURER'S
YEAR
WARRANTY
MANUFACTURER'S
YEAR
WARRANTY
– 19 –
GB

Dimensions (L×W×H): R10 round: Ø 300×55mm
R20 round: Ø 350×55mm
R30 round: Ø 420×55mm
R20 square: 300×300×55mm
R30 square: 350×350×55mm
Supply voltage AC: 220 – 240 V, 50/60 Hz DC: 186 – 250 V
Power consumption (Pon): R10 PLUS SC NW:
R10 PLUS SC WW:
R20 PLUS SC NW:
R20 PLUS Q SC NW:
R20 PLUS Q SC WW:
R20 PLUS SC WW:
R30 PLUS SC NW:
R30 PLUS Q SC NW:
R30 PLUS Q SC WW:
R30 PLUS SC WW:
R10 BASIC SC NW:
R10 BASIC SC WW:
R20 BASIC SC NW:
R20 BASIC Q SC NW:
R20 BASIC Q SC WW:
R20 BASIC SC WW:
R30 BASIC SC NW:
R30 BASIC Q SC NW:
R30 BASIC Q SC WW:
R30 BASIC SC WW:
8.50W
8.50W
15.86W
15.86W
15.86W
15.86W
23.70W
23.90W
23.90W
23.70W
8.50W
8.50W
15.30W
15.30W
15.40W
15.30W
23.39W
23.40W
23.30W
23.22W
Luminous flux with shade
“Backlight switched OFF”: R10 PLUS SC NW:
R10 PLUS SC WW:
R20 PLUS SC NW:
R20 PLUS Q SC NW:
R20 PLUS Q SC WW:
R20 PLUS SC WW:
R30 PLUS SC NW:
R30 PLUS Q SC NW:
R30 PLUS Q SC WW:
R30 PLUS SC WW:
R10 BASIC SC NW:
R10 BASIC SC WW:
R20 BASIC SC NW:
R20 BASIC Q SC NW:
R20 BASIC Q SC WW:
R20 BASIC SC WW:
R30 BASIC SC NW:
R30 BASIC Q SC NW:
R30 BASIC Q SC WW:
R30 BASIC SC WW:
1053lm
992lm
1976lm
1970lm
1826lm
1823lm
3019lm
2964lm
2813lm
2813lm
1053lm
992lm
1976lm
1970lm
1826lm
1823lm
3019lm
2964lm
2813lm
2813lm
Eciency with shade
“Backlight switched OFF”: R10 PLUS SC NW:
R10 PLUS SC WW:
R20 PLUS SC NW:
R20 PLUS Q SC NW:
R20 PLUS Q SC WW:
R20 PLUS SC WW:
R30 PLUS SC NW:
R30 PLUS Q SC NW:
R30 PLUS Q SC WW:
124lm/W
117lm/W
125lm/W
124lm/W
115lm/W
115lm/W
127lm/W
124lm/W
118lm/W
12. Technical specifications
– 20 –
Pagina se încarcă...
Pagina se încarcă...
Pagina se încarcă...
Pagina se încarcă...
Pagina se încarcă...
Pagina se încarcă...
Pagina se încarcă...
Pagina se încarcă...
Pagina se încarcă...
Pagina se încarcă...
Pagina se încarcă...
Pagina se încarcă...
Pagina se încarcă...
Pagina se încarcă...
Pagina se încarcă...
Pagina se încarcă...
Pagina se încarcă...
Pagina se încarcă...
Pagina se încarcă...
Pagina se încarcă...
Pagina se încarcă...
Pagina se încarcă...
Pagina se încarcă...
Pagina se încarcă...
Pagina se încarcă...
Pagina se încarcă...
Pagina se încarcă...
Pagina se încarcă...
Pagina se încarcă...
Pagina se încarcă...
Pagina se încarcă...
Pagina se încarcă...
Pagina se încarcă...
Pagina se încarcă...
Pagina se încarcă...
Pagina se încarcă...
Pagina se încarcă...
Pagina se încarcă...
Pagina se încarcă...
Pagina se încarcă...
Pagina se încarcă...
Pagina se încarcă...
Pagina se încarcă...
Pagina se încarcă...
Pagina se încarcă...
Pagina se încarcă...
Pagina se încarcă...
Pagina se încarcă...
Pagina se încarcă...
Pagina se încarcă...
Pagina se încarcă...
Pagina se încarcă...
Pagina se încarcă...
Pagina se încarcă...
Pagina se încarcă...
Pagina se încarcă...
Pagina se încarcă...
Pagina se încarcă...
Pagina se încarcă...
Pagina se încarcă...
Pagina se încarcă...
Pagina se încarcă...
Pagina se încarcă...
Pagina se încarcă...
Pagina se încarcă...
Pagina se încarcă...
Pagina se încarcă...
Pagina se încarcă...
Pagina se încarcă...
Pagina se încarcă...
Pagina se încarcă...
Pagina se încarcă...
Pagina se încarcă...
Pagina se încarcă...
Pagina se încarcă...
Pagina se încarcă...
Pagina se încarcă...
Pagina se încarcă...
Pagina se încarcă...
Pagina se încarcă...
Pagina se încarcă...
Pagina se încarcă...
Pagina se încarcă...
Pagina se încarcă...
Pagina se încarcă...
Pagina se încarcă...
Pagina se încarcă...
Pagina se încarcă...
Pagina se încarcă...
Pagina se încarcă...
Pagina se încarcă...
Pagina se încarcă...
Pagina se încarcă...
Pagina se încarcă...
Pagina se încarcă...
Pagina se încarcă...
Pagina se încarcă...
Pagina se încarcă...
Pagina se încarcă...
Pagina se încarcă...
Pagina se încarcă...
Pagina se încarcă...
Pagina se încarcă...
Pagina se încarcă...
Pagina se încarcă...
Pagina se încarcă...
Pagina se încarcă...
Pagina se încarcă...
Pagina se încarcă...
Pagina se încarcă...
Pagina se încarcă...
Pagina se încarcă...
Pagina se încarcă...
Pagina se încarcă...
Pagina se încarcă...
Pagina se încarcă...
Pagina se încarcă...
Pagina se încarcă...
Pagina se încarcă...
Pagina se încarcă...
Pagina se încarcă...
Pagina se încarcă...
Pagina se încarcă...
Pagina se încarcă...
Pagina se încarcă...
Pagina se încarcă...
Pagina se încarcă...
Pagina se încarcă...
Pagina se încarcă...
Pagina se încarcă...
Pagina se încarcă...
Pagina se încarcă...
Pagina se încarcă...
Pagina se încarcă...
Pagina se încarcă...
Pagina se încarcă...
Pagina se încarcă...
Pagina se încarcă...
Pagina se încarcă...
Pagina se încarcă...
Pagina se încarcă...
Pagina se încarcă...
Pagina se încarcă...
Pagina se încarcă...
Pagina se încarcă...
Pagina se încarcă...
Pagina se încarcă...
Pagina se încarcă...
Pagina se încarcă...
Pagina se încarcă...
Pagina se încarcă...
Pagina se încarcă...
Pagina se încarcă...
Pagina se încarcă...
Pagina se încarcă...
Pagina se încarcă...
Pagina se încarcă...
Pagina se încarcă...
Pagina se încarcă...
Pagina se încarcă...
Pagina se încarcă...
Pagina se încarcă...
Pagina se încarcă...
Pagina se încarcă...
Pagina se încarcă...
Pagina se încarcă...
Pagina se încarcă...
Pagina se încarcă...
Pagina se încarcă...
Pagina se încarcă...
Pagina se încarcă...
Pagina se încarcă...
Pagina se încarcă...
Pagina se încarcă...
Pagina se încarcă...
Pagina se încarcă...
Pagina se încarcă...
Pagina se încarcă...
Pagina se încarcă...
Pagina se încarcă...
Pagina se încarcă...
Pagina se încarcă...
Pagina se încarcă...
Pagina se încarcă...
Pagina se încarcă...
Pagina se încarcă...
Pagina se încarcă...
Pagina se încarcă...
Pagina se încarcă...
Pagina se încarcă...
Pagina se încarcă...
Pagina se încarcă...
-
 1
1
-
 2
2
-
 3
3
-
 4
4
-
 5
5
-
 6
6
-
 7
7
-
 8
8
-
 9
9
-
 10
10
-
 11
11
-
 12
12
-
 13
13
-
 14
14
-
 15
15
-
 16
16
-
 17
17
-
 18
18
-
 19
19
-
 20
20
-
 21
21
-
 22
22
-
 23
23
-
 24
24
-
 25
25
-
 26
26
-
 27
27
-
 28
28
-
 29
29
-
 30
30
-
 31
31
-
 32
32
-
 33
33
-
 34
34
-
 35
35
-
 36
36
-
 37
37
-
 38
38
-
 39
39
-
 40
40
-
 41
41
-
 42
42
-
 43
43
-
 44
44
-
 45
45
-
 46
46
-
 47
47
-
 48
48
-
 49
49
-
 50
50
-
 51
51
-
 52
52
-
 53
53
-
 54
54
-
 55
55
-
 56
56
-
 57
57
-
 58
58
-
 59
59
-
 60
60
-
 61
61
-
 62
62
-
 63
63
-
 64
64
-
 65
65
-
 66
66
-
 67
67
-
 68
68
-
 69
69
-
 70
70
-
 71
71
-
 72
72
-
 73
73
-
 74
74
-
 75
75
-
 76
76
-
 77
77
-
 78
78
-
 79
79
-
 80
80
-
 81
81
-
 82
82
-
 83
83
-
 84
84
-
 85
85
-
 86
86
-
 87
87
-
 88
88
-
 89
89
-
 90
90
-
 91
91
-
 92
92
-
 93
93
-
 94
94
-
 95
95
-
 96
96
-
 97
97
-
 98
98
-
 99
99
-
 100
100
-
 101
101
-
 102
102
-
 103
103
-
 104
104
-
 105
105
-
 106
106
-
 107
107
-
 108
108
-
 109
109
-
 110
110
-
 111
111
-
 112
112
-
 113
113
-
 114
114
-
 115
115
-
 116
116
-
 117
117
-
 118
118
-
 119
119
-
 120
120
-
 121
121
-
 122
122
-
 123
123
-
 124
124
-
 125
125
-
 126
126
-
 127
127
-
 128
128
-
 129
129
-
 130
130
-
 131
131
-
 132
132
-
 133
133
-
 134
134
-
 135
135
-
 136
136
-
 137
137
-
 138
138
-
 139
139
-
 140
140
-
 141
141
-
 142
142
-
 143
143
-
 144
144
-
 145
145
-
 146
146
-
 147
147
-
 148
148
-
 149
149
-
 150
150
-
 151
151
-
 152
152
-
 153
153
-
 154
154
-
 155
155
-
 156
156
-
 157
157
-
 158
158
-
 159
159
-
 160
160
-
 161
161
-
 162
162
-
 163
163
-
 164
164
-
 165
165
-
 166
166
-
 167
167
-
 168
168
-
 169
169
-
 170
170
-
 171
171
-
 172
172
-
 173
173
-
 174
174
-
 175
175
-
 176
176
-
 177
177
-
 178
178
-
 179
179
-
 180
180
-
 181
181
-
 182
182
-
 183
183
-
 184
184
-
 185
185
-
 186
186
-
 187
187
-
 188
188
-
 189
189
-
 190
190
-
 191
191
-
 192
192
-
 193
193
-
 194
194
-
 195
195
-
 196
196
-
 197
197
-
 198
198
-
 199
199
-
 200
200
-
 201
201
-
 202
202
-
 203
203
-
 204
204
-
 205
205
-
 206
206
-
 207
207
-
 208
208
-
 209
209
-
 210
210
-
 211
211
-
 212
212


STEINEL RS PRO R10 basic SC neutralweiß Manual de utilizare
- Tip
- Manual de utilizare
Lucrări înrudite
-
STEINEL RS PRO CONNECT R20 Q Sensor Switched LED Indoor Light Manual de utilizare
-
STEINEL L 825 SC anthrazit Manual de utilizare
-
-
-
-
-
-
-
-
Alte documente
-
Grundfos CUE Safety Instructions And Other Important Information
-
Ingersoll-Rand R55 Product Maintenance Information
-
RAIDER Pro RDP-SPC20 Manual de utilizare
-
ANSMANN 802828 Fișa cu date
-
-
Uniross RC101296 Fișa cu date
-
Blaupunkt BSD-9000 Manual de utilizare
-
Blaupunkt BSA-8001 Manual de utilizare
-
Dometic RC10.4S.70, RC10.4T.70, RC10.4S.90, RC10.4T.90, RC10.4P.100, RC10.4M.90, RCS10.5S, RCS10.5T, RCS10.5XS, RCS10.5XT, RCL10.4E, RCL10.4ES, RCL10.4ET, RCD10.5S, RCD10.5T, RCD10.5XS, RCD10.5XT Ghid de instalare
-
ProForm PFIVEX87214 Manualul proprietarului