Tefal P4800731 Manual de utilizare
- Categorie
- Accesorii mixer / robot de bucătărie
- Tip
- Manual de utilizare

January 2020 - 1520009839b - Realization : Espace Graphique
www.tefal.com
EN p. 1
FR p. 27
NL p. 52
DE p. 76
IT p. 102
ES p. 126
PT p. 151
DA p. 176
FI p. 200
NO p. 224
SV p. 248
BG p. 272
BS p. 296
CS p. 320
HR p. 344
HU p. 368
PL p. 392
RO p. 416
RU p. 440
SK p. 464
SL p. 488
SR p. 512
UK p. 536
TR p. 560
User manual - Guide de l'utilisateur -
Bedienungsanleitung - Gebruiksaanwijzing - Manuale
d’uso - Guía del usuario - Manual do utilizador -
Brugervejledning - Käyttöopas - Bruksanvisning -
Bruksanvisning - Ръководство на потребителя -
Uputstvo za upotrebu - Uživatelská příručka - Upute za
korisnika - Használati útmutató - Instrukcja obsługi -
Ghidul utilizatorului - Руководство пользователя -
Používateľská príručka - Navodila za uporabnika -
Uputstvo za upotrebu - Інструкція з експлуатації -
Kullanım kılavuzu
www.tefal.com
EN
FR
NL
DE
IT
ES
PT
DA
FI
NO
SV
BG
BS
CS
HR
HU
PL
RO
RU
SK
SL
SR
UK
TR
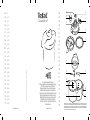
ClipsoMinut'
®
*depending on model - *selon modèle - *Je nach Modell - *afhankelijk van model - *a seconda del modello - *según el
modelo - *consoante o modelo - *afhængig af modellen - *mallikohtainen - *avhengig av modell - *beroende på modell -
*В зависимост от модела - *ovisno o modelu - *v závislosti na modelu - *ovisno o modelu - *modelltől függően - *w
zależności od modelu - * în funcție de model - *в зависимости от модели - *v závislosti od modelu - *odvisno od modela
- *u zavisnosti od modela - *залежно від моделі - *modele göre
1/3 Max 1
1/2
2/3 Max 2
1/3 Max 1
1/2
2/3 Max 2
J*
K*
N*
P
Q
G
I
H
L*
F*
E
D
B
C
A
O*
M*

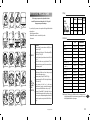
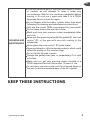
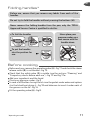
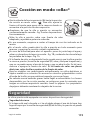
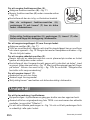
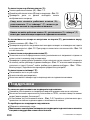
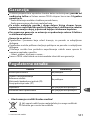
Before using your pressure cooker, please take the time
to read all the instructions and always refer to the "User guide".
Improper use may result in damage.
For your safety, this pressure cooker complies with the applicable standards
and regulations:
- Pressure Equipment Directive
- Materials that come into contact with food products
- Environment
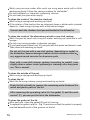
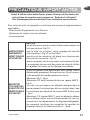
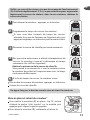
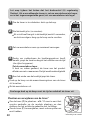
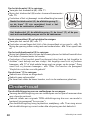
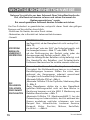
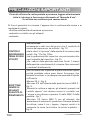
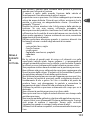
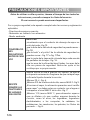
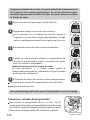
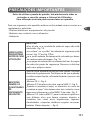
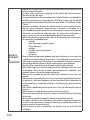
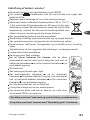
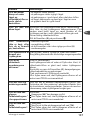
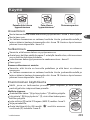
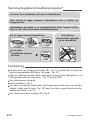
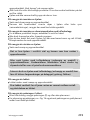
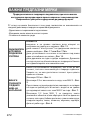
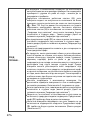
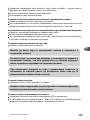
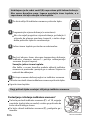
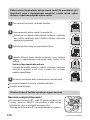
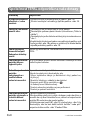
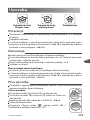
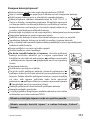
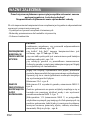
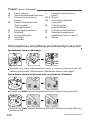
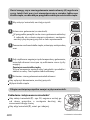
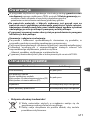
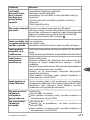
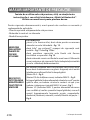
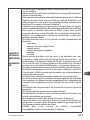
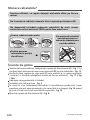
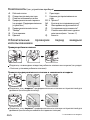
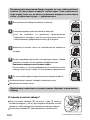
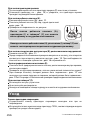
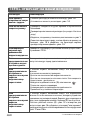
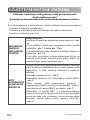
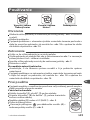
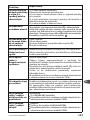
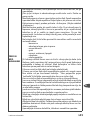
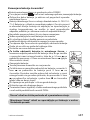
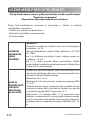
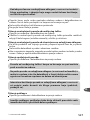
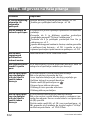
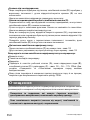
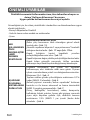
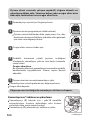
IMPORTANT PRECAUTIONS
BEFORE USE
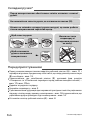
MAKE SURE
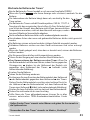
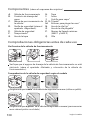
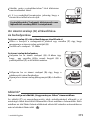
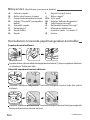
Make sure that the steam release outlet (B) is not
obstructed - fig 13.
that the bearing* or the piston* of the safety valve (E) is
mobile - fig 17 or fig 17a.
that the lid gasket is placed under each notch of the lid
- fig 14.
that the lid handles are properly fastened. The lid
handles are safety components. Never remove them or
replace them yourself.
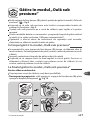
ALWAYS
RESPECT THE
FOLLOWING
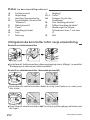
FILLING
QUANTITIES
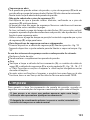
Never use your pressure cooker without liquid, as this
could damage it. Make sure there's always enough
liquid in the device when cooking.
Minimum quantity of liquid 250 ml/25 cl - fig 4.
Maximum quantity of food 2/3 of the height of the pan,
MAX 2 mark - fig 5.
When steaming food, the food in the steam
basket*must not come into contact with the water and
must not exceed the MAX 2 mark on the pan - fig 7.
Maximum 1/3 (mark MAX 1) of the height of the pan
for foodstuffs that expand and/or foam during cooking,
such as rice, pulses, dehydrated vegetables, stewed fruit,
pumpkin, courgettes, carrots, potatoes, fillets of fish, etc.
- fig 6.
fig 1 fig 2 fig 3
fig 4
min 250ml/25 cl
fig 5
MAX2
2/3
fig 6
1/3
M
AX1
fig 7
MAX2
2/3
fig 8
fig 9 fig 10 fig 11 fig 12
22
1
2
fig 13 fig 14 fig 15 fig 16
fig 17 fig 17 bis/17a fig 18 fig 19
*depending on model
585
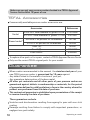
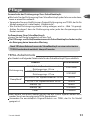
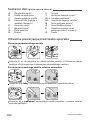
TR
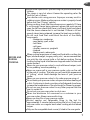
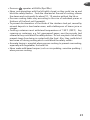
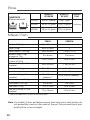
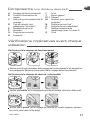
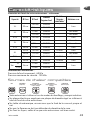
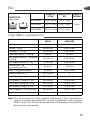
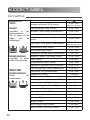
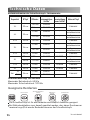
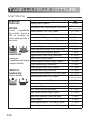
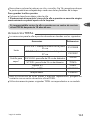
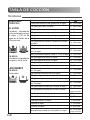
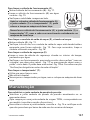
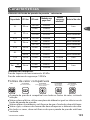
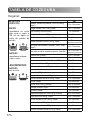
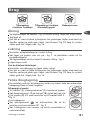
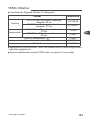
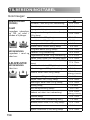
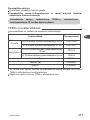
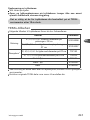
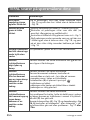
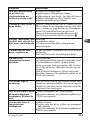
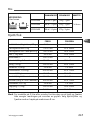
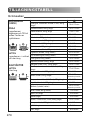
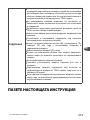
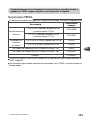
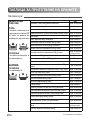
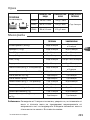
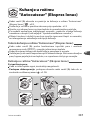
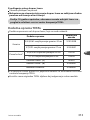
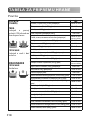
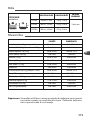
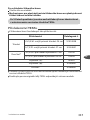
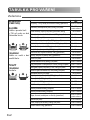
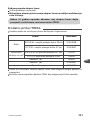
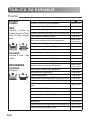
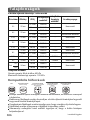
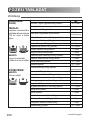
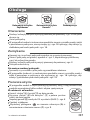
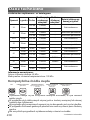
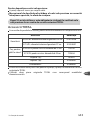
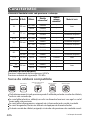
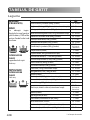
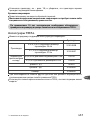
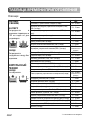
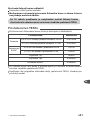
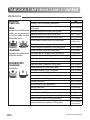
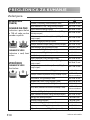
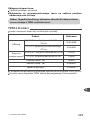
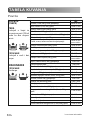
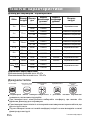
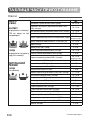
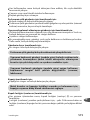
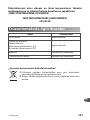
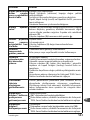
Pirinç
Et/ balık
SU İÇİNDE
Sepet olmadan.
MAX 11/3
SU MİKTARI PİRİNÇ MİKTARI
PİŞİRME
SÜRESİ
2 KİŞİ 400 ml / 2 bardak 150 g / 1 bardak
7-8 dk4 KİŞİ
500 ml / 2,5 bardak
250 g / 2 bardak
6 KİŞİ
700 ml / 3,5 bardak
375 g / 3 bardak
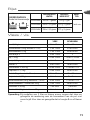
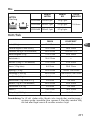
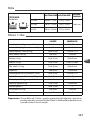
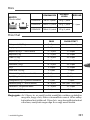
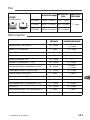
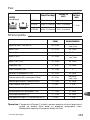
TAZE DONDURULMUŞ
Bıldırcın: 4 9 İLA 10 dk 18 İLA 20 dk
Ördek (1,8 kg) 45 İLA 47 dk 50 İLA 55 dk
Piliç: 2 (1,3 kg) 23 İLA 25 dk 40 İLA 45 dk
Somon bifteği: 4 (0,8 kg) 5 İLA 6 dk 7 İLA 8 dk
Domuz eti bonfile: 2 adet
350 g parça
13 İLA 15 dk 26 İLA 29 dk
Dana eti bonfile: 0,7 kg 17 İLA 21 dk 33 İLA 38 dk
Keler balığı fileto 1 kg
Parça olarak 75 g
5 İLA 6 dk 7 İLA 8 dk
Tavşan (1,5 kg parça olarak) 8 İLA 9 dk 20 İLA 23 dk
Dana sarma: 4 10 İLA 12 dk x
Tavuk (1,35 kg) 23 İLA 25 dk 1 sa İLA 1 sa 10
Sığır biftek (1 kg Ø 8-11 cm) 30 İLA 35 dk 45 İLA 50 dk
Domuz biftek (0,8 kg Ø 8-10 cm) 30 İLA 35 dk 1 sa 05 İLA 1 sa 15
Dana biftek (0,8 kg Ø 5-7 cm) 17 İLA 19 dk 37 İLA 40 dk
Kuzu bacak: 2 (veya 0,95 kg) 40 İLA 45 dk 1 sa 05 İLA 1 sa 15
Ton balığı biftek: 4 (veya 0,7 kg) 5 İLA 6 dk 7 İLA 9 dk
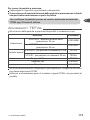
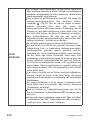
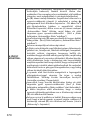
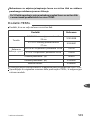
Not: Kapasitesi 5 litreden az olan düdüklü tencereler için, kırmızı veya beyaz
et parçaları haznenin MAX 2 seviyesinin üzerine geçmemelidir. 8 cm veya
daha düşük yükseklikte bir et seçimi yapın.

1
EN
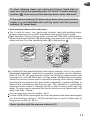
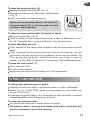
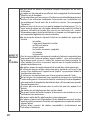
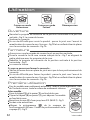
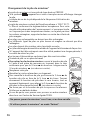
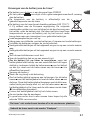
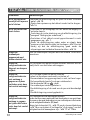
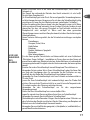
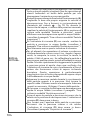
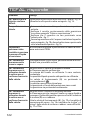
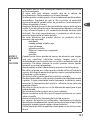
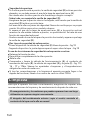
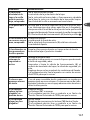
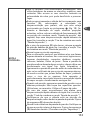
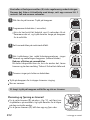
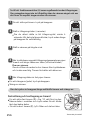
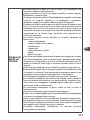
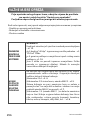
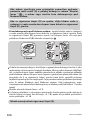
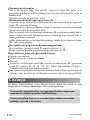
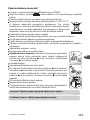
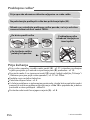
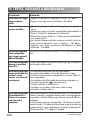
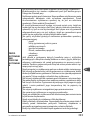
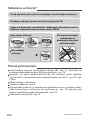
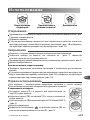
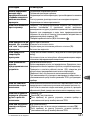
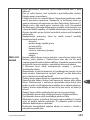
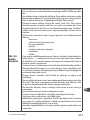
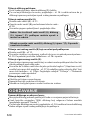
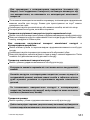
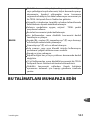
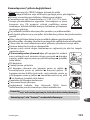
BEFORE AND
DURING
COOKING
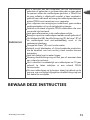
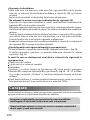
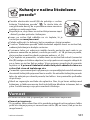
Ensure close supervision if you are using the pressure cooker near
children.
The steam is very hot when it leaves the operating valve. Be
careful of jets of steam.
Your device cooks using pressure. Improper use may result in
scalding injuries. Make sure the pressure cooker is properly closed
before use. (See “Closing” section).
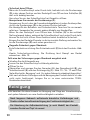
During cooking, check that the valve murmurs regularly. If there
is not enough steam being released, release the pressure and
open the lid then check that there is sufficient liquid, and check
that the steam release duct is not blocked. If there is still not
enough steam being released, increase the heat source slightly.
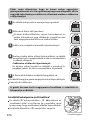
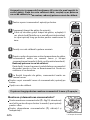
Do not cook food that could block the ducts of the safety
components:
- blueberries, cranberries
- pearl barley, spelt, millet
- oat flakes
- split peas
- noodles, macaroni, spaghetti
- rhubarb
- blackcurrants, redcurrants
When cooking large pieces of meat and food with a surface skin
layer (whole sausages, tongue, poultry, etc.) : we recommend that
you prick the skin using a knife or fork before cooking. During
cooking, boiling liquid could become trapped under the skin and
create spatters.
Never use your pressure cooker to cook milk-based recipes (such
as rice pudding, semolina pudding…).
Never use coarse salt in your pressure cooker, only use fine salt
at the end of cooking. That way you will avoid the appearance
of “pitting”, which could damage the base of your pressure
cooker.
Never use your pressure cooker to fry under pressure using oil.
Do not leave your pressure cooker unsupervised when heating oil
or fats. Continuing to heat a smoking oil will degrade it and may
increase the temperature of the oil enough for flames to appear.
Do not use your pressure cooker for any other purpose than the
one it is meant for.
Do not put your pressure cooker in a hot oven.
Never use aluminium foil unsecured on a container in your
pressure cooker. Always secure with string.
Never use cling film in your pressure cooker.
Alcohol vapours are flammable. Bring to the boil for
approximately 2 minutes before putting the lid on. Check your
pressure cooker on a regular basis when cooking alcohol-based
recipes.
Only use the compatible heat source(s) listed in the user guide.

2
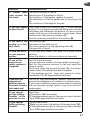
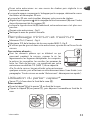
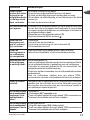
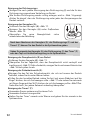
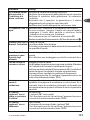
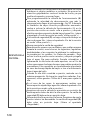
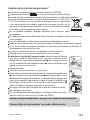
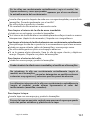
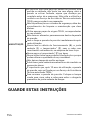
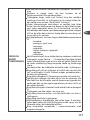
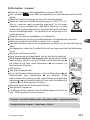
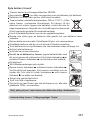
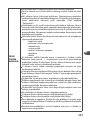
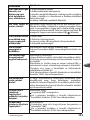
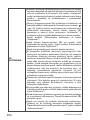
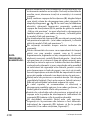
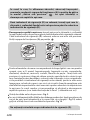
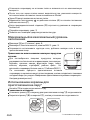
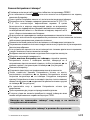
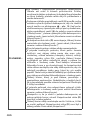
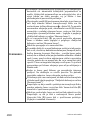
AFTER
COOKING
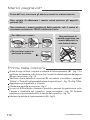
For models with a non-stick coating: do not use whisks or sharp
utensils made of metal. Do not tap the rim of the pan to remove
food from utensils, as it could damage it and cause leaks.
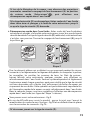
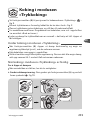
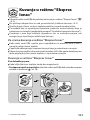
Steadily turn the operating valve (A) to adjust the
decompression speed, and finish opposite the pictogram mark
- fig 10. If, when releasing steam, you notice any food or
liquid starts to spurt out, return the operating valve (A) to the
“Pressure Cooking” position, then carry out fast decompression
in cold water - (refer to the “End of cooking in ‘Pressure Cooking’
mode” section.).
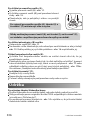
If the pressure indicator (D) does not go down, carry out fast
decompression in cold water - (refer to the “End of cooking in
‘Pressure Cooking’ mode” section).
Never interfere with the pressure indicator.
For foodstuffs that expand and/or foam during cooking, such
as rice, pulses, dehydrated vegetables, stewed fruit, pumpkin,
courgettes, carrots, potatoes, fillets of fish, etc. Let your pressure
cooker cool down for a few minutes, and then carry out fast
decompression in cold water - (refer to the section 'End of
cooking in pressure Cooker mode'). Methodically and gently
shake the pressure cooker each time before opening, after
having checked that the pressure indicator has gone down to
the lowered position, to prevent bubbles of steam from
overflowing and burning you. This operation is particularly
important when steam is released quickly or after cooling down
under tap water.
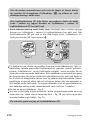
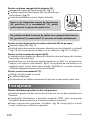
Always be very careful when moving your pressure cooker under
pressure. Do not touch hot surfaces. Use oven mitts when
necessary. Lift using both of the handles.
For soups, we recommend that you do a fast decompression in
cold water (refer to the “End of cooking in ‘Pressure Cooking’
mode” section).
Make sure the operating valve (A) is in the steam release
position before opening the pressure cooker. The pressure
indicator (D) should be in the lowered position.
Never use force to open your pressure cooker. Make sure the
internal pressure has been released. The pressure indicator (D)
should be in the lowered position. (See “Safety” section).

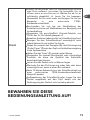
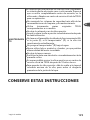
KEEP THESE INSTRUCTIONS
* depending on model
3
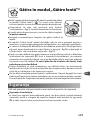
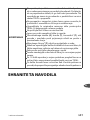
EN
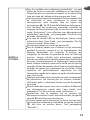
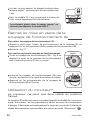
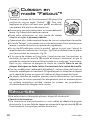
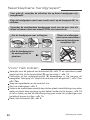
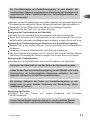
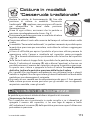
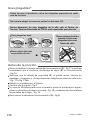
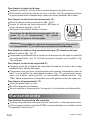
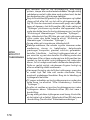
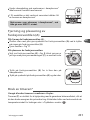
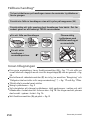
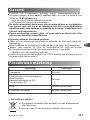
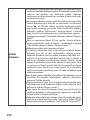
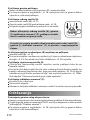
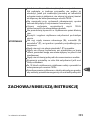
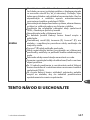
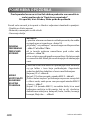
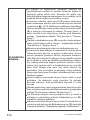
CLEANING AND
MAINTENANCE
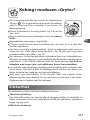
If you notice that a part of your pressure cooker is broken
or cracked, do not attempt to open it under any
circumstances. Wait for it to cool down completely before
moving it. Do not use it again and take it to a TEFAL
Approved Service Centre for repair.
Do not tamper with the safety systems other than when
following the cleaning and maintenance instructions.
Only use the correct TEFAL original parts for your model.
Do not leave food in the pressure cooker.
Wash and rinse your pressure cooker immediately after
each use.
Never put the operating valve (A), the gasket (I), the cook
control* (F), or the pan with non-stick coating in the
dishwasher.
Never place the cook control* (F) under water.
Never use bleach or chlorine-based products, which could
affect the quality of the stainless steel.
Do not let the lid soak in water.
Change the gasket every year, or immediately if it is split
or broken.
Make sure you get your pressure cooker checked in a
TEFAL Approved Service Centre after 10 years of use.
To store your pressure cooker: rest the lid upside down on
the pan, to avoid premature wear of the lid's gasket.

4
*depending on model
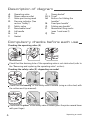
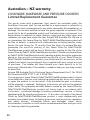
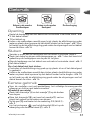
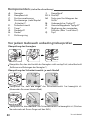
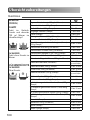
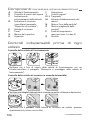
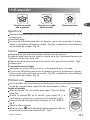
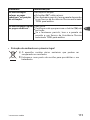
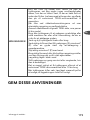
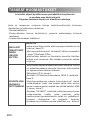
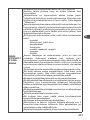
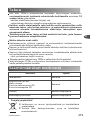
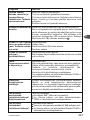
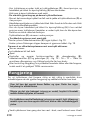
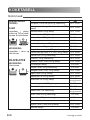
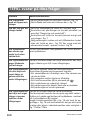
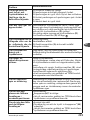
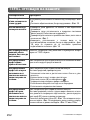
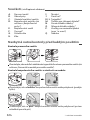
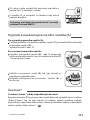
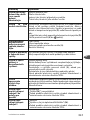
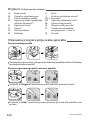
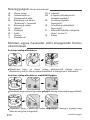
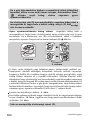
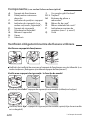
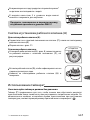
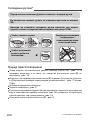
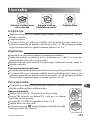
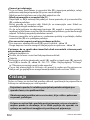
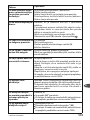
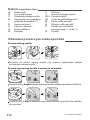
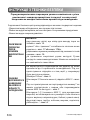
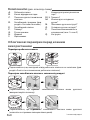
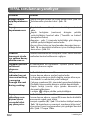
Description of diagram
Compulsory checks before each use
Checking the operating valve (A)
Check that the draining hole of the operating valve is not obstructed (refer to
the “Removing and replacing the operating valve” section).
Checking the safety valve (E): depending on model
Check that the bearing* of the safety valve is mobile (using a cotton bud, with
the cotton wool tip removed).
Check that the piston* of the safety valve is mobile (press the piston several times
with your finger)
A. Operating valve
B. Steam release outlet
C. Valve positioning mark
D. Pressure indicator (See
section "Safety")
E. Safety valve
F. Removable timer*
G. Lid handle
H. Lid
I. Gasket
J. Steam basket*
K./ L. Trivet*
M. Buttons for folding the
handles*
N. Fixed pan handle*
O. Folding pan handle*
P. Maximum filling marks
(max 1 and max 2)
Q Pan

5
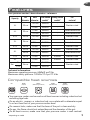
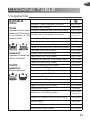
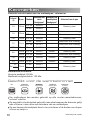
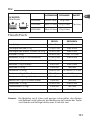
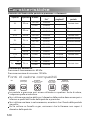
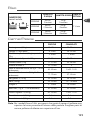
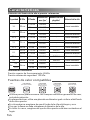
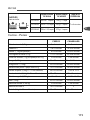
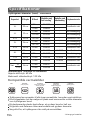
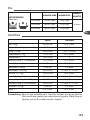
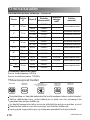
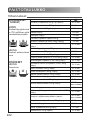
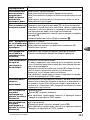
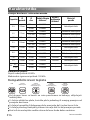
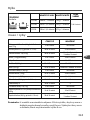
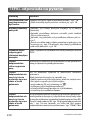
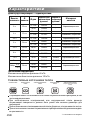
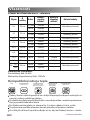
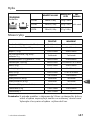
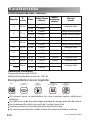
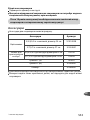
Your pressure cooker's base diameter - reference
Technical information:
Maximum operating pressure: 65kPa/9 psi/9 lbs
Maximum safety pressure: 120 kPa/17.4 psi/17.4 lbs
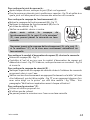
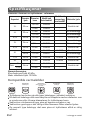
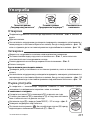
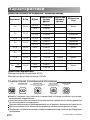
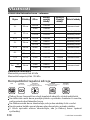
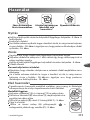
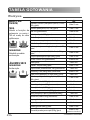
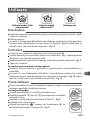
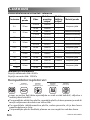
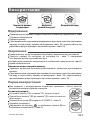
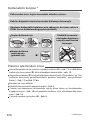
Compatible heat sources
Your pressure cooker can be used on all heat sources including induction but
excluding Aga hobs.
On an electric , ceramic or induction hob, use a plate with a diameter equal
to or less than that of your pressure cooker base.
On ceramic hobs, make sure that the base of the pot is clean and dry.
On gas, the flame should not extend beyond the diameter of the pot.
On all heat sources, make sure that your pressure cooker is well centred.
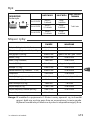
Features
Capacity
Pot
diameter
Base
diameter
Fixed handle
models*
Folding handle
models*
Pot
material
3 L 22 cm
15.5 cm P46205 -
Stainless steel
18 cm P46605 -
4 L 22 cm
14 cm P46042 - Coated aluminium
17.5 cm P47042 - Coated aluminium
4.5 L 22 cm 15.5 cm P46206 - Stainless steel
5 L 24 cm
14 cm P46051 - Coated aluminium
19.7 cm P47051 - Coated aluminium
5.2 L 24 cm 20 cm P46654 - Stainless steel
6 L
22 cm 15.5 cm P46207 P49007 Stainless steel
24 cm 17.5 cm P48007 - Coated aluminium
7.5 L 24 cm 18 cm P46248 P49048 Stainless steel
9 L 24 cm 18 cm P46249 P49049 Stainless steel
Set
5 L
24 cm
14 cm P46051 -
Stainless steel
7.5 L 18 cm P46248 -
GAS ELECTRIC
(Solid plate)
ELECTRIC
(Radiant or halogen ceramic hobs)
ELECTRIC
(Ceramic induction hob)
ELECTRIC
(Spiral resistor)
EN
* depending on model

6
*depending on model
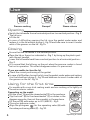
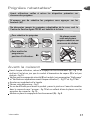
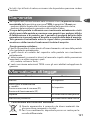
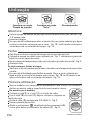
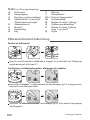
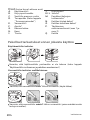
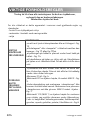
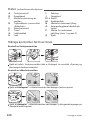
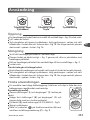
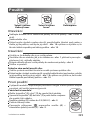
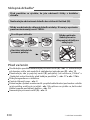
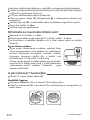
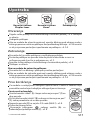
Pressure cooking Stewpot* Steam release
Opening
Switch the lid handle from a horizontal position to a vertical position - Fig. 3.
The lid turns.
Lift the lid.
In case of difficulties opening the lid; rinse the gasket under water and
replace it in the lid without drying it - fig 18 and take care to insert it under
each of the grooves on the lid - fig 14.
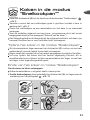
Closing
Ensure that the lid handle is in a vertical position.
Place the lid on the pot as indicated in - Fig. 1 by lining up the plastic part
with the pot handles.
Lower the lid handle back from a vertical position to a horizontal position -
Fig. 2.
It is normal that the lid turns on the pot. when the pressure cooker is closed
but not in operation. This effect disappears when it is pressurised.
If you are unable to close the lid:
Check the correct positioning of the gasket.
In case of difficulties closing the lid, rinse the gasket under water and replace
it in the lid without drying it - fig 18 and take care to insert it under each of
the grooves on the lid - fig 14.
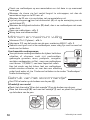
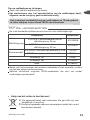
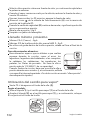
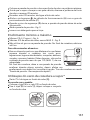
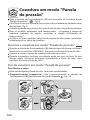
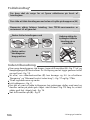
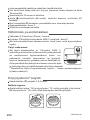
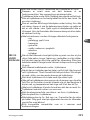
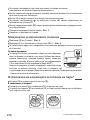
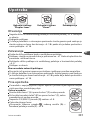
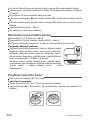
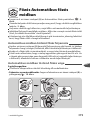
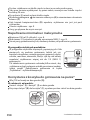
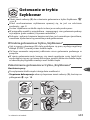
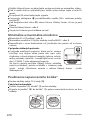
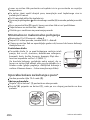
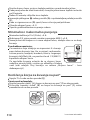
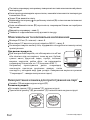
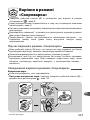
Using for the first time
For models with a non-stick coating: wash and use cooking oil to lightly oil
the entire interior surface.
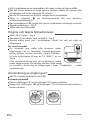
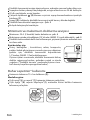
Depending on the model:
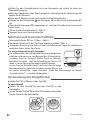
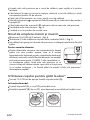
Put the trivet* (L) and the steam basket*(J) in the pan base.
Clip the trivet* (K) to the steam basket* (J) as shown in the
diagram opposite, then set the assembly in the pan base.
Fill the pot (Q) with water up to 2/3 (MAX 2) - fig 5.
Close your pressure cooker.
Align the pictogram for the operating valve (A) with
the valve positioning mark (C) - fig 10.
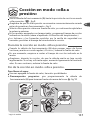
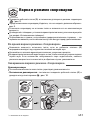
Use

*depending on model
7
EN
Place your pressure cooker on a heat source then set to maximum power.
When steam begins to exit the valve, turn down the heat source and set a
timer to 20 min.
After 20 min., turn off your heat source.
Gradually turn the operating valve (A), adjusting the speed that pressure is
released by how far you open the valve, to align the pictogram for the
operating valve (A) with the valve positioning mark (C).
When the pressure indicator (D) drops down again, your pressure cooker is
no longer under pressure.
Open your pressure cooker - Fig. 3.
Clean with washing-up liquid.
Minimum and maximum fill level
Minimum 250ml - Fig. 4.
Maximum 2/3 of the height of the pot, MAX 2 mark - Fig. 5.
Never use coarse salt in your pressure cooker, only use fine salt at the end of
cooking.
For some foods:
For foodstuffs that expand and/or foam during cooking,
such as rice, pulses, dehydrated vegetables, stewed fruit,
pumpkin, courgettes, carrots, potatoes, fillets of fish, etc.
do not fill your pressure cooker above 1/3 (MAX 1) of
the depth of the pan.
At the end of cooking, let your pressure cooker cool
down for a few minutes, and then cool by standing in
cold water (refer to the “End of cooking in ‘Pressure
Cooking’ mode - fast decompression” section).
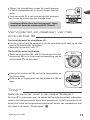
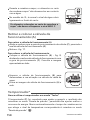
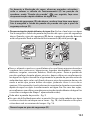
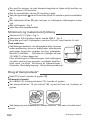
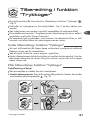
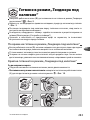
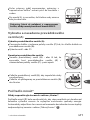
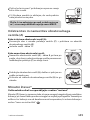
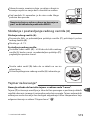
Using the steam basket*
Pour 750ml of water into the bottom of the pot (Q).
Depending on the model:
Put the trivet* (L) and the steam basket* (J) in the pan base.
OR
Clip the trivet* (K) to the steam basket* (J), then set the assembly in the pan
base.
1/3
MAX1

8
*depending on model
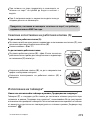
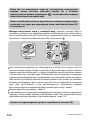
When steam cooking, the food in the steam basket*
must not be in contact with the water.
In the 3L model, it is normal for the water level to cover
a little of the bottom of the steam basket.
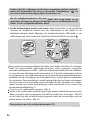
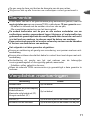
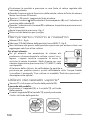
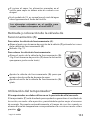
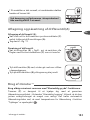
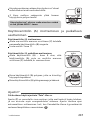
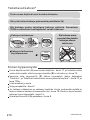
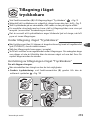
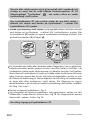
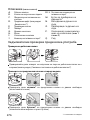
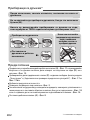
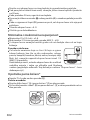
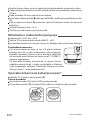
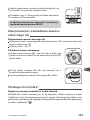
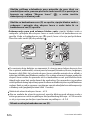
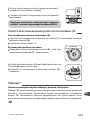
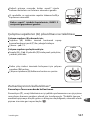
Fitting and removal of the
Operating valve (A)
To remove the operating valve (A):
Align the groove with the operating valve positioning mark (C) by pressing
down on the ring of the operating valve (A).
Remove it - Fig. 11.
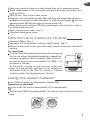
To fit the operating valve:
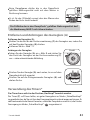
Fit the operating valve (A) - fig 8 by aligning the groove
of the operating valve, marked with a dot, with the
positioning mark (C) (see opposite).
Press the operating valve (A) so that it engages on the
steam release outlet (B), then turn it to the pictogram
symbol required.
Press on the operating valve pictograms (A) and turn.
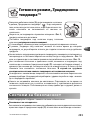
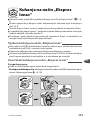
Using the cook control*
The cook control cannot be used in the Stewpot
mode.
The cook control (F) has been designed to help you obtain the best cooking
result by allowing you to optimise energy consumption. It automatically
counts down the cooking time once the temperature required for “Pressure
Cooking” is reached .
T
h
e
f
o
o
d
in
t
h
e
s
t
ea
m
ba
s
ket
*
m
u
s
t
no
t
t
o
u
ch
th
e lid
o
f th
e p
res
s
u
re c
o
o
ker.
MAX2
2/3
dot

*depending on model
9
EN
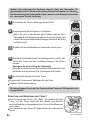
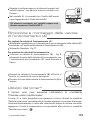
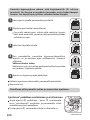
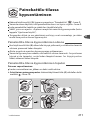
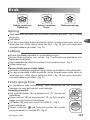
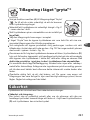
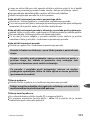
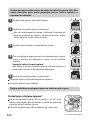
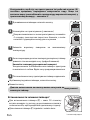
To switch on the cook control: press the button.
Program the cooking time (in minutes).
If you made a mistake with the cooking time, wait for
4 seconds until the flame symbol does not flash any
more, then hold the button down to reset.
Start with the heat source at maximum power.
As soon as your pressure cooker has reached the
cooking temperature, the cook control rings and the
countdown begins (numbers flash).
Reduce the power of the heat source.
If you wish, you can now remove the cook control from
the pressure cooker and take it with you. The time will
continue to count down.
At the end of the cooking time, the cook control rings.
To stop the cook control ringing, press the button.
Turn off the heat source.
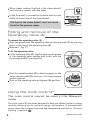
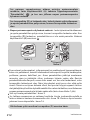
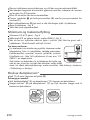
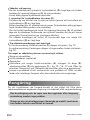
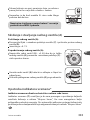
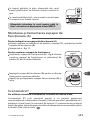
Fitting and removing the cook control*
To fit the cook control (F) - Fig. 12, first insert the front
part into the module and then press to clip the rear
part.
To remove the cook control (F), lift it using the tab and
remove it.
D
uri
ng
cook
i
ng
,
che
ck
t
ha
t
t
he
ope
r
a
t
i
ng
v
a
l
v
e
(A
) murm
urs
r
e
g
ul
a
rl
y
. If t
he
r
e
i
s not
e
noug
h ste
a
m,
i
ncr
e
a
se
t
he
he
a
t
sour
ce
s
ligh
tly;
if th
ere is
to
o
m
u
c
h
s
t
eam
, red
u
c
e th
e h
eat s
o
u
rc
e.
1
2
3
4
5
Holding the button down resets and switches off the cook control.
22
1
2

10
*depending on model
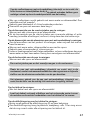
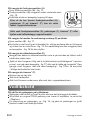
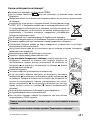
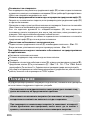
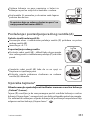
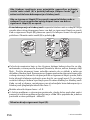
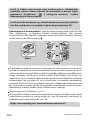
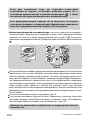
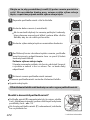
Changing the cook control* battery
The cook control battery is a CR2032 button battery.
If the symbol appears, or if you no longer have a display, change the
battery.
The battery life depends on how often the cook control is used.
The cook control battery contains Dimethoxyethane no. CAS
110-71 - 4. It is in accordance with the European regulations.
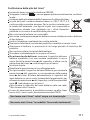
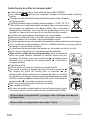
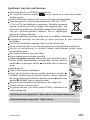
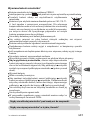
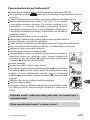
For your safety and environmental protection: do not open the
battery, do not expose it to high temperatures, do not throw it
away with household waste; Dispose of battery at a battery
disposal point.
Non-rechargeable batteries should not be recharged.
Different types of batteries or new and used batteries should not be mixed.
Batteries must be inserted according to the correct polarity.
Used batteries must be removed from the pressure cooker and disposed of
correctly.
If the pressure cooker is to be stored without being used for a long period,
you are advised to remove the batteries.
The power supply terminals must not be short circuited.
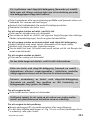
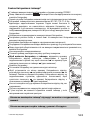
Proceed to a flat work surface.
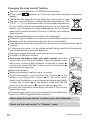
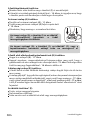
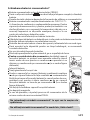
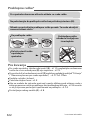
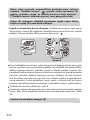
To remove the battery from your cook control, place the
cook control on a flat work surface. Open the battery cover
with a coin, turning it anti-clockwise so that the ½ moon
on the cover aligns with the ½ moon on the cook control
(see illustration opposite).
Replace the battery.
Replace the battery sealing ring in its casing.
To refit the battery cover, position the ½ moon of the
battery cover facing the ½ moon of the cook control.
Gently turn the battery cover clockwise, while pressing lightly,
to align the ½ moon of the battery cover with the full
moon on the cook control ● (see illustration opposite)
Do not force the battery cover when you close it. Do not turn
beyond the stops.
If you lose your cook control, you can purchase another from
any of our TEFAL Approved Service Centres.
◗◗
◗
◗
◗
Never place the cook control* in water, nor in the dishwasher.
Never use the cook control* in “Stewpot” mode.
+

*depending on model
11
EN
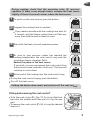
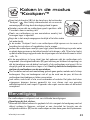
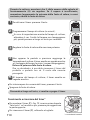
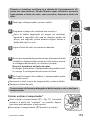
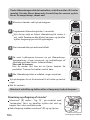
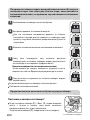
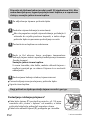
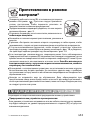
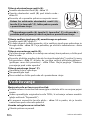
Folding handles*
Before cooking
Before each use, remove the operating valve (A) - fig 11 and check the steam
release outlet (B) is not blocked - fig 13.
Check that the safety valve (E) is mobile (see the sections “Cleaning” and
"Compulsory checks before each use") - fig 17 and fig 17a.
Add your ingredients and the liquid.
Close your pressure cooker - fig 2
In case of difficulties closing the lid: rinse the gasket under water and replace
it in the lid without drying it - fig 18 and take care to insert it under each of
the grooves on the lid - fig 14.
Fit the operating valve (A) - fig 8.
Befo
re
u
s
e,
ens
u
r
e
th
at
yo
u
rem
o
ve
any
lab
els
fro
m
eac
h
o
f
th
e
h
and
les
.
N
ever rem
o
ve th
e fo
ld
ing h
and
les
fro
m
th
e p
an;
o
nly th
e T
E
F
AL
Ap
p
r
o
ved
Servic
e Centre is
q
u
alif
ied
to
d
o
th
is
.
Do
no
t tr
y to
fo
ld
th
e h
and
les
with
o
u
t p
res
s
ing th
e b
u
tto
ns
(
M
).
1
1
2
2
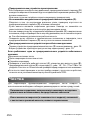
To fold the handles
To put the handles
into the position for
use:
“CLICK”
Never place your
pressure cooker on a
heat source with the
handles down.

12
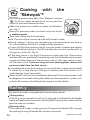
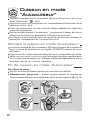
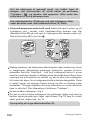
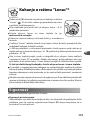
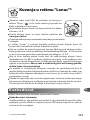
Cooking with
"Pressure Cooking"
Turn the operating valve (A) to the cooking with "Pressure Cooking" position
- fig 10. The pressure cooker operates at 65kPa / 9 lbs (psi).
Make sure your pressure cooker is properly closed before use - Fig. 2.
Place your pressure cooker on a heat source then set to maximum power.
For models equipped with a cook control*: programme the cooking time
indicated on the recipe (see section "Using the cook control").
A jangling noise and wisps of smoke emitted from the pressure cooker
indicator are normal when bringing the Clipso Minut up to pressure, as the
air escapes before cooking.
During “Pressure Cooking”
When the operating valve (A) is constantly emitting steam and making a
regular sound (PSCHHHT), lower the heat source.
Then either begin timing the food manually or program the cook control*
(depending on your model), for the cooking time indicated in the recipe.
During cooking, check that the valve murmurs regularly. If there is not
enough steam being released, increase the heat source slightly. If there is
too much steam, reduce it.
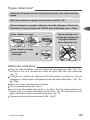
End of “Pressure Cooking”
To release the steam:
When the heat source has been turned off, you have two options:
• Gradual pressure release:
This is used for stews, vegetables, meat joints and fish dishes.
Gradually turn the operating valve (A), adjusting the speed that the pressure
is released by how far you open the valve, until the steam release symbol
is opposite the positioning mark (C).
*depending on model

13
EN
• Fast pressure release with cold water:
This is used for soups, rice, pasta, egg custards, cake and pudding mixes,
recipes containing rice or pasta, and recipes with a high liquid content.
Place the base of your pressure cooker in a sink half-filled with cold tap water.
When the pressure indicator (D) drops down, your pressure cooker is no longer
under pressure. Turn the operating valve (A) to the position .
For foodstuffs that expand and/or foam during cooking, such as rice, pulses,
dehydrated vegetables, stewed fruit, pumpkin, courgettes, carrots, potatoes,
fillets of fish, etc. Let your pressure cooker cool down for a few minutes, and
then place in sink half-filled with cold tap water. Methodically and gently
shake the pressure cooker each time before opening, after having checked
that the pressure indicator has gone down completely, to prevent bubbles of
steam from overflowing and burning you. This operation is particularly
important when steam is released quickly or after cooling down with tap
water. For soups, we recommend that you do a fast pressure release with cold
water (see Step 1 above).
You can open your pressure cooker - fig 3.
In case of difficulties opening the lid: rinse the gasket under water and replace
it in the lid without drying it - fig 18 and take care to insert it under each of
the grooves on the lid - fig 14 .
If,
wh
en
releas
ing
s
team
,
yo
u
no
tic
e
any
f
o
o
d
o
r
liq
u
id
s
tar
t
to
s
p
u
rt
o
u
t,
r
etu
rn
th
e
o
p
erating
valve
(
A)
to
th
e
“P
res
s
u
re
Co
o
king”
p
o
s
itio
n
, th
en c
arry o
u
t fas
t d
ec
o
m
p
r
es
s
io
n u
nd
er c
o
ld
water.
If th
e
p
r
es
s
u
re ind
ic
ato
r
(
D)
d
o
es
no
t go
d
o
wn, p
lac
e
yo
u
r p
res
s
u
re
c
o
o
ker
in
a
s
ink
h
alf-filled
with
c
o
ld
tap
water
u
ntil
th
e
p
res
s
u
re
ind
ic
ato
r (
D)
c
o
m
es
d
o
wn.
Never interfere with the pressure indicator (D).
Etape 1
{
Etape 2

14
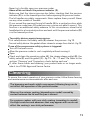
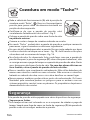
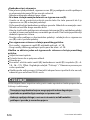
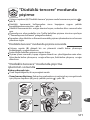
Cooking with the
“Stewpot"*
Turn the operating valve (A) to the “Stewpot” position
. To do this, apply enough force to turn past the
notch for the steam release position.
Make sure the pressure cooker is properly closed before
use - fig. 2.
Place your pressure cooker on a heat source set at low
or medium power.
Then start timing the food manually.
Note: The cook control cannot be used with Stewpot mode.
During ‘stewpot’ cooking, you can open your pressure cooker at any time to
stir, check whether the food is cooked or add ingredients.
In case of difficulties opening the lid: rinse the gasket in water and replace
it in the lid without drying it - fig 18 and take care to insert it under each of
the grooves on the lid - fig 14
If the heat source is too high, the pressure cooker may lock (the pressure
indicator (D) rises and blocks the opening) and the lid handle may not work
or may not allow opening of the pressure cooker. In this case, reduce or turn
off the heat source. If you are using cast iron heating plates, remove the
pressure cooker from the heat source.
For models with a non-stick coating: do not use whisks or sharp utensils made
of metal. Do not tap the rim of the pan to remove food from utensils, as it
could damage it and cause leaks.
Never let fat or oil burn until completely carbonised. The cooking fumes could
be dangerous to animals with a particularly sensitive respiratory system, such
as birds. Bird owners should keep them away from the kitchen.
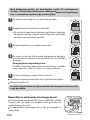
Your pressure cooker is equipped with several safety devices:
Closing safety:
- If the lid is not positioned correctly or if you forget to fold back the lid handle,
steam will leak from the pressure indicator (D) of the pressure cooker and the
pressure may not increase.
Opening safety:
- If your pressure cooker is under pressure, the pressure indicator (D) is up and
the opening/closing lid handle (G) should not be used.
Safety
*depending on model

15
EN
- Never try to forcibly open your pressure cooker.
- Above all do not touch the pressure indicator (D).
- Make sure that the interior pressure has fallen, checking that the pressure
indicator (D) is in the lowered position before opening the pressure cooker.
- The lid handles are safety components. Never replace them yourself. Never
use any other models of handles.
- If you moved the opening/closing lid handle (G) to a vertical position while
the pressure cooker was still under pressure, you are not able to open it. This
function is an additional safety measure. In this circumstance, move the lid
handle back to a horizontal position and wait until the pressure indicator (D)
is in the lowered position.
Two safety devices against overpressure:
- First safety device: the safety valve (E) releases the pressure - fig 19.
- Second safety device: the gasket allows steam to escape from the lid - fig 19.
If one of the overpressure safety systems is triggered:
Turn off the heat source.
Allow the pressure cooker to cool completely without moving it.
Open.
Check and clean the operating valve (A), the steam release outlet (B), the
safety valve (E) and the gasket (I) - fig 15 - 16 - 17 and 17a. Refer to the
sections "Cleaning" and "Compulsory checks before each use".
If, after these checks and cleaning, your product leaks or no longer works,
take it to a TEFAL Approved Service Centre.
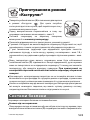
To ensure the correct operation of your pressure cooker, follow these cleaning
and maintenance recommendations after each use.
Cleaning
The brown
in
g
a
n
d ma
r
ks
which may
a
ppea
r
fol
lowin
g l
on
g
use do
not affect the operation of the pressure cooker.
Wear on the exterior coating (depending on model) caused by
contact between the lid and the pan is normal.
For pressure cookers with non stick coating (according to model):
the slight scratches and abrasions that may appear with use do not
affect the coating's non stick performance.

16
*depending on model
Wash your pressure cooker after each use using warm water with a little
washing-up liquid. Follow the same procedure for the basket*.
Do not use bleach or chemicals containing chlorine.
Do not heat your pan when empty.
To clean the inside of the stainless steel pot:
Wash using a sponge and washing-up liquid.
If the interior of the steel pot has an iridescent sheen or white marks (mineral
deposits), clean using a sponge with a little white vinegar.
To clean the inside of the aluminium pot with a non stick coating:
Wash the pan by hand only using hot water, washing-up liquid and a soft
sponge.
Do not use scouring powder or abrasive sponges.
If you have burned some food, fill your pan with hot water and leave to soak.
Then clean with washing-up liquid.
To clean the outside of the pot:
Wash using a sponge and washing-up liquid.
To clean the lid:
Wash the lid using a damp sponge and washing-up liquid.
To clean the gasket of the lid:
After each use, clean the gasket (I) and its housing.
To replace the gasket, refer to - Fig. 14 and ensure that the gasket is properly
inserted beneath each of the grooves on the lid.
Drain the lid vertically to remove the remaining water between the
metal and plastic parts of the lid.
Y
ou
c
a
n
w
a
s
h
t
he
s
ta
i
nl
e
s
s
s
t
e
e
l
pa
n
a
nd
ba
s
ke
t
i
n
t
he
d
i
s
hw
a
s
he
r.
Do
n
o
t
p
ut t
he pan
wit
h a n
o
n-st
ick c
oat
in
g (
d
ep
end
in
g o
n
mo
del) in
t
he d
ishwasher, because d
etergen
t
t
ablet
s c
o
n
t
ain
substan
c
es that are
v
ery
aggressive an
d
c
orrosiv
e
fo
r
alumin
ium
p
art
s.
Pa
ns wit
h a n
on
-
s
t
ic
k in
t
er
ior coa
ting (a
c
cordin
g
t
o m
odel)
, may
sl
ight
l
y
a
l
ter
in
c
ol
our in
s
ide (y
el
lowin
g
or s
ta
inin
g)
a
fter
l
on
g term
us
e. This
is norm
a
l
.
After removing the operating valve (A), the gasket (I) and the cook
control* (F), you can put the lid in the dishwasher.

*depending on model
17
EN
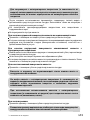
To clean the operating valve (A):
Remove the operating valve (A) - Fig. 11
Clean the operating valve (A) under cold tap water
- Fig. 15.
Check its mobility: see figure opposite.
To clean the steam release outlet (B) located on the lid:
Remove the valve (A) - Fig. 11
Check to make sure the steam release outlet is clear of debris and round -
Fig. 13. If needed, clean it with a tooth pick - Fig. 16 and rinse it.
To clean the safety valve (E):
Clean the part of the safety valve located inside the lid by washing under
water.
Check its proper functioning by pressing firmly on the bearing* (using a
cotton bud, with the cotton wool tip removed), which must be mobile - fig
17 or by pressing the piston* several times with your finger (it must be
mobile) - fig 17a. Refer to the section "Compulsory checks before each use".
To clean the cook control* (F):
Use a clean dry cloth.
Do not use any solvents.
Never place the cook control in water, nor in the dishwasher.
To change your pressure cooker's gasket:
Change your pressure cooker's gasket every year or if split or damaged.
Always use an original TEFAL gasket corresponding to your model (see
section "Accessories")
To replace the gasket, refer to - Fig 14 and ensure that the gasket is properly
inserted beneath each of the grooves on the lid.
To store your pressure cooker:
Turn the lid over and store it upside down on the pan.
The pressure cooker's opening and closing system does not require any
specific maintenance apart from cleaning.
Ne
ve
r
put
t
he
ope
r
a
t
i
ng
v
a
l
ve
(A),
t
he
g
a
s
ke
t
(I),
the
c
o
ok
c
o
n
tro
l*
(
F)
,
or
the
pan
w
ith
n
o
n
-
stic
k
c
o
ating in th
e d
is
h
was
h
er.
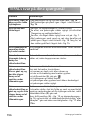
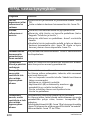
Maintenance

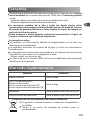
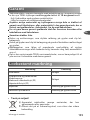
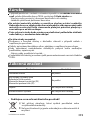
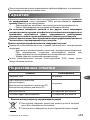
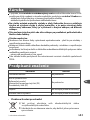
TEFAL Accessories
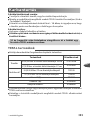
Commercially available pressure cooker accessories are:
To replace other parts or for repairs, contact a TEFAL Approved Service Centre.
Only use the correct TEFAL original parts for your model.
When used as recommended in the manual, the stainless steel pan of your
new TEFAL pressure cooker is guaranteed for 10 years against:
- Any defect linked to the metallic structure of your pot,
- Any premature deterioration of the base metal
All other pot materials and all other parts of your pressure cooker are
guaranteed against defects in workmanship or materials, for the period
of guarantee defined in valid legislation in force in the country where the
product was purchased from the date of purchase.
This contractual guarantee is established upon presentation of the receipt
or invoice showing the date of purchase.
These guarantees exclude:
Scratches and discolouration resulting from ageing for pans with non stick
coating.
Damage resulting from failure to comply with important precautions, or
negligent use, particularly:
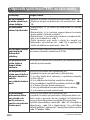
Accessories References
Gasket
3/4/4.5/6 L: outer diameter of gasket: 24 cm X1010008
5/7.5/9 L: outer diameter of gasket: 27 cm
X1010007
Steam basket*
3/4.5/4/6 L: for pot with 22 cm diameter
792185
5/7.5/9 L: for pot with 24 cm diameter 792654
Trivet* (L)
792691
Trivet* (K)
X1030007
Cook control*
X1060007
Guarantee
Ma
ke
s
ur
e
you
g
e
t
your
p
r
e
s
s
ur
e
cooke
r
ch
e
cke
d
in
a
TE
FAL
Ap
p
r
ove
d
Servic
e Centre af
t
er 10 y
ears
o
f u
s
e.
18
*depending on model
Pagina se încarcă ...
Pagina se încarcă ...
Pagina se încarcă ...
Pagina se încarcă ...
Pagina se încarcă ...
Pagina se încarcă ...
Pagina se încarcă ...
Pagina se încarcă ...
Pagina se încarcă ...
Pagina se încarcă ...
Pagina se încarcă ...
Pagina se încarcă ...
Pagina se încarcă ...
Pagina se încarcă ...
Pagina se încarcă ...
Pagina se încarcă ...
Pagina se încarcă ...
Pagina se încarcă ...
Pagina se încarcă ...
Pagina se încarcă ...
Pagina se încarcă ...
Pagina se încarcă ...
Pagina se încarcă ...
Pagina se încarcă ...
Pagina se încarcă ...
Pagina se încarcă ...
Pagina se încarcă ...
Pagina se încarcă ...
Pagina se încarcă ...
Pagina se încarcă ...
Pagina se încarcă ...
Pagina se încarcă ...
Pagina se încarcă ...
Pagina se încarcă ...
Pagina se încarcă ...
Pagina se încarcă ...
Pagina se încarcă ...
Pagina se încarcă ...
Pagina se încarcă ...
Pagina se încarcă ...
Pagina se încarcă ...
Pagina se încarcă ...
Pagina se încarcă ...
Pagina se încarcă ...
Pagina se încarcă ...
Pagina se încarcă ...
Pagina se încarcă ...
Pagina se încarcă ...
Pagina se încarcă ...
Pagina se încarcă ...
Pagina se încarcă ...
Pagina se încarcă ...
Pagina se încarcă ...
Pagina se încarcă ...
Pagina se încarcă ...
Pagina se încarcă ...
Pagina se încarcă ...
Pagina se încarcă ...
Pagina se încarcă ...
Pagina se încarcă ...
Pagina se încarcă ...
Pagina se încarcă ...
Pagina se încarcă ...
Pagina se încarcă ...
Pagina se încarcă ...
Pagina se încarcă ...
Pagina se încarcă ...
Pagina se încarcă ...
Pagina se încarcă ...
Pagina se încarcă ...
Pagina se încarcă ...
Pagina se încarcă ...
Pagina se încarcă ...
Pagina se încarcă ...
Pagina se încarcă ...
Pagina se încarcă ...
Pagina se încarcă ...
Pagina se încarcă ...
Pagina se încarcă ...
Pagina se încarcă ...
Pagina se încarcă ...
Pagina se încarcă ...
Pagina se încarcă ...
Pagina se încarcă ...
Pagina se încarcă ...
Pagina se încarcă ...
Pagina se încarcă ...
Pagina se încarcă ...
Pagina se încarcă ...
Pagina se încarcă ...
Pagina se încarcă ...
Pagina se încarcă ...
Pagina se încarcă ...
Pagina se încarcă ...
Pagina se încarcă ...
Pagina se încarcă ...
Pagina se încarcă ...
Pagina se încarcă ...
Pagina se încarcă ...
Pagina se încarcă ...
Pagina se încarcă ...
Pagina se încarcă ...
Pagina se încarcă ...
Pagina se încarcă ...
Pagina se încarcă ...
Pagina se încarcă ...
Pagina se încarcă ...
Pagina se încarcă ...
Pagina se încarcă ...
Pagina se încarcă ...
Pagina se încarcă ...
Pagina se încarcă ...
Pagina se încarcă ...
Pagina se încarcă ...
Pagina se încarcă ...
Pagina se încarcă ...
Pagina se încarcă ...
Pagina se încarcă ...
Pagina se încarcă ...
Pagina se încarcă ...
Pagina se încarcă ...
Pagina se încarcă ...
Pagina se încarcă ...
Pagina se încarcă ...
Pagina se încarcă ...
Pagina se încarcă ...
Pagina se încarcă ...
Pagina se încarcă ...
Pagina se încarcă ...
Pagina se încarcă ...
Pagina se încarcă ...
Pagina se încarcă ...
Pagina se încarcă ...
Pagina se încarcă ...
Pagina se încarcă ...
Pagina se încarcă ...
Pagina se încarcă ...
Pagina se încarcă ...
Pagina se încarcă ...
Pagina se încarcă ...
Pagina se încarcă ...
Pagina se încarcă ...
Pagina se încarcă ...
Pagina se încarcă ...
Pagina se încarcă ...
Pagina se încarcă ...
Pagina se încarcă ...
Pagina se încarcă ...
Pagina se încarcă ...
Pagina se încarcă ...
Pagina se încarcă ...
Pagina se încarcă ...
Pagina se încarcă ...
Pagina se încarcă ...
Pagina se încarcă ...
Pagina se încarcă ...
Pagina se încarcă ...
Pagina se încarcă ...
Pagina se încarcă ...
Pagina se încarcă ...
Pagina se încarcă ...
Pagina se încarcă ...
Pagina se încarcă ...
Pagina se încarcă ...
Pagina se încarcă ...
Pagina se încarcă ...
Pagina se încarcă ...
Pagina se încarcă ...
Pagina se încarcă ...
Pagina se încarcă ...
Pagina se încarcă ...
Pagina se încarcă ...
Pagina se încarcă ...
Pagina se încarcă ...
Pagina se încarcă ...
Pagina se încarcă ...
Pagina se încarcă ...
Pagina se încarcă ...
Pagina se încarcă ...
Pagina se încarcă ...
Pagina se încarcă ...
Pagina se încarcă ...
Pagina se încarcă ...
Pagina se încarcă ...
Pagina se încarcă ...
Pagina se încarcă ...
Pagina se încarcă ...
Pagina se încarcă ...
Pagina se încarcă ...
Pagina se încarcă ...
Pagina se încarcă ...
Pagina se încarcă ...
Pagina se încarcă ...
Pagina se încarcă ...
Pagina se încarcă ...
Pagina se încarcă ...
Pagina se încarcă ...
Pagina se încarcă ...
Pagina se încarcă ...
Pagina se încarcă ...
Pagina se încarcă ...
Pagina se încarcă ...
Pagina se încarcă ...
Pagina se încarcă ...
Pagina se încarcă ...
Pagina se încarcă ...
Pagina se încarcă ...
Pagina se încarcă ...
Pagina se încarcă ...
Pagina se încarcă ...
Pagina se încarcă ...
Pagina se încarcă ...
Pagina se încarcă ...
Pagina se încarcă ...
Pagina se încarcă ...
Pagina se încarcă ...
Pagina se încarcă ...
Pagina se încarcă ...
Pagina se încarcă ...
Pagina se încarcă ...
Pagina se încarcă ...
Pagina se încarcă ...
Pagina se încarcă ...
Pagina se încarcă ...
Pagina se încarcă ...
Pagina se încarcă ...
Pagina se încarcă ...
Pagina se încarcă ...
Pagina se încarcă ...
Pagina se încarcă ...
Pagina se încarcă ...
Pagina se încarcă ...
Pagina se încarcă ...
Pagina se încarcă ...
Pagina se încarcă ...
Pagina se încarcă ...
Pagina se încarcă ...
Pagina se încarcă ...
Pagina se încarcă ...
Pagina se încarcă ...
Pagina se încarcă ...
Pagina se încarcă ...
Pagina se încarcă ...
Pagina se încarcă ...
Pagina se încarcă ...
Pagina se încarcă ...
Pagina se încarcă ...
Pagina se încarcă ...
Pagina se încarcă ...
Pagina se încarcă ...
Pagina se încarcă ...
Pagina se încarcă ...
Pagina se încarcă ...
Pagina se încarcă ...
Pagina se încarcă ...
Pagina se încarcă ...
Pagina se încarcă ...
Pagina se încarcă ...
Pagina se încarcă ...
Pagina se încarcă ...
Pagina se încarcă ...
Pagina se încarcă ...
Pagina se încarcă ...
Pagina se încarcă ...
Pagina se încarcă ...
Pagina se încarcă ...
Pagina se încarcă ...
Pagina se încarcă ...
Pagina se încarcă ...
Pagina se încarcă ...
Pagina se încarcă ...
Pagina se încarcă ...
Pagina se încarcă ...
Pagina se încarcă ...
Pagina se încarcă ...
Pagina se încarcă ...
Pagina se încarcă ...
Pagina se încarcă ...
Pagina se încarcă ...
Pagina se încarcă ...
Pagina se încarcă ...
Pagina se încarcă ...
Pagina se încarcă ...
Pagina se încarcă ...
Pagina se încarcă ...
Pagina se încarcă ...
Pagina se încarcă ...
Pagina se încarcă ...
Pagina se încarcă ...
Pagina se încarcă ...
Pagina se încarcă ...
Pagina se încarcă ...
Pagina se încarcă ...
Pagina se încarcă ...
Pagina se încarcă ...
Pagina se încarcă ...
Pagina se încarcă ...
Pagina se încarcă ...
Pagina se încarcă ...
Pagina se încarcă ...
Pagina se încarcă ...
Pagina se încarcă ...
Pagina se încarcă ...
Pagina se încarcă ...
Pagina se încarcă ...
Pagina se încarcă ...
Pagina se încarcă ...
Pagina se încarcă ...
Pagina se încarcă ...
Pagina se încarcă ...
Pagina se încarcă ...
Pagina se încarcă ...
Pagina se încarcă ...
Pagina se încarcă ...
Pagina se încarcă ...
Pagina se încarcă ...
Pagina se încarcă ...
Pagina se încarcă ...
Pagina se încarcă ...
Pagina se încarcă ...
Pagina se încarcă ...
Pagina se încarcă ...
Pagina se încarcă ...
Pagina se încarcă ...
Pagina se încarcă ...
Pagina se încarcă ...
Pagina se încarcă ...
Pagina se încarcă ...
Pagina se încarcă ...
Pagina se încarcă ...
Pagina se încarcă ...
Pagina se încarcă ...
Pagina se încarcă ...
Pagina se încarcă ...
Pagina se încarcă ...
Pagina se încarcă ...
Pagina se încarcă ...
Pagina se încarcă ...
Pagina se încarcă ...
Pagina se încarcă ...
Pagina se încarcă ...
Pagina se încarcă ...
Pagina se încarcă ...
Pagina se încarcă ...
Pagina se încarcă ...
Pagina se încarcă ...
Pagina se încarcă ...
Pagina se încarcă ...
Pagina se încarcă ...
Pagina se încarcă ...
Pagina se încarcă ...
Pagina se încarcă ...
Pagina se încarcă ...
Pagina se încarcă ...
Pagina se încarcă ...
Pagina se încarcă ...
Pagina se încarcă ...
Pagina se încarcă ...
Pagina se încarcă ...
Pagina se încarcă ...
Pagina se încarcă ...
Pagina se încarcă ...
Pagina se încarcă ...
Pagina se încarcă ...
Pagina se încarcă ...
Pagina se încarcă ...
Pagina se încarcă ...
Pagina se încarcă ...
Pagina se încarcă ...
Pagina se încarcă ...
Pagina se încarcă ...
Pagina se încarcă ...
Pagina se încarcă ...
Pagina se încarcă ...
Pagina se încarcă ...
Pagina se încarcă ...
Pagina se încarcă ...
Pagina se încarcă ...
Pagina se încarcă ...
Pagina se încarcă ...
Pagina se încarcă ...
Pagina se încarcă ...
Pagina se încarcă ...
Pagina se încarcă ...
Pagina se încarcă ...
Pagina se încarcă ...
Pagina se încarcă ...
Pagina se încarcă ...
Pagina se încarcă ...
Pagina se încarcă ...
Pagina se încarcă ...
Pagina se încarcă ...
Pagina se încarcă ...
Pagina se încarcă ...
Pagina se încarcă ...
Pagina se încarcă ...
Pagina se încarcă ...
Pagina se încarcă ...
Pagina se încarcă ...
Pagina se încarcă ...
Pagina se încarcă ...
Pagina se încarcă ...
Pagina se încarcă ...
Pagina se încarcă ...
Pagina se încarcă ...
Pagina se încarcă ...
Pagina se încarcă ...
Pagina se încarcă ...
Pagina se încarcă ...
Pagina se încarcă ...
Pagina se încarcă ...
Pagina se încarcă ...
Pagina se încarcă ...
Pagina se încarcă ...
Pagina se încarcă ...
Pagina se încarcă ...
Pagina se încarcă ...
Pagina se încarcă ...
Pagina se încarcă ...
Pagina se încarcă ...
Pagina se încarcă ...
Pagina se încarcă ...
Pagina se încarcă ...
Pagina se încarcă ...
Pagina se încarcă ...
Pagina se încarcă ...
Pagina se încarcă ...
Pagina se încarcă ...
Pagina se încarcă ...
Pagina se încarcă ...
Pagina se încarcă ...
Pagina se încarcă ...
Pagina se încarcă ...
Pagina se încarcă ...
Pagina se încarcă ...
Pagina se încarcă ...
Pagina se încarcă ...
Pagina se încarcă ...
Pagina se încarcă ...
Pagina se încarcă ...
Pagina se încarcă ...
Pagina se încarcă ...
Pagina se încarcă ...
Pagina se încarcă ...
Pagina se încarcă ...
Pagina se încarcă ...
Pagina se încarcă ...
Pagina se încarcă ...
Pagina se încarcă ...
Pagina se încarcă ...
Pagina se încarcă ...
Pagina se încarcă ...
Pagina se încarcă ...
Pagina se încarcă ...
Pagina se încarcă ...
Pagina se încarcă ...
Pagina se încarcă ...
Pagina se încarcă ...
Pagina se încarcă ...
Pagina se încarcă ...
Pagina se încarcă ...
Pagina se încarcă ...
Pagina se încarcă ...
Pagina se încarcă ...
Pagina se încarcă ...
Pagina se încarcă ...
Pagina se încarcă ...
Pagina se încarcă ...
Pagina se încarcă ...
Pagina se încarcă ...
Pagina se încarcă ...
Pagina se încarcă ...
Pagina se încarcă ...
Pagina se încarcă ...
Pagina se încarcă ...
Pagina se încarcă ...
Pagina se încarcă ...
Pagina se încarcă ...
Pagina se încarcă ...
Pagina se încarcă ...
Pagina se încarcă ...
Pagina se încarcă ...
Pagina se încarcă ...
Pagina se încarcă ...
Pagina se încarcă ...
Pagina se încarcă ...
Pagina se încarcă ...
Pagina se încarcă ...
Pagina se încarcă ...
Pagina se încarcă ...
Pagina se încarcă ...
Pagina se încarcă ...
Pagina se încarcă ...
Pagina se încarcă ...
Pagina se încarcă ...
Pagina se încarcă ...
Pagina se încarcă ...
Pagina se încarcă ...
Pagina se încarcă ...
Pagina se încarcă ...
Pagina se încarcă ...
Pagina se încarcă ...
Pagina se încarcă ...
Pagina se încarcă ...
Pagina se încarcă ...
Pagina se încarcă ...
Pagina se încarcă ...
Pagina se încarcă ...
Pagina se încarcă ...
Pagina se încarcă ...
Pagina se încarcă ...
Pagina se încarcă ...
Pagina se încarcă ...
Pagina se încarcă ...
Pagina se încarcă ...
Pagina se încarcă ...
Pagina se încarcă ...
Pagina se încarcă ...
Pagina se încarcă ...
Pagina se încarcă ...
Pagina se încarcă ...
Pagina se încarcă ...
Pagina se încarcă ...
Pagina se încarcă ...
Pagina se încarcă ...
Pagina se încarcă ...
Pagina se încarcă ...
Pagina se încarcă ...
Pagina se încarcă ...
Pagina se încarcă ...
Pagina se încarcă ...
Pagina se încarcă ...
Pagina se încarcă ...
Pagina se încarcă ...
Pagina se încarcă ...
Pagina se încarcă ...
Pagina se încarcă ...
Pagina se încarcă ...
Pagina se încarcă ...
Pagina se încarcă ...
Pagina se încarcă ...
Pagina se încarcă ...
Pagina se încarcă ...
Pagina se încarcă ...
Pagina se încarcă ...
Pagina se încarcă ...
Pagina se încarcă ...
Pagina se încarcă ...
Pagina se încarcă ...
Pagina se încarcă ...
Pagina se încarcă ...
Pagina se încarcă ...
Pagina se încarcă ...
Pagina se încarcă ...
Pagina se încarcă ...
Pagina se încarcă ...
Pagina se încarcă ...
Pagina se încarcă ...
Pagina se încarcă ...
Pagina se încarcă ...
Pagina se încarcă ...
Pagina se încarcă ...
Pagina se încarcă ...
Pagina se încarcă ...
Pagina se încarcă ...
Pagina se încarcă ...
-
 1
1
-
 2
2
-
 3
3
-
 4
4
-
 5
5
-
 6
6
-
 7
7
-
 8
8
-
 9
9
-
 10
10
-
 11
11
-
 12
12
-
 13
13
-
 14
14
-
 15
15
-
 16
16
-
 17
17
-
 18
18
-
 19
19
-
 20
20
-
 21
21
-
 22
22
-
 23
23
-
 24
24
-
 25
25
-
 26
26
-
 27
27
-
 28
28
-
 29
29
-
 30
30
-
 31
31
-
 32
32
-
 33
33
-
 34
34
-
 35
35
-
 36
36
-
 37
37
-
 38
38
-
 39
39
-
 40
40
-
 41
41
-
 42
42
-
 43
43
-
 44
44
-
 45
45
-
 46
46
-
 47
47
-
 48
48
-
 49
49
-
 50
50
-
 51
51
-
 52
52
-
 53
53
-
 54
54
-
 55
55
-
 56
56
-
 57
57
-
 58
58
-
 59
59
-
 60
60
-
 61
61
-
 62
62
-
 63
63
-
 64
64
-
 65
65
-
 66
66
-
 67
67
-
 68
68
-
 69
69
-
 70
70
-
 71
71
-
 72
72
-
 73
73
-
 74
74
-
 75
75
-
 76
76
-
 77
77
-
 78
78
-
 79
79
-
 80
80
-
 81
81
-
 82
82
-
 83
83
-
 84
84
-
 85
85
-
 86
86
-
 87
87
-
 88
88
-
 89
89
-
 90
90
-
 91
91
-
 92
92
-
 93
93
-
 94
94
-
 95
95
-
 96
96
-
 97
97
-
 98
98
-
 99
99
-
 100
100
-
 101
101
-
 102
102
-
 103
103
-
 104
104
-
 105
105
-
 106
106
-
 107
107
-
 108
108
-
 109
109
-
 110
110
-
 111
111
-
 112
112
-
 113
113
-
 114
114
-
 115
115
-
 116
116
-
 117
117
-
 118
118
-
 119
119
-
 120
120
-
 121
121
-
 122
122
-
 123
123
-
 124
124
-
 125
125
-
 126
126
-
 127
127
-
 128
128
-
 129
129
-
 130
130
-
 131
131
-
 132
132
-
 133
133
-
 134
134
-
 135
135
-
 136
136
-
 137
137
-
 138
138
-
 139
139
-
 140
140
-
 141
141
-
 142
142
-
 143
143
-
 144
144
-
 145
145
-
 146
146
-
 147
147
-
 148
148
-
 149
149
-
 150
150
-
 151
151
-
 152
152
-
 153
153
-
 154
154
-
 155
155
-
 156
156
-
 157
157
-
 158
158
-
 159
159
-
 160
160
-
 161
161
-
 162
162
-
 163
163
-
 164
164
-
 165
165
-
 166
166
-
 167
167
-
 168
168
-
 169
169
-
 170
170
-
 171
171
-
 172
172
-
 173
173
-
 174
174
-
 175
175
-
 176
176
-
 177
177
-
 178
178
-
 179
179
-
 180
180
-
 181
181
-
 182
182
-
 183
183
-
 184
184
-
 185
185
-
 186
186
-
 187
187
-
 188
188
-
 189
189
-
 190
190
-
 191
191
-
 192
192
-
 193
193
-
 194
194
-
 195
195
-
 196
196
-
 197
197
-
 198
198
-
 199
199
-
 200
200
-
 201
201
-
 202
202
-
 203
203
-
 204
204
-
 205
205
-
 206
206
-
 207
207
-
 208
208
-
 209
209
-
 210
210
-
 211
211
-
 212
212
-
 213
213
-
 214
214
-
 215
215
-
 216
216
-
 217
217
-
 218
218
-
 219
219
-
 220
220
-
 221
221
-
 222
222
-
 223
223
-
 224
224
-
 225
225
-
 226
226
-
 227
227
-
 228
228
-
 229
229
-
 230
230
-
 231
231
-
 232
232
-
 233
233
-
 234
234
-
 235
235
-
 236
236
-
 237
237
-
 238
238
-
 239
239
-
 240
240
-
 241
241
-
 242
242
-
 243
243
-
 244
244
-
 245
245
-
 246
246
-
 247
247
-
 248
248
-
 249
249
-
 250
250
-
 251
251
-
 252
252
-
 253
253
-
 254
254
-
 255
255
-
 256
256
-
 257
257
-
 258
258
-
 259
259
-
 260
260
-
 261
261
-
 262
262
-
 263
263
-
 264
264
-
 265
265
-
 266
266
-
 267
267
-
 268
268
-
 269
269
-
 270
270
-
 271
271
-
 272
272
-
 273
273
-
 274
274
-
 275
275
-
 276
276
-
 277
277
-
 278
278
-
 279
279
-
 280
280
-
 281
281
-
 282
282
-
 283
283
-
 284
284
-
 285
285
-
 286
286
-
 287
287
-
 288
288
-
 289
289
-
 290
290
-
 291
291
-
 292
292
-
 293
293
-
 294
294
-
 295
295
-
 296
296
-
 297
297
-
 298
298
-
 299
299
-
 300
300
-
 301
301
-
 302
302
-
 303
303
-
 304
304
-
 305
305
-
 306
306
-
 307
307
-
 308
308
-
 309
309
-
 310
310
-
 311
311
-
 312
312
-
 313
313
-
 314
314
-
 315
315
-
 316
316
-
 317
317
-
 318
318
-
 319
319
-
 320
320
-
 321
321
-
 322
322
-
 323
323
-
 324
324
-
 325
325
-
 326
326
-
 327
327
-
 328
328
-
 329
329
-
 330
330
-
 331
331
-
 332
332
-
 333
333
-
 334
334
-
 335
335
-
 336
336
-
 337
337
-
 338
338
-
 339
339
-
 340
340
-
 341
341
-
 342
342
-
 343
343
-
 344
344
-
 345
345
-
 346
346
-
 347
347
-
 348
348
-
 349
349
-
 350
350
-
 351
351
-
 352
352
-
 353
353
-
 354
354
-
 355
355
-
 356
356
-
 357
357
-
 358
358
-
 359
359
-
 360
360
-
 361
361
-
 362
362
-
 363
363
-
 364
364
-
 365
365
-
 366
366
-
 367
367
-
 368
368
-
 369
369
-
 370
370
-
 371
371
-
 372
372
-
 373
373
-
 374
374
-
 375
375
-
 376
376
-
 377
377
-
 378
378
-
 379
379
-
 380
380
-
 381
381
-
 382
382
-
 383
383
-
 384
384
-
 385
385
-
 386
386
-
 387
387
-
 388
388
-
 389
389
-
 390
390
-
 391
391
-
 392
392
-
 393
393
-
 394
394
-
 395
395
-
 396
396
-
 397
397
-
 398
398
-
 399
399
-
 400
400
-
 401
401
-
 402
402
-
 403
403
-
 404
404
-
 405
405
-
 406
406
-
 407
407
-
 408
408
-
 409
409
-
 410
410
-
 411
411
-
 412
412
-
 413
413
-
 414
414
-
 415
415
-
 416
416
-
 417
417
-
 418
418
-
 419
419
-
 420
420
-
 421
421
-
 422
422
-
 423
423
-
 424
424
-
 425
425
-
 426
426
-
 427
427
-
 428
428
-
 429
429
-
 430
430
-
 431
431
-
 432
432
-
 433
433
-
 434
434
-
 435
435
-
 436
436
-
 437
437
-
 438
438
-
 439
439
-
 440
440
-
 441
441
-
 442
442
-
 443
443
-
 444
444
-
 445
445
-
 446
446
-
 447
447
-
 448
448
-
 449
449
-
 450
450
-
 451
451
-
 452
452
-
 453
453
-
 454
454
-
 455
455
-
 456
456
-
 457
457
-
 458
458
-
 459
459
-
 460
460
-
 461
461
-
 462
462
-
 463
463
-
 464
464
-
 465
465
-
 466
466
-
 467
467
-
 468
468
-
 469
469
-
 470
470
-
 471
471
-
 472
472
-
 473
473
-
 474
474
-
 475
475
-
 476
476
-
 477
477
-
 478
478
-
 479
479
-
 480
480
-
 481
481
-
 482
482
-
 483
483
-
 484
484
-
 485
485
-
 486
486
-
 487
487
-
 488
488
-
 489
489
-
 490
490
-
 491
491
-
 492
492
-
 493
493
-
 494
494
-
 495
495
-
 496
496
-
 497
497
-
 498
498
-
 499
499
-
 500
500
-
 501
501
-
 502
502
-
 503
503
-
 504
504
-
 505
505
-
 506
506
-
 507
507
-
 508
508
-
 509
509
-
 510
510
-
 511
511
-
 512
512
-
 513
513
-
 514
514
-
 515
515
-
 516
516
-
 517
517
-
 518
518
-
 519
519
-
 520
520
-
 521
521
-
 522
522
-
 523
523
-
 524
524
-
 525
525
-
 526
526
-
 527
527
-
 528
528
-
 529
529
-
 530
530
-
 531
531
-
 532
532
-
 533
533
-
 534
534
-
 535
535
-
 536
536
-
 537
537
-
 538
538
-
 539
539
-
 540
540
-
 541
541
-
 542
542
-
 543
543
-
 544
544
-
 545
545
-
 546
546
-
 547
547
-
 548
548
-
 549
549
-
 550
550
-
 551
551
-
 552
552
-
 553
553
-
 554
554
-
 555
555
-
 556
556
-
 557
557
-
 558
558
-
 559
559
-
 560
560
-
 561
561
-
 562
562
-
 563
563
-
 564
564
-
 565
565
-
 566
566
-
 567
567
-
 568
568
-
 569
569
-
 570
570
-
 571
571
-
 572
572
-
 573
573
-
 574
574
-
 575
575
-
 576
576
-
 577
577
-
 578
578
-
 579
579
-
 580
580
-
 581
581
-
 582
582
-
 583
583
-
 584
584
-
 585
585
-
 586
586


Tefal P4800731 Manual de utilizare
- Categorie
- Accesorii mixer / robot de bucătărie
- Tip
- Manual de utilizare
în alte limbi
- slovenčina: Tefal P4800731 Používateľská príručka
- italiano: Tefal P4800731 Manuale utente
Lucrări conexe
-
Tefal P4605131 Manual de utilizare
-
Tefal P2050743 Manualul proprietarului
-
-
Tefal CY505E30 Manualul proprietarului
-
-
-
Tefal P2500747 Manual de utilizare
-
-
-
Alte documente
-
IKEA 204.636.50 Manual de utilizare
-
BROWIN 340207 Manualul proprietarului
-
-
Camry CR 6409 Instrucțiuni de utilizare
-
Taurus Tasty Multipot Multifunction Kitchen Robot Manual de utilizare
-
BROWIN 340112 Manualul proprietarului
-
Taurus 973980000 Manual de utilizare
-
BROWIN 313515 Manualul proprietarului
-