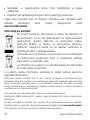
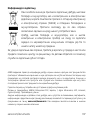
AENO DB1S Smart Sonic Electric Toothbrush Manual de utilizare
- Tip
- Manual de utilizare

aeno.com/documents 1
03.11.2022 | v 1.3.5

2 aeno.com/documents
EN
........................................................................................................................................................................
7
UK
...........................................................................................................................................................................
13
AR
.......................................................................................................................................................................
20
BG
.......................................................................................................................................................................
24
CS
.......................................................................................................................................................................
31
DE
...........................................................................................................................................................................
37
ET
.........................................................................................................................................................................
44
ES
........................................................................................................................................................................
50
FR
........................................................................................................................................................................
56
HR
........................................................................................................................................................................
63
HU
........................................................................................................................................................................
69
HY
..........................................................................................................................................................................
75
IT
........................................................................................................................................................................
81
KA
...........................................................................................................................................................................
87
KK
........................................................................................................................................................................
94
LT
.........................................................................................................................................................................
101
LV
..........................................................................................................................................................................
107
PL
........................................................................................................................................................................
113
RO
….....................................................................................................................................................................
119
SK
...........................................................................................................................................................................
125
SR
...........................................................................................................................................................................
131
UZ
.........................................................................................................................................................................
138
ZH
..........................................................................................................................................................................
145

aeno.com/documents 3

4 aeno.com/documents

aeno.com/documents 5

6 aeno.com/documents

aeno.com/documents 7
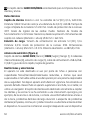
EN Toothbrush AENO DB1S / DB2S is designed for daily cleaning of teeth and
gums.
Specifications
Toothbrush. Battery: non-removable Li-ion 5 V (DC), 0.3 A, 1400 mAh. Power:
1.85 W. Noise level (at 0.3 m): ≤60 dB. Battery full charge time: 5 h ± 30 min.
Enclosure protection degree: IPX7. Stiffness of the bristles: medium. Number
of operating modes: 5. Control: mechanical, from the application. Dimensions
of the brush with nozzle (diam × h): Ø 26 mm × 240 mm. Emission power:
+4 dBm/2.5 mW.
Charging Station. Input supply voltage: 5 V (DC), 1.0 A. Power: 5.0 W. Enclosure
protection degree: IPX5. Dimensions (diam × h): Ø 45 mm × 21 mm.
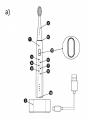
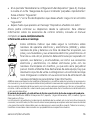
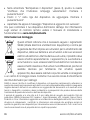
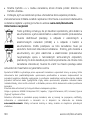
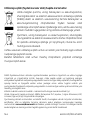
Scope of Delivery (figure a)
AENO DB1S (white)/DB2S (black) toothbrush (handle (1), 3 toothbrush heads
(2)), charging station (3), power cable USB-A/USB-C (0.8 m), quick start guide,
warranty card.
Limitations and Warnings
The appliance is not intended for use by children or persons with reduced
physical/mental/intellectual capabilities unless they have been given
supervision or instruction concerning use of the appliance by a person
responsible for their safety. Do not leave a plugged-in device unattended. Do
not turn on the damaged device. Disconnect the device from the mains by
holding the power plug, not the cord; do not use an extension cord. The
toothbrush is designed exclusively for cleaning teeth and gums. After surgical
intervention, such as surgery on the gums or in the oral cavity, as well as in the
presence of gum and oral cavity diseases, long-term dental problems or
suspicions of similar problems (fillings, crowns, etc.), you must first consult your
dentist about the possibility of using the device. If your gums begin to bleed

8 aeno.com/documents
after using the device and the bleeding continues for more than seven (7) days,
contact your dentist immediately. Charge your toothbrush only on the original
charging cradle, placed on a level and stable surface. If the charging cradle
accidentally falls into water, you must first unplug it from the mains and only
then remove it from the water and dry it thoroughly. The area where the mains
cable of the charging cradle and the USB cable are located must be dry. Each
family member should use their own brush head. Replace the brush head at
least once every three months, depending on the degree of wear. Use only
original replacement tips.
ATTENTION! Do not wash the device or any part of it in the dishwasher.
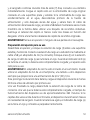
Preparing the device for use
Unpack the device and place the charging station (3) on a stable horizontal
surface. Connect the charging station to the mains using a USB cable and an
AC adapter (not supplied). Place the device (1) on the charging station. The
charging LED (4) will turn red. When the LED indicator (4) glows green, it
means that the battery is fully charged, and the device is ready for use.
ATTENTION! The AC adapter is not included in the package. You can use the
AC adapter from your phone, tablet, or other device, if it provides power options
5.0 V (DC), 1.0 A.
To prolong battery life, charge the brush for at least 20 hours before first use.
At the end of charging, you must unplug the charging station from the outlet.
When the battery is fully charged, the brush runs for about 360 minutes. If you
brush your teeth twice a day for 2 minutes, the device will work without
charging for up to 3 months. When the battery is discharged, the charge
indicator (4) flashes red and starts flashing slowly.

aeno.com/documents 9
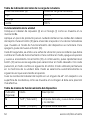
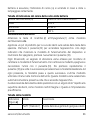
Battery charge color indication table
Indicator color (4)
Battery charge level
red
0–10 %
orange
10–99 %
green
100 %
Operation of the device
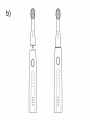
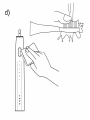
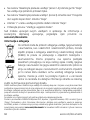
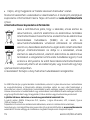
Place the cleaning pad (2) onto the handle of the device (1) as shown in figure b.
Apply some dentifrice to the brush bristles. Press the power button (10). One of
the indicators starts to light, showing the mode of operation of the device. The
device starts working in this mode. To turn off the device, press the button (10)
again.
Every 30 sec. a vibration signal is triggered, reminding you of the opportunity
to change the operating mode. To change the mode, switch the device off and
on again with the button (10). Then quickly press the button (10) several times
in succession, selecting the desired mode. Each time you press, the mode
changes to the next one. After each use, the toothbrush remembers the last
mode. This mode will be automatically selected the next time the device is
turned on.
Guide the brush head at a 45° angle to the surface of the teeth, as shown in
Figure c. In this position, the toothbrush head works most efficiently.
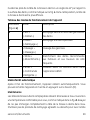
Device operating modes table
Indicator
(figure a)
Mode
Description
5
«Soft»
Delicate, gentle cleaning of gums and
teeth
6
«Clean»
Daily standard cleaning

10 aeno.com/documents
7
«Massage»
Gum surface massage
8
«White»
Teeth Whitening. Recommended for
smokers and frequent coffee drinkers
9
«Smart»
Work according to the scenario set in the
AENO application
Auto power off mode
After 2 minutes of operation, the device automatically turns off. You can turn
on the device again by pressing the button (10).
Maintenance
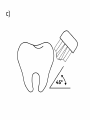
Replaceable toothbrush heads should be washed in running water at a
comfortable temperature for you, as shown in Figure d. Try not to completely
submerge the toothbrush head in water. Do not use aggressive or cleaning
agents when washing the attachment. It is allowed to treat the bristles of the
toothbrush head with a mouthwash from time to time. Any dirt on the handle
of the device and the charging station should be removed with a damp cloth,
as shown in figure d. Then you should carefully wipe the surface with a dry
cloth. For stubborn dirt, apply dishwashing liquid to a cloth to clean the handle
of the device. Remove any remaining moisture with a towel after washing.
NOTE. Perform maintenance on the device and its components only after
turning off the device and disconnecting the charging base from the mains.
Elimination of possible malfunctions
• The toothbrush does not turn on. Possible cause: The device battery is low.
Solution: charge the device for at least 5.5 hours.
• The device placed in the charging station does not charge. Possible
reasons: damage to the cord of the charging base, incorrect parameters of

aeno.com/documents 11
the power adapter. Solution: Make sure the cord is intact and that the
outlet is working. Check if the AC adapter has (DC) 5.0 V, 1.0 A output.
• The brush head vibrates very weakly. Possible Cause: The attachment is too
tight on the handle of the device. Solution to the problem: make sure that
there is a small gap at the mating point (11), about 1 mm.
• Short working time after fully charged. Possible cause: The device has not
been used for more than 6 months, so the battery may not hold a charge
well. Solution: contact the service center and replace the device battery.
ATTENTION! If none of the possible remedies resolves your problem, contact
your supplier or service center. Do not disassemble the device or try to repair it
yourself.
Connecting to the AENO mobile app
Turn on the device by pressing the button (10). Make sure that the battery of
the device is charged. The indicator (4) should light up green or orange. Place
your smartphone as close to the device as possible.
• Download the AENO mobile app from Google Play or the Apple Store and
register a new account (or sign in to an existing one).*
• On the main application screen tap «+» or «Add device» (if there are no
devices added to the application). In the window that opens select the
«Toothbrush» category.
NOTE. If a system prompts you to turn on any features on your smartphone,
follow the recommendations in the prompts.
• On the «Reset the device» screen (steps 1-2) click «Next». You do not need to
press any buttons on the device.
*Google Play is a registered trademark of Google LLC, and Apple Store is a registered trademark of
Apple Inc.

12 aeno.com/documents
• On the «Reset Device Settings» screen (step 3), check the «Make sure the
LED blinks fast» box. Click «Next».
• Click the «+» in the row of the device to be added. Click the «Next» button.
• Wait until the message «Device successfully added» appears.
Now you can control your device from the app. For information on remote
control scenarios see the installation and operation manual at
aeno.com/documents.
Recycling information
These symbols indicate that you must follow the Waste Electrical
and Electronic Equipment (WEEE) and Waste Battery and
Battery Regulations when disposing of the device, its batteries
and accumulators, and its electrical and electronic accessories.
According to the rules, this equipment must be disposed of
separately at the end of its service life. Do not dispose of the
device, its batteries and accumulators, or its electrical and
electronic accessories together with unsorted municipal waste,
as this will harm the environment.
To dispose of this equipment, it must be returned to the point of
sale or turned in to a local recycling facility.
You should contact your local household waste disposal service for details.
ASBIS reserves the right to modify the device and to make edits and changes to this document
without prior notice to users and shall not be liable for possible negative consequences resulting
from the use of an outdated version of the document or for any possible technical or typographical
errors or omissions or incidental or consequential damages that may arise from the transmission
of this document or the use of devices.
The warranty period and service life shall be 2 years as from the date of purchase of the device.
Manufacturer: ASBISc Enterprises PLC, Iapetou, 1, Agios Athanasios, 4101, Limassol, Cyprus. Made in
China. For current information and details on the device description and specification, as well as
connection process, certificates, warranty and quality issues, see relevant Installation and
Operation Manuals available for downloading at aeno.com/documents. All trademarks and names
herein are the property of their respective owners.

aeno.com/documents 13
UK Зубна щітка AENO DB1S/DB2S призначена для щоденного очищення
зубів та ясен.
Технічні характеристики
Зубна щітка. Акумулятор: незнімний літій-іонний 5 В (DC), 0,3 A, 1400 мА
год. Потужність: 1,85 Вт. Рівень шуму (на відстані 0,3 м): ≤60 дБ. Час повної
зарядки акумулятора: 5 год ±30 хв. Ступінь захисту корпусу: IPX7. Ступінь
жорсткості щетини: середня. Кількість режимів роботи: 5. Управління:
механічне, із додатка. Розміри щітки з насадкою (діаметр × висота):
Ø 26 мм × 240 мм. Потужність випромінювання: +4 dBm/2,5 mW.
Зарядна станція. Напруга живлення на вході: 5 В (DC) , 1,0 А. Потужність:
5,0 Вт. Ступінь захисту корпусу: IPX5. Розміри (діаметр × висота):
Ø 45 мм × 21 мм.
Комплект постачання (малюнок a)
Зубна щітка AENO DB1S (біла) / DB2S (чорна) (ручка (1), 3 змінні насадки (2)),
зарядна станція (3), кабель живлення USB-A/USB-C (0,8 м), короткий
посібник користувача, гарантійний талон.
Обмеження та попередження
Пристрій не призначений для використання дітьми або особами з
обмеженими фізичними/психічними/розумовими здібностями при
відсутності у них достатньо досвіду та навичок з експлуатації пристрою,
або якщо вони не знаходяться під контролем особи, яка відповідає за їх
безпеку. Не залишайте включений в розетку пристрій без нагляду. Не
вмикайте пошкоджений пристрій. Від'єднуйте пристрій від мережі,
тримаючись за вилку живлення, а не за шнур; не використовуйте
подовжувач. Зубна щітка призначена виключно для чистки зубів і ясен.
Після хірургічного втручання, наприклад, операції на яснах або в

14 aeno.com/documents
порожнині рота, а також при наявності захворювань ясен і порожнини
рота, тривалих проблем з зубами або підозр на подібні проблеми (пломби,
коронки та інше) необхідно попередньо проконсультуватися у
стоматолога про можливість користуватися пристроєм. Якщо після
використання пристрою починають кровоточити ясна, і кровотеча
продовжується більше 7 (семи) днів, негайно зверніться до стоматолога.
Заряджайте зубну щітку тільки на оригінальній зарядній підставці, яка
встановлена на рівну і стійку поверхню. Якщо зарядна підставка
випадково потрапить у воду, необхідно спочатку від'єднати її від
електромережі і тільки після цього витягти з води і ретельно висушити.
Місце, де знаходиться мережевий кабель зарядної підставки і USB-кабель,
повинно бути сухим. Кожен з членів сім'ї має користуватися своєю
насадкою щітки. Замінюйте насадку щітки не рідше ніж один рази кожні
три місяці в залежності від ступеня зношеності. Використовуйте тільки
оригінальні змінні насадки.
УВАГА! Забороняється мити пристрій або будь-яку його частину в
посудомийній машині.
Підготовка пристрою до роботи
Розпакуйте пристрій та розмістіть зарядну станцію (3) на стійкій
горизонтальній поверхні. Підключіть зарядну станцію до електричної
мережі за допомогою USB-кабелю та мережевого адаптеру (не входить до
комплекту поставки). Встановіть пристрій на зарядну станцію.
Світлодіодний індикатор заряджання (4) почне світитися червоним. Коли
світлодіодний індикатор (4) почне світитися зеленим, акумулятор
повністю заряджений і пристрій готовий до роботи.

aeno.com/documents 15
УВАГА! Мережевий адаптер не входить до комплекту поставки. Ви можете
використовувати мережний адаптер від смартфона, планшета або іншого
пристрою, якщо він забезпечує параметри живлення (DC) 5,0 В, 1,0 А.
Щоб продовжити термін служби акумулятора, перед першим
використанням заряджайте пристрій щонайменше 20 год.
Після закінчення заряджання необхідно від'єднати зарядну станцію від
розетки. Після повного заряджання акумулятора час роботи пристрою
становить близько 360 хв. Якщо ви чистите зуби двічі на день по 2 хв, то
пристрій буде працювати без зарядки до 3 місяців. Коли акумулятор
розряджається, індикатор заряду (4) спалахує червоним і починає
повільно блимати.
Таблиця кольорової індикації заряду акумулятора
Колір індикатора (4)
Ступінь заряду акумулятора
червоний
0–10 %
помаранчевий
10–99 %
зелений
100 %
Експлуатація пристрою
Встановіть змінну головку зубної щітки (2) на ручку (1), як показано на
малюнку b. Нанесіть трохи засобу для догляду за зубами на щетину.
Натисніть кнопку живлення (10). Один із індикаторів, що показуює режим
роботи пристрою, почне світитися. Прилад працюватиме у вказаному
режимі. Щоб вимкнути пристрій, знову натисніть кнопку (10).
Кожні 30 с спрацьовує вібросигнал, нагадуючи про можливість
переключити режим роботи. Щоб змінити режим, вимкніть і знову
увімкніть пристрій кнопкою (10). Потім швидко натискайте кнопку (10)
кілька разів поспіль, вибираючи потрібний режим. Після кожного
натискання режим змінюється на наступний. Останній використаний

16 aeno.com/documents
режим залишається в пам'яті пристрою. Цей режим буде автоматично
вибрано під час наступного увімкнення пристрою.
Направляйте щетину головки зубної щітки під кутом 45° до поверхні зубів,
як показано на малюнку c. У такому положенні головка зубної щітки
працює найбільш ефективно.
Таблиця режимів роботи пристрою
Індикатор
(малюнок a)
Режим
Опис
5
«Soft»
(«Ділікатний»)
Делікатне, м'яке очищення ясен та
зубів
6
«Clean» («Чистка»)
Щоденне стандартне очищення
7
«Massage»
(«Масаж»)
Масаж ясен
8
«White»
(«Відбілювання»)
Відбілювання зубів.
Рекомендується для людей, що
палять та часто вживають каву
9
«Smart» («Розумне
управління»)
Робота за сценарієм, заданим у
додатку AENO
Режим автовимкнення
Через 2 хвилини роботи пристрій автоматично вимикається. Ви можете
знову увімкнути пристрій, натиснувши кнопку (10).
Технічне обслуговування
Змінні головки зубної щітки слід мити в проточній воді, комфортної для вас
температури, як показано на малюнку d. Намагайтеся не занурювати
головку зубної щітки у воду повністю. Не використовуйте при митті
головки зубної щітки агресивні чи чистячі речовини. Дозволяється іноді

aeno.com/documents 17
обробляти щетину головки зубної щітки рідиною для полоскання рота.
Забруднення на ручці пристрою та зарядної станції слід видаляти вологою
серветкою, як показано на малюнку d. Після очищення ретельно протріть
поверхню сухою серветкою. При сильному забрудненні для очищення
ручки пристрою нанесіть на серветку рідину для миття посуду. Після миття
видаліть залишки вологи рушником.
ПРИМІТКА. Проводьте технічне обслуговування пристрою та його
компонентів тільки після вимкнення пристрою та вимкнення зарядної
станції від електромережі.
Усунення можливих несправностей
• Зубна щітка не вмикається. Можлива причина: акумулятор пристрою
розряджений. Рішення: зарядіть пристрій протягом не менше 5,5 годин.
• Розміщений на зарядній станції пристрій не заряджається. Можливі
причини: пошкодження шнура зарядної бази, некоректні параметри
мережевого адаптера. Рішення: переконайтеся, що шнур не
пошкоджений, а розетка справна. Перевірте, чи має мережевий адаптер
вихідні параметри (DC) 5,0 В, 1,0 А.
• Змінна головка зубної щітки вібрує дуже слабко. Можлива причина:
головка зубної щітки надто щільно прилягає до ручки пристрою.
Рішення: переконайтеся, що в місці з'єднання (11) є невеликий зазор,
приблизно 1 мм.
• Короткий час роботи після повного заряджання. Можлива причина:
пристрій не використовувався більше 6 місяців, акумулятор може
погано тримати заряд. Рішення: зверніться до сервісного центру та
замініть акумулятор пристрою.

18 aeno.com/documents
УВАГА! Якщо жоден із можливих варіантів не допоміг вирішити вашу
проблему, зверніться до постачальника або до сервісного центру. Не
розбирайте пристрій та не намагайтеся відремонтувати його самостійно.
Підключення до мобільного додатку AENO
Увімкніть пристрій, натиснувши кнопку (10). Переконайтеся, що
акумулятор не розряджений. Індикатор (4) повинен світитись зеленим або
помаранчевим кольором. Розмістіть смартфон якомога ближче до
пристрою.
• Завантажте мобільний додаток AENO з Google Play або App Store і
зареєструйте новий обліковий запис (або увійдіть до існуючого).*
• На головному екрані програми натисніть «+» або «Додати пристрій»
(якщо у програмі немає доданих пристроїв). У вікні виберіть категорію
«Зубна щітка».
ПРИМІТКА. У разі появи системних запитів про включення будь-яких
функцій на смартфоні, дотримуйтесь вказаних у них рекомендацій.
• На екрані «Скиньте налаштування пристрою» (кроки 1–2) натисніть
кнопку «Далі». На пристрою жодних кнопок не потрібно натискати.
• На екрані «Скиньте налаштування пристрою» (крок 3) поставте галочку
у рядку «Переконайтеся, що індикатор блимає швидко». Натисніть
кнопку «Далі».
• Натисніть «+» у рядку доданого пристрою. Натисніть кнопку «Далі».
• Дочекайтеся появи повідомлення: «Пристрій успішно додано».
Тепер ви зможете керувати вашим пристроєм з додатка. Інформація про
сценарії віддаленого керування наведена у повній версії посібника на
aeno.com/documents .
* Google Play – зареєстрована торгова марка Google LLC, App Store – зареєстрована торгова
марка Apple Inc.

aeno.com/documents 19
Інформація про утилізацію
Ці символи означають, що при утилізації пристрою, його
батарей і акумуляторів, а також його електричних і
електронних аксесуарів, необхідно слідувати Директиві щодо
відпрацьованого електричного й електронного обладнання
(WEEE) і Директиві про батарейки та акумулятори та відходи
від батарейок та акумуляторів, що містять небезпечні
речовини. Згідно з директивами, дане обладнання після
закінчення терміну служби підлягає окремій утилізації.
Не допускається утилізацію пристрою, його батареї та
акумулятори, а також його електричні і електронні аксесуари
разом з несортованими міськими відходами, оскільки це завдасть шкоди
навколишньому середовищу. Для утилізації даного устаткування, його
необхідно повернути в пункт продажу або здати в місцевий пункт
переробки. Для отримання детальної інформації слід звернутися в
місцеву службу ліквідації побутових відходів.
Компанія ASBIS залишає за собою право модифікувати пристрій та вносити правки та зміни
до цього документа без попереднього повідомлення користувачів та не несе
відповідальності за можливі негативні наслідки, що виникли внаслідок використання
застарілої версії документа, а також за будь-які можливі технічні та типографічні помилки або
упущення чи випадковий або пов'язаний збиток, який може виникнути внаслідок передачі
цього документа або використання пристроїв.
Гарантійний термін і термін служби – 2 роки з дати придбання виробу.
Відомості про виробника: ASBISc Enterprises PLC, Iapetou, 1, Agios Athanasios, 4101, Limassol,
Cyprus (Китай). Зроблено в Китаї.
Актуальні відомості і докладний опис пристрою, а також інструкція по підключенню,
сертифікати, відомості про компанії, які приймають претензії щодо якості та гарантії, доступні
для скачування за посиланням aeno.com/documents. Всі зазначені торговельні марки і їх
назви є власністю їх відповідних власників.

20 aeno.com/documents
AR DB2S/DB1SAENO
IPX7
IPX5 +4 dBm/2,5 mW
a AENO DB1SDB2S
USB-A/USB-C
. .
. .
USB
Pagina se încarcă...
Pagina se încarcă...
Pagina se încarcă...
Pagina se încarcă...
Pagina se încarcă...
Pagina se încarcă...
Pagina se încarcă...
Pagina se încarcă...
Pagina se încarcă...
Pagina se încarcă...
Pagina se încarcă...
Pagina se încarcă...
Pagina se încarcă...
Pagina se încarcă...
Pagina se încarcă...
Pagina se încarcă...
Pagina se încarcă...
Pagina se încarcă...
Pagina se încarcă...
Pagina se încarcă...
Pagina se încarcă...
Pagina se încarcă...
Pagina se încarcă...
Pagina se încarcă...
Pagina se încarcă...
Pagina se încarcă...
Pagina se încarcă...
Pagina se încarcă...
Pagina se încarcă...
Pagina se încarcă...
Pagina se încarcă...
Pagina se încarcă...
Pagina se încarcă...
Pagina se încarcă...
Pagina se încarcă...
Pagina se încarcă...
Pagina se încarcă...
Pagina se încarcă...
Pagina se încarcă...
Pagina se încarcă...
Pagina se încarcă...
Pagina se încarcă...
Pagina se încarcă...
Pagina se încarcă...
Pagina se încarcă...
Pagina se încarcă...
Pagina se încarcă...
Pagina se încarcă...
Pagina se încarcă...
Pagina se încarcă...
Pagina se încarcă...
Pagina se încarcă...
Pagina se încarcă...
Pagina se încarcă...
Pagina se încarcă...
Pagina se încarcă...
Pagina se încarcă...
Pagina se încarcă...
Pagina se încarcă...
Pagina se încarcă...
Pagina se încarcă...
Pagina se încarcă...
Pagina se încarcă...
Pagina se încarcă...
Pagina se încarcă...
Pagina se încarcă...
Pagina se încarcă...
Pagina se încarcă...
Pagina se încarcă...
Pagina se încarcă...
Pagina se încarcă...
Pagina se încarcă...
Pagina se încarcă...
Pagina se încarcă...
Pagina se încarcă...
Pagina se încarcă...
Pagina se încarcă...
Pagina se încarcă...
Pagina se încarcă...
Pagina se încarcă...
Pagina se încarcă...
Pagina se încarcă...
Pagina se încarcă...
Pagina se încarcă...
Pagina se încarcă...
Pagina se încarcă...
Pagina se încarcă...
Pagina se încarcă...
Pagina se încarcă...
Pagina se încarcă...
Pagina se încarcă...
Pagina se încarcă...
Pagina se încarcă...
Pagina se încarcă...
Pagina se încarcă...
Pagina se încarcă...
Pagina se încarcă...
Pagina se încarcă...
Pagina se încarcă...
Pagina se încarcă...
Pagina se încarcă...
Pagina se încarcă...
Pagina se încarcă...
Pagina se încarcă...
Pagina se încarcă...
Pagina se încarcă...
Pagina se încarcă...
Pagina se încarcă...
Pagina se încarcă...
Pagina se încarcă...
Pagina se încarcă...
Pagina se încarcă...
Pagina se încarcă...
Pagina se încarcă...
Pagina se încarcă...
Pagina se încarcă...
Pagina se încarcă...
Pagina se încarcă...
Pagina se încarcă...
Pagina se încarcă...
Pagina se încarcă...
Pagina se încarcă...
Pagina se încarcă...
Pagina se încarcă...
Pagina se încarcă...
Pagina se încarcă...
Pagina se încarcă...
Pagina se încarcă...
Pagina se încarcă...
Pagina se încarcă...
Pagina se încarcă...
Pagina se încarcă...
Pagina se încarcă...
Pagina se încarcă...
Pagina se încarcă...
Pagina se încarcă...
-
 1
1
-
 2
2
-
 3
3
-
 4
4
-
 5
5
-
 6
6
-
 7
7
-
 8
8
-
 9
9
-
 10
10
-
 11
11
-
 12
12
-
 13
13
-
 14
14
-
 15
15
-
 16
16
-
 17
17
-
 18
18
-
 19
19
-
 20
20
-
 21
21
-
 22
22
-
 23
23
-
 24
24
-
 25
25
-
 26
26
-
 27
27
-
 28
28
-
 29
29
-
 30
30
-
 31
31
-
 32
32
-
 33
33
-
 34
34
-
 35
35
-
 36
36
-
 37
37
-
 38
38
-
 39
39
-
 40
40
-
 41
41
-
 42
42
-
 43
43
-
 44
44
-
 45
45
-
 46
46
-
 47
47
-
 48
48
-
 49
49
-
 50
50
-
 51
51
-
 52
52
-
 53
53
-
 54
54
-
 55
55
-
 56
56
-
 57
57
-
 58
58
-
 59
59
-
 60
60
-
 61
61
-
 62
62
-
 63
63
-
 64
64
-
 65
65
-
 66
66
-
 67
67
-
 68
68
-
 69
69
-
 70
70
-
 71
71
-
 72
72
-
 73
73
-
 74
74
-
 75
75
-
 76
76
-
 77
77
-
 78
78
-
 79
79
-
 80
80
-
 81
81
-
 82
82
-
 83
83
-
 84
84
-
 85
85
-
 86
86
-
 87
87
-
 88
88
-
 89
89
-
 90
90
-
 91
91
-
 92
92
-
 93
93
-
 94
94
-
 95
95
-
 96
96
-
 97
97
-
 98
98
-
 99
99
-
 100
100
-
 101
101
-
 102
102
-
 103
103
-
 104
104
-
 105
105
-
 106
106
-
 107
107
-
 108
108
-
 109
109
-
 110
110
-
 111
111
-
 112
112
-
 113
113
-
 114
114
-
 115
115
-
 116
116
-
 117
117
-
 118
118
-
 119
119
-
 120
120
-
 121
121
-
 122
122
-
 123
123
-
 124
124
-
 125
125
-
 126
126
-
 127
127
-
 128
128
-
 129
129
-
 130
130
-
 131
131
-
 132
132
-
 133
133
-
 134
134
-
 135
135
-
 136
136
-
 137
137
-
 138
138
-
 139
139
-
 140
140
-
 141
141
-
 142
142
-
 143
143
-
 144
144
-
 145
145
-
 146
146
-
 147
147
-
 148
148
-
 149
149
-
 150
150
-
 151
151
-
 152
152
-
 153
153
-
 154
154
-
 155
155
-
 156
156


AENO DB1S Smart Sonic Electric Toothbrush Manual de utilizare
- Tip
- Manual de utilizare
Lucrări înrudite
-
AENO RC2S Manualul utilizatorului
-
AENO SC3 Manualul utilizatorului
-
-
-
-
-
AENO ATB0002 Manualul utilizatorului
-
AENO ATB0003 Manual de utilizare
-
AENO AKS0001S Manual de utilizare
-