CANGAROO Bassinet Always Together gray Instrucțiuni de utilizare
- Categorie
- Mobilier pentru copii
- Tip
- Instrucțiuni de utilizare

66
BG: ИНСТРУКЦИЯ ЗА УПОТРЕБА НА БЕБЕШКО ЛЕГЛО
МОДЕЛ “Always Together" АРТИКУЛЕН НОМЕР: P-10
EN: INSTRUCTION MANUAL FOR BABY BASSINET
MODEL: “Always Together" ITEM No. P-10
RO: MANUAL DE INSTRUCȚIUNE PENTRU BASSINETUL BABY
MODEL: “Always Together" ITEM P-10
GR: ΕΓΧΕΙΡΙΔΙΟ ΟΔΗΓΙΩΝ ΓΙΑ ΜΠΑΤΑΡΙΑ ΜΠΑΝΙΟΥ
ΥΠΟΔΕΙΓΜΑ: “Always Together" ΑΡΙΘ. P-10
RU: ИНСТРУКЦИЯ ПО СБОРКЕ И ИСПОЛЬЗОВАНИЮ О КРОВАТКА “Always
Together" НОМЕР:P-10
Моля, прочетете внимателно този наръчник преди
употребата на бебешкото легло, за да осигурите правилното използване на продукта.Запазете
инструкцията за бъдеща справка,тъй като съдържа важна информация. Съветваме Ви да следвате
правилните стъпки за поставяне на продукта,за да осигурите неговата безопасна употреба.Леглото
отговаря на следните Европейски стандарти EN1130: 2019
Please, read carefully this manual before using the bassinet to ensure the correct use of the product.
Keep the instructions for future reference as it contains important information. We recommend that
you follow the right steps for folding and unfolding of the product on to ensure its safe use. The
bassinet meets the requirements of the following EN standards:
EN 1130:2019
Citiți cu atenție acest manual înainte de
Utilizarea patului pentru copii, pentru a asigura utilizarea corectă a produsului. Păstrați instrucțiunile
pentru referințe ulterioare deoarece conțin informații importante. Vă sfătuim să urmați pașii corecți
pentru introducerea produsului pentru a vă asigura utilizarea sigură. Patul este conform cu
următoarele standarde europene EN1130:2019
Παρακαλώ, διαβάστε αυτό το εγχειρίδιο προσεκτικά πριν την χρήση του παιδικού κρεβατιού, για να
εξασφαλίσετε την σωστή χρήση του προϊόντος. Κρατήστε τις οδηγίες για μελλοντική αναφορά,
περιέχουν σημαντική πληροφορία. Σας συνιστούμε να ακολουθήστε τα σωστά βήματα για την
τοποθέτηση του προϊόντος, για να εξασφαλίσετε την ακίνδυνη χρήση του. Το κρεβάτι ακολουθεί το
Ευρωπαϊκό πρότυπο EN 1130:2019
Пожалуйста, внимательно прочитайте это руководство, прежде чем
использование детской кроватки для обеспечения правильного использования продукта.
Сохраните руководство для дальнейшего использования, так как оно содержит важную
информацию. Мы рекомендуем вам выполнить правильные шаги для размещения продукта,
чтобы обеспечить его безопасное использование. Кровать соответствует европейским
стандартам EN 1130:2019

УКАЗАНИЯ И ПРЕДУПРЕЖДЕНИЯ ЗА БЕЗОПАСНОСТ!
Моля прочетете тези инструкции преди да използвате продукта.
Моля запазете инструкциите за бъдещи въпроси,тъй като съдържат важна
информация.
ВНИМАНИЕ:Неспазването на тези инструкции при използването или сглобяването на продукта може да
застраши сериозноздравето на детето Ви и да доведе до смърт.
1. Предназначено е за деца от 0м.идо 11 кг.Внимание! Да не се използва след като детето само може да се
изтласква и изправя.
2. Детското креватче трябва да се постави върху хоризонтален под!
2. Малки деца не трябва да се оставят да играят в непосредствена близост до детското креватче/ люлката без
надзор.
3.ВНИМАНИЕ! Детското креватче трябва да е блокирано във фиксирана позиция, когато детето е без надзор в
него.
4. ВНИМАНИЕ! Да не се използва детското креватче, ако някоя част е скъсана или липсва.
5. Когато детето може да сяда, да коленичи или да се изправя само детското креватче не трябва да се използва
повече от това дете.
6. Всички средства за монтаж да бъдат винаги затегнати.Да се внимава да няма хлабави винтове, защото може
части от тялото на детето или от дрехи да се защипят (ленти, огърлици, панделки за биберони и др.), които ще
представляват опасност от задушаване.
7. Корпусът на люлката да не се използва без носещата рамка.
8. Дебелината на матрака да се избира така, че вертикалната вътрешна височина (от горната повърхнина на
матрака до горният кант на страниците на леглото) при най-високо положение на дъното на леглото трябва да
бъде най-малко 200мм.
9. ВНИМАНИЕ! Общата дебелина на матрака не трябва да надвишава 3,8 сантиметра, а дължината и ширината
не трябва да позволяват пролука, по-голяма от 2,5 см между матрака и стената на детското легло, а когато
матракът е притиснат към стените и в единия ъгъл на кошничката.
10. ВНИМАНИЕ! Детското креватче да не се оставя в близост до открит огън или друг силен горещ източник на
топлина, например гореща печка, газова печка и др.
11.ВНИМАНИЕ! Не правете никакви промени и подобрения по конструкцията на креватчето, тъй като това
може да доведе до прекатурване или повреда на креватчето, докато детето е в нея и то да се нарани.
12.Не прикачвайте предмети и аксесоари към креватчето, които не са осигурени от производителя, тъй като
това може да се отрази на стабилността на креватчето и безопасността
BG
ВНИМАНИЕ! ПРОЧЕТЕТЕ ВНИМАТЕЛНО ИНСТРУКЦИИТЕ И ЗАПАЗЕТЕ ЗА ПО-НАТАТЪШНИ СПРАВКИ НА СИГУРНО
МЯСТО!
ВНИМАНИЕ! ВАШЕТО ДЕТЕ ЩЕ БЪДЕ МАКСИМАЛНО ЗАЩИТЕНО, АКО СПАЗВАТЕ ПРЕПОРЪКИТЕ И УКАЗАНИЯТА
ОТ ИНСТРУКЦИЯТА! Обърнете внимание на предупрежденията за безопасна употреба и осигурете всички
необходими предпазни мерки, за да предотвратите риска от нараняване или увреждане на детето и да
осигурите неговата безопасност! Вие носите отговорност за безопасността на детето, ако не спазвате и не се
съобразявате с тези указания и препоръки! Уверете се, че всеки, който ползва креватчето е запознат с
инструкцията и я спазва.
Забележка:Спецификациите и цветовете на продукта може да се различават от тези, които са илюстрирани в
инструкцията.отговаря на изискванията за безопасност на европейски стандарт
EN 1130:2019
2
WARTUNGS- UND REINIGUNGSANLEITUNG
Reinigung
Stoff
1.Überprüfen Sie regelmäßig die festen Teile und Verriegelungsmechanismen auf Beschädigungen oder
Bruch. Wenn Schäden festgestellt werden, verwenden Sie das Kinderbett bitte nicht mehr, bis das
beschädigte Teil ersetzt ist. Reparieren Sie das Produkt nicht selbst, sondern wenden Sie sich an ein
autorisiertes Servicecenter oder den Vertriebsmitarbeiter, bei dem Sie das Produkt gekauft haben.
Andernfalls erlischt Ihre Garantie.
2.Reinigen Sie das Kinderbett regelmäßig.
3.Die Stoffe am Kinderbett werden mit warmem Wasser und milder Seife gereinigt. Lassen Sie das
Kinderbett nach der Reinigung gut trocknen, bevor Sie es verwenden. Es ist absolut verboten, es zu falten
und zu lagern, bevor es vollständig trocken ist.
4.Verwenden Sie zum Reinigen des Produkts keine starken Reinigungsmittel, Bleichmittel oder
Scheuermittel. Es ist untersagt, es in einer Waschmaschine oder einem Trockner durch chemische
Reinigung, Bleichen und Schleudern zu reinigen.
Kunststoff und Metall
1.Reinigen Sie die Kunststoff- und Metallteile mit einem feuchten, weichen Tuch und trocknen Sie diese mit
einem trockenen, weichen Tuch ab.
2.Lassen Sie das Produkt nicht unter ungünstigen Bedingungen externer Faktoren - direktem Sonnenlicht,
Regen, Schnee oder Wind. Dies kann die Metall- und Kunststoffteile beschädigen und die Stoffe bleichen.
3.Lagern Sie das Produkt bei Nichtgebrauch an einem trockenen und belüfteten Ort, nicht in staubigen,
feuchten Räumen mit sehr niedrigen oder sehr hohen Raumtemperaturen.
Rahmen
Der Farbbelag auf dem Rahmen kann bei Bedarf neu aufgetragen werden. Verwenden Sie nur ungiftige
Farben, die für Kinderprodukte zugelassen sind. Überprüfen Sie von Zeit zu Zeit alle Kunststoffteile an der
Aufhängung des Rahmens. Ziehen Sie gegebenenfalls alle Schrauben und Bolzen an.
65

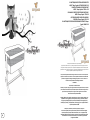
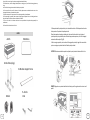
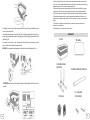
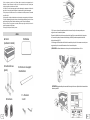
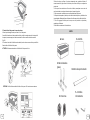
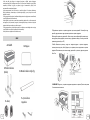
ЧАСТИ
А-Кош В-Матрак
С-Странични рамки
(крака) D- Средна Поддържаща рамка
Е-Колани
F –4 броя болтчета
1 брой шестограм
на Вашето дете.То може да си закачи крака, да се оплете и това да доведе до задушаване.
13.Преди всяка употреба проверявайте дали няма повредени, счупени, отчупени или
липсващи части.Ако установите такива повреди, моля, преустановете ползването на
креватчето, докато повредата бъде отстранена и счупените части подменени.
14.Не извършвайте сами ремонт на детското креватче.При установена повреда,моля,
свържете се с оторизиран сервиз или с търговския агент, от когото сте закупили продукта.
15.Не използвайте аксесоари или резервни части, различни от тези, одобрени от
производителя.
16.След разопаковане на продукта, моля, отстранете всички найлонови опаковки и ги
изхвърлете на означените за целта места.Дръжте ги далеч от децата,за да предотвратите
задушаване на децата.
17.Не използвайте и не добавяйте матрак за креватчето, различен от този предоставен с
продукта и одобрен от производителя.
18.Не сгъвайте креватчето, докато детето е в нея.
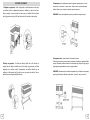
ACHTUNG! Stellen Sie sicher, dass das Kinderbett sicher am Bett der Eltern befestigt ist. Ziehen
Sie die Riemen so fest wie möglich an.
3.Befestigung des Kinderbetts mit den Gurten am Bett der Eltern. Befestigen Sie das
Kinderbett mit dem mitgelieferten Set Gurte am Bett der Eltern.
Verriegeln Sie die Schnallen an beiden Seiten unter dem Kinderbett und befestigen Sie die
Gurte um die Struktur des Elternbettes. Beginnen Sie dabei von unten nach oben und ziehen
Sie schließlich die Schnallen unter dem Bett fest (Abb. 18).
4.Um das Kinderbett neben dem Bett der Elternteils sicher zu platzieren, ziehen Sie erneut an
den Gurten, um sicherzustellen, dass das Kinderbett fest positioniert ist.
VORSICHT! Der maximale Abstand zwischen dem Kinderbett und dem Bett der Eltern sollte 2
cm betragen.
364

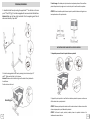
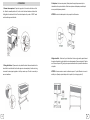
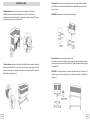
СГЛОБЯВАНЕ
1.Сглобете рамката на леглото, като вкарата поддържащата тръба „С“ в отворите във
вътрешната част на „А“ и „Б“(фиг.1). Всяка страна е оборудвана с два винта за
закрепване на рамката на леглото.
Внимание!Уверете се че рамката е добре затегната и стабилна.Това е носещата
част на креватчето и подсигурява безопасността на вашето дете.
2.Прикрепете коша за спане към рамката, като го вкарате в отворите на тръби „А“ и „Б“.
Затегнете добре с болт (а) в (б), както е показано.
Внимание! Уверете се, че болтовете са затегнати добре и кошчето е закрепено
стабилно към рамката на легълцето.
Поставете матрака в кошчето.
Съединителна
част
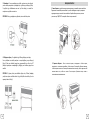
5. Schwenkfunktion - Stopper befinden sich an beiden Enden der Füβe. Um das Kinderbett aus
einer statischen Position zu lösen, ziehen Sie leicht und drehen Sie jeden der Stopper
gleichzeitig nach oben.
ACHTUNG! Lassen Sie niemals ein schlafendes Kind in der Schaukelposition. Stellen Sie sicher,
dass sich alle Stopper in der unbeweglichen Position befinden.
ANWEISUNGEN ZUR BEFESTIGUNG DES KINDERBETTS ANS BETT DER ELTERN
1.Entfernen Sie die Trennwand und befestigen Sie diese am Boden des Kinderbetts.
2. Bewegen Sie das Kinderbett ans Bett der Eltern und prüfen Sie, ob die Höhe des Kinderbetts
der Höhe der Matratze am Bett der Eltern entspricht.
ACHTUNG! Die Matratze am Bett der Eltern muss gleich hoch oder höher als die niedrigste
Position auf der abnehmbaren Seite des Kinderbetts sein.
ACHTUNG! Bei der Befestigung am Bett der Eltern sollten sich beide Füβe des Kinderbetts
immer auf gleicher Höhe befinden.
463

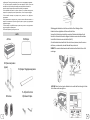
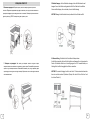
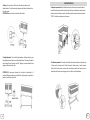
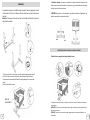
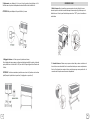
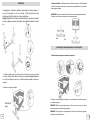
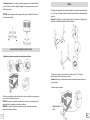
1. Сваляне на преградата-Отворете ципът, които се намира от долната страна на
кошчето. Повдигнете подвижната преграда на кошчето, така че да се откачи основата и
прикрепете падащата страна във долната част на кошчето. Затворете страничния панел
докато чуете звук „КЛИК“ и затворете от двете страни с ципа.
2. Затваряне на преградата-Ако искате да затворите откачете от двете страни
закрепете отново към основата на кошчето от двете страни.Използвайте страничните
ципове за да затворите напълно.Използвайте металния ринг, за да свържете двата
ципа заедно, така че да не могат да се отворят.Креватчето сега е готово да се използва
като самостоятелно.
ФУНКЦИИ НА КРЕВАТЧЕТО 3.Kinderbett bewegen - Um das Kinderbett zu bewegen, heben Sie die Rückwand an und
bewegen Sie es mit den Rädern an die gewünschte Stelle. Das Kinderbett hat auf beiden
Seiten rutschfeste Stopper, die es verhindern, dass sich das Bett bewegt.
ACHTUNG! Bewegen Sie das Kinderbett niemals, während sich das Kind darin aufhält.
4. Höhenverstellung - Das Kinderbett hat 5 einstellbare Höhenpositionen.
Um die Höhe einzustellen, drücken Sie die Einstelltaste und bewegen Sie es in die gewünschte
Position. Der Boden des Korbs kann mit einer Neigung von bis zu 30 °verwendet werden, um
Unbehaglichkeit und Erstickungsgefahr des Kindes zu vermeiden.
ACHTUNG! Die maximale Neigung des Korbs wird durch 2 Positionsunterschiede zwischen
dem einen und dem anderen Fuβ bestimmt. (Beispiel: Der rechte Fuß ist auf Position 3 und
der linke auf Position 1).
562

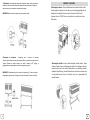
3. Преместване -За да преместите креватчето, повдигнете задната страна, след което го
преместете с колелата на желаното място. Креватчето има неплъзгащи се стопери от
двете страни, които не позволяват на креватчето да мърда.
ВНИМАНИЕ! Никога не местете креватчето, докато детето е вътре.
4.Регулиране на височината – Креватчето има 5позиции на височина.
За да регулирате нивото, натиснете регулиращия бутон и преместете на желаната от вас
позиция.Основата на кошчето може да се ползва с наклон до 30° градуса, за
предотвратяване на дискомфорт и опаснот от задушаване на детето.
ВНИМАНИЕ !Максималния наклон на кошчето се определя до 2позиции разлика
между единия и другия крак. ( Пример:десния крак е позиция 3и левия е позиция 1).
1.Bettschutzgitter entfernen -Öffnen Sie den Reißverschluss am Boden des Korbes. Heben
Sie das bewegliche Schutzgitter am Korb, so dass es von der Grundlage abgehängt wird, und
befestigen Sie die bewegliche Wand am unteren Teil des Korbes. Schließen Sie die
Seitenwand, bis Sie ein "KLICKEN" hören, und verschließen Sie an beiden Seiten mit dem
Reißverschluss.
2.Bettschutzgitter schließen - Wenn Sie das Bettschutzgitter schließen möchten, hängen
Sie dieses an beiden Seiten ab, und befestigen Sie wieder an die Grundlage des Korbes an
beiden Seiten. Benutzen Sie die seitlichen Reißverschlüsse ,um vollständig zu schließen.
Verwenden Sie den Metallring, um beide Reißverschlüsse so miteinander zu verbinden, dass
sie nicht geöffnet werden können. Das Kinderbett kann jetzt als eigenständiges Bett
verwendet werden.
KINDERBETT - FUNKTIONEN
661

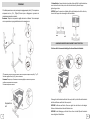
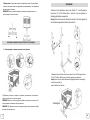
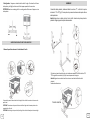
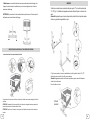
5. Функция люлка – В двата края на краката са раположени стопери. За да освободите
от статично положение креватчето, издърпайте леко и едновременно с това завъртете на
горе всеки един от стоперите.
ВНИМАНИЕ! Никога не оставяйте спящо дете в люлееща се позиция. Уверете се, че
всички стопери са в статична позиция.
ИНСТРУКЦИЯ ЗА ФИКСИРАНЕ НА КРЕВАТЧЕТО КЪМ ЛЕГЛОТО НА РОДИТЕЛЯ
1. Свалете преградата и закрепете в долната част на креватчето
2. Доближете до леглото на родителя и проверете дали височината на креватчето с
матрака е същата като на леглото на родителя
ВНИМАНИЕ! Матрака на леглото на родителя трябва да е наравно или по-висок от най-
ниската позиция на сваляемата страна на креватчето.
ВНИМАНИЕ! При фиксиране към леглото на родителя, двата крака на креватчето трябва
винаги да са на една височина.
ZUSAMMENBAU
1.Montieren Sie den Bettrahmen, indem Sie das Stützrohr "C" in die Öffnungen des
Innenteils von "A" und "B" einführen (Abb. 1). Jede Seite ist mit zwei Schrauben zur
Befestigung des Bettrahmens ausgestattet .
Achtung ! Stellen Sie sicher, dass der Rahmen fest und stabil ist. Dies ist der tragende Teil
des Kinderbetts und gewährleistet die Sicherheit Ihres Kindes.
2. Befestigen Sie den Schlafkorb an den Rahmen, indem Sie ihn in die Öffnungen der Rohre
"A" und "B" einführen. Mit Schraube (a) und (b) wie angegeben, gut festziehen.
Achtung! Stellen Sie sicher, dass die Schrauben fest angezogen und der Korb unbeweglich
am Bettrahmen befestigt ist.
Legen Sie die Matratze in den Korb.
Verbindungsteil
760

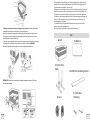
ВНИМАНИЕ ! Уверете се, че креватчето е стабилно закрепено за леглото. Затегнете
коланите максимално.
3.Фиксиране на креватчето към леглото на родителя чрез коланите Използвайте чифта каишки,
предоставени за фиксиране на креватчето към леглото на родителя.
Застопорете катарамите под креватчето от двете страни след това фиксирайте каишките около
конструкцията на леглото на родителя, като започнете от най-долу и вървите нагоре и накрая
затягате катарамите под леглото (фиг.18).
4. За да подсигурите креватчето, когато е до леглото на родителя, дръпнете каишките още веднъж,
за да се уверите, че креватчето е твърдо закрепено за леглото на родителя ВНИМАНИЕ!
Максималната дистанция между креватчето и леглото на родителя трябва да е 2 см.
TEILE
А-Korb В-Matratze
С-Seitenrahmen
(Füβe) D- Mittlerer Unterstützungsrahmen
Е-Gurte
F –4 Schrauben
1 Werkzeug
13.Überprüfen Sie vor jedem Gebrauch, ob Teile beschädigt, angebrochen, abgebrochen sind
oder fehlen. Wenn Sie solche Schäden feststellen, stellen Sie die Verwendung bitte ein, bis der
Schaden behoben und die defekten Teile ersetzt sind.
14.Reparieren Sie das Kinderbett nicht selbst. Im Falle eines Defekts wenden Sie sich bitte an ein
autorisiertes Servicecenter oder den Handelsvertreter, bei dem Sie das Produkt gekauft haben.
15.Verwenden Sie kein anderes Zubehör oder Ersatzteile als die vom Hersteller zugelassenen.
16.Entfernen Sie nach dem Auspacken des Produkts alle Plastikverpackungen und entsorgen Sie
diese an den dafür vorgesehenen Stellen. Halten Sie Verpackungen von Kindern fern, um
Erstickungsgefahren zu verhindern.
17.Verwenden oder fügen Sie keine andere Bettmatratze hinzu, als die mit dem Produkt
gelieferte und vom Hersteller zugelassene.
18. Falten Sie das Bett nicht zusammen, während das Kind darin liegt.
8 59

УКАЗАНИЯ ЗА ПОДДРЪЖКА И ПОЧИСТВАНЕ
Почистване
Плат
1.Редовно проверявайте фиксирани части и заключващите механизми, дали има нещо счупено или
отчупено и дали не са повредени. Ако установите повреда, моля, преустановете ползването на
детското креватче, докато повредената част се подмени. Не извършвайте сами ремонт на продукта, а
се свържете с оторизиран сервиз или търговския агент, от който сте закупили продукта. В противен
случай Вашата гаранция ще бъде анулирана.
2.Периодично почиствайте креватчето.
3.Платовете по креватчето се почистват с топла вода и мек сапун. След почистване оставете
креватчето да изсъхне добре преди да я използвате. Абсолютно забранено е да я сгъвате и прибирате
преди да е напълно изсъхнала.
4.Не използвайте силни почистващи препарати, белина или препарати с абразивни частици, за да
почистите продукта. Забранено е почистването му в перална машина, сушилня, чрез химическо
чистене, избелване и центрофугиране.
Пластмаса и метал
1.Пластмасовите и метални части почиствайте с влажна мека кърпа и подсушавайте със суха мека
кърпа.
2.Не оставяйте продукта на вредното въздействие на външните фактори -преки слънчеви лъчи, дъжд,
сняг или вятър. Това може да доведе до повреда на металните и пластмасови части и избеляване на
платовете на креватчето.
3.Когато не използвате продукта, съхранявайте го на сухо и проветриво място, а не в прашни, влажни
помещения с много ниски или много високи стайни температури.
Рамка
Боята на рамката може да бъде освежена при нужда. Използвайте само нетоксични бои, одобрени за
детски стоки.
От време на време проверявайте всички пластмасови части за окачване на рамката. Затягайте всички
винтове и болтове при нужда.
SICHERHEITS- UND WARNHINWEISE!
Bitte, lesen Sie diese Gebrauchsanweisung, bevor Sie das Produkt verwenden.
Bitte, bewahren Sie die Gerauchsanweisung für zukünftige Fragen auf, da sie wichtige Informationen enthält.
ACHTUNG: Die Nichtbeachtung dieser Gerauchsanweisung bei der Verwendung oder Montage des Produkts kann
die Gesundheit Ihres Kindes ernsthaft gefährden und zum Tod führen.
1.Das Kinderbett ist für Kinder im Alter von 0 Monaten und bis 11 Kg entwickelt worden. Achtung! Wenn das Kind
sich selbstständig fortbewegen und aufrichten kann, soll das Produkt nicht mehr benutzt werden.
2.Das Kinderbett muss auf einen horizontalen Boden gestellt werden!
2.Kleinkinder dürfen nicht ohne Aufsicht in unmittelbarer Nähe des Kinderbetts / der Schaukel spielen.
3.ACHTUNG! Das Kinderbett muss in einer festen Position verriegelt sein, wenn das Kind unbeaufsichtigt ist.
4.ACHTUNG! Verwenden Sie das Kinderbett nicht, wenn ein Teil zerrissen ist oder fehlt.
5.Wenn das Kind sitzen, knien oder aufstehen kann, sollte das Kinderbett nicht mehr benutzt werden.
6.Ziehen Sie immer alle Befestigungsmittel fest an. Achten Sie darauf, dass keine losen Schrauben vorhanden sind, da
Teile des Körpers oder der Kleidung des Kindes eingeklemmt werden können (Bänder, Halsketten, Schnullerbänder
usw.), die eine Erstickungsgefahr darstellen.
7.Verwenden Sie den Schaukelkörper nicht ohne Stützrahmen.
8.Die Dicke der Matratze sollte so gewählt werden, dass die vertikale Innenhöhe (von der Oberseite der Matratze bis
zur Oberkante der Bettseiten) an der höchsten Position am Boden des Bettes mindestens 200 mm beträgt.
9.ACHTUNG! Die Gesamtdicke der Matratze sollte 3,8 cm nicht überschreiten, und die Länge und Breite sollten
keinen Spalt von mehr als 2,5 cm zwischen Matratze und Wand des Kinderbetts betragen, und wenn die Matratze
gegen die Wände und in eine Ecke gedrückt wird – auch in Bezug auf den Korb.
10.ACHTUNG! Lassen Sie das Kinderbett nicht in der Nähe von offenen Feuerstellen oder einer anderen starken
heißen Wärmequelle wie einem heißen Ofen, Gasherd usw. stehen.
11.ACHTUNG! Nehmen Sie keine Änderungen oder Verbesserungen am Design des Kinderbetts vor, da dies dazu
führen kann, dass das Kinderbett umkippt oder beschädigt wird, während sich das Kind darin befindet und sich dabei
verletzt.
12.Befestigen Sie keine Gegenstände und Zubehörteile am Bett, die nicht vom Hersteller bereitgestellt werden, da
dies die Stabilität des Bettes und die Sicherheit Ihres Kindes beeinträchtigen kann. Es kann seine Füße darin
einfangen, sich verwickeln, was zu Erstickungsgefahr führt.
DE
ACHTUNG! LESEN SIE DIE GEBRAUCHSANWEISUNG SORGFÄLTIG DURCH UND BAWAHREN SIE DIESE FÜR SPӒTERES
NACHSCHLAGEN AN EINEM SICHEREN ORT AUF!
ACHTUNG! IHR KIND WIRD MAXIMAL GESCHÜTZT, WENN SIE DIE EMPFEHLUNGEN UND ANWEISUNGEN DER
GEBRAUCHSANWEISUNG BEFOLGEN! Beachten Sie die Warnhinweise zur sicheren Verwendung und treffen Sie alle
erforderlichen Vorkehrungen, um das Risiko von Verletzungen oder Geundheitsschäden des Kindes zu vermeiden und
seine Sicherheit zu gewährleisten! Sie sind für die Sicherheit des Kindes verantwortlich, wenn Sie diese Anweisungen
und Empfehlungen nicht befolgen und nicht einhalten! Stellen Sie sicher, dass jeder, der das Kinderbett benutzt, mit
der Gebrauchsanweisung vertraut ist und diese befolgt.
Hinweis: Produktspezifikationen und Farben können von den in der Gebrauchsanweisung angegebenen abweichen.
Das Erzeugnis erfüllt die Sicherheitsanforderungen der europäischen Norm EN 1130:2019
58
9

I. SAFETY INSTRUCTIONS AND WARNINGS!
Please read these instructions before using the product.
Please keep the instructions for future questions as they contain important
information.
WARNING: Failure to follow these instructions when using or assembling the product can seriously endanger your
child's health and lead to death.
1.Designed for children from 0m. and up to 11 kg. Attention! Do not use after the child can only be pushed and
straightened.
2.The cot must be placed on a horizontal floor!
2.Young children should not be allowed to play in the immediate vicinity of the crib / swing without supervision.
3.ATTENTION! The cot must be locked in a fixed position when the child is unattended.
4.ATTENTION! Do not use the crib if any part is torn or missing.
5.When the child can sit, kneel or stand up only the cot should not be used more than this child.
6.Always tighten all mounting means. Be careful not to loosen screws, as parts of the child's body or clothing may
become pinched (ribbons, necklaces, pacifier ribbons, etc.) that will pose a choking hazard.
7.Do not use the swing body without the support frame.
8. The thickness of the mattress should be chosen so that the vertical internal height (from the upper surface of the
mattress to the upper edge of the sides of the bed) at the highest position at the bottom of the bed should be at least
200 mm.
9.ATTENTION! The total thickness of the mattress should not exceed 3.8 cm, and the length and width should not
allow a gap greater than 2.5 cm between the mattress and the wall of the crib, and when the mattress is pressed
against the walls and in one corner on the basket.
10.ATTENTION! Do not leave the crib near an open fire or other strong hot heat source, such as a hot stove, gas stove,
etc.
11.ATTENTION! Do not make any changes or improvements to the design of the crib, as this may result in the crib
overturning or being damaged while the child is in it and injuring the crib.
12.Do not attach items and accessories to the crib that are not provided by the manufacturer, as this may affect the
stability of the crib and the safety
EN
ATTENTION! READ THE INSTRUCTIONS CAREFULLY AND SAVE FOR FURTHER REFERENCES IN A SAFE PLACE!
ATTENTION! YOUR CHILD WILL BE MAXIMUM PROTECTED IF YOU FOLLOW THE RECOMMENDATIONS AND
INSTRUCTIONS OF THE INSTRUCTIONS! Pay attention to the warnings for safe use and provide all necessary
precautions to prevent the risk of injury or injury to the child and to ensure his safety! You are responsible for the
safety of the child if you do not follow and do not follow these instructions and recommendations! Make sure that
everyone who uses the crib is familiar with the instructions and follows them.
Note: Product specifications and colors may differ from those illustrated in the instructions. meets the safety
requirements of a European standard
EN 1130:2019
10
INSTRUCTIUNI DE INTRETINERE SI CURATARE
Curatare
Cuvertura
1Verificati in mod regulat partile fixe si mecanismele de blocare, daca exista ceva uzat sau defect si daca
acestea nu sunt deteriorate. Daca depistati vreo deteriorare, va rugam sa incetati folosirea patutului pana
cand aceasta componenta deteriorata nu va fi schimbata. Nu reparati singur produsul, contactati centrul de
service autorizat sau agentul de vanzari de la care ati achizitionat produsul. In caz contrar, garantia
dumneavoastra va fi anulata.
2.Curatati patutul in mod periodic.
3.Cuvertura patutului trebuie curatate cu apa calda si sapun moale. Dupa curatare, lasati patutul sa se
usuce bine inainte de al folosi. Este absolut interzis sa pliati si sa depozitati inainte de a se usca in mod
complet.
4.Nu folositi detergenti puternici, inalbitori sau detergenti cu compozitie abraziva pentru a curata produsul.
Este interzisa spalarea acesteia intr-o masina de spalat, uscator, curatare chimica, albire si centrifugare.
Componente din plastic si metal
1.Componentele din plastic si metal curatati cu o carpa umeda moale si uscati cu o carpa uscata moale.
2.Nu lasati produsul la efectele nocive ale factorilor externi - lumina directa a soarelui, ploaie, zapada sau
vant. Acest lucru poate duce la deteriorarea componentelor din metal si plastic si albirea cuverturii
patutului.
3.Atunci cand nu folositi produsul, pastrati intr-un loc uscat si ventilat, nu in incaperi prafuite, umede, cu
temperaturi ale camerei foarte scazute sau foarte ridicate.
Cadru
Vopseaua cadrului poate fi reimprospatata la nevoie. Folositi numai vopsele non-toxice aprobate pentru
produse pentru copii.
Din cand in cand verificati toate componentele din plastic pentru starea lor de fixare pe cadru.
Strangeti toate suruburile si piulitele la nevoie.
57

PARTS
А-Crib В-Mattress
С-Side frames (legs)
D- Medium Support Frame
Е-Belts
F –4 bolts
1 tool
of your child. It can catch your feet, become entangled and cause suffocation.
13. Before each use, check for damaged, broken, broken or missing parts. If you find such damage, please stop
using
the crib until the damage is removed and the broken parts replaced.
14.Do not repair the crib yourself. In the event of a defect, please contact an authorized service center or the
sales agent from whom you purchased the product.
15.Do not use accessories or spare parts other than those approved by the manufacturer.
16. After unpacking the product, please remove all plastic bags and dispose of them in the designated areas.
Keep them away from children to prevent suffocation of children.
17.Do not use or add acrib mattress other than the one provided with the product and approved by the
manufacturer.
18.Do not fold the crib while the child is in it.
ATENTIE! Asigurati-va ca patutul este foarte bine fixat pe pat. Strangeti centurile cat mai mult
posibil.
3.Fixarea patutului de patul parintelui prin intermediul curelelor. Utilizati perechea de curele
livrate pentru a fixa patutul de patul parintelui.
Blocati cataramele sub patut pe ambele parti, dupa care fixati curelele in jurul structurii
patului parintelui, incepand din partea inferioara spre partea superioara, iar la final strangeti
cataramele aflate sub pat (Fig.18).
4.Pentru a asigura patutul, atunci cand se afla langa patul parintelui, trageti din nou curelele
pentru a va asigura ca patutul este bine fixat de patul parintelui.
ATENTIE! Distanta maxima dintre patutul copilului si patul parintelui trebuie sa fie de 2 cm.
11 56

СГЛОБЯВАНЕ/ ASSEMBLING
1. Assemble the bed frame by inserting the support tube "C" into the holes in the inner
part of "A" and "B" (Fig. 1). Each side is equipped with two screws to attach the bed frame.
Attention! Make sure the frame is tight and stable. This is the supporting part of the crib
and ensures the safety of your child.
2. Attach the sleeping basket to the frame by inserting it into the holes of pipes "A"
and "B". Tighten well with bolt (a) c (b) as shown.
Attention! Make sure that the bolts are tight and the basket is firmly attached to
the bed frame.
Put the mattress in the trash.
Connecting part
5. Functie leagan –De ambele parti ale picioarelor sunt amplasate opritoare. Pentru a elibera
patutul din pozitia statica, trageti usor si in acelasi timp rotiti in sus fiecare dintre opritoare.
ATENTIE! Nu lasati niciodata copilul sa doarma in patut in pozitie de balansare. Asigurati-va ca
toate opritoarele se afla in pozitie statica.
INSTRUCTIUNI PENTRU FIXAREA PATUTULUI DE PATUL PARINTELUI
1. Indepartati paravanul si atasati in partea inferioara a patutului
2. Apropiati de patul parintelui si verificati daca inaltimea patutului impreuna cu salteaua se
aflat la acelasi nivel cu patul parintelui.
ATENTIE! Salteaua patului parintelui trebuie sa fie la acelasi nivel sau la inaltime mai mare fata
de cea mai joasa pozitie a partii detasabile a patutului.
ATENTIE! La fixarea de patul parintelui, ambele picioare ale patutului trebuie sa fie
intotdeauna la aceeasi inaltime.
12 55

1. Remove the compartment - Open the zipper, which is located on the bottom of the
bin. Raise the movable partition of the bin so that the base detaches and attach the
falling side to the bottom of the bin. Close the side panel until you hear a "CLICK" sound
and close the zipper on both sides.
2. Closing the bulkhead -If you want to close, detach from both sides and reattach to the
base of the bin on both sides. Use the side zippers to close completely. Use the metal ring
to connect the two zippers together so that they cannot open. The crib is now ready to
use as a standalone.
COT FUNCTIONS 3. Manipulare –Pentru a muta patutul, ridicati partea din spate, dupa care mutati prin
intermediul rotilor spre locatia dorita. Patutul are opritoare antiderapante pe ambele parti
care nu permit deplasarea patutului.
ATENTIE! Nu mutati niciodata patutul in timp ce copilul se afla inauntru.
4.Reglarea inaltimii –Patutul are 5 pozitii de inaltime. Pentru a regla nivelul, apasati butonul
de reglare si deplasati in pozitia dorita de catre dumneavoastra. Baza cosului poate fi folosita
cu o inclinare de pana la 30°grade, pentru prevenirea disconfortului si pericolului de sufocare
al copilului.
ATENTIE! Inclinarea maxima a cosului se determina pana la 2 pozitii diferenta intre unul si
celalalt picior. (Exemplu: piciorul drept se afla in pozitia 3, iar cel stang in pozitia 1).
13 54

3.Moving - To move the crib, lift the back, then move the wheels to the
desired location. The crib has non-slip stoppers on both sides that do not allow
the crib to move.
ATTENTION! Never move the crib while the child is inside.
4. Height adjustment - The crib has 5 height positions. To adjust the level, press
the adjustment button and move to the desired position. The base of the basket
can be used with an inclination of up to 30 °degrees, to prevent discomfort and
danger of suffocation of the child.
ATTENTION! The maximum inclination of the basket is determined by 2
positions difference between one and the other leg. (Example: the right foot is
position 3 and the left is position 1).
1.Indepartarea paravanului –Deschideti fermoarul care este situat in partea inferioara a
cosului. Ridicati paravanul mobil al cosului, astfel incat baza sa se detaseze si atasati partea
cazatoare in partea inferioara a cosului. Inchideti panoul lateral pana cand veti auzi sunetul
“CLICK” si inchideti pe ambele parti cu fermoarul.
2.Inchiderea paravanului –Daca doriti sa inchideti, detasati pe ambele parti, atasati din nou
la baza cosului pe ambele parti. Folositi fermoarele laterale pentru a inchide complet.
Folositi inelul metalic pentru a conecta cele doua fermoare, astfel incat acestea sa nu se
poata deschida. Patutul acum este gata pentru a fi utilizat in mod independent.
FUNCTIILE PATUTULUI
14 53

5. Swing function - Stoppers are located at both ends of the legs. To release the crib from a
static position, pull slightly and turn each of the stoppers upwards at the same time.
ATTENTION! Never leave a sleeping child in a rocking position. Make sure all stoppers are in a
static position.
INSTRUCTIONS FOR FIXING THE BED TO THE PARENT'S BED
1. Remove the partition and secure it to the bottom of the crib
2. Approach the parent's bed and check that the height of the crib with the mattress is the same as the
parent's bed
ATTENTION! The mattress on the parent's bed must be flat or higher than the lowest position on the
removable side of the crib.
ATTENTION! When fixing to the parent's bed, both legs of the crib should always be at the same height.
ASAMBLARE
1.Asamblati cadrul patutului, introducand tubul de sustinere “C” in orificiile din partea
interioara la “A” si “B” (fig.1). Fiecare parte este prevazuta cu doua suruburi pentru fixarea
cadrului patutului.
Atentie! Asigurati-va ca cadrul este bine fixat si stabil. Aceasta este partea portanta a
patutului si asigura siguranta copilului dumneavoastra.
2. Atasati cosul pentru dormit de cadru, prin introducerea acestuia in orificiile tuburilor “A” si
“B”. Strangeti bine cu surubul (a) si (b) asa cum este prezentat in imagine.
Atentie! Asigurati-va ca suruburile sunt bine stranse si cosul este bine fixat de cadrul
patutului.
Introduceti salteaua in cos.
Piesa de conectare
15 52

ATTENTION! Make sure the crib is securely attached to the bed. Tighten the belts as much as
possible.
3.Fixing the crib to the parent's bed using the belts Use the pair of straps provided to secure
the crib to the parent's bed.
Lock the buckles under the crib on both sides, then fix the straps around the structure of the
parent's bed, starting from the bottom and going up and finally tightening the buckles under
the bed (Fig.18).
4.To secure the crib when it is next to the parent's bed, pull the straps once more to make
sure the crib is firmly attached to the parent's bed.
CAUTION! The maximum distance between the crib and the parent's bed should be 2cm.
COMPONENTE
А-Cos В-Saltea
С-Cadre laterale
(picioare) D- Cadru mediu de sustinere
Е-Curele
F –4 șuruburi
1 instrument
13.Inainte de fiecare utilizare, verificati daca nu exista componente deteriorate, sparte, rupte sau
lipsa. In cazul in care constatati astfel de deteriorari, va rugam sa incetati utilizarea patutului pana la
indepartarea deteriorarilor si inlocuirea componentelor defecte.
14.Nu efectuati singuri reparatii la patutul pentru copii. Daca constatati vreun defect, va rugam sa
contactati centrul de service autorizat sau agentul de vanzari de la care ati achizitionat produsul.
15.Nu folositi accesorii sau componente de schimb, altele decat cele aprobate de catre producator.
16.Dupa despachetarea produsului, va rugam sa indepartati toate ambalajele din plastic si sa le
eliminati in locurile desemnate pentru acest scop. Tineti departe de copii, pentru a evita sufocarea
copiilor.
17.Nu folositi si nu adaugati o saltea pentru patut, alta decat cea furnizata cu acest produs si
aprobata de catre producator.
18.Nu pliati patutul, timp in care copilul se afla inauntru.
16 51

INSTRUCTIONS FOR MAINTENANCE AND CLEANING
Cleaning
Fabric
1.Regularly check fixed parts and locking mechanisms for damage or breakage. If damage is found, please
stop using the crib until the damaged part is replaced. Do not repair the product yourself, but contact an
authorized service center or the sales agent from whom you purchased the product. Otherwise, your
warranty will be void.
2.Periodically clean the crib.
3.The fabrics on the crib are cleaned with warm water and mild soap. After cleaning, allow the crib to dry
well before using it. It is absolutely forbidden to fold and store it before it is completely dry.
4.Do not use strong detergents, bleach or abrasive cleaners to clean the product. It is forbidden to clean it
in a washing machine, dryer, by dry cleaning, bleaching and spinning.
Plastic and metal
1.Clean the plastic and metal parts with a damp soft cloth and dry with a dry soft cloth.
2.Do not leave the product to the harmful effects of external factors - direct sunlight, rain, snow or wind.
This can damage the metal and plastic parts and bleach the crib fabrics.
3.When not in use, store the product in a dry and ventilated place, not in dusty, damp rooms with very
low or very high room temperatures.
Frame
The paint on the frame can be refreshed if needed. Use only non-toxic paints approved for children's
products. Check all plastic parts for hanging the frame from time to time. Tighten all screws and bolts if
necessary.
RECOMANDARI SI AVERTIZARI PRIVIND UTILIZAREA IN STARE DE SIGURANTA!
Va rugam sa cititi aceste instructiuni inainte de a utiliza produsul.
Va rugam sa pastrati instructiunile pentru referinte viitoare, deoarece contin informatii importante.
ATENTIE: Nerespectarea acestor instructiuni la utilizarea sau asamblarea produsul poate pune in pericol grav
sanatatea copilului dumneavoastra si poate duce la deces.
1.Destinat pentru copii in varsta de la 0 luni si pana la 11 kg. Atentie! Nu folositi dupa ce copilul se poate deplasa sau
ridica singur.
2.Patutul pentru copii trebuie amplasat pe o podea orizontala!
2.Copiii mici nu trebuie lasati sa se joace nesupravegheati in imediata apropiere a patutului / leaganului pentru copii.
3. ATENTIE! Patutul pentru copii trebuie sa fie blocat in pozitie fixata, atunci cand copilul se afla nesupravegheat in
acesta.
4.ATENTIE! Nu folositi patutul pentru copii daca o anumita componenta este rupta sau lipseste.
5.Atunci cand copilul se poate aseza singur, sa ingenuncheze sau sa se ridice singur, patutul nu trebuie sa fie utilizat
de catre acest copil.
6.Toate componentele pentru montare si fixare trebuie sa fie intotdeauna stranse. Asigurati-va ca nu exista suruburi
slabite, deoarece parti ale corpului sau imbracamintea copilului pot fi prinse sau agatate (curele, coliere, panglici
pentru tetine etc.), fapt care prezinta risc de sufocare.
7.Carcasa leaganului nu trebuie utilizata fara cadrul de sustinere.
8.Grosimea saltelei trebuie aleasa astfel incat inaltimea interioara verticala (de la suprafata superioara a saltelei pana
la marginea superioara a laturilor patului) in pozitia cea mai inalta din partea inferioara a patului sa fie de cel putin
200 mm.
9.ATENTIE! Grosimea totala a saltelei nu trebuie sa depaseasca 3,8 centimetri, iar lungimea si latimea nu trebuie sa
permita un decalaj mai mare de 2,5 cm intre saltea si peretele patutului pentru copii, atunci cand salteaua este
presata de pereti si unul din colturile cosului.
10. ATENTIE! Patutul pentru copii nu trebuie lasat in apropriere de flacara deschisa sau alte surse puternice de
caldura fierbinte, de exemplu soba fierbinte, aragaz si altele.
11.ATENTIE! Nu faceti nici un fel de modificari sau imbunatatiri la constructia patutului, deoarece acest lucru poate
duce la rasturnarea sau deteriorarea patutului, timp in care copilul se afla inauntru si prin urmare acesta se poate
rani.
12.Nu atasati obiecte si accesorii de patut, care nu sunt furnizate de catre producator, deoarece acestea lucru poate
afecta stabilitatea patutului si siguranta copilului dumneavoastra. Copilul isi poate agata piciorul, se poate impleti,
lucru care poate duce la sufocare.
RO
ATENTIE! CITITI CU ATENTIE INSTRUCTIUNILE SI PASTRATI PENTRU REFERENTE ULTERIOARE INTR-UN LOC SIGUR!
ATENTIE! COPILUL DUMNEAVOASTRA VA FI PROTEJAT IN MOD MAXIM, DACA URMATI RECOMANDARILE SI
SFATURILE DIN INSTRUCTIUNE! Fiti atenti la avertismentele pentru utilizarea in conditii de siguranta si asigurati toate
masurile de precautie necesare, pentru a preveni riscul de ranire sau vatamare a copilului si pentru a asigura siguranta
acestuia! Dumneavoastra sunteti responsabil pentru siguranta copilului, daca nu urmati si nu respectati aceste
instructiuni si recomandari! Asigurati-va ca toate persoanele care foloseste patutul au luat la cunostinta instructiunile
si le respecta.
Nota: Specificatiile si culorile produsului pot diferi de acestea care sunt ilustrate in instructiune. Patutul indeplineste
cerintele de siguranta ale standardului european EN 1130:2019
50
17

DIRECTIVES ET AVERTISSEMENTS DE SÉCURITÉ !
Lire ces instructions avant d’assembler le produit.
La notice contient des informations importantes –conserver-la pour un usage ultérieur.
ATTENTION :le non-respect des directives et des avertissements peut entraîner de graves blessures ou la mort de
Votre enfant.
1. Le lit est destiné aux enfants de 0 mois et jusqu’à un poids de 11 kg. Attention ! Ne pas utiliser quand l’enfant est
capable de se pousser ou de se tenir debout.
2. Positionner le lit sur un plan horizontal !
3. Ne pas laisser les petits enfants àjouer près du lit / berceau bébé sans surveillance d’un adulte.
4. ATTENTION ! Utiliser la position fixe du lit si l’enfant est sans surveillance d’un adulte.
5. ATTENTION ! Ne pas utiliser le lit bébé si des pièces sont manquantes, endommagées ou brisées.
6. Ne pas plus utiliser le lit bébé si l’enfant est capable de s’asseoir, se mettre àgenoux ou de se tenir debout tout
seul.
7. Tous les moyens de montage doivent être bien serrés. Attention au vis mal serrés – risque de pincement des
membres de l’enfant ou de ses vêtements (cordons, colliers, bandeaux des bibérons,etc.) et de suffocation.
8. Ne pas utiliser le berceau sans châssis.
9. Instructions pour le choix de matelas : hauteur intérieure vérticale (de la surface supérieure du matelas au bord
supérieur du panneau latéral) à la plus grande hauteur du fond du lit –au moins 200 mm.
10.ATTENTION ! Épaisseur maximale totale du matelas –3,8 cm au maximum ; dans tous les cas de fixation et
montage, àlongueur et àlargeur, la fente maximale entre le matelas et le panneau latérale doit être 2,5 cm au
maximum.
11.ATTENTION ! Garder le lit bébé à distance des flammes noues ou d’autre sources de chaleur, comme des
appareils de chauffage électriques ou àgaz.
12.ATTENTION ! Ne pas modifier la construction du lit pour éviter le risque de déstabiliser le lit et de blessure de
l’enfant.
FR
ATTENTION ! LIRE ATTENTIVEMENT LA NOTICE ET LA CONSERVER POUR UN USAGE ULTÉRIEUR !
ATTENTION ! LE RESPECT DES AVERTISSEMENTS ET DES INSTRUCTIONS DE LA NOTICE ASSURE LA SÉCURITÉ DE VOTRE
ENFANT ! Lire toutes les instructions d’usage correcte et assurer toutes les précautions pour éviter le risque de
blessure de l’enfant et pour assurer sa sécurité ! Vous êtes responsables de la sécurité de l’enfant en cas de non-
respect des avertissements et des instructions ! Informer tout autre utilisateur du lit bébé aux instructions de la notice.
Note: les spécifications et les couleurs de votre produit peuvent varier par rapport à l’illustré dans la notice. Le produit
correspond aux exigences de sécurité, norme européenne EN 1130:2019.
18
INSTRUCCIONES DE MANTENIMIENTO Y LIMPIEZA
Limpieza
Paño
1.Revise regularmente las partes fijas y los mecanismos de bloqueo por daños o roturas. Si se encuentran
daños, deje de usar la cuna hasta que se reemplace la parte dañada. No repare el producto usted mismo,
póngase en contacto con un centro de servicio autorizado o con el agente de ventas a quien le compró el
producto. De lo contrario, su garantía será nula.
2.Limpie periódicamente la cuna.
3.Las telas en la cuna se limpian con agua tibia y jabón suave. Después de la limpieza, deje que la cuna se
seque bien antes de usarla. Está absolutamente prohibido doblarlo y almacenarlo antes de que esté
completamente seco.
4.No utilice detergentes fuertes, lejía o limpiadores abrasivos para limpiar el producto. Está prohibido
limpiarlo en una lavadora, secadora, mediante limpieza en seco, blanqueado y centrifugado.
Plástico y metal
1.Limpie las piezas de plástico y metal con un paño suave y húmedo y séquelas con un paño suave y seco.
2.No deje el producto a los efectos nocivos de factores externos: luz solar directa, lluvia, nieve o viento.
Esto puede dañar las partes de metal y plástico y blanquear las telas de la cuna.
3.Cuando no esté en uso, guarde el producto en un lugar seco y ventilado, no en habitaciones polvorientas
y húmedas con temperaturas ambiente muy bajas o muy altas.
Marco
La pintura en el marco se puede renovar si es necesario. Use solo pinturas no tóxicas aprobadas para
productos para niños.
De vez en cuando verifique todas las piezas de plástico para colgar el marco. Apriete todos los tornillos si es
necesario.
49

PIÈCES
А-Panier
(revêtement textile) В-Matelas
С-Cadres latéraux
(pieds) D- Structure de support
intermédiaire
Е-Ceintures
F –4 boulons
1 outil
13.Ne pas ajouter et accrocher au lit d’autres objets et accessoires, non-approuvés par le
fabriquant –risque d’influencer la stabilité du lit et la sécurité de Votre enfant. L’enfant peut
s’accrocher la jambe, s’enchevêtrer et s’étouffer.
14.Vérifier le lit avant chaque usage pour des pièces endommagées, manquantes ou brisées.Ne
pas utiliser le lit avant la réparation du défaut et le remplacement des pièces endommagées.
15.Ne pas réparer le lit bébé tout seul. En cas de constatation de défaut, contacter le revendeur
ou un SAV certifié.
16.Ne pas utiliser des pièces de substitution ou des accessoires, non-approuvés par le fabriquant.
17.Après le dépaquetage du produit, enlever tous les emballages plastiques et jeter les dans une
poubelle de recyclage. Garder àdistance des enfants pour éviter le risque de suffocation.
18.Ne pas utiliser et ne pas ajouter un matelas, différent par rapport àcelui, délivré avec le
produit et approuvé par le fabriquant.
19.Ne pas plier le lit quand l’enfant s’y trouve.
¡ATENCIÓN! Asegúrese de que la cuna esté bien sujeta a la cama. Apriete los cinturones tanto
como sea posible.
3.Fijar la cuna a la cama de los padres usando los cinturones Use el par de correas previstas para
asegurar la cuna a la cama de los padres.
Bloquee las hebillas debajo de la cuna en ambos lados, luego fije las correas alrededor de la estructura
de la cama de los padres, comenzando desde abajo y subiendo y finalmente apretando las hebillas
debajo de la cama (Fig. 18).
4.Para asegurar la cuna cuando está al lado de la cama de los padres, tire de las correas una vez más para
asegurarse de que la cuna esté firmemente unida a la cama de los padres
¡PRECAUCIÓN! La distancia máxima entre la cuna y la cama de los padres debe ser de 2 cm.
19 48

ASSEMBLAGE
1.Assembler la structure en installant la tube de support C dans les logements àla côté
intérieure de Aet B (fig. 1). De chaque côté sont prévus deux vis pour la fixation de la
structure.
Attention ! S’assurer que la structure est bien fixée et stable. Le châssis du lit procure la
sécurité de Votre enfant.
2.Fixer le panier à dormir à la structure : installer-le dans les logements des tubes A
et B. Serrer bien avec le boulon (a) dans (b), comme indique l’image. Attention !
S’assurer que les boulons sont bien fixés et le montage du panier à la structure est
stable.
Placer le matelas dans le panier.
Pièce de
raccordement
5. Función de columpio - Los tapones se encuentran en ambos extremos de las piernas. Para
liberar la cuna de una posición estática, tire ligeramente y gire simultáneamente cada uno de
los topes hacia arriba al mismo tiempo.
¡ATENCIÓN! Nunca deje a un niño dormido en una posición de balanceo. Asegúrese de que
todos los topes estén en una posición estática.
INSTRUCCIONES PARA FIJAR LA CAMA A LA CAMA DE LOS PADRES
1.Retire la barrera y asegúrela en la parte inferior de la cuna.
2. Acérquese a la cama de los padres y verifique que la altura de la cuna con el colchón sea la misma que
la de los padres.
¡ATENCIÓN! El colchón en la cama de los padres debe ser igual o más alto que la posición más baja en el
lado extraíble de la cuna.
¡ATENCIÓN! Cuando se fija a la cama de los padres, ambas patas de la cuna siempre deben estar a la
misma altura.
20 47
Pagina se încarcă...
Pagina se încarcă...
Pagina se încarcă...
Pagina se încarcă...
Pagina se încarcă...
Pagina se încarcă...
Pagina se încarcă...
Pagina se încarcă...
Pagina se încarcă...
Pagina se încarcă...
Pagina se încarcă...
Pagina se încarcă...
Pagina se încarcă...
-
 1
1
-
 2
2
-
 3
3
-
 4
4
-
 5
5
-
 6
6
-
 7
7
-
 8
8
-
 9
9
-
 10
10
-
 11
11
-
 12
12
-
 13
13
-
 14
14
-
 15
15
-
 16
16
-
 17
17
-
 18
18
-
 19
19
-
 20
20
-
 21
21
-
 22
22
-
 23
23
-
 24
24
-
 25
25
-
 26
26
-
 27
27
-
 28
28
-
 29
29
-
 30
30
-
 31
31
-
 32
32
-
 33
33


CANGAROO Bassinet Always Together gray Instrucțiuni de utilizare
- Categorie
- Mobilier pentru copii
- Tip
- Instrucțiuni de utilizare
în alte limbi
Lucrări înrudite
Alte documente
-
Brevi Side bed crib Vicino Manualul proprietarului
-
-
mothercare Stokke Sleepi Crib_Bed 065776 Manualul utilizatorului
-
-
Moni Folding cot Tommy pink Instrucțiuni de utilizare
-
Kinderkraft NESTE UP Manual de utilizare
-
-
-
-
Brevi 610 Manualul proprietarului