Auriol Z30237B Operation and Safety Notes
- Categorie
- Ceasuri cu alarmă
- Tip
- Operation and Safety Notes
Acest manual este potrivit și pentru

RADIO-CONTROLLED LCD CLOCK
Operation and Safety Notes
LCD-FUNKUHR
Bedienungs- und Sicherheitshinweise
LCD-RADIO SAT
Upute za posluživanje i za Vašu sigurnost
ΡΟΛΟΪ ΡΑΔΙΟΚΥΜΑΤΩΝ-LCD
Υποδείξεις χειρισμού και ασφαλείας
CEAS RADIOCONTROLAT CU LCD
Instrucţiuni de utilizare şi de siguranţă
СВЕТОДИОДЕН РАДИОЧАСОВНИК
Инструкции за обслужване и безопасност
7
Z30237B
Z30237C

GB / CY Operation and Safety Notes Page 5
HR Upute za posluživanje i za Vašu sigurnost Stranica 12
RO Instrucţiuni de utilizare şi de siguranţă Pagina 19
BG Инструкции за обслужване и безопасност Страница 26
GR / CY Υποδείξεις χειρισμού και ασφαλείας Σελίδα 34
DE / AT / CH Bedienungs- und Sicherheitshinweise Seite 42

3
1 3
4
6
7
91011
12
26
13
18
19
17
Z30237B
8
15
5
16
202122232425
2
14

4
Z30237C
1 3
7
4
1011
26
26
13
12
18
19
17
15
16
202122232425
2
5
14

5 GB/CY
Table of Contents
Introduction
Proper Use ........................................................................................................................................Page 6
Description of Parts ..........................................................................................................................Page 6
Technical data ..................................................................................................................................Page 6
Safety
General Safety Information .............................................................................................................Page 6
Safety Instructions for Batteries .......................................................................................................Page 7
Before Initial Use
Setting up Devices ............................................................................................................................Page 7
Installing the LCD radio-controlled clock ........................................................................................Page 8
Inserting or replacing batteries........................................................................................................Page 8
Operation
Reception of DCF radio signal ........................................................................................................Page 8
Setting the year / month / date / time / day of the week ................................................................Page 9
Setting the day of the week display ................................................................................................Page 9
Using the 12 / 24-hour display .......................................................................................................Page 9
Setting the alarm ..............................................................................................................................Page 9
Activating / deactivating the alarm .................................................................................................Page 9
Switching off the alarm signal .........................................................................................................Page 10
Displaying the temperature in °C / °F ............................................................................................Page 10
Moon phase (Model B only) ..........................................................................................................Page 10
Displaying summertime ....................................................................................................................Page 10
Setting the time zone .......................................................................................................................Page 10
Troubleshooting .....................................................................................................................Page 10
Cleaning and Maintenance ...........................................................................................Page 10
Service ............................................................................................................................................Page 11
Disposal .........................................................................................................................................Page 11
Declaration of Conformity .............................................................................................Page 11

6 GB/CY
Introduction / Safety
Radio-Controlled LCD Clock
Introduction
Use the product only as described and
for the indicated purpose.
Proper Use
The clock is only suitable for operation in enclosed
spaces at normal room temperature. The device is
not intended for commercial use.
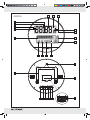
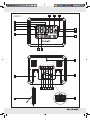
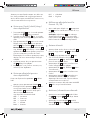
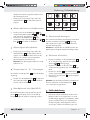
Description of Parts
1
Time display
2
Radio symbol
3
Battery symbol
4
Summer time symbol
5
Time zone symbol
6
Calender week (Model B only)
7
Indoor air temperature
8
Moon phase (Model B only)
9
Year display (Model B only)
10
Month display
11
Date display
12
Day of the week display
13
PM symbol (afternoon)
14
AM symbol (morning)
15
Alarm 1 symbol
16
Alarm 2 symbol
17
Hanger
18
Battery compartment cover
19
Battery compartment
20
SNOOZE button
21
WAVE button
22
DOWN button
23
UP button
24
ALARM button
25
SET button
26
Folding stand
Technical data
Battery type: 2 x 1.5 V , AAA (supplied)
Safety
WARNING!
Please read all safety information
and instructions. Failure to comply with the safety
information and instructions may result in, fire and / or
severe injuries.
KEEP ALL THE SAFETY ADVICE AND INSTRUC-
TIONS IN A SAFE PLACE FOR FUTURE REFERENCE!
General Safety
Information
WARNING!
DANGER TO
LIFE AND ACCIDENT HAZARD
FOR TODDLERS AND
SMALL
CHILDREN! Never allow children
to play un-
supervised with the packaging material. There
is a danger of suffocation from the packaging
material. Children frequently underestimate the
dangers. Children should be kept away from
the product at all times. This is not a toy.
Children or persons who lack the knowledge
or experience to use the device or whose
physical, sensory or intellectual capacities are
limited must never be allowed to use the device
without supervision or instruction by a person
responsible for their safety. Children must never
be allowed to play with the device.
Do not use the device if it is damaged. Damaged
devices represent a danger of death!
WARNING!
Do not use the device in hospitals
or medical facilities, as otherwise this may result
in malfunctions of life-support systems.
Please prevent the housing of the device from
rubbing to strongly against textiles. This may
result in static charges and affect the results of
the measurements.
Please note that the guarantee does not cover
damage caused by incorrect handling, non-com-

7 GB/CY
pliance with the operating instructions or interfer-
ence with the device by unauthorised individuals.
Under no circumstances should you take the
device apart. Improper repairs may place the
user in considerable danger. Repairs should
only be carried out by specialist personnel.
Safety Instructions
for Batteries
WARNING!
DANGER TO LIFE! Batteries
can be swallowed, which may represent a
danger to life. If a battery has been swallowed,
medical help is required immediately.
Remove the batteries from the device if they
have not been used for a long period.
CAUTION! DANGER OF EXPLO-
SION! The batteries must never be
recharged!
CAUTION! RISK OF EXPLO-
SION! Use batteries of the indicated
type only. Otherwise there is a risk
of an explosion.
When inserting the batteries, ensure the correct
polarity!
If necessary clean the contacts on the batteries
and on the device itself before inserting them.
Remove exhausted batteries from the device
immediately. Otherwise the batteries are more
likely to leak.
If you disregard the above instructions and
advice, your batteries may discharge beyond
their minimum voltage, thus increasing the
chance of leakage. If the batteries in your
device leak, remove them immediately to
prevent the device from being damaged.
Keep batteries away from children; do not
throw batteries in the fire, short-circuit batteries
or take them apart.
Avoid contact with the skin, eyes and mucous
membranes. Any parts of the body coming into
contact with battery acid should be rinsed off
with copious amounts of water and / or a doctor
contacted if necessary!
Dispose of batteries in accordance with the
disposal instructions.
Before Initial Use
Unscrew the transport securing device on the
back of the box in order to remove the device.
Remove the protective foil before first use.
Setting up Devices
CAUTION! When selecting a location to set
up the device, please ensure that it is not exposed
to any direct sunlight, vibrations, dust, heat, cold or
moisture. Do not place the device close to sources of
heat, e.g. radiators. Otherwise it may be damaged.
Make sure that the device is standing safely on
a stable surface.
Make sure that the device is mounted properly
if installed on a wall. A falling clock could injure
people
or cause damage to the device itself or
to other objects.
Stand the radio-controlled clock on its base
26
or mount it on the wall.
Place the clock on a level, horizontal surface.
Do not stand the device on valuable or sensitive
surfaces without suitable protection. The surface
may otherwise be damaged.
Do not place the device anywhere near to sources
of interference such as televisions, computers,
thick walls, etc. These may hinder reception of
the radio signal.
Do not use the clock in reinforced concrete
buildings, e. g. airports, high-rises, factories or
basements. This can seriously disrupt reception
of the radio signal.
Do not start radio reception in a moving vehicle,
e. g. car or train. Reception of the radio signal
by the device can disrupt the vehicle electronics.
Do not expose the clock to temperatures below
--10°C for any length of time. This can seriously
affect the reception range of the device.
Safety / Before Initial Use

8 GB/CY
Installing the LCD
radio-controlled clock
Note: You will need a drill, suitable assembly
material and a screwdriver for installation.
CAUTION! DANGER TO LIFE AND RISK
OF INJURY; RISK OF DAMAGE TO PROP-
ERTY! Please read the operating and safety instruc-
tions for your drill carefully.
WARNING!
DANGER TO LIFE! Please
ensure that you do not drill into any electrical wiring,
gas or water pipes in the wall. If necessary, carry out
checks with a wire, pipe and stud detector before
you drill into a wall.
Find a suitable place to install the radio-controlled
clock.
Mark the drill hole on the wall.
CAUTION! DANGER OF INJURY! Refer to
the operating instructions for your electric drill.
Drill the hole with a drill.
Insert a suitable dowel into the drill hole.
Use a screwdriver to insert a suitable screw.
Hang the radio-controlled clock on the screw
using the mount
17
.
Inserting or replacing batteries
The battery symbol
3
appears in the LC dis-
play if the batteries are too weak. Make sure you
replace the batteries at the earliest opportunity.
The radio-controlled LCD wall clock starts to receive
the radio time signal as soon as the batteries are
inserted.
Note: Do not alter the position of the radio-controlled
clock during reception of the signal. This may disrupt
reception.
Radio time signal (DCF):
The DCF signal (time signal transmission) consists
of time pulses broadcast from one of the most accu-
rate clocks in the world. It is situated near Frankfurt /
Main, Germany.
Your radio-controlled clock receives these signals
under ideal conditions up to a distance of approx.
1,500 km around Frankfurt / Main. Reception of the
radio signal generally takes approx. 3–10 minutes.
If it does not work properly, restart the radio-
controlled clock. To do this, keep the WAVE
button
21
pressed for approx. 3 seconds.
Reception can be considerably impaired by obstacles
(e.g. concrete walls) or sources of interference (e.g.
other electrical devices). If necessary, change the
location of the radio clock (e.g. by putting it near a
window) if you have problems with reception.
Operation
Reception of DCF radio signal
The radio-controlled clock automatically starts to
search for the DCF radio signal. The radio icon
2
on the LCD indicates that the clock is searching for the
radio signal.
Note: Reception of the radio signal may be seriously
disrupted in reinforced concrete buildings (see “Set-
ting up Devices”).
It is also possible to start reception of the DCF radio
signal manually on the clock.
Press and keep pressed the WAVE button
21
for longer than 3 seconds. The LCD radio-con-
trolled wall clock attempts to receive the DCF
radio time signal. This process takes several
minutes and is indicated in the LC display by a
flashing radio symbol
2
.
Note: If the radio-controlled clock cannot pick up
the DCF radio signal on account of an error or the
distance from the transmitter, etc., it is also possible
to set the time manually. As soon as reception of
the DCF signal is successful, the manual settings
are overwritten.
Before Initial Use / Operation

9 GB/CY
Setting the year / month /
date / time / day of the week
1. Press and keep pressed the WAVE button
21
for
approx. 3 seconds. The radio symbol
2
flashes.
2. Press and keep pressed the WAVE button
21
again for approx. 3seconds to stop the recep-
tion of the radio time signal.
3. Press and keep pressed the SET button
25
for
approx. 2 seconds. The year display flashes.
Set the desired value by pressing the UP
23
or
DOWN button
22
.
Tip: By keeping the UP
23
or DOWN button
22
pressed you can accelerate the setting process
and reach the desired value more quickly. This
quicker method can also be used for making
the other settings. If during a period of 15sec-
onds no buttons are pressed, the LC display
returns automatically to the default display.
4. Confirm your settings by pressing the SET but-
ton
25
. The month display flashes.
5. Repeat steps 3 and 4 to set the values for day,
hour, minute and day of the week.
Setting the day of the week
display
The day of the week
12
can be displayed in various
languages.
Press the DOWN button
22
and keep it pressed.
In the day of the week display
12
, the abbrevi-
ation for the current language appears. Release
the DOWN button
22
when the abbreviation
for your chosen language appears.
The following languages are available:
GER = German
FRE = French
SPA = Spanish
ITA = Italian
DAN = Danish
DUT = Dutch
ENG = English
Using the 12 / 24-hour display
While time display
1
is indicated press the
UP button
23
to switch between 12- hour and
24-hour format.
Note: The AM icon
14
on the LCD stands for
mornings in 12-hour format. The PM icon
13
on the LCD stands for afternoons in 12-hour
format.
Setting the alarm
Press the SET button
25
once or twice to select
alarm 1
15
or alarm 2
16
.
Press and keep pressed the SET button
25
for
about 2seconds. The hour display flashes.
Press the UP
23
or DOWN button
22
to set
the desired value.
Press the SET button
25
to confirm your setting.
The minute display flashes.
Press the UP
23
or DOWN button
22
to set
the desired minute value.
Press the SET button
25
to confirm your setting.
Press the SNOOZE button
20
as soon as the
alarm signal sounds. The alarm signal stops
sounding. The alarm will sound again 5minutes
after the set waking time or alarm time.
Press any button except the SNOOZE button
20
to stop the alarm signal sounding.
Activating / deactivating the
alarm
Press the ALARM button
24
briefly. The appro-
priate alarm symbol
15
or
16
is dis-
played to indicate that the alarm is activated.
Pressing the ALARM button
24
again causes
the appropriate alarm symbol
15
or
16
to cease to be displayed. The alarm is deacti-
vated.
Operation

10 GB/CY
Switching off the alarm signal
Press any button except the SNOOZE button
20
to stop the alarm signal sounding. You do not
have to reactivate the alarm. It reactivates itself
automatically according to the weekly rhythm.
Note: The alarm signal switches itself off after
2minutes.
Displaying the temperature
in °C / °F
The current inside temperature
7
is indicated on
the LCD.
Press the DOWN button
22
to switch between
the Celsius and Fahrenheit temperature scales
7
.
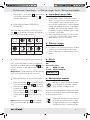
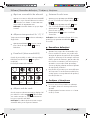
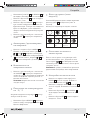
Moon phase (Model B only)
The LCD radio-controlled wall clock shows the current
moon phase
8
in the LC display (Model B only).
It uses the following symbols:
Full moon Waning
gibbous
Last quarter Waning
crescent
New moon Waxing
crescent
First quarter Waxing
gibbous
Displaying summertime
Summertime is automatically indicated on the LCD
by the summertime icon
4
. The clock receives
the information as to whether it is summertime or not
from the DCF radio signal.
Note: Reception of the radio signal may be seriously
disrupted in reinforced concrete buildings.
Setting the time zone
Press and keep pressed the DOWN button
22
for
about 2seconds. The time zone symbol
5
is displayed.
Press and keep pressed the SET button
25
for
about 3seconds. The hour display flashes.
Press the UP
23
or DOWN button
22
to set
the desired hour value.
Press the SET button
25
to confirm your setting.
Note: Press and keep pressed the DOWN button
22
for about 2seconds to deactivate the time zone
function.
Troubleshooting
This appliance has delicate electronic compo-
nents. This means that if it is placed near an
object that transmits radio signals, it could cause
interference. This could be, for example, mobile
telephones, walkie talkies, CB radios, remote
controls and microwaves. If the display indicates
a problem, move such objects away from it.
Electrostatic discharges may cause malfunctions.
In the event of such malfunctions, remove the
batteries briefly and reinsert them.
Cleaning and Maintenance
Under no circumstances should you use liquids
or detergents, as these will damage the device.
The device should only be cleaned on the out-
side with a soft dry cloth.
Operation / Troubleshooting / Cleaning and Maintenance

11 GB/CY
Service
GB
Service Great Britain
Tel.: 0871 5000 720
(0,10 GBP/Min.)
e-mail: milome[email protected]
IAN 66773
CY
Service Cyprus
Tel.: 8009 4409
e-mail: milome[email protected]
IAN 66773
Disposal
The packaging is made entirely of recy-
clable materials, which you may dispose
of at local recycling facilities.
Contact your local refuse disposal authority for more
details of how to dispose of your worn-out product.
To help protect the environment, please
dispose of the product properly when it
has reached the end of its useful life and
not in the household waste. Information
on collection points and their opening
hours can be obtained from your local
authority.
Faulty or used batteries must be recycled in accord-
ance with Directive 2006 / 66 / EC. Please return
the batteries and / or the device to the available
collection points.
Pb Hg
Environmental damage through
incorrect disposal of the batteries!
Batteries may not be disposed of with the usual do-
mestic waste. They may contain toxic heavy metals
and are subject to hazardous waste treatment rules
and regulations. The chemical symbols for heavy
metals are as follows: Cd = cadmium, Hg = mercury,
Pb = lead. That is why you should dispose of used
batteries at a local collection point.
Declaration of Conformity
We, Milomex Ltd., c / o Milomex Services, Hilltop
Cottage, Barton Road, Pulloxhill, Bedfordshire,
MK45 5HP, UK, hereby declare under our sole
responsibility that the product: Radio-Controlled
LCD Clock, Model No.: Z30237B / Z30237C,
Version: 07 / 2011, to which this declaration refers,
complies with the standards / normative documents
of 1999 / 05 / EC.
The complete declaration of conformity can be
viewed at: www.milomex.com
EMC
Product description:
Radio-Controlled LCD Clock
Model No.: Z30237B / Z30237C
Version: 07 / 2011
Service / Disposal / Declaration of Conformity

12 HR
Popis sadržaja
Uvod
Namjenska uporaba ..................................................................................................................Stranica 13
Opis dijelova ..............................................................................................................................Stranica 13
Tehnički podaci ..........................................................................................................................Stranica 13
Sigurnost
Opće sigurnosne upute .............................................................................................................Stranica 13
Sigurnosne upute za baterije ....................................................................................................Stranica 14
Prije stavljanja u pogon
Postavljanje uređaja...................................................................................................................Stranica 14
Montiranje LCD-radiosata .........................................................................................................Stranica 14
Postavljanje i zamjena baterije .................................................................................................Stranica 15
Posluživanje
Primanje DCF-radiosignala ........................................................................................................Stranica 15
Namještanje godine / mjeseca / nadnevka / vremena / dana u tjednu ..................................Stranica 15
Namještanje pokazivanja dana u tjednu .................................................................................Stranica 16
Uporaba pokazivanja sati 12 / 24 ..........................................................................................Stranica 16
Namještanje alarma ..................................................................................................................Stranica 16
Uključivanje / isključivanje alarma ............................................................................................Stranica 16
Isključivanje alarma ...................................................................................................................Stranica 16
Pokazivanje temperature u °C / °F ..........................................................................................Stranica 16
Mjesečeva faza (isključivo model B) ........................................................................................Stranica 17
Pokazivanje ljetnog vremena ....................................................................................................Stranica 17
Namještanje vremenske zone ...................................................................................................Stranica 17
Ispravljanje pogrešaka .............................................................................................Stranica 17
Čišćenje i njega ..................................................................................................................Stranica 17
Servis
.........................................................................................................................................Stranica 17
Zbrinjavanje otpada ....................................................................................................Stranica 17
Izjava o sukladnosti ....................................................................................................Stranica 18

13 HR
Uvod / Sigurnost
LCD-radio sat
Uvod
Rabite uređaj isključivo sukladno opisu
te za navedena područja primjene.
Namjenska uporaba
Uređaj je isključivo namijenjen za pogon u zatvore-
nim prostorijama pri uobičajenoj sobnoj temperaturi.
Uređaj nije namijenjen za komercijalne svrhe.
Opis dijelova
1
pokazivanje vremena
2
radio znak
3
znak baterije
4
znak ljetno vrijeme
5
znak vremenska zona
6
kalendarski tjedan (isključivo model B)
7
unutarnja temperatura
8
mjesečeva faza (isključivo model B)
9
pokazivanje godine (isključivo model B)
10
pokazivanje mjeseca
11
pokazivanje nadnevka
12
pokazivanje dana
13
znak PM (poslijepodne)
14
znak AM (prijepodne)
15
znak alarm 1
16
znak alarm 2
17
naprava za ovješenje
18
poklopac baterijskog kućišta
19
baterijsko kućište
20
tipka SNOOZE (“drijemanje“)
21
tipka WAVE (“val“)
22
tipka DOWN (“prema dolje“)
23
tipka UP (“prema gore“)
24
tipka ALARM (“namještanje budilice“)
25
tipka SET
26
rasklopiva nogara
Tehnički podaci
Tip baterije: 2 x 1,5 V , AAA
(sadržano u pošiljci)
Sigurnost
UPOZORENJE!
Pročitajte sve sigurnosne
upute i ostale upute. Propusti u pridržavanju sigur-
nosnih uputa i ostalih uputa mogu prouzrokovati
strujni udar, požar i / ili teške ozljede.
SAČUVAJTE SVE SIGURNOSNE UPUTE I INE
UPUTE ZA UBUDUĆE!
Opće sigurnosne upute
UPOZORENJE!
OPA-
SNOST PO ŽIVOT I OD NEZ-
GODE ZA DJECU! Ne ostavljajte
djecu nikad bez nadzora zajedno sa omotnim
materijalom. Prijeti opasnost od zagušenja kroz
omotni materijal. Djeca često podcjenjuju opa-
snost. Držite djecu uvijek podalje od proizvoda.
Ovaj proizvod nije igračka.
Ovaj uređaj nije namjenjen za korištenje oso-
bama (uključujući djecu) s ograničenim fizičkim,
senzoričkim i umnim sposobnostima ili kojima
nedostaje iskustva i / ili kojima nedostaje znanja,
jedino ako će biti nadgledani od za sigurnost
zadužene osobe ili ako su od nje dobili napu-
tak kako koristiti uređaj. Djecu je potrebno nad-
gledati kako bi se osiguralo da se neće igrati s
uređajem.
Ne stavljajte uređaj u pogon ako je oštećen.
Oštećeni uređaji su opasni po život zbog
mogućeg strujnog udara!
UPOZORENJE!
Ne rabite uređaj u bolnica-
ma ili medicinskim ustanovama. Isti bi mogao
prouzrokovati funkcijske smetnje kod sustava
za održavanje života.
Osigurajte da se kućište uređaja ne riba pre-
snažno od tkaninu. Isto bi moglo prouzrokovati
statična napajanja i utjecati na mjerni rezultat.

14 HR
Vodite računa o tome, da jamstvo ne obuhvaća
oštećenja prouzrokovana od nestručnog ruko-
vanja, nepridržavanja uputa za uporabu ili
zahvate od neovlaštenih osoba.
Ne rastavljajte uređaj ni u kojem slučaju. Ne-
stručne popravke mogu prouzrokovati znatnu
opasnost za korisnika. Prepustite popravke
isključivo stručnim osobama.
Sigurnosne upute
za baterije
UPOZORENJE!
OPASNOST PO ŽI.
VOT! Moglo bi se progutati baterije, što je
opasno po život. Ako se proguta bateriju, po-
trebno je smjesta zatražiti medicinsku pomoć.
Otklonite baterije iz uređaja, ako ih se dulje
vrijeme nije koristilo.
OPREZ! OPASNOST OD
EKSPLOZIJE! Ne punite baterije
nikad ponovno!
OPREZ! OPASNOST OD
EKSPLOZIJE! Rabite isključivo
baterije navedenoga tipa. Inače
prijeti opasnost od eksplozije.
Pri postavljanju vodite računa o ispravnoj
polarnost!
Prije postavljanja očistite kontakt baterije i
uređaja ukoliko je potrebno.
Smjesta izvadite istrošene baterije iz uređaja.
Inače prijeti povećana opasnost da iscure.
U slučaju nepridržavanja prethodno spomenu-
tih uputa, baterije bi se mogle isprazniti preko
svog napona. U tom slučaju prijeti opasnost da
iscure. Ako su baterije iscurjele u Vašem uređaju,
smjesta ih izvadite kako bi spriječili oštećenje
uređaja!
Držite baterije podalje od djece, ne bacajte ih
u vatru, ne punite ih ponovno i ne rastavljajte ih.
Izbjegavajte dodir s kožom, očima i sluznicom.
U slučaju dodira baterijske kiseline, isperite do-
tično mjesto sa dostatno vode i / ili obratite se
liječniku!
Zbrinite baterije sukladno uputama za zbrinja-
vanje.
Prije stavljanja u pogon
Odvijte osiguranje za transport na poleđini
kartona, kako bi izvadili uređaj.
Prije prve uporabe otklonite zaštitnu foliju.
Postavljanje uređaja
OPREZ! Prije odabira mjesta postave, osigurajte
da uređaji nisu izlagani izravnom suncu, vibraciji,
prašini, vrućini, hladnoći i vlagi. Ne postavljajte uređaje
u blizini izvora topline, npr. grijalica. Inače prijeti opa-
snost od oštećenja uređaja.
Vodite računa o tome, da je uređaj sigurno
postavljen na stabilnoj podlozi.
Vodite računa o tome, da se u slučaju zidne
instalacije propisno ovjesi uređaj. Pad uređaja
mogao bi ozljediti osobe, te oštetiti uređaj ili
druge predmete.
Postavite radiosat na postolje
26
ili montirajte
ga na zid.
Postavite uređaj na ravnu, vodoravnu površinu.
Ne postavljajte uređaj bez prikladne zaštite na
vrijedne ili osjetljive površine. Iste bi se inače
mogle oštetiti.
Ne postavljajte uređaj u blizini izvora smetnji,
kao televizora, računala, debelih zidova itd.
Isto bi moglo umanjiti prijem radiosignala.
Ne postavljajte uređaj u zgradama od armira-
nog betona, npr. u uzletištima, neboderima,
tvornicama ili podrumima. Isto bi moglo znatno
smetati prijemu radiosignala.
Ne započinjite prijem u vozilu koje se kreće,
npr. automobilu ili vlaku. Prijem radiosignala
može smetati elektroniki vozila.
Ne izlažite uređaj dulje vrijeme temperaturama
ispod --10°C.
Montiranje LCD-radiosata
Uputa: Za taj radni postupak potrebna Vam je
bušilica kao i prikladni montažni materijal, te izvijač.
OPREZ! OPASNOST PO ŽIVOT I OD
OZLJEDA I OPASNOST OD MATERIJALNE
Sigurnost / Prije stavljanja u pogon

15 HR
Prije stavljanja u pogon / Posluživanje
ŠTETE! Pomno pročitajte upute za posluživanje i
sigurnost Vaše bušilice.
UPOZORENJE!
OPASNOST PO ŽIVOT!
Uvjerite se da nećete pogoditi vod struje, plina ili
vode pri bušenju zida. Za sigurnost provjerite tra-
gačem vodova prije nego bušite zid.
Pronađite povoljno mjesto za radio zidni sat.
Obilježite bušotinu na zidu.
OPREZ! PRIJETI OPASNOST OD OZLJE-
ĐIVANJA! Provjerite uputstvo za uporabu
Vaše bušilice.
Izbušite rupu sa bušilicom.
Stavite odgovarajuću zaglavicu u bušotinu.
Pomoću odvijača uvijte odgovarajući vijak.
Objesite radio zidni sat sa napravom za vješa-
nje
17
na vijak.
Postavljanje i zamjena baterija
Znak baterije
3
se pojavi na LC-pokazivaču,
ako su baterije slabe. Vodite računa o tome, da
pravovremeno zamijenite baterije.
Nakon što ste umetnuli baterije, zidni LCD radio sat
započne s prijemom radio signala.
Uputa: Ne mijenjajte lokaciju zidnog LCD radio
sata za vrijeme prijema. Inače može doći do smet-
nji u prijemu.
Radio signal (DCF):
DCF signal (odašiljač vremenskog signala) se sastoji
od vremenskih impulsa, koje odašilje jedan od
najpreciznijih satova na svijetu, u blizini Frankfurt-
a / na Main-i u Njemačkoj.
Vaš radiosat prima te signale u optimalnim uvjetima
sve do udaljenosti od cca. 1.500 km oko Frankfurt-
a / na Main-i. Prijem radiosignala traje u pravilu
cca. 3–10 minuta.
Ukoliko je potrebno, ponovno uključite radiosat,
ako isti ne radi ispravno. Za to držite tipku
WAVE
21
cca. 3 sekunde pritisnutom.
Prijem može biti znatno umanjen kroz prepreke
(npr. betonski zidovi) ili izvora smetnje (npr. drugi
električni uređaji). Ako dođe do smetnji prijema,
promijenite lokaciju radiosata (npr. u blizini televi-
zora).
Posluživanje
Primanje DCF-radiosignala
Radiosat automatski započinje pretragu DCF-radio-
signala. Pretraga je označena žmiganjem radio-
znaka
2
na LC-pokazivaču.
Uputa: U zgradama od armiranog betona prijem
radiosignala može biti znatno ometan (vidite
“Postavljanje uređaja”).
Prijem DCF-radiosignala može se također ručno
pokrenuti na radiosatu.
Držite tipku WAVE
21
dulje od 3 sekunde priti-
snutom. Zidni LCD radio sat pokušava primiti
DCF radio signal. Taj postupak može potrajati
nekoliko minuta i prikazat će se žmiganjem
radio znaka
2
na LC-pokazivaču.
Uputa: Ako zidni LCD radio sat nemože primiti
DCF radio signal, zbog pogreški, prevelike udalje-
nosti prema odašiljaču, i.sl., imate mogućnost ručno
namjestiti vrijeme. Čim je prijem DCF radio signala
uspješan, prepisuju se ručno namještene vrijednosti.
Namještanje godine / mjeseca /
nadnevka / vremena / dana u
tjednu
1. Držite tipku WAVE
21
cca. 3 sekunde pritisnu-
tom. Radio znak
2
žmiga.
2. Držite tipku WAVE
21
ponovno cca. 3 sekun-
de pritisnutom, kako bi prekinuli prijem radio
signala.
3. Držite tipku SET
25
cca. 2 sekunde pritisnutom.
Pokazivanje godine žmiga. Namjestite pritiska-
njem tipke UP
23
tj. DOWN
22
željenu vrijed-
nost.
Uputa: Držite tipku UP
23
tj. DOWN
22
pritisnutom. Na taj način postižete ubrzano

16 HR
Posluživanje
namještanje vrijednosti. To brzo namještanje
možete također rabiti za slijedeće postupke
namještanja. Ako u roku od 15 sekundi ne priti-
snete ni jednu tipku, LC-pokazivač automatski
prebaci na standardno pokazivanje.
4. Potvrdite Vaš unos pritiskanjem tipke SET
25
.
Pokazivanje mjeseca žmiga.
5. Ponovite korake 3. i 4., kako bi namjestili
vrijednosti za dan, sate, minute i dan u tjednu.
Namještanje pokazivanja
dana u tjednu
Pokazivanje dana u tjednu
12
može se prikazivati
na različitim jezicima.
Držite tipku DOWN
22
pritisnutom.
Na pokazivanju dana u tjednu
12
se pojavi
kratica za trenutno namješteni jezik. Otpustite
tipku DOWN
22
tek, kad se pojavi kratica za
željeni jezik.
Slijedeći jezici stoje Vam na raspolaganju:
GER = njemački
FRE = francuski
SPA = španjolski
ITA = talijanski
DAN = danski
DUT = nizozemski
ENG = engleski
Uporaba pokazivanja
sati 12 / 24
Pritisnite pri prikazanom pokazivanju vremena
1
tipku UP
23
, kako bi prebacivali između formata
sati 12 i 24.
Uputa: Znak AM
14
na LC-pokazivaču stoji u
formatu sati 12 za prijepodne. Znak PM
13
na LC-pokazivaču stoji u formatu sati 12 za
poslepodne.
Namještanje alarma
Pritisnite jednom ili dva puta tipku SET
25
, kako
bi odabrali alarm 1
15
ili alarm 2
16
.
Držite tipku SET
25
cca. 2 sekunde pritisnutom.
Pokazivanje sati žmiga.
Pritisnite tipku UP-
23
tj. DOWN
22
, kako bi
namjestili željenu vrijednost.
Pritisnite tipku SET
25
, kako bi potvrdili Vaš
unos. Pokazivanje minuta žmiga.
Pritisnite tipku UP-
23
tj. DOWN
22
, kako bi
namjestili željenu vrijednost minuta.
Pritisnite tipku SET
25
, kako bi potvrdili Vaš
unos.
Pritisnite tipku SNOOZE
20
, čim zazvuči signal
buđenja. Signal buđenja se izgasi. 5 minuta
nakon namještenog vremena buđenja tj. nakon
namještenog alarma, ponovno zazvuči signal
buđenja.
Pritisnite bilo koju tipku osim tipke SNOOZE
20
,
kako bi zaustavili signal alarma.
Uključivanje / isključivanje
alarma
Pritisnite kratko tipku ALARM
24
. Odgovarajući
znak alarma
15
tj.
16
se prikaže, alarm
je uključen.
Ako ponovno pritisnite tipku ALARM
24
,
odgovarajući znak alarma
15
tj.
16
se
izgasi. Alarm je isključen.
Isključivanje alarma
Pritisnite bilo koju tipku osim tipke SNOOZE
20
,
kako bi zaustavili signal alarma. Ne trebate
alarm ponovno uključiti. On se automatski
uključuje u namještenom tjednom ritmu.
Uputa: Alarm se izgasi nakon 2 minute.
Pokazivanje temperature
u °C / °F
Trenutna unutarnja temperatura
7
prikazuje se na
LC-pokazivaču.

17 HR
Posluživanje / Ispravljanje … / Čišćenje i njega / Servis / Zbrinjavanje otpada
Pritisnite tipku - / C / F / RCC
22
, kako bi preba-
civali između namještanja temperature
7
u
celzijima i Fahrenheit-u.
Mjesečeva faza (isključivo
model B)
Zidni LCD radio sat pokazuje trenutnu mjesečevu
fazu
8
na LC-pokazivaču (isključivo za model B).
Mogu se prikazivati slijedeći znakovi:
pun mjesec opadajući
mjesec
opadajući
polumjesec
opadajući
mjesečev srp
mlađak rastući
mjesećev srp
rastući
polumjesec
rastući mjesec
Pokazivanje ljetnog vremena
Ljetno vrijeme automatski će Vam se pokazati na
LC-pokazivaču znakom ljetnog vremena
4
. Dali
je ljetno vrijeme ili ne, sat ustanovi preko DCF-radi-
osignala.
Napomena: U građevinama od armiranog betona
prijem radio signala može biti jako ograničen.
Namještanje vremenske zone
Držite tipku DOWN
22
cca. 2 sekunde pritisnu-
tom. Znak vremenske zone
5
se prikazuje.
Držite tipku SET
25
cca. 3 sekunde pritisnutom.
Pokazivanje sati žmiga.
Pritisnite tipku UP
23
tj. DOWN
22
, kako bi
namjestili željenu vrijednost sati.
Pritisnite tipku SET
25
, kako bi potvrdili Vaš
unos.
Uputa: Držite tipku DOWN
22
cca. 2 sekunde
pritisnutom, kako bi isključili funkciju vremenskih
zona.
Ispravljanje pogrešaka
Uređaj sadrži osjetljive elektronske sastavne
dijelove. Stoga je moguće da zbog radio prije-
nosnih uređaja u blizini nastanu smetnje. To
mogu npr. biti mobilni telefoni, voki-toki, CB-radio
uređaji, radio daljinski upravljači / i drugi daljinski
upravljači i mikrovalni uređaji. Ukažu li se takvi
pokazatelji u displeju, odstranite takve uređaje
iz okružja ovog uređaja.
Elektrostatička izbijanja mogu prouzročiti smet-
nje u funkciji. U slučaju takvih smetnji izvadite
kratko baterije i ponovno ih umetnite.
Čišćenje i njega
Ne rabite ni u kojem slučaju tekućine ili sredstva
za čišćenje, jer ista bi mogla oštetiti uređaj.
Čistite uređaj isključivo izvana mekom, suhom
krpom.
Servis
HR
Servis Hrvatska
Tel.: 0800 777 999
e-mail: milome[email protected]
IAN 66773
Zbrinjavanje otpada
Pakiranje se sastoji od ekološki prihvatlji-
vog materijala, kojeg možete odložiti
preko lokalnih reciklažnih mjesta.
O mogućnostima zbrinjavanja dotrajalog proizvoda
možete se informirati pri vašem općinskom ili grad-
skom komunalnom uredu.
Ne bacajte dotrajali proizvod u smeće iz
kućanstva, zbog zaštite okoline, već ga
predajte na mjestu za stručno odlaganje
otpada. Informacije o mjestima za saku-

18 HR
Zbrinjavanje otpada / Izjava o sukladnosti
pljanje otpada i njihovom radnom vremenu
možete dobiti pri Vašem nadležnom
općinskom uredu.
Oštećene ili istrošene baterije potrebno je sukladno
smjernici 2006 / 66 / EC predati sustavu reciklaže.
Vratite baterije i / ili uređaj preko ponuđenih sabir-
nih ustanova.
Pb Hg
Ugrožavanje okoliša kroz
pogrešno uklanjanje baterija!
Baterije se ne smije uklanjati zajedno s kućnim ot-
padom. Iste mogu sadržavati otrovne teške metale
i obvezno ih je uklanjati sukladno odredbama za
poseban otpad. Kemički znakovi teških metala su
slijedeći: Cd = kadmij, Hg = živa, Pb = olovo. Stoga
predajte istrošene baterije na komunalno mjesto za
sabiranje otpada.
Izjava o sukladnosti
Mi Milomex Ltd., c / o Milomex Services, Hilltop
Cottage, Barton Road, Pulloxhill, Bedfordshire,
MK45 5HP, UK, izjavljujemo u vlastitoj odgovorno-
sti da je proizvod: LCD-radio sat, model br.:
Z30237B / Z30237C, Verzija: 07 / 2011, na koji
se ova izjava odnosi, izrađena u skladu s normama
i normativnim dokumentima 1999 / 05 / EC.
Te dokumente prema potrebi možete skinuti s
interneta na stranici www.milomex.com.
Izjava o sukladnosti za ovaj proizvod dostupna je
na internet stranici www.lidl.hr.
EMC
Opis proizvoda:
LCD-radio sat
model br.: Z30237B / Z30237C
Verzija: 07 / 2011

19 RO
Cuprins
Introducere
Utilizare corespunzătoare scopului ........................................................................................... Pagina 20
Descrierea componentelor ......................................................................................................... Pagina 20
Specificaţii tehnice ...................................................................................................................... Pagina 20
Siguranţă
Indicaţii generale de siguranţă .................................................................................................. Pagina 20
Indicaţii de siguranţă referitoare la baterii ................................................................................ Pagina 21
Înainte de punerea în funcţiune
Amplasare aparat ....................................................................................................................... Pagina 21
Montare ceas radio de perete cu LCD ...................................................................................... Pagina 22
Introducerea şi schimbarea bateriei .......................................................................................... Pagina 22
Utilizare
Recepţionare semnal radio DCF ................................................................................................ Pagina 22
Setare an / lună / dată / timp / ziua săptămânii ........................................................................ Pagina 23
Setarea afişajului pentru ziua săptămânii ................................................................................. Pagina 23
Utilizarea afişajului orei în format 12 / 24 ................................................................................ Pagina 23
Setare alarmă .............................................................................................................................. Pagina 23
Activare / dezactivare alarmă .................................................................................................... Pagina 23
Oprirea semnalului de alarmă ...................................................................................................Pagina 24
Afişarea temperaturii în °C / °F ................................................................................................. Pagina 24
Faza lunii (doar modelul B) ........................................................................................................ Pagina 24
Afişare oră de vară ..................................................................................................................... Pagina 24
Setarea fusului orar ..................................................................................................................... Pagina 24
Remediere defecţiuni .................................................................................................... Pagina 24
Curăţare şi întreţinere .................................................................................................. Pagina 24
Service
....................................................................................................................................... Pagina 25
Înlăturare ............................................................................................................................... Pagina 25
Declaraţie de conformitate ...................................................................................... Pagina 25

20 RO
Introducere / Siguranţă
Ceas radiocontrolat cu LCD
Introducere
Folosiţi aparatul numai*în modul descris
şi numai în domeniile de utilizare indicate.
Utilizare corespunzătoare
scopului
Aparatul se pretează numai la utilizarea în spaţiile
închise la o temperatură ambientală normală.
Acest aparat nu este destinat utilizării comerciale.
Descrierea componentelor
1
Afişaj oră
2
Simbol radio
3
Simbol baterie
4
Simbol perioada de vară
5
Simbol fus orar
6
Calendar săptămâni (doar modelul B)
7
Temperatură interioară
8
Faza lunii (doar modelul B)
9
Afişaj an (doar modelul B)
10
Afişaj lună
11
Afişaj dată
12
Afişaj ziua săptămânii
13
Simbol PM (după-masă)
14
Simbol AM (dimineaţă)
15
Simbol alarmă 1
16
Simbol alarmă 2
17
Dispozitiv pentru suspendare
18
Capac compartiment baterii
19
Compartiment baterii
20
Tastă SNOOZE („Somn uşor“)
21
Tastă WAVE („Undă“)
22
Tastă DOWN („În jos“)
23
Tastă UP („În sus“)
24
Tastă ALARM („Setare alarmă“)
25
Tastă SET
26
Suport pliabil
Specificaţii tehnice
Tip baterie: 2 x 1,5 V , AAA
(incluse în pachetul de livrare)
Siguranţă
AVERTISMENT!
Citiţi toate indicaţiile de
siguranţă şi instrucţiunile. Nerespectarea indicaţiilor
de siguranţă şi a instrucţiunilor pot cauza incendii
şi / sau accidente grave.
PĂSTRAŢI TOATE INDICAŢIILE DE SIGURANŢĂ
ŞI INSTRUCŢIUNILE PENTRU VIITOR!
Indicaţii generale de
siguranţă
AVERTISMENT!
PERICOL
DE MOARTE ŞI DE ACCIDENTA-
RE PENTRU SUGARI ŞI COPII!
Nu lăsaţi niciodată copii nesupravegheaţi în
apropierea materialului de ambalaj. Există
pericol de asfixiere datorită materialului de
ambalaj. Deseori copii subapreciază pericolul.
Nu păstraţi produsul la îndemâna copiilor.
Acest produs nu este o jucărie!
Acest aparat poate fi folosit de către persoane
(inclusiv copii) cu capacităţi fizice, senzoriale
sau psihice limitate sau cu lipsă de experienţă
sau cunoştinţe doar dacă, sunt supravegheate
de către o persoană responsabilă de siguranţa
acestora sau au primit instrucţiuni de folosire a
paratului. Copii trebuie supravegheaţi pentru a
nu se juca cu aparatul.
Nu folosiţi aparatul dacă, este defect. În cazul
unui aparat defect aceasta poate cauza elec-
trocutări mortale.
AVERTISMENT!
Nu folosiţi aparatul în spitale
sau alte instituţii medicale. Acesta poate cauza
erori de funcţionare ale sistemelor vitale pentru
viaţă.
Împiedicaţi frecarea carcaselor aparatului de
materialele textile. Aceasta poate cauza încărcări
statice şi poate influenţa rezultatul măsurării.
Pagina se încarcă ...
Pagina se încarcă ...
Pagina se încarcă ...
Pagina se încarcă ...
Pagina se încarcă ...
Pagina se încarcă ...
Pagina se încarcă ...
Pagina se încarcă ...
Pagina se încarcă ...
Pagina se încarcă ...
Pagina se încarcă ...
Pagina se încarcă ...
Pagina se încarcă ...
Pagina se încarcă ...
Pagina se încarcă ...
Pagina se încarcă ...
Pagina se încarcă ...
Pagina se încarcă ...
Pagina se încarcă ...
Pagina se încarcă ...
Pagina se încarcă ...
Pagina se încarcă ...
Pagina se încarcă ...
Pagina se încarcă ...
Pagina se încarcă ...
Pagina se încarcă ...
Pagina se încarcă ...
Pagina se încarcă ...
Pagina se încarcă ...
Pagina se încarcă ...
Pagina se încarcă ...
-
 1
1
-
 2
2
-
 3
3
-
 4
4
-
 5
5
-
 6
6
-
 7
7
-
 8
8
-
 9
9
-
 10
10
-
 11
11
-
 12
12
-
 13
13
-
 14
14
-
 15
15
-
 16
16
-
 17
17
-
 18
18
-
 19
19
-
 20
20
-
 21
21
-
 22
22
-
 23
23
-
 24
24
-
 25
25
-
 26
26
-
 27
27
-
 28
28
-
 29
29
-
 30
30
-
 31
31
-
 32
32
-
 33
33
-
 34
34
-
 35
35
-
 36
36
-
 37
37
-
 38
38
-
 39
39
-
 40
40
-
 41
41
-
 42
42
-
 43
43
-
 44
44
-
 45
45
-
 46
46
-
 47
47
-
 48
48
-
 49
49
-
 50
50
-
 51
51


Auriol Z30237B Operation and Safety Notes
- Categorie
- Ceasuri cu alarmă
- Tip
- Operation and Safety Notes
- Acest manual este potrivit și pentru
Lucrări conexe
-
Auriol Z29962D Operating Instructions Manual
-
Auriol z31092 Operation and Safety Notes
-
Auriol Z29962D Operation and Safety Notes
-
-
-
-
Auriol IAN 96414 Instrucțiuni de utilizare
-
-
-