
Z29536
RADIO-CONTROLLED WEATHER STATION
Operation and Safety Notes
FUNK-WETTERSTATION
Bedienungs- und Sicherheitshinweise
VREMENSKA ST ANICA
Upute za posluživanje i za Vašu sigurnost
ΑΣΥΡΜΑΤΟΣ ΜΕΤΕΩΡΟΛΟΓΙΚΟΣ ΣΤΑΘΜΟΣ
Υποδείξεις χειρισμού και ασφαλείας
STAţIE METEO RADIO-REgLATă
Instrucţiuni de utilizare şi de siguranţă
МЕТЕОРОЛОГИЧНА СТАНЦИЯ
С РАДИОКОНТРОЛ
Инструкции за обслужване и безопасност
7

GB / CY Operation and Safety Notes Page 4
HR Upute za posluživanje i za Vašu sigurnost Stranica 14
RO Instrucţiuni de utilizare şi de siguranţă Pagina 24
BG Инструкции за обслужване и безопасност Страница 34
GR / CY Υποδείξεις χειρισμού και ασφαλείας Σελίδα 45
DE / AT / CH Bedienungs- und Sicherheitshinweise Seite 56

3
CHANNEL SUN/MOONWEATHER
HISTORY
Absolute
Relative
°C/°F MAX/MIN
RESET
B
1
433 MHz
REMOTE SENSOR
C
1
2
3
°C/°F
CHANNEL
TX
D
38
39
40
41
42
43
IN
OUT
DAYM
AM
D
HR
HIST Abs. mb hPa
R.H.
SUN RISE
SUNSET MOONSET
LOCATION
MOONRISE
AM
PM AM
PM
MOON
PHASE
inHg hPa
-12hr -8hr 0hr-2hr-4hr
-0.18
-0.12
-0.06
0
+0.06
+0.12
+0.18
-6
-4
-2
0
+2
+4
+6
MODE SNOOZE/LIGHT12/24 AL ON/OFF
433 MHz
A
1
3
4
5
7
16
17
18
19
21
22
20
9
8
6
10111214 1315
32
34
35
33
26 27 28 29 30 31
36
37
24 2523 2

4 GB/CY
Table of Contents
Introduction
Intended Use .................................................................................................................Page 5
Description of parts and features .................................................................................Page 5
Technical Data ..............................................................................................................Page 5
Scope of Supply ............................................................................................................ Page 5
Safety
General Safety Information ..........................................................................................Page 6
Safety Instructions for Batteries ....................................................................................Page 6
Before Initial Use
Setting up Devices ......................................................................................................... Page 6
Putting the Outdoor Sensor into Operation.................................................................Page 7
Putting the Weather Station into Operation ................................................................Page 7
Operation
DCF Radio Signal Reception ........................................................................................Page 8
Setting the Date / Language / Location / Clock / Time Zone Manually .....................Page 8
Using the 12 / 24 hour display ....................................................................................Page 9
Setting the alarm time ...................................................................................................Page 9
Activating / deactivating the alarm function ................................................................Page 10
Displaying the sun and moon rising / setting times .....................................................Page 10
Moon phases ................................................................................................................Page 10
Preparing to use the weather forecasting function ...................................................... Page 10
Reading the barometric pressure .................................................................................Page 11
Reading the barometric pressure for the last 12 hours ..............................................Page 11
Setting the channel ........................................................................................................ Page 11
Displaying the outdoor temperature ............................................................................Page 11
Displaying the temperature trend (outdoor) ................................................................ Page 11
Displaying the indoor temperature ..............................................................................Page 12
Displaying temperatures in °C / °F .............................................................................Page 12
Displaying the air humidity (indoor) ............................................................................Page 12
Displaying the Maximum / Minimum Temperature / Humidity ...................................Page 12
Backlight ........................................................................................................................Page 12
Battery state display ...................................................................................................... Page 12
Replacing the batteries .................................................................................................Page 12
Troubleshooting ..................................................................................................Page 12
Cleaning and Maintenance ........................................................................Page 13
Disposal ......................................................................................................................Page 13
Information
Declaration of conformity .............................................................................................Page 13

5 GB/CY
Introduction
Radio-controlled weather station
Q
Introduction
Familiarise yourself with the product
before using it for the first time. In
addition please refer carefully to the
operating instructions below and the safety advice.
Use the product only as described and for the
indicated purpose. Keep these instructions in a
safe place. If you pass the product on to anyone
else, please ensure that you also pass on all the
documentation.
Q
Intended Use
The weather station displays the indoor and out-
door temperatures in Celsius (°C) or Fahrenheit
(°F), the indoor air humidity in percent (% RH) and
their maximum and minimum values. The weather
station also displays the weather forecast, the time
in 12 / 24-hour clock modes and the date. The
weather station also displays the sunrise and sunset
times for that day and the phase of the moon.
In addition, the weather station has an alarm and
calendar function. Other uses or changes to the
device are considered to be contrary to the intend-
ed use and may result in personal injury and / or
damage to the device. The manufacturer accepts
no liability for damage caused through the use
of the device in contradiction of its intended use.
The device is not intended for commercial use.
Q
Description of parts
and features
Weather station
1
Weather symbol
2
Barometric pressure bar display
3
Indoor air temperature
4
Comfort indicator
5
Air humidity (%RH) (indoor)
6
Moon phase
7
Moon rise / set
8
Location
9
Sunrise / time of sunrise
10
ALARM button
11
/ button
12
SNOOZE / LIGHT button
13
Alarm icon
14
/ 12 / 24 button
15
MODE button
16
Date (year, month, day)
17
Time display
18
Radio tower symbol
19
Barometric pressure of previous hour
20
Absolute / relative barometric pressure
21
Temperature trend (outdoor)
22
Selected channel
23
Battery state indicator
24
Outdoor temperature
25
Barometric pressure trend
26
Channel button (CHANNEL)
27
HISTORY / WEATHER button
(Weather data memory)
28
“+“ / °C / °F button
29
“–“ / MAX / MIN
button
30
Relative / absolute barometric pressure button
31
SUN / MOON button (Sun / moon)
32
Wall mounting hole
33
Reset button
34
Battery compartment
35
Stand
Sensor
36
Control LED
37
Outdoor temperature / outdoor sensor channel
38
Wall mounting hole
39
Channel selector switch
40
Battery compartment
41
°C / °F button
42
TX button (“Channel setting button”)
43
Stand
Q
Technical Data
Weather Station:
Temperature range: 0 - + 50 °C
+ 32 - + 122 °F
Temperature resolution: 0.1 °C
Humidity
measurement range: 20 % - 99 %
Humidity resolution: 1 %
Radio signal: DCF
Battery: 3 x AA 1.5 V
(Mignon, LR06, included
in scope of supply)
Dimensions: 230 x 150 x 30 mm
(B x H x D)
Outdoor Sensor:
Temperature
measurement range: – 20 - + 50 °C
– 4 - + 122 °F
HF transmission signal: 433 MHz
HF transmission range: max. 25 Meter
in open spaces
Battery: 2 x AAA 1.5 V
(Micro, LR03, included
in scope of supply)
Q
Scope of Supply
Please check the supplied items immediately
after unpacking the device to ensure that there is
nothing missing and that the product and all of
its parts are in perfect condition.
1 x Weather station
1 x Outdoor sensor
3 x Battery AA 1.5 V (Mignon, LR06, pre-installed)
2 x Dowel
2 x Screw
2 x Battery AAA 1.5 V (Micro, LR03 pre-installed)
1 x Operating instructions

6 GB/CY
Safety / Before Initial Use
Safety
Please read all safety information and instructions.
Failure to comply with the safety information and
instructions may result in an electric shock, fire
and / or severe injuries.
YOU SHOULD STORE ALL SAFETY INFOR-
MATION AND INSTRUCTIONS IN A SAFE
PLACE IN CASE YOU NEED TO REFER TO
THEM AGAIN IN THE FUTURE!
Q
General Safety Information
J
WARNING!
DANGER
TO LIFE AND ACCIDENT
HAZARD FOR TODDLERS
AND SMALL CHILDREN! Never allow
children to play unsupervised with the packag-
ing material. There is a danger of suffocation
from the packaging material. Children frequently
underestimate the dangers. Children should
be kept away from the product at all times.
m
DANGER TO LIFE! Batteries can be swal-
lowed, which may represent a danger to life.
If a battery has been swallowed, medical
help is required immediately.
J Children or persons who lack the knowledge or
experience to use the device or whose physical,
sensory or intellectual capacities are limited
must never be allowed to use the device without
supervision or instruction by a person responsi-
ble for their safety. Children must never be
allowed to play with the device.
J Do not use the device if it is damaged. Dam-
aged devices represent a danger of death
from electric shock!
J
Do not use the device in hospitals or medical
facilities, as otherwise this may result in mal-
functions of life-support systems.
J Do not expose the device to
- extreme temperatures,
- strong vibrations,
- heavy mechanical loads,
- direct sunlight,
- moisture.
Otherwise there is a danger that the device
will be damaged.
J Do not expose the device to an extremely
high electromagnetic field. This may impair
the correct functioning of the device.
J Please prevent the housing of the device
from rubbing to strongly against textiles.
This may result in static charges and affect
the results of the measurements.
J Please note that the guarantee does not cover
damage caused by incorrect handling, non-
compliance with the operating instructions or
interference with the device by unauthorised
individuals.
J Under no circumstances should you take the
device apart. Improper repairs may place
the user in considerable danger. Repairs
should only be carried out by specialist
personnel.
Safety Instructions
for Batteries
J Remove the batteries from the device if they are
not going to be used for a prolonged period.
g CAUTION! DANGER OF EXPLOSION!
The batteries must never be recharged!
J When inserting the batteries, ensure the
correct polarity! This is shown in the battery
compartments.
J If necessary, clean the batteries and device
contacts before inserting the batteries.
J Remove spent batteries immediately from the
device. There is an increased danger of leaks!
J Batteries must not be disposed of in the
normal domestic waste!
J Every consumer is legally obliged to dispose
of batteries in the proper manner!
J Keep batteries away from children; do not
throw them in the fire, short-circuit them or
take them apart.
J Always replace all the batteries at once.
J Use batteries of the same type only.
J If the above instructions are not complied
with, the batteries may discharge themselves
beyond their end voltage. There is a danger
of leaking. If the batteries have leaked inside
your device, you should remove them immedi-
ately in order to prevent damage to the device!
J Avoid contact with the skin, eyes and mucous
membranes. Any parts of the body coming
into contact with battery acid should be
rinsed off with copious amounts of water
and / or a doctor contacted if necessary!
Q
Before Initial Use
Q
Setting up Devices
m CAUTION! When selecting a location to set
up the devices, please ensure that they are not
exposed to any direct sunlight, vibrations, dust,
heat, cold or moisture. Do not place the devices
close to sources of heat, e.g. radiators. Otherwise
they may be damaged.
j Ensure that the devices are placed on a stable
surface.
j Please ensure that devices installed on the
wall are correctly suspended. Should they fall
down, this may cause personal injury or
damage the devices themselves or other items.
j Place the weather station on the accompany-
ing base
35
,
43
.
Note: Please ensure that the pins in the
stand
35
are inserted into the corresponding
recesses on the weather station.
j Place the devices on a flat, horizontal surface.
j Do not place the devices on valuable or sen-
sitive surfaces unless these are appropriately
protected. Otherwise they may be damaged.

7 GB/CY
Before Initial Use
j Do not place the devices near sources of in-
terference such as television sets, computers,
thick walls, thermopane windows etc. Other-
wise the transmission of radio waves between
the devices may be impaired.
j Please install the devices at least 2 metres
away from sources of interference. Otherwise
the transmission of radio waves between the
devices may be severely impaired.
j Please ensure that neighbouring devices are not
operated at the same frequency of 433 MHz.
Such devices may cause interference to the
radio connection.
j Do not place the devices next to or on metal
plates. Otherwise the quality of radio wave
transmission may be reduced.
j Do not install the devices in buildings made
of reinforced concrete, e.g. airports, high-rise
buildings, factories or cellars. Otherwise the
transmission of the radio waves between the
devices may be severely impaired.
j Do not start reception of the waves in a moving
vehicle, e.g. car or train. The transmission of
the radio waves to the devices may interfere
with the electronics of the vehicles.
j In open spaces do not place the devices more
than 25 metres apart, as otherwise transmission
of the radio waves may be interrupted.
j Do not expose the devices to temperatures
below –20 °C for prolonged periods, as
otherwise this will adversely affect the trans-
mission range.
Q
Putting the Outdoor
Sensor into Operation
Removing the battery safety strip:
Note: For this procedure you need a flat-blade
screwdriver.
j Open the battery compartment cover on the
rear of the outdoor sensor by turning the
screw in an anticlockwise direction with the
flat-blade screwdriver.
j Remove the battery safety strip. The outdoor
sensor is now ready for operation and the
control LED
36
lights up briefly.
j Close the battery compartment cover and
tighten the screw in a clockwise direction.
Installing the Outdoor Sensor:
Note: For this step you need a drill.
CAUTION! DANGER OF DEATH
AND INJURY AND DANGER OF
MATERIAL DAMAGE! Please read
the operating and safety instructions of your drill
through carefully.
j
Find an appropriate place for the outdoor sensor.
Note: Please ensure that you install the
outdoor sensor within a radius of 25 m from
the weather station. Check that there are no
obstacles between the outdoor sensor and
the weather station. Otherwise there may be
interference of the transmission of data.
For wall mounting:
j Mark the drill hole on the wall.
j Drill the hole with a drill.
j Insert a suitable wall plug into the drill hole.
j Use a screwdriver to insert a suitable screw.
j Hang the outdoor sensor on the screw with
the wall mounting hole
38
.
For free standing:
j Turn the stand
43
out from the bottom of the
outdoor sensor.
Q
Putting the Weather
Station into Operation
Removing the battery safety strip:
j Open the battery compartment
34
on the
back of the weather station.
j Pull out the battery safety strip.
j Then close the battery compartment
34
.
j Press the RESET button
33
. All of the symbols
light up briefly.
As soon as the battery safety strip has been
removed, the weather station starts to receive
the radio signal.
Note: Do not change the location of the weath-
er station during reception. Otherwise there may
be interference.
For wall mounting:
j Mark the drill hole on the wall.
j Drill the hole with a drill.
j Insert a suitable wall plug into the drill hole.
j Use a screwdriver to insert a suitable screw.
j Hang the weather station on the screw with
the wall mounting hole
32
.
For free standing:
j Turn the stand
35
out from the bottom of the
weather station.
Connecting the weather station with the
outdoor sensor and the DCF radio signal:
After removal of the battery safety strip the weather
station attempts to establish a connection with
the outdoor sensor. This process may take a few
minutes. When the connection with the outdoor
sensor has been successfully established, the
selected channel symbol
22
is shown the channel
of the outdoor sensor (To change the channel of
the sensor, see “Setting the channel”). If the con-
nection with the outdoor sensor is not established
automatically, this can be done manually by
pressing TX button
42
of the sensor”.
As soon as the weather station has established a
connection with the outdoor sensor it automatically
begins to receive the DCF radio signal. This proce-
dure takes a few minutes and is shown in the LC
display by the flashing radio tower symbol
18
.
When the DCF radio signal is being successfully
received, the radio tower symbol
18
is shown
permanently in the display. If at the time of putting
the device into operation it is not possible to syn-

8 GB/CY
Before Initial Use / Operation
chronise with the atomic clock, you can also carry
out the clock adjustments manually (see “Setting the
Date / Language / Time / Time Zone Manually”).
Radio Signal (DCF):
The DCF signal (time signal transmitter) consists
of time pulses emitted by one of the most accurate
clocks in the world close to Frankfurt / Main, Ger-
many – this varies by 1 second in a million years.
Your weather station receives these signals under
ideal conditions up to a distance of approximately
1500 km around Frankfurt / Main. Reception of
the radio signal usually takes about 3 - 10 minutes.
j If your weather station is not working correctly,
please perform a new start by pressing the
RESET button
33
.
Reception can be considerably impaired by
obstacles (e.g. concrete walls) or sources of
interference (e.g. other electrical devices). If
necessary, change the location of the radio clock
(e.g. by putting it near a window) if you have
problems with reception.
Q
Operation
Q
DCF Radio Signal Reception
After the establishment of a connection with the
outdoor sensor the weather station automatically
begins to search for the DCF radio signal. The
search is shown in the LC display by the radio
tower symbol
18
flashing.
Note: During the signal search all of the function
buttons of the weather station are blocked.
Note: In buildings made of reinforced concrete
the reception of the radio signal may be severely
impaired (see “Setting up devices”).
In order to correct any deviations from the exact
time, the clock is automatically synchronised with
the DCF radio signal every day at 3 a.m. If the
synchronisation with the DCF radio signal fails,
the radio tower symbol
18
goes off. The clock
then attempts to synchronise with the DCF radio
signal at 4 a.m., 5 a.m. and 6 a.m.
Reception of the DCF radio signal can also be
started manually on the weather station.
j Press and hold down the
/ button
11
for 3 seconds. The weather station attempts
to receive the DCF radio signal. This process
takes several minutes and is indicated in the LC
display by a flashing radio tower symbol
18
.
If the connection with the DCF radio signal cannot
be established, the search is stopped. A further
attempt to establish a connection is made auto-
matically on the next full hour.
Note: If the clock of the weather station cannot
receive the DCF radio signal due to errors, too great
a distance from the transmitter or similar reasons,
it is possible to set the time manually. As soon as
the DCF radio signal is successfully received, the
values that have been set manually are overwritten.
Q
Setting the Date / Language /
Location / Clock / Time Zone
Manually
At the location site of the weather station, recep-
tion of the DCF radio signal may be impaired or
interrupted. In this case it is possible to adjust the
device manually.
Follow these steps:
1. Press and hold down the MODE button
15
for about 3 seconds. The hour value of the
time display
17
flashes. Press the / but-
ton
11
and the / 12 / 24 button
14
to set
it to the desired value.
Tip: By keeping the
/ button
11
and
the
/ 12 / 24 button
14
pressed, you
accelerate the process and reach the desired
value more quickly. This quicker method can
also be used for making the other settings.
If during a period of 15 seconds no buttons
are pressed, the LC display returns automati-
cally to the default display.
2. Confirm your settings by pressing the MODE
button
15
. The minute value of the time dis-
play
17
flashes. Press the / button
11
and the
/ 12 / 24 button
14
to set it to
the desired value.
3. Confirm your settings by pressing the MODE
button
15
. The second value of the time dis-
play
17
flashes. Press the / button
11
or the
/ 12 / 24 button
14
to set the sec-
ond value to 0.
4. Confirm your settings by pressing the MODE
button
15
. The year value flashes in the time
display
17
. Press the / button
11
and
the
/ 12 / 24 button
14
to set it to the
desired value.
5. Confirm your settings by pressing the MODE
button
15
. The month value of the date
display
16
flashes. Press the / button
11
and the / 12 / 24 button
14
to set it
to the desired value.
6. Confirm your settings by pressing the MODE
button
15
. The day value of the date display
16
flashes. Press the / button
11
and
the
/ 12 / 24 button
14
to set it to the
desired value.
7. Confirm your settings by pressing the MODE
button
15
. The language field for the name
of the day of the week of the date display
16
flashes. Press the
/ button
11
and the
/ 12 / 24 button
14
to set it to the desired
language.
Note: You have the choice of German,
English, Russian, Danish, Dutch, Italian,
Spanish and French.
Note: The weather station is supplied in the
default setting of German (GER).

9 GB/CY
Operation
8. Confirm your settings by pressing the MODE
button
15
. The location display for country
8
flashes. Press the
/ button
11
and the
/ 12 / 24 button
14
to set it to the desired
country. Confirm your setting by pressing the
MODE button
15
. The location display for
city
8
flashes. Press the / button
11
and the
/ 12 / 24 button
14
to set it to
the desired city.
9. Confirm your settings by pressing the MODE
button
15
. Then the time zone will shifted
automatically.
Germany GER
Aachen AAC
Berlin BER
Düsseldorf DUS
Dresden DRE
Erfurt ERF
Frankfurt FRA
Flensburg FLE
Freiburg FRE
Hannover HAN
Bremen BRE
Hamburg HAM
Rostock ROS
Stralsund STR
Köln KOE
Kiel KIE
Kassel KAS
Leipzig LEI
München MUE
Magdeburg MAG
Nürnberg NUE
Regensburg REG
Stuttgart STU
Saarbruecken SAA
Schwerin SCH
Danmark DAN
Albørg ALB
Arhus ARH
Copenhagen COP
Odense ODE
Spain,
Andorra
ESP
Alicante ALI
Andorra AND
Badajoz BAD
Barcelona BAR
Bilbao BIL
Cadix CAD
Cordoba COR
Ibiza IBI
La Corogna LAC
Leon LEO
Las Palmas LPA
Madrid MAD
Malaga MAL
Palma de
Mallorca
PDM
Salamanca SAL
Sevilla SEV
Valencia VAL
Zaragossa ZAR
France FRA
Besançon BES
Biarritz BIA
Bordeaux BOR
Brest BRE
Cherbourg CHE
Lyon LYO
Marseille MAR
Monaco MON
Metz MET
Nantes NAN
Nice NIC
Orléans ORL
Paris PAR
Perpignan PER
Lille LIL
Rouen ROU
Strasbourg STR
Toulouse TOU
Finland FIN
Helsinki HEL
Great Britain GB
Aberdeen ABD
Belfast BEL
Birmingham BIR
Bristol BRI
Edinburgh EDI
Glasgow GLA
London LON
Manchester MAN
Plymouth PLY
Hungary HUN
Budapest BUD
Croatia CRO
Zagreb ZAG
Italy ITA
Ancona ANC
Bari BAI
Bologna BOL
Cagliari CAG
Catania CAT
Firenze FIR
Foggia FOG
Genova GEN
Lecce LEC
Messina MES
Milano MIL
Napoli NAP
Palermo PAL
Parma PAR
Perugia PER
Roma ROM
Torino TOR
Trieste TRI
Venezia VEN
Verona VER
Ventimiglia VTG
Ireland IRL
Dublin DUB
Luxembourg LUX
Norway NOR
Bergen BER
Oslo OSL
Stavanger STA
Netherlands NET
Amsterdam AMS
Eindhoven EIN
Enschede ENS
Groningen GRO
Den Haag DHA
Rotterdam ROT
Portugal POR
Evora EVO
Coimbra COI
Faro FAR
Leiria LEI
Lisbon LIS
Porto POR
Poland POL
Gdansk GDA
Krakow KRA
Poznan POZ
Szczecin SZC
Warsaw WAR
Russia RUS
St.Petersburg PET
Sweden SWE
Gothenburg GOT
Stockholm STO
Slovakia SLK
Bratislave BRA
Slovenia SLO
Ljubljana LJU
Serbia SRB
Belgrade BER
Austria AUS
Graz GRA
Innsbruck INN
Linz LIN
Salzburg SAL
Vienna VIE
Belgium BEL
Antwerpen ANT
Brugges BRU
Bruxelles BRL
Charleroi CHA
Liege LIE
Switzerland,
Liechtenstein
SWI
Basel BAS
Bern BER
Chur CHU
Geneva GEN
Locamo LOC
Luceme LUC
St Moritz MOR
St Gallen GAL
Sion SIO
Vaduz VAD
Zuerich ZUE
Czech Repu-
blic
CZR
Prague PRA
You can choose from the following countries and
cities:
Q
Using the 12 / 24 hour display
j Press the / 12 / 24 button
14
to switch
between the 12 and 24 hour time formats.
Note: The AM symbol in the time display
17
stands for before noon in the 12 hour format.
The PM symbol in the time display
17
stands
for after noon in the 12 hour format.
Q
Setting the alarm time
Note: You can set two different alarms separately.
j Press the MODE button
15
to select either
Alarm 1
13
or Alarm 2
13
. The
currently set alarm time and the selected
alarm symbol
13
,
13
appear in
the time display
17
.

10 GB/CY
Operation
j Press and hold down the MODE button
15
for about 3 seconds. The hour value
flashes. Press the
/ button
11
or the
/ 12 / 24 button
14
to set it to the desired
value.
Tip: By keeping the
/ button
11
or the
/ 12 / 24 button
14
pressed, you acceler-
ate the process and reach the desired value
more quickly. This quicker method can also
be used for making the other settings. If dur-
ing a period of 15 seconds no buttons are
pressed, the LC display returns automatically
to the default display.
j Press the MODE button
15
. The minute value
flashes. Press the
/ button
11
or the
/ 12 / 24 button
14
to set it to the desired
value.
j Confirm your settings by pressing the MODE
button
15
.
Q
Activating / deactivating the
alarm function
j Press the MODE button
15
to access the
activate or deactivate the alarm mode.
j Press the ALARM button
10
to activate the
alarm function. The Alarm symbol
13
appears
in the LC display.
j Press the ALARM button
10
to deactivate
the alarm function. The Alarm symbol
13
disappears from the LC display.
j The alarm will sound when it reach to the set
time. Press the MODE button
15
, the /
button
11
, the / 12 / 24 button
14
or the
SNOOZE / LIGHT button
12
to switch off
the alarm signal. Otherwise the alarm signal
sounds for about 2 minutes then stops auto-
matically.
Q
Displaying the sun and moon
rising / setting times
Note: The calculated times of setting and rising
of the sun and moon are intended for orientation
only. You should contact your local weather fore-
casting service for the exact times.
Note: After you have completed all the settings
(see”setting the date / language / clock / time
zone), the weather station calculates the rising and
setting times of the sun and moon. The setting /
rising time of the sun or moon flashes during this
operation.
j Press the SUN / MOON button
31
to display
the calculated sunshine hours of the selected
day.
j To check the setting / rising time for other
location & date, press and hold down the
SUN / MOON button
31
for about 3 sec-
onds to access the setting / rising time of the
sun or moon quick control mode. The loca-
tion
8
flashes.
j Set the country, city, year, month and the
day for which you wish the information to be
displayed by pressing the SUN / MOON
button
31
or the / button
11
or the
/ 12 / 24 button
14
.
j Press the SUN / MOON button
31
to con-
firm your settings.
Note: The sun and moon setting or rising
time flashes while the values are being
calculated.
Note: If the next moon rising or setting is
on the following day, the display shows
MOONRISE+1 or MOONSET+1.
Q
Moon phases
The following moon phases are shown by the
moon phase symbol
6
:
New moon Waxing half-
moon
Half-moon Waxing full
moon
Full moon Waning full
moon
Half-moon Waning half-
moon
Q
Preparing to use the weather
forecasting function
Note: Please take the weather forecast from
your local weather forecasting service into account
as well as the forecast from your weather station.
If there are discrepancies between the information
from your device and from the local weather
forecasting service, please take the advice of the
latter as authoritative.
j Press the HISTORY / WEATHER button
27
for about 3 seconds. The weather symbol
1
flashes.
j Set the current weather by pressing
the “+“ / °C / °F button
28
or the
“–“ / MAX / MIN
button
29
.
You can choose between the following
weather symbols:
= sunny
= light clouds
= cloudy

11 GB/CY
Operation
= cloudburst /
storm
= rainy
j Press the HISTORY / WEATHER button
27
to
confirm your settings.
Note: Ensure that you have set the current
weather correctly, otherwise the weather
forecast will not be correctly displayed.
j The weather station starts with the weather
forecast approximately 6 hours after you
enter the current weather.
j The weather station can display the barometric
pressure trend
25
. You may see the following
displays:
= the barometric pressure will rise.
= the barometric pressure will remain
constant.
= the barometric pressure will fall.
Q
Reading the barometric
pressure
j Press the Relative / absolute barometric pres-
sure button
30
to switch between the relative
and absolute barometric pressure display.
Note: The display shows “Abs” if you have
selected absolute pressure. The display shows
“Rel” if you have selected relative pressure.
Note: The absolute barometric pressure is
measured by the weather station.
j Set the relative barometric pressure to the
barometric pressure relative to that at sea
level. Ask your local weather forecast service
for the barometric pressure at sea level.
j Press and hold down the Relative / absolute
barometric pressure button
30
for about
3 seconds.
j Set the current barometric pressure by press-
ing
the “+“ / °C / °F button
28
or the
“–“ / MAX / MIN
button
29
.
j Press the Relative / absolute barometric
pressure button
30
to confirm your settings.
Q
Reading the barometric
pressure for the last 12 hours
j Press the HISTORY / WEATHER button
27
to read the barometric pressure values for
the last 12 hours.
0HR = present barometric pressure
– 1HR = barometric pressure an hour earlier
– 2HR = barometric pressure two hours
earlier, etc.
j Press and hold down the “+“ / °C / °F button
28
for about 3 seconds to switch between
displaying the barometric pressure units in
inHg or mb / hPa.
Q
Setting the channel
The weather station receives the sensor signal
automatically after you have made all the settings.
The field for the Outdoor temperature
24
flashes
during this time.
Note: If you use more than one sensor (max. 3),
you can receive the data from each of the outdoor
sensors separately.
j Set a different channel for each of the sensors.
j To do this open the battery compartment on
the back of the outdoor sensor and take it off.
j Set the channel by means of the Channel
selection switch
39
.
j Press the TX button
42
to transmit the measured
temperature to the weather station manually.
The latter sounds an audible signal when it
receives the signal.
j Then close the battery compartment
40
.
Q
Displaying the outdoor
temperature
j Press the Channel button
26
to display the
outdoor temperature of each outdoor sensor.
- Press the Channel button
26
1 x to display
channel 1.
- Press the Channel button
26
2 x to display
channel 2.
- Press the Channel button
26
3 x to display
channel 3.
- Press the Channel button
26
4 x to display
all the channels one after the other in a loop.
j Press and hold down the Channel button
26
to remove unused channels. If a further out-
door sensor and channel are added later,
the weather station will receive the signal
automatically. Alternatively, you can also
transmit the initial signal from the outdoor
sensor manually by pressing the TX button
42
.
Q
Displaying the temperature
trend (outdoor)
After successfully connecting with the outdoor
sensor, the weather station can display the
Temperature trend
21
.
You may see the following displays:
= The outdoor temperature is rising.
= The outdoor temperature is remaining
constant.
= The outdoor temperature is falling.

12 GB/CY
Operation / Troubleshooting
Q
Displaying the indoor
temperature
The current Indoor temperature
3
is shown in
the LC display.
Q
Displaying temperatures
in °C / °F
Note: °C is the legally required temperature unit.
Note: The weather station is supplied in the
default setting of °Celsius.
j Press the “+“ / °C / °F button
28
to switch
between the Celsius and Fahrenheit tempera-
ture scales.
Q
Displaying the air humidity
(indoor)
The current air humidity
5
is shown in the LC
display. The Comfort indicator
4
displays the
air humidity in three categories.
The following categories are available:
“Dry” = Air humidity
5
< 45 %
“Comfort” = Air humidity
5
45 - 75 %,
indoor temperature
3
24 °C - 27.9 °C
“Wet” = Air humidity
5
> 75 %
Q
Displaying the Maximum /
Minimum Temperature /
Humidity
The minimum / maximum temperature / humidity is
measured for the first time after the batteries have
been inserted and stored in the weather station.
j Press the
“–“ / MAX / MIN
button
29
briefly.
The maximum indoor
3
and outdoor tem-
perature
24
measured and the maximum
humidity
5
measured are shown.
j Press the
“–“ / MAX / MIN
button
29
again
briefly. The minimum indoor
3
and outdoor
temperature
24
measured and the minimum
humidity
5
measured are shown.
j Press the
“–“ / MAX / MIN
button
29
again
briefly to return to the current values.
Note: If no button is pressed within 5 seconds,
the displays automatically return to the
standard display.
j Hold the
“–“ / MAX / MIN
button
29
down
for approx. 3 seconds in order to delete the
stored maximum and minimum values when
you hear a beep sound. The values measured
from the time of deletion of the old values
until the next time the memory is called up
can be called up again.
Q
Backlight
j Press the SNOOZE / LIGHT button
12
. The
backlight illuminates for 3 seconds.
Q
Battery state display
The Battery state indicator
23
appears in the
weather station’s LC display if the batteries are
weak. Make sure you replace the batteries at the
earliest opportunity (see “Replacing the batteries”).
Q
Replacing the batteries
Weather station:
You should replace the batteries if the display
becomes unclear.
j Remove the battery compartment cover on
the back of the weather station.
j Remove the used batteries.
j Insert 3 new batteries type AA 1.5 V
(Mignon, LR06).
Note: Make sure you fit the batteries the
right way round (polarity). The correct polarity
is shown inside the battery compartment
34
.
j Close the battery compartment
34
.
j Press the RESET button
33
. All the symbols
light up briefly.
Outdoor sensor:
Note: For this step you need a flat-blade
screwdriver.
j Open the battery compartment cover on the
rear of the outdoor sensor by turning the
screw in an anticlockwise direction with the
flat-blade screwdriver.
j Remove the used batteries.
j Insert 2 new batteries of type AAA 1.5 V
(Micro, LR03).
Note: Ensure the correct polarity. This is
shown in the battery compartment
40
.
j Close the battery compartment cover and
tighten the screw in a clockwise direction.
Q
Troubleshooting
Note: This appliance has delicate electronic
components. This means that if it is placed near
an object that transmits radio signals, it could
cause interference. This could be, for example,
mobile telephones, walkie talkies, CB radios,
remote controls and microwaves.
j If the display indicates a problem, move such
objects away from it or remove the batteries
for a short while and then replace them.

13 GB/CY
Cleaning and Maintenance / Disposal / Information
Q
Cleaning and Maintenance
j The device should only be cleaned on the
outside with a soft dry cloth.
j Under no circumstances should you use
liquids or detergents, as these will damage
the device.
j Under no circumstances should you spray
the outdoor sensor, e.g. with a garden hose.
The outdoor sensor is only protected against
rain from above.
Q
Disposal
The packaging is made entirely of
recyclable materials, which you may
dispose of at local recycling facilities.
Contact your local refuse disposal authority for
more details of how to dispose of your worn-out
product.
To help protect the environment,
please dispose of the product properly
when it has reached the end of its
useful life and not in the household
waste. Information on collection
points and their opening hours can be
obtained from your local authority.
Faulty or used batteries must be recycled in
accordance with Directive 2006 / 66 / EC.
Please return the batteries and / or the device
to the available collection points.
Pb
Environmental damage
through incorrect disposal of
the batteries!
Batteries may not be disposed of with the usual
domestic waste. They may contain toxic heavy
metals and are subject to hazardous waste treat-
ment rules and regulations. The chemical symbols
for heavy metals are as follows: Cd = cadmium,
Hg= mercury, Pb = lead. That is why you should
dispose of used batteries at a local collection
point.
Q
Information
Q
Declaration of conformity
Herewith Milomex Ltd., c / o Milomex Services,
Hilltop Cottage, Barton Road, Pulloxhill, Bedford-
shire, MK45 5HP, UK, declares that the article
Radio-controlled weather station · model number:
Z29536 · Version: 11 / 2010 fulfills the basic
requirement and the other relevant requirements
of 1999 / 5 / EC. The declaration of conformity
can be found under www.milomex.com.
EMC
Product Designation:
Radio-controlled weather station
Model No.: Z29536
Version: 11 / 2010

14 HR
Popis sadržaja
Uvod
Namjensko korištenje ........................................................................................................Stranica 15
Opis dijelova ...................................................................................................................... Stranica 15
Tehnički podatci .................................................................................................................Stranica 15
Opseg pošiljke ...................................................................................................................Stranica 15
Sigurnost
Opće sigurnosne upute .....................................................................................................Stranica 16
Sigurnosne upute za baterije ............................................................................................Stranica 16
Prije stavljanja u pogon
Postavljanje uređaja...........................................................................................................Stranica 16
Stavljanje u pogon vanjskog osjetnika .............................................................................Stranica 17
Stavljanje u pogon metereološke postaje ........................................................................Stranica 17
Posluživanje
Primanje DCF-radiosignala ................................................................................................ Stranica 18
Datum / jezik / mjesto postavljanja / vrijeme / vremensku zonu postavite ručno............Stranica 18
Koristite 12 / 24 prikaz sata .............................................................................................Stranica 19
Postavljanje vremena buđenja ..........................................................................................Stranica 19
Aktivirati / deaktivirati funkciju buđenja ............................................................................ Stranica 20
Prikazati vrijeme izlaska odnosno zalaska sunca i mjeseca ...........................................Stranica 20
Mjesečeve faze .................................................................................................................. Stranica 20
Pokrenuti prognozu vremena ............................................................................................Stranica 20
Očitati tlak zraka ...............................................................................................................Stranica 21
Očitajte tlak zraka zadnjih 12 sati ...................................................................................Stranica 21
Postaviti kanal .....................................................................................................................Stranica 21
Prikazati vanjsku temperaturu............................................................................................Stranica 21
Pokazivanje trenda temperature (vani) ............................................................................Stranica 21
Pokazivanje unutarnje temperature ..................................................................................Stranica 21
Pokazivanje temperature u °C / °F ..................................................................................Stranica 21
Prikazati vlažnost zraka (unutra) ......................................................................................Stranica 22
Prikazati maksimalnu / minimalnu temperaturu / vlažnost zraka.....................................Stranica 22
Osvjetljenje pozadine ........................................................................................................ Stranica 22
Prikaz baterije.....................................................................................................................Stranica 22
Zamjena baterija ................................................................................................................Stranica 22
Ukloniti grešku .......................................................................................................... Stranica 22
Čišćenje i njega .......................................................................................................... Stranica 22
Otklanjanje otpada ............................................................................................... Stranica 23
Informacije
Izjava o sukladnost ............................................................................................................Stranica 23

15 HR
Uvod
Vremenska stanica
Q
Uvod
Upoznajte se sa uređajem, prije
prvog stavljanja u pogon. Za to
pomno pročitajte slijedeće upute za
uporabu i sigurnost. Rabite uređaj isključivo
sukladno opisu i za navedena područja primjene.
Dobro sačuvajte ove upute za uporabu. U slučaju
prosljeđivanja uređaja trećim osobama, predajte
također svu pripadajuću dokumentaciju.
Q
Namjensko korištenje
Meteorološka postaja pokazuje vam vanjsku i
unutarnju temperaturu u Celzijevim (°C) stupnje-
vima ili Fahrenheitovim (°F), te postotak unutarnje
vlažnosti (% RH), te njihovu maksimalnu i minimalnu
vrijednost. Daljnji vrijednosti prikaza meteorološke
stanice su prognoza vremena, vrijeme u formatu
12- / 24 sata i datum. Nadalje meteorološka
stanica prikazuje vrijeme izlaska i zalaska sunca,
te mjesečeve faze. Meteorološka stanica nadalje
raspolaže s funkcijom alarma i kalendara. Druga
vrsta uporabe ili promjene uređaja smatrat će se
nenamjenskim i mogu prouzrokovati opasnosti
od ozljeda i / ili oštećenja uređaja. Proizvođač ne
preuzima nikakvu odgovornost za štete nastale
od nenamjenske uporabe. Uređaj nije namijenjen
u komercijalne svrhe.
Q
Opis dijelova
Metereološka postaja
1
Simbol vremena
2
Tlak zraka - prikaz stupca
3
Unutarnja temperatura
4
Indikator komfora
5
Vlažnost zraka (%RH) (unutra)
6
Mjesečeva faza
7
Izlazak / zalazak mjeseca
8
Mjesto postavljanja
9
Izlazak sunca / vrijeme izlaska sunca
10
ALARM-tipka
11
- / -tipka
12
SNOOZE / LIGHT-tipka
13
Alarm-znak
14
/ 12 / 24-tipka
15
MODE-tipka
16
Datum (godina, mjesec, dan)
17
Prikaz vremena
18
Simbol repetitora
19
Tlak zraka u proteklom satu
20
Apsolutni / Relativni tlak zraka
21
Trend temperature (vani)
22
Odabrani kanal
23
Prikaz baterije
24
Vanjska temperatura
25
Trend tlaka zraka
26
Kanal-tipka (CHANNEL)
27
HISTORY / WEATHER-tipka
(memorija podataka o vremenu)
28
„+“ / °C / °F-tipka
29
„–“ / MAX / MIN-
tipka
30
Relativni / Apsolutni tlak zraka tipka
31
Tipka SUN / MOON (sunce / mjesec)
32
Naprava za vješanje
33
RESET-tipka
34
Spremnik baterija
35
Nogar za stajanje
Vanjski senzor
36
Kontrolna-LED
37
Vanjska temperatura / Kanal vanjskog senzora
38
Naprava za vješanje
39
Tipka za odabir kanala
40
Spremnik baterija
41
°C- / °F-tipka
42
TX-tipka („tipka za podešavanje kanala”)
43
Nogar za stajanje
Q
Tehnički podatci
Metereološka postaja:
Mjerno područje
temperature: 0 - + 50 °C
+ 32 - + 122 °F
Temperaturna razlučivost: 0,1 °C
Područje mjerenja
Vlažnost zraka: 20 – 99 %
Razlučivost
Vlažnost zraka: 1 %
Radijski signal: DCF
Baterije: 3 x AA 1,5 V
(Mignon, LR06, nisu
sadržane u opsegu
pošiljke)
Mjere: 230 x 150 x 30 mm
(Š x V x D)
Vanjski osjetnik:
Mjerno područje
temperature: – 20 - + 50 °C
– 4 - + 122 °F
HF Signal prijenosa: 433 MHz
HF Doseg prijenosa: max. 25 metera na
otvorenome terenu
Baterija: 2 x AAA 1,5 V
(mikro, LR03, nisu
sadržane u opsegu
pošiljke)
Q
Opseg pošiljke
Provjerite odmah nakon raspakiranja ospeg
pošilje na potpunost kao i besprijekorno stanje
proizvoda i svih dijelova.
1 x metereološka postaja
1 x vanjski osjetnik
3 x baterija AA 1,5 V (minjon, LR06, prethodno
instalirana)
2 x usadica
2 x vijak

16 HR
Uvod / Sigurnost / Prije stavljanja u pogon
2 x baterija AAA 1,5 V (mikro, LR03, prethodno
instalirana)
1 x uputa za uporabu
Sigurnost
Pročitajte sve sigurnosne upute i ostale upute.
Propusti u pridržavanju sigurnosnih uputa i ostalih
uputa mogu prouzrokovati strujni udar, požar i / ili
teške ozljede.
SAČUVAJTE SVE SIGURNOSNE UPUTE
I INE UPUTE ZA UBUDUĆE!
Q
Opće sigurnosne upute
J
UPOZORENJE!
OPA-
SNOST PO ŽIVOT I OD
NEZGODE ZA DJECU! Ne
ostavljajte djecu nikad bez nadzora zajedno
sa omotnim materijalom. Prijeti opasnost od
zagušenja kroz omotni materijal. Djeca često
podcjenjuju opasnost. Držite djecu uvijek
podalje od proizvoda.
m OPASNOST PO ŽIVOT! Moglo bi se
progutati baterije, što je opasno po život.
Ako se proguta bateriju, potrebno je smjesta
zatražiti medicinsku pomoć.
J Djeca ili osobe koje imaju manjka znanja
ili iskustva u ophođenju s uređajem ili koji
su svojim tjelesnim, osjetilnim ili duševnim
sposobnostima ograničeni ne smiju koristiti
uređaj bez nadzora ili vodstva od strane
osobe koja je odgovorna za njihovu sigurnost.
Djeca se moraju nadzirati da se ne bi igrala
uređajem.
J Ne stavljajte uređaj u pogon ako je oštećen.
Oštećeni uređaji su opasni po život zbog
mogućeg strujnog udara!
J Ne rabite uređaj u bolnicama ili medicinskim
ustanovama. Isti bi mogao prouzrokovati
funkcijske smetnje kod sustava za održavanje
života.
J Ne izlažite uređaj
- ekstremnim temperaturama,
- snažnim vibracijama,
- snažnom mehaničkom habanju,
- izravnom suncu,
- vlagi.
Uređaj bi se inače mogao oštetiti.
J Ne izlažite uređaj ekstremno visokim
elektromagnetskim poljima. Isto bi moglo
smetati funkciji uređaja.
J Osigurajte da se kućište uređaja ne riba
presnažno od tkaninu. Isto bi moglo prou-
zrokovati statična napajanja i utjecati na
mjerni rezultat.
J Vodite računa o tome, da jamstvo ne obuhvaća
oštećenja prouzrokovana od nestručnog
rukovanja, nepridržavanja uputa za uporabu
ili zahvate od neovlaštenih osoba.
J Ne rastavljajte uređaj ni u kojem slučaju.
Nestručne popravke mogu prouzrokovati
znatnu opasnost za korisnika. Prepustite
popravke isključivo stručnim osobama.
Sigurnosne upute
za baterije
J Otklonite baterije iz uređaja, ako ga se
dulje vrijeme nije koristilo.
g OPREZ! OPASNOST OD EKSPLOZIJE!
Ne punite baterije nikad ponovno!
J Tijekom umetanja baterija, vodite računa o
ispravnoj polarizaciji! Ista je prikazana u
baterijskom kućištu.
J Ukoliko je potrebno, očistite baterijski kontakt
i kontakt uređaja prije postavljanja baterija.
J Istrošene baterije potrebno je smjesta otkloniti
iz uređaja. Postoji povećana opasnost od
iscurivanja!
J Ne bacajte baterije u kućni otpad!
J Svaki potrošač zakonski je obvezan, propisno
otklanjati baterije!
J Držite baterije podalje od djece, ne bacajte ih
u vatru, ne punite ih ponovno i ne rastavljajte ih.
J Uvijek zamijenite sve baterije istodobno.
J Koristite samo baterije istoga tipa.
J U slučaju nepridržavanja uputa, baterije bi
se mogle isprazniti preko napona na kraju
pražnjenja. U tom slučaju prijeti opasnost
od iscurivanja. Ukoliko su iscurile baterije u
Vašem uređaju, smjesta otklonite iste, kako
bi spriječili oštećenja na uređaju!
J Izbjegavajte dodir s kožom, očima i sluznicom.
U slučaju dodira baterijske kiseline, isperite
dotično mjesto sa dostatno vode i / ili obratite
se liječniku!
Q
Prije stavljanja u pogon
Q
Postavljanje uređaja
m OPREZ! Prije odabira mjesta postave,
osigurajte da uređaji nisu izlagani izravnom
suncu, vibraciji, prašini, vrućini, hladnoći i vlagi.
Ne postavljajte uređaje u blizini izvora topline,
npr. grijalica. Inače prijeti opasnost od oštećenja
uređaja.
j Vodite računa o tome, da su uređaji sigurno
postavljeni na stabilnoj podlozi.
j Vodite računa o tome, da se u slučaju zidne
instalacije propisno ovjesi uređaje. Osobe bi
se mogle ozljediti, uređaji i ostale predmete
oštetiti, ako uređaji padnu.
j Postavite metereološku postaju na pripadajuće
postolje
35
,
43
.
Napomena: Vodite računa o tome, da su
zatici postolja
35
postavljeni u odgovarajuće
otvore na metereološkoj postaji.
j Postavite uređaje na ravnu, vodoravnu
površinu.
j Ne postavljajte uređaje na vrijedne ili osjetljive
površine, bez prikladne zaštite. Iste bi se inače
mogle oštetiti.

17 HR
Prije stavljanja u pogon
j Ne postavljajte uređaj u blizni izvora smetnji
kao televizor, računalo, debeli zidovi, termo-
pen-prozori itd. Radioprijenos između uređaja
bi se time mogao umanjiti.
j Postavite uređaje najmaje dva metra
udaljene od izvora smetnji. Radioprijenos
uređaja mogao bi biti znatno ometan.
j Osigurajte, da susjedni uređaji nisu na istoj
frekvenciji od 433 MHz u pogonu. Ti uređaji
bi mogli prouzrokovati smetnju radioveze.
j Ne postavljajte uređaj pored ili na metalne
ploče. Time bi se mogao umanjiti radioprijenos
između uređaja.
j Ne postavljajte uređaje u zgradama od
armiranog betona, npr. uzletište, neboder,
tvornice ili podrumi. Isto bi moglo smetati
radioprijenosu između uređaja.
j Nezapočinjite prijem u vozilu tijekom vožnje,
npr. automobil ili vlak. Radioprijenos uređaja
mogao bi smetati elektronici vozila.
j Ne postavljajte uređaje na otvorenome
terenu u razmaku više od 25 metara jedan
od drugog. Radioprijenos između uređaja
mogao bi se prekinuti.
j Ne izlažite uređaje dulje vrijeme temperatu-
rama ispod – 20 °C. Isto bi moglo znatno
utjecati na doseg prijenosa.
Q
Stavljanje u pogon
vanjskog osjetnika
Otklanjanje sigurnosnih traka na
baterijama:
Napomena: Za taj radni postupak potreban
Vam je križni izvijač.
j Otklonite poklopac baterijskog kućišta na
poleđini vanjskog osjetnika, na način da
izvijete vijak pomoću križnog izvijača u
suprotnom smjeru vrtnje kazaljke sata.
j Otklonite sigurnosne trake na baterijama.
Vanjski osjetnik je sad spreman za pogon i
kontrolna LED-svjećica
36
će kratko zasvjetliti.
j Zatvorite poklopac baterijskog kućišta i
zavijte vijak u smjeru vrtnje kazaljke sata.
Montiranje vanjskog osjetnika:
Napomena: Za taj radni postupak potrebna
Vam je bušilica.
OPREZ! OPASNOST PO ŽIVOT
I OD OZLJEDA I OPASNOST
OD MATERIJALNE ŠTETE! Pomno
pročitajte upute za rukovanje i sigurnost Vaše
bušilice.
j Potražite prikladno mjesto za vanjskog
osjetnika.
Napomena: Vodite računa o tome, da
vanjski osjetnik montirate u razmaku od
25 m do metereološke postaje. Osigurajte
da se između vanjskog osjetnika i metereo-
loške postaje ne nalaze prepreke. Prijenos
podataka bi inače mogao biti ometan.
Montaža za zid:
j Označite bušotinu na zidu.
j Bušite rupu pomoću bušilice.
j Umetnite jedan od priloženih zavoranja u
izbušenu rupu.
j Pomoću odvijača uvrtajte jednog od priloženih
vijaka.
j Ovjesite vanjski osjetnik sa ovjesnom
napravom
38
na vijak.
Postavljanje:
j Rasklopite nogar za stajanje
43
na podu
vanjskog senzora.
Q
Stavljanje u pogon
metereološke postaje
Otklanjanje sigurnosne trake na
baterijama:
j Otvrite spremnika za baterije
34
na
stražnjoj strani meteorološke stanice.
j Izvucite sigurnosne trake sa baterija.
j Potom ponovno zatvorite spremnik za
baterije
34
.
j Pritisnite tipku RESET
33
. Svi znakovi
kratko će zasvjetljeti.
Metereološka postaja započinje prijem radiosi-
gnala, čim je otklonjena sigurnosna traka sa
baterija.
Napomena: Ne mijenjajte lokaciju metereo-
loške postaje tijekom prijema. Isto bi moglo
ometati prijem.
Zidna montaža:
j Označite bušotinu na zidu.
j Izbušite rupu bušilicom.
j Ugurajte dostavljenu usadicu u bušotinu.
j Zavijte s izvijačem jedan dostavljeni vijak.
j Ovjesite vremensku postaju s napravom za
ovješenje
32
na vijak.
Postavljanje:
j Rasklopite nogaru
35
na dnu vremenske
postaje.
Spajanje metereološke postaje sa vanj-
skim osjetnikom i DCF-radiosignalom:
Nakon otklanjanja sigurnosnih traka sa baterija,
metereološka postaja pokušava uspostaviti spoj
sa vanjskim osjetnikom. Taj postupak može
potrajati nekoliko minuta. Kod uspješnog spajanja
s vanjskim senzorom se na LCD zaslonu prikazuje
simbol odabranog kanala
22
s kanalom vanjskog
senzora (prema potrebi prebacite kanal vanjskog
senzora u skladu s poglavljem „Podesiti kanal”.
Ako se ne može uspostaviti automatsko povezivanje,
onda pritisnite TX-tipku
42
, kako bi uspostavili
povezivanje ručno.
Metereološka postaja počinje automatski primati
DCF-radiosignal, čim je spojena sa vanjskim
osjetnikom. Taj postupak zauzima nekoliko
minuta i prikazan je na LC-pokazivaču pomoću
žmigajućeg znaka radiotornja
18
.

18 HR
Prije stavljanja u pogon / Posluživanje
U slučaju uspješnog prijema DCF-radiosignala,
znak radiotornja
18
biti će trajno prikazan na
pokazivaču. Ako u trenutku stavljanja u pogon,
sinkronizacija sa atomskim satom nije moguća,
sat možete također ručno namjestiti (vidite
„Nadnevak / jezik / vrijeme / vremenska zona /
ručno namještanje”).
Radiosignal (DCF):
Znak DCF (odašiljač vremenskog signala) se
sastoji od dva vremenska impulsa, koje prijenosi
jedan od najtočnijih satova na svijetu, u blizini
Frankfurt-a / na Main-i, Njemačka – on varira za
1 sekundu u 1 milijun godina.
Vaša metereološka postaja prima signale u
optimalnim uvjetima do udaljenosti od cca.
1.500 km u okolici Frankfurt-a / na Main-i. Prijem
radiosignala po pravilu traje cca. 3 - 10 minuta.
j Ukoliko je potrebno pokrenite metereološku
postaju ponovno, ako ista ne radi ispravno.
Za to pritisnite tipku RESET
33
.
Prijem može biti znatno umanjen kroz prepreke
(npr. betonski zidovi) ili izvora smetnje (npr.
drugi električni uređaji). Ako dođe do smetnji
prijema, promijenite lokaciju radiosata (npr. u
blizini televizora).
Q
Posluživanje
Q
Primanje DCF-radiosignala
Nakon uspješnog spoja sa vanjskim osjetnikom,
sat metereološke stanice automatski počinje
tražiti DCF-radiosignal. Pretraga se prikazuje
na LC-pokazivaču pomoću znaka žmigajućeg
radiotornja
18
.
Napomena: Funkcijske tipke metereološke
postaje su blokirane, tijekom traženja signala.
Napomena: Prijem radiosignala može biti
znatno umanjen u zgradama od armiranog
betona (vidite „Postavljanje uređaja”).
Kako bi ispravili eventualna odstupanja od
točnog vremena, sat svakodnevno u 03:00 sata
izvodi automatsku sinkronizaciju sa DCF-radiosi-
gnalom. Ukoliko sinkronizacija sa DCF-radiosi-
gnalom bude neuspješan, znak radiotornja se
izgasi
18
. Nakon toga sat ponovno pokušava
izvesti sinkronizaciju sa DCF-radiostupom u
04:00, 05:00 i 06:00 sati.
Prijem DCF-radiosignala može se također ručno
pokrenuti na metereološkoj postaji.
j Pritisnite i držite tipku
/
11
i držite ju 3
sekunde pritisnutom. Metereološka postaja
pokušava primiti DCF-radiosignal.
Taj postupak može potrajati nekoliko minuta
i biti će prikazan na LC-pokazivaču pomoću
žmigajućeg znaka radiotornja
18
.
Ukoliko se ne uspostavi spoj sa DCF-radiosignalom,
pretraga se prekida. Na slijedeći puni sat auto-
matski se pokušava uspostaviti vezu.
Napomena: Ukoliko sat metereološke postaje
zbog grešaka, prevelike udaljenosti od odašiljača,
i.sl. nemože primiti DCF-radiosignal, imate moguć-
nost ručno namijestiti vrijeme. Ručno namještene
vrijednosti će se prepisati, čim prijem DCF-radio-
signala bude uspješan.
Q
Datum / jezik / mjesto postav-
ljanja / vrijeme / vremensku
zonu postavite ručno.
Prijem DCF-radiosignala može na mjestu postave
metereološke postavljanja biti ometan tj. prekinut.
U tom slučaju imate mogućnost ručno namjestiti
uređaj.
Postupite na slijedeći način:
1. Pritisnite tipku MODE
15
i držite ju pritisnutu
za ca. 3 sekundi. Prikaz sata u prikazu
vremena
17
žmiga. Pritiskanjem tipke /
11
i tipke / 12 / 24
14
postavite željenu
vrijednost.
Savjet: Držite tipku
/
11
odnosno
tipku
/ 12 / 24
14
pritisnutu. Tako posti-
žete ubrzano postavljanje vrijednosti. Brzo
postavljanje možete koristiti i za slijedeće
postupke postavljanja.
Ako unutar 15 sekundi ne pritisnite niti jednu
tipku, onda se LCD zaslon vraća automatski
na standardni prikaz.
2. Potvrdite Vaš unos pritiskom na tipku MODE
15
. Prikaz minuta u prikazu vremena
17
žmiga. Sada pritiskanjem tipki
/
11
i
/ 12 / 24
14
postavite željenu vrijednost.
3. Potvrdite Vaš unos pritiskom na tipku MODE
15
. Prikaz sekundi u prikazu vremena
17
žmiga. Pritisnite tipku
/
11
ili tipku
/ 12 / 24
14
da bi prikaz sekundi posta-
vili na 0.
4. Potvrdite Vaš unos pritiskom na tipku MODE
15
. Prikaz godine u prikazu vremena
17
žmiga. Sada pritiskanjem tipki
/
11
i
/ 12 / 24
14
postavite željenu vrijednost.
5. Potvrdite Vaš unos pritiskom na tipku MODE
15
. Prikaz mjeseca u prikazu datuma
16
žmiga. Sada pritiskanjem tipki
/
11
i
/ 12 / 24
14
postavite željenu vrijednost.
6. Potvrdite Vaš unos pritiskom na tipku MODE
15
. Prikaz dana u prikazu datuma
16
žmiga.
Sada pritiskanjem tipki
/
11
i
/ 12 / 24
14
postavite željenu vrijednost.
7. Potvrdite Vaš unos pritiskom na tipku MODE
15
. U prikazu datuma
16
žmiga prikaz jezika
za nazive dana tjedna. Sada pritiskanjem
tipki
/
11
i
/ 12 / 24
14
postavite
željeni jezik.
Napomena: Imate izbor između njemačkog,
engleskog, ruskog, danskog, nizozemskog,
talijanskog, španjolskog i francuskog jezika.
Napomena: Pri isporuci je meteorološka
stanica automatski postavljena na njemački
(GER).

19 HR
Posluživanje
8. Potvrdite Vaš unos pritiskom na tipku MODE
15
. Prikaz mjesta postavljanja za državu
8
žmiga. Pritiskanjem tipki
/
11
i
/ 12 / 24
14
postavite željenu državu.
Potvrdite Vaš unos pritiskom na tipku MODE
15
. Prikaz mjesta postavljanja za grad
8
žmiga. Pritiskanjem tipki
/
11
i
/ 12 / 24
14
postavite željeni grad.
9. Potvrdite unos pritiskanjem tipke MODE
15
.
Vremenska zona će se automatski promijeniti.
Slijedeće države i gradove se može odabrati:
Njemačka GER
Aachen AAC
Berlin BER
Düsseldorf DUS
Dresden DRE
Erfurt ERF
Frankfurt FRA
Flensburg FLE
Freiburg FRE
Hannover HAN
Bremen BRE
Hamburg HAM
Rostock ROS
Stralsund STR
Köln KOE
Kiel KIE
Kassel KAS
Leipzig LEI
München MUE
Magdeburg MAG
Nürnberg NUE
Regensburg REG
Stuttgart STU
Saarbruecken SAA
Schwerin SCH
Danska DAN
Albørg ALB
Arhus ARH
Copenhagen COP
Odense ODE
Španjolska,
Andora
ESP
Alicante ALI
Andorra AND
Badajoz BAD
Barcelona BAR
Bilbao BIL
Cadix CAD
Cordoba COR
Ibiza IBI
La Corogna LAC
Leon LEO
Las Palmas LPA
Madrid MAD
Malaga MAL
Palma de
Mallorca
PDM
Salamanca SAL
Sevilla SEV
Valencia VAL
Zaragossa ZAR
Francuska FRA
Besançon BES
Biarritz BIA
Bordeaux BOR
Brest BRE
Cherbourg CHE
Lyon LYO
Marseille MAR
Monaco MON
Metz MET
Nantes NAN
Nice NIC
Orléans ORL
Paris PAR
Perpignan PER
Lille LIL
Rouen ROU
Strasbourg STR
Toulouse TOU
Finska FIN
Helsinki HEL
Velika
Britanija
GB
Aberdeen ABD
Belfast BEL
Birmingham BIR
Bristol BRI
Edinburgh EDI
Glasgow GLA
London LON
Manchester MAN
Plymouth PLY
Madžarska HUN
Budapest BUD
Hrvatska CRO
Zagreb ZAG
Italija ITA
Ancona ANC
Bari BAI
Bologna BOL
Cagliari CAG
Catania CAT
Firenze FIR
Foggia FOG
Genova GEN
Lecce LEC
Messina MES
Milano MIL
Napoli NAP
Palermo PAL
Parma PAR
Perugia PER
Roma ROM
Torino TOR
Trieste TRI
Venezia VEN
Verona VER
Ventimiglia VTG
Irska IRL
Dublin DUB
Luksemburg LUX
Norveška NOR
Bergen BER
Oslo OSL
Stavanger STA
Nizozemska NET
Amsterdam AMS
Eindhoven EIN
Enschede ENS
Groningen GRO
Den Haag DHA
Rotterdam ROT
Portugal POR
Evora EVO
Coimbra COI
Faro FAR
Leiria LEI
Lisbon LIS
Porto POR
Poljska POL
Gdansk GDA
Krakow KRA
Poznan POZ
Szczecin SZC
Warsaw WAR
Rusija RUS
St.Petersburg PET
Švedska SWE
Gothenburg GOT
Stockholm STO
Slovačka SLK
Bratislave BRA
Slovenija SLO
Ljubljana LJU
Srbija SRB
Belgrade BER
Austrija AUS
Graz GRA
Innsbruck INN
Linz LIN
Salzburg SAL
Vienna VIE
Belgija BEL
Antwerpen ANT
Brugges BRU
Bruxelles BRL
Charleroi CHA
Liege LIE
Švicarska,
Lihtenštajn
SWI
Basel BAS
Bern BER
Chur CHU
Geneva GEN
Locamo LOC
Luceme LUC
St Moritz MOR
St Gallen GAL
Sion SIO
Vaduz VAD
Zuerich ZUE
Češka CZR
Prague PRA
Q
Koristite 12 / 24 prikaz sata
j Pritisnite tipku / 12 / 24
14
da bi
prebacivali između prikaza u 12-satnom
i 24-satnom formatu.
Napomena: Simbol AM u prikazu vremena
17
u 12-satnom formatu prikaza vremena
znači prijepodne. Simbol PM u prikazu
vremena
17
u 12-satnom formatu prikaza
vremena znači poslijepodne.
Q
Postavljanje vremena buđenja
Napomena: Imate mogućnost postaviti dva
različita individualna alarma.
j Pritisnite tipku MODE
15
da bi birali između
alarma 1
13
i alarma 2
13
. U
prikazu vremena
17
pojavljuje se postavljeno
vrijeme buđenja, te dotični simbol alarma
13
,
13
.
j Pritisnite tipku MODE
15
i držite ju pritisnutu
za ca. 3 sekundi. Prikaz sata žmiga. Sada
pritiskanjem tipki
/
11
i
/ 12 / 24
14
postavite željenu vrijednost.

20 HR
Posluživanje
Savjet: Držite tipku /
11
odnosno tipku
/ 12 / 24
14
pritisnutu. Tako postižete
ubrzano postavljanje vrijednosti. Brzo postav-
ljanje možete koristiti i za slijedeće postupke
postavljanja. Ako unutar 15 sekundi ne priti-
snite niti jednu tipku, onda se LCD zaslon
vraća automatski na standardni prikaz.
j Pritisnite tipku MODE
15
. Prikaz minuta
žmiga. Sada pritiskanjem tipki
/
11
i
/ 12 / 24
14
postavite željenu vrijednost.
j Potvrdite Vaš unos pritiskom na tipku
MODE
15
.
Q
Aktivirati / deaktivirati
funkciju buđenja
j Pritisnite tipku MODE
15
da bi mogli
aktivirati odnosno deaktivirati alarm.
j Pritisnite tipku ALARM
10
da bi aktivirali
funkciju buđenja. U LCD zaslonu se prikazuje
simbol alarma
13
.
j Pritisnite tipku ALARM
10
da bi deaktivirali
funkciju buđenja. U LCD zaslonu se gasi
simbol alarma
13
.
j Signal alarma će se oglasiti čim se postav-
ljeno vrijeme postigne. Pritisnite tipku
SNOOZE / LIGHT
12
, tipku /
11
, tipku
/ 12 / 24
14
ili tipku MODE
15
da bi
zaustavili signal alarma. U suprotnome će se
signal alarma oglasiti u trajanju od ca.
2 minute i potom će se automatski zaustaviti.
Q
Prikazati vrijeme izlaska
odnosno zalaska sunca
i mjeseca
Napomena: Izračunato vrijeme izlaska i
zalaska sunca odnosno mjeseca služe samo
za orijentaciju. Da bi saznali egzaktna vremena
obratite se lokalnoj meteorološkoj službi.
Napomena: Nakon što se poduzeli sve po-
stavke (vidi poglavlje „Ručno postaviti datum /
jezik / mjesto postavljanja / vrijeme / vremensku
zonu”) meteorološka stanica će izračunati vremena
za izlazak odnosno zalazak sunca odnosna
mjeseca. Vrijeme izlaska odnosno zalaska sunca
odnosno mjeseca tijekom toga žmiga.
j Pritisnite tipku SUN / MOON
31
da bi
prikazali sate sunca odabranog dana.
j Pritisnite i držite tipku SUN / MOON
31
za
ca. 3 sekundi da bi došli do kratke kontrole
vremena zalaska odnosno izlaska sunca
odnosno mjeseca. Prikaz mjesta postavljanja
8
žmiga.
j Postavite državu, grad, godinu, mjesec i dan
kojeg želite da Vam se prikaže tako što ćete
pritisnuti tipku SUN / MOON
31
, tipku /
11
ili tipku / 12 / 24
14
.
j Pritisnite tipku SUN / MOON
31
da bi
potvrdili Vaš unos.
Napomena: Vrijeme izlaska odnosno
zalaska sunca odnosno mjeseca tijekom
izračuna žmiga.
Napomena: Ako je slijedeći izlazak odno-
sno zalazak mjeseca tek slijedećeg dana,
onda se prikazuje MOONRISE+1 odnosno
MOONSET+1.
Q
Mjesečeve faze
Slijedeće mjesečeve faze prikazuju se putem
znaka za mjesečeve faze
6
:
Mladi mjesec Rastući
polumjesec
Polumjesec Rastući puni
mjesec
Pun mjesec Padajući puni
mjesec
Polumjesec Padajući
polumjesec
Q
Pokrenuti prognozu vremena
Napomena: Molimo dodatno pazite na pro-
gnozu vremena vaše lokalne meteorološke službe.
Ako bi došlo do odstupanja između uređaja i
Vaše lokalne meteorološke službe, onda Vas
molimo da se ravnate prema Vašoj lokalnoj
meteorološkoj službi.
j Pritisnite i držite tipku HISTORY / WEATHER
27
za ca. 3 sekunde. Simbol vremena
1
žmiga.
j Postavite aktualno vrijeme pritiskanjem tipke
„+“ / °C / °F
28
odnosno tipke
„–“ / MAX / MIN
29
.
Slijedeći simboli vremena su Vam na
raspolaganju:
= sunčano
= povremena
naoblaka
= oblačno
= prolom oblaka /
grmljavina
= kišno
j Pritisnite tipku HISTORY / WEATHER
27
za
potvrdu Vašeg unosa.
Napomena: Pazite na to da aktualno
vrijeme ispravno postavite. U suprotnome
se vremenska prognoza ne može ispravno
prikazati.
Pagina se încarcă...
Pagina se încarcă...
Pagina se încarcă...
Pagina se încarcă...
Pagina se încarcă...
Pagina se încarcă...
Pagina se încarcă...
Pagina se încarcă...
Pagina se încarcă...
Pagina se încarcă...
Pagina se încarcă...
Pagina se încarcă...
Pagina se încarcă...
Pagina se încarcă...
Pagina se încarcă...
Pagina se încarcă...
Pagina se încarcă...
Pagina se încarcă...
Pagina se încarcă...
Pagina se încarcă...
Pagina se încarcă...
Pagina se încarcă...
Pagina se încarcă...
Pagina se încarcă...
Pagina se încarcă...
Pagina se încarcă...
Pagina se încarcă...
Pagina se încarcă...
Pagina se încarcă...
Pagina se încarcă...
Pagina se încarcă...
Pagina se încarcă...
Pagina se încarcă...
Pagina se încarcă...
Pagina se încarcă...
Pagina se încarcă...
Pagina se încarcă...
Pagina se încarcă...
Pagina se încarcă...
Pagina se încarcă...
Pagina se încarcă...
Pagina se încarcă...
Pagina se încarcă...
Pagina se încarcă...
Pagina se încarcă...
Pagina se încarcă...
-
 1
1
-
 2
2
-
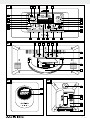 3
3
-
 4
4
-
 5
5
-
 6
6
-
 7
7
-
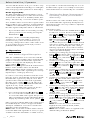 8
8
-
 9
9
-
 10
10
-
 11
11
-
 12
12
-
 13
13
-
 14
14
-
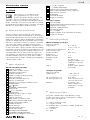 15
15
-
 16
16
-
 17
17
-
 18
18
-
 19
19
-
 20
20
-
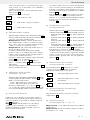 21
21
-
 22
22
-
 23
23
-
 24
24
-
 25
25
-
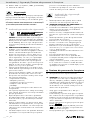 26
26
-
 27
27
-
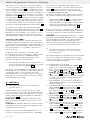 28
28
-
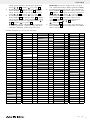 29
29
-
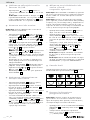 30
30
-
 31
31
-
 32
32
-
 33
33
-
 34
34
-
 35
35
-
 36
36
-
 37
37
-
 38
38
-
 39
39
-
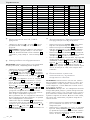 40
40
-
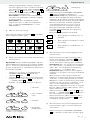 41
41
-
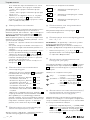 42
42
-
 43
43
-
 44
44
-
 45
45
-
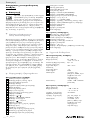 46
46
-
 47
47
-
 48
48
-
 49
49
-
 50
50
-
 51
51
-
 52
52
-
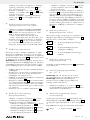 53
53
-
 54
54
-
 55
55
-
 56
56
-
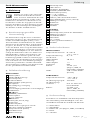 57
57
-
 58
58
-
 59
59
-
 60
60
-
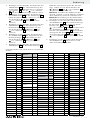 61
61
-
 62
62
-
 63
63
-
 64
64
-
 65
65
-
 66
66


Lucrări înrudite
-
Auriol z31092 Operation and Safety Notes
-
Auriol IAN 96414 Instrucțiuni de utilizare
-
-
-
-
Auriol Z29962D Operation and Safety Notes
-
-
-
Auriol Z30237C Operation and Safety Notes
-
Auriol Z29962D Operating Instructions Manual
Alte documente
-
Hama 00185861 Manual de utilizare
-
Hama 00186369 Manualul proprietarului
-
-
-
-
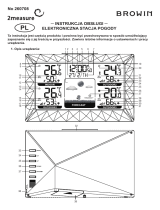 2measure 260708 Manualul proprietarului
-
-
Silvercrest SWE 100 A1 Manual de utilizare
-
-
Vitek VT-6410 Manual de utilizare
