
Manual de usuario de Xiaomi Robot Vacuum S12 · 17
Manuel d’utilisation du Xiaomi Robot Vacuum S12 · 33
Manuale utente Xiaomi Robot Vacuum S12 · 49
Руководство пользователя Робота-пылесоса Xiaomi Robot Vacuum S12 · 65
Odkurzacz Xiaomi Robot S12 Instrukcja obsługi · 82
Xiaomi Roboterstaubsauger S12 Benutzerhandbuch · 98
Xiaomi Temizlik Robotu S12 Kullanım Kılavuzu · 114
· 130
· 145
Manual do utilizador do Aspirador robô Xiaomi S12 · 160
Посібник користувача Робота-пилососа Xiaomi Robot Vacuum S12 · 176
Robotický vysavač Xiaomi S12 – Uživatelská příručka · 192
Εγχειρίδιο χρήστη για τη ρομποτική σκούπα Xiaomi S12 · 208
Aspirator robotic Xiaomi S12 – Manual de utilizare · 224
Xiaomi Robotdammsugare S12 Användarhandbok · 240
Panduan Pengguna Xiaomi Robot Vacuum S12 · 256
Xiaomi Robotstøvsuger S12 Brugervejledning · 276
Xiaomi S12 -roboi-imurin käyöopas · 291
Xiaomi robotstøvsuger S12 Brukerhåndbok · 306
Xiaomi Robotstofzuiger S12 Gebruikershandleiding · 321
„Xiaomi S12“ dulkių siurblio-roboto naudotojo vadovas · 336
Xiaomi robotporszívó S12 – Felhasználói kézikönyv · 351
Korisnički priručnik za Xiaomi robotski usisavač S12 · 366
Uporabniški priročnik za robotski sesalnik XiaomiS12 · 381
Наръчник на потребителя за Прахосмукачка робот Xiaomi S12 · 396
Korisnički priručnik za Robotski usisivač Xiaomi S12 · 411
Používateľská príručka robotického vysávača Xiaomi S12 · 426
ﻦﻣ تﻮﺑوﺮﻟا ﺔﻴﺋﺎﺑﺮﻬﻜﻟا ﺔﺴﻨﻜﻤﻟا مﺪﺨﺘﺴﻣ ﻞﻴﻟد
Xiaomi S12
יטובור קבא באושב שמתשמל ךירדמ
Xiaomi S12
Robot Vacuum S12 User Manual · 01

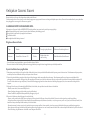
Safety Instructions
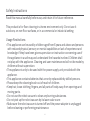
Usage Restrictions
• This appliance can be used by children aged from 8 years and above and persons
with reduced physical, sensory or mental capabilities or lack of experience and
knowledge if they have been given supervision or instruction concerning use of
the appliance in a safe way and understand the hazards involved. Children shall
not play with the appliance. Cleaning and user maintenance shall not be made by
children without supervision.
• The appliance is only to be used with the power supply unit provided with the
appliance.
• This appliance contains baeries that are only replaceable by skilled persons.
• Please keep the cleaning brush out of reach of children.
• Keep hair, loose clothing, fingers, and all parts of body away from openings and
moving parts.
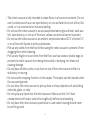
• Do not use the robot vacuum to clean any burning substances.
• Do not pick up the robot vacuum by its laser radar cover.
• Make sure the robot vacuum is turned off and the power adapter is unplugged
before cleaning or performing maintenance.
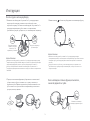
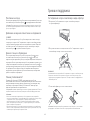
Read this manual carefully before use, and retain it for future reference.
This product is for floor cleaning in a home environment only. Do not use it
outdoors, on non-floor surfaces, or in a commercial or industrial seing.
01

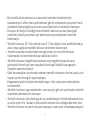
• This robot vacuum is only intended to clean floors in a home environment. Do not
use it outdoors such as on an open balcony or on a surface that is not a floor, like
a sofa, or in a commercial or industrial seing.
• Do not use the robot vacuum in an area suspended above ground level, such as a
lo, open balcony, or on top of furniture, unless a protective barrier is present.
• Do not use the robot vacuum at an ambient temperature above 35°C or below 0°C
or on a floor with liquids or sticky substances.
• Pick up any cables from the floor before using the robot vacuum to prevent it from
dragging them while cleaning.
• Pick up any fragile or loose items from the floor, such as vases or plastic bags, to
prevent the robot vacuum from being obstructed or bumping into them and
causing damage.
• Do not place children, pets, or any item on top of the robot vacuum while it is
stationary or moving.
• Do not use the mopping function on the carpet. The carpet can be cleaned under
the vacuuming mode.
• Do not allow the robot vacuum to pick up hard or sharp objects such as building
materials, glass, or nails.
• Do not spray any liquid into the robot vacuum. Make sure the 2-in-1 dust
compartment with water tank is thoroughly dry before its reinstalling.
• Do not place the robot vacuum upside down. Laser radar housing should never
touch the ground.
02

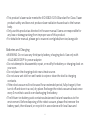
Baeries and Charging
• WARNING: Do not use any third-party baery,charging dock. Use only with
<BLJ24W200120P-V> power adapter.
• Do not aempt to disassemble, repair, or modify the baery or charging dock on
your own.
• Do not place the charging dock near a heat source.
• Do not use a wet cloth or wet hands to wipe or clean the dock’s charging
contacts.
• If the robot vacuum will not be used for an extended period, fully charge it, then
turn it off and store in a cool, dry place. Recharge the robot vacuum at least once
every 3 months to avoid over-discharging the baery.
• The lithium-ion baery pack contains substances that are hazardous to the
environment. Before disposing of the robot vacuum, please first remove the
baery pack, then discard, or recycle it in accordance with local laws and
• This product's laser radar meets the IEC 60825-1:2014 Standard for Class 1 laser
product safety and does not produce laser radiation hazardous to the human
body.
• Only use this product as directed in the user manual. Users are responsible for
any loss or damage arising from improper use of this product.
• For detailed e-manual, please go to www.mi.com/global/service/userguide
03

regulations of the country or region it is used in.
• When removing the baeries from the product, it is beer to use up the baeries
and make sure your product is disconnected from power.
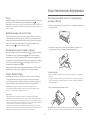
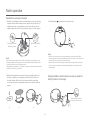
1). Uninstall the screw on the boom, then remove the cover.
2). Unplug the baery connector, then remove the baeries. Do not damage the
baery case to avoid any risk of injuries.
3). Return the baeries to a professional recycling organization.
04

05
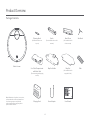
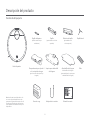
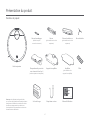
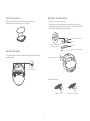
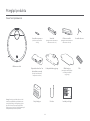
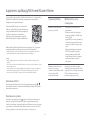
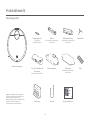
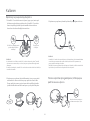
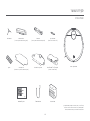
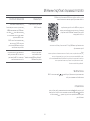
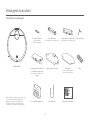
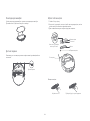
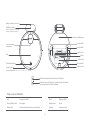
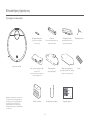
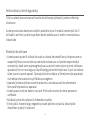
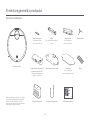
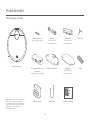
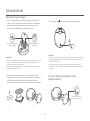
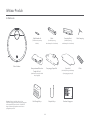
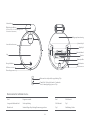
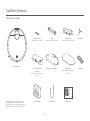
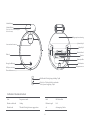
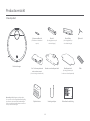
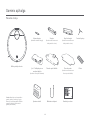
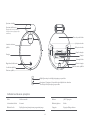
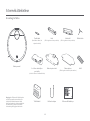
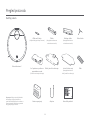
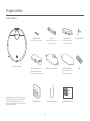
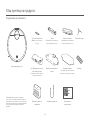
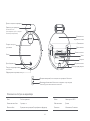
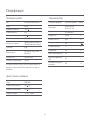
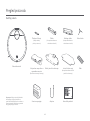
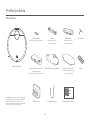
Product Overview
Note: Illustrations of product, accessories,
and user interface in the user manual are
for reference purposes only. Actual
product and functions may vary due to
product enhancements.
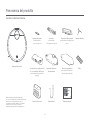
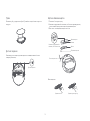
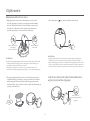
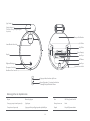
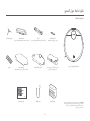
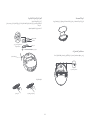
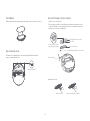
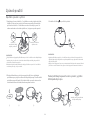
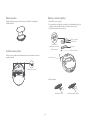
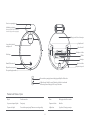
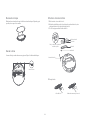
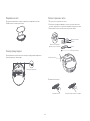
Robot Vacuum
Side Brush
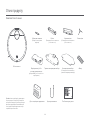
Package Contents
Mop Pad Holder Filter
Charging Dock Power Adapter User Manual
Cleaning Brush
(Visible when the cover
is open)
2-in-1 Dust Compartment
with Water Tank
(For vacuuming and mopping
modes)
Brush
(Pre-installed on the robot
vacuum)
Brush Cover
(Pre-installed on the
robot vacuum)
Mop Pad
(Pre-installed on the
mop pad holder)

06
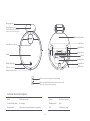
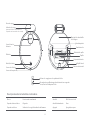
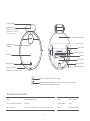
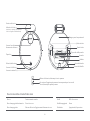
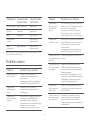
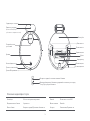
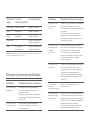
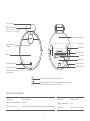
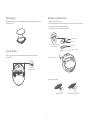
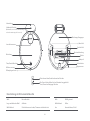
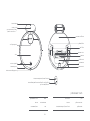
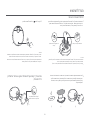
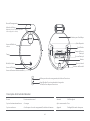
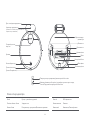
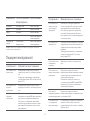
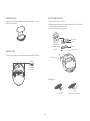
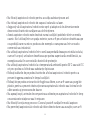
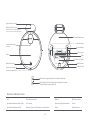
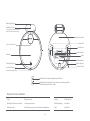
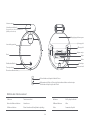
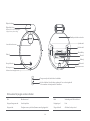
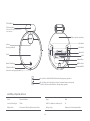
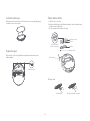
Cover
Laser Distance Sensor
Buon/Indicator
Charging Dock
Le Wheel
Baery Pack
Mop Pad Assembly
Cliff Sensor
Right Wheel
Side Brush
Brush Cover
Brush
IR Receiver Sensor
Collision Sensor
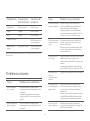
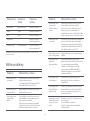
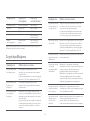
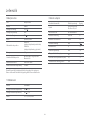
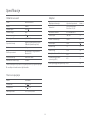
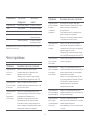
Indicator Status Descriptions
Working normally
In charging
Returning to charge/Firmware is upgrading
White
Slowly blinking white
Blinking white
Wi-Fi disconnected
Error
Shutdown/In sleep
Yellow
Blinking yellow
Off
Press and hold for three seconds to turn on or off
Press to start or pause cleaning
Press to return to charge or stop docking
Charging Indicator
(Remain white when the robot
vacuum is connected to power)

07
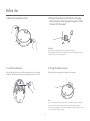
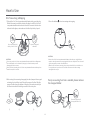
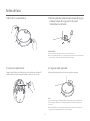
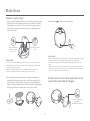
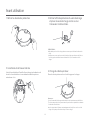
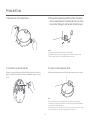
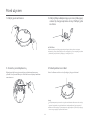
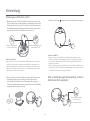
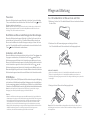
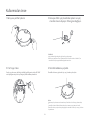
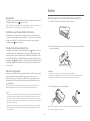
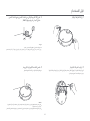
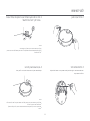
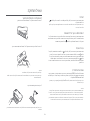
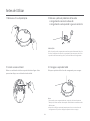
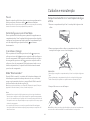
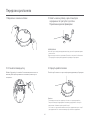
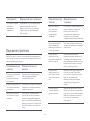
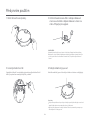
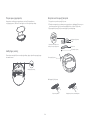
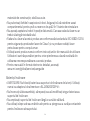
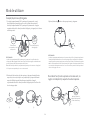
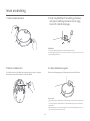
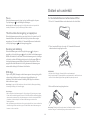
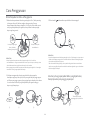
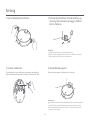
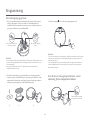
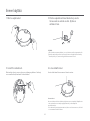
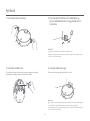
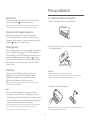
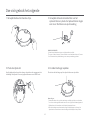
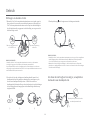
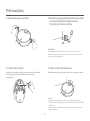
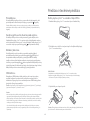
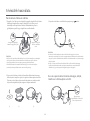
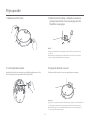
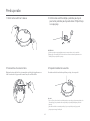
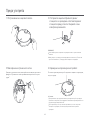
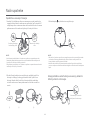
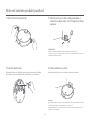
Before Use
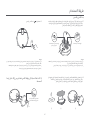
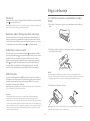
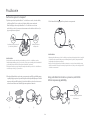
1. Remove the protective strips. 3. Remove the protective film from the charging
dock and place the charging dock against a wall.
Connect it to the power.
4. Charge the robot vacuum.
Place the robot vacuum on the charging dock to charge.
Take out the side brush, and install it onto the position as indicated in
the figure. The side brush is properly installed when you hear a "click".
2. Install the side brush.
CAUTIONS:
Do not place the charging dock in an area with direct sunlight.
Please ensure that no items are placed within 0.5 m on the le and right sides and
within 1.5 m in front of the charging dock.
Notes:
It is recommended to fully charge the robot vacuum before using it for the first
time to maintain its optimal baery performance and maximize baery life.
The robot vacuum will turn on automatically when it is on the charging dock, and
cannot be turned off while charging.
0.5 m
0.5 m
1.5 m

08
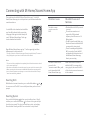
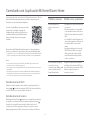
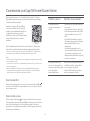
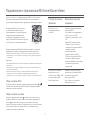
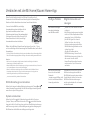
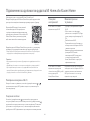
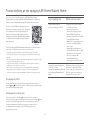
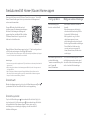
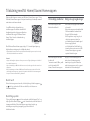
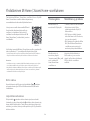
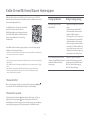
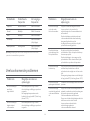
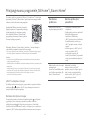
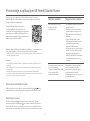
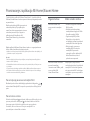
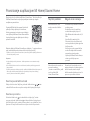
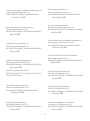
Connecting with Mi Home/Xiaomi Home App
This product works with the Mi Home/Xiaomi Home app*. Use the Mi
Home/Xiaomi Home app to control your device, and to interact with other
smart home devices.
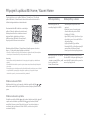
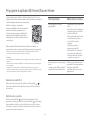
Scan the QR code to download and install the
app. You will be directed to the connection
setup page if the app is installed already. Or
search "Mi Home/Xiaomi Home" in the app
store to download and install it.
Open Mi Home/Xiaomi Home app, tap "+" on the upper right, and then
follow prompts to add your device.
* The app is referred to as Xiaomi Home app in Europe (except for Russia). The name of
the app displayed on your device should be taken as the default.
Notes:
• The version of the app might have been updated, please follow the instructions based
on the current app version.
• If the robot vacuum's QR code cannot be scanned, you can search for its name to add it.
• When connecting the robot vacuum to the Mi Home/Xiaomi Home app using an iOS
device, follow the instructions in the app to connect to the robot vacuum's hotspot
"xiaomi-vacuum-b106eu_mibtxxxx".
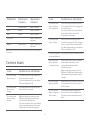
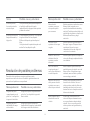
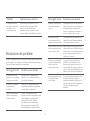
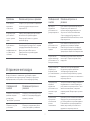
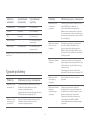
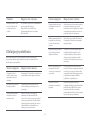
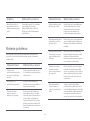
Common Issues Possible Causes and
Solutions
Make sure the robot vacuum is
within the Wi-Fi coverage with a
strong signal, then reset the Wi-Fi
of the robot vacuum and reconnect
to the network.
The robot vacuum cannot
connect to the
"xiaomi-vacuum-b106eu_mibt
xxxx" network in the Mi
Home/Xiaomi Home app.
The robot vacuum
cannot connect to
Wi-Fi.
Check whether the Wi-Fi password
is correct.
The robot vacuum does not
support the 5 GHz network
frequency band. Please use a 2.4
GHz network.
The Wi-Fi signal is weak. Make sure
the robot vacuum is within the Wi-Fi
coverage with a strong signal.
There is something wrong with the
Wi-Fi connection. Reset the Wi-Fi
and download the latest version of
the Mi Home/Xiaomi Home app,
then try reconnecting.
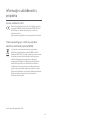
Press and hold the buon for five seconds until you hear a "beep",
and then press and hold the buon for five seconds again until you
hear the voice prompt. The robot vacuum then restarts, and seings
like scheduled cleaning and Wi-Fi are restored to factory default.
Reseing System
While the robot vacuum is turned on, press and hold the buons and
for seven seconds. The Wi-Fi is successfully reset when you hear a voice
prompt.
Reseing Wi-Fi
578BCC56

09
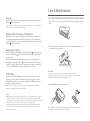
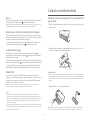
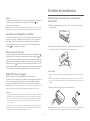
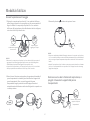
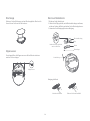
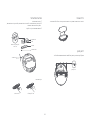
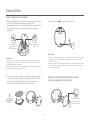
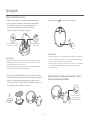
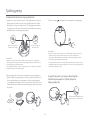
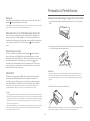
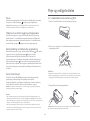
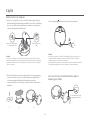
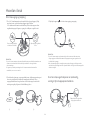
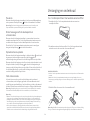
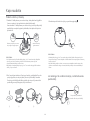
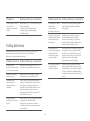
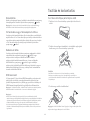
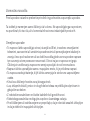
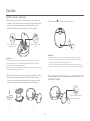
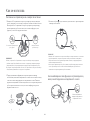
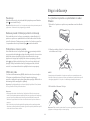
How to Use
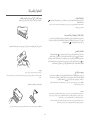
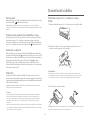
1. Take out the 2-in-1 dust compartment with water tank, open the plug,
fill with clean water, and then refasten the plug. Install the 2-in-1 dust
compartment with water tank onto the robot vacuum in the direction
indicated in the figure, and make sure that the clip is firmly clasped.
2. Before using the vacuuming & mopping function, dampen the mop pad
and wring it out and then install it onto the mop pad holder. Slide the
mop pad holder along the boom of the robot vacuum horizontally in
the direction indicated in the figure until it clicks into place.
3. Press the buon to start vacuuming and mopping.
CAUTIONS:
Please remove the 2-in-1 dust compartment with water tank before adding water.
Do not add liquids such as hot water, detergent, or disinfectant to prevent
damaging the robot vacuum.
Due to production testing, the 2-in-1 dust compartment with water tank may have
water stains, which is normal.
Clip Plug
It is properly installed
when you hear a "click".
Open the plug and
add water.
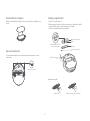
ş Š š
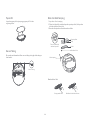
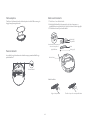
If only vacuuming function is needed, please remove
the mop pad holder.
Clips
Press the clips and pull
the mop pad holder out.
Start Vacuuming & Mopping
CAUTIONS:
Remove the 2-in-1 dust compartment with water tank and pour out the leover
water in a timely manner aer a mopping task has been completed. Then clean and
dry the mop pad to prevent odor and mildew.
When the robot vacuum is running, please set up virtual walls or restricted areas
for carpeted areas in your home to avoid the robot vacuum from becoming
entangled in the carpet.

10
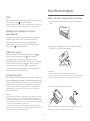
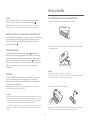
CAUTIONS:
Do not rinse or soak the 2-in-1 dust compartment with water tank.
Regularly clean the 2-in-1 dust compartment with water tank to prevent dirt
buildup. This will help maintain optimal performance.
Note: The filter can be rinsed with water. Make sure it is completely dry before
reinstalling. Frequent rinses are not recommended.
1. Remove the 2-in-1 dust compartment with water tank and remove the
filter.
2. Remove any debris and clean the 2-in-1 dust compartment with water
tank with the cleaning brush.
3. Clean the filter with the cleaning brush.
2-in-1 Dust Compartment with Water Tank and Filter
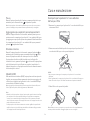
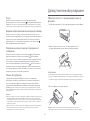
Care & Maintenance
When the robot vacuum is running, press any buon to pause. Press the
buon to resume cleaning.
Note: The robot vacuum will enter sleep mode aer being paused or in standby mode
for five minutes. Press any buon to wake it up.
Pausing
When the robot vacuum is working, pause it first then remove the 2-in-1
dust compartment with water tank to add water or clean the mop pad.
Then reinstall the 2-in-1 dust compartment with water tank and press the
buon to resume the task.
Adding Water or Cleaning the Mop Pad
When the robot vacuum is working, press the buon to pause the task,
and press the buon again to send the robot vacuum to return to the
dock to charge.
When the robot vacuum is in standby mode and not connected to the
charging dock, press the buon to send the robot vacuum to return to
the dock to charge. When a task is complete or the baery is too low, the
robot vacuum will automatically return to the dock to charge.
Docking & Charging
In the do not disturb (DND) mode, the robot vacuum does not resume
cleanup, perform scheduled cleanups or play voice prompts, and the
indicator turns off aer one minute of charging. The DND mode can be
enabled or disabled in the app.
Note: Please refer to the app for more features, including Clean There, Resume
Cleanup, Scheduled Cleanup, and Virtual Walls.
DND mode
Notes:
When using the robot vacuum for the first time, please follow the in-app prompts to
complete quick map creation. To ensure accurate mapping, it is recommended to
follow the robot vacuum and remove any obstacles on the ground when it is creating
the map. Make sure the robot vacuum starts from the charging dock.
If the robot vacuum may get stuck or scratch the surface of the furniture in some
areas, you can set restricted areas in the app to prevent the robot vacuum from
entering those areas.

11
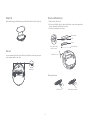
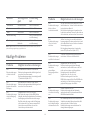
Remove the mop pad from the mop pad holder. Wash it and let it air dry.
Mop Pad
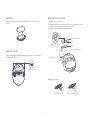
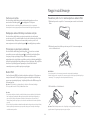
1. Remove the side brush.
2. Press and hold the clips to remove the brush cover, then remove the
brush, and pull out the brush bearing.
3. Use the cleaning brush to clean.
Brush and Side Brush
Cleaning the Brush
Cut the hair Remove dirt and debris
Clip
Brush Cover
Brush
Brush Bearing
Side Brush
Press and hold the
clips to remove.
Cliff Sensor
It is recommended to clean the cliff sensor and IR receiver sensor every
three months with a so cloth.
Sensor

12
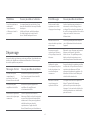
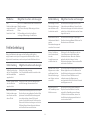
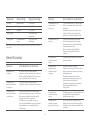
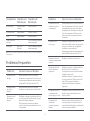
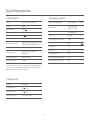
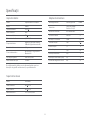
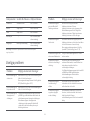
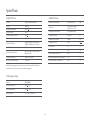
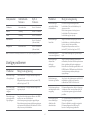
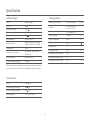
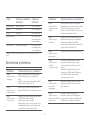
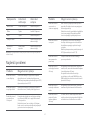
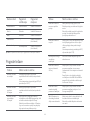
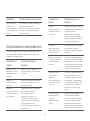
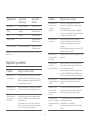
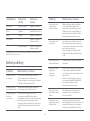
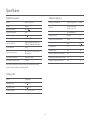
Side brush
Components Maintenance
Frequency
Replacement
Frequency
Brush
Filter
Brush cover
Every 3–6 months
Every 6–12 months
Every 3–6 months
Every 3–6 months (or
upon worn)
Every two weeks
Weekly
Weekly
/
Mop pad Every 3–6 months (or
upon worn)
Aer each use
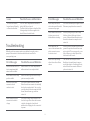
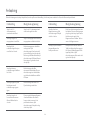
A foreign object might be caught in the
brush, side brush, or the le/right wheel.
Turn off the robot vacuum and remove any
debris.
The robot vacuum
makes strange noises
while cleaning.
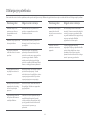
Issues Possible Causes and Solutions
The robot vacuum
does not perform
scheduled cleanups.
The robot vacuum
keeps going offline.
Make sure the robot vacuum is connected
to the network and stays in the range of
Wi-Fi at all times.
Make sure the robot vacuum is connected
to the network; otherwise, it cannot
synchronize time and perform the
scheduled cleanups.
Make sure the robot vacuum is not set to
DND mode. The DND mode will prevent the
robot vacuum from performing scheduled
cleanups.
The robot vacuum
does not charge.
Make sure there is enough open space
around the charging dock and its charging
contacts are free of dust and other debris.
The ambient temperature is too low (below
0°C) or too high (above 35°C).
The robot vacuum
does not return to
the charging dock.
Turn the robot vacuum off and then restart it.
The robot vacuum has
an abnormal behavior.
There are too many obstructions around
the charging dock. Place the charging dock
in a more open area.
The robot vacuum is too far away from the
charging dock. Move it closer to the
charging dock and try again.
Issues Possible Causes and Solutions
The baery level is low. Fully recharge the
robot vacuum, then try again.
The ambient temperature is too low (below
0°C) or too high (above 35°C).
The robot vacuum
does not turn on.
The baery level is low. Fully recharge the
robot vacuum, then try again.
The robot vacuum
does not start
cleaning.
The robot vacuum
does not resume
cleanup.
Make sure the robot vacuum is not set to
DND mode, which will prevent the robot
vacuum from resuming cleanup.
The robot vacuum does not resume cleaning
when it is manually returned to the dock to
charge or placed onto the charging dock.
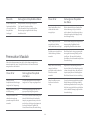
Common Issues
Note: Please refer to the table for accessory replacements to ensure the optimal
cleaning effect.

13
Issues Possible Causes and Solutions
The robot vacuum no
longer cleans efficiently,
or leaves dust behind.
The 2-in-1 dust compartment with water
tank is full. Please clean it.
The filter is blocked, please clean the filter.
A foreign object has been caught in the
brush. Please clean the brush.
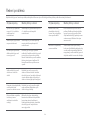
Error Messages Possible Causes and Solutions
Please make sure the laser
distance sensor is not
blocked before starting.
Please wipe the cliff
sensor clean and move the
robot vacuum to a new
location to start.
Clear any foreign objects which may
block or obstruct the laser distance
sensor. If the problem still exists, move
the robot vacuum to a new place and
restart it.
Part of the robot vacuum may be off the
ground. Re-position the robot vacuum
and restart it. This error may also occur
if the cliff sensor is dirty. Wipe off the
dirt from the cliff sensor.
Please clear any foreign
objects from the collision
sensor.
The collision sensor may be stuck.
Gently tap it several times to remove
any foreign objects. If nothing falls out,
move the robot vacuum to a different
place and restart it.
The robot vacuum may be caught or stuck.
Clear away any obstructions around it.
Please help remove the
obstacles around the robot
vacuum and try again.
Error Messages Possible Causes and Solutions
Please move the robot
vacuum to a level
surface to start.
The robot vacuum is tilted at startup.
Move the robot vacuum to a horizontally
level surface and restart it. You can also
reset the level of robot vacuum in the Mi
Home/Xiaomi Home app, and then
restart it.
Make sure the 2-in-1 dust compartment
with water tank is securely installed.
Please make sure the 2-in-1
dust compartment with
water tank is installed.
Make sure the mop pad holder and mop
pad are securely installed.
The robot vacuum cannot return to the
dock to charge. Place the robot vacuum
onto the charging dock and check
whether the charging dock is connected
to power.
Please make sure the mop
pad is installed.
Please return the robot
vacuum to the dock to
charge.
When the robot vacuum encounters a problem, it may play a voice
prompt. Please refer to the information below to resolve the
corresponding issue.
Troubleshooting

14
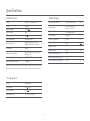
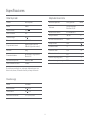
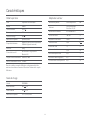
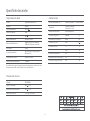
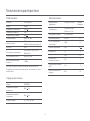
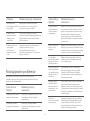
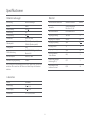
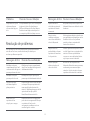
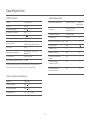
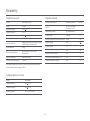
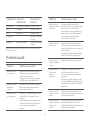
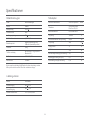
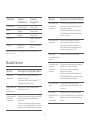
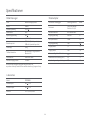
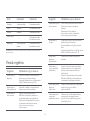
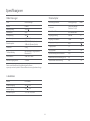
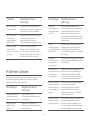
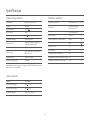
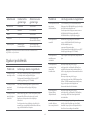
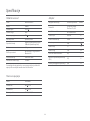
Specifications
Robot Vacuum
Item Dimensions 152 × 74.6 × 99.5 mm
Charging Dock
Rated Output
Rated Input
Model CDZB106GL
20 V 1.2 A
20 V 1.2 A
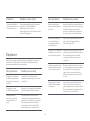
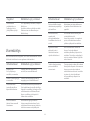
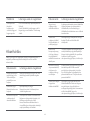
Power Adapter
Information Published UnitValue and Precision
Input AC Frequency 50/60 Hz
Output Voltage 20.0
Input Voltage 100–240 V~
Output Current 1.2 A
Output Power 24.0 W
86.2 %
81.5 %
0.10 W
Manufacturer -
Model Identifier -BLJ24W200120P-V
Average Active Efficiency
Efficiency at Low Load (10%)
No-load Power Consumption
Zhongshan Baolijin
Electronic Co.,Ltd.
V
Item Dimensions »350 × 94.5 mm
45 WRated Power
Charging Voltage
Name Robotic Vacuum Cleaner
B106GLModel
20 V
Under normal use of condition, this equipment should be kept a separation
distance of at least 20 cm between the antenna and the body of the user.
4.8 kgNet Weight
Wireless Connectivity Wi-Fi IEEE 802.11b/g/n 2.4 GHz
Bluetooth 4.2
14.8 VRated Voltage
Operation Frequency 2400–2483.5 MHz
Maximum Output Power < 20 dBm
3000 mAh (rated capacity)
3200 mAh (nominal capacity)
Baery Capacity

15
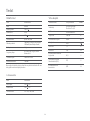
EU Declaration of Conformity
Hereby, Xiaomi Communications Co., Ltd. declares that the
radio equipment type B106GL is in compliance with Directive
2014/53/EU. The full text of the EU declaration of conformity is
available at the following internet address:
hp://www.mi.com/global/service/support/declaration.html
All products bearing this symbol are waste electrical and
electronic equipment (WEEE as in directive 2012/19/EU) which
should not be mixed with unsorted household waste. Instead,
you should protect human health and the environment by
handing over your waste equipment to a designated collection
point for the recycling of waste electrical and electronic
equipment, appointed by the government or local authorities.
Correct disposal and recycling will help prevent potential
negative consequences to the environment and human health.
Please contact the installer or local authorities for more
information about the location as well as terms and conditions
of such collection points.
Regulatory Compliance
Information
WEEE Disposal and Recycling Information
WARRANTY NOTICE
THIS WARRANTY GIVES YOU SPECIFIC RIGHTS, AND YOU MAY HAVE OTHER
RIGHTS CONVEYED BY LAWS OF YOUR COUNTRY, PROVINCE OR STATE.
INDEED, IN SOME COUNTRIES, PROVINCES OR STATES, CONSUMER LAW
MAY IMPOSE A MINIMUM WARRANTY PERIOD. OTHER THAN AS PERMITTED
BY LAW, XIAOMI DOES NOT EXCLUDE, LIMIT OR SUSPEND OTHER RIGHTS
YOU MAY HAVE. FOR A FULL UNDERSTANDING OF YOUR RIGHTS WE INVITE
YOU TO CONSULT THE LAWS OF YOUR COUNTRY, PROVINCE OR STATE.
1. LIMITED PRODUCT WARRANTY
XIAOMI warrants that the Products are free from defects in materials and
workmanship under normal use and use in accordance with the respective
Product user manual, during the Warranty Period.
The duration and conditions related to the legal warranties are provided by
respective local laws. For more information about the consumer warranty
benefits, please refer to Xiaomi's official website
hps://www.mi.com/global/support/warranty
Xiaomi warrants to the original purchaser that its Xiaomi Product will be free
from defects in materials and workmanship under normal use in the period
mentioned above.
Xiaomi does not guarantee that the operation of the Product will be
uninterrupted or error free.
Xiaomi is not liable for damages arising from non-compliance with the
instructions related to the use of the Product.
2. REMEDIES
If a hardware defect is found and a valid claim is received by Xiaomi within the
Warranty Period, Xiaomi will either (1) repair the product at no charge, (2)
replace the product, or (3) refund the Product, excluding potential shipping
costs.
3. HOW TO OBTAIN WARRANTY SERVICE
To obtain warranty service, you must deliver the Product, in its original
packaging or similar packaging providing an equal degree of Product
protection, to the address specified by Xiaomi. Except to the extent prohibited
by applicable law, Xiaomi may require you to present proofs or proof of
purchase and / or comply with registration requirements before receiving
warranty service.
4. EXCLUSIONS AND LIMITATIONS
Unless otherwise stipulated by Xiaomi, this Limited Warranty applies only to
the Product manufactured by or for Xiaomi and identifiable by the
trademarks, trade name or "Xiaomi" or "Mi" logo.
The Limited Warranty does not apply to any (a) Damage due to acts of
nature or God, for example, lightning strikes, tornadoes, flood, fire,
earthquake or other external causes; (b) Negligence; (c) Commercial use; (d)
Alterations or modifications to any part of the Product; (e) Damage caused
by use with non-Xiaomi products; (f) Damage caused by accident, abuse or
misuse; (g) Damage caused by operating the Product outside the permied
or intended uses described by Xiaomi or with improper voltage or power
supply; or (h) Damage caused by service (including upgrades and
expansions) performed by anyone who is not a representative of Xiaomi.
It is your responsibility to backup any data, soware, or other materials you
may have stored or preserved on the product. It is likely that the data,
soware or other materials in the equipment will be lost or reformaed
during the service process, Xiaomi is not responsible for such damage or
loss.
No Xiaomi reseller, agent, or employee is authorized to make any
modification, extension, or addition to this Limited Warranty. If any term is
held to be illegal or unenforceable, the legality or enforceability of the
remaining terms shall not be affected or impaired.
Except as prohibited by laws or otherwise promised by Xiaomi, the
aer-sales services shall be limited to the country or region of the original
purchase.
Products which were not duly imported and/or were not duly manufactured
by Xiaomi and/or were not duly acquired from Xiaomi or a Xiaomi’s official
seller are not covered by the present warranties. As per applicable law you
may benefit from warranties from the non-official retailer who sold the
product. Therefore, Xiaomi invites you to contact the retailer from whom you
purchased the product.
The present warranties do not apply in Hong Kong and Taiwan.
5. IMPLIED WARRANTIES
Except to the extent prohibited by applicable law, all implied warranties
(including warranties of merchantability and fitness for a particular purpose)
will have a limited duration up to a maximum duration of this limited
warranty. Some jurisdictions do not allow limitations on the duration of an
implied warranty, so the above limitation will not be applied in these cases.
6. DAMAGE LIMITATION
Except to the extent prohibited by applicable law, Xiaomi shall not be liable
for any damages caused by accidents, indirect, special or consequential
damages, including but not limited to loss of profits, revenue or data,
damages resulting from any breach of express or implied warranty or
condition, or under any other legal theory, even if Xiaomi has been informed
of the possibility of such damages. Some jurisdictions do not allow the
exclusion or limitation of special, indirect, or consequential damages, so the
above limitation or exclusion may not apply to you.
7. XIAOMI CONTACTS
For customers, please visit the website:
hps://www.mi.com/global/support/warranty
The contact person for the aer-sale service may be any person in Xiaomi's
authorized service network, Xiaomi's authorized distributors or the final
vendor who sold the products to you. If in doubt please contact the relevant
person as Xiaomi may identify.

16
User Manual Version: V2.0
4. EXCLUSIONS AND LIMITATIONS
Unless otherwise stipulated by Xiaomi, this Limited Warranty applies only to
the Product manufactured by or for Xiaomi and identifiable by the
trademarks, trade name or "Xiaomi" or "Mi" logo.
The Limited Warranty does not apply to any (a) Damage due to acts of
nature or God, for example, lightning strikes, tornadoes, flood, fire,
earthquake or other external causes; (b) Negligence; (c) Commercial use; (d)
Alterations or modifications to any part of the Product; (e) Damage caused
by use with non-Xiaomi products; (f) Damage caused by accident, abuse or
misuse; (g) Damage caused by operating the Product outside the permied
or intended uses described by Xiaomi or with improper voltage or power
supply; or (h) Damage caused by service (including upgrades and
expansions) performed by anyone who is not a representative of Xiaomi.
It is your responsibility to backup any data, soware, or other materials you
may have stored or preserved on the product. It is likely that the data,
soware or other materials in the equipment will be lost or reformaed
during the service process, Xiaomi is not responsible for such damage or
loss.
No Xiaomi reseller, agent, or employee is authorized to make any
modification, extension, or addition to this Limited Warranty. If any term is
held to be illegal or unenforceable, the legality or enforceability of the
remaining terms shall not be affected or impaired.
Except as prohibited by laws or otherwise promised by Xiaomi, the
aer-sales services shall be limited to the country or region of the original
purchase.
Products which were not duly imported and/or were not duly manufactured
by Xiaomi and/or were not duly acquired from Xiaomi or a Xiaomi’s official
seller are not covered by the present warranties. As per applicable law you
may benefit from warranties from the non-official retailer who sold the
product. Therefore, Xiaomi invites you to contact the retailer from whom you
purchased the product.
The present warranties do not apply in Hong Kong and Taiwan.
5. IMPLIED WARRANTIES
Except to the extent prohibited by applicable law, all implied warranties
(including warranties of merchantability and fitness for a particular purpose)
will have a limited duration up to a maximum duration of this limited
warranty. Some jurisdictions do not allow limitations on the duration of an
implied warranty, so the above limitation will not be applied in these cases.
6. DAMAGE LIMITATION
Except to the extent prohibited by applicable law, Xiaomi shall not be liable
for any damages caused by accidents, indirect, special or consequential
damages, including but not limited to loss of profits, revenue or data,
damages resulting from any breach of express or implied warranty or
condition, or under any other legal theory, even if Xiaomi has been informed
of the possibility of such damages. Some jurisdictions do not allow the
exclusion or limitation of special, indirect, or consequential damages, so the
above limitation or exclusion may not apply to you.
7. XIAOMI CONTACTS
For customers, please visit the website:
hps://www.mi.com/global/support/warranty
The contact person for the aer-sale service may be any person in Xiaomi's
authorized service network, Xiaomi's authorized distributors or the final
vendor who sold the products to you. If in doubt please contact the relevant
person as Xiaomi may identify.

17
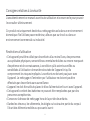
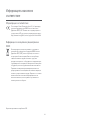
Instrucciones de seguridad
Restricciones de uso
• Este aparato puede ser utilizado por niños a partir de 8 años y por personas con
capacidades sicas, sensoriales o mentales reducidas o con falta de experiencia
y conocimientos si han recibido supervisión o instrucciones sobre el uso del
aparato de forma segura y comprenden los peligros que conlleva. Los niños no
deben jugar con el aparato. La limpieza y el mantenimiento por parte del usuario
no deben ser realizados por niños sin supervisión.
• El aparato sólo debe utilizarse con la fuente de alimentación suministrada con el
aparato.
• Este aparato contiene baterías que sólo pueden ser sustituidas por personas
cualificadas.
• Por favor, mantenga el cepillo de limpieza fuera del alcance de los niños.
• Mantenga el pelo, la ropa suelta, los dedos y todas las partes del cuerpo alejados
de las aberturas y las piezas móviles.
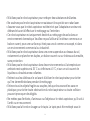
Lea detenidamente este manual antes de usar el producto y consérvelo para
futuras consultas.
Este producto es sólo para la limpieza de suelos en un entorno doméstico. No lo
utilice en el exterior, en superficies que no sean el suelo o en un entorno comercial
o industrial.

18
• No utilice el robot aspirador para limpiar sustancias en combustión.
• No coja el robot aspirador por la tapa del radar láser.
• Asegúrese de que el robot aspirador está apagado y el adaptador de corriente
desenchufado antes de limpiar o realizar el mantenimiento.
• Este robot aspirador sólo está pensado para limpiar suelos en un entorno
doméstico. Por favor, no lo utilice en el exterior, como en un balcón abierto o en
una superficie que no sea el suelo, como un sofá, o en un entorno comercial o
industrial.
• No utilice el robot aspirador en una zona suspendida sobre el nivel del suelo,
como un desván, un balcón abierto o encima de un mueble, a menos que haya
una barrera protectora.
• No utilice el robot aspirador a una temperatura ambiente superior a 35°C o
inferior a 0°C ni en un suelo con líquidos o sustancias pegajosas.
• Recoja los cables del suelo antes de utilizar el robot aspirador para evitar que los
arrastre mientras limpia.
• Recoja cualquier elemento frágil o suelto del suelo, como jarrones o bolsas de
plástico, para evitar que el robot aspirador se obstruya o choque con ellos y les
cause daños.
• No coloque niños, mascotas ni ningún objeto encima del robot aspirador
mientras esté parado o en movimiento.
• No utilice la función de fregado en la alfombra. La alfombra puede limpiarse en el
modo de aspiración.

19
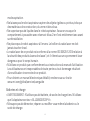
Baterías y carga
• ADVERTENCIA: No utilice ninguna batería de terceros, ni base de carga. Utilizar
sólo con el adaptador de corriente <BLJ24W200120P-V>.
• No intente desmontar, reparar o modificar la batería o la base de carga por su
cuenta.
• No permita que el robot aspirador recoja objetos duros o afilados, como
materiales de construcción, vidrio o clavos.
• No pulverice ningún líquido en el robot aspirador. Asegúrese de que el
compartimento para el polvo 2 en 1 con depósito de agua esté completamente
seco antes de volver a instalarlo.
• No coloque el robot aspirador boca abajo. La carcasa del radar láser nunca debe
tocar el suelo.
• El radar láser de este producto cumple con la norma IEC 60825-1:2014 sobre
seguridad de productos láser de clase 1 y no produce radiación láser peligrosa
para el cuerpo humano.
• Utilice este producto sólo como se indica en el manual de usuario. Los usuarios
son responsables de cualquier pérdida o daño derivado del uso inadecuado de
este producto.
• Para un manual electrónico detallado, vaya a
www.mi.com/global/service/userguide
Pagina se încarcă...
Pagina se încarcă...
Pagina se încarcă...
Pagina se încarcă...
Pagina se încarcă...
Pagina se încarcă...
Pagina se încarcă...
Pagina se încarcă...
Pagina se încarcă...
Pagina se încarcă...
Pagina se încarcă...
Pagina se încarcă...
Pagina se încarcă...
Pagina se încarcă...
Pagina se încarcă...
Pagina se încarcă...
Pagina se încarcă...
Pagina se încarcă...
Pagina se încarcă...
Pagina se încarcă...
Pagina se încarcă...
Pagina se încarcă...
Pagina se încarcă...
Pagina se încarcă...
Pagina se încarcă...
Pagina se încarcă...
Pagina se încarcă...
Pagina se încarcă...
Pagina se încarcă...
Pagina se încarcă...
Pagina se încarcă...
Pagina se încarcă...
Pagina se încarcă...
Pagina se încarcă...
Pagina se încarcă...
Pagina se încarcă...
Pagina se încarcă...
Pagina se încarcă...
Pagina se încarcă...
Pagina se încarcă...
Pagina se încarcă...
Pagina se încarcă...
Pagina se încarcă...
Pagina se încarcă...
Pagina se încarcă...
Pagina se încarcă...
Pagina se încarcă...
Pagina se încarcă...
Pagina se încarcă...
Pagina se încarcă...
Pagina se încarcă...
Pagina se încarcă...
Pagina se încarcă...
Pagina se încarcă...
Pagina se încarcă...
Pagina se încarcă...
Pagina se încarcă...
Pagina se încarcă...
Pagina se încarcă...
Pagina se încarcă...
Pagina se încarcă...
Pagina se încarcă...
Pagina se încarcă...
Pagina se încarcă...
Pagina se încarcă...
Pagina se încarcă...
Pagina se încarcă...
Pagina se încarcă...
Pagina se încarcă...
Pagina se încarcă...
Pagina se încarcă...
Pagina se încarcă...
Pagina se încarcă...
Pagina se încarcă...
Pagina se încarcă...
Pagina se încarcă...
Pagina se încarcă...
Pagina se încarcă...
Pagina se încarcă...
Pagina se încarcă...
Pagina se încarcă...
Pagina se încarcă...
Pagina se încarcă...
Pagina se încarcă...
Pagina se încarcă...
Pagina se încarcă...
Pagina se încarcă...
Pagina se încarcă...
Pagina se încarcă...
Pagina se încarcă...
Pagina se încarcă...
Pagina se încarcă...
Pagina se încarcă...
Pagina se încarcă...
Pagina se încarcă...
Pagina se încarcă...
Pagina se încarcă...
Pagina se încarcă...
Pagina se încarcă...
Pagina se încarcă...
Pagina se încarcă...
Pagina se încarcă...
Pagina se încarcă...
Pagina se încarcă...
Pagina se încarcă...
Pagina se încarcă...
Pagina se încarcă...
Pagina se încarcă...
Pagina se încarcă...
Pagina se încarcă...
Pagina se încarcă...
Pagina se încarcă...
Pagina se încarcă...
Pagina se încarcă...
Pagina se încarcă...
Pagina se încarcă...
Pagina se încarcă...
Pagina se încarcă...
Pagina se încarcă...
Pagina se încarcă...
Pagina se încarcă...
Pagina se încarcă...
Pagina se încarcă...
Pagina se încarcă...
Pagina se încarcă...
Pagina se încarcă...
Pagina se încarcă...
Pagina se încarcă...
Pagina se încarcă...
Pagina se încarcă...
Pagina se încarcă...
Pagina se încarcă...
Pagina se încarcă...
Pagina se încarcă...
Pagina se încarcă...
Pagina se încarcă...
Pagina se încarcă...
Pagina se încarcă...
Pagina se încarcă...
Pagina se încarcă...
Pagina se încarcă...
Pagina se încarcă...
Pagina se încarcă...
Pagina se încarcă...
Pagina se încarcă...
Pagina se încarcă...
Pagina se încarcă...
Pagina se încarcă...
Pagina se încarcă...
Pagina se încarcă...
Pagina se încarcă...
Pagina se încarcă...
Pagina se încarcă...
Pagina se încarcă...
Pagina se încarcă...
Pagina se încarcă...
Pagina se încarcă...
Pagina se încarcă...
Pagina se încarcă...
Pagina se încarcă...
Pagina se încarcă...
Pagina se încarcă...
Pagina se încarcă...
Pagina se încarcă...
Pagina se încarcă...
Pagina se încarcă...
Pagina se încarcă...
Pagina se încarcă...
Pagina se încarcă...
Pagina se încarcă...
Pagina se încarcă...
Pagina se încarcă...
Pagina se încarcă...
Pagina se încarcă...
Pagina se încarcă...
Pagina se încarcă...
Pagina se încarcă...
Pagina se încarcă...
Pagina se încarcă...
Pagina se încarcă...
Pagina se încarcă...
Pagina se încarcă...
Pagina se încarcă...
Pagina se încarcă...
Pagina se încarcă...
Pagina se încarcă...
Pagina se încarcă...
Pagina se încarcă...
Pagina se încarcă...
Pagina se încarcă...
Pagina se încarcă...
Pagina se încarcă...
Pagina se încarcă...
Pagina se încarcă...
Pagina se încarcă...
Pagina se încarcă...
Pagina se încarcă...
Pagina se încarcă...
Pagina se încarcă...
Pagina se încarcă...
Pagina se încarcă...
Pagina se încarcă...
Pagina se încarcă...
Pagina se încarcă...
Pagina se încarcă...
Pagina se încarcă...
Pagina se încarcă...
Pagina se încarcă...
Pagina se încarcă...
Pagina se încarcă...
Pagina se încarcă...
Pagina se încarcă...
Pagina se încarcă...
Pagina se încarcă...
Pagina se încarcă...
Pagina se încarcă...
Pagina se încarcă...
Pagina se încarcă...
Pagina se încarcă...
Pagina se încarcă...
Pagina se încarcă...
Pagina se încarcă...
Pagina se încarcă...
Pagina se încarcă...
Pagina se încarcă...
Pagina se încarcă...
Pagina se încarcă...
Pagina se încarcă...
Pagina se încarcă...
Pagina se încarcă...
Pagina se încarcă...
Pagina se încarcă...
Pagina se încarcă...
Pagina se încarcă...
Pagina se încarcă...
Pagina se încarcă...
Pagina se încarcă...
Pagina se încarcă...
Pagina se încarcă...
Pagina se încarcă...
Pagina se încarcă...
Pagina se încarcă...
Pagina se încarcă...
Pagina se încarcă...
Pagina se încarcă...
Pagina se încarcă...
Pagina se încarcă...
Pagina se încarcă...
Pagina se încarcă...
Pagina se încarcă...
Pagina se încarcă...
Pagina se încarcă...
Pagina se încarcă...
Pagina se încarcă...
Pagina se încarcă...
Pagina se încarcă...
Pagina se încarcă...
Pagina se încarcă...
Pagina se încarcă...
Pagina se încarcă...
Pagina se încarcă...
Pagina se încarcă...
Pagina se încarcă...
Pagina se încarcă...
Pagina se încarcă...
Pagina se încarcă...
Pagina se încarcă...
Pagina se încarcă...
Pagina se încarcă...
Pagina se încarcă...
Pagina se încarcă...
Pagina se încarcă...
Pagina se încarcă...
Pagina se încarcă...
Pagina se încarcă...
Pagina se încarcă...
Pagina se încarcă...
Pagina se încarcă...
Pagina se încarcă...
Pagina se încarcă...
Pagina se încarcă...
Pagina se încarcă...
Pagina se încarcă...
Pagina se încarcă...
Pagina se încarcă...
Pagina se încarcă...
Pagina se încarcă...
Pagina se încarcă...
Pagina se încarcă...
Pagina se încarcă...
Pagina se încarcă...
Pagina se încarcă...
Pagina se încarcă...
Pagina se încarcă...
Pagina se încarcă...
Pagina se încarcă...
Pagina se încarcă...
Pagina se încarcă...
Pagina se încarcă...
Pagina se încarcă...
Pagina se încarcă...
Pagina se încarcă...
Pagina se încarcă...
Pagina se încarcă...
Pagina se încarcă...
Pagina se încarcă...
Pagina se încarcă...
Pagina se încarcă...
Pagina se încarcă...
Pagina se încarcă...
Pagina se încarcă...
Pagina se încarcă...
Pagina se încarcă...
Pagina se încarcă...
Pagina se încarcă...
Pagina se încarcă...
Pagina se încarcă...
Pagina se încarcă...
Pagina se încarcă...
Pagina se încarcă...
Pagina se încarcă...
Pagina se încarcă...
Pagina se încarcă...
Pagina se încarcă...
Pagina se încarcă...
Pagina se încarcă...
Pagina se încarcă...
Pagina se încarcă...
Pagina se încarcă...
Pagina se încarcă...
Pagina se încarcă...
Pagina se încarcă...
Pagina se încarcă...
Pagina se încarcă...
Pagina se încarcă...
Pagina se încarcă...
Pagina se încarcă...
Pagina se încarcă...
Pagina se încarcă...
Pagina se încarcă...
Pagina se încarcă...
Pagina se încarcă...
Pagina se încarcă...
Pagina se încarcă...
Pagina se încarcă...
Pagina se încarcă...
Pagina se încarcă...
Pagina se încarcă...
Pagina se încarcă...
Pagina se încarcă...
Pagina se încarcă...
Pagina se încarcă...
Pagina se încarcă...
Pagina se încarcă...
Pagina se încarcă...
Pagina se încarcă...
Pagina se încarcă...
Pagina se încarcă...
Pagina se încarcă...
Pagina se încarcă...
Pagina se încarcă...
Pagina se încarcă...
Pagina se încarcă...
Pagina se încarcă...
Pagina se încarcă...
Pagina se încarcă...
Pagina se încarcă...
Pagina se încarcă...
Pagina se încarcă...
Pagina se încarcă...
Pagina se încarcă...
Pagina se încarcă...
Pagina se încarcă...
Pagina se încarcă...
Pagina se încarcă...
Pagina se încarcă...
Pagina se încarcă...
Pagina se încarcă...
Pagina se încarcă...
Pagina se încarcă...
Pagina se încarcă...
Pagina se încarcă...
Pagina se încarcă...
Pagina se încarcă...
Pagina se încarcă...
Pagina se încarcă...
Pagina se încarcă...
Pagina se încarcă...
Pagina se încarcă...
Pagina se încarcă...
Pagina se încarcă...
Pagina se încarcă...
Pagina se încarcă...
Pagina se încarcă...
Pagina se încarcă...
Pagina se încarcă...
Pagina se încarcă...
Pagina se încarcă...
Pagina se încarcă...
Pagina se încarcă...
Pagina se încarcă...
Pagina se încarcă...
Pagina se încarcă...
Pagina se încarcă...
Pagina se încarcă...
Pagina se încarcă...
Pagina se încarcă...
Pagina se încarcă...
Pagina se încarcă...
Pagina se încarcă...
Pagina se încarcă...
Pagina se încarcă...
Pagina se încarcă...
Pagina se încarcă...
Pagina se încarcă...
Pagina se încarcă...
Pagina se încarcă...
Pagina se încarcă...
Pagina se încarcă...
Pagina se încarcă...
Pagina se încarcă...
Pagina se încarcă...
Pagina se încarcă...
Pagina se încarcă...
-
 1
1
-
 2
2
-
 3
3
-
 4
4
-
 5
5
-
 6
6
-
 7
7
-
 8
8
-
 9
9
-
 10
10
-
 11
11
-
 12
12
-
 13
13
-
 14
14
-
 15
15
-
 16
16
-
 17
17
-
 18
18
-
 19
19
-
 20
20
-
 21
21
-
 22
22
-
 23
23
-
 24
24
-
 25
25
-
 26
26
-
 27
27
-
 28
28
-
 29
29
-
 30
30
-
 31
31
-
 32
32
-
 33
33
-
 34
34
-
 35
35
-
 36
36
-
 37
37
-
 38
38
-
 39
39
-
 40
40
-
 41
41
-
 42
42
-
 43
43
-
 44
44
-
 45
45
-
 46
46
-
 47
47
-
 48
48
-
 49
49
-
 50
50
-
 51
51
-
 52
52
-
 53
53
-
 54
54
-
 55
55
-
 56
56
-
 57
57
-
 58
58
-
 59
59
-
 60
60
-
 61
61
-
 62
62
-
 63
63
-
 64
64
-
 65
65
-
 66
66
-
 67
67
-
 68
68
-
 69
69
-
 70
70
-
 71
71
-
 72
72
-
 73
73
-
 74
74
-
 75
75
-
 76
76
-
 77
77
-
 78
78
-
 79
79
-
 80
80
-
 81
81
-
 82
82
-
 83
83
-
 84
84
-
 85
85
-
 86
86
-
 87
87
-
 88
88
-
 89
89
-
 90
90
-
 91
91
-
 92
92
-
 93
93
-
 94
94
-
 95
95
-
 96
96
-
 97
97
-
 98
98
-
 99
99
-
 100
100
-
 101
101
-
 102
102
-
 103
103
-
 104
104
-
 105
105
-
 106
106
-
 107
107
-
 108
108
-
 109
109
-
 110
110
-
 111
111
-
 112
112
-
 113
113
-
 114
114
-
 115
115
-
 116
116
-
 117
117
-
 118
118
-
 119
119
-
 120
120
-
 121
121
-
 122
122
-
 123
123
-
 124
124
-
 125
125
-
 126
126
-
 127
127
-
 128
128
-
 129
129
-
 130
130
-
 131
131
-
 132
132
-
 133
133
-
 134
134
-
 135
135
-
 136
136
-
 137
137
-
 138
138
-
 139
139
-
 140
140
-
 141
141
-
 142
142
-
 143
143
-
 144
144
-
 145
145
-
 146
146
-
 147
147
-
 148
148
-
 149
149
-
 150
150
-
 151
151
-
 152
152
-
 153
153
-
 154
154
-
 155
155
-
 156
156
-
 157
157
-
 158
158
-
 159
159
-
 160
160
-
 161
161
-
 162
162
-
 163
163
-
 164
164
-
 165
165
-
 166
166
-
 167
167
-
 168
168
-
 169
169
-
 170
170
-
 171
171
-
 172
172
-
 173
173
-
 174
174
-
 175
175
-
 176
176
-
 177
177
-
 178
178
-
 179
179
-
 180
180
-
 181
181
-
 182
182
-
 183
183
-
 184
184
-
 185
185
-
 186
186
-
 187
187
-
 188
188
-
 189
189
-
 190
190
-
 191
191
-
 192
192
-
 193
193
-
 194
194
-
 195
195
-
 196
196
-
 197
197
-
 198
198
-
 199
199
-
 200
200
-
 201
201
-
 202
202
-
 203
203
-
 204
204
-
 205
205
-
 206
206
-
 207
207
-
 208
208
-
 209
209
-
 210
210
-
 211
211
-
 212
212
-
 213
213
-
 214
214
-
 215
215
-
 216
216
-
 217
217
-
 218
218
-
 219
219
-
 220
220
-
 221
221
-
 222
222
-
 223
223
-
 224
224
-
 225
225
-
 226
226
-
 227
227
-
 228
228
-
 229
229
-
 230
230
-
 231
231
-
 232
232
-
 233
233
-
 234
234
-
 235
235
-
 236
236
-
 237
237
-
 238
238
-
 239
239
-
 240
240
-
 241
241
-
 242
242
-
 243
243
-
 244
244
-
 245
245
-
 246
246
-
 247
247
-
 248
248
-
 249
249
-
 250
250
-
 251
251
-
 252
252
-
 253
253
-
 254
254
-
 255
255
-
 256
256
-
 257
257
-
 258
258
-
 259
259
-
 260
260
-
 261
261
-
 262
262
-
 263
263
-
 264
264
-
 265
265
-
 266
266
-
 267
267
-
 268
268
-
 269
269
-
 270
270
-
 271
271
-
 272
272
-
 273
273
-
 274
274
-
 275
275
-
 276
276
-
 277
277
-
 278
278
-
 279
279
-
 280
280
-
 281
281
-
 282
282
-
 283
283
-
 284
284
-
 285
285
-
 286
286
-
 287
287
-
 288
288
-
 289
289
-
 290
290
-
 291
291
-
 292
292
-
 293
293
-
 294
294
-
 295
295
-
 296
296
-
 297
297
-
 298
298
-
 299
299
-
 300
300
-
 301
301
-
 302
302
-
 303
303
-
 304
304
-
 305
305
-
 306
306
-
 307
307
-
 308
308
-
 309
309
-
 310
310
-
 311
311
-
 312
312
-
 313
313
-
 314
314
-
 315
315
-
 316
316
-
 317
317
-
 318
318
-
 319
319
-
 320
320
-
 321
321
-
 322
322
-
 323
323
-
 324
324
-
 325
325
-
 326
326
-
 327
327
-
 328
328
-
 329
329
-
 330
330
-
 331
331
-
 332
332
-
 333
333
-
 334
334
-
 335
335
-
 336
336
-
 337
337
-
 338
338
-
 339
339
-
 340
340
-
 341
341
-
 342
342
-
 343
343
-
 344
344
-
 345
345
-
 346
346
-
 347
347
-
 348
348
-
 349
349
-
 350
350
-
 351
351
-
 352
352
-
 353
353
-
 354
354
-
 355
355
-
 356
356
-
 357
357
-
 358
358
-
 359
359
-
 360
360
-
 361
361
-
 362
362
-
 363
363
-
 364
364
-
 365
365
-
 366
366
-
 367
367
-
 368
368
-
 369
369
-
 370
370
-
 371
371
-
 372
372
-
 373
373
-
 374
374
-
 375
375
-
 376
376
-
 377
377
-
 378
378
-
 379
379
-
 380
380
-
 381
381
-
 382
382
-
 383
383
-
 384
384
-
 385
385
-
 386
386
-
 387
387
-
 388
388
-
 389
389
-
 390
390
-
 391
391
-
 392
392
-
 393
393
-
 394
394
-
 395
395
-
 396
396
-
 397
397
-
 398
398
-
 399
399
-
 400
400
-
 401
401
-
 402
402
-
 403
403
-
 404
404
-
 405
405
-
 406
406
-
 407
407
-
 408
408
-
 409
409
-
 410
410
-
 411
411
-
 412
412
-
 413
413
-
 414
414
-
 415
415
-
 416
416
-
 417
417
-
 418
418
-
 419
419
-
 420
420
-
 421
421
-
 422
422
-
 423
423
-
 424
424
-
 425
425
-
 426
426
-
 427
427
-
 428
428
-
 429
429
-
 430
430
-
 431
431
-
 432
432
-
 433
433
-
 434
434
-
 435
435
-
 436
436
-
 437
437
-
 438
438
-
 439
439
-
 440
440
-
 441
441
-
 442
442
-
 443
443
-
 444
444


Mi Xiaomi Robot Vacuum S12 Manual de utilizare
- Tip
- Manual de utilizare
- Acest manual este potrivit și pentru
în alte limbi
Lucrări înrudite
-
Mi Xiaomi Robot Vacuum S10 Manual de utilizare
-
-
-
-
-
-
-
Alte documente
-
Rowenta DW3261U1 Manual de utilizare
-
Tesla RoboStar T60 – white Manual de utilizare
-
Kärcher RCV 5 Manual de utilizare
-
-
Tesla RoboStar iQ300 Manual de utilizare
-
Xiaomi M2112W1 Manual de utilizare
-
Xiaomi WATCH S1 Manual de utilizare
-
-
-