Wellis WB00374 Manual de utilizare
- Categorie
- Grătare
- Tip
- Manual de utilizare
Acest manual este potrivit și pentru

EN
DE
FR
HU
RO
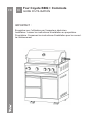
WB00374+WB00373
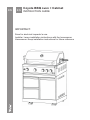
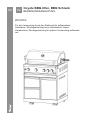
Coyote
Coyote BBQ oven + Cabinet
INSTRUCTION GUIDE
Coyote BBQ-Ofen + Schrank
BEDIENUNGSANLEITUNG
Four Coyote BBQ + Commode
GUIDE D’UTILISATION
Coyote BBQ sütő + szekrény
HASZNÁLATI ÚTMUTATÓ
Cuptor BBQ Coyote + Dulap

EN
IMPORTANT:
Save for electrical inspector’s use.
Installer: Leave installation instructions with the homeowner.
Homeowner: Keep installation instructions for future reference
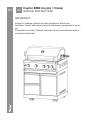
EN Coyote BBQ oven + Cabinet
INSTRUCTION GUIDE

Warnings
These are the most critical warnings summarized below.
***WARNING***
may result, causing property damage, personal injury or death.
this or other appliance,
gas supplier.
What to do if you smell gas
• Do not light any appliance
• Do not touch an electrical switch
• Immediately call the gas supplier from a neighbor’s phone
• Follow the gas supplier’s instructions

EN OUTDOOR GRILL SAFETY
The installation must conform with local codes or, in the absence of
local codes, with either the National Fuel
Gas Code, ANSI Z223.1/NFPA 54, or the Natural Gas and Propane
Installation Code, CSA B149.1, or the
Propane Storage and Handling Code, CSA B149.2
The outdoor cooking gas appliance, when installed, must be electri-
cally grounded in accordance with
local codes or, in the absence of local codes, with the National Elec-
trical Code, ANSI/NFPA 70, or the
Canadian Electrical Code, Part I, CSA C22.1
Your safety and the safety of others are very important.
We have provided many important safety
messages in this manual and on your appli-
ance. Always read and obey all safety mes-
sages
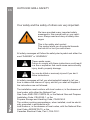
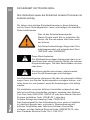
This is the safety alert symbol.
This symbol alerts you to potential hazards
that can kill or hurt you and others.
All safety messages will follow the safety alert symbol and either the
word ‘DANGER” or ‘WARNING.’
These words mean:
Failure to comply with these instructions could result
injury, death, property damage.
You can be killed or seriously injured if you don’t
follow instructions.
All safety messages will tell you what potential hazard is, tell you
how to reduce the chance of injury, and tell you what will happen if
the instructions are not followed.

GENERAL SAFETY INSTRUCTION
1. For Outdoor Use Only. Side burners are only intended for residential use
and are not intended for commercial use, where anyone other than the origi-
nal purchaser (homeowner) would be using and maintaining the side burner.
2. NEVER use indoors or in any type of enclosed area, such as a garage,
shed or breezeway. Keep clear of trees and shrubs. The side burners are
not intended for installation in or on recreational vehicles, portable trailers,
boats or any other moving installation.
3. To reduce the risk of serious or fatal injury from breathing toxic fumes and
and ventilation air.
4. Fire Hazard: The area surrounding your new side burner should be kept
5. NEVER use the side burner in windy conditions. If located in a consistently
clearance from side and back of unit to combustible construction, 36 inch
from side and 36 inch from back.
6. NEVER leave the side burner unattended while cooking.
7.
propane gas or vice versa.
8.
9. NEVER allow children to use or play near the side burner. Always keep
children and pets away from a hot side burner
10. Installation and any repairs or replacement of parts should be performed
contractor or technician to do so.
11. Burn Hazard: NEVER lean over an open side burner. Do not place cloth-
or death.

EN
12. Burn Hazard: When using the side burner, do not touch the side
burner rack, burner grate, or immediate surroundings as these
areas become extremely hot and can cause burns. Always use
a covered/gloved hand when opening the side burner hood and
only do so slowly to allow heat and steam to escape.
13.
14. -
injury or death.
15. NEVER use aluminum foil to line the side burner racks or the drip
heat in the control area causing the knobs and cause damage to
the igniter.
16. NEVER allow grease or other hot material to drip from the side
burner onto the valve, hose, or regulator. If that occurs, turn off
the fuel supply immediately. After the side burner has cooled, de-
termine the cause of the dripping and correct it. After cleaning the
valve, hose and regulator, perform a soapy water leak test before
for service.
17. NEVER heat any unopened glass or metal container of food on
the side burner. Pressure may build up and cause the container
to burst, possibly resulting in death, serious personal injury, or
property damage.
18. ALWAYS: Keep any electrical supply cords away from water or
heated surfaces. Electrical cords should be placed away from
walkways to avoid tripping hazard.
19. ALWAYS: Keep gas supply lines as short as possible.
20. NEVER move the side burner when hot.
21.
alcohol.
22. NEVER store a spare gas cylinder under or near your side
burner.
23. If a burner goes out, turn burner knobs to the full OFF position,
fully open the side burner hood and let it air out. NEVER attempt
to use the side burner until the gas has had time to dissipate.
24. Do not use a side burner until a leak check has been completed.
25. ALWAYS: Turn off the LP cylinder tank valve when your side
burner is not in use.
26. ALWAYS: Ensure the control knobs are in the “OFF” position
when not in use.
27. ALWAYS: Use only a Ground Fault Interrupter (GFI) protected
circuit with this outdoor cooking gas appliance.

28. The installation must conform with local codes or, in the absence of local
codes, with either the National Fuel Gas Code, ANSI 2223.1/NFPA 54, or
the Natural Gas and Propane Installation Code, CSA B149.1, or the Pro-
pane Storage and Handling Code, CSA B149.2.
29. Keeping the ventilation opening(s) of the cylinder enclosure free and clear
from debris.
30. Checking and cleaning burner/venturi tubes for insects and insect nests. A
31. If the outdoor cooking gas appliance is not in use, the gas must be turned
off at the supply cylinder(s). Storage of an outdoor cooking gas appliance
indoors is permissible only if the cylinder(s) is (are) disconnectedand re-
moved from the outdoor cooking gas appliance. Cylinders must be stored
outdoors out of the reach of children and must not be stored in a building,
garage, or any other enclosed area.
32. The pressure regulator and hose assembly supplied with the outdoor
cooking gas appliance must be used. Replacement pressure regulators
appliance manufacturer.
1. Do not store a spare LP gas cylinder under or near this appliance.
2.
3.
causing death or serious injury may occur
SAVE THESE INSTRUCTIONS FOR FUTURE REFERENCE.

EN
This manual applies to the following models’ series:
Model # WB00373 (Coyote BBQ cabinet)
Model # WB00374 (Coyote BBQ oven)
Welcome
Thank you for purchasing your Coyote BBQ oven Appliance! We
appreciate your business and we recommend that you read this entire
This manual contains instructions on how to properly install and set up
product offers. Please keep this manual for future reference, as it con-
Thank you

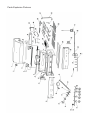
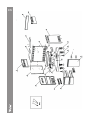
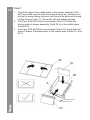
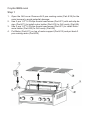
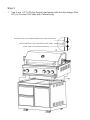
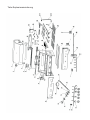
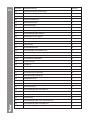
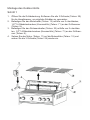
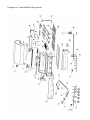
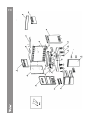
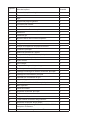
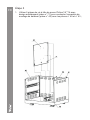
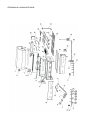
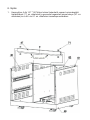
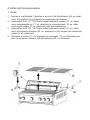
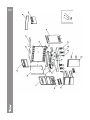
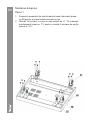
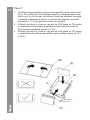
Parts Explosive Pictures

EN

Explosive Part Name Quantity
1Grill Top Cover 1
2 Thermometer 1
3 logo 1
4 left handle holder 1
5 Light Cover 2
6 Light #1 1
7 Top warming rack 1
8 Rotisserie 1
9 Grill Cavity 1
10 Top cover rotary pin 2
11 Motor 1
12 Motor holder 1
13 Burner valve holding plate 1
14 Main manifold 1
15 5-point Spark Module 1
16 Main burner ignition harness 1
17 Main Burner Knob 5
18 corrugated pipe 1
19 Embedded joint 1
20 Gas regulator and gas pipe 1
21 Metal push button 2
22 Main burner knob light wiring 1
23 Main switch wiring 1
24 Grill control panel 1
25 match holder 1
26 Main burner power plug 1
28 Grease tray 1
29 Cooking rack 1
30 Main burner electrode 3
31 Tube burner 3
32 Rotisserie holder 1
33 Back broil burner corrugated pipe 1
34 Front broil burner electrode 1
35 Infrared broil burner 136
3
37 1
38 2

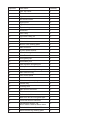
EN Explosive Part Name Quantity
39 Back broiler burner electrode 1
40 Back broiler burner protection cover 1
41 Light #2 1
42 Back broil burner 1
43 gas-collecting hood 1
44 Temperature rod 1
45 Clapboard welding part 1
46 Left side panel A welding assembly 1
47 beam welding assembly 1
48 LP tank supporting slide 2
49 tank bottom welding assembly 1
50 Snap bolt 1
51 Slideway 4
52 Drawer assembly 2
52.1 drawer front panel welding plate 2
52.2 drawer front panel lining 2
52.3 drawer middle plate 2
52.4 drawer bottom plate 2
53 Door assembly 1
54 Door barrier strip 1
55 Supporting leg 2
56 Fixed caster 2
57 Universal caster with Brake 2
58 1
59 Tank bottom support 1
60 14” Sliders 4
61 Right side panel A welding assembly 1
62 Rubber gasket 4
63 Back panel A welding assembly 1
64 gas tank heat shield 1
65 Laminate board 1
66 Door Hinge 2
67 Left side panel B welding assembly 1
68 Back Panel B welding assembly 1
69 Right side panel B welding assembly 1

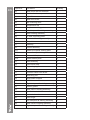
Explosive Part Name Quantity
70 5/32“Philips thumb head screw 52
71 1/4“*14 Philips thumb head screw
with antislip design
59
72 12
73 front broil burner valve 1
74 back broil burner valve 1
75 main burner valve 3
76 Top cover handle 1
77 cabinet back connecting plate 2

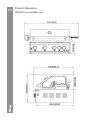
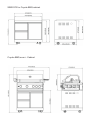
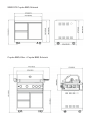
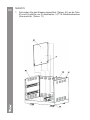
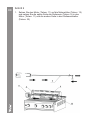
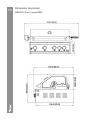
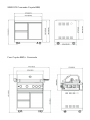
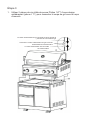
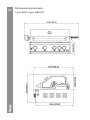
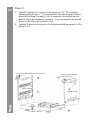
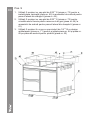
EN Product Dimension
WB00374 Coyote BBQ oven

WB00373 for Coyote BBQ cabinet
Coyote BBQ oven + Cabinet

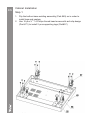
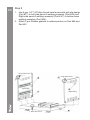
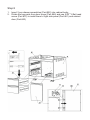
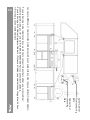
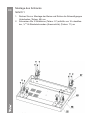
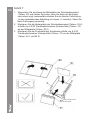
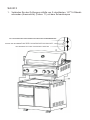
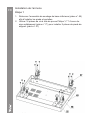
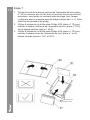
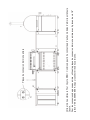
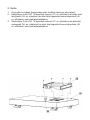
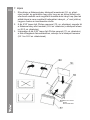
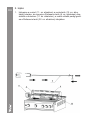
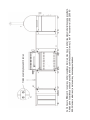
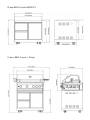
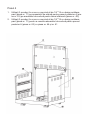
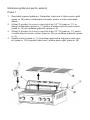
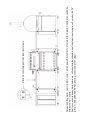
EN Cabinet Installation
Step 1
1. Flip the bottom base welding assembly (Part #49) so in order to
install legs and casters
2. Use 16 pcs ¼” *14 Philips thumb head screw with anti-slip design
(Part #71) to install 2 pcs supporting legs (Part#57)

Step 2
1.
2.
3.
(Part # 54) to bottom base welding assembly (Part #49)

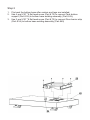
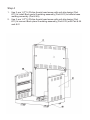
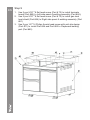
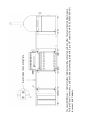
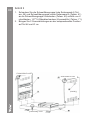
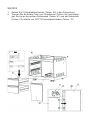
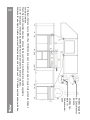
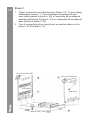
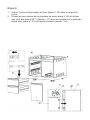
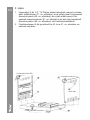
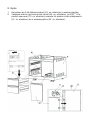
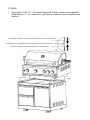
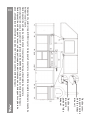
EN Step 3
1. Use 6 pcs 1/4“*14 Philips thumb head screw with anti-slip design
(Part #71) to Left side panel A welding assembly (Part #46) and
Right-side panel A welding assembly (Part # 61) to bottom base
2. Attach 2 pcs Rubber gaskets to related position on Part #46 and
Part #61
Hinge Holes Front
Hinge Holes Front
(Left side)
(Right side)
Door Stop: Front

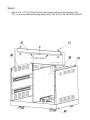
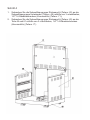
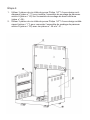
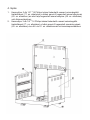
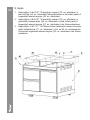
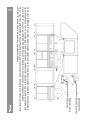
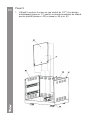
Step 4
1. Use 3 pcs 1/4“*14 Philips thumb head screw with anti-slip design (Part
#71) to install Back panel A welding assembly (Part # 63) to bottom base
2. Use 3 pcs 1/4“*14 Philips thumb head screw with anti-slip design (Part
#71) to connect Back panel A welding assembly (Part # 63) with Part # 46
and # 61

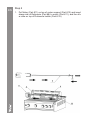
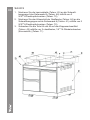
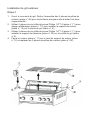
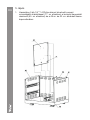
EN Step 5
1. Use 5 pcs 1/4“*14 Philips thumb head screw with anti-slip design
(Part #71) to connect Clapboard welding part (Part # 45) with Part
#49 and #63
Pagina se încarcă...
Pagina se încarcă...
Pagina se încarcă...
Pagina se încarcă...
Pagina se încarcă...
Pagina se încarcă...
Pagina se încarcă...
Pagina se încarcă...
Pagina se încarcă...
Pagina se încarcă...
Pagina se încarcă...
Pagina se încarcă...
Pagina se încarcă...
Pagina se încarcă...
Pagina se încarcă...
Pagina se încarcă...
Pagina se încarcă...
Pagina se încarcă...
Pagina se încarcă...
Pagina se încarcă...
Pagina se încarcă...
Pagina se încarcă...
Pagina se încarcă...
Pagina se încarcă...
Pagina se încarcă...
Pagina se încarcă...
Pagina se încarcă...
Pagina se încarcă...
Pagina se încarcă...
Pagina se încarcă...
Pagina se încarcă...
Pagina se încarcă...
Pagina se încarcă...
Pagina se încarcă...
Pagina se încarcă...
Pagina se încarcă...
Pagina se încarcă...
Pagina se încarcă...
Pagina se încarcă...
Pagina se încarcă...
Pagina se încarcă...
Pagina se încarcă...
Pagina se încarcă...
Pagina se încarcă...
Pagina se încarcă...
Pagina se încarcă...
Pagina se încarcă...
Pagina se încarcă...
Pagina se încarcă...
Pagina se încarcă...
Pagina se încarcă...
Pagina se încarcă...
Pagina se încarcă...
Pagina se încarcă...
Pagina se încarcă...
Pagina se încarcă...
Pagina se încarcă...
Pagina se încarcă...
Pagina se încarcă...
Pagina se încarcă...
Pagina se încarcă...
Pagina se încarcă...
Pagina se încarcă...
Pagina se încarcă...
Pagina se încarcă...
Pagina se încarcă...
Pagina se încarcă...
Pagina se încarcă...
Pagina se încarcă...
Pagina se încarcă...
Pagina se încarcă...
Pagina se încarcă...
Pagina se încarcă...
Pagina se încarcă...
Pagina se încarcă...
Pagina se încarcă...
Pagina se încarcă...
Pagina se încarcă...
Pagina se încarcă...
Pagina se încarcă...
Pagina se încarcă...
Pagina se încarcă...
Pagina se încarcă...
Pagina se încarcă...
Pagina se încarcă...
Pagina se încarcă...
Pagina se încarcă...
Pagina se încarcă...
Pagina se încarcă...
Pagina se încarcă...
Pagina se încarcă...
Pagina se încarcă...
Pagina se încarcă...
Pagina se încarcă...
Pagina se încarcă...
Pagina se încarcă...
Pagina se încarcă...
Pagina se încarcă...
Pagina se încarcă...
Pagina se încarcă...
Pagina se încarcă...
Pagina se încarcă...
Pagina se încarcă...
Pagina se încarcă...
Pagina se încarcă...
Pagina se încarcă...
Pagina se încarcă...
Pagina se încarcă...
Pagina se încarcă...
Pagina se încarcă...
Pagina se încarcă...
Pagina se încarcă...
Pagina se încarcă...
Pagina se încarcă...
Pagina se încarcă...
Pagina se încarcă...
Pagina se încarcă...
Pagina se încarcă...
Pagina se încarcă...
Pagina se încarcă...
Pagina se încarcă...
Pagina se încarcă...
Pagina se încarcă...
Pagina se încarcă...
-
 1
1
-
 2
2
-
 3
3
-
 4
4
-
 5
5
-
 6
6
-
 7
7
-
 8
8
-
 9
9
-
 10
10
-
 11
11
-
 12
12
-
 13
13
-
 14
14
-
 15
15
-
 16
16
-
 17
17
-
 18
18
-
 19
19
-
 20
20
-
 21
21
-
 22
22
-
 23
23
-
 24
24
-
 25
25
-
 26
26
-
 27
27
-
 28
28
-
 29
29
-
 30
30
-
 31
31
-
 32
32
-
 33
33
-
 34
34
-
 35
35
-
 36
36
-
 37
37
-
 38
38
-
 39
39
-
 40
40
-
 41
41
-
 42
42
-
 43
43
-
 44
44
-
 45
45
-
 46
46
-
 47
47
-
 48
48
-
 49
49
-
 50
50
-
 51
51
-
 52
52
-
 53
53
-
 54
54
-
 55
55
-
 56
56
-
 57
57
-
 58
58
-
 59
59
-
 60
60
-
 61
61
-
 62
62
-
 63
63
-
 64
64
-
 65
65
-
 66
66
-
 67
67
-
 68
68
-
 69
69
-
 70
70
-
 71
71
-
 72
72
-
 73
73
-
 74
74
-
 75
75
-
 76
76
-
 77
77
-
 78
78
-
 79
79
-
 80
80
-
 81
81
-
 82
82
-
 83
83
-
 84
84
-
 85
85
-
 86
86
-
 87
87
-
 88
88
-
 89
89
-
 90
90
-
 91
91
-
 92
92
-
 93
93
-
 94
94
-
 95
95
-
 96
96
-
 97
97
-
 98
98
-
 99
99
-
 100
100
-
 101
101
-
 102
102
-
 103
103
-
 104
104
-
 105
105
-
 106
106
-
 107
107
-
 108
108
-
 109
109
-
 110
110
-
 111
111
-
 112
112
-
 113
113
-
 114
114
-
 115
115
-
 116
116
-
 117
117
-
 118
118
-
 119
119
-
 120
120
-
 121
121
-
 122
122
-
 123
123
-
 124
124
-
 125
125
-
 126
126
-
 127
127
-
 128
128
-
 129
129
-
 130
130
-
 131
131
-
 132
132
-
 133
133
-
 134
134
-
 135
135
-
 136
136
-
 137
137
-
 138
138
-
 139
139
-
 140
140
-
 141
141
-
 142
142
-
 143
143
-
 144
144


Wellis WB00374 Manual de utilizare
- Categorie
- Grătare
- Tip
- Manual de utilizare
- Acest manual este potrivit și pentru
în alte limbi
- français: Wellis WB00374 Manuel utilisateur
- English: Wellis WB00374 User manual
- Deutsch: Wellis WB00374 Benutzerhandbuch
Lucrări înrudite


Alte documente
-
LANDMANN GG-V-491 Manual de utilizare
-
Jamie Oliver Pro 3s Operating Instructions Manual
-
 OUTDOOR CHEF CAIRNS 3 G Manual de utilizare
-
Campingaz Master 4 Series Classic LS Instructions For Use Manual
-
-
BorMann BBQBBQ2000 Manual de utilizare
-
Campingaz 3 Series Operation And Maintenance
