
DJV185
EN Cordless Jig Saw INSTRUCTION MANUAL 7
SL Brezžična vbodna žaga NAVODILA ZA UPORABO 15
SQ Sharra pa kabllo për punime
në forma MANUALI I PËRDORIMIT 23
BG Акумулаторен прободен
трион РЪКОВОДСТВО ЗА
ЕКСПЛОАТАЦИЯ 31
HR Bežična ubodna pila PRIRUČNIK S UPUTAMA 40
МК Безжична убодна пила УПАТСТВО ЗА УПОТРЕБА 48
SR Бежична убодна тестера УПУТСТВО ЗА УПОТРЕБУ 57
RO Ferăstrău pendular cu
acumulator MANUAL DE INSTRUCŢIUNI 66
UK Бездротовий лобзик ІНСТРУКЦІЯ З
ЕКСПЛУАТАЦІЇ 74
RU Аккумуляторный Лобзик РУКОВОДСТВО ПО
ЭКСПЛУАТАЦИИ 83

2
1
2
3
Fig.1
1
2
Fig.2
1
Fig.3
1
2
Fig.4
1
2
Fig.5
1
Fig.6
1
32
Fig.7

3
1
2
3
Fig.8
1
2
3
Fig.9
1
Fig.10
2
1
Fig.11
Fig.12
3
2
1
Fig.13
2
1
Fig.14

4
3
2
1
Fig.15
Fig.16
Fig.17
Fig.18
1
Fig.19
1
Fig.20

5
1
Fig.21
1
2
Fig.22
Fig.23
1
Fig.24
1
23
Fig.25
1
Fig.26
43
1
2
5
Fig.27
1
2
Fig.28

6
1
2
Fig.29
1
2
3
Fig.30
32
1
Fig.31

7ENGLISH
ENGLISH (Original instructions)
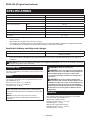
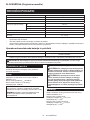
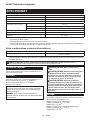
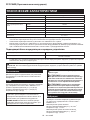
SPECIFICATIONS
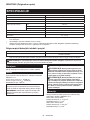
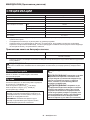
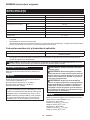
Model: DJV185
Length of stroke 23 mm
Strokes per minute 800 - 3,000 min-1
Blade type B type
Max. cutting capacities Wood 135 mm
Mild steel 10 mm
Aluminum 20 mm
Overall length (with BL1860B) 259 mm
Rated voltage D.C. 18 V
Net weight 2.0 - 2.3 kg
• Duetoourcontinuingprogramofresearchanddevelopment,thespecicationshereinaresubjecttochange
without notice.
• Specicationsmaydierfromcountrytocountry.
• Theweightmaydierdependingontheattachment(s),includingthebatterycartridge.Thelightestandheavi-
estcombinations,accordingtoEPTA-Procedure01/2014,areshowninthetable.
Applicable battery cartridge and charger
Battery cartridge BL1815N/BL1820B/BL1830B/BL1840B/BL1850B/BL1860B
Charger DC18RC/DC18RD/DC18RE/DC18SD/DC18SE/DC18SF/
DC18SH/DC18WC
• Someofthebatterycartridgesandchargerslistedabovemaynotbeavailabledependingonyourregionof
residence.
WARNING: Only use the battery cartridges and chargers listed above.Useofanyotherbatterycartridges
andchargersmaycauseinjuryand/orre.
Intended use
The tool is intended for the sawing of wood, plastic and
metal materials.
Noise
The typical A-weighted noise level determined accord-
ingtoEN62841-2-11:
Sound pressure level (LpA):84dB(A)
Sound power level (LWA):95dB(A)
Uncertainty(K):3dB(A)
NOTE: The declared noise emission value(s) has
beenmeasuredinaccordancewithastandardtest
methodandmaybeusedforcomparingonetoolwith
another.
NOTE: The declared noise emission value(s)
mayalsobeusedinapreliminaryassessmentof
exposure.
WARNING: Wear ear protection.
WARNING: The noise emission during actual
use of the power tool can dier from the declared
value(s) depending on the ways in which the
tool is used especially what kind of workpiece is
processed.
WARNING: Be sure to identify safety mea-
sures to protect the operator that are based on an
estimation of exposure in the actual conditions of
use (taking account of all parts of the operating
cycle such as the times when the tool is switched
o and when it is running idle in addition to the
trigger time).
Vibration
Thevibrationtotalvalue(tri-axialvectorsum)deter-
minedaccordingtoEN62841-2-11:
Workmode:cuttingboards
Vibrationemission(ah,B):10.3m/s2
Uncertainty(K):1.7m/s2
Workmode:cuttingsheetmetal
Vibrationemission(ah,M):9.0m/s2
Uncertainty(K):1.5m/s2

8ENGLISH
NOTE:Thedeclaredvibrationtotalvalue(s)hasbeen
measured in accordance with a standard test method
andmaybeusedforcomparingonetoolwithanother.
NOTE:Thedeclaredvibrationtotalvalue(s)mayalso
beusedinapreliminaryassessmentofexposure.
WARNING: The vibration emission during
actual use of the power tool can dier from the
declared value(s) depending on the ways in which
the tool is used especially what kind of workpiece
is processed.
WARNING: Be sure to identify safety mea-
sures to protect the operator that are based on an
estimation of exposure in the actual conditions of
use (taking account of all parts of the operating
cycle such as the times when the tool is switched
o and when it is running idle in addition to the
trigger time).
Declarations of Conformity
For European countries only
The Declarations of conformity are included in Annex A
to this instruction manual.
SAFETY WARNINGS
General power tool safety warnings
WARNING Read all safety warnings, instruc-
tions, illustrations and specications provided with
this power tool.Failuretofollowallinstructionslisted
belowmayresultinelectricshock,reand/orserious
injury.
Save all warnings and instruc-
tions for future reference.
The term "power tool" in the warnings refers to your
mains-operated(corded)powertoolorbattery-operated
(cordless) power tool.
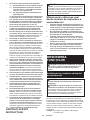
Cordless jig saw safety warnings
1. Hold the power tool by insulated gripping
surfaces, when performing an operation where
the cutting accessory may contact hidden wir-
ing. Cutting accessory contacting a “live” wire may
make exposed metal parts of the power tool “live”
and could give the operator an electric shock.
2. Use clamps or another practical way to secure
and support the workpiece to a stable plat-
form.Holdingtheworkpiecebyhandoragainst
yourbodyleavesitunstableandmayleadtoloss
of control.
3. Always use safety glasses or goggles.
Ordinary eye or sun glasses are NOT safety
glasses.
4. Avoid cutting nails. Inspect workpiece for any
nails and remove them before operation.
5. Do not cut oversize workpiece.
6. Check for the proper clearance around the
workpiece before cutting so that the jig saw
blade will not strike the oor, workbench, etc.
7. Hold the tool rmly.
8. Make sure the jig saw blade is not contacting
the workpiece before the switch is turned on.
9. Keep hands away from moving parts.
10. Do not leave the tool running. Operate the tool
only when hand-held.
11. Always switch o and wait for the jig saw
blade to come to a complete stop before
removing the jig saw blade from the
workpiece.
12. Do not touch the jig saw blade or the work-
piece immediately after operation; they may be
extremely hot and could burn your skin.
13. Do not operate the tool at no-load
unnecessarily.
14. Some material contains chemicals which may
be toxic. Take caution to prevent dust inhala-
tion and skin contact. Follow material supplier
safety data.
15. Always use the correct dust mask/respirator
for the material and application you are work-
ing with.
SAVE THESE INSTRUCTIONS.
WARNING: DO NOT let comfort or familiarity
with product (gained from repeated use) replace
strict adherence to safety rules for the subject
product. MISUSE or failure to follow the safety
rules stated in this instruction manual may cause
serious personal injury.
Important safety instructions for
battery cartridge
1. Before using battery cartridge, read all instruc-
tions and cautionary markings on (1) battery
charger, (2) battery, and (3) product using
battery.
2. Do not disassemble or tamper with the battery
cartridge.Itmayresultinare,excessiveheat,
or explosion.
3. If operating time has become excessively
shorter, stop operating immediately. It may
result in a risk of overheating, possible burns
and even an explosion.
4. If electrolyte gets into your eyes, rinse them
out with clear water and seek medical atten-
tion right away. It may result in loss of your
eyesight.
5. Do not short the battery cartridge:
(1) Do not touch the terminals with any con-
ductive material.
(2) Avoid storing battery cartridge in a con-
tainer with other metal objects such as
nails, coins, etc.
(3) Do not expose battery cartridge to water
or rain.
A battery short can cause a large current
ow, overheating, possible burns and even a
breakdown.

9ENGLISH
6. Do not store and use the tool and battery car-
tridge in locations where the temperature may
reach or exceed 50 °C (122 °F).
7. Do not incinerate the battery cartridge even if
it is severely damaged or is completely worn
out. The battery cartridge can explode in a re.
8. Do not nail, cut, crush, throw, drop the battery
cartridge, or hit against a hard object to the
battery cartridge. Such conduct may result in a
re,excessiveheat,orexplosion.
9. Do not use a damaged battery.
10. The contained lithium-ion batteries are subject
to the Dangerous Goods Legislation require-
ments.
Forcommercialtransportse.g.bythirdparties,
forwarding agents, special requirement on pack-
agingandlabelingmustbeobserved.
Forpreparationoftheitembeingshipped,consult-
ing an expert for hazardous material is required.
Pleasealsoobservepossiblymoredetailed
national regulations.
Tapeormaskoopencontactsandpackupthe
batteryinsuchamannerthatitcannotmove
around in the packaging.
11. When disposing the battery cartridge, remove
it from the tool and dispose of it in a safe
place. Follow your local regulations relating to
disposal of battery.
12. Use the batteries only with the products
specied by Makita.Installingthebatteriesto
non-compliantproductsmayresultinare,exces-
sive heat, explosion, or leak of electrolyte.
13. If the tool is not used for a long period of time,
the battery must be removed from the tool.
14. During and after use, the battery cartridge may
take on heat which can cause burns or low
temperature burns. Pay attention to the han-
dling of hot battery cartridges.
15. Do not touch the terminal of the tool imme-
diately after use as it may get hot enough to
cause burns.
16. Do not allow chips, dust, or soil stuck into the
terminals, holes, and grooves of the battery
cartridge.Itmaycauseheating,catchingre,
burstandmalfunctionofthetoolorbatterycar-
tridge,resultinginburnsorpersonalinjury.
17. Unless the tool supports the use near
high-voltage electrical power lines, do not use
the battery cartridge near high-voltage electri-
cal power lines. It may result in a malfunction or
breakdownofthetoolorbatterycartridge.
18. Keep the battery away from children.
SAVE THESE INSTRUCTIONS.
CAUTION: Only use genuine Makita batteries.
Useofnon-genuineMakitabatteries,orbatteriesthat
havebeenaltered,mayresultinthebatterybursting
causingres,personalinjuryanddamage.Itwill
also void the Makita warranty for the Makita tool and
charger.
Tips for maintaining maximum
battery life
1. Charge the battery cartridge before completely
discharged. Always stop tool operation and
charge the battery cartridge when you notice
less tool power.
2. Never recharge a fully charged battery car-
tridge. Overcharging shortens the battery
service life.
3. Charge the battery cartridge with room tem-
perature at 10 °C - 40 °C (50 °F - 104 °F). Let
a hot battery cartridge cool down before
charging it.
4. When not using the battery cartridge, remove
it from the tool or the charger.
5. Charge the battery cartridge if you do not use
it for a long period (more than six months).
FUNCTIONAL
DESCRIPTION
CAUTION: Always be sure that the tool is
switched o and the battery cartridge is removed
before adjusting or checking function on the tool.
Installing or removing battery
cartridge
CAUTION: Always switch o the tool before
installing or removing of the battery cartridge.
CAUTION: Hold the tool and the battery car-
tridge rmly when installing or removing battery
cartridge.Failuretoholdthetoolandthebattery
cartridgermlymaycausethemtoslipoyourhands
andresultindamagetothetoolandbatterycartridge
andapersonalinjury.
Toinstallthebatterycartridge,alignthetongueonthe
batterycartridgewiththegrooveinthehousingandslip
it into place. Insert it all the way until it locks in place
with a little click. If you can see the red indicator as
showninthegure,itisnotlockedcompletely.
Toremovethebatterycartridge,slideitfromthetool
whileslidingthebuttononthefrontofthecartridge.
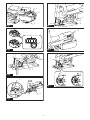
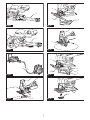
►Fig.1: 1. Red indicator 2. Button 3. Battery cartridge
CAUTION: Always install the battery cartridge
fully until the red indicator cannot be seen. If not,
itmayaccidentallyfalloutofthetool,causinginjuryto
you or someone around you.
CAUTION: Do not install the battery cartridge
forcibly. If the cartridge does not slide in easily, it is
notbeinginsertedcorrectly.

10 ENGLISH
Tool / battery protection system
Thetoolisequippedwithatool/batteryprotectionsystem.This
systemautomaticallycutsopowertothemotortoextendtool
andbatterylife.Thetoolwillautomaticallystopduringoperationif
thetoolorbatteryisplacedunderoneofthefollowingconditions:
Overload protection
Whenthetoolorbatteryisoperatedinamannerthat
causesittodrawanabnormallyhighcurrent,thetoolauto-
matically stops without any indication. In this situation, turn
thetooloandstoptheapplicationthatcausedthetoolto
becomeoverloaded.Thenturnthetoolontorestart.
Overheat protection
Whenthetoolorbatteryisoverheated,thetoolstops
automaticallyandthelampblinks.Inthiscase,letthe
toolandbatterycoolbeforeturningthetoolonagain.
Overdischarge protection
Whenthebatterycapacityisnotenough,thetoolstopsautomatically.
Inthiscase,removethebatteryfromthetoolandchargethebattery.
Protections against other causes
Protectionsystemisalsodesignedforothercausesthatcould
damage the tool and allows the tool to stop automatically.
Take all the following steps to clear the causes, when the tool
hasbeenbroughttoatemporaryhaltorstopinoperation.
1.
Turnthetoolo,andthenturnitonagaintorestart.
2. Chargethebattery(ies)orreplaceit/themwith
rechargedbattery(ies).
3. Letthetoolandbattery(ies)cooldown.
Ifnoimprovementcanbefoundbyrestoringprotection
system, then contact your local Makita Service Center.
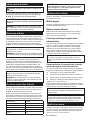
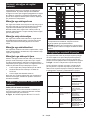
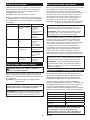
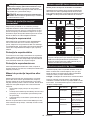
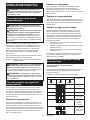
Indicating the remaining battery capacity
Only for battery cartridges with the indicator
Pressthecheckbuttononthebatterycartridgetoindicatetheremain-
ingbatterycapacity.Theindicatorlampslightupforafewseconds.
►Fig.2: 1. Indicator lamps 2.Checkbutton
Indicator lamps Remaining
capacity
Lighted O Blinking
75%to100%
50%to75%
25%to50%
0%to25%
Charge the
battery.
Thebattery
may have
malfunctioned.
NOTE: Depending on the conditions of use and the
ambienttemperature,theindicationmaydierslightly
from the actual capacity.
NOTE:Therst(farleft)indicatorlampwillblinkwhen
thebatteryprotectionsystemworks.
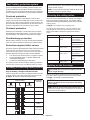
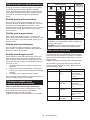
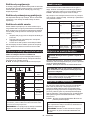
Selecting the cutting action
Thistoolcanbeoperatedwithanorbitalorastraight
line(upanddown)cuttingaction.Theorbitalcutting
actionthruststhejigsawbladeforwardandincreases
cutting speed.
►Fig.3: 1. Cutting action changing lever
To change the cutting action, turn the cutting action
changing lever to the desired cutting action position.
Refertothetabletoselecttheappropriatecutting
action.
Position Cutting action Applications
0Straight line cutting
action Forcuttingmild
steel, stainless
steel and plastics.
Forcleancutsin
wood and plywood.
ISmallorbital
cutting action Forcuttingmild
steel, aluminum
and hard wood.
II Mediumorbital
cutting action Forcuttingwood
and plywood.
Forfastcuttingin
aluminum and mild
steel.
III Largeorbital
cutting action Forfastcuttingin
wood and plywood.
Lighting up the front lamp
CAUTION: Do not look in the light or see the
source of light directly.
Toturnonthelamp,pressthelock/unlockbutton.To
turnothelamp,pressthelock/unlockbuttonagain.
►Fig.4: 1. Lamp 2.Lock/unlockbutton
NOTICE: When the tool is overheated, the lamp
blinks. Cool down the tool fully before operating
the tool again.
NOTE:Useadryclothtowipethedirtothelensof
the lamp. Be careful not to scratch the lens of lamp, or
it may lower the illumination.

11 ENGLISH
Switch action
Toturnonthetool,pressthelock/unlockbutton.The
toolturnsintothestandbymode.Tostartthetool,press
thestart/stopbuttoninthestandbymode.Tostopthe
tool,pressthestart/stopbuttonagain.Thetoolturns
intothestandbymode.Toturnothetool,pressthe
lock/unlockbuttoninthestandbymode.
►Fig.5: 1.Lock/unlockbutton2.Start/stopbutton
NOTE: If the tool is left for 10 seconds without any
operationinthestandbymode,thetoolautomatically
turnsoandthelampgoeso.
NOTE:Youcanalsostopandturnothetoolby
pressingthelock/unlockbuttonwhilethetoolis
operating.
Todecreasesthebrightnessofthelamp,pressandhold
thelock/unlockbuttonwhenturningintothestandby
mode.About1secondafteryoustartpressingthelock/
unlockbutton,thebrightnessofthelampwillstartto
decrease,soreleasethelock/unlockbuttonwhenyou
reachthedesiredbrightness.Itturnsthetoolintothe
standbymode,too.About3secondsafteryoustart
pressingthelock/unlockbutton,thebrightnessofthe
lampwillbeminimizedandthebrightnesswillnot
change after that.
NOTE:Thebrightnessofthelampcannotbe
adjustedwhilethetoolisinstandbymode.Toadjust
thebrightnessofthelamp,turnothetool.
NOTE:Thereisnomemoryfunctionforthebright-
nessofthelamp.Ifyouturnthelampoandthenturn
iton,thebrightnessofthelampwillbemaximized
each time.
Speed adjusting dial
Thetoolspeedcanbeadjustedbyturningthespeed
adjustingdial.Youcangetthehighestspeedat5and
the lowest speed at 1.
►Fig.6: 1.Speedadjustingdial
Refertothetabletoselecttheproperspeedforthe
workpiecetobecut.However,theappropriatespeed
maydierwiththetypeorthicknessoftheworkpiece.In
general, higher speeds will allow you to cut workpieces
fasterbuttheservicelifeofthejigsawbladewillbe
reduced.
Workpiece Number
Wood 4-5
Mild steel 3 - 5
Stainless steel 3-4
Aluminum 3 - 5
Plastics 1-4
NOTICE: The speed adjusting dial can be turned
only as far as 5 and back to 1. Do not force it past
5 or 1, or the speed adjusting function may no
longer work.
Electronic function
The tool is equipped with the electronic functions for
easy operation.
Soft start
The soft-start function minimizes start-up shock, and
makes the tool start smoothly.
Constant speed control
Electronicspeedcontrolforobtainingconstantspeed.
Possibletogetnenish,becausethetoolspeedis
kept constant even under load condition.
Soft no-load rotation function
Toreducethevibrationandalignthejigsawbladewith
the cutting line easily, the tool automatically reduces
the tool speed until the tool starts cutting the workpiece
whenthespeedadjustingdialissetat2orhigher.Once
the tool starts cutting the workpiece, the tool speed
reaches the preset speed and keeps the speed until the
tool stops.
NOTE: When the temperature is low, this function
maynotbeavailable.Also,dependingonthemate-
rial,jigsawblade,andtoolspeed,thisfeaturemay
notbeavailable.
Disabling or enabling the soft no-load
rotation function
Todisableorenablethesoftno-loadrotationfunction,
followthestepsbelow.
1. Makesurethatthetoolisturnedo.
2. Setthespeedadjustingdialto"1".
3. Pressthelock/unlockbuttontoturnonthetool.
4. Setthespeedadjustingdialto"5"byturningit,
andthensetitto"1"byturnitback.
Thelampblinkstwicetoindicatethatthesoftno-load
rotationfunctionisdisabled.Toenablethisfunction
again, perform the same procedure again.
NOTE:Ifthesoftno-loadrotationfunctionisdisabled,
thelampblinkstwicewhenthetoolisturnedon.
NOTE:Youcanalsodisableorenablethesoft
no-loadrotationfunctionbychangingthespeed
adjustingdialfrom"5"to"1"andchangingitfrom"1"
to "5".
Electric brake
Thistoolisequippedwithanelectricbrake.Ifthetool
consistentlyfailstoquicklystopafterthestart/stop
buttonorthelock/unlockbuttonispressed,havethe
tool serviced at a Makita service center.

12 ENGLISH
ASSEMBLY
CAUTION: Always be sure that the tool is
switched o and the battery cartridge is removed
before carrying out any work on the tool.
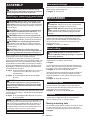
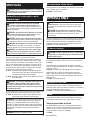
Installing or removing jig saw blade
CAUTION: Always clean out all chips or for-
eign matter adhering to the jig saw blade and/or
blade holder.Failuretodosomaycauseinsucient
tighteningofthejigsawblade,resultinginaserious
personalinjury.
CAUTION: Do not touch the jig saw blade or
the workpiece immediately after operation. They
maybeextremelyhotandcouldburnyourskin.
CAUTION: Always secure the jig saw blade
rmly.Insucienttighteningofthejigsawblademay
causethebladebreakageorseriouspersonalinjury.
CAUTION: Use only B type jig saw blades.
UsingbladesotherthanBtypecausesinsucient
tighteningofthejigsawblade,resultinginaserious
personalinjury.
CAUTION: When you remove the jig saw
blade, be careful not to hurt your ngers with the
top of the jig saw blade or the tips of workpiece.
Beforeinstallingthejigsawblade,makesurethatthe
bladeclampleverisinthereleasedposition.
Toinstallthejigsawblade,insertthejigsawblade
(teethfacingforward)intothejigsawbladeholder.The
bladeclamplevermovestothexedpositionandthe
jigsawbladeislocked.Makesurethatthebackedge
ofthejigsawbladetsintotheroller.Pullthejigsaw
bladelightlytomakesurethatthejigsawbladedoes
notfalloduringoperation.
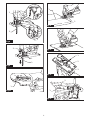
►Fig.7: 1.Jigsawbladeholder2. Blade clamp lever
(released position) 3. Blade clamp lever
(xedposition)
►Fig.8: 1.Jigsawbladeholder2.Jigsawblade
3. Roller
CAUTION: If the blade clamp lever does not
move to the xed position, the jig saw blade is
not installed completely. Do not press the blade
clamp lever by hand to the xed position. It may
damage the tool.
Toremovethejigsawblade,pushthebladeclamplever
forwardasfarasitwillgo.Thisallowsthejigsawblade
tobereleased.
►Fig.9: 1.Jigsawbladeholder2. Blade clamp lever
3.Jigsawblade
NOTE:Ifitisdiculttoremovethejigsawblade,turn
the cutting action changing lever to the position "III"
andmovethejigsawbladeholdertothebottom.To
movethejigsawbladeholdertothebottom,return
thebladeclampleverfullytothexedpositiononce
and slightly switch on the tool several times.
NOTE:Occasionallylubricatetheroller.
Hex wrench storage
When not in use, store the hex wrench as shown in the
guretokeepitfrombeinglost.
►Fig.10: 1. Hex wrench
OPERATION
CAUTION: Always hold the base ush with
the workpiece.Failuretodosomaycausejigsaw
bladebreakage,resultinginaseriousinjury.
CAUTION: Advance the tool very slowly when
cutting curves or scrolling.Forcingthetoolmay
causeaslantedcuttingsurfaceandjigsawblade
breakage.
Turnthetoolonwithoutthejigsawblademakingany
contactandwaituntilthejigsawbladeattainsfull
speed.Thenrestthebaseatontheworkpieceand
gently move the tool forward along the previously
marked cutting line.
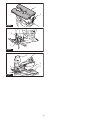
►Fig.11: 1. Cutting line 2. Base
Bevel cutting
CAUTION: Always be sure that the tool is
switched o and the battery cartridge is removed
before tilting the base.
Withthebasetilted,youcanmakebevelcutsatany
anglebetween0°and45°(leftorright).
►Fig.12
Loosentheboltonthebackofthebasewiththehex
wrench.Movethebasesothattheboltispositionedin
thecenterofthecross-shapedslotinthebase.
►Fig.13: 1. Hex wrench 2. Bolt 3. Base
Tiltthebaseuntilthedesiredbevelangleisobtained.
Theedgeofthemotorhousingindicatesthebevel
anglebygraduations.Thentightenthebolttosecure
thebase.
►Fig.14: 1.Edge2. Graduation
Front ush cuts
Loosentheboltonthebottomofthebasewiththe
hexwrenchandslidethebaseallthewayback.Then
tightenthebolttosecurethebase.
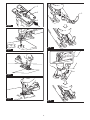
►Fig.15: 1. Hex wrench 2. Bolt 3. Base
Cutouts
Cutoutscanbemadewitheitheroftwomethods:
“Boringastartinghole”or“Plungecutting”.
Boring a starting hole
Forinternalcutoutswithoutalead-incutfromanedge,
pre-drill a starting hole 12 mm or more in diameter.
Insertthejigsawbladeintothisholetostartyourcut.
►Fig.16

13 ENGLISH
Plunge cutting
Youneednotboreastartingholeormakealead-incut
if you carefully do as follows.
1. Touchthefrontedgeofthebasetotheworkpiece,
andtiltthetoolwiththejigsawbladepointpositioned
justabovetheworkpiecesurface.
2. Apply pressure to the tool so that the front edge of
thebasewillnotmovewhenyouswitchonthetooland
gentlylowerthebackendofthetoolslowly.
3. Asthejigsawbladepiercestheworkpiece,slowly
lowerthebaseofthetooldownontotheworkpiece
surface.
4. Complete the cut in the normal manner.
►Fig.17
Finishing edges
Totrimedgesormakedimensionaladjustments,runthe
jigsawbladelightlyalongthecutedges.
►Fig.18
Metal cutting
Alwaysuseasuitablecoolant(cuttingoil)whencutting
metal.Failuretodosowillcausesignicantjigsaw
bladewear.Theundersideoftheworkpiececanbe
greased instead of using a coolant.
Dust extraction
Installing or removing the dust cover
Installthedustcoverasshowninthegure.
►Fig.19: 1. Dust cover
To remove the dust cover, press one side of the cover,
andthenremoveitasshowninthegure.
►Fig.20: 1. Dust cover
Installing or removing the dust
nozzle
You can connect this tool to a Makita vacuum cleaner
byattachingthedustnozzle.
Insert the dust nozzle all the way into the tool.
►Fig.21: 1. Dust nozzle
To remove the dust nozzle, pull out the dust nozzle
whilepressingthebuttononthedustnozzle.
►Fig.22: 1. Button 2. Dust nozzle
Connecting the tool to the vacuum
cleaner
Connect the hose of the vacuum cleaner to the dust
nozzle.
►Fig.23
Rip fence
Optional accessory
CAUTION: Always be sure that the tool is
switched o and the battery cartridge is removed
before installing or removing accessories.
Straight cuts
When repeatedly cutting widths of 160 mm or less, use
of the rip fence will assure fast, clean, straight cuts.
►Fig.24: 1. Rip fence (Guide rule)
Toinstall,insertthebarpartintothesquareholeofthe
basewiththefencepartfacingdown.Slidetheripfence
to the desired cutting width position, then tighten the
bolttosecureit.
►Fig.25: 1. Hex wrench 2. Bolt 3. Rip fence (Guide
rule)
Circular cuts
Whencuttingcirclesorarcsof170mmorlessinradius,
install the rip fence as follows.
►Fig.26: 1. Rip fence (Guide rule)
CAUTION: Do not touch the tip of the circular
guide pin. The sharp tip of the circular guide pin can
causeinjury.
1. Insertthebarpartintothesquareholeofthebase
with the fence part facing up.
2. Insert the circular guide pin through either of the
twoholesonthefencepart.Screwthethreadedknob
onto the circular guide pin to secure the circular guide
pin.
►Fig.27: 1.Threadedknob2. Rip fence (Guide rule)
3. Circular guide pin 4. Bolt 5. Hex wrench
3. Slide the rip fence to the desired cutting radius,
andtightenthebolttosecureitinplace.
NOTE:AlwaysusejigsawbladesNo.B-17,B-18,
B-26orB-27whencuttingcirclesorarcs.
Anti-splintering device
Optional accessory
CAUTION: The anti-splintering device cannot
be used when making bevel cuts.
Forsplinter-freecuts,theanti-splinteringdevicecan
beused.Toinstalltheanti-splinteringdevice,movethe
toolbaseallthewayforwardandtitfromthebackof
toolbase.
When you use the cover plate, install the anti-splintering
device onto the cover plate.
►Fig.28: 1. Base 2. Anti-splintering device
Cover plate
Use the cover plate when cutting decorative veneers,
plastics, etc. It protects sensitive or delicate surfaces
fromdamage.Fititonthebottomofthetoolbase.
►Fig.29: 1. Cover plate 2. Base

14 ENGLISH
Guide rail adapter set
Optional accessory
When cutting parallel and uniform width or cutting
straight, the use of the guide rail and the guide rail
adapter will assure the production of fast and clean
cuts. To install the guide rail adapter, insert the rule
barintothesquareholeofthebaseasfarasitgoes.
Securetheboltwiththehexwrenchsecurely.
►Fig.30: 1. Hex wrench 2.Rulebar3. Bolt
Inserttherulebarintothesquareholeoftheguiderail
adapter,andsecurethescrewrmly.Placetheguide
rail adapter on the guide rail.
►Fig.31: 1. Guide rail adapter 2. Guide rail 3. Screw
NOTICE:AlwaysusejigsawbladesNo.B-8,B-13,
B-16,B-17or58whenusingtheguiderailandthe
guide rail adapter.
MAINTENANCE
CAUTION: Always be sure that the tool is
switched o and the battery cartridge is removed
before attempting to perform inspection or
maintenance.
NOTICE: Never use gasoline, benzine, thinner,
alcohol or the like. Discoloration, deformation or
cracks may result.
TomaintainproductSAFETYandRELIABILITY,
repairs,anyothermaintenanceoradjustmentshould
beperformedbyMakitaAuthorizedorFactoryService
Centers, always using Makita replacement parts.
OPTIONAL ACCESSORIES
CAUTION: These accessories or attachments
are recommended for use with your Makita tool
specied in this manual. The use of any other
accessories or attachments might present a risk of
injurytopersons.Onlyuseaccessoryorattachment
for its stated purpose.
If you need any assistance for more details regard-
ing these accessories, ask your local Makita Service
Center.
• Jigsawblades
• Rip fence (guide rule) set
• Guide rail adapter set
• Anti-splintering device
• Cover plate
• Dust nozzle
• Dust cover
• Makitagenuinebatteryandcharger
NOTE:Someitemsinthelistmaybeincludedinthe
tool package as standard accessories. They may
dierfromcountrytocountry.

15 SLOVENŠČINA
SLOVENŠČINA (Originalna navodila)
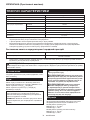
TEHNIČNI PODATKI
Model: DJV185
Dolžinahoda 23 mm
Hodi na minuto 800 – 3.000 min-1
Tip rezila Tip B
Največjezmogljivostirezanja Les 135 mm
Mehkojeklo 10 mm
Aluminij 20 mm
Celotnadolžina(zBL1860B) 259 mm
Nazivna napetost D.C. 18 V
Netoteža 2,0 – 2,3 kg
• Kernenehnoopravljamoraziskaveinrazvijamosvojeizdelke,selahkotehničnipodatkivtemdokumentu
spremenijobrezobvestila.
• Tehničnipodatkiselahkorazlikujejooddržavedodržave.
• Težaselahkorazlikujegledenapriključke,vključnozakumulatorskobaterijo.Najlažjainnajtežjakombinacijav
skladuspostopkomEPTA01/2014staprikazanivpreglednici.
Uporabna akumulatorska baterija in polnilnik
Baterijskivložek BL1815N/BL1820B/BL1830B/BL1840B/BL1850B/BL1860B
Polnilnik DC18RC/DC18RD/DC18RE/DC18SD/DC18SE/DC18SF/
DC18SH/DC18WC
• Nekaterezgorajnavedeneakumulatorskebaterijeinpolnilnikimordavvašidržaviprebivališčanisonavoljo.
OPOZORILO: Uporabljajte le zgoraj navedene akumulatorske baterije in polnilnike.Uporabadrugih
akumulatorskihbaterijinpolnilnikovlahkopovzročitelesnepoškodbein/alipožar.
Predvidena uporaba
Orodjejenamenjenozažaganjelesa,plastikein
kovinskih materialov.
Hrup
ObičajnaA-ovrednotenaravenhrupavskladuz
EN62841-2-11:
Ravenzvočnegatlaka(LpA):84dB(A)
Ravenzvočnemoči(LWA):95dB(A)
Odstopanje(K):3dB(A)
OPOMBA:Navedenevrednostioddajanjahrupaso
bileizmerjenevskladusstandardnimimetodami
testiranjainselahkouporabljajozaprimerjavoorodij.
OPOMBA:Navedenevrednostioddajanjahrupa
selahkouporabljajotudipripredhodnioceni
izpostavljenosti.
OPOZORILO: Uporabljajte zaščito za sluh.
OPOZORILO: Oddajanje hrupa med dejansko
uporabo električnega orodja se lahko razlikuje od
navedenih vrednosti, odvisno od načina uporabe
orodja in predvsem vrste obdelovanca.
OPOZORILO: Upravljavec mora za lastno
zaščito poznati varnostne ukrepe, ki temeljijo
na oceni izpostavljenosti v dejanskih pogojih
uporabe (poleg časa proženja je treba upoštevati
celoten delovni cikel, vključno s časom, ko je
orodje izklopljeno, in časom, ko deluje v prostem
teku).
Vibracije
Skupnevrednostivibracij(vektorskavsotatrehosi)v
skladuzEN62841-2-11:
Delovninačin:rezanjeplošč
Oddajanjetresljajev(ah, B):10,3m/s2
Odstopanje(K):1,7m/s2
Delovninačin:rezanjepločevine
Oddajanjetresljajev(ah, M):9,0m/s2
Odstopanje(K):1,5m/s2

16 SLOVENŠČINA
OPOMBA:Navedeneskupnevrednostioddajanja
vibracijsobileizmerjenevskladusstandardnimi
metodamitestiranjainselahkouporabljajozaprimer-
javoorodij.
OPOMBA:Navedeneskupnevrednostioddajanja
vibracijselahkouporabljajotudipripredhodnioceni
izpostavljenosti.
OPOZORILO: Oddajanje vibracij med
dejansko uporabo električnega orodja se lahko
razlikuje od navedenih vrednosti, odvisno
od načina uporabe orodja in predvsem vrste
obdelovanca.
OPOZORILO: Upravljavec mora za lastno
zaščito poznati varnostne ukrepe, ki temeljijo
na oceni izpostavljenosti v dejanskih pogojih
uporabe (poleg časa proženja je treba upoštevati
celoten delovni cikel, vključno s časom, ko je
orodje izklopljeno, in časom, ko deluje v prostem
teku).
Izjave o skladnosti
Samo za evropske države
IzjaveoskladnostisovključenevdodatkuAtehnavodil
zauporabo.
VARNOSTNA OPOZORILA
Splošna varnostna opozorila za
električno orodje
OPOZORILO Preberite vsa varnostna opozorila
ter navodila s slikami in tehničnimi podatki, ki so
priloženi temu električnemu orodju.Obneupošteva-
njuspodajnavedenihnavodilobstajanevarnostelek-
tričnegaudara,požarain/alihudihtelesnihpoškodb.
Shranite vsa opozorila in navo-
dila za poznejšo uporabo.
Izraz„električnoorodje“vopozorilihsenanašanavaše
električnoorodje(skablom)alibaterijskoelektrično
orodje(brezkabla).
Varnostna opozorila za uporabo
brezžične vbodne žage
1. Če obstaja nevarnost, da bi z rezilnim orodjem
prerezali skrito električno napeljavo, držite ele-
ktrično orodje na izoliranih držalnih površinah.
Obstikuzvodnikipodnapetostjodobijonapetost
vsineizoliranikovinskidelielektričnegaorodja,
zaradičesarlahkouporabnikutrpielektričniudar.
2. Uporabljajte sponke ali druge praktične načine
za pritrditev in podporo obdelovanca na sta-
bilno podlago.Čedržiteobdelovaneczroko
aliganaslanjatenatelo,jenestabileninlahko
povzročiizgubonadzora.
3. Vedno uporabljajte zaščitna očala. Navadna ali
sončna očala NISO zaščitna očala.
4. Izogibajte se rezanju žebljev. Preglejte obde-
lovanec, če so v njem žeblji, in jih pred delom
odstranite.
5. Ne režite prevelikih obdelovancev.
6. Pred rezanjem preverite ustrezen prostor
okrog obdelovanca, tako da rezilo vbodne
žage ne bo udarilo ob tla, delovni pult itd.
7. Trdno držite orodje.
8. Preden vklopite stikalo, se prepričajte, da se
rezilo vbodne žage ne dotika obdelovanca ipd.
9. Ne približujte rok premikajočim se delom.
10. Orodja ne pustite delovati brez nadzora.
Dovoljeno ga je uporabljati samo ročno.
11. Orodje vedno izključite in počakajte, da se
rezilo vbodne žage popolnoma ustavi, preden
odstranite rezilo vbodne žage iz obdelovanca.
12.
Neposredno po končani obdelavi se ne dotikajte
rezila vbodne žage ali obdelovanca; lahko sta
zelo vroča in se lahko z njima opečete.
13. Ne uporabljajte orodja brez obremenitve po
nepotrebnem.
14. Nekateri materiali vsebujejo kemikalije, ki so
lahko strupene. Bodite previdni ter preprečite
vdihavanje prahu in stik s kožo. Upoštevajte
varnostne podatke dobavitelja materiala.
15. Vedno uporabite ustrezno protiprašno masko/
respirator za načrtovani material in uporabo.
SHRANITE TA NAVODILA.
OPOZORILO: NE dovolite, da bi zaradi udob-
nejšega dela ali znanja o uporabi izdelka (prido-
bljenega z večkratno uporabo) opustili strogo
upoštevanje varnostnih zahtev v okviru pravilne
uporabe orodja. ZLORABA ali neupoštevanje var-
nostnih zahtev v teh navodilih za uporabo lahko
povzroči resne telesne poškodbe.
Pomembna varnostna navodila za
akumulatorsko baterijo
1. Pred uporabo baterijskega vložka preberite
vsa navodila in opozorilne oznake na (1) pol-
nilniku akumulatorja, (2) akumulatorju in (3)
izdelku, ki uporablja akumulator.
2. Ne razstavljajte ali spreminjajte akumulatorske
baterije.Stemlahkopovzročitepožar,preko-
mernovročinoalieksplozijo.
3. Če se je čas delovanja občutno skrajšal, takoj
prenehajte uporabljati orodje. V nasprotnem
primeru lahko pride do pregretja, morebitnih
opeklin in celo eksplozije.
4. Če pride elektrolit v stik z očmi, jih sperite s
čisto vodo in takoj poiščite zdravniško pomoč.
Posledica je lahko izguba vida.
5. Ne povzročite kratkega stika baterijskega
vložka:
(1) Ne dotikajte se priključkov s kakršnim
koli prevodnim materialom.
(2) Izogibajte se shranjevanju baterijskega
vložka v vsebniku z drugimi kovinskimi
predmeti kot so žeblji, kovanci itn.
(3) Ne izpostavljajte baterijskega vložka vodi
ali dežju.

17 SLOVENŠČINA
Kratek stik akumulatorja lahko povzroči velik
električni tok, pregrevanje, morebitne opekline
in celo okvaro.
6. Ne shranjujte in uporabljajte orodja in akumu-
latorske baterije na mestih, kjer lahko tempera-
tura doseže ali preseže 50 °C (122 °F).
7. Ne sežigajte baterijskega vložka, tudi če je
hudo poškodovan ali v celoti izpraznjen.
Baterijski vložek lahko v ognju eksplodira.
8. Ne pribijajte, režite, drobite, mečite, spuščajte
akumulatorske baterije oziroma ne udarjajte
z akumulatorsko baterijo po trdem predmetu.
Takšnoravnanjelahkopovzročipožar,preko-
mernovročinoalieksplozijo.
9. Ne uporabljajte poškodovanih akumulatorjev.
10. Priložene litij-ionske baterije ustrezajo zahte-
vam zakonodaje v zvezi z nevarnim blagom.
Zakomercialneprevoze,npr.tiste,kijihopravljajo
tretjestrankeincarinskiposredniki,jetrebaupo-
števatiposebnezahtevevzvezizembalažoin
označevanjem.
Med postopkom priprave na odpremo izdelka se
jetrebaposvetovatisstrokovnjakomzanevarne
snovi.Pritemupoštevajtetudipodrobnejšenacio-
nalne predpise.
Odprtestikeoblepitezlepilnimtrakomalijihdru-
gačezaščitite,baterijopazapakirajtetako,dasev
embalažinemorepremikati.
11. Ko odstranjujete akumulatorsko baterijo, jo
vzemite iz orodja in varno zavrzite. Upoštevajte
lokalne uredbe glede odlaganja baterije.
12. Baterije uporabljajte le z izdelki, ki jih določi
Makita.Čenamestitebaterijevneskladneizdelke,
lahkopridedopožara,pregrevanja,eksplozijeali
puščanjaelektrolita.
13. Če orodja dlje časa ne uporabljate, morate iz
njega odstraniti baterijo.
14. Med uporabo in po uporabi lahko akumu-
latorska baterija postane vroča in povzroči
opekline. Z vročimi akumulatorskimi baterijami
ravnajte pazljivo.
15.
Ne dotikajte se priključka orodja takoj po uporabi,
ker se lahko dovolj segreje, da povzroči opekline.
16.
Ne dovolite, da bi se v priključke, odprtine in utore
akumulatorske baterije zlepili ostružki, prah ali
zemlja.Tolahkopovzročipregrevanje,požar,razpo-
čenjeinokvaroorodjaaliakumulatorskebaterijeter
privededoopeklinalidrugihtelesnihpoškodb.
17. Razen če orodje podpira uporabo v bližini
visokonapetostnih električnih vodov, akumula-
torske baterije ne uporabljajte v bližini visoko-
napetostnih električnih vodov.Takšnauporaba
lahkopovzročimotnjevdelovanjualiokvaro
orodjaoziromaakumulatorskebaterije.
18. Baterijo hranite izven dosega otrok.
SHRANITE TA NAVODILA.
POZOR: Uporabljajte le originalne baterije
Makita.ČeuporabljateneoriginalnebaterijeMakita
alibaterije,kisobilespremenjene,lahkopridedo
eksplozijebaterijeinposledičnodopožara,telesnih
poškodbalimaterialneškode.Stakšnouporabo
bostetudirazveljaviligarancijoMakitazaorodjein
polnilnik Makita.
Nasveti za ohranjanje največje
zmogljivosti akumulatorja
1. Napolnite baterijski vložek, preden se v celoti
izprazni. Ko opazite, da ima orodje manjšo
moč, vedno ustavite delovanje orodja in napol-
nite baterijski vložek.
2. Nikoli znova ne polnite popolnoma napol-
njenega baterijskega vložka. Prenapolnjenje
skrajša življenjsko dobo akumulatorja.
3. Baterijski vložek s sobno temperaturo pol-
nite pri temperaturi okolja od 10 °C do 40 °C.
Počakajte, da se vroč baterijski vložek pred
polnjenjem ohladi.
4. Ko akumulatorske baterije ne uporabljate, jo
odstranite iz orodja ali polnilnika.
5. Če baterijskega vložka ne uporabljate dalj časa
(več kot 6 mesecev), ga napolnite.
OPIS DELOVANJA
POZOR: Pred nastavljanjem ali preizkusom
delovanja orodja se prepričajte, ali je orodje
izključeno in ali je akumulatorska baterija
odstranjena.
Nameščanje ali odstranjevanje
akumulatorske baterije
POZOR: Vedno izklopite orodje, preden name-
stite ali odstranite akumulatorsko baterijo.
POZOR: Kadar nameščate ali odstranjujete
akumulatorsko baterijo, trdno držite orodje in
akumulatorsko baterijo.Čeorodjainakumulatorske
baterijenedržitetrdno,selahkozgodi,davamzdr-
snetaizrok,posledicapajelahkopoškodbaorodjain
akumulatorskebaterijetertelesnapoškodba.
Akumulatorskobaterijovstavitetako,daporavnate
jezičeknabaterijizutoromnaohišjuinjopotisnetev
ležišče.Potisnitejodokonca,dasezaskoči.Čevidite
rdečiindikator,kotjeprikazanonasliki,seakumulator-
skabaterijaniustreznozaskočila.
Čeželiteodstranitiakumulatorskobaterijo,jopotisnite
izorodja,pritempapomikajtegumbnasprednjistrani
vložka.
►Sl.1: 1.Rdečiindikator2.Gumb3.Baterijskivložek
POZOR: Vedno namestite akumulatorsko
baterijo tako, da rdeči indikator ni več viden.Če
teganeupoštevate,lahkobaterijanepričakovano
padeizorodjainpoškodujevasaliosebevneposre-
dnibližini.
POZOR: Ne nameščajte akumulatorske bate-
rije s silo.Česeakumulatorskabaterijanezaskoči
zlahka,nipravilnovstavljena.

18 SLOVENŠČINA
Zaščitni sistem orodja/akumulatorja
Orodjejeopremljenozzaščitnimsistemomzaorodje/
akumulator.Sistemsamodejnoprekinenapajanje
orodja,dapodaljšaživljenjskodoboorodjainakumula-
torja.Orodjesesamodejnozaustavimeddelovanjem,
čeorodjealiakumulatordelujetapodnaslednjimi
pogoji:
Zaščita pred preobremenitvijo
Kadarorodjealiakumulatoruporabljatenanačin,ki
povzročauporaboneobičajnovisokegatoka,seorodje
samodejnoustavibrezkakršnihkoliznakov.Vtem
primeruizklopiteorodjeinprekinitedelo,kijepovzročilo
preobremenitevorodja.Natovklopiteorodje,daga
znovazaženete.
Zaščita pred pregrevanjem
Čejeorodjealiakumulatorpregret,seorodjesamo-
dejnoustaviinlučkazačneutripati.Vtemprimerupoča-
kajte,daseorodjeinakumulatorohladi,predenznova
vklopiteorodje.
Zaščita pred izpraznjenjem
Kojezmogljivostbaterijeprenizka,seorodjesamo-
dejnoustavi.Vtemprimeruodstraniteakumulatorsko
baterijoizorodjainjonapolnite.
Zaščita pred drugimi vzroki
Sistemzaščitejezasnovantudizadrugevzroke,kibi
lahkopovzročilipoškodbeorodja,inomogočasamo-
dejnoustavitevorodja.Kadarseorodjezačasnoustavi
aliprenehadelovati,izveditevsenaslednjekorake,da
odpravite vzroke.
1. Izklopiteorodjeinganatovklopite,dagaznova
zaženete.
2. Napolnitebaterijoalijozamenjajteznapolnjeno
baterijo(popotrebiponovitepostopekšezadrugo
baterijo).
3. Počakajte,daseorodjeinbaterijaohladita.
Čezobnovitvijosistemazaščiteneodpravitetežave,se
obrnitenalokalniservisnicenterMakita.
Prikazuje preostalo raven
napolnjenosti akumulatorja
Samo za akumulatorske baterije z indikatorjem
Pritisnitegumbzapreverjanjenabaterijskemvložku,
dapreveriteravennapolnjenostiakumulatorja.
Indikatorskelučkenakratkozasvetijo.
►Sl.2: 1.Indikatorskelučke2.Gumbzapreverjanje
Indikatorske lučke Prikaz pre-
ostale ravni
napolnjenosti
Sveti Ne sveti Utripa
od75%do
100%
od50%do
75%
od25%do
50%
od0%do
25%
Napolnite
akumulator.
Akumulator
jemorda
okvarjen.
OPOMBA:Odvisnoodpogojevuporabeinokoljske
temperatureseoznačbalahkonekolikorazlikujeod
dejanskenapolnjenosti.
OPOMBA:Prvaopozorilnalučka(skrajnolevo)bo
utripala,kosistemzazaščitoakumulatorjadeluje.
Izbira načina delovanja
Toorodjelahkodelujeznihajnimalilinearnimhodom
rezilažage(gibanjenavzgorinnavzdol).Prinihajnem
hoduserezilovbodnežagepomikanaprejinpoveča
hitrostrezanja.
►Sl.3: 1.Ročicazaspreminjanjehodarezilažage
Zaspremembohodarezilažageobrnitepreklopnik
vželenipoložaj.Ustrezenhodrezilažageizberites
pomočjospodnjetabele.
Položaj Hod rezila žage Uporaba
0Linearni hod rezila
žage
Zarezanje
mehkegajekla,
nerjavnegajeklain
plastike.
Začisterezevles
in vezani les.
IMajhninihajnihod
rezilažage
Zarezanjemeh-
kegaželeza,
aluminijaintrdega
lesa.
II Srednjinihajnihod
rezilažage
Zarezanjelesain
veznega lesa.
Zahitrorezanjev
aluminijinmehko
jeklo.
III Velikinihajnihod
rezilažage
Zahitrorezanjev
les in vezani les.

19 SLOVENŠČINA
Vklop sprednje lučke
POZOR: Ne glejte neposredno v lučko ali vir
svetlobe.
Zavkloplučkepritisnitestikalozazaklep/odklep.Za
izkloplučkeznovapritisnitestikalozazaklep/odklep.
►Sl.4: 1.Lučka2.Gumbzazaklep/odklep
OBVESTILO: Če je orodje pregreto, lučka
utripa. Pred ponovno uporabo orodje popolnoma
ohladite.
OPOMBA:Uporabitesuhokrpo,daobrišeteumaza-
nijozlečelučke.Pazite,daneopraskatesteklalučke,
kerpraskeobčutnozmanjšajosvetilnost.
Delovanje stikala
Zavkloporodjapritisnitestikalozazaklep/odklep.Orodjepreklopiv
stanjepripravljenosti.Zazagonorodjavstanjupripravljenostipriti-
snitegumbzavklop/izklop.Zaustavitevorodjaznovapritisnitegumb
zavklop/izklop.Orodjepreklopivstanjepripravljenosti.Zaizklop
orodjavstanjupripravljenostipritisnitegumbzazaklep/odklep.
►Sl.5:
1.Gumbzazaklep/odklep2.Gumbzavklop/izklop
OPOMBA:Čeorodjepustite10sekundvstanju
pripravljenosti,nedabigauporabili,sesamodejno
izklopiinlučkaugasne.
OPOMBA:Orodjelahkoustaviteinizklopitetuditako,
dameddelovanjempritisnetegumbzazaklep/odklep.
Čeželitezmanjšatisvetlostlučke,pritisniteinpridržitegumb
zazaklep/odklep,kopreklopitevstanjepripravljenosti.
Približno1sekundopotem,kozačnetepritiskatigumbza
zaklep/odklep,sebosvetlostlučkezačelazmanjševati,zato
spustitegumbzazaklep/odklep,kodosežeteželenosvet-
lost.Tudiorodjepreklopivstanjepripravljenosti.Približno3
sekundepotem,kozačnetepritiskatigumbzazaklep/odklep,
sebosvetlostlučkezmanjšalainsepotemnebospremenila.
OPOMBA:Svetlostilučkenimogočenastaviti,koje
orodjevstanjupripravljenosti.Čeželiteprilagoditi
svetlostlučke,izklopiteorodje.
OPOMBA:Zasvetlostlučkeninavoljospominska
funkcija.Čelučkougasneteinnatovklopite,bosvet-
lostlučkevsakičnajvečja.
Gumb za nastavitev hitrosti
Hitrostorodjalahkonastavljatezvrtenjemgumbazanastavi-
tevhitrosti.Zanajvišjohitrostnastavitena5,najnižjopana1.
►Sl.6: 1.Gumbzanastavitevhitrosti
Zaizbiroustreznehitrostizaobdelovanec,kigabosterezali,
glejtetabelo.Optimalnahitrostjeodvisnatudiodvrsteindebe-
lineobdelovanca.Večjahitrostpravilomapospešihitrostreza-
nja,vendartudiskrajšaživljenjskodoborezilavbodnežage.
Obdelovanec Številka
Les 4–5
Mehkojeklo 3–5
Nerjavnojeklo 3–4
Aluminij 3–5
Plastika 1–4
OBVESTILO: Gumb za izbiro hitrosti lahko obr-
nete samo do 5 in nazaj do 1. Ne vrtite ga na silo
prek položaja 5 ali 1, ker lahko pride do okvare
funkcije nastavljanja hitrosti.
Elektronska funkcija
Orodjejeopremljenozelektronskimifunkcijamiza
enostavnodelovanje.
Mehki zagon
Funkcijamehkegazagonazmanjšasunekobzagonuin
omogočigladekzagonorodja.
Nadzor stalne hitrosti
Elektronskinadzorhitrostizastalnoštevilovrtljajev.
Možnostnekončneobdelave,sajjehitrostorodja
stalnatudimedobremenitvijo.
Funkcija mehkega zagona brez
obremenitve
Kojegumbzanastavitevhitrostinastavljennavrednost
2aliveč,orodjesamodejnozmanjšahitrostorodja,
doklernezačneterezatiobdelovanca,karzmanjša
vibriranjeinomogočilažjoporavnavorezilavbodne
žagessmerjorezanja.Kozačnetezorodjemrezati
obdelovanca,orodjedosežeprednastavljenohitrostin
joohranja,doklerganezaustavite.
OPOMBA:Kojetemperaturanizka,funkcijamorda
ninavoljo.Polegtegafunkcijamordaninavoljo,
odvisnoodmateriala,rezilavbodnežageinhitrosti
orodja.
Onemogočanje ali omogočanje funkcije
mehkega zagona brez obremenitve
Čeželiteonemogočitialiomogočitifunkcijomehkega
zagonabrezobremenitve,upoštevajtespodnjekorake.
1. Prepričajtese,dajeorodjeizklopljeno.
2.
Obrnitegumbzanastavitevhitrostinavrednost„1“.
3.
Pritisnitegumbzazaklep/odklep,davklopiteorodje.
4. Gumbzanastavitevhitrostinajprejobrnitena
vrednost„5“innatonazajna„1“.
Lučkadvakratutripne,karpomeni,dajefunkcijameh-
kegazagonabrezobremenitveonemogočena.Čeželite
funkcijoznovaomogočiti,ponovitepostopek.
OPOMBA:Čejefunkcijamehkegazagonabrez
obremenitveonemogočena,lučkadvakratutripne,ko
vklopiteorodje.
OPOMBA:Funkcijomehkegazagonabrezobre-
menitvelahkoonemogočitealiomogočitetuditako,
dagumbzanastavitevhitrostinajprejpremaknetez
vrednosti „5“ na „1“ in nato z vrednosti „1“ na „5“.
Električna zavora
Orodjejeopremljenozelektričnozavoro.Česeorodje
popritiskugumbazavklop/izklopaligumbazazaklep/
odklepnizmožnohitrozaustaviti,odnesiteorodjena
popravilo v servisni center Makita.

20 SLOVENŠČINA
MONTAŽA
POZOR: Pred vsako izvedbo dela na orodju se
prepričajte, da je le to izključeno in da je akumula-
torska baterija odstranjena.
Namestitev ali odstranitev rezila
vbodne žage
POZOR: Z rezila vbodne žage in/ali držala
rezila redno odstranjujte sprijete ostružke ali
tujke. V nasprotnem primeru lahko pride do nezado-
stnepritrditverezilavbodnežage,karpovzročihudo
telesnopoškodbo.
POZOR: Takoj po končani obdelavi se ne doti-
kajte rezila vbodne žage ali obdelovanca. Lahko
stazelovročainpovzročitaopeklinekože.
POZOR: Vedno trdno pritrdite rezilo vbodne
žage.Nezadostnapritrditevrezilavbodnežagelahko
povzročizlomrezilaalihudetelesnepoškodbe.
POZOR:
Uporabljajte samo rezila vbodne žage
tipa B.Rezilvbodnežage,kinisotipaB,nimogoče
zadostnopritrditi,karpovzročihudotelesnopoškodbo.
POZOR:
Pri odstranjevanju rezila vbodne žage
bodite previdni, da na zgodnjem delu rezila vbodne
žage ali konicah obdelovanca ne poškodujete prstov.
Predennamestiterezilovbodnežage,poskrbite,daje
vpenjalorezilažagevsproščenempoložaju.
Zanamestitevrezilavbodnežagele-tegavstavite(z
zobci,obrnjeniminaprej)vdržalorezilavbodnežage.
Ročicavpenjalarezilažagesepremaknevksnipolo-
žajinrezilovbodnežagesezaskoči.Preverite,alise
zadnjirobrezilavbodnežageprilegavvaljček.Rahlo
povleciterezilovbodnežage,dazagotovite,darezilo
vbodnežagemeddelovanjemnepade.
►Sl.7: 1.Držalorezilavbodnežage2.Ročicavpe-
njalarezilažage(sproščenipoložaj)3.Ročica
vpenjalarezilažage(ksnipoložaj)
►Sl.8: 1.Držalorezilavbodnežage2.Rezilovbodne
žage3.Valjček
POZOR: Če se ročica vpenjala rezila žage ne
premakne v ksni položaj, rezilo vbodne žage
ni pravilno nameščeno. Ne pritiskajte na ročico
vpenjala rezila žage z roko v ksni položaj. Orodje
se lahko poškoduje.
Zaodstranjevanjerezilavbodnežagepotisniteročicovpenjalarezila
žagedokoncanaprej.Takobostesprostilirezilovbodnežage.
►Sl.9: 1.Držalorezilavbodnežage2.Ročicavpe-
njalarezilažage3.Rezilovbodnežage
OPOMBA:Čejetežkoodstranitirezilovbodnežage,
obrniteročicozaspreminjanjehodarezilažagena
položaj„III“inpotisnitedržalorezilavbodnežage
navzdol.Čeželitepotisnitidržalorezilavbodnežage
navzdol,povrniteročicovpenjalarezilažagepovsem
doksnegapoložajainorodjenekajkratnarahlo
zaženite.
OPOMBA:Občasnonamažitevaljček.
Shranjevanje inbus ključa
Koinbusključaneuporabljate,gashranite,kotjeprika-
zanonasliki,daganeizgubite.
►Sl.10: 1.Inbusključ
UPRAVLJANJE
POZOR: Drsnik mora biti vedno poravnan z
obdelovancem. V nasprotnem primeru lahko pride
dozlomarezilavbodnežage,posledicapajehuda
poškodba.
POZOR: Pri rezanju krivin ustrezno zmanj-
šajte pomik orodja.Premočnopritiskanjezorodjem
lahkopovzročinenatančnostrezainzlomrezila
vbodnežage.
Korezilovbodnežagenivstikuzobdelovancem,vklopite
orodjeinpočakajte,darezilovbodnežagedosežepolno
hitrost.Prislonitedrsnikploskonaobdelovanecinstroj
previdnopomikajtenaprejvzdolžoznačenelinijereza.
►Sl.11: 1.Linijareza2. Drsnik
Poševno rezanje
POZOR: Preden nagnete drsnik, se vedno pre-
pričajte, da je orodje izklopljeno in akumulatorska
baterija odstranjena.
Znagibanjemdrsnikalahkonastavitepoljubenpoševni
kotrezanjavobmočjumed0°in45°(vlevoalidesno).
►Sl.12
Popustitevijaknaspodnjistranidrsnikazinbusklju-
čem.Premaknitedrsniktako,dajevijakvsredinikrižne
zareze v drsniku.
►Sl.13: 1.Inbusključ2.Vijak3.Osnovnaplošča
Nagnitedrsnikvpoložaj,kiustrezaželenemukotu.
Robvohišjumotorjaoznačujerazličnenastavitveza
poševnikotreza.Ponastavitvizategnitevijakzapritr-
ditev drsnika.
►Sl.14: 1.Rob2.Stopnja
Rezanje tik ob robu
Popustitevijaknadnudrsnikazimbusnimključemin
potisnitedrsnikpovsemnazajdonaslona.Ponastavitvi
zategnitevijakzapritrditevdrsnika.
►Sl.15: 1.Imbusniključ2.Vijak3. Drsnik
Izrezi
Izrezelahkoizvajatezenimodnaslednjihpostopkov:
„vrtanjepomožneizvrtine“ali„pogreznjenorezanje“.
Vrtanje pomožne izvrtine
Čeželiteizdelatiizrezbrezdovodnegarezaodroba
obdelovanca,izvrtajteskoziobdelovanecluknjospre-
merom12mmaliveč.Vstaviterezilovbodnežagev
izvrtanoluknjoinzačnitezrezanjem.
►Sl.16
Pagina se încarcă...
Pagina se încarcă...
Pagina se încarcă...
Pagina se încarcă...
Pagina se încarcă...
Pagina se încarcă...
Pagina se încarcă...
Pagina se încarcă...
Pagina se încarcă...
Pagina se încarcă...
Pagina se încarcă...
Pagina se încarcă...
Pagina se încarcă...
Pagina se încarcă...
Pagina se încarcă...
Pagina se încarcă...
Pagina se încarcă...
Pagina se încarcă...
Pagina se încarcă...
Pagina se încarcă...
Pagina se încarcă...
Pagina se încarcă...
Pagina se încarcă...
Pagina se încarcă...
Pagina se încarcă...
Pagina se încarcă...
Pagina se încarcă...
Pagina se încarcă...
Pagina se încarcă...
Pagina se încarcă...
Pagina se încarcă...
Pagina se încarcă...
Pagina se încarcă...
Pagina se încarcă...
Pagina se încarcă...
Pagina se încarcă...
Pagina se încarcă...
Pagina se încarcă...
Pagina se încarcă...
Pagina se încarcă...
Pagina se încarcă...
Pagina se încarcă...
Pagina se încarcă...
Pagina se încarcă...
Pagina se încarcă...
Pagina se încarcă...
Pagina se încarcă...
Pagina se încarcă...
Pagina se încarcă...
Pagina se încarcă...
Pagina se încarcă...
Pagina se încarcă...
Pagina se încarcă...
Pagina se încarcă...
Pagina se încarcă...
Pagina se încarcă...
Pagina se încarcă...
Pagina se încarcă...
Pagina se încarcă...
Pagina se încarcă...
Pagina se încarcă...
Pagina se încarcă...
Pagina se încarcă...
Pagina se încarcă...
Pagina se încarcă...
Pagina se încarcă...
Pagina se încarcă...
Pagina se încarcă...
Pagina se încarcă...
Pagina se încarcă...
Pagina se încarcă...
Pagina se încarcă...
-
 1
1
-
 2
2
-
 3
3
-
 4
4
-
 5
5
-
 6
6
-
 7
7
-
 8
8
-
 9
9
-
 10
10
-
 11
11
-
 12
12
-
 13
13
-
 14
14
-
 15
15
-
 16
16
-
 17
17
-
 18
18
-
 19
19
-
 20
20
-
 21
21
-
 22
22
-
 23
23
-
 24
24
-
 25
25
-
 26
26
-
 27
27
-
 28
28
-
 29
29
-
 30
30
-
 31
31
-
 32
32
-
 33
33
-
 34
34
-
 35
35
-
 36
36
-
 37
37
-
 38
38
-
 39
39
-
 40
40
-
 41
41
-
 42
42
-
 43
43
-
 44
44
-
 45
45
-
 46
46
-
 47
47
-
 48
48
-
 49
49
-
 50
50
-
 51
51
-
 52
52
-
 53
53
-
 54
54
-
 55
55
-
 56
56
-
 57
57
-
 58
58
-
 59
59
-
 60
60
-
 61
61
-
 62
62
-
 63
63
-
 64
64
-
 65
65
-
 66
66
-
 67
67
-
 68
68
-
 69
69
-
 70
70
-
 71
71
-
 72
72
-
 73
73
-
 74
74
-
 75
75
-
 76
76
-
 77
77
-
 78
78
-
 79
79
-
 80
80
-
 81
81
-
 82
82
-
 83
83
-
 84
84
-
 85
85
-
 86
86
-
 87
87
-
 88
88
-
 89
89
-
 90
90
-
 91
91
-
 92
92


Lucrări înrudite
-
Makita JV102D Manual de utilizare
-
Makita JV001G Manual de utilizare
-
Makita JV101D Manual de utilizare
-
Makita DJR143 Manual de utilizare
-
-
Makita JR103D Manual de utilizare
-
Makita 4350T Manual de utilizare
-
-
-
Makita 4300BA Manual de utilizare