
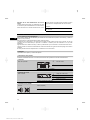
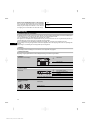
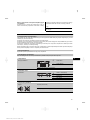
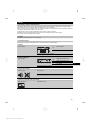
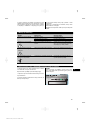
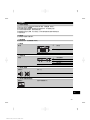
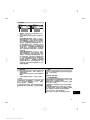
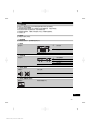
*404004*
404004
PS 30
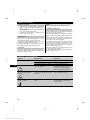
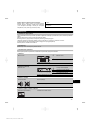
Bedienungsanleitung de
Operating instructions en
Mode d’emploi fr
Istruzioni d’uso it
Manual de instrucciones es
Manual de instruções pt
Gebruiksaanwijzing nl
Brugsanvisning da
Bruksanvisning sv
Bruksanvisning no
Käyttöohje
Οδηγιεςχρησεως el
Használati utasítás hu
Instrukcjaobsługi pl
Инструкцияпозксплуатации ru
Návod k obsluze cs
Návod na obsluhu sk
Upute za uporabu hr
Navodila za uporabo sl
Ръководствозаобслужване bg
Instrucţiunideutilizare ro
KulllanmaTalimatı tr
Lietošanaspamācība lv
Instrukcija lt
Kasutusjuhend et
Інструкціязексплуатації uk
ja
ko
zh
cn
Printed: 27.10.2015 | Doc-Nr: PUB / 5070391 / 000 / 02

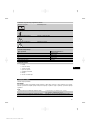
2 1
3
54
1
Printed: 27.10.2015 | Doc-Nr: PUB / 5070391 / 000 / 02

2
Printed: 27.10.2015 | Doc-Nr: PUB / 5070391 / 000 / 02

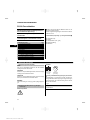
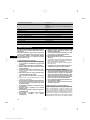
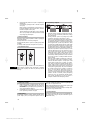
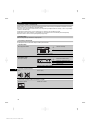
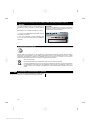
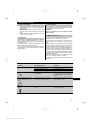
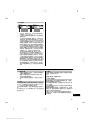
ORIGINAL BEDIENUNGSANLEITUNG
PS 30 Ferrodetektor
Lesen Sie die Bedienungsanleitung vor Inbe-
triebnahme unbedingt durch.
Bewahren Sie diese Bedienungsanleitung im-
mer beim Gerät auf.
Geben Sie das Gerät nur mit Bedienungsanlei-
tung an andere Personen weiter.
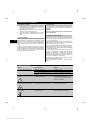
Inhaltsverzeichnis Seite
1 Allgemeine Hinweise 1
2 Beschreibung 2
3 Technische Daten 3
4 Sicherheitshinweise 4
5 Inbetriebnahme 5
6 Bedienung 6
7 Pflege und Instandhaltung 7
8 Fehlersuche 7
9 FCC-Hinweis (gültig in USA) / ICES-Hinweis
(gültig in Kanada) 8
10 Entsorgung 8
11 Herstellergewährleistung Geräte 8
12 EG-Konformitätserklärung (Original) 9
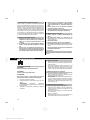
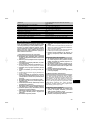
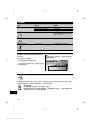
1 Die Zahlen verweisen auf Abbildungen. Die Abbildun-
gen finden Sie am Anfang der Bedienungsanleitung.
Im Text dieser Bedienungsanleitung bezeichnet »das Ge-
rät« immer den Ferrodetektor PS 30.
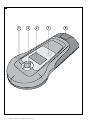
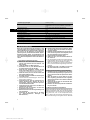
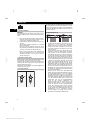
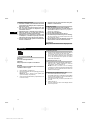
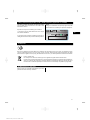
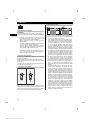
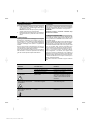
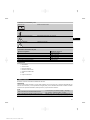
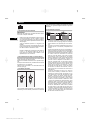
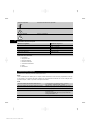
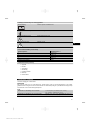
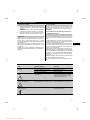
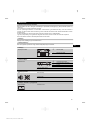
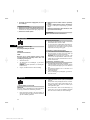
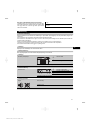
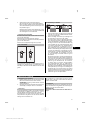
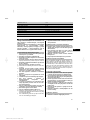
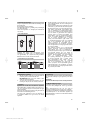
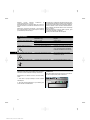
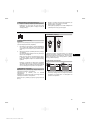
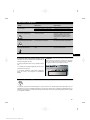
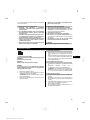
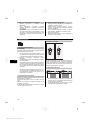
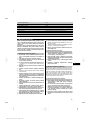
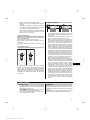
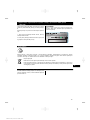
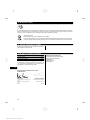
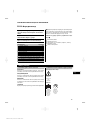
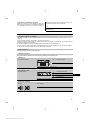
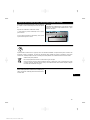
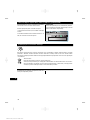
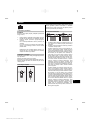
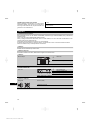
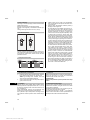
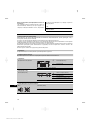
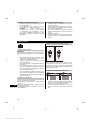
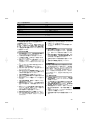
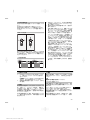
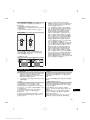
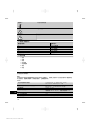
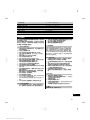
Gerätebauteile, Bedienungs‑ und Anzeigeelemente 1
@
Ein-/ Aus-Taste
;
Anzeigefeld
=
Status-LEDs (rot / grün)
%
Markieröffnung
&
Batteriefach
1 Allgemeine Hinweise
1.1 Signalwörter und ihre Bedeutung
GEFAHR
Für eine unmittelbar drohende Gefahr, die zu schweren
Körperverletzungen oder zum Tod führt.
WARNUNG
Für eine möglicherweise gefährliche Situation, die zu
schweren Körperverletzungen oder zum Tod führen kann.
VORSICHT
Für eine möglicherweise gefährliche Situation, die zu
leichten Körperverletzungen oder zu Sachschaden führen
könnte.
HINWEIS
Für Anwendungshinweise und andere nützliche Informa-
tionen.
1.2 Erläuterung der Piktogramme und weitere
Hinweise
Warnzeichen
Warnung vor
allgemeiner
Gefahr
Symbole
Vor
Benutzung
Bedienungs-
anleitung
lesen
Materialien
der Wieder-
verwertung
zuführen
de
1
Printed: 27.10.2015 | Doc-Nr: PUB / 5070391 / 000 / 02

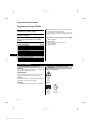
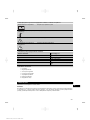
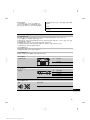
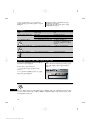
1
2
1 2 3 4
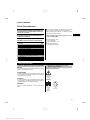
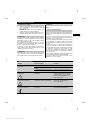
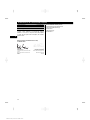
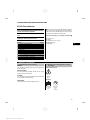
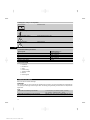
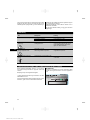
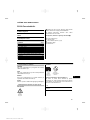
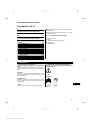
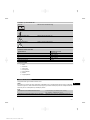
Ort der Identifizierungsdetails auf dem Gerät
Die Typenbezeichnung und die Serienkennzeichnung
sind auf dem Typenschild Ihres Geräts angebracht.
Übertragen Sie diese Angaben in Ihre Bedienungsan-
leitung und beziehen Sie sich bei Anfragen an unsere
Vertretung oder Servicestelle immer auf diese Angaben.
Typ:
Serien Nr.:
2Beschreibung
2.1 Bestimmungsgemässe Verwendung
Der Hilti Ferrodetektor PS 30 ist zur Detektion von Eisenmetallen (Armierungseisen) und Nicht-Eisenmetallen (Kupfer
und Aluminium) bestimmt.
Für die Lokalisierung von Spannkabeln ist das Gerät nicht geeignet.
Vom Gerät und seinen Hilfsmittelnkönnen Gefahren ausgehen, wenn sie von unausgebildetem Personal unsachgemäss
behandelt oder nicht bestimmungsgemäss verwendet werden.
Befolgen Sie die Angaben zu Betrieb, Pflege und Instandhaltung in der Bedienungsanleitung.
Berücksichtigen Sie die Umgebungseinflüsse. Benutzen Sie das Gerät nicht, wo Brand‑ oder Explosionsgefahr besteht.
Manipulationen oder Veränderungen am Gerät sind nicht erlaubt.
2.2 Anzeigefeld
Die Anzeige stellt Einstellungen und den Gerätestatus dar.
2.3 Anzeigenbeleuchtung
Bei geringer Umgebungshelligkeit wird die Anzeigenbeleuchtung automatisch eingeschaltet.
2.4 Display
Bereiche des Displays
@
Statusbereich
;
Detektionsbereich
Stellt die zwei Bereiche des Displays dar
2.5 Statusanzeige
Statusbereich
@
Eisenmetall-Objekt
;
Nichteisenmetall-Objekt
=
Ton aus
%
Batteriestatus
Stellt dar, welcher Status aktiv ist
2.6 Display-Symbole
Ton aktiv (links)
inaktiv (rechts)
de
2
Printed: 27.10.2015 | Doc-Nr: PUB / 5070391 / 000 / 02

2.7 Display Warn- und Fehlersymbole
Fehlermeldung Service kontaktieren
Temperaturwarnung Unzulässiger Betriebsbereich
Elektromagnetische Störung Umgebungsstörung zu groß
Kalibrierwarnung Kalibrierung erforderlich
2.8 Zustandsanzeige der Batterie
Anzahl Segmente
Ladezustand in %
3
=100%voll
2
=80 % voll
1
=50 % voll
0
=20 % voll
Batteriesymbol blinkt =leer
2.9 Lieferumfang
1 Gerät
1 Handschlaufe
1 Gerätetasche
1 Bedienungsanleitung
1 Herstellerzertifikat
4Batterien
2Markierstifte
3 Technische Daten
Technische Änderungen vorbehalten!
HINWEIS
Alle Angaben gelten für ein einzelnes stabförmiges metallisches Objekt, senkrecht zur Bewegungsrichtung und eine
flache, glatte Betonoberfläche ohne äussere Störeinflüsse. Bei Messungen auf Ziegeluntergrund ist der Messbereich
und die Messgenauigkeit eingeschränkt.
PS 30
Messbereich zur Lokalisierung von Eisenmetallen > ∅ 8 mm (≧ # 3): 5…120 mm (¼ in ... 4¾ in)
∅ 6…8 mm: 5…100 mm (¼ in ...4 in)
Messbereich zur Lokalisierung von Nicht-Eisenmetallen
(Kupfer- und Aluminiumrohre)
Durchmessermin.10mm(½in),Wandstärkemin.2
mm (³/₃₂ in): 5…80 mm (¼ in ... 3¹/₈ in)
de
3
Printed: 27.10.2015 | Doc-Nr: PUB / 5070391 / 000 / 02

Lokalisierungsgenauigkeit ±10 mm (± ½ in)
Minimaler Objektabstand Tiefenbereich 5...55 mm (¼ ...2¹/₈ in): 55 mm (2¹/₈ in)
Tiefenbereich >55 mm (2¹/₈ in): Abstand / Tiefe Faktor
>1.5
Energieversorgung 4x1,5V (AAA) LR03 Alkali-Mangan-Batterien
Betriebsdauer bei 20 °C 10 h
Betriebstemperatur -15…+50 °C (5° F bis 122° F)
Selbstabschaltung 5 min
Lagertemperatur (trocken) -25…+63 °C (-13°F bis 145°F)
Relative Luftfeuchtigkeit
95 %
Schutzklasse IP 54 (Staub‑ und Spritzwassergeschützt)
Gewicht (inklusive Batterien) 420 g (0,99 lbs)
Abmessungen (L x B x H) 237 mm x 104 mm x 47 mm (9,4 in x 4 in x 2 in)
4 Sicherheitshinweise
Neben den sicherheitstechnischen Hinweisen in den
einzelnen Kapiteln dieser Bedienungsanleitung sind
folgende Bestimmungen jederzeit strikt zu beachten.
Das Gerät ist für die Detektion von Eisenmetallen
(Armierungseisen) und Nicht-Eisenmetallen (Kupfer,
Aluminium) in Beton, Ziegel, Trockenbauwänden und
unter verputzten Oberflächen in Übereinstimmung mit
den im Abschnitt aufgeführten technischen Daten be-
stimmt.
4.1 Grundlegende Sicherheitsvermerke
a) Machen Sie keine Sicherheitseinrichtungen un-
wirksam und entfernen Sie keine Hinweis- und
Warnschilder.
b) Halten Sie Kinder vom Messgerät fern.
c) Kontrollieren Sie vor jeder Inbetriebnahme die
korrekte Funktionsweise des Gerätes.
d) Prüfen Sie das Anzeigefeld, nachdem Sie das
Gerät eingeschaltet haben. Das Anzeigefeld sollte
innerhalb von 1 Sekunde alle Symbole anzeigen.
e) Stellen Sie sicher, dass sich das Gerät nach dem
Einschalten kalibrieren kann.
f) Das Gerät darf nicht in der Nähe von Schwangeren
verwendet werden.
g) Schnell ändernde Messbedingungen können das
Messergebnis verfälschen.
h) Verwenden Sie das Gerät nur innerhalb der de-
finierten Einsatzgrenzen. Arbeiten Sie nicht in
Untergründen, welche beispielsweise Spannka-
bel oder Edelstahl beinhalten.
i) Verwenden Sie das Gerät nicht in der Nähe von
medizinischen Apparaten.
j) Bohren Sie nicht an Positionen, an denen das
Gerät Objekte gefunden hat.
k) Beachten Sie immer die Warnungsmeldungen auf
dem Anzeigefeld.
l) Verwenden Sie das Gerät nicht in der Nähe
von elektromagnetischen Störungen (z.B.
Meisselhämmer).
m) Berücksichtigen Sie Umgebungseinflüsse. Benut-
zen Sie das Gerät nicht, wo Brand- oder Explosi-
onsgefahr besteht.
n) Halten Sie das Anzeigefeld lesbar (z.B. fassen Sie
nicht mit den Fingern auf das Anzeigefeld, lassen
Sie das Anzeigefeld nicht verschmutzen).
o) Verwenden Sie kein defektes Gerät.
p) Stellen Sie sicher, dass die Detektionsfläche im-
mersauberist.
q) Die Genauigkeit des Geräts wird vom Untergrundma-
terial beeinflusst. Wenn sich das Gerät nicht richtig
kalibrieren kann, können Messfehler entstehen.
r) Wenn eine Autokalbrierung nicht korrekt stattfinden
kann, erscheint eine Warnungsmeldung auf dem An-
zeigefeld.
s) Das Gerät darf nicht in der Nähe von Personen
mit Herzschrittmachern verwendet werden.
4.2 Sachgemässe Einrichtung des Arbeitsplatzes
a) Vermeiden Sie bei Ausrichtarbeiten auf Leitern,
eine abnormale Körperhaltung. Sorgen Sie für si-
cheren Stand und halten Sie jederzeit das Gleich-
gewicht.
b) Wenn das Gerät aus grosser Kälte in eine wär-
mere Umgebung gebracht wird oder umgekehrt,
sollten Sie das Gerät vor dem Gebrauch akklima-
tisieren lassen.
c) Verwenden Sie das Gerät nur innerhalb der defi-
nierten Einsatzgrenzen.
d) Beachten sie die landesspezifischen Unfallverhü-
tungsvorschriften.
4.3 Elektromagnetische Verträglichkeit
Obwohl das Gerät die strengen Anforderungen der ein-
schlägigen Richtlinien erfüllt, kann Hilti die Möglichkeit
nicht ausschliessen, dass das Gerät durch starke Strah-
lung gestört wird, was zu einer Fehloperation führen
kann. In diesem Fall oder anderen Unsicherheiten müs-
sen Kontrollmessungen durchgeführt werden. Ebenfalls
de
4
Printed: 27.10.2015 | Doc-Nr: PUB / 5070391 / 000 / 02

kann Hilti nicht ausschliessen dass andere Geräte (z.B.
Navigationseinrichtungen von Flugzeugen) gestört wer-
den. Das Gerät entspricht der Klasse A; Störungen im
Wohnbereich können nicht ausgeschlossen werden.
4.4 Allgemeine Sicherheitsmassnahmen
a)
Überprüfen Sie das Gerät vor dem Gebrauch. Falls
das Gerät beschädigt ist, lassen Sie es durch eine
Hilti-Servicestelle reparieren.
b) Nach einem Sturz oder anderen mechanischen
Einwirkungen müssen Sie die Genauigkeit des
Geräts überprüfen.
c) Obwohl das Gerät für den harten Baustellenein-
satz konzipiert ist, sollten Sie es wie auch andere
Messgeräte sorgfältig behandeln.
d) Obwohl das Gerät gegen den Eintritt von Feuch-
tigkeit geschützt ist, sollten Sie das Gerät vor
dem Verstauen in den Transportbehälter trocken-
wischen.
e) Stellen Sie sicher, dass alle Symbole sichtbar
sind, wenn Sie das Gerät einschalten.
f) Prüfen Sie vor Messanwendungen das Gerät auf
seine Genauigkeit.
4.5 Elektrische Sicherheit
a) Die Batterien dürfen nicht in die Hände von Kin-
dern gelangen.
b)
Überhitzen Sie die Batterien nicht und setzen Sie
sie nicht einem Feuer aus. Die Batterien können ex-
plodieren oder es können toxische Stoffe freigesetzt
werden.
c) Laden Sie die Batterien nicht auf.
d) Verlöten Sie die Batterien nicht im Gerät.
e) Entladen Sie die Batterien nicht durch
Kurzschliessen. Sie können dadurch überhitzen
und Brandblasen verursachen.
f)
Öffnen Sie die Batterien nicht und setzen Sie sie
nicht übermässiger mechanischer Belastung aus.
4.6 Transport
Gerät immer ohne eingesetzte Batterien transportie-
ren.
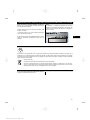
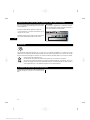
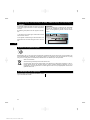
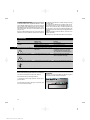
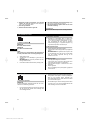
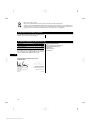
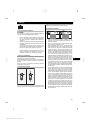
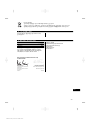
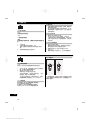
5 Inbetriebnahme
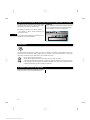
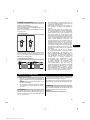
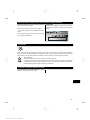
5.1 Batterien einsetzen 2
VORSICHT
Setzen Sie keine beschädigten Batterien ein.
VORSICHT
Tauschen Sie immer den kompletten Batteriesatz aus.
GEFAHR
Mischen Sie nicht neue und alte Batterien. Verwenden
Sie keine Batterien von verschiedenen Herstellern
oder mit unterschiedlichen Typenbezeichnungen.
1. Öffnen Sie das Batteriefach.
2. Nehmen Sie die Batterien aus der Verpackung und
setzen diese ins Gerät ein.
HINWEIS Achten Sie auf die Polarität (siehe Markie-
rung im Batteriefach).
3. Prüfen Sie das ordnungsgemässe Verschliessen der
Batteriefach‑Verriegelung.
5.2 Prüfung des Geräts
1. Stellen Sie sicher, dass das Sensorfeld nicht feucht
ist. Ansonsten trocknen Sie das Sensorfeld unter
Verwendung eines Tuches ab.
2. Um genaue Messergebnisse zu erzielen, lassen
Sie das Gerät, nachdem es extremen Temperatur-
schwankungen ausgesetzt war, sich vor Gebrauch
an die Umgebungstemperatur anpassen, bevor Sie
das Gerät einschalten.
5.3 Gerät ein‑/ ausschalten
1. Schalten Sie das Gerät mit der Ein-/ Aus-Taste ein.
2. Im eingeschalteten Zustand die Ein-/ Aus-Taste
drücken: das Gerät schaltet aus.
HINWEIS Wenn das Gerät nicht genutzt wird oder
eine Fehlermeldung angezeigt wird, schaltet es sich
nach fünf Minuten automatisch ab. Bei leeren Bat-
terien schaltet sich das Gerät ab.
5.4 Ton ein‑/ ausschalten
1. Drücken Sie die Ein‑/ Aus-Taste für 5 Sekunden.
Das Tonmenü erscheint und wenn es aktiviert ist,
drücken Sie erneut die Ein‑/ Aus-Taste zur Deakti-
vierung.
2. Drücken Sie die Ein‑/ Aus-Taste für 5 Sekunden, um
das Gerät auszuschalten.
3. Schalten Sie das Gerät ein.
Die neue Einstellung erscheint im Anzeigefeld und
das Gerät ist startbereit.
de
5
Printed: 27.10.2015 | Doc-Nr: PUB / 5070391 / 000 / 02

6 Bedienung
6.1 Gerät vorbereiten
VORSICHT
Berücksichtigen Sie beim Bohren in der Nähe von de-
tektierten Objekten einen ausreichenden Sicherheitsab-
stand.
1. Bevor Sie das Gerät einschalten, stellen Sie sicher,
dass das Gerät frei steht, keinen Kontakt zum Un-
tergrund oder metallischen Objekten hat.
2. Schalten Sie das Gerät durch Drücken der Ein‑/ Aus-
Taste ein.
AlleSymboleerscheineninnerhalbvon1Sekunde
auf dem Anzeigefeld.
Nach einem kurzen Selbsttest startet das Gerät
die automatische Kalibrierung. Sobald diese abge-
schlossen ist, leuchten die Status-LEDs grün.
Halten Sie das Gerät während der Kalibrierung in
die Luft und mindestens 30 cm (12 in) entfernt von
metallischenObjektenoderwegvomzuuntersu-
chenden Untergrund.
6.2 Arbeiten mit dem Gerät
Stellen Sie sicher, dass das Gerät vollen Kontakt mit dem
Untergrund hat, welchen Sie untersuchen wollen.
Verwenden Sie das Gerät nur auf ebenen Untergründen.
Setzen Sie das Gerät langsam mit Vorsicht auf den zu
untersuchenden Untergrund.
Arbeiten Sie mit dem Gerät in einer Geschwindigkeit von
höchstens 20 cm/s (9 in/s).
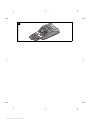
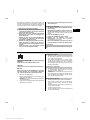
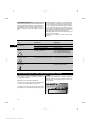
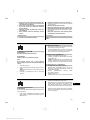
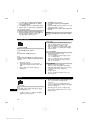
6.2.1 Wischmethode
Das Gerät sollte mit der Wischmethode verwendet wer-
den (ausgedehnte horizontale und vertikale Vor- und Zu-
rückbewegungen über das Objekt), um beste Ergebnisse
zu erreichen. Die Bilderreihe zeigt Ihnen die Durchführung
der Wischmethode.
6.3 Objektlokalisierung
1. Schalten Sie das Gerät ein und halten Sie es min-
destens 30 cm (12 in) entfernt von metallischen
Objekten oder vom zu untersuchenden Untergrund.
2. Setzen Sie das Gerät vorsichtig auf den zu unter-
suchenden Untergrund und beginnen Sie die Seit-
wärtsbewegung.
Nähert sich das Gerät einem Eisenmetall (Armie-
rungseisen), blinkt das Eisensymbol, die Status-
LEDs leuchten rot und die Amplitude des Signal-
stärkebalkens steigt an und erreicht ihr Maximum,
wenn sich das Gerät über dem Zentrum des Objekts
befindet. Wird das Gerät weiterbewegt und das Ei-
senmetall passiert, leuchten die Status-LEDs grün
und der Signalstärkebalken nimmt ab. Zur genauen
Lokalisierung des Objekts bewegen Sie das Gerät
wieder in die entgegengesetzte Richtung, bis die
Status-LEDs wieder rot leuchten und der Signal-
stärkebalken wieder den maximalen Stand erreicht.
Nehmen Sie dann den bereitgelegten Stift und mar-
kieren Sie die Position des Eisenmetalls durch die
Markieröffnung. Ist der Lautsprecher aktiviert, ertönt
ein stetiger Ton, solange Sie sich mit dem Gerät über
dem Eisenmetall befinden.
Nähert sich das Gerät einem Nicht-Eisenmetall
(Kupfer, Aluminium), blinkt das Nicht-Eisen-Symbol,
die Status-LEDs leuchten rot und die Amplitude
des Signalstärkebalkens steigt an und erreicht ihr
Maximum, wenn sich das Gerät über dem Zentrum
des Objekts befindet. Wird das Gerät weiterbewegt
und das Nicht-Eisenmetall passiert, leuchten die
Status-LEDs grün und der Signalstärkebalken
nimmt ab. Zur genauen Lokalisierung des
Objekts bewegen Sie das Gerät wieder in die
entgegengesetzte Richtung, bis die Status-LEDs
wieder rot leuchten und der Signalstärkebalken
wieder den maximalen Stand erreicht. Nehmen
Sie dann den bereitgelegten Stift und markieren
Sie die Position des Nicht-Eisenmetalls durch die
Markieröffnung. Ist der Lautsprecher aktiviert,
ertönt ein stetiger Ton, solange Sie sich mit dem
Gerät über dem Nicht-Eisenmetall befinden.
de
6
Printed: 27.10.2015 | Doc-Nr: PUB / 5070391 / 000 / 02

7 Pflege und Instandhaltung
7.1 Reinigen und trocknen
1. Nur mit einem sauberen und weichen Tuch reinigen;
wenn nötig mit reinem Alkohol oder etwas Wasser
befeuchten.
HINWEIS Keine anderen Flüssigkeiten verwenden,
da diese die Kunststoffteile angreifen können.
2. Temparaturgrenzwerte bei der Lagerung Ihrer Aus-
rüstung beachten, speziell im Winter / Sommer.
7.2 Lagern
Nass gewordene Geräte auspacken. Geräte, Transport-
behälter und Zubehör abtrocknen (bei höchstens 40 °C /
104 °F) und reinigen. Ausrüstung erst wieder einpacken,
wenn sie völlig trocken ist.
Führen Sie nach längerer Lagerung oder längerem Trans-
port Ihrer Ausrüstungvor Gebrauch eine Kontrollmessung
durch.
Bitte entnehmen Sie vor längeren Lagerzeiten die Batte-
rien aus dem Gerät. Durch auslaufende Batterien kann
das Gerät beschädigt werden.
7.3 Transportieren
Verwenden Sie für den Transport oder Versand Ihrer
Ausrüstung entweder den Hilti Versandkoffer oder eine
gleichwertige Verpackung. Lagern Sie das Gerät sicher.
VORSICHT
Gerät immer ohne eingesetzte Batterien transportie-
ren.
7.4 Hilti Kalibrierservice
Wir empfehlen die regelmässige Überprüfung der Ge-
räte durch den Hilti Kalibrierservice zu nutzen, um die
Zuverlässigkeit gemäss Normen und rechtlichen Anfor-
derungen gewährleisten zu können.
Der Hilti Kalibrierservice steht Ihnen jederzeit zur Ver-
fügung; empfiehlt sich aber mindestens einmal jährlich
durchzuführen.
Im Rahmen des Hilti Kalibrierservice wird bestätigt, dass
die Spezifikationen des geprüften Geräts am Tag der Prü-
fung den technischen Angaben der Bedienungsanleitung
entsprechen.
Bei Abweichungen von den Herstellerangaben werden
die gebrauchten Messgeräte wieder neu eingestellt. Nach
der Justierung und Prüfung wird eine Kalibrierplakette
amGerätangebrachtundmiteinemKalibrierzertifikat
schriftlich bestätigt, dass das Gerät innerhalb der Her-
stellerangaben arbeitet.
Kalibrierzertifikate werden immer benötigt für Unterneh-
men, die nach ISO 900X zertifiziert sind.
Ihr nächstliegender Hilti Kontakt gibt Ihnen gerne weitere
Auskunft.
8 Fehlersuche
Fehler
Mögliche Ursache
Behebung
Gerät lässt sich nicht einschal-
ten.
Batterie leer. Batterie austauschen.
Falsche Polarität der Batterie. Batterie richtig einlegen.
Batteriefach nicht geschlossen. Batteriefach schliessen.
Gerät kann sich nicht kalibrie-
ren.
Gerät ist zu dicht an metallischen Ob-
jekten.
Schalten Sie das Gerät aus und mit
einem Mindestabstand von 30 cm
(12 in) zu metallischen Objekten oder
dem untersuchenden Untergrund wie-
der ein.
Gerät zeigt elektromagnetische
Warnung an.
Gerätistzudichtanelektromagneti-
schen Störungen.
Halten Sie das Gerät von elektroma-
gnetischen Störungen fern.
Gerät zeigt Temperaturwarnung
an.
Temperatur zu hoch oder zu tief. Anwendungstemperatur (Technische
Daten) beachten.
de
7
Printed: 27.10.2015 | Doc-Nr: PUB / 5070391 / 000 / 02

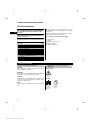
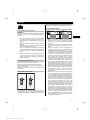
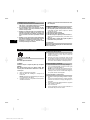
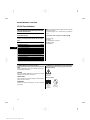
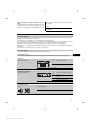
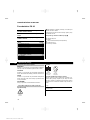
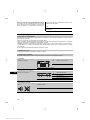
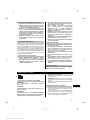
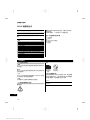
4
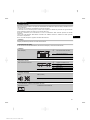
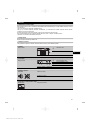
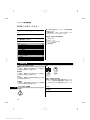
02289
PS 30
01
Hilti=trademark of Hilti Corp., Schaan, LI Made in Malaysia
Item No.: Serialnumber:
This device complies with part 15 of the FCC Rules. Operation is subject to the condition that this device does not cause
harmful interference. This Class B digital apparatus complies with Canadian ICES-003. Cet appareil numérique de la classe
B est conforme à la norme NMB-003 du Canada.
Power: 6V/140 mA
9 FCC-Hinweis (gültig in USA) / ICES-Hinweis (gültig in Kanada)
Dieses Gerät entspricht Artikel 15 der FCC-Normen und
den Anforderungen nach ICES-003 für Klasse B Geräte
der IC.
Die Bedienung erfolgt unter den folgenden Bedingungen:
1. Dieses Gerät verursacht keine Interferenzen die nicht
den Normen entsprechen.
2. Dieses Gerät akzeptiert jegliche Interferenzen, auch
die, die eventuell Störungen verursachen können.
HINWEIS
Änderungen oder Modifikationen, die nicht ausdrücklich
von Hilti erlaubt wurden, kann das Recht des Anwenders
einschränken, das Gerät in Betrieb zu nehmen.
10 Entsorgung
Hilti-Geräte sind zu einem hohen Anteil aus wiederverwertbaren Materialien hergestellt. Voraussetzung für eine
Wiederverwertung ist eine sachgemässe Stofftrennung. In vielen Ländern ist Hilti bereits eingerichtet, Ihr Altgerät zur
Verwertung zurückzunehmen. Fragen Sie den Hilti Kundenservice oder Ihren Verkaufsberater.
Nur für EU Länder
Werfen Sie elektronische Messgeräte nicht in den Hausmüll!
Gemäss Europäischer Richtlinie über Elektro- und Elektronik-Altgeräte und Umsetzung in nationales
Recht müssen verbrauchte Elektrogeräte und Akkus getrennt gesammelt und einer umweltgerechten
Wiederverwertung zugeführt werden.
11 Herstellergewährleistung Geräte
BittewendenSiesichbeiFragenzudenGarantiebedin-
gungen an Ihren lokalen HILTI Partner.
de
8
Printed: 27.10.2015 | Doc-Nr: PUB / 5070391 / 000 / 02

12 EG-Konformitätserklärung (Original)
Bezeichnung: Ferrodetektor
Typenbezeichnung: PS 30
Konstruktionsjahr: 2009
Wir erklären in alleiniger Verantwortung, dass dieses Pro-
dukt mit den folgenden Richtlinien und Normen über-
einstimmt: bis 19. April 2016: 2004/108/EG, ab 20. April
2016: 2014/30/EU, 2011/65/EU, EN ISO 12100.
Hilti Aktiengesellschaft, Feldkircherstrasse 100,
FL‑9494 Schaan
Paolo Luccini Edward Przybylowicz
Head of BA Quality and Process Mana-
gement
Head of BU Measuring Systems
Business Area Electric Tools & Acces-
sories
BU Measuring Systems
06/2015 06/2015
Technische Dokumentation bei:
Hilti Entwicklungsgesellschaft mbH
Zulassung Elektrowerkzeuge
Hiltistrasse 6
86916 Kaufering
Deutschland
de
9
Printed: 27.10.2015 | Doc-Nr: PUB / 5070391 / 000 / 02

ORIGINAL OPERATING INSTRUCTIONS
PS 30 ferrodetector
It is essential that the operating instructions
are read before the tool is operated for the
first time.
Always keep these operating instructions to-
gether with the tool.
Ensure that the operating instructions are
with the tool when it is given to other persons.
Contents Page
1 General information 10
2Description 11
3 Technical data 12
4 Safety instructions 13
5Beforeuse 14
6 Operation 15
7 Care and maintenance 16
8 Troubleshooting 16
9 FCC statement (applicable in US) / ICES
statement (applicable in Canada) 17
10 Disposal 17
11 Manufacturer’s warranty 17
12 EC declaration of conformity (original) 18
1 These numbers refer to the illustrations. You can
find the illustrations at the beginning of the operating
instructions.
In these operating instructions, the designation “the tool”
always refers to the PS 30 Ferrodetector.
Parts, operating controls and indicators 1
@
On/off button
;
Display
=
Status LEDs (red / green)
%
Marking opening
&
Battery compartment
1 General information
1.1 Safety notices and their meaning
DANGER
Draws attention to imminent danger that will lead to
seriousbodilyinjuryorfatality.
WARNING
Draws attention to a potentially dangerous situation that
could lead to serious personal injury or fatality.
CAUTION
Draws attention to a potentially dangerous situation that
could lead to slight personal injury or damage to the
equipment or other property.
NOTE
Draws attention to an instruction or other useful informa-
tion.
1.2 Explanation of the pictograms and other
information
Warning signs
General
warning
Symbols
Read the
operating
instructions
before use.
Return
materials for
recycling
en
10
Printed: 27.10.2015 | Doc-Nr: PUB / 5070391 / 000 / 02

1
2
1 2 3 4
Location of identification data on the tool
The type designation and serial number can be found on
the type identification plate on the tool. Make a note of
this data in your operating instructions and always refer
to it when making an enquiry to your Hilti representative
or service department.
Type:
Serial no.:
2 Description
2.1 Use of the product as directed
The Hilti PS 30 Ferrodetector is designed to detect ferrous metals (steel rebars) and non-ferrous metals (copper and
aluminium).
The tool is not suitable for locating tensioning cables.
The tool and its ancillary equipment may present hazards when used incorrectly by untrained personnel or when used
not as directed.
Observe the information printed in the operating instructions concerning operation, care and maintenance.
Take the influences of the surrounding area into account. Do not use the tool or appliance where there is a risk of fire
or explosion.
Modification of the tool is not permissible.
2.2 Display
The settings and tool status are shown in the display.
2.3 Display illumination
The display illumination switches on automatically in conditions of low ambient light.
2.4 Display
Areas of the display
@
Status area
;
Detection area
Shows the two areas of the display.
2.5 Status indicator
Status area
@
Ferrous metal object
;
Non-ferrous metal object
=
Audible signal off
%
Battery status
Shows which status is active
2.6 Symbols in the display
Audible signal active (left)
inactive (right)
en
11
Printed: 27.10.2015 | Doc-Nr: PUB / 5070391 / 000 / 02

2.7 Warnings and error symbols in the display
Error message Contact Hilti service
Temperature warning Inadmissible operating range
Electromagnetic interference Too much interference from the surroundings
Calibration warning Calibration is required
2.8 Battery condition indicator
Number of segments shown
Charge status in %
3
= 100 % capacity
2
= 80 % capacity
1
= 50 % capacity
0
= 20 % capacity
Battery symbol blinks = fully discharged
2.9 Items supplied
1 Tool
1 Hand strap
1 Soft pouch
1 Operating instructions
1 Manufacturer’s certificate
4Batteries
2Markers
3 Technical data
Right of technical changes reserved.
NOTE
All values apply to individual rod-like metal objects positioned at right angles to the direction of movement of the
detector and when the surface of the concrete is flat and smooth with no external interference factors. Detection range
and accuracy is reduced when measurements are taken on brickwork.
PS 30
Detection range for locating ferrous metals > ∅ 8 mm (≧ # 3): 5…120 mm (¼ in ... 4¾ in)
∅ 6…8 mm: 5…100 mm (¼ in ...4 in)
Detection range for locating non-ferrous metals (copper
and aluminium pipes)
Diameter at least 10 mm (½ in), Pipe wall thickness at
least2mm(³/₃₂in):5…80mm(¼in...3¹/₈in)
en
12
Printed: 27.10.2015 | Doc-Nr: PUB / 5070391 / 000 / 02

Localization accuracy ±10 mm (± ½ in)
Minimum distance between objects Depth range 5...55 mm (¼ ...2¹/₈ in): 55 mm(2¹/₈in)
Depth range >55 mm (2¹/₈ in): Distance / depth factor
>1.5
Power source 4x1.5V (AAA) LR03 alkaline batteries
Battery life at 20 °C 10 h
Operating temperature range -15…+50°C (5° F to 122° F)
Automatic cut-out 5 min
Storage temperature range (dry) -25…+63°C (-13°F to 145°F)
Relative air humidity
95%
Protection class IP 54 (protection against dust and water spray)
Weight (including batteries) 420 g (0.99 lb)
Dimensions(LxWxH) 237mmx104mmx47mm(9.4inx4inx2in)
4 Safety instructions
In addition to the information relevant to safety given
in each of the sections of these operating instructions,
the following points must be strictly observed at all
times.
The tool is designed to detect ferrous metals (steel
rebars) and non-ferrous metals (copper, aluminium)
in concrete, brick, drywall and under plaster surfaces
in accordance with the information provided in the
technical data section.
4.1 Basic information concerning safety
a) Do not render safety devices ineffective and do
not remove information and warning notices.
b) Keep children away from the tool.
c) Check that the tool functions correctly each time
before use.
d) Check the display after switching the tool on. The
display should show all symbols within 1 second.
e) Check to ensure that the tool is able to calibrate
itself after switching on.
f) Operation of the tool in the proximity of pregnant
women is not permissible.
g) Rapidly changing detection conditions may lead to
inaccurate readings.
h) Use the tool only within its specified limits. Do not
use the tool on materials containing tensioning
cables or stainless steel objects.
i) Do not use the tool in the proximity of medical
instruments and appliances.
j) Do not drill at positions where the tool has located
an object.
k) The warnings shown in the display must always
be observed.
l) Do not use the tool in the proximity of electro-
magnetic interference (e.g. electric breakers in
operation).
m) Take the influences of the surrounding area into
account. Do not use the tool where there is a risk
of fire or explosion.
n) Make sure that the display area can be easily
read (e.g. do not touch the display area with the
fingers, keep the display area clean).
o) Do not use the tool if it is defective.
p) Always keep the detection area clean.
q) The accuracy of the tool is influenced by the base
material. If the tool is unable to calibrate itself cor-
rectly, scanning errors may result.
r) When the tool is unable to calibrate itself automatic-
ally, a warning appears in the display.
s) Use of the tool in the proximity of persons with a
cardiac pacemaker is not permissible.
4.2 Proper organization of the workplace
a) Avoid unfavorable body positions when working
on ladders or scaffolding. Make sure you work
fromasafestanceandstayinbalanceatall
times.
b) When the tool is brought into a warm environment
from very cold conditions, or vice-versa, allow it
to become acclimatized before use.
c) Use the tool only within its specified limits.
d) Observe the accident prevention regulations ap-
plicable in your country.
4.3 Electromagnetic compatibility
Although the tool complies with the strict requirements of
the applicable directives, Hilti cannot entirely rule out the
possibility of the tool being subject to interference caused
by powerful electromagnetic radiation, leading to incor-
rect operation. Check the accuracy of the tool by taking
measurements by other means when working under such
conditions or if you are unsure. Likewise, Hilti cannot rule
out the possibility of interference with other devices (e.g.
aircraft navigation equipment). The tool complies with the
requirements of class A; The possibility of interference
occurring in a domestic environment cannot be excluded.
en
13
Printed: 27.10.2015 | Doc-Nr: PUB / 5070391 / 000 / 02

4.4 General safety instructions
a) Check the condition of the tool before use. If the
tool is found to be damaged, have it repaired at a
Hilti service center.
b) The user must check the accuracy of the tool
after it has been dropped or subjected to other
mechanical stresses.
c) Although the tool is designed for the harsh con-
ditions of jobsite use, as with other measuring
instruments it should be treated with care.
d) Although the tool is protected to prevent entry
of dampness, it should be wiped dry each time
before being put away in its transport container.
e) Check to ensure that all symbols are visible when
the tool is switched on.
f) Check the accuracy of the tool before using it for
detection or measurement.
4.5 Electrical safety
a) Keep the batteries out of reach of children.
b) Do not allow the batteries to overheat and do not
expose them to fire. The batteries may explode or
release toxic substances.
c) Do not charge the batteries.
d) Do not solder the batteries into the tool.
e) Do not discharge the batteries by short-circuiting.
This may cause them to overheat and present a risk
of personal injury (burns).
f) Do not attempt to open the batteries and do not
subject them to excessive mechanical stress.
4.6 Transport
Always remove the batteries before shipping the tool.
5Beforeuse
5.1 Inserting the batteries 2
CAUTION
Do not use damaged batteries.
CAUTION
Always replace the complete set of batteries.
DANGER
Do not mix old and new batteries. Do not mix batteries
of different makes or types.
1. Open the battery compartment.
2. Remove the batteries from the packaging and insert
them in the tool.
NOTE Take care to observe correct polarity (see
symbols in batterycompartment).
3. Check to ensure that the battery compartment cover
is closed correctly.
5.2 Checking the tool
1. Check to ensure that the sensor area is not damp. If
necessary, use a cloth to dry the sensor area.
2. For accurate results, allow the tool to acclimatize
itself to the ambient conditions before switching it
on if it has previously been exposed to extreme
temperature fluctuations.
5.3 Switching the tool on / off
1. Switch the tool on by pressing the on/off button.
2. When the tool is already switched on, press the
on/off button: The tool switches off.
NOTE If the tool is not used or an error message
is displayed, it switches itself off automatically after
five minutes. The tool switches itself off when the
batteries are discharged.
5.4 Switching the audible signal on / off
1. Press the on/off button for 5 seconds.
The audible signal menu is displayed. If the audible
signal is already activated it can be deactivated by
pressing the on/off button again.
2. To switch the tool off, press the on/off button for 5
seconds.
3. Switch the tool on.
Thenewsettingsareshowninthedisplayandthe
tool is ready for use.
en
14
Printed: 27.10.2015 | Doc-Nr: PUB / 5070391 / 000 / 02

6Operation
6.1 Preparing the tool for use
CAUTION
Alwaysdrillatasafedistancefromobjectsyouhave
detected.
1. Before switching the tool on, check that it is not in
contact with anything and is clear of the working
surface or metal objects.
2. Switch the tool on by pressing the on/off button.
All symbols are shown in the display within 1 second.
After carrying out a brief self-test, the tool begins to
calibrate itself automatically. The status LEDs light
green as soon as this has been completed.
While the tool is calibrating itself, hold it in the air at
least 30 cm (12 in) away from any metal objects and
away from the surface on which you are working.
6.2 Working with the tool
Check that the tool makes full contact with the surface
you wish to scan.
Use the tool only on smooth surfaces.
Bring the tool slowly and carefully into contact with the
surfacetobescanned.
Do not move the tool at a speed greater than 20 cm/s (9
in/s).
6.2.1 Sweep scan method
In order to achieve best results, the tool should be used
with a sweeping motion (extended horizontal and vertical,
back and forward movements over the object). The series
of illustrations shows the sweep scan technique in use.
6.3 Locating objects
1. Switch the tool on and hold it at least 30 cm (12
in) away from any metal objects and away from the
surface on which you are working.
2. Carefully bring the tool into contact with the surface
to be scanned and then begin to move it sideways.
When the tool approaches a ferrous metal object (a
rebar), the “ferrous metal” symbol begins to blink,
the status LEDs light red and the amplitude of the
signal strength indicator rises and reaches its max-
imum when the tool is positioned over the center of
the object. If the tool is moved further until it is past
the ferrous metal, the status LEDs light green and
the signal strength indicator shows a decreasing
value. To obtain an exact indication of the position
of the rebar, the tool must be moved back in the
opposite direction until the status LEDs again light
red and the signal strength indicator shows the max-
imum value. Use the marking pen supplied to mark
the position of the ferrous metal object through the
marking opening in the tool. If the loudspeaker has
been activated, a constant audible signal is emitted
so long as the tool is positioned over the ferrous
metal object.
When the tool approaches a non-ferrous metal ob-
ject (copper, aluminium), the “non-ferrous metal”
symbol begins to blink, the status LEDs light red
and the amplitude of the signal strength indicator
rises and reaches its maximum when the tool is po-
sitioned over the center of the object. If the tool is
moved further until it is past the non-ferrous metal
object, the status LEDs light green and the signal
strength indicator shows a decreasing value. To ob-
tain an exact indication of the position of the rebar,
the tool must be moved back in the opposite dir-
ection until the status LEDs again light red and the
signal strength indicator shows the maximum value.
Usethemarkingpensuppliedtomarktheposition
of the non-ferrous metal object through the marking
opening in the tool. If the loudspeaker has been ac-
tivated, a constant audible signal is emitted so long
as the tool is positioned over the non-ferrous metal
object.
en
15
Printed: 27.10.2015 | Doc-Nr: PUB / 5070391 / 000 / 02

7 Care and maintenance
7.1 Cleaning and drying
1. Useonlyaclean, soft cloth for cleaning. If necessary,
moisten the cloth slightly with pure alcohol or a little
water.
NOTE Do not use any other liquids as these may
damage the plastic components.
2. The temperature limits for storage of your equipment
must be observed, especially in winter / summer.
7.2 Storage
Remove the tool from its case if it has become wet.
The tool, its carrying case and accessories should be
cleaned and dried (at maximum 40°C / 104°F). Repack
the equipment only once it is completely dry.
Check the accuracy of the equipment before it is used
after a long period of storage or transportation.
Remove the batteries from the tool before storing it for a
long period. Leaking batteries may damage the tool.
7.3 Transport
Use the Hilti toolbox or packaging of equivalent quality
for transporting or shipping your equipment. Store the
tool safely.
CAUTION
Always remove the batteries before shipping the tool.
7.4 Hilti calibration service
We recommend that the tool is checked by the Hilti cal-
ibration service at regular intervals in order to verify its
reliability in accordance with standards and legal require-
ments.
Use can be made of the Hilti calibration service at any
time, but checking at least once a year is recommended.
The calibration service provides confirmation that the
tool is in conformance, on the day it is tested, with the
specifications given in the operating instructions.
The tool will be readjusted if deviations from the man-
ufacturer’s specification are found. After checking and
adjustment, a calibration sticker applied to the tool and
a calibration certificate provide written verification that
the tool operates in accordance with the manufacturer’s
specification.
Calibration certificates are always required by companies
certified according to ISO 900x.
Your local Hilti Center or representative will be pleased
to provide further information.
8 Troubleshooting
Fault Possible cause Remedy
The tool can’t be switched on. The battery is exhausted. Replace the battery.
The battery is inserted the wrong way
round (incorrect polarity).
Insert the battery correctly.
The battery compartment is not
closed.
Close the battery compartment.
The tool can’t calibrate itself. The tool is too close to metal objects. Switch the tool off and then hold it
at least 30 cm (12 in) away from any
metal objects and away from the sur-
face on which you are working before
switching it on again.
The tool displays an electro-
magnetic interference warning.
Thetoolistooclosetoasourceof
electromagnetic interference.
Keep the tool away from electromag-
netic interference.
The tool displays a temperature
warning.
The temperature is too high or too
low.
Observe the operating temperature
range (technical data).
en
16
Printed: 27.10.2015 | Doc-Nr: PUB / 5070391 / 000 / 02

4
02289
PS 30
01
Hilti=trademark of Hilti Corp., Schaan, LI Made in Malaysia
Item No.: Serialnumber:
This device complies with part 15 of the FCC Rules. Operation is subject to the condition that this device does not cause
harmful interference. This Class B digital apparatus complies with Canadian ICES-003. Cet appareil numérique de la classe
B est conforme à la norme NMB-003 du Canada.
Power: 6V/140 mA
9 FCC statement (applicable in US) / ICES statement (applicable in Canada)
This device complies with section 15 of the FCC stand-
ards and fulfills the IC requirements in accordance with
ICES-003 for class B.
Operation is subject to the following two conditions:
1. This device may not cause interference not in compli-
ance with the standards.
2. This device must accept any interference received, in-
cluding interference that may cause undesired operation.
NOTE
ChangesormodificationsnotexpresslyapprovedbyHilti
could void the user’s authority to operate the equipment.
10 Disposal
Most of the materials from which Hilti tools or appliances are manufactured can be recycled. The materials must be
correctly separated before they can be recycled. In many countries, Hilti has already made arrangements for taking
back old tools or appliances for recycling. Ask Hilti Customer Service or your Hilti representative for further information.
For EC countries only
Do not dispose of electronic measuring tools or appliances together with household waste.
In observance of the European Directive on waste electrical and electronic equipment and its implement-
ation in accordance with national law, electrical appliances and batteries that have reached the end of
their life must be collected separately and returned to an environmentally compatible recycling facility.
11 Manufacturer’s warranty
Please contact your local Hilti representative if you have
questions about the warranty conditions.
en
17
Printed: 27.10.2015 | Doc-Nr: PUB / 5070391 / 000 / 02
Pagina se încarcă...
Pagina se încarcă...
Pagina se încarcă...
Pagina se încarcă...
Pagina se încarcă...
Pagina se încarcă...
Pagina se încarcă...
Pagina se încarcă...
Pagina se încarcă...
Pagina se încarcă...
Pagina se încarcă...
Pagina se încarcă...
Pagina se încarcă...
Pagina se încarcă...
Pagina se încarcă...
Pagina se încarcă...
Pagina se încarcă...
Pagina se încarcă...
Pagina se încarcă...
Pagina se încarcă...
Pagina se încarcă...
Pagina se încarcă...
Pagina se încarcă...
Pagina se încarcă...
Pagina se încarcă...
Pagina se încarcă...
Pagina se încarcă...
Pagina se încarcă...
Pagina se încarcă...
Pagina se încarcă...
Pagina se încarcă...
Pagina se încarcă...
Pagina se încarcă...
Pagina se încarcă...
Pagina se încarcă...
Pagina se încarcă...
Pagina se încarcă...
Pagina se încarcă...
Pagina se încarcă...
Pagina se încarcă...
Pagina se încarcă...
Pagina se încarcă...
Pagina se încarcă...
Pagina se încarcă...
Pagina se încarcă...
Pagina se încarcă...
Pagina se încarcă...
Pagina se încarcă...
Pagina se încarcă...
Pagina se încarcă...
Pagina se încarcă...
Pagina se încarcă...
Pagina se încarcă...
Pagina se încarcă...
Pagina se încarcă...
Pagina se încarcă...
Pagina se încarcă...
Pagina se încarcă...
Pagina se încarcă...
Pagina se încarcă...
Pagina se încarcă...
Pagina se încarcă...
Pagina se încarcă...
Pagina se încarcă...
Pagina se încarcă...
Pagina se încarcă...
Pagina se încarcă...
Pagina se încarcă...
Pagina se încarcă...
Pagina se încarcă...
Pagina se încarcă...
Pagina se încarcă...
Pagina se încarcă...
Pagina se încarcă...
Pagina se încarcă...
Pagina se încarcă...
Pagina se încarcă...
Pagina se încarcă...
Pagina se încarcă...
Pagina se încarcă...
Pagina se încarcă...
Pagina se încarcă...
Pagina se încarcă...
Pagina se încarcă...
Pagina se încarcă...
Pagina se încarcă...
Pagina se încarcă...
Pagina se încarcă...
Pagina se încarcă...
Pagina se încarcă...
Pagina se încarcă...
Pagina se încarcă...
Pagina se încarcă...
Pagina se încarcă...
Pagina se încarcă...
Pagina se încarcă...
Pagina se încarcă...
Pagina se încarcă...
Pagina se încarcă...
Pagina se încarcă...
Pagina se încarcă...
Pagina se încarcă...
Pagina se încarcă...
Pagina se încarcă...
Pagina se încarcă...
Pagina se încarcă...
Pagina se încarcă...
Pagina se încarcă...
Pagina se încarcă...
Pagina se încarcă...
Pagina se încarcă...
Pagina se încarcă...
Pagina se încarcă...
Pagina se încarcă...
Pagina se încarcă...
Pagina se încarcă...
Pagina se încarcă...
Pagina se încarcă...
Pagina se încarcă...
Pagina se încarcă...
Pagina se încarcă...
Pagina se încarcă...
Pagina se încarcă...
Pagina se încarcă...
Pagina se încarcă...
Pagina se încarcă...
Pagina se încarcă...
Pagina se încarcă...
Pagina se încarcă...
Pagina se încarcă...
Pagina se încarcă...
Pagina se încarcă...
Pagina se încarcă...
Pagina se încarcă...
Pagina se încarcă...
Pagina se încarcă...
Pagina se încarcă...
Pagina se încarcă...
Pagina se încarcă...
Pagina se încarcă...
Pagina se încarcă...
Pagina se încarcă...
Pagina se încarcă...
Pagina se încarcă...
Pagina se încarcă...
Pagina se încarcă...
Pagina se încarcă...
Pagina se încarcă...
Pagina se încarcă...
Pagina se încarcă...
Pagina se încarcă...
Pagina se încarcă...
Pagina se încarcă...
Pagina se încarcă...
Pagina se încarcă...
Pagina se încarcă...
Pagina se încarcă...
Pagina se încarcă...
Pagina se încarcă...
Pagina se încarcă...
Pagina se încarcă...
Pagina se încarcă...
Pagina se încarcă...
Pagina se încarcă...
Pagina se încarcă...
Pagina se încarcă...
Pagina se încarcă...
Pagina se încarcă...
Pagina se încarcă...
Pagina se încarcă...
Pagina se încarcă...
Pagina se încarcă...
Pagina se încarcă...
Pagina se încarcă...
Pagina se încarcă...
Pagina se încarcă...
Pagina se încarcă...
Pagina se încarcă...
Pagina se încarcă...
Pagina se încarcă...
Pagina se încarcă...
Pagina se încarcă...
Pagina se încarcă...
Pagina se încarcă...
Pagina se încarcă...
Pagina se încarcă...
Pagina se încarcă...
Pagina se încarcă...
Pagina se încarcă...
Pagina se încarcă...
Pagina se încarcă...
Pagina se încarcă...
Pagina se încarcă...
Pagina se încarcă...
Pagina se încarcă...
Pagina se încarcă...
Pagina se încarcă...
Pagina se încarcă...
Pagina se încarcă...
Pagina se încarcă...
Pagina se încarcă...
Pagina se încarcă...
Pagina se încarcă...
Pagina se încarcă...
Pagina se încarcă...
Pagina se încarcă...
Pagina se încarcă...
Pagina se încarcă...
Pagina se încarcă...
Pagina se încarcă...
Pagina se încarcă...
Pagina se încarcă...
Pagina se încarcă...
Pagina se încarcă...
Pagina se încarcă...
Pagina se încarcă...
Pagina se încarcă...
Pagina se încarcă...
Pagina se încarcă...
Pagina se încarcă...
Pagina se încarcă...
Pagina se încarcă...
Pagina se încarcă...
Pagina se încarcă...
Pagina se încarcă...
Pagina se încarcă...
Pagina se încarcă...
Pagina se încarcă...
Pagina se încarcă...
Pagina se încarcă...
Pagina se încarcă...
Pagina se încarcă...
Pagina se încarcă...
Pagina se încarcă...
Pagina se încarcă...
Pagina se încarcă...
Pagina se încarcă...
Pagina se încarcă...
Pagina se încarcă...
Pagina se încarcă...
Pagina se încarcă...
-
 1
1
-
 2
2
-
 3
3
-
 4
4
-
 5
5
-
 6
6
-
 7
7
-
 8
8
-
 9
9
-
 10
10
-
 11
11
-
 12
12
-
 13
13
-
 14
14
-
 15
15
-
 16
16
-
 17
17
-
 18
18
-
 19
19
-
 20
20
-
 21
21
-
 22
22
-
 23
23
-
 24
24
-
 25
25
-
 26
26
-
 27
27
-
 28
28
-
 29
29
-
 30
30
-
 31
31
-
 32
32
-
 33
33
-
 34
34
-
 35
35
-
 36
36
-
 37
37
-
 38
38
-
 39
39
-
 40
40
-
 41
41
-
 42
42
-
 43
43
-
 44
44
-
 45
45
-
 46
46
-
 47
47
-
 48
48
-
 49
49
-
 50
50
-
 51
51
-
 52
52
-
 53
53
-
 54
54
-
 55
55
-
 56
56
-
 57
57
-
 58
58
-
 59
59
-
 60
60
-
 61
61
-
 62
62
-
 63
63
-
 64
64
-
 65
65
-
 66
66
-
 67
67
-
 68
68
-
 69
69
-
 70
70
-
 71
71
-
 72
72
-
 73
73
-
 74
74
-
 75
75
-
 76
76
-
 77
77
-
 78
78
-
 79
79
-
 80
80
-
 81
81
-
 82
82
-
 83
83
-
 84
84
-
 85
85
-
 86
86
-
 87
87
-
 88
88
-
 89
89
-
 90
90
-
 91
91
-
 92
92
-
 93
93
-
 94
94
-
 95
95
-
 96
96
-
 97
97
-
 98
98
-
 99
99
-
 100
100
-
 101
101
-
 102
102
-
 103
103
-
 104
104
-
 105
105
-
 106
106
-
 107
107
-
 108
108
-
 109
109
-
 110
110
-
 111
111
-
 112
112
-
 113
113
-
 114
114
-
 115
115
-
 116
116
-
 117
117
-
 118
118
-
 119
119
-
 120
120
-
 121
121
-
 122
122
-
 123
123
-
 124
124
-
 125
125
-
 126
126
-
 127
127
-
 128
128
-
 129
129
-
 130
130
-
 131
131
-
 132
132
-
 133
133
-
 134
134
-
 135
135
-
 136
136
-
 137
137
-
 138
138
-
 139
139
-
 140
140
-
 141
141
-
 142
142
-
 143
143
-
 144
144
-
 145
145
-
 146
146
-
 147
147
-
 148
148
-
 149
149
-
 150
150
-
 151
151
-
 152
152
-
 153
153
-
 154
154
-
 155
155
-
 156
156
-
 157
157
-
 158
158
-
 159
159
-
 160
160
-
 161
161
-
 162
162
-
 163
163
-
 164
164
-
 165
165
-
 166
166
-
 167
167
-
 168
168
-
 169
169
-
 170
170
-
 171
171
-
 172
172
-
 173
173
-
 174
174
-
 175
175
-
 176
176
-
 177
177
-
 178
178
-
 179
179
-
 180
180
-
 181
181
-
 182
182
-
 183
183
-
 184
184
-
 185
185
-
 186
186
-
 187
187
-
 188
188
-
 189
189
-
 190
190
-
 191
191
-
 192
192
-
 193
193
-
 194
194
-
 195
195
-
 196
196
-
 197
197
-
 198
198
-
 199
199
-
 200
200
-
 201
201
-
 202
202
-
 203
203
-
 204
204
-
 205
205
-
 206
206
-
 207
207
-
 208
208
-
 209
209
-
 210
210
-
 211
211
-
 212
212
-
 213
213
-
 214
214
-
 215
215
-
 216
216
-
 217
217
-
 218
218
-
 219
219
-
 220
220
-
 221
221
-
 222
222
-
 223
223
-
 224
224
-
 225
225
-
 226
226
-
 227
227
-
 228
228
-
 229
229
-
 230
230
-
 231
231
-
 232
232
-
 233
233
-
 234
234
-
 235
235
-
 236
236
-
 237
237
-
 238
238
-
 239
239
-
 240
240
-
 241
241
-
 242
242
-
 243
243
-
 244
244
-
 245
245
-
 246
246
-
 247
247
-
 248
248
-
 249
249
-
 250
250
-
 251
251
-
 252
252
-
 253
253
-
 254
254
-
 255
255
-
 256
256
-
 257
257
-
 258
258
-
 259
259
-
 260
260
-
 261
261


în alte limbi
- slovenčina: Hilti PS 30 Návod na používanie
Lucrări înrudite
-
Hilti PS 38 Instrucțiuni de utilizare
-
Hilti PS 30 Instrucțiuni de utilizare
-
-
-
-
-
Hilti PM 4-M Instrucțiuni de utilizare
-
-
-